Infrastructure Post 1: Making a site to site tunnel for access behind a well structure firewall and obscufation of home hosting
Obligatory shill of blog stream post: Phaselockedloopable- PLL's continued exploration of networking, self-hosting and decoupling from big tech
As always check for updates in the second post ![]()
What is a site to site Tunnel
The main aim of a site-to-site VPN is to securely connect two locations through gateway hardware; in my case I am using Raspberry Pi’s (running Manjaro/Arch) and a coreboot Protectli (running OPNsense). Site-to-site VPNs are often used in WANs to connect the LANs of separate branches or offices without the need for individual VPN software on each device. This is the business application. However, we can also use them to host on home connections where this is typically a violation of terms of service and one is usually behind CG-NAT. This will fully bypass those protections.
The main principal advantages I see hosting through a site to site tunnel are the following:
- Security- Site-to-site VPN security is the most important benefit, as most VPN protocols will ensure all traffic is encrypted in transit through the VPN tunnel. The site-to-site VPN tunnel only allows traffic from one end to the other, blocking any attempts to intercept the traffic from the outside. All traffic must be signed by a digital certificate, and to get authenticated, a public key infrastructure (PKI) must be deployed. Each VPN has their own method of handling this.
-
Scalability - When compared to a traditional VPN, a benefit of a site-to-site VPN is its scalability. Rather than needing to ensure each system is running VPN client software as if it were on a remote access VPN, a site-to-site VPN only requires a VPN gateway at each location (say your home and a Linode server
 ). This makes it easy to add a new site or add multiple sites tied to one location of hosting. Say you want a server in Toronto and a server location in the UK. You can connect one location through one gateway through two site to site VPNs and forward the traffic hosted through both.
 - Obscufation of main location IPs- Obviously through the use of clever routing and the use of an NGINX Proxy-passing reverse proxy we can hide the IP of say our homes from those whom wish to whois us or find our servers IP and location
What is the best protocol?
In my humble opinion, I submit the not yet fully audited wireguard protocol.
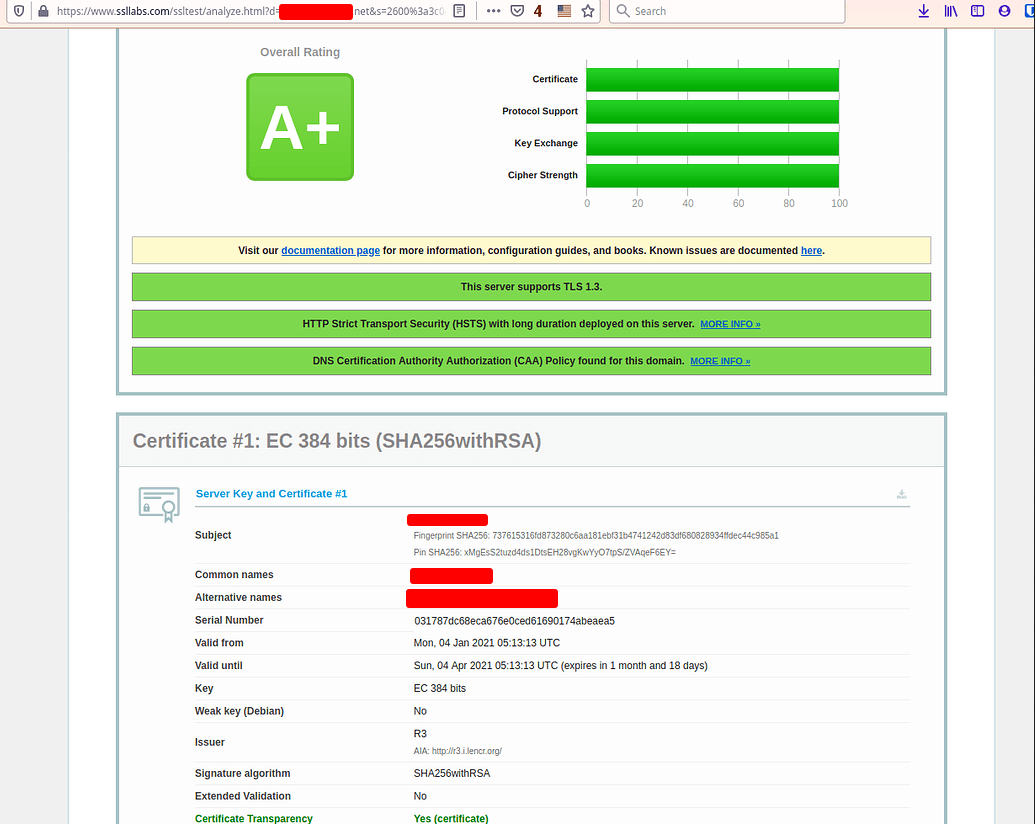
Wireguard is a lightweight protocol. Its remarkably efficient due to its reliance on elliptic curves. Its also quite a bit more secure. It uses ChaCha20 for symmetric encryption, authenticated with Poly1305, using RFC7539’s AEAD construction and Curve25519 for ECDH.
So you guys probably know me as more of a math, scientistic engineer type but I can be an absolute crypto-nut. AES is simply not as fast as chacha20. We dont need AES-NI to take advantage of it either which highly benefits phones and other ARM based systems without it. Hence why I can use it on the Pi’s and why I use it as the main encryption standard in my certificates.

You see on a general-purpose 64 bit CPU without dedicated instructions such as AES-NI, ChaCha20 blows AES out of the water. The reason for this is the fact that ChaCha20 is based on the ARX (Addition-Rotation-XOR) method, which are CPU friendly instructions for all intents and purposes. (if you have been through a microprocessors class or programmed assembly you understand why this is). AES does have its own optimizations and lookup tables but ChaCha20 does surpass it when it comes to performance. Additionally, those optimizations with AES can make it vulnerable to attacks (lookup cache timing attacks). The reason we have AES-NI is to prevent that. But what if we did not need AES-NI and had all the advantages. Sounds too good to be true but it is true. ChaCha20 is pretty nice. That said it is young. It has not had the auditing AES has had and these come as a risk in ways for some. So keep that in mind before using wireguard if that sort of thing concerns you.
Heres a blog comparison of most of the common symmetric methods of encrypting.
How do I set it up?
To setup wireguard first you must understand its not a client server VPN setup. Both sides are a peer so in essence you need to setup private and public keys for each side. Technically you will derive the public key from the private key. In fact this is the first thing I suggest you do after installing the requisite tools. Please see your distribution documentation for setting up wireguard .
On your site A side you should run the following commands:
$ umask 077
$ wg genkey > siteApriv
$ wg pubkey < siteApriv > siteApub
On your site B side you should run the following commands:
$ umask 077
$ wg genkey > siteBpriv
$ wg pubkey < siteBpriv > siteBpub
I took the optional step of generating a preshared key which gives wireguard quantum resilience or so they claim:
wg genpsk > site_A-site_B.psk
you will need to keep this for configuration on both sides later
Now you have both sets of keys. Keep the private keys somewhere safe. Its time to set up the respective site configurations. I am going to provide mine with some information missing in the hope that it is instructionally useful. It is by no means the absolute way to set this up.
Site A wg0.conf:
[Interface]
Address    = <Private IP4 Address of Choice>/24, <Link Local IP6 Address of Choice>/64
PrivateKey = <Private Key of  Site A>
ListenPort = <PORT#- Keep for site B>
PostUp = iptables -A FORWARD -i %i -j ACCEPT; iptables -A FORWARD -o %i -j ACCEPT; iptables -t nat -A POSTROUTING -o eth0 -j MASQUERADE; ip6tables -A FORWARD -i %i -j ACCEPT; ip6tables -A FORWARD -o %i -j ACCEPT; ip6tables -t nat -A POSTROUTING -o eth0 -j MASQUERADE
PostDown = iptables -D FORWARD -i %i -j ACCEPT; iptables -D FORWARD -o %i -j ACCEPT; iptables -t nat -D POSTROUTING -o eth0 -j MASQUERADE; ip6tables -D FORWARD -i %i -j ACCEPT; ip6tables -D FORWARD -o %i -j ACCEPT; ip6tables -t nat -D POSTROUTING -o eth0 -j MASQUERADE

### Begin Site B ###
[Peer]
PublicKey = <Public Key of  Site B>
PresharedKey = <PSK you generated (optional)>
AllowedIPs =<Subnet CIDR of wireguard tunnel>/24, <Prefix CIDR of wireguard tunnel>/64, <Subnet CIDR of site B's network to be accesed>/24
PersistentKeepalive = 25
### End Site B ###
Site B wg0.conf:
[Interface]
PrivateKey = <Private Key of  Site B>
Address = <Private IP4 Address of Choice>/24, <Link Local IP6 Address of Choice>/64
PostUp = iptables -A FORWARD -i %i -j ACCEPT; iptables -A FORWARD -o %i -j ACCEPT; iptables -t nat -A POSTROUTING -o eth0 -j MASQUERADE; ip6tables -A FORWARD -i %i -j ACCEPT; ip6tables -A FORWARD -o %i -j ACCEPT; ip6tables -t nat -A POSTROUTING -o eth0 -j MASQUERADE
PostDown = iptables -D FORWARD -i %i -j ACCEPT; iptables -D FORWARD -o %i -j ACCEPT; iptables -t nat -D POSTROUTING -o eth0 -j MASQUERADE; ip6tables -D FORWARD -i %i -j ACCEPT; ip6tables -D FORWARD -o %i -j ACCEPT; ip6tables -t nat -D POSTROUTING -o eth0 -j MASQUERADE
ListenPort = <PORT#>

### Begin Site A###
[Peer]
PublicKey = <Public Key of  Site A>
PresharedKey = <PSK you generated (optional)>
Endpoint = <Public IP4 Site A>
PersistentKeepAlive=25
AllowedIPs =<Subnet CIDR of wireguard tunnel>/24, <Prefix CIDR of wireguard tunnel>/64
### End Site A ###
So it would be helpful to all to understand my mapping here.
Site A is my NGINX reverse proxy on the Linode. It serves as a frontend. I want it to be able to access my home network but I dont need my home network to access all the networks that linode has within it (or virtual networks). So the ENDPOINT is mapped on the site B end. The site A end will lack this however it will gain the inclusion of an extra allowed subnet to allow the mapping of my internal subnet outward to its wireguard subnet. Once this is complete the Linode and my Internal network will be able to talk (in theory there are a few more things to do).
So in essence your confs will take the perspective of Site A is a host. It has a peer of site B. It must make a handshake that direction. Site B is a host and it has a peer of site A. It must make the hand shake that direction. They kind of meet in the middle, which makes sense given the type of encryption used. Wiregurd is great for encryption it’s not to potentially great on the privacy end of things nor was it designed for this purpose specifically.
The most important thing you must do before you setup one of these. MAP YOUR NETWORK. Understand what you are doing so you can apply it conceptually. I have a tendency to wild wild west it. You absolutely will have the most massive headache if you attempt it the way I do.
Now that you have your proper configuration on both sites run the config through wg-quick via the command wg-quick up <location of wg0.conf> . This will bring the interfaces up on both sides. You can verify its up by typing in wg. The sites will not be able to access each other yet so we need to take a few more steps.
Now what do we need to finalize this? The IP tables rules will not work if you do not have IP forwarding enabled on site A and site B. Now this usually can be distribution specific. The main values you want set in your systemctl conf are the following
net.ipv4.ip_forward=1
net.ipv6.conf.default.forwarding=1
net.ipv6.conf.all.forwarding=1
This will allow forwarding and masquerading that you need from the IP rules.
Now that we have the wireguard setup we can use our firewall or route of choice to setup and additional gateway. This gateway will have the H, S and U flags. This is because the gateway is not on the router. We will not be checking if its online etc. It will always allow the routes we define to it.
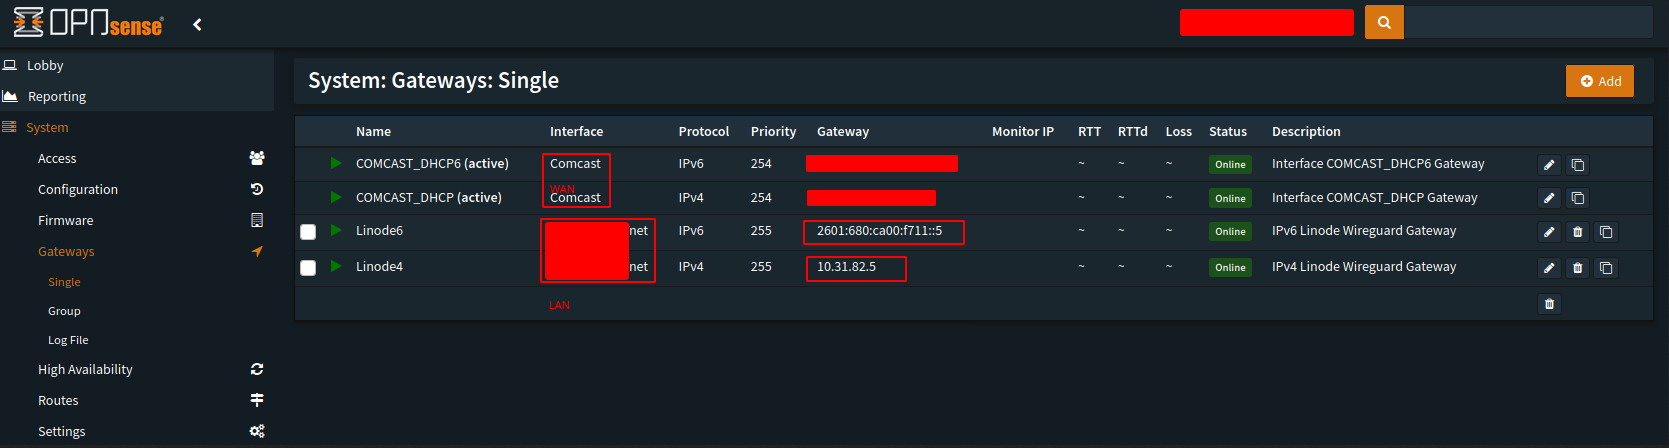
OPNSense makes it easy to add the LAN gateway. In anycase I will not show the specifics as your software could differ but this should visually help. You want the Gateway IP to be the IP of whatever device is Site B or the WG-Gateway In my case it is the .5 and ::5 device. It is helpful if they have a static mapping in your DHCP server so that their IP doesnt change but this is entirely up to you. wireguard is dynamic IP tolerant.
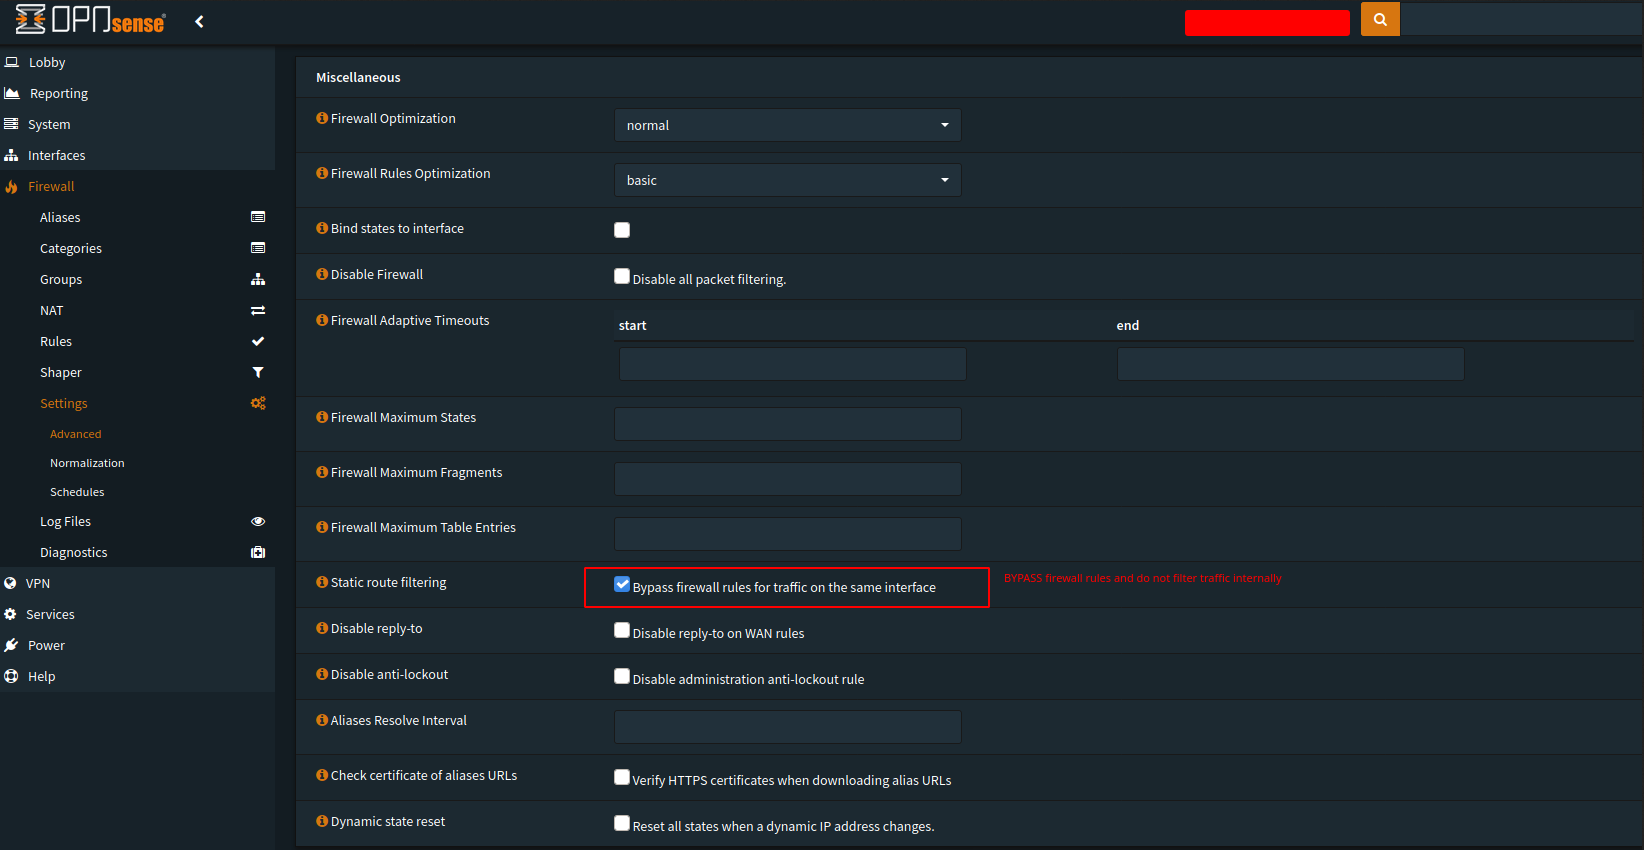
The last thing you need to add is a static route.

Pretty easy but it will again differ from software to software. The “jist” is that you want the wireguard subnet to be routed in its entirety to and from that gateway so that access can be established and mapped by your router without the need to add firewall rules. On the protectli with OPNsense there is one more step I had to take but pfsense doesnt need this step and neither do most other common firewalls
Now I suggest for immediate effects that you reboot all devices (site A, site B and the site B router). That should bring everything up properly and access will be established between sites between all devices at each site.
( I will update this as I go. I just wanted to share some knowledge so enjoy)
WIP,
PLL
Links to Infrastructure Series and Other Resources
Blog: Phaselockedloopable- PLL’s continued exploration of networking, self-hosting and decoupling from big tech
Series 1: Native Dual Stack IP4+IP6
Infrastructure Series – Native Dual Stack IP4+IP6
Series 2: Wireguard Site to Site Tunnel
Infrastructure Series – Wireguard Site to Site Tunnel
Series 3: Recursive DNS and Adblocking DNS over TLS w/NGINX
Infrastructure Series – Recursive DNS and Adblocking DNS over TLS w/NGINX
Series 4: NGINX Reverse Proxy and Hardening SSL
Infrastructure Series – NGINX Reverse Proxy and Hardening SSL
Series 5: Taking DNS One Step Further - Full DNS Server infrastructure
Infrastructure Series – Taking DNS One Step Further - Full DNS Server infrastructure
Series 6: HTTP(S) Security Headers! You should use them!
Infrastructure Series – HTTP(S) Security Headers! You should use them! [NGINX]
Series 7: Use NGINX to inject CSS themes
Infrastructure Series – Use NGINX to inject CSS themes
ONE KEY TO RULE THEM ALL
Setting up a YubiKey Properly – One Key to rule them ALL!
Series 9: Infrastructure Series: BIND9 Authoritative DNS Guide “Please See Me Edition”
Infrastructure Series: BIND9 Authoritative DNS Guide “Please See Me Edition”
Buy me a crypto-beer
If you found this guide helpful you can donate Monero or Bitcoin to me at the following address in my User Card Profile

 … thanks man don’t ban me lol