YubiKey Do What Skeleton Key Do
So we all know about the YubiKey. We are going to be using the 5 series in this guide and we are going to load all of our keys we need on a day to day deed onto the key via GPG! We are also going to pin and access code protect everything on the key preventing tampering!
Without judging my messy desk I will be programming all 3 of my keys. A current, hot spare, cold spare to be moved to a off site undisclosed everything proof location

So lets get to it.
OS: Arch Linux
DE: XFCE
Notice: Work in Progress
YubiKey 5 Initial Setup
Open the YubiKey Manager on your chosen Linux Distro
For me I installed everything I needed from the CLI in arch as follows:
sudo pacman -S gnupg pinentry libusb-compat pcsclite ccid yubikey-manager-qt yubikey-manager yubikey-personalization yubikey-personalization-gui yubico-pam pam-u2f libfido2
Setup each of the applications you need. I dont do FIPS or PIV so I will be excluding that
FIDO2/U2F
Set the FIDO2 pin
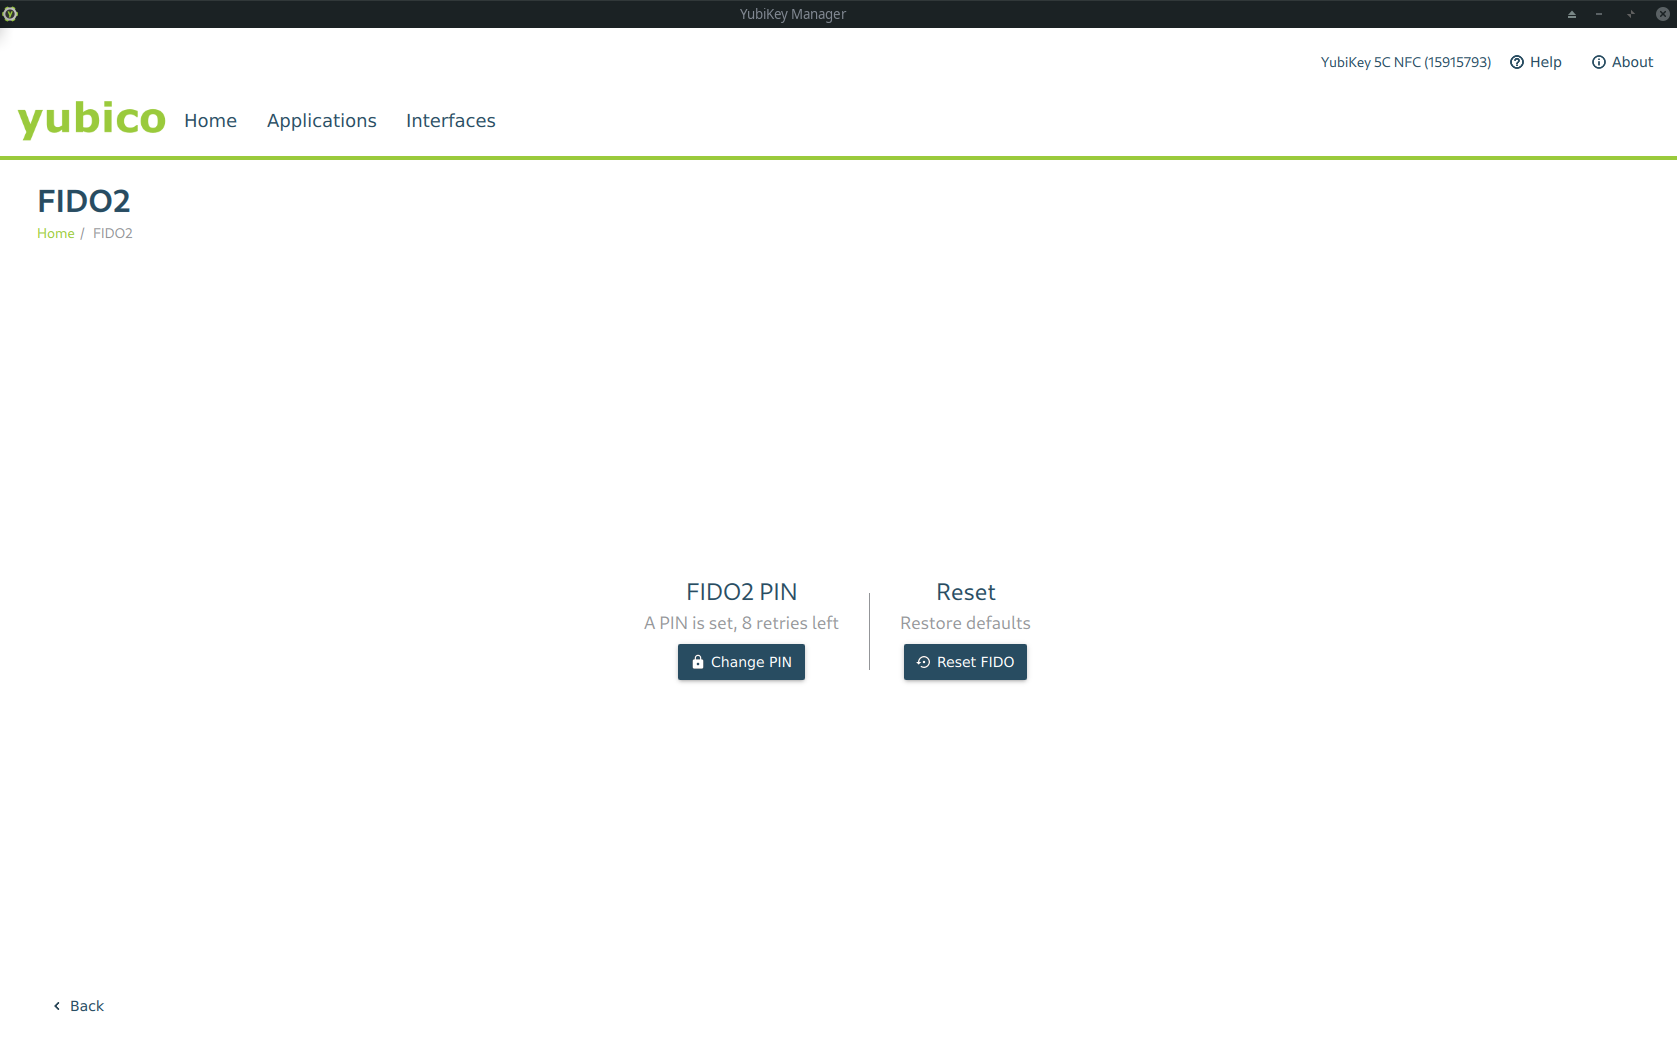
Do not forget this. Do not type it in too many times incorrect or you permanently lock out yourself from these mechanisms and have to erase the yubikey applet.
OTP and encrypting slots
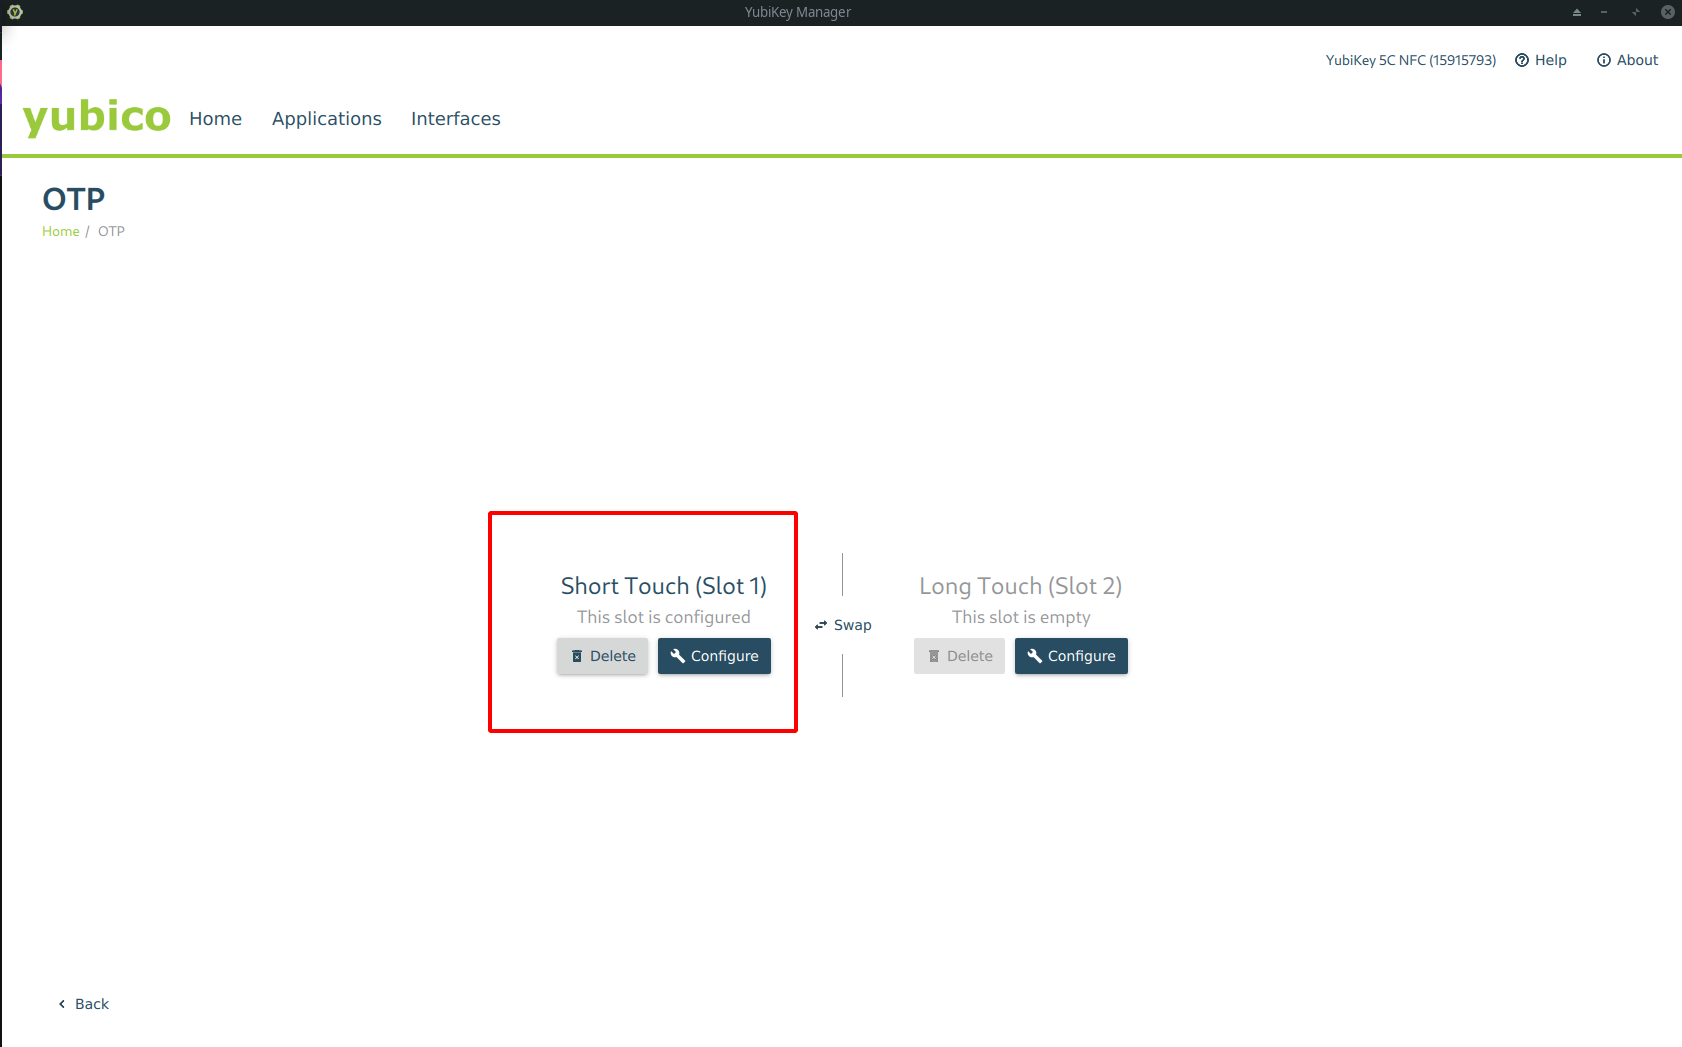
Configure slot 1 completely and make sure it is registered with yubico OTP server.
Now we are going to clock that slot with a different piece of software so it cannot be tampered with.
Select from the drop down. YubuKeys unprotected enable protection.
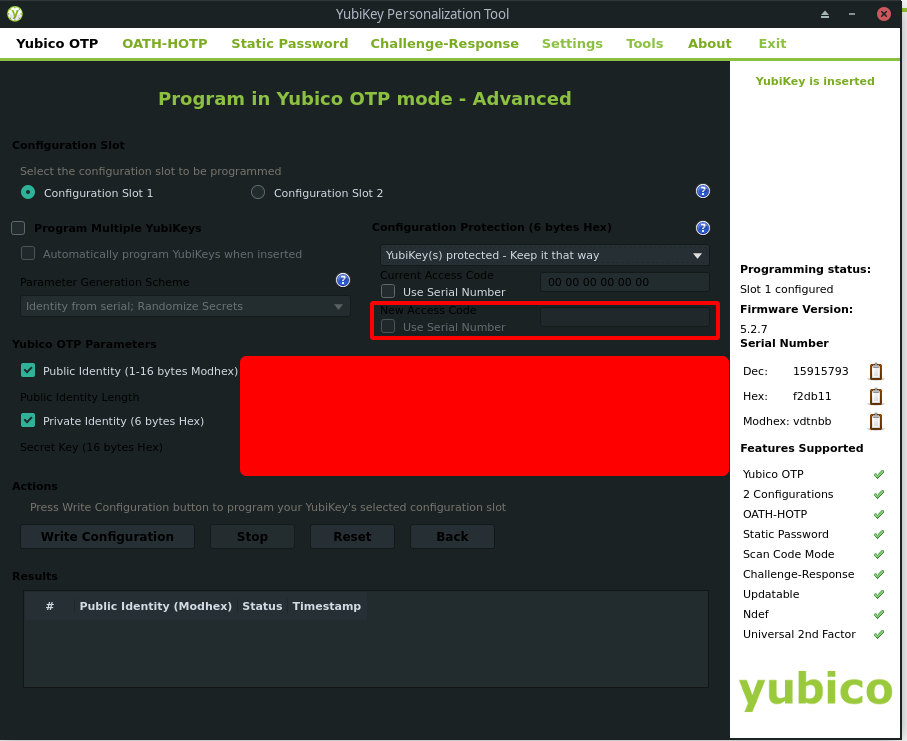
Create an access code and REMEMBER IT. if you lose it. This part of the yubikey functionality is FOREVER broken by design.
There now we have locked both parts of the key that we will use for u2f. Which is important if you are going to store keys away from your residence or tenure-ship
GPG ED25519-Curve25519 ED-DSA setup
Ed25519 was introduced to OpenSSH already, so, we can use ssh-agent feature of gpg-agent using authentication subkey of OpenPGP. Since GnuPG 2.1.8 of March 2016, encryption by Curve25519 is supported. ECC is generic term and security of ECC depends on the curve used. Unfortunately, no one wants to use standardized curve of NIST but thats okay. We can still take advantage of state of the art cryptography.
Define your LD Library path
export LD_LIBRARY_PATH=/usr/local/lib
Nuke gpg agent
gpg-connect-agent KILLAGENT /bye
Using the newer gpg package and standard create a key using expert options
gpg2 --expert --full-gen-key
The output will look like
Please select what kind of key you want:
   (1) RSA and RSA (default)
   (2) DSA and Elgamal
   (3) DSA (sign only)
   (4) RSA (sign only)
   (7) DSA (set your own capabilities)
   (8) RSA (set your own capabilities)
   (9) ECC and ECC
  (10) ECC (sign only)
  (11) ECC (set your own capabilities)
Your selection?
Select Option 9. We will use both ED25519 and Curve25519
Seeing as we have many curves to our disposal you have choice as well. I suggest 25519.
Please select which elliptic curve you want:
   (1) Curve 25519
   (2) NIST P-256
   (3) NIST P-384
   (4) NIST P-521
   (5) Brainpool P-256
   (6) Brainpool P-384
   (7) Brainpool P-512
   (8) secp256k1
Your selection?
Option 1 is what I selected. Depending on your version you may get this warning to which you select yes
GPG: WARNING: Curve25519/ED25519 is not yet part of the OpenPGP standard.
Use this curve anyway? (y/N) y
Make a non expiring key.
Please specify how long the key should be valid.
         0 = key does not expire
      <n>  = key expires in n days
      <n>w = key expires in n weeks
      <n>m = key expires in n months
      <n>y = key expires in n years
Key is valid for? (0)
Key does not expire at all
Is this correct? (y/N) y
We are going to construct a gpg user card for this key. We will also add as many as we like later. it is not difficult
GnuPG needs to construct a user ID to identify your key.

Real name: (Given Name) (Sur Name)
Email address: <email>
Comment: <any commentary about the key>
You selected this USER-ID:
    "(Given Name) (Sur Name)  <email>"
On confirmation:
Change (N)ame, (C)omment, (E)mail or (O)kay/(Q)uit?
Select O
You will get some sort of confirmation message where it outputs
gpg: key <HEX> marked as ultimately trusted
public and secret key created and signed.
Echo out the keyid You will need it later
echo "<redacted>" >> keyid
We are going to now edit this key to give us both encryption and authentication capabilities.
gpg2 --expert --edit-key <HEX>
Invoke the addkey function
gpg> addkey
It will proceed to ask for the type of key we want. In this case we want to define our own capabilities
Please select what kind of key you want:
   (3) DSA (sign only)
   (4) RSA (sign only)
   (5) Elgamal (encrypt only)
   (6) RSA (encrypt only)
   (7) DSA (set your own capabilities)
   (8) RSA (set your own capabilities)
  (10) ECC (sign only)
  (11) ECC (set your own capabilities)
  (12) ECC (encrypt only)
  (13) Existing key
Your selection?
So select option 11 since we are creating ED-DSA keys and then, we specify “Authenticate” capability. Select S then A then quit
Possible actions for a EDDSA key: Sign Authenticate
Current allowed actions: Sign

   (S) Toggle the sign capability
   (A) Toggle the authenticate capability
   (Q) Finished

Your selection? S

Possible actions for a EDDSA key: Sign Authenticate
Current allowed actions: Sign Authenticate

   (S) Toggle the sign capability
   (A) Toggle the authenticate capability
   (Q) Finished

Your selection? A

Possible actions for a EDDSA key: Sign Authenticate
Current allowed actions: Authenticate

   (S) Toggle the sign capability
   (A) Toggle the authenticate capability
   (Q) Finished

Your selection? Q
It follows up with where it asks which curve. We input 1 for “Curve25519”.
Please select which elliptic curve you want:
   (1) Curve 25519
   (2) NIST P-256
   (3) NIST P-384
   (4) NIST P-521
   (5) Brainpool P-256
   (6) Brainpool P-384
   (7) Brainpool P-512
   (8) secp256k1
Your selection? 1
It asks confirmation. We say y.
gpg: WARNING: Curve25519 is not yet part of the OpenPGP standard.
Use this curve anyway? (y/N) y
It asks expiration of the key just like last time
Please specify how long the key should be valid.
         0 = key does not expire
      <n>  = key expires in n days
      <n>w = key expires in n weeks
      <n>m = key expires in n months
      <n>y = key expires in n years
Key is valid for? (0)
Key does not expire at all
Is this correct? (y/N) y
Really create? (y/N) y
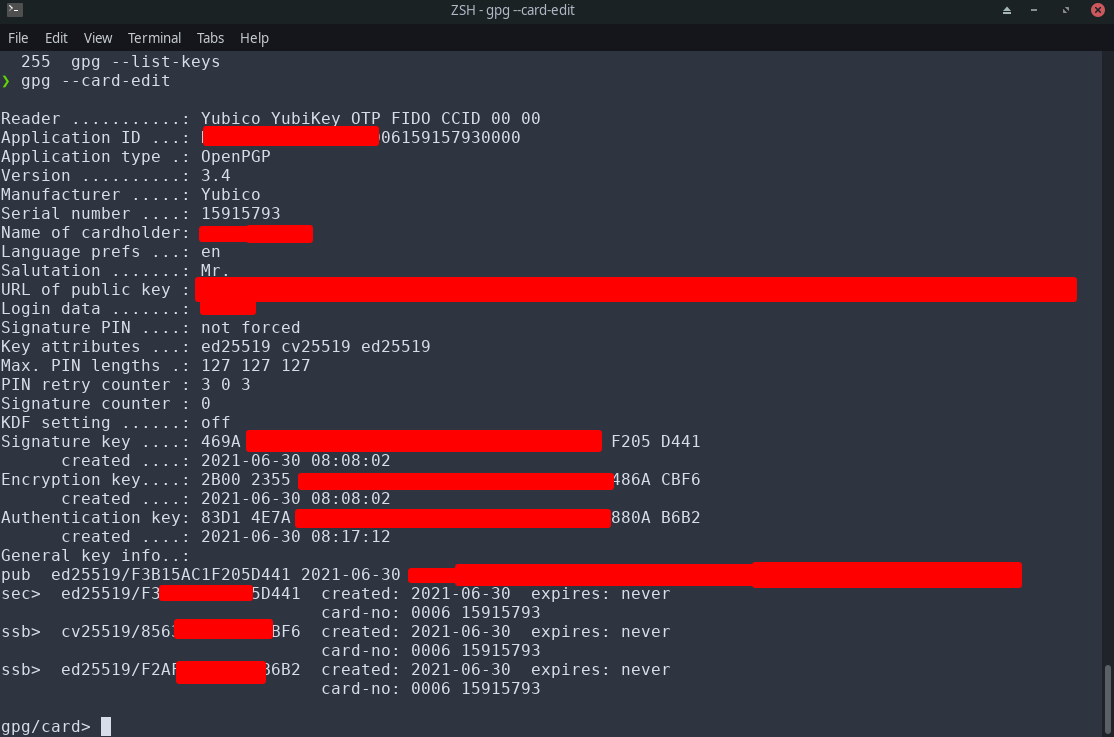
Done you should find yourself with 3 keys in the gpg key package.
sec  ed25519/<redacted>
     created: 2021-06-30  expires: never       usage: SC
     trust: unknown       validity: unknown
ssb  cv25519/<redacted>
     created: 2021-06-30  expires: never       usage: E
ssb  ed25519/<redacted>
     created: 2021-06-30  expires: never       usage: A
Invoke the save command
UNLESS you need to add more emails and stuff. I added all my emails to my card. You can even add a photo for identification if you would like.
The process is simple and kind of verbose. Here you see the process
  $ gpg2 --edit-key <key-id>
  gpg> adduid
  Real Name: <name>
  Email address: <email>
  Comment: <comment or Return to none>
  Change (N)ame, (C)omment, (E)mail or (O)kay/(Q)uit? O
  Enter passphrase: <password>
  gpg> uid <uid>
  gpg> trust
  Your decision? 5
  Do you really want to set this key to ultimate trust? (y/N) y
  gpg> save
You have the following options you may also change
> passwd       # change the passphrase
> clean        # compact any user ID that is no longer usable (e.g revoked or expired)
> revkey       # revoke a key
> addkey       # add a subkey to this key
> expire       # change the key expiration time
> adduid       # add additional names, comments, and email addresses
> addphoto     # add photo to key (must be JPG, 240x288 recommended, enter full path to image when prompted)
If you absolutely need RSA keys you can add them as a secondary auth and secondary sign and secondary encrypt subkey. Ive not done this. I discard legacy quickly. If that is something you need to do consider doing so in the same way we added subkeys earlier.
Upload your keys to a keyserver of your choice once you are complete adding what you need.
I prefer keys.openpgp.org as it requires verification of your identity. This fixes my gripe I have with SKHS
After your done make sure you export the keys this way we will need it later.
gpg --armor --export-secret-keys $(cat keyid) > mastersub.key
gpg --armor --export-secret-subkeys $(cat keyid) > sub.key
gpg --armor --export $(cat keyid) > public.key
Then tarball or zip the following up
keyid
mastersub.key
public.key
sub.key
This zip file (gpg.zip) should be backed up offline to a usb drive, or other secure location. It is also very important, because each time we move our gpg key over to a yubikey, the gpg tool destroys the key. So we have to copy over a duplicate each time.
GPG Key to Card
Alright now we need to add the key to the OpenPGP applet on the Yubi-Key. This part is quite verbose. It was frustrating for me to figure out how to do so at first.
You will repeat this ENTIRE section per key you wish to use. So they maybe exact clones.
With the yubikey plugged in
gpg --card-edit
invoke admin
admin
On this prompt, you will want to change the pin. When the prompt comes up, type 123456 for the current pin, this is the default for yubikeys. This will be your unlock code for SSH and GPG general usage. Invoke option 3 when done
Now invoke passwd
passwd
This time we need to change the admin pin. The initial pin is 12345678 . Change the pin. Make it longer and different from the admin pin. Remember both of these. This is the most secure way.
Now lets change the embedded card attributes. Execute each of these and fill out the forms
name
lang
login
url (insert the URL of your key on a keyserver)
sex (gender)
login (username)
Now use ykman to set the openpgp touch requirements. Im an all on guy. I want to have control over when these things are done and so they cant be done with me away from my desk and someone else pushes it.
ykman openpgp keys set-touch aut on
ykman openpgp keys set-touch sig on
ykman openpgp keys set-touch enc on
This is just telling your yubikey that any authentication, signature, or encryption key usage, requires a physical touch of the device before it will do the operation. This can be useful for ultra security conscious individuals. A program wouldn’t be able to sign or encrypt anything with your key in the background, because it would require a touch before any action.
You need to execute the following commands outside of the gpg directory that we created in the key creation step. Your current directory should have a zip file in it that we created. Start by unarchiving the gpg.zip that we created earlier. Each time you do this section (for every key) you need to delete the gpg folder, and unarchive gpg.zip again. We can’t reuse the gpg folder each time, because the gpg smart card commands delete the secret key, so you MUST have a fresh copy of the gpg files each time.
mkdir opgpyk-exp
tar -xvzf opgpyk-exp.tar.gz -C opgpyk-exp/
export GNUPGHOME=$(mktemp -d)
cp -r opgpyk-exp $GNUPGHOME
cd $GNUPGHOME/opgpyk-exp

gpg --import mastersub.key
gpg --edit-key $(cat keyid)
That should do it. Now the keys are going to be displayed. You will have SC, E and A. We will put SC without selecting any of the subkeys to the signature spot by invoking the key to card functionality.
keytocard (signature)
Next we will do auth and encryption much the same way BUT we must be very verbose. key 1 selects. invoke function then key 1 to deselect again. If you do not deselect it will copy both. Do not do this.
key 1
keytocard (choose encryption, 1)
key 1

key 2
keytocard (auth)
key 2

save
Done and if you get the error “operation not supported by device” after you do the initial yubikey setup and run the keytocard command. Just unplug your yubikey, then plug it back in, type keytocard again
I realize this dox’s me. Just so yall know I own a 10mm and a mossberg. Dont try anything but your welcome to ASK to have drinks with me. I prefer whiskey btw ![]()
Voila, Rinse and repeat per key.
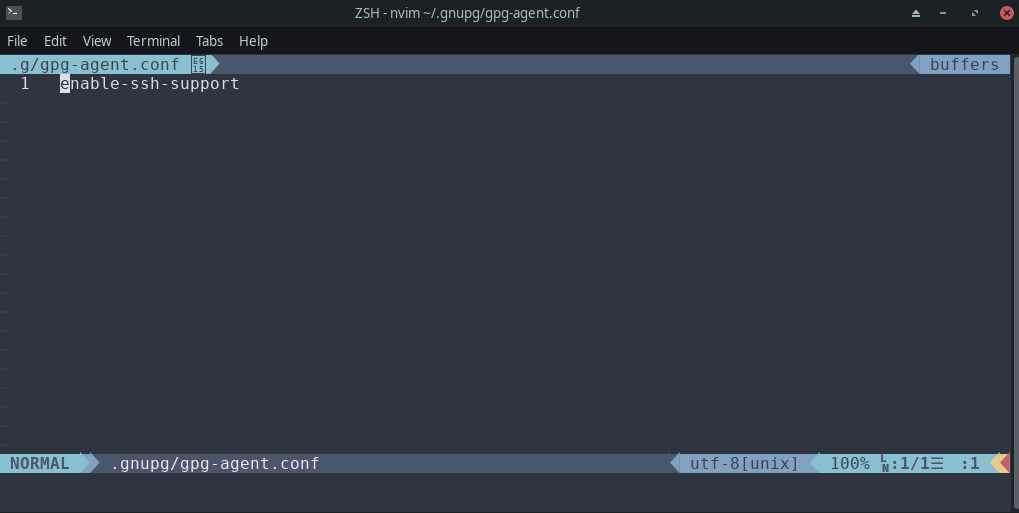
GPG for SSH
When you are using secure shell a subroutine called ssh-agent is used to manage the keys. To use a GPG key, you’ll use a similar subroutine called gpg-agent , that manages GPG keys. To get gpg-agent to handle requests to and from SSH, you need to enable support by adding the line enable-ssh-support to the ~/.gnupg/gpg-agent.conf . You could do this globally in ETC too. Use your favorite editor to do this
Now typically it gets annoying that you are ssh-adding a lot… we can use the GPG keygrip function to make sure we choose the right key everytime.
To do this, specify the keys in the ~/.gnupg/sshcontrol file. The entries in this file are keygrips —internal identifiers gpg-agent uses to refer to keys. Unlike a key hash, a keygrip refers to both the public and private key. To find the keygrip, use gpg2 -K --with-keygrip , as shown below. Then add that line to the sshcontrol file.
REMEMBER if you have exported you key to the hardware key your keys are no longer stored in gpg. You don’t need to reimport if you do not want to you can instead fetch based on the yubikeys stored information if you set it up correctly
gpg2 --card-edit
gpg/card> fetch
ssb>  ed25519 2021-06-30 [A]
      Keygrip = <a-redacted-string>
Echo it in
echo <a-redacted-string> >> ~/.gnupg/sshcontrol
Now you tell the SSH auth socket to connect to gpg agent in your shel config. Ive achieved this in my Z shell config
$ cat ~/.zshrc
...
export SSH_AUTH_SOCK=$(gpgconf --list-dirs agent-ssh-socket)
gpgconf --launch gpg-agent
...
In order to use SSH, you need to share your public key with the remote host. You have two options. First, you can run ssh-add -L to list your public keys and copy it manually to the remote host OR you may also use ssh-copy-id rom this perspective, nothing has changed.
Done now you only need the GPG key
GPG for GIT
This process should be done on each computer that you want to do commit signing on via GIT or however you have your SVN or GIT commit signing functioning
git config --global user.signingkey $(cat keyid)
git config --global commit.gpgsign true
gpg --import public.key
Do not forget you must import the public key from your gpg master key, otherwise git won’t recognize your yubikey. You have been warned. You could spend hours figuring that out xD.
Be sure to add the contents of our public.key file to GitHub or other service, so that your commits will show as verified otherwise they will show up as unverified or insecure.
PAM-U2F-FIDO2 for Linux Login
The last part. Configure the PAM module on linux to handle U2F FIDO2 for login
mkdir ~/.config/Yubico
pamu2fcfg -o pam://hostname -i pam://hostname > ~/.config/Yubico/u2f_keys
Click the button of your U2F key to confirm the key and If you own multiple keys, append them with:
pamu2fcfg -o pam://hostname -i pam://hostname -n >> ~/.config/Yubico/u2f_keys
You can also do passwordless sudo and configure it per display manager. PLEASE see your documentation per distro and Desktop environment on how to do that. I really cant cover them all. Dont forget to sudo -s in case you screw up and need to revert changes.
Additional Notes
You can use this key in many places as a smart card and also on windows. (I have reserved this section for if I do this. I dont use windows rn)
Good luck 
Leave a like… Sent the metrics to the moon

Links to Infrastructure Series and Other Resources
Blog: Phaselockedloopable- PLL’s continued exploration of networking, self-hosting and decoupling from big tech
Series 1: Native Dual Stack IP4+IP6
Infrastructure Series – Native Dual Stack IP4+IP6
Series 2: Wireguard Site to Site Tunnel
Infrastructure Series – Wireguard Site to Site Tunnel
Series 3: Recursive DNS and Adblocking DNS over TLS w/NGINX
Infrastructure Series – Recursive DNS and Adblocking DNS over TLS w/NGINX
Series 4: NGINX Reverse Proxy and Hardening SSL
Infrastructure Series – NGINX Reverse Proxy and Hardening SSL
Series 5: Taking DNS One Step Further - Full DNS Server infrastructure
Infrastructure Series – Taking DNS One Step Further - Full DNS Server infrastructure
Series 6: HTTP(S) Security Headers! You should use them!
Infrastructure Series – HTTP(S) Security Headers! You should use them! [NGINX]
Series 7: Use NGINX to inject CSS themes
Infrastructure Series – Use NGINX to inject CSS themes
ONE KEY TO RULE THEM ALL
Setting up a YubiKey Properly – One Key to rule them ALL!
Series 9: Infrastructure Series: BIND9 Authoritative DNS Guide “Please See Me Edition”
Infrastructure Series: BIND9 Authoritative DNS Guide “Please See Me Edition”
