(All IPs in here are no invalid as the records have changed)
Introduction
Ever wanted your pi-hole to block ads everywhere in a secure manner? Do not want to use other recursive resolvers such cloudflare, quad 9, google DNS, and openNIC? Well you can make your server a recursive server and skip the middle man entirely going right to the root DNS servers of the web. Lets do it!
Obligatory shill of blog stream post: Phaselockedloopable- PLL’s continued exploration of networking, self-hosting and decoupling from big tech
As always check for updates in the second post ![]()
Prequisites:
- You must have HTTPS/TLS working with certificates on your NGINX
- Working knowledge of NGINX
- Domain bought through namecheap or elsewhere
- Ability to set DynDNS records (in some manner I wont dictate how you do)
- Means or system to run pi-hole and unbound on (preferably independent and not docker)
So let us start by an overview of DNS. Its critical to understanding what is happening in this wiki.
What is DNS?
DNS or Domain Name Server is quite literally the phonebook of the internet. Well actually its more like the whitebooks/yellowpages. You could navigate the internet with IPs but it would be difficult. So you want to lookup the IP of the name of the URL you put in the browser. That is the function of the Domain Name Server. For example, the domain name < URL from my nextcloud >, translates to the IP address 192.53.120.164 (in the old IPv4 format) or 2600:3c04::f03c:92ff:fec6:2030 (in the newer IPv6 format). Those are called A and AAAA records respectively. These are sourced at the highest level by recursive DNS servers such as cloudflare etc via a root server which is defined in my SOA or State of Authority DNS Record as follows:
SOA a.root-servers.net. nstld.verisign-grs.com. 2021022100 1800 900 604800 86400
DNS is very essential to the internet as you know it. It is an unsung hero and any change to it must be very slow. We all probably have heard about the arguments against DNS over HTTPS and DNSCrypt vs DNS over TLS being good. (Famous Extremely relevant talk about DoH+DNSCrypt vs DoT)
One of the functions that DNS handles well is when an IP record changes. You can still navigate to the page so long as the record is updated. Unlike a phone book and much like the yellow pages ![]() , DNS records are commonly updated, meaning that a server’s IP address can change without affecting users of the website. Users continue to use the same domain name, and are automatically redirected to the new address. A DNS A or AAAA Record points a domain or subdomain to an IP, and a CNAME record points a domain or subdomain to another domain name (redirect CNAME). More on this later. Registration is a very important aspect of DNS and needs to be continuosly insured that the registrations are up to date. However this can take time to propagate.
, DNS records are commonly updated, meaning that a server’s IP address can change without affecting users of the website. Users continue to use the same domain name, and are automatically redirected to the new address. A DNS A or AAAA Record points a domain or subdomain to an IP, and a CNAME record points a domain or subdomain to another domain name (redirect CNAME). More on this later. Registration is a very important aspect of DNS and needs to be continuosly insured that the registrations are up to date. However this can take time to propagate.
After you register a new domain name or when you update DNS servers on your domain name, it usually takes about 12-36 hours for the domain name servers world-wide to be updated and able to access the information. This time can be greatly shorter in the immediate continent or sector of the internet you are in. This is what propagation time is.
Now there is a function in every OS and every network has one of some type. This is called a resolver. 99.99% of the time when you connect to a local network or to an ISP, the primary routing devices sends the network configuration information to your device, including one or more DNS servers as a function of DHCP. These are the initial DNS servers your device will use to translate host names to IP addresses. These can of course be changed and we will do that in this guide but first we need to understand the component responsible for your lookups. This is called a DNS Resolver and it is responsible for checking if the host name is available in local cache, and if not, contacts a series of DNS Name Servers, until eventually it receives the IP of the website or service you are trying to reach. There are 2 types of resolvers (technically a third but you cant host it).
Different Types of DNS Servers
Local DNS Server (Forward or Recursive)
So the first resolver you will hit is likely your local router or your local DNS server you have setup. It can be setup in a forwarder or resursive mode. I will be setting my network up cutting out the middle man which forwarders go to you. See below. In forward mode (most peoples setups) It simply forwards the non cached lookups to a set recurssive DNS server of its choice. All the information transmitted is then handled by the recurssive server that handles the bulk of the lookup.
Recursive DNS Server (Cloudflare, Quad 9, Google DNS, OpenNIC etc)
Recursive DNS is the middle-man between the consumer and the Authoritative DNS servers that are hosting a networks domains and the IP addresses that are associated with a domain name. This type of server you are familiar with. You have seen Cloudflare, Quad 9, Google DNS, OpenNIC etc, they are all recursive DNS Servers that your local DNS forwards to when in forward mode. We will be going through the process of setting up a recursive server in this guide.
DNS Root Server
The root server is the first step in translating friendly URLs into IP addresses. The Top Level Domain or TLD takes the TLD provided in the user’s query - for example my nextcloud, https://URL OF MY NC - and provides details for the .net TLD Name Server. The recursive server has knowledge of these. They are call root hints or root servers in a recursive resolvers configuration and it is this server that the recursive server calls to first.
There are not many root webservers and you cannot host one yourself. There are 13 root servers across the world, indicated by the letters A through M , operated by organizations such as Verisign, Cogent, ICANN, NIC DDN.mil, NASA.gov, and the U.S. Army Research Lab.
Top Level Domain Server
The TLD Name Server takes the domain name provided in the query, for example my nextcloud URL, and provides the IP of an Authoritative Name Server for the record. This is why the SOA record is important so we know which server is the authority on this IP and URL combination. This is a DNS server that contains DNS records for the specific domain itself. There are 1500+ valid TLDs in the current internet setup. Please see wikipedia for more information: List of Internet top-level domains - Wikipedia
Authoritative Name Server
Finally we reach the Authoritative Domain Name Server which is the last stop in our query before the infromation is returned to the recursive server or resolver. The Authoritative Name Server takes the domain name and subdomain, and if it has access to the DNS records or they are updated properly, it returns the correct IP address to the DNS Resolver or forwarder. Sometimes there can be different Authoritative servers for TLDs than there are for Subdomains. This is not always the case but you can find it in the enterprise in certain places. Its a good way to load balance record lookups. Authoritative Name Servers are organized using what are called DNS Zones. Each DNS zone has a closed set of Authoritative Name Servers. They are called “authoritative” because they can provide an authoritative, correct response as to what is the current IP for a specific domain. It is in essence the authority on where your server is located.
At this level most query’s are handled. You have 3 different types of queries. Recursive query, that a DNS client requires that a DNS server (typically a DNS recursive resolver) respond to the client with either the requested resource record or an error message if it can’t find the record. There is an iterative query in which the resolver seeks out each authoritative server until it finds a match or times out. Then you have a non-recursive query and this can occur in two situations, either the query is cached or that the recursive server is the authority for the record. Just knowledge you might want to have.
Different types of DNS records:
There are a lot of different types of records. I will cover the common records you will see:
- Address Mapping records (A) - records that hold a hostname and its corresponding IPv4 address.
- IP Version 6 Address records (AAAA) - records that hold a hostname and its corresponding IPv6 address.
- Service Location (SRV) - service location record, like MX but for other, newer protocols.
- Canonical Name records (CNAME) - used to create aliases of domain names. Can be used to alias a domain to another domain.
- Name Server records (NS) - delegates a DNS Zone to use a specific Authoritative Name Server.
- Reverse-lookup Pointer records (PTR) - used to look up domain names based on an IP address.
- Mail exchanger record (MX) - specifies a mail exchange server for the domain name, used in the SMTP protocol to route emails to the correct email server.
- Certificate record (CERT) - stores encryption certificates such as PKIX, SPKI, PGP, etc.
- State of Authority (SOA) - An SOA record is a Start of Authority. Every domain must have a Start of Authority record at the cutover point where the domain is delegated from its parent domain. The SOA record includes the following details: The primary name server for the domain, which is a.root-servers.net or the first name server in the vanity name server list in my case nstld.verisign-grs.com, The responsible party for the domain: cloud.< MY-TLD >.net, A timestamp that changes whenever you update your domain, The number of seconds before the zone should be refreshed, The number of seconds before a failed refresh should be retried, The upper limit in seconds before a zone is considered no longer authoritative and finally the negative result TTL (for example, how long a resolver should consider a negative result for a subdomain to be valid before retrying).
Setting up Unbound Recursive DNS Resolver+cache:
Let’s set this up and test it. Install unbound with all the recommended packages of your distribution. If you run arch linux or manjaro like I do on my server they have great docs: Unbound - ArchWiki . I will not help setup per distribution and that is why I left this installation step out.
The first thing we want to do after the package installation is to pull the active list of root servers. We also want this to update monthly so we never have an issue if the root servers should change (rare).
Root Hints Acquisition
Execute the following command:
sudo curl --output /etc/unbound/root.hints https://www.internic.net/domain/named.cache
Once complete we want to create systemD timers to update this monthly, to setup the systemD automation we need a timer and a service. Lets create those files
Setup the timer: using your favorite editor create /etc/systemd/system/roothints.timer
It should contain the following:
[Unit]
Description=Run root.hints monthly

[Timer]
OnCalendar=monthly
Persistent=true

[Install]
WantedBy=timers.target
Setup the service: Using your favorite editor create /etc/systemd/system/roothints.service
It should contain the following:
[Unit]
Description=Update root hints for unbound
After=network.target

[Service]
ExecStart=/usr/bin/curl -o /etc/unbound/root.hints https://www.internic.net/domain/named.cache
After saving both files start and enable the systemD service you just created.
Unbound.conf Configuration
Now we need to configure the unbound configuration to be a recurssive server.
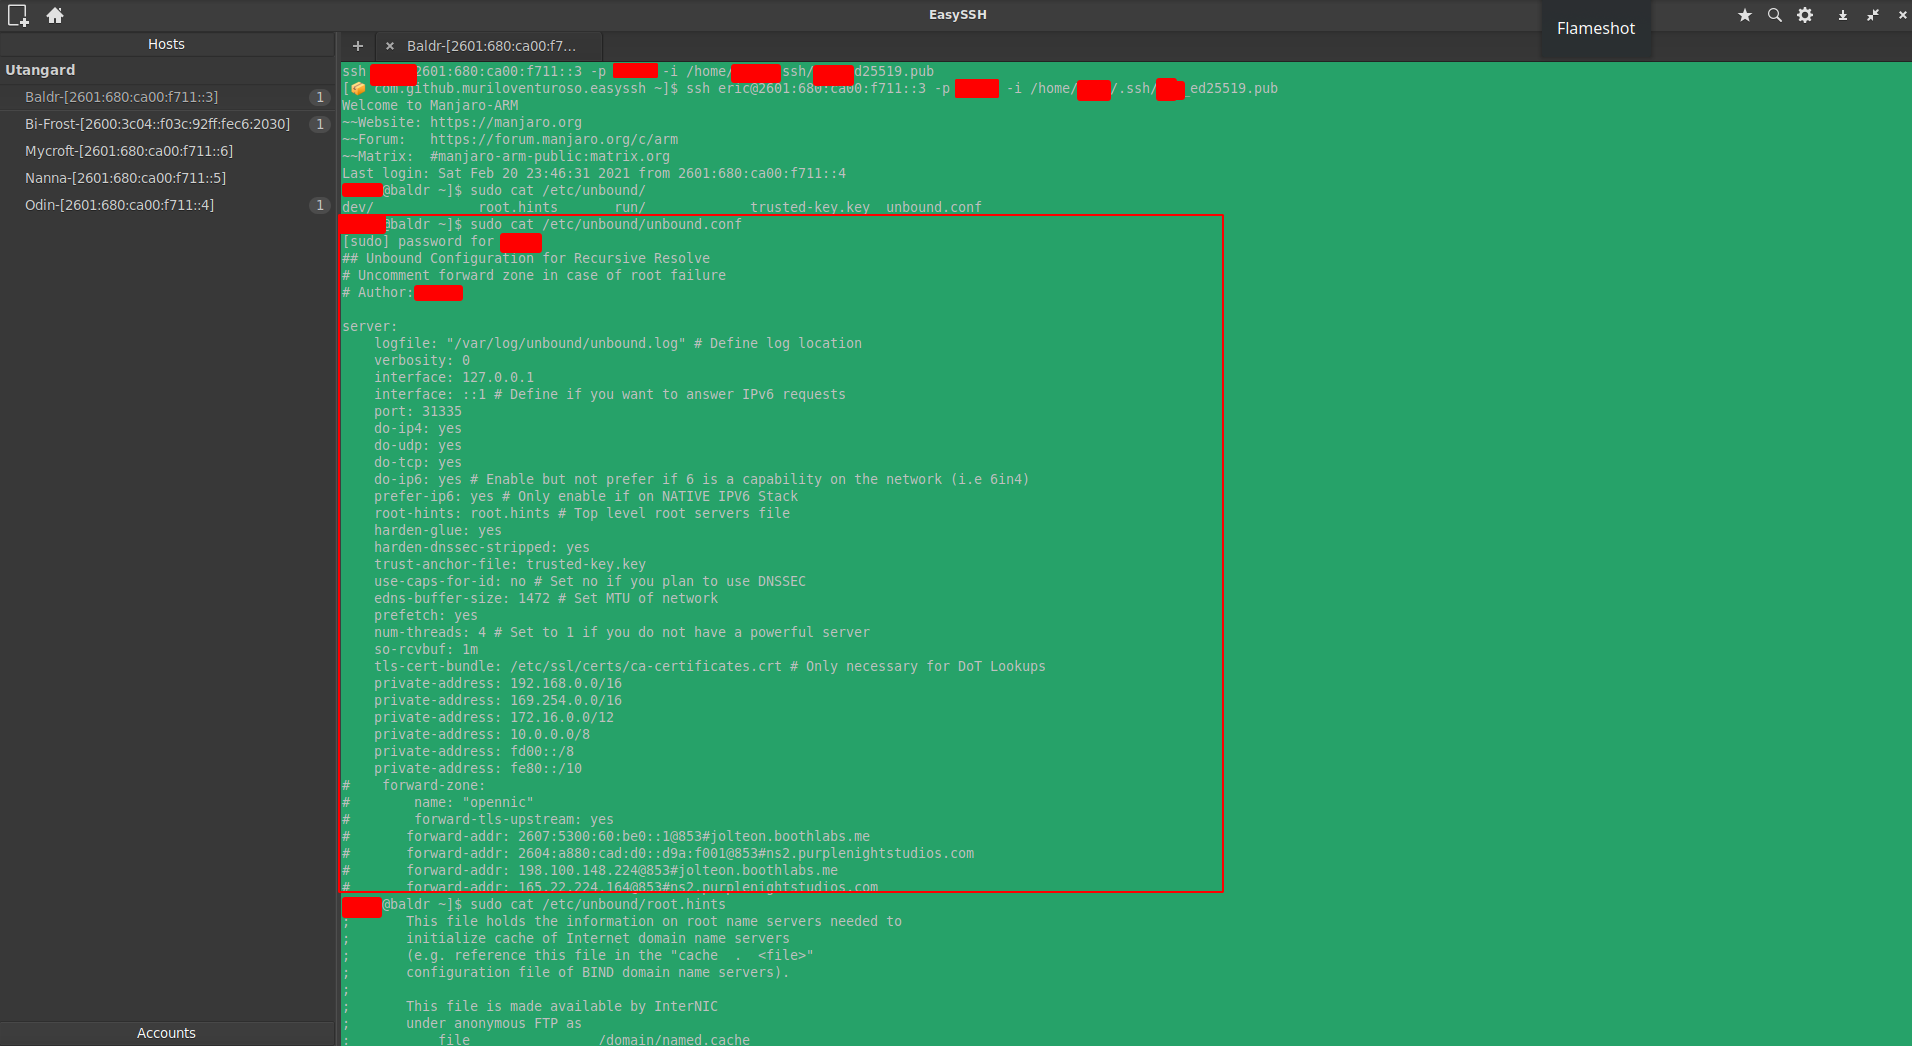
I typically do so via ssh due to my server not being local to my current system. That is my configuration. I will post it below:
Original (see update)
## Unbound Configuration for Recursive Resolve
# Uncomment forward zone in case of root failure
# Author: PhaseLockedLoop

server:
    logfile: "/var/log/unbound/unbound.log" # Define log location
    verbosity: 0
    interface: 127.0.0.1
    interface: ::1 # Define if you want to answer IPv6 requests
    port: 31335 # Define port of your choice
    do-ip4: yes
    do-udp: yes
    do-tcp: yes
    do-ip6: yes # Enable but not prefer if 6 is a capability on the network (i.e 6in4)
    prefer-ip6: yes # Only enable if on NATIVE IPV6 Stack
    root-hints: root.hints # Top level root servers file
    harden-glue: yes
    harden-dnssec-stripped: yes
    trust-anchor-file: trusted-key.key # MUST HAVE FOR DNS SEC
    use-caps-for-id: no # Set no if you plan to use DNSSEC
    edns-buffer-size: 1472 # Set MTU of network
    prefetch: yes
    num-threads: 4 # Set to 1 if you do not have a powerful server
    so-rcvbuf: 1m
    tls-cert-bundle: /etc/ssl/certs/ca-certificates.crt # Only necessary for DoT Lookups
    private-address: 192.168.0.0/16
    private-address: 169.254.0.0/16
    private-address: 172.16.0.0/12
    private-address: 10.0.0.0/8
    private-address: fd00::/8
    private-address: fe80::/10
#    forward-zone:
#        name: "< MY-TLD > DoT"
#        forward-tls-upstream: yes
#	  forward-addr: 2600:3c04::f03c:92ff:fec6:2030@853#<TLD>
#	  forward-addr: 192.53.120.164@853#<TLD>
Resolv Conf
I have added comments for all to know what lines do which somewhat. YMMV. You will want to make sure your /etc/resolv.conf looks like this in order to use unbound as your local resolver (especially if its the same machine as the pihole)
nameserver ::1
nameserver 127.0.0.1
options trust-ad
Notes
Now that this is out of the way some notes:
IPv6 can be resolved as well but only enable it if you have a Native Stack. It can be buggy otherwise. Seeing as IPv6 is my primary stack its also preferred in my resolver. You will notice I even use IPv6 internally and on ssh ![]() . It is the future and I intend to embrace it fully. I never like being behind the times.
. It is the future and I intend to embrace it fully. I never like being behind the times.
There is a forwarding section however that is for later when we want to setup DoT on linux systems and mac. Leave it commented out for recursive setups
Once complete, attempt to start unbound. It should work.
Testing the resolver
To test if DNSSEC is working, after starting unbound.service, do:
$ unbound-host -C /etc/unbound/unbound.conf -v sigok.verteiltesysteme.net
The response should be the ip address with the word (secure) next to it.
$ unbound-host -C /etc/unbound/unbound.conf -v sigfail.verteiltesysteme.net
Here the response should include (BOGUS (security failure)).
Additionally you can use drill to test the resolver as follows:
$ drill sigfail.verteiltesysteme.net
$ drill sigok.verteiltesysteme.net
The first command should give an rcode of SERVFAIL. The second should give an rcode of NOERROR.
Once this is verified functional and your system is resolving through the unbound congratulations you now have a recursive resolver! Now its time to use your already fully setup pi-hole ![]() to utilize it for which it forwards request to instead of someone else’s recursive resolver.
to utilize it for which it forwards request to instead of someone else’s recursive resolver.
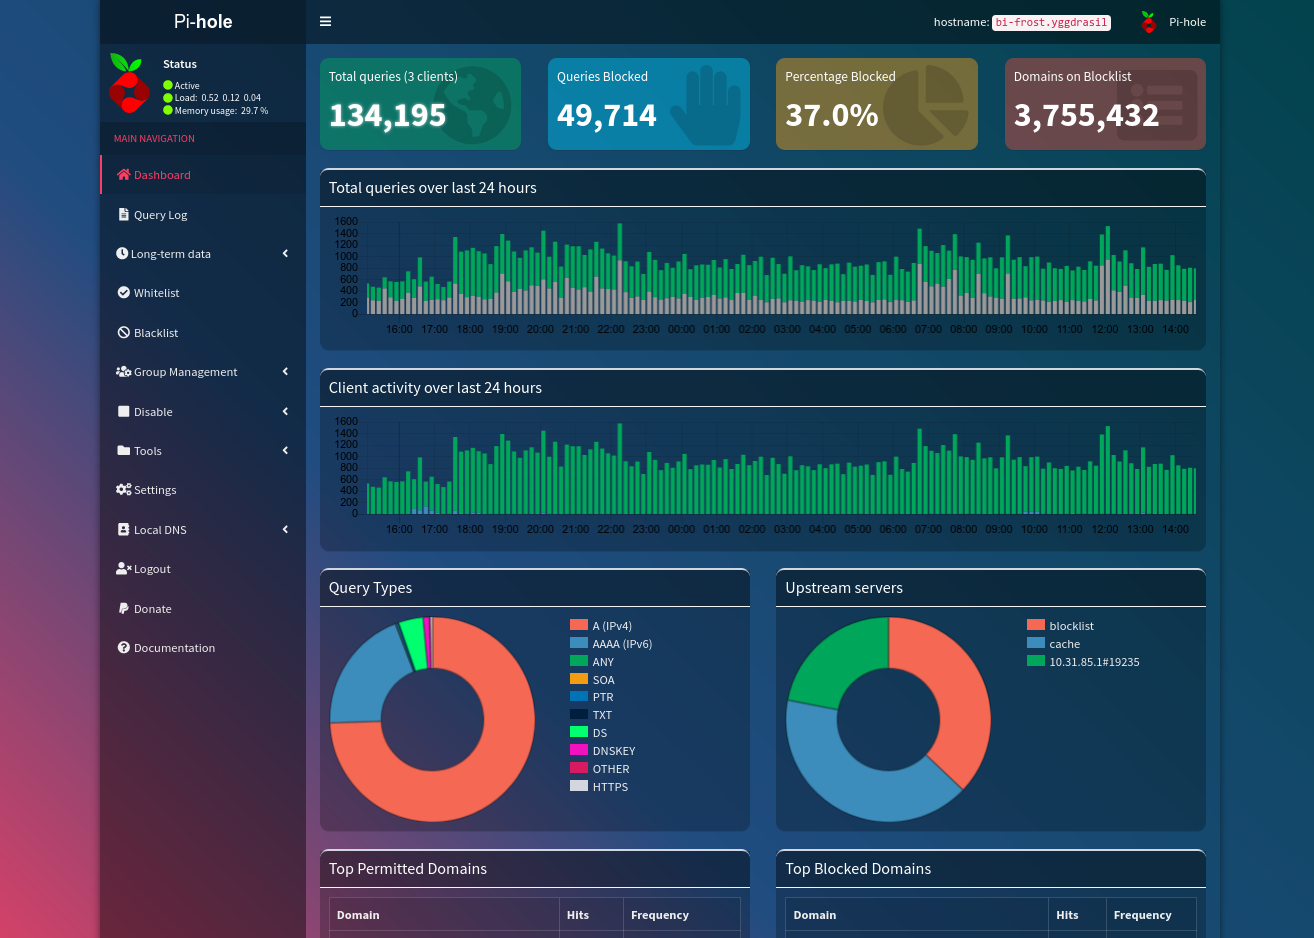
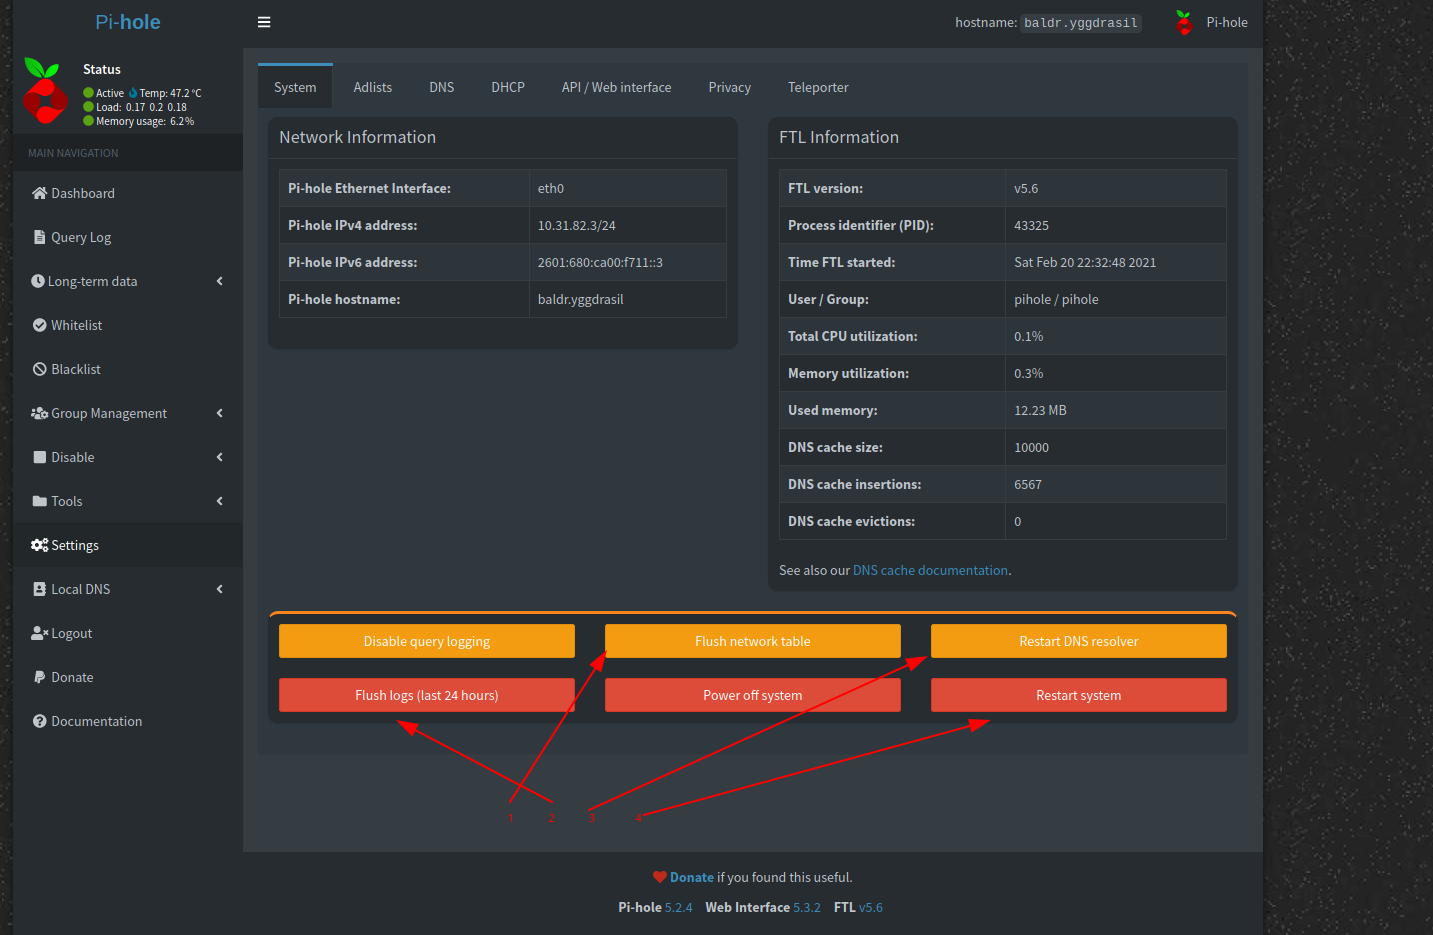
Setting up Pi-Hole:
This guide assumes you already had pi-hole setup as your principle DNS adblocker. Lets go ahead and configure the pi-hole to use our newly configured setup.
First navigate to its page:
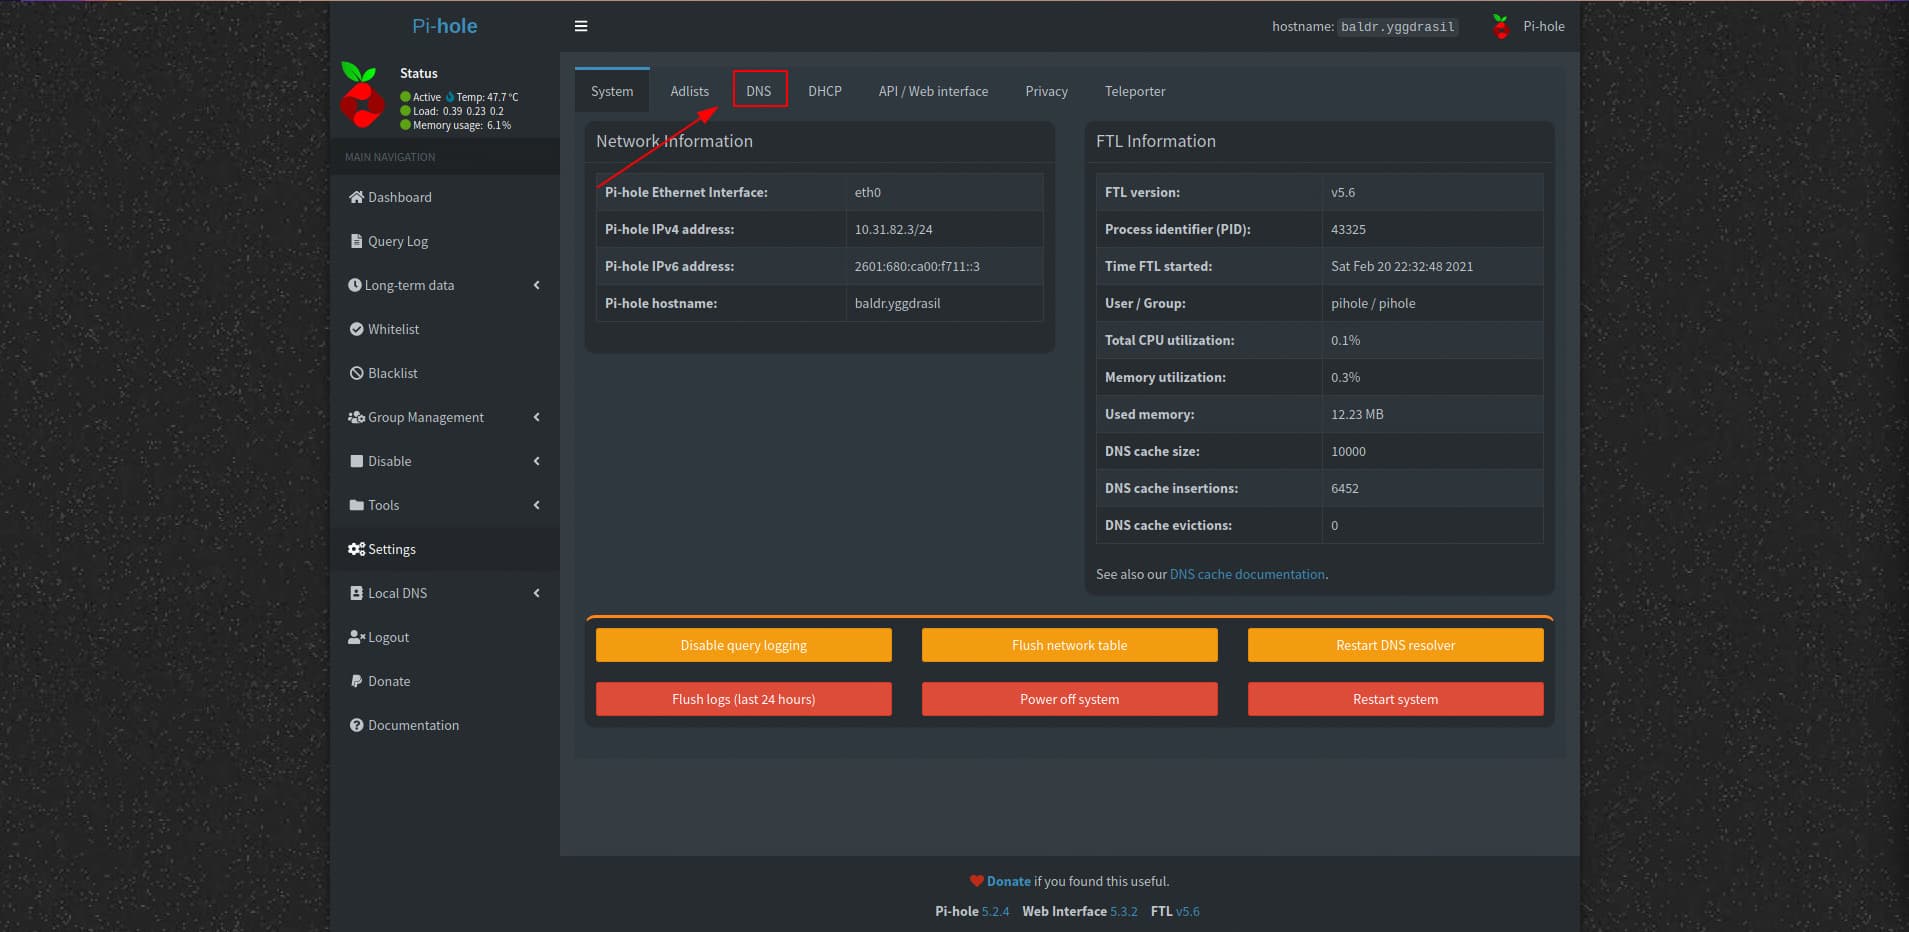
We want to go to settings next
Sure you can use the URL but its protected by a github 2FA proxy ![]()
In settings: Go to the DNS Tab
We want to configure DNS as follows
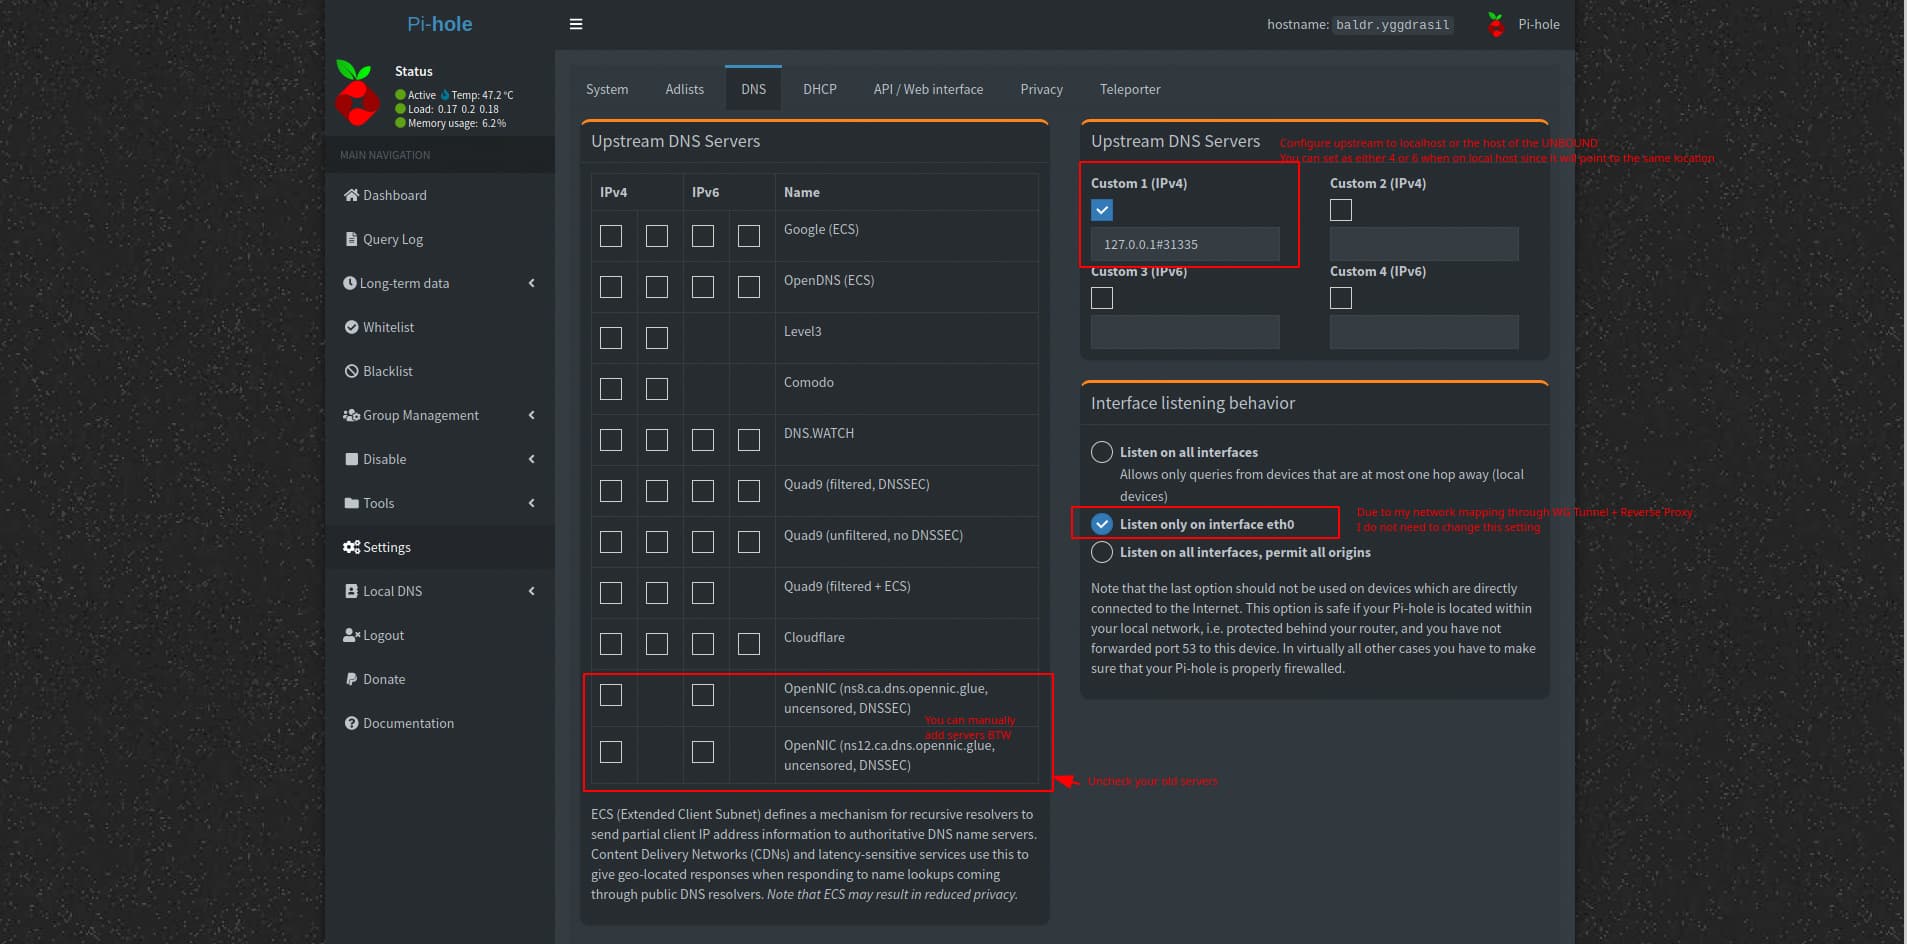
Enable DNSSEC if those are the options you left enabled.

Save this to apply it. The pi-hole will now use your recursive DNS server and cut out the middle man internally. External DoT is the next step so we can do it everywhere.
I did the following. You do not need to:
If you dont want to use your own recursive DNS server but want to change the available DNS servers in the conf… see Infrastructure Series -- Recursive DNS and Adblocking DNS over TLS w/NGINX - #24 by PhaseLockedLoop
Alright now lets setup a DoT NGINX Stream so we can pass DoT to the pi-hole.
NGINX DoT Configuration:
This guide will be performing a setup based on my network site to site configuration: Infrastructure Series -- Wireguard Site to Site Tunnel
Please adapt this guide to however you chose to setup your network, you know your network best, YMMV ![]()
So assuming you already have a website via a NGINX server and you have TLS working, the only thing you really need to do is add a stream configuration to TCP proxy DNS from the DoT 853 port to the 53 port of your pi-hole which is configured to use your recursive server. This is my configuration block. You may place the configuration block anywhere as long as its OUTSIDE the http block. This means it can go into stream.d folder or the main conf outside http.
stream {
    # DNS upstream pool
    upstream dns {
        zone dns 64k;
        server 10.31.82.3:53;
#	server_name dns.TLD;
    }

   # DoT server for decryption
   server {
	listen 853 ssl;
    listen [::]:853 ssl;
#	server_name dns.TLD;
        ssl_certificate <certpath>/fullchain.pem;
        ssl_certificate_key <certpath>/privkey.pem;
        proxy_pass dns;
    }
}
In essence what we are asking NGINX to do is respond on port 853 with our existing URL or TLD’s certificate. We are asking it to then upstream that via a TCP stream (NOT A WEBSOCKET) to the pi-hole server which internally has the following IP above. This will go through my wireguard tunnel and into my home network via routing you can see I setup in my site to site tunnel. Make sure your certificates are set to the fullchain (to avoid the cipher overlap error) and the key is set for wherever the private key is.
The next step is to open up port 853 in the firewall. This is a TCP port not a UDP so it is only necessary to open it up on both IPv6 and IPv4 for TCP 853. Your firewall setups can vary. Please execute this step appropriately for your network.
All you need to do now is restart the NGINX server and if you configured this block properly, you will have a DoT server in which you can externally and globally block all of your ads and have full control of your DNS anywhere and everywhere ![]()
Now lets setup the clients. A good first test client is android BTW. DoT is the method in which android private DNS works on and it will basically tell you if it is working.
Setting up DoT Clients:
Windows
The best resolver by far is stubby. You can acquire it here: http://dnsprivacy.org/dns_privacy_daemon_-_stubby/installation/windows_installer_for_stubby/
Install it and we will configure it via CMD PROMPT
Open an Admin CMD Prompt and cd to the stubby director
cd "\Program Files\Stubby"
Open the configuration YAML in notepad
notepad stubby.yml
The settings will look as follows for me: (set it up for your config YMMV)
resolution_type: GETDNS_RESOLUTION_STUB
dns_transport_list:
GETDNS_TRANSPORT_TLS
tls_authentication: GETDNS_AUTHENTICATION_NONE
tls_query_padding_blocksize: 128
edns_client_subnet_private: 1
idle_timeout: 10000
listen_addresses:
- 127.0.0.1
- 0::1
round_robin_upstreams: 2
upstream_recursive_servers:
- address_data: 192.53.120.164
  tls_auth_name: “< MY-TLD >.net"
- address_data: 2600:3c04::f03c:92ff:fec6:2030
  tls_auth_name: “< MY-TLD >.net"
Save that and run the following command to replace the default DNS server to a local Stubby:
PowerShell -ExecutionPolicy bypass -file “C:\Program Files\Stubby\stubby_setdns_windows.ps1”
Run a stubby.bat file (inside the stubby folder)
stubby.bat
Done and Done this should have have set stubby as the DNS in windows AND started the server.
Linux
Linux is so much easier. Lets just create the unbound as we did before on the local system EXCEPT we make it forward to our DoT server
See that section for configuring. See below for the changed configuration
## Unbound Configuration for Forwarding DOT Resolve
# Author: PhaseLockedLoop

server:
    logfile: "/var/log/unbound/unbound.log" # Define log location
    verbosity: 0
    interface: 127.0.0.1
    interface: ::1 # Define if you want to answer IPv6 requests
    port: 31335 # Define port of your choice
    do-ip4: yes
    do-udp: yes
    do-tcp: yes
    do-ip6: yes # Enable but not prefer if 6 is a capability on the network (i.e 6in4)
    prefer-ip6: yes # Only enable if on NATIVE IPV6 Stack
    root-hints: root.hints # Top level root servers file
    harden-glue: yes
    harden-dnssec-stripped: yes
    trust-anchor-file: trusted-key.key # MUST HAVE FOR DNS SEC
    use-caps-for-id: no # Set no if you plan to use DNSSEC
    edns-buffer-size: 1472 # Set MTU of network
    prefetch: yes
    num-threads: 4 # Set to 1 if you do not have a powerful server
    so-rcvbuf: 1m
    tls-cert-bundle: /etc/ssl/certs/ca-certificates.crt # Only necessary for DoT Lookups
    private-address: 192.168.0.0/16
    private-address: 169.254.0.0/16
    private-address: 172.16.0.0/12
    private-address: 10.0.0.0/8
    private-address: fd00::/8
    private-address: fe80::/10
    forward-zone:
        name: "DoT"
        forward-tls-upstream: yes
	forward-addr: 2600:3c04::f03c:92ff:fec6:2030@853#<TLD>
	forward-addr: 192.53.120.164@853#<TLD>
Start unbound and point your DNS settings in your network manager to it as well as your /etc/resolve.conf (see earlier in the guide)
Done
Mac OSX
Step 1: Install Stubby with Homebrew (http://dnsprivacy.org/dns_privacy_daemon_-_stubby/):
brew install stubby
Step 2: Edit the configuration file:
vim /usr/local/etc/stubby/stubby.yml
Step 3: Remove the default DNSes an replace them with your server: (similar to how you did with windows) (ill post only the upstream block)
upstream_recursive_servers:
- address_data: 192.53.120.164
  tls_auth_name: “<TLD>"
- address_data: 2600:3c04::f03c:92ff:fec6:2030
  tls_auth_name: “<TLD>"
And also verify that Stubby is configured to use DNS over TLS for MAC OSX: (check the section or add it)
dns_transport_list:
    - GETDNS_TRANSPORT_TLS

tls_authentication: GETDNS_AUTHENTICATION_REQUIRED
Step 4: Start the stubby service using the daemon that homebrew executes:
sudo brew services start stubby
Step 5: Replace the current DNS configuration to use 127.0.0.1 using the script provided with stubby
sudo /usr/local/opt/stubby/sbin/stubby-setdns-macos.sh
Step 6: Verify that everything is working as expected (use dig or nslookup): (I like to lookup all the information I can)
dig -t A www.google.com ALL
dig -t AAAA www.google.com ALL
Voila done
Android (Android P and above)
LOL Probably the simplest configuration there is:
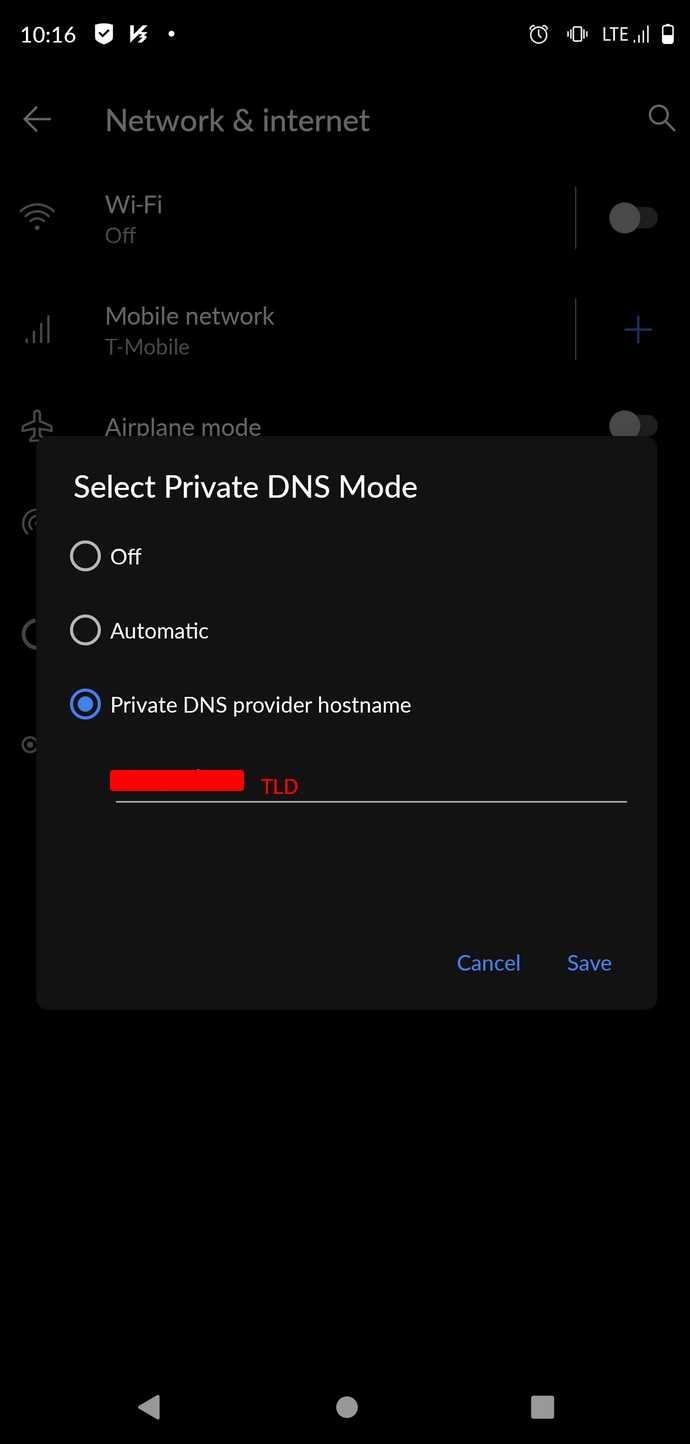
Just set your URL in the private DNS settings location (varies from android to android)
IOS
You cant right now but you can set plain DNS for openNIC if you want ![]()
Guess yall are just (as of 02/21/2021)
")
SEE UPDATE IN UPDATES SECTION
Updates!
CONFIG UPDATE:
Ive added optimizations. Auth Zones for the master. Hardened DNSSEC further. See below
HARDENING UPDATE
Updated Configuration 2021-11-09T07:00:00Z:
## Unbound Configuration for Recursive Resolve


# SERVER BLOCK
server:

    # Initial Configuration and Ports
    logfile: "/var/log/unbound/unbound.log" # Define log location
    verbosity: 5
    interface: 127.0.0.1
    interface: ::1 # Define if you want to answer IPv6 requests
    port: 31335

    # IP4/6 TCP/UDP Configuration
    do-ip4: yes
    do-udp: yes
    do-tcp: yes
    do-ip6: yes # Enable but not prefer if 6 is a capability on the network (i.e 6in4)
    prefer-ip6: yes # Only enable if on NATIVE IPV6 Stack
    so-reuseport: yes
    max-udp-size: 3072
    udp-upstream-without-downstream: yes

    # Root Hints
    root-hints: root.hints # Top level root servers file

    # DNSSEC and HARDEN
    harden-short-bufsize: yes
    harden-large-queries: yes
    harden-glue: yes
    harden-dnssec-stripped: yes
    harden-below-nxdomain: yes
    harden-referral-path: yes
    target-fetch-policy: "-1 -1 -1 -1 -1 -1"
    harden-algo-downgrade: no
    trust-anchor-file: trusted-key.key
    use-caps-for-id: no # Set no if you plan to use DNSSEC
    edns-buffer-size: 1472 # Set MTU of network
    hide-identity: yes
    hide-version: yes
    qname-minimisation: yes
    aggressive-nsec: yes
    unwanted-reply-threshold: 10000
    rrset-roundrobin: yes
    minimal-responses: yes
    module-config: "validator iterator"
    root-key-sentinel: yes
    val-clean-additional: yes
    val-log-level: 2
    trust-anchor-signaling: yes

    # OPTIMIZE
    prefetch: yes
    cache-min-ttl: 0
    serve-expired: yes
    so-reuseport: yes
    msg-cache-slabs: 8
    rrset-cache-slabs: 8
    infra-cache-slabs: 8
    key-cache-slabs: 8
    outgoing-range: 4096
    msg-cache-size: 256m
    rrset-cache-size: 512m
    num-threads: 4
    so-rcvbuf: 8m
    so-sndbuf: 8m
    # Other parameters
    tls-cert-bundle: /etc/ssl/certs/ca-certificates.crt # Only necessary for DoT Lookups
    private-address: 192.168.0.0/16
    private-address: 169.254.0.0/16
    private-address: 172.16.0.0/12
    private-address: 10.0.0.0/8
    private-address: fd00::/8
    private-address: fe80::/10


# REMOTE CONTROL BLOCK
remote-control:
    # Enable Remote Control
    control-enable: yes

    # what interfaces are listened to for remote control.
    control-interface: 127.0.0.1

    # port number for remote control operations.
    control-port: 8953

    # unbound server key file.
    server-key-file: "/etc/unbound/unbound_server.key"

    # unbound server certificate file.
    server-cert-file: "/etc/unbound/unbound_server.pem"

    # unbound-control key file.
    control-key-file: "/etc/unbound/unbound_control.key"

    # unbound-control certificate file.
    control-cert-file: "/etc/unbound/unbound_control.pem"
Apple IOS and MAC OSX USERS Update
ive written a rudimentary way of your installing DoT into your iphone with iOS 13+
Filename < MY-TLD >-ios-dns.mobileconfig
<?xml version="1.0" encoding="UTF-8"?>
<!DOCTYPE plist PUBLIC "-//Apple//DTD PLIST 1.0//EN" "http://www.apple.com/DTDs/PropertyList-1.0.dtd">
<plist version="1.0">
<dict>
	<key>PayloadContent</key>
	<array>
        <dict>
            <key>Name</key>
            <string>XYZ DNS over TLS</string>
            <key>PayloadDescription</key>
            <string>Configures device to use XYZ Encrypted DNS over TLS</string>
            <key>PayloadDisplayName</key>
            <string>XYZ DNS</string>
            <key>PayloadIdentifier</key>
            <string>com.apple.dnsSettings.managed.AFCA1444-5AEB-44CD-B23D-5D1B3ADCD1EE</string>
            <key>PayloadType</key>
            <string>com.apple.dnsSettings.managed</string>
            <key>PayloadUUID</key>
            <string>A6F9CB2D-F00E-4C3A-90EB-E19E5B872C4F</string>
            <key>PayloadVersion</key>
            <integer>1</integer>
            <key>DNSSettings</key>
            <dict>
                <key>DNSProtocol</key>
                <string>TLS</string>
                <key>ServerAddresses</key>
                <array>
                    <string>2600:3c04:0:0:f03c:92ff:fec6:2030</string>
                    <string>192.53.120.164</string>
                </array>
                <key>ServerName</key>
                <string>YOUR TLD</string>
            </dict>
        </dict>
    </array>
	<key>PayloadDescription</key>
	<string>Adds the XYZ DNS to Big Sur and iOS 14 based systems</string>
	<key>PayloadDisplayName</key>
	<string>XYZ DNS over TLS</string>
	<key>PayloadIdentifier</key>
    <string>r.macOSBeta.0BD60CF6-64B5-4D16-BEA4-7294E93BDD4C</string>
	<key>PayloadRemovalDisallowed</key>
	<false/>
	<key>PayloadType</key>
	<string>Configuration</string>
	<key>PayloadUUID</key>
	<string>01DA864C-C3AF-4039-A8D0-A00D982B1569</string>
	<key>PayloadVersion</key>
	<integer>1</integer>
</dict>
</plist>
Basically what you need to do is replace your DNS server’s DoT endpoint into my file…
Install Directions
-
Transfer the file to your phone, you can email it to yourself, use iCloud or any other method you prefer.
-
Open the file on your phone. Once open, you will see a message which says Profile Downloaded.
-
Open Settings and select Profile Downloaded
-
Tap Install in the top-right corner and follow on-screen instructions. The phone will display a warning that the profile is unsigned. thats fine LOL
-
To start using encrypted DNS, in Settings, select VPN & Network. You should see DNS near the bottom. Tap this and from the list select < MY-TLD > DNS. These are the settings from your freshly installed profile.
There’s no guarantee this continues working. It’s at the whim of apple and it’s documentation
@Eden @SgtAwesomesauce bet you could rejigger this mobile config for any DoT endpoint. Say quad9 or your preferred server? Eden you know more about apple. What’s the state of DoT and DoH?
Gravity Lists
The manual output of lists is useless because the functionality is a package deal. You need all of my settings imported not just adlists
[✓] Creating new gravity databases
[✓] Storing downloaded domains in new gravity database
[✓] Building tree
[✓] Swapping databases
[i] Number of gravity domains: 15255050 (6179958 unique domains)
[i] Number of exact blacklisted domains: 30
[i] Number of regex blacklist filters: 54
[i] Number of exact whitelisted domains: 15384
[i] Number of regex whitelist filters: 12
[✓] Flushing DNS cache
[✓] Cleaning up stray matter
[✓] FTL is listening on port 53
[✓] UDP (IPv4)
[✓] TCP (IPv4)
[✓] UDP (IPv6)
[✓] TCP (IPv6)
[✓] Pi-hole blocking is enabled
~ ▓▒░ ░▒▓ ✔ took 7m 38s with eric@bi-frost at 13:02:56
Should your google play store or IOS store stop working. Its possible the google and apple URLs got caught. Consult your query log and proceed to whitelist until functional.
Comments, Questions Concerns?
C’est fini, bonne chance ![]()
Any services discovered in this guide are pursuant to the following Policy: https://services.< MY-TLD >.net/privacyLegal.html
Links to Infrastructure Series and Other Resources
Blog: Phaselockedloopable- PLL’s continued exploration of networking, self-hosting and decoupling from big tech
Series 1: Native Dual Stack IP4+IP6
Infrastructure Series – Native Dual Stack IP4+IP6
Series 2: Wireguard Site to Site Tunnel
Infrastructure Series – Wireguard Site to Site Tunnel
Series 3: Recursive DNS and Adblocking DNS over TLS w/NGINX
Infrastructure Series – Recursive DNS and Adblocking DNS over TLS w/NGINX
Series 4: NGINX Reverse Proxy and Hardening SSL
Infrastructure Series – NGINX Reverse Proxy and Hardening SSL
Series 5: Taking DNS One Step Further - Full DNS Server infrastructure
Infrastructure Series – Taking DNS One Step Further - Full DNS Server infrastructure
Series 6: HTTP(S) Security Headers! You should use them!
Infrastructure Series – HTTP(S) Security Headers! You should use them! [NGINX]
Series 7: Use NGINX to inject CSS themes
Infrastructure Series – Use NGINX to inject CSS themes
ONE KEY TO RULE THEM ALL
Setting up a YubiKey Properly – One Key to rule them ALL!
Series 9: Infrastructure Series: BIND9 Authoritative DNS Guide “Please See Me Edition”
Infrastructure Series: BIND9 Authoritative DNS Guide “Please See Me Edition”
Buy me a crypto-beer
If you found this guide helpful you can donate Monero or Bitcoin to me at the following address in my User Card Profile
