DRAFT of the article for ubuntu passthrough setup from the live stream. Images are missing for right now. Any comments? A video is being edited that goes through the how-to step by step.
Step 1
install ubuntu
step 2
install ukuu
sudo apt-add-repository -y ppa:teejee2008/ppa
sudo apt-get update
sudo apt-get install ukuu
Use ukuu to install the latest kernel. In our case we want Kernel 4.14-rc1 because that is the latest kernel as of the time of this writing and this kernel is known to work on this hardware configuration, even though it is a pre-release kernel. This kernel, or later, is also important for AMD Ryzen or Threadripper users as it contains a number of updates for those platforms.
The update utility will often fail the first time due to the cache folders not being created automatically. Just run it again and it will work the second time.
Notice that as it updates the kernel, it also automatically runs update-grub and update-initramfs and that it complains about missing microcode. It isn’t clear if the microcode is required, but the microcode is non-free. It can be found on the internet, however.
We must also add some kernel parameters and re-run the update commands above, but that can be done later.
step 3 (optional, skip)
find microcode and copy to /var/lib/firmware
step 4 (doing the vfio stuff)
We are ready to setup a virtual machine and pass through real graphics hardware to the virtual machine. To start, we need to make sure the host platform has been configured correctly: That hardware virtualization extensions are enabled, and that the IOMMU groupings are suitable.
First, make sure that vt-d (or SVM on the amd platform) is enabled in the UEFI. This varies from platform to platform but typically Level1 Techs motherboard review cover where these options are and what the IOMMU groupings are for particular motherboards.
Most Linux distros do not enable IOMMU by default. You will need to update your grub bootloader config to support IOMMU. Fortunately, Ubuntu makes it fairly straightforward.
Edit /etc/default/grub and find the line below. Append “iommu=1 intel_iommu=on” to the quoted string. e.g.
GRUB_CMDLINE_LINUX_DEFAULT="iommu=1 intel_iommu=on"
(Or if you are on the AMD platform, amd_iommu=on is more appropriate.)
another perfectly valid command line might be something like:
GRUB_CMDLINE_LINUX_DEFAULT="quiet splash iommu=1 intel_iommu=on"
Reboot the system, the it is a good idea to check to see that IOMMU grouping is working properly. This script will help you:
#!/bin/bash
for d in /sys/kernel/iommu_groups/*/devices/*; do
  n=${d#*/iommu_groups/*}; n=${n%%/*}
  printf 'IOMMU Group %s ' "$n"
  lspci -nns "${d##*/}"
done
This is a shells cript. Paste this into a file such as ls-iommu.sh and then run
chmod +x ./ls-iommu.sh
to mark it as executable. It should be run with
./ls-iommu.sh
You should see output similar to the following:
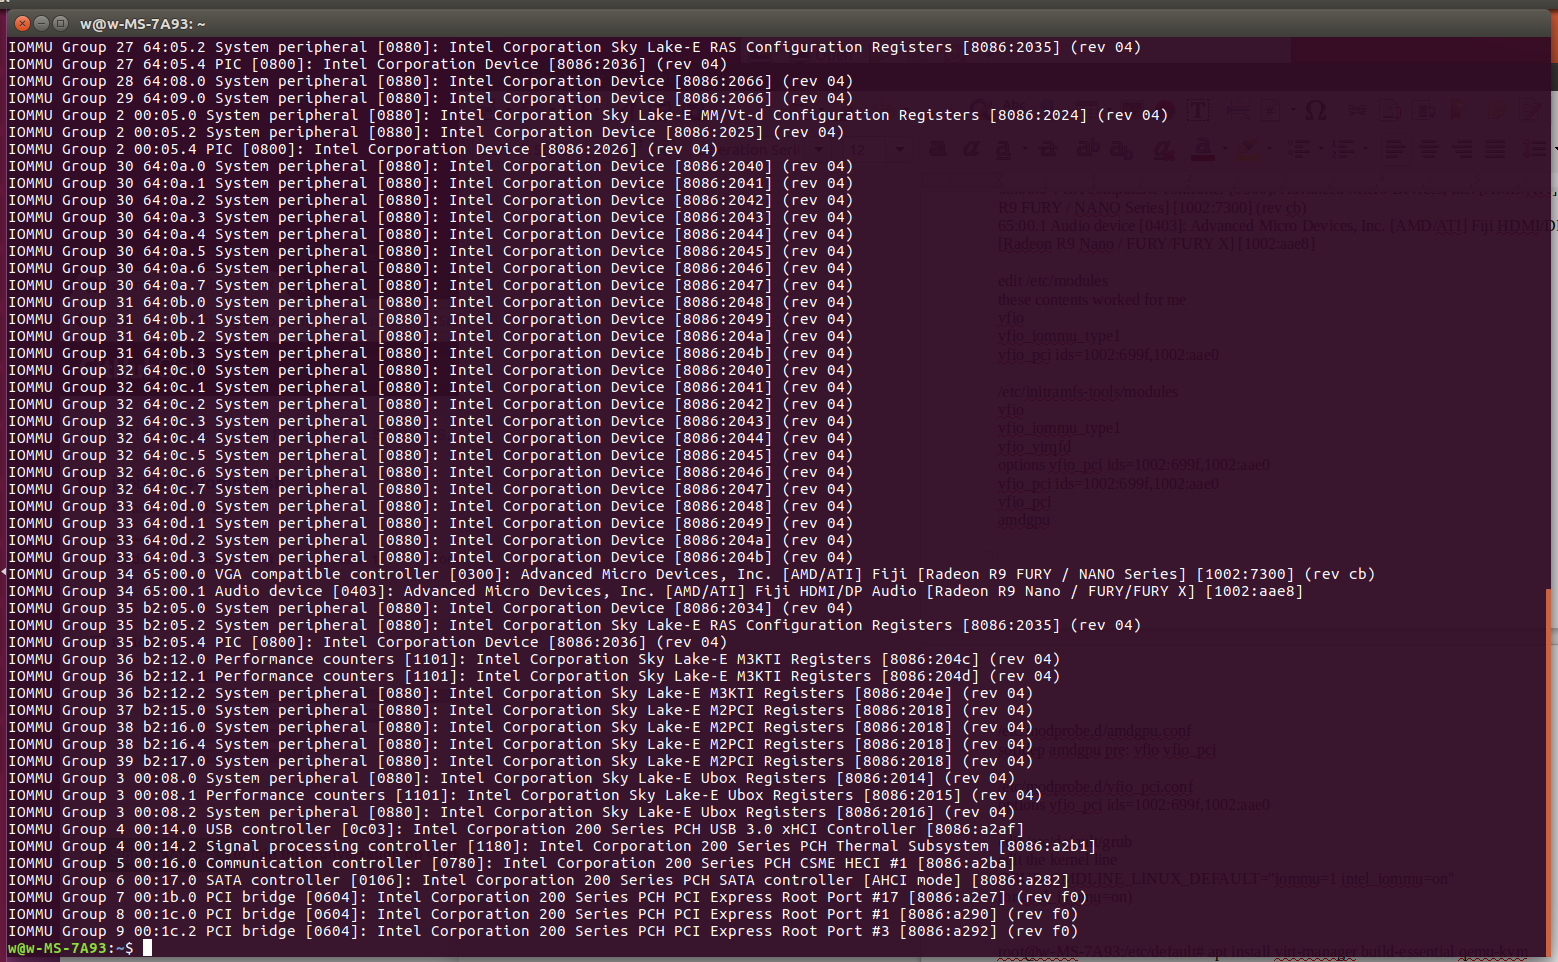
If you do not see any “IOMMU Group X” in the output, it means that IOMMU has not been properly enabled. You can run the dmesg command to look for clues after a fresh bootup.
Notice that our two “VGA compatible controller” entries (our graphics cards) show up as the R9 Fury and the Polaris12. The Polaris12 is our RX550. Each graphics card has an accompanying audio device, and each card’s audio device is in the same IOMMU group as the parent card.
We are ready to setup our devices to be used inside a virtual machine. To do this, we must bind the vfio-pci driver to the device(s) we want to pass through to the virtual machine, and this is most easily done by PCI device ID. Note the PCI device IDs: [1002:699f] and [1002:aae0] from the ls-iommu.sh script. (The device IDs can also be seen with the lspci -nn command).
It is important to understand the boot process on Ubuntu 17.04: The initial ram disk (/boot/initrd*) contains drivers and “other stuff” necessary to bootstrap the system from nothing and mount the root filesystem and continue with the rest of the boot up process. Because graphics drivers tend to load early, and because the amdgpu will want to gab hold of both of our graphics cards, we must carefully ensure that the vfio-pci driver is given the opportunity to load ahead of the amdgpu driver so that it takes priority. This is accomplished by modifying the initial ramdisk as follows:
Modify the
/etc/initramfs-tools/modules
file and add the following lines:
softdep amdgpu pre: vfio vfio_pci

vfio
vfio_iommu_type1
vfio_virqfd
options vfio_pci ids=1002:699f,1002:aae0
vfio_pci ids=1002:699f,1002:aae0
vfio_pci
amdgpu
(substituting 1002:699f and 1002:aae0 for your device IDs, of course). The syntax here is probably imperfect; it should not be necessary to specify an options line and vfio_pci with ids both. The author should clean this up later.
To keep our system consistent, we should also modify the “regular” bootup module options as well.
Add the follwowing contents to the
/etc/modules
file.
vfio
vfio_iommu_type1
vfio_pci ids=1002:699f,1002:aae0
We will also create explicit configurations for the modules in /etc/modprobe.d ; Again, this is likely overkill but we had some difficulty on the live stream.
/etc/modprobe.d/amdgpu.conf

softdep amdgpu pre: vfio vfio_pci
/etc/modprobe.d/vfio_pci.conf

options vfio_pci ids=1002:699f,1002:aae0
Once all that is done, reboot the system and run lspci -nnv |less and search the command output for the device ID that you bound to vfio. You should see something similar to the following:

  Kernel driver in use: vfio-pci
  Kernel modules: amdgpu
This indicate that while the amdgpu driver understands this card, the driver servicing this card is vfio-pci. This is what one wants to see; it should be the same for both the graphics card and the audio driver.
Next we need to install virt-manager and the qemu-kvm:
apt install virt-manager qemu-kvm ovmf
If the reader is at this stage, you have done well. We can now setup our virtual machine, but we need to deal with App Armor, a security package for Ubuntu. App Armor, in a nutshell, prevents programs from doing suspicious things.
Edit the /etc/apparmor.d/abstractions/libvirt-qemu file and find the # for usb access section and modify it thusly:
# for usb access
 /dev/bus/usb/** rw,
 /etc/udev/udev.conf r,
 /sys/bus/ r,
 /sys/class/ r,
 /run/udev/data/* rw,
It is a known issue:
https://bugs.launchpad.net/ubuntu/+source/libvirt/+bug/1708013
Note that if you intend to pass through a “real” block device to QEMU/libvirt, you will also need to open up things a bit more, adding lines such as:
/dev/sda rw,
If, for example, you intend to use /dev/sda as a passthrough block device with your virtual machine. If you are using a qcow2 or image file, you don’t need to do this.
With the file modified, you must restart apparmor with
service apparmor restart
If you find AppArmor is still causing problems, you can remove it entirely (not recommended):
service apparmor stop
service apparmor teardown
update-rc.d -f apparmor remove
apt remove apparmor
How do you know if AppArmor is causing problems? It will give you clues when you run the dmesg command or check the logs located at /var/log
audit: type=1400 audit(1506210770.241:42): apparmor="DENIED" operation="open" profile="libvirt-407d2e4f-3a8e-47ba-abfb-45a333b7fd8f" name="/dev/bus/usb/" pid=2714 comm="qemu-system-x86" requested_mask="r" denied_mask="r" fsuid=64055 ouid=0
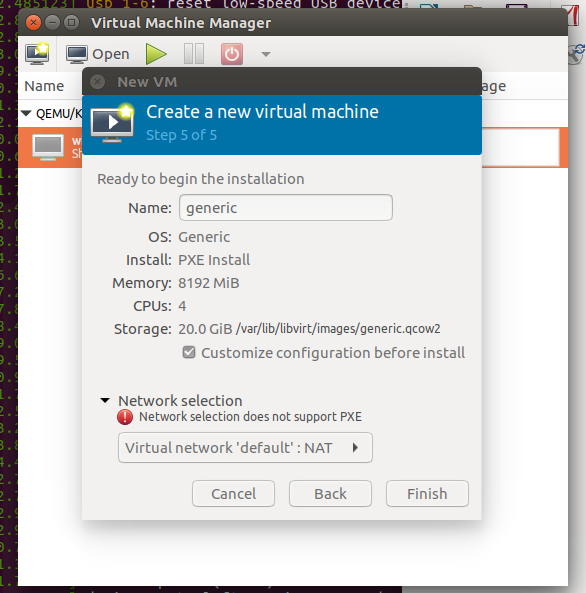
Start Virtual Machine Manager, and create a new VM. Be sure to check “Customize Confiruation” on the last step.
You must change the Firmware from BIOS mode to OVMF, which is a UEFI bios. You must also remove “Video QXL” and “Display Spice” and any other displays from the config. Use “Add Hardware” to add both the graphics card and its companion audio device. The author recommends plugging in a second mouse and keyboard and assigning those USB devices here as well. When the virtual machine is powered on, it will assign those USB devices to the virtual machine.
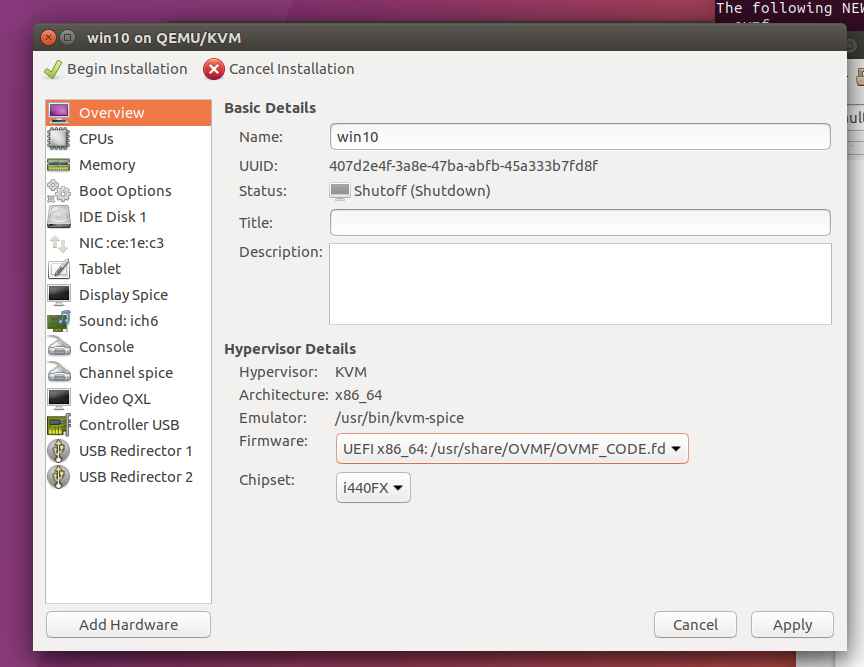
It would also be a good idea to add an operating system installation ISO if one was not specified during the initial setup wizard from the Virtual Machine Manager. This ISO should support UEFI boot mode.
We downloaded the Windows ISO from Microsoft and set it up using this method.
Finally, install drivers for your hardware. Note that some graphics hardware suffers from what is known as a “Reset Bug” – this means that the graphics card can only be initalized one time and the machine must be power cycled to support reinitialization. The Fury cards are known to suffer from this bug.
If you are using an Nvidia card, you are likely to get a cryptic “Code 43” error. The Nvidia drivers do not support running in a virtual machine, but this can be worked around by modifying your virtual machine configuration to hide the fact that a hypervisor is present.
So you need a raw disk? Virsh edit that sucker:
<disk type='block' device='disk'>
  <driver name='qemu' type='raw'/>
  <source dev='/dev/sda '/>
  <target dev='vdb' bus='sata'/>
</disk>
(dont forget to edit your app armor config to, for example, allow r/w access to /dev/sda or /dev/whatever. And that virtio is waaaaaay faster than sata, but you need to install the virtio drivers THEN switch to virtio from sata…)
<disk type='block' device='disk'>
  <driver name='qemu' type='raw' cache='none' io='native'/>
  <source dev='/dev/sda'/>
  <target dev='vda' bus='virtio'/>
  <address type='pci' domain='0x0000' bus='0x00' slot='0x0d' function='0x0'/>
</disk>
Note that Fedora doesn’t care about not having driver/address, or it didn’t care, but ubuntu does care about having address type pci/etc. Probably also need bootable=1?
<boot order='1'/>
Might be needed, depending on the rest of your vm xml config. safe to edit the gui w/this part too.
When you switch from sata to virtio for the boot disk, you have to give it a push sometimes. Add a second virtio disk to be sure the drivers are working properly, THEN switch the primary disk from sata to virtio.
Build 1830 of windows is buggy. You have to ignore the MSRS in KVM.
options kvm ignore_msrs=1
And if nvidia is giving you code 43, you need to set the vendor id and hide kvm:
<hyperv>
  <relaxed state='on'/>
  <vapic state='on'/>
  <spinlocks state='on' retries='8191'/>
  <vendor_id state='on' value='whatever'/>
</hyperv>
<kvm>
  <hidden state='on'/>
</kvm>
inside your config.