Email server

So I did a guide on building an email server before on a Raspberry Pi but all the instructions were in a pdf. I have recently rebuilt my email server on an x86 platform and have redone all the instructions in a suitable format.

The biggest difference in terms of the two platforms was the version of postfix. 2.11.3 for the Raspberry Pi and 3.1.8 for the x86 platform. The only practical issues I ran into around this was that some of the parameters in the postfix main.cf were different. Reading the documentation indicates a big upgrade of postfix around version 2.3

The Pi also used less RAM. Just over 200MB in operation while the x86 platform is just a bit over 300MB.

Their will be another guide in a few weeks or so about adding a Nextcloud server onto the same platform.


Community discussion at: Email Server - Talk Page

13 Likes

Part I - Introduction

This document is a guide to building a personal email and cloud server to hold your emails and files. Why would you do this? To take control of your data. Taking control of your data also means taking responsibility for it.

Requirements

  1. An x86 server (physical or virtual)
  2. A power supply (if physical)
  3. A domain
  4. A static IP address
  5. An internet connection
  6. An ethernet cable (if physical)
  7. A power supply (if physical)
  8. A four port gigabit switch with power supply (if physical)
  9. A USB drive (if physical)
  10. External storage (HDD or NAS)

In this guide I am using a physical device, a Udoo x86 Advance Plus. This is a single board computer rather like a Raspberry Pi but more powerful, running an Intel Celeron N3160

You could use a virtual server either running on your own hardware or in the cloud. However I won’t be covering the setup of those options in this guide.

Objective

The objective is to be able to send, receive, share and store emails and files via an Android smartphone or any internet connected PC anywhere in the world.

The files and emails could be stored on the Udoo x86, on a separate storage device or on a combination of the two.

In this guide I will be storing the emails on the Udoo x86 and the files stored via the cloud servers on a FreeNAS

Assumptions

You possess a separate internet connected computer.

System information

This guide was created using a Udoo x86 as mentioned above. The server operating system is Debian GNU/Linux 9 (stretch). The client PC is running Linux Mint 18.3 Sylvia.

Yes I know Mint is a noob distro. I like the Cinnamon desktop and having all the Ubuntu features, so sue me.

I don’t doubt you could do all this from a Windows PC with PuTTy, WinSCP and some other tools but that is outside the scope of this document.

Command, configurations and examples

Terminal commands will be in bold

Configuration files or scripts will be code blocks

The example domain is

planetexpress.net

The example server host name is

Old-Bessie

The example user created at OS installation is

farnsworth

The example SQL root password is

leela

The example mailuser password is

fry

The example postmaster email password is

bender

The example end user email password is

nibbler

1 Like

Part II - Debian

This section covers the download and installation of Debian.

Download

Browse to https://www.debian.org/distrib/ and download the 64-bit PC netinst iso

This is smallest image so it will fit on any USB key you might have and it saves you from having to edit the sources.list file later to comment out the physical media.

Once downloaded burn it onto your USB key.

Selection_024

Installation

Now insert the drive into your physical server (if you are using a virtual server just mount the iso directly) and turn it on.

You should boot into the installer, select “Graphical install” and follow the wizard.

The only point of note is to not enter a root password. This means that sudo is installed and the user account you create is added to it.

I am not providing blow by blow screen shots as I am sure you have installed an operating system before if you are reading this.

Set a Static IP

Login to your new server and enter the following command

sudo nano /etc/network/interfaces

Amend the file with suitable addresses for your network.

# This file describes the network interfaces available on your system
# and how to activate them. For more information, see interfaces(5).

source /etc/network/interfaces.d/*

# The loopback network interface
auto lo
iface lo inet loopback

# The primary network interface
auto enp2s0
iface enp2s0 inet static
address 192.168.0.3
netmask 255.255.255.0
broadcast 192.168.0.255
gateway 192.168.0.1
dns-nameservers 192.168.0.4 192.168.0.11

In the primary network interface block I changed “allow-hotplug” to “auto” as I was getting the following failures

Selection_001

It seems I am not alone in encountering this issue. But after the change it all seems to work properly.

Now reboot your server with

sudo shutdown -r now

All other configuration will be done via SSH from your PC.

Add an entry to your own PCs hosts file at

/etc/hosts

for your new server.

1 Like

Part III - Initial configuration

Connect via SSH

On your PC open a terminal and enter the following command.

ssh -p 22 farnsworth@Old-Bessie

You should be greeting with a warning about the authenticity of the host. Accept the warning and then enter the password.

We don’t have to use the -p 22 option at this point but we will be changing the port later so I included it here anyway.

You should now be logged in via SSH to your new server.

Update and upgrade

Enter the following commands.

sudo apt-get update

sudo apt-get dist-upgrade

Lets also install a couple of useful pieces of software.

sudo apt-get install htop inxi

htop gives you any easy to read system monitor and inxi gives you a tool to get a nice hardware summary of your system.

Change SSH port

For security it is best to change the default SSH port. This also has the benefit of letting you connect to lots of devices on one external IP if they are all using a different port for SSH.

Enter the following command.

sudo nano /etc/ssh/ssh_config

Uncomment and edit the line containing “Port”. Change the number 22 to something between 49152 and 65535.

For this example I am going with 64000

Close and save the file.

Enter the following command.

sudo nano /etc/ssh/sshd_config

Uncomment and edit the line containing “Port” 64000

Reboot the server with the command.

sudo shutdown -r now

Reconnect to your server with the command.

ssh -p 64000 farnsworth@Old-Bessie

Configure iptables

Enter the following command.

sudo nano /etc/iptables.firewall.rules

Paste in the following text.

*filter

#  Allow all loopback (lo0) traffic and drop all traffic to 127/8 that doesn't use lo0
-A INPUT -i lo -j ACCEPT
-A INPUT -d 127.0.0.0/8 -j REJECT

#  Accept all established inbound connections
-A INPUT -m state --state ESTABLISHED,RELATED -j ACCEPT

#  Allow all outbound traffic - you can modify this to only allow certain traffic
-A OUTPUT -j ACCEPT

# Accept HTTP and HTTPS
-A INPUT -p tcp --dport 80 -j ACCEPT
-A INPUT -p tcp --dport 443 -j ACCEPT

# Allows MariaDB connections
-A INPUT -p tcp --dport 3306 -j ACCEPT

# Allows smtp and smtps access
-A INPUT -p tcp --dport 25 -j ACCEPT
-A INPUT -p tcp --dport 465 -j ACCEPT
-A INPUT -p tcp --dport 587 -j ACCEPT

# Allows imap and imaps connections
-A INPUT -p tcp --dport 143 -j ACCEPT
-A INPUT -p tcp --dport 993 -j ACCEPT

#  Allow SSH connections
#  The -dport number should be the same port number you set in sshd_config
-A INPUT -p tcp -m state --state NEW --dport 64000 -j ACCEPT

COMMIT

Quit and save the file. Activate the rules with the following command

sudo iptables-restore < /etc/iptables.firewall.rules

And check with the following command

sudo iptables -L

Now we have to create a method to reload the rules after a reboot

sudo nano /etc/network/if-pre-up.d/firewall

Paste in the text below.

#!/bin/sh
/sbin/iptables-restore < /etc/iptables.firewall.rules

Quit and save the file.

Enter the following command to make the script executable.

sudo chmod +x /etc/network/if-pre-up.d/firewall

Now reboot server.

sudo shutdown -r now

And reconnect to your server.

ssh -p 64000 farnsworth@Old-Bessie

All of the ports in the rules above will be exposed to the outside world except 80 and 3306. We leave those open so we can check our web server is working from our PC on the LAN and connect to our DB with whatever tools we prefer.

Configure SSH keys

To make SSH access to the server more secure we will setup SSH keys and then disable password login.

On your client PC open a terminal and type.

ssh-keygen -t rsa

You will be prompted to enter a passphrase but you don’t have to. Just hit the return / enter key twice.

The key pair will be placed at

/home/username/.ssh/

which is a hidden directory. The private key is located at

/home/username/.ssh/id_rsa

while the public keys is

/home/username/.ssh/id_rsa.pub

Open the id_rsa.pub file and copy the contents.

Back on your server create a directory and then a file with the following commands.

mkdir /home/farnsworth/.ssh

nano /home/farnsworth/.ssh/authorized_keys

Now paste the contents of id_rsa.pub (which should still be in your clipboard) into authorized_keys

Reboot the server with

sudo shutdown -r now

Now log back into the server with

ssh -p 64000 farnsworth@Old-Bessie

You should be logged in without being prompted for a password.

Now we disable password authetication.

Enter the following command.

sudo nano /etc/ssh/sshd_config

Change the following section.

# Change to no to disable tunnelled clear text passwords
PasswordAuthentication no

Exit and save the file.

Enter the following command.

sudo shutdown -r now

Cut the authorized_keys file out to your desktop and try logging backin again with

ssh -p 64000 farnsworth@Old-Bessie

It should fail. Put the authorized_keys back to its orginal location and try again. You should login with no issue.

We have now installed our operating system, set a static IP, updated, established communications and hardened it.

2 Likes

Part IV - Spamhaus PBL

Now make sure your external IP is not on or removed from the Spamhaus PBL. All residential IPs are on this list.

https://www.spamhaus.org/pbl/removal/

1 Like

Part V - DNS & port forwarding

Before we really get into we need to setup our mx record with our domain registrar and the port forwarding on our router.

Head over to your domain registar and create an MX record for planetexpress.net

It will look like this.

Now login to your router and seup the following port forwarding rules to the internal IP of your mail server.

You can see that these ports match up with the ports set in the iptables except for 80 and 443 which we are leaving out. We will add 443 later. The column headings are as follows.

Name, WAN interface, External IP, Internal IP, Start port, End port, Translation start port, Translation end port, Protocol

1 Like

Part VI - Database installation and configuration

Database install and client connection

First download and install MySQL Workbench onto your PC from your distributions repository.
Now lets install MariaDB. This is a fork of MySQL which was created when Oracle bought MySQL. The popular theory is Oracle bought MySQL to run it into the ground so it would not compete with their own commercial offerings.

Enter the following commands.

sudo apt-get install mariadb-server mariadb-client

After the process completes run the following command.

sudo mysql_secure_installation

Now answer all the questions carefully. I recommend setting a complex root password (unlike the example), removing the anonymous user, removing the test database, allowing root access from the network (so we can use client software as root) and reloading all the privilege tables.

Edit the following file

sudo nano /etc/mysql/mariadb.conf.d/50-server.cnf

and comments out the line containing bind-address as shown below.

# bind-address = 127.0.0.1

Login as root MySQL user and allow connection from the IP of your client workstation.

sudo mysql -u root -p

Enter password: leela

mysql> GRANT ALL PRIVILEGES ON . TO root@‘ipyouwantconnectfrom’ IDENTIFIED BY ‘leela’ WITH GRANT OPTION;

mysql>FLUSH PRIVILEGES;

mysql>exit

service mysql restart

We can now connect from MySQL Workbench. You will get a compatibility warning but at this point it can be ignored.

Mariadb 10.1 is equivalent to MySQL 5.7

Mail database creation and configuration

Now we need to create our database for the mail server, add a user and some tables.

Execute the following statements in a MySQL Workbench query window.

GRANT SELECT,INSERT,UPDATE,DELETE ON mail.* TO 'mailuser'@'localhost' IDENTIFIED BY 'fry';

FLUSH PRIVILEGES;

Select the ‘mail’ database by double clicking on it in the left hand pane and execute the three following commands.

CREATE TABLE `virtual_domains` (
  `id` int(11) NOT NULL auto_increment,
  `name` varchar(50) NOT NULL,
  PRIMARY KEY (`id`)
) ENGINE=InnoDB DEFAULT CHARSET=utf8;
CREATE TABLE `virtual_users` (
  `id` int(11) NOT NULL auto_increment,
  `domain_id` int(11) NOT NULL,
  `password` varchar(106) NOT NULL,
  `email` varchar(100) NOT NULL,
  PRIMARY KEY (`id`),
  UNIQUE KEY `email` (`email`),
  FOREIGN KEY (domain_id) REFERENCES virtual_domains(id) ON DELETE CASCADE
) ENGINE=InnoDB DEFAULT CHARSET=utf8;
CREATE TABLE `virtual_aliases` (
  `id` int(11) NOT NULL auto_increment,
  `domain_id` int(11) NOT NULL,
  `source` varchar(100) NOT NULL,
  `destination` varchar(100) NOT NULL,
  PRIMARY KEY (`id`),
  FOREIGN KEY (domain_id) REFERENCES virtual_domains(id) ON DELETE CASCADE
) ENGINE=InnoDB DEFAULT CHARSET=utf8;

If all the commands execute successfully you should see the new objects.

Selection_027

INSERT INTO `mail`.`virtual_domains`
  (`id` ,`name`)
VALUES
  ('1', 'planetexpress.net')

INSERT INTO `mail`.`virtual_users`
  (`id`, `domain_id`, `password` , `email`)
VALUES
  ('1', '1', ENCRYPT('bender', CONCAT('$6$', SUBSTRING(SHA(RAND()), -16))), '[email protected]')
INSERT INTO `mail`.`virtual_aliases`
  (`id`, `domain_id`, `source`, `destination`)
VALUES
  ('1', '1', '[email protected]', '[email protected]');

Lastly create the actual email address you will be using.

INSERT INTO `mail`.`virtual_users`
  (`id`, `domain_id`, `password` , `email`)
VALUES
  ('2', '1', ENCRYPT('nibbler', CONCAT('$6$', SUBSTRING(SHA(RAND()), -16))), '[email protected]')

In my personal server I have two domains so it ends up looking like this.

The password shown is the encrypted string. Not the actual password.

Selection_026

Now we are almost ready to start installing the mail server software.

1 Like

Part VII - SSL certificates (manual)

A section on automated certificates is present later in the guide but as we don’t have a web server yet we are going to do this manually. Also it is just good practice to understand the process.

First we need a CSR. You can do this on your server with OpenSSL using the command below or any of the many CSR creation pages on the internet.

sudo openssl req -out planetexpress.csr -new -newkey rsa:4096 -nodes -keyout planetexpress.key

Answer all the questions and you will have the two files you need.

Move the key file to the correct location with

sudo mv planetexpress.key /etc/ssl/private/

Get a copy of the csr text with

sudo cat planetexpress.csr

and copy it into a text editor program.

Head over to sslforfree.com and create an account. Once done enter planetexpress.net in the field shown.

Then select “Manual Verification (DNS)”

Selection_007

Then “Manually Verify Domain”

Selection_008

Paste in your CSR into the field at the bottom and then head back to your DNS registrar and put in the txt record as shown in point 2. with a 1 second TTL

Verify this is correct by clicking on the link in point 3. Make sure it returns a valid response as shown.

Now you can click “Download SSL Certificate”. If all goes well you will see the screen below appear.

Click “Download all SSL certificate files”.

You will download a zip with the following files.

Selection_012

Make a new text file called “planetexpress.pem” and paste in the text from “certificate.crt” first then paste in the text from “ca_bundle.crt” directly under it.

Save the file and then double click on it.

It should look like this.

Selection_013

Copy this file to your server at /etc/ssl/certs/

You should now have the following files on your server ready to be used by our mail server software.

/etc/ssl/certs/planetexpress.pem

/etc/ssl/private/planetexpress.key

1 Like

Part VIII - Mail server installation and configuration

Install software

Debain comes with exim4 as its default MTA which we want to remove before proceeding.

Enter the following commands.

sudo apt-get remove exim4 exim4-base exim4-config exim4-daemon-light

sudo apt-get purge exim4 exim4-base exim4-config exim4-daemon-light

sudo apt-get autoremove

And now we can install the new software.

sudo apt-get install postfix postfix-mysql dovecot-core dovecot-imapd dovecot-pop3d dovecot-lmtpd dovecot-mysql postgrey opendkim opendkim-tools spamassassin smapc

Select “Internet host” and enter your domain when prompted. In this case it would be planetexpress.net

Configure Postfix

Most of the configuration of postfix is done in the main.cf and master.cf files which live in /etc/postfix

First create a backup directory and make a copy of the orginal files

sudo mkdir /etc/postfix/backup

sudo cp /etc/postfix/main.cf /etc/postfix/backup/main.cf

sudo cp /etc/postfix/master.cf /etc/postfix/backup/master.cf

Editing main.cf

Now edit the main.cf file with

sudo nano /etc/postfix/main.cf

and edit the following areas of the file.

smtpd_banner = planetexpress.net.in-addr.arpa ESMTP $mail_name (Debian/GNU)

# TLS parameters
smtpd_tls_cert_file=/etc/ssl/certs/planetexpress.pem
smtpd_tls_key_file=/etc/ssl/private/planetexpress.key
smtp_tls_CAfile=/etc/ssl/certs/ca-certificates.crt
smtpd_tls_session_cache_database = btree:${data_directory}/smtpd_scache
smtp_tls_session_cache_database = btree:${data_directory}/smtp_scache
mydestination = $myhostname, Old-Bessie.planetexpress.net, localhost.planetexpress.net, localhost

And then add the entire block below at the bottom of the file.

With the “TLS encryption” section you can change “may” to “encrypt” which means if someone sends you an email in an unencrypted transmission it will be refused. According to the postfix documentation you are not supposed to do this for internet facing servers. My mobile phone providers billing emails (lazy bastards) as an example are blocked for this very reason, hence I am using “may”.

# TLS encryption
smtpd_tls_security_level = may
smtp_tls_security_level = may
smtp_tls_mandatory_ciphers = high
smtpd_tls_loglevel = 1

# Enabling SMTP for authenticated users, and handing off authentication to Dovecot
smtpd_sasl_type = dovecot
smtpd_sasl_path = private/auth

smtpd_recipient_restrictions =
   permit_mynetworks,
   permit_sasl_authenticated, 
   reject_unauth_destination,
   reject_non_fqdn_sender,
   reject_non_fqdn_recipient,
   reject_unknown_sender_domain,
   reject_unknown_recipient_domain,
   reject_unauth_pipelining,
   reject_invalid_hostname,
   reject_non_fqdn_hostname,
   reject_rbl_client zen.spamhaus.org,
 #check_policy_service inet:127.0.0.1:10023,
 #check_policy_service unix:private/policy-spf,
 #check_sender_access hash:/etc/postfix/blacklist,
   permit

#Handing off local delivery to Dovecot's LMTP, and telling it where to store mail
virtual_transport = lmtp:unix:private/dovecot-lmtp

#Virtual domains, users and aliases
virtual_mailbox_domains = mysql:/etc/postfix/mysql-virtual-mailbox-domains.cf
virtual_mailbox_maps = mysql:/etc/postfix/mysql-virtual-mailbox-maps.cf
virtual_alias_maps = mysql:/etc/postfix/mysql-virtual-alias-maps.cf
      mysql:/etc/postfix/mysql-virtual-email2email.cf

#The following settings are used by DKIM
#milter_protocol = 2
#milter_default_action = accept

#smtpd_milters = inet:localhost:12301
#non_smtpd_milters = inet:localhost:12301

Some of these lines we will come back to later and uncomment once we configure other components.

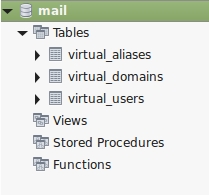
Now we are going to create the four files listed under the “Virtual domains, users and aliases” section.

Enter the following command.

sudo nano /etc/postfix/mysql-virtual-mailbox-domains.cf

Enter the following text.

user = mailuser
password =  fry
hosts = 127.0.0.1
dbname = mail
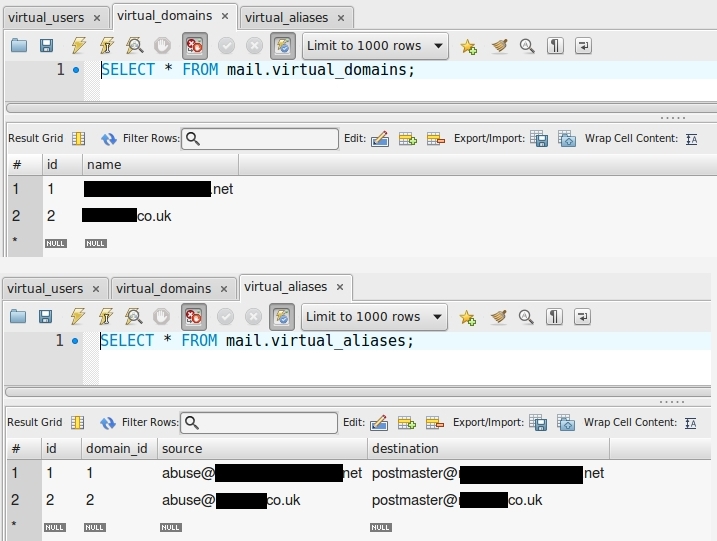
query = SELECT 1 FROM virtual_domains WHERE name='%s'

Exit and save the file.

Enter the following command.

sudo nano /etc/postfix/mysql-virtual-mailbox-maps.cf

Enter the following text.

user = mailuser
password = fry
hosts = 127.0.0.1
dbname = mail
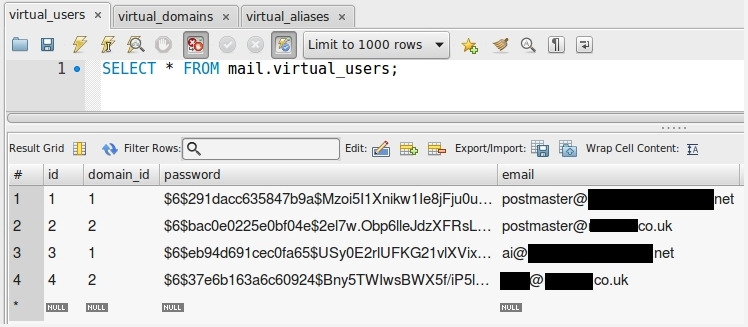
query = SELECT 1 FROM virtual_users WHERE email='%s'

Exit and save the file.

Enter the following command.

sudo nano /etc/postfix/mysql-virtual-alias-maps.cf

Enter the following text.

user = mailuser
password = fry
hosts = 127.0.0.1
dbname = mail
query = SELECT destination FROM virtual_aliases WHERE source='%s'

Exit and save the file.

Enter the following command.

sudo nano /etc/postfix/mysql-virtual-email2email.cf

Enter the following text.

user = mailuser
password = fry
hosts = 127.0.0.1
dbname = mail
query = SELECT email FROM virtual_users WHERE email='%s'

Exit and save the file.

Enter the following command.

service postfix restart

You should get no errors which means postfix is (probably) happy with the configuration file.

Editing master.cf

Edit the master.cf file with the following command.

sudo nano /etc/postfix/master.cf

Uncomment the following section as shown. Make sure you uncomment the top line! This is something I have missed in the past and felt like a total dumbass. The rest of the file can be left as is.

submission inet n       -       -       -       -       smtpd
  -o syslog_name=postfix/submission
  -o smtpd_tls_security_level=encrypt
  -o smtpd_sasl_auth_enable=yes
  -o smtpd_reject_unlisted_recipient=no
# -o smtpd_client_restrictions=$mua_client_restrictions
# -o smtpd_helo_restrictions=$mua_helo_restrictions
# -o smtpd_sender_restrictions=$mua_sender_restrictions
  -o smtpd_recipient_restrictions=
  -o smtpd_relay_restrictions=permit_sasl_authenticated,reject
  -o milter_macro_daemon_name=ORIGINATING
smtps     inet  n       -       -       -       -       smtpd
  -o syslog_name=postfix/smtps
  -o smtpd_tls_wrappermode=yes
  -o smtpd_sasl_auth_enable=yes
  -o smtpd_reject_unlisted_recipient=no
# -o smtpd_client_restrictions=$mua_client_restrictions
# -o smtpd_helo_restrictions=$mua_helo_restrictions
# -o smtpd_sender_restrictions=$mua_sender_restrictions
  -o smtpd_recipient_restrictions=
  -o smtpd_relay_restrictions=permit_sasl_authenticated,reject
  -o milter_macro_daemon_name=ORIGINATING

Exit and save the file.

sudo service postfix restart

If postfix fails to start the first place to look is in the following log files.

/var/log/mail.log

/var/log/syslog

/var/log/mail.info

/var/log/mail.warn

/var/log/mail.err

Configure Dovecot

Enter the following commands to backup the configuration files.

sudo mkdir /etc/dovecot/backup

sudo cp /etc/dovecot/dovecot.conf /etc/dovecot/backup

sudo cp /etc/dovecot/dovecot-sql.conf.ext /etc/dovecot/backup

sudo mkdir /etc/dovecot/conf.d/backup

sudo cp /etc/dovecot/conf.d/10-mail.conf /etc/dovecot/conf.d/backup

sudo cp /etc/dovecot/conf.d/10-auth.conf /etc/dovecot/conf.d/backup

sudo cp /etc/dovecot/conf.d/10-master.conf /etc/dovecot/conf.d/backup

sudo cp /etc/dovecot/conf.d/10-ssl.conf /etc/dovecot/conf.d/backup

Editing dovecot.conf

Enter the following command.

sudo nano /etc/dovecot/dovecot.conf

Edit the text block shown to include the third line.

# Enable installed protocols
!include_try /usr/share/dovecot/protocols.d/*.protocol
protocols = imap pop3 lmtp

Exit and save the file.

Enter the following command.

sudo nano /etc/dovecot/dovecot-sql.conf.ext

In this file there are four sections that need to be changed. In each example an additional section is left in to help you find what you are looking for.

# Database driver: mysql, pgsql, sqlite
driver = mysql

# Examples:
#   connect = host=192.168.1.1 dbname=users
#   connect = host=sql.example.com dbname=virtual user=virtual password=blarg
#   connect = /etc/dovecot/authdb.sqlite
#
connect = host=127.0.0.1 dbname=mail user=mailuser password=fry

# Default password scheme.
#
# List of supported schemes is in
# http://wiki2.dovecot.org/Authentication/PasswordSchemes
#
default_pass_scheme = SHA512-CRYPT

# Example:
#   password_query = SELECT userid AS user, pw AS password \
#     FROM users WHERE userid = '%u' AND active = 'Y'
#
password_query = SELECT email as user, password FROM virtual_users WHERE email='%u';

Exit and save the file.

Enter the following command.

sudo nano /etc/dovecot/conf.d/auth-sql.conf.ext

Change the userdb section as shown.

userdb {
  driver = static
  args = uid=vmail gid=vmail home=/var/mail/vhosts/%d/%n

Exit and save the file.

Enter the following command.

sudo nano /etc/dovecot/conf.d/10-mail.conf

In this file there are two sections that need to be changed. In each example an additional section is left in to help you find what you are looking for.

# See doc/wiki/Variables.txt for full list. Some examples:
#
    mail_location = maildir:~/var/mail/vhosts/%d/%n
#   mail_location = mbox:~/mail:INBOX=/var/mail/%u
#   mail_location = mbox:/var/mail/%d/%1n/%n:INDEX=/var/indexes/%d/%1n/%n

# Group to enable temporarily for privileged operations. Currently this is
# used only with INBOX when either its initial creation or dotlocking fails.
# Typically this is set to "mail" to give access to /var/mail.
mail_privileged_group = mail

The rest of the file can be left as is. Exit and save the file.

Enter the following command.

sudo ls -ld /var/mail

You should be returned the following output.

drwxrwsr-x 2 root mail 4096 Month Date Time /var/mail

Create the vmail user with the following commands.

groupadd -g 5000 vmail

useradd -g vmail -u 5000 vmail -d /var/mail

Make the vmail user the owner of the /var/mail folder

chown -R vmail:vmail /var/mail

Enter the following command again

ls -ld /var/mail

You should be returned the following output.

drwxrwsr-x 3 vmail vmail 4096 Month Date Time /var/mail

The vmail user is the account in charge of reading email from the server. Users emails will be stored in sub-folders within /var/mail/vhosts

Enter the following command.

sudo nano /etc/dovecot/conf.d/10-auth.conf

In this file there are three sections that need to be changed. In each example an additional section is left in to help you find what you are looking for.

# Disable LOGIN command and all other plaintext authentications unless
# SSL/TLS is used (LOGINDISABLED capability). Note that if the remote IP
# matches the local IP (ie. you're connecting from the same computer), the
# connection is considered secure and plaintext authentication is allowed.
# See also ssl=required setting.
disable_plaintext_auth = yes


# Space separated list of wanted authentication mechanisms:
#   plain login digest-md5 cram-md5 ntlm rpa apop anonymous gssapi otp skey
#   gss-spnego
# NOTE: See also disable_plaintext_auth setting.
auth_mechanisms = plain login


#!include auth-system.conf.ext
!include auth-sql.conf.ext
#!include auth-ldap.conf.ext
#!include auth-passwdfile.conf.ext
#!include auth-checkpassword.conf.ext
#!include auth-vpopmail.conf.ext
#!include auth-static.conf.ext

The rest of the file can be left as is. Exit and save the file.

Enter the following command.

sudo nano /etc/dovecot/conf.d/10-master.conf

In this file there are six sections that need to be changed and one that needs to be added (the third block below). In each example an additional section is left in to help you find what you are looking for.

service imap-login {
  inet_listener imap {
    #port = 143
  }
  inet_listener imaps {
    port = 993
    ssl = yes
  }


service pop3-login {
  inet_listener pop3 {
    #port = 110
  }
  inet_listener pop3s {
    port = 995
    ssl = yes
  }
}


service lmtp {
  unix_listener /var/spool/postfix/private/dovecot-lmtp {
    mode = 0600
    user = postfix
    group = postfix
  }


  unix_listener /var/spool/postfix/private/auth  {
    mode = 0666
    user = postfix
    group = postfix
  }

unix_listener auth-userdb {
    mode = 0600
    user = vmail
    #group =
  }


# Auth process is run as this user.
user = dovecot


service auth-worker {
  # Auth worker process is run as root by default, so that it can access
  # /etc/shadow. If this isn't necessary, the user should be changed to
  # $default_internal_user.
  user = vmail
}

Don’t miss the last curly bracket!.

The rest of the file can be left as is. Exit and save the file.

Enter the following command.

sudo nano /etc/dovecot/conf.d/10-ssl.conf

In this file there is two sections that need to be changed. In each example it is the highlighted section that needs to be changed. The additional section is left in to help you find what you are looking for.

# SSL/TLS support: yes, no, required. <doc/wiki/SSL.txt>
ssl = required

# PEM encoded X.509 SSL/TLS certificate and private key. They're opened before
# dropping root privileges, so keep the key file unreadable by anyone but
# root. Included doc/mkcert.sh can be used to easily generate self-signed
# certificate, just make sure to update the domains in dovecot-openssl.cnf
ssl_cert = </etc/ssl/certs/planetexpress.pem
ssl_key = </etc/ssl/private/planetexpress.key

The rest of the file can be left as is. Exit and save the file and restart dovecot.

sudo service dovecot restart

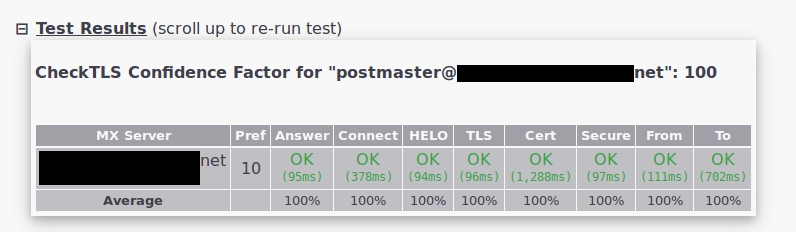
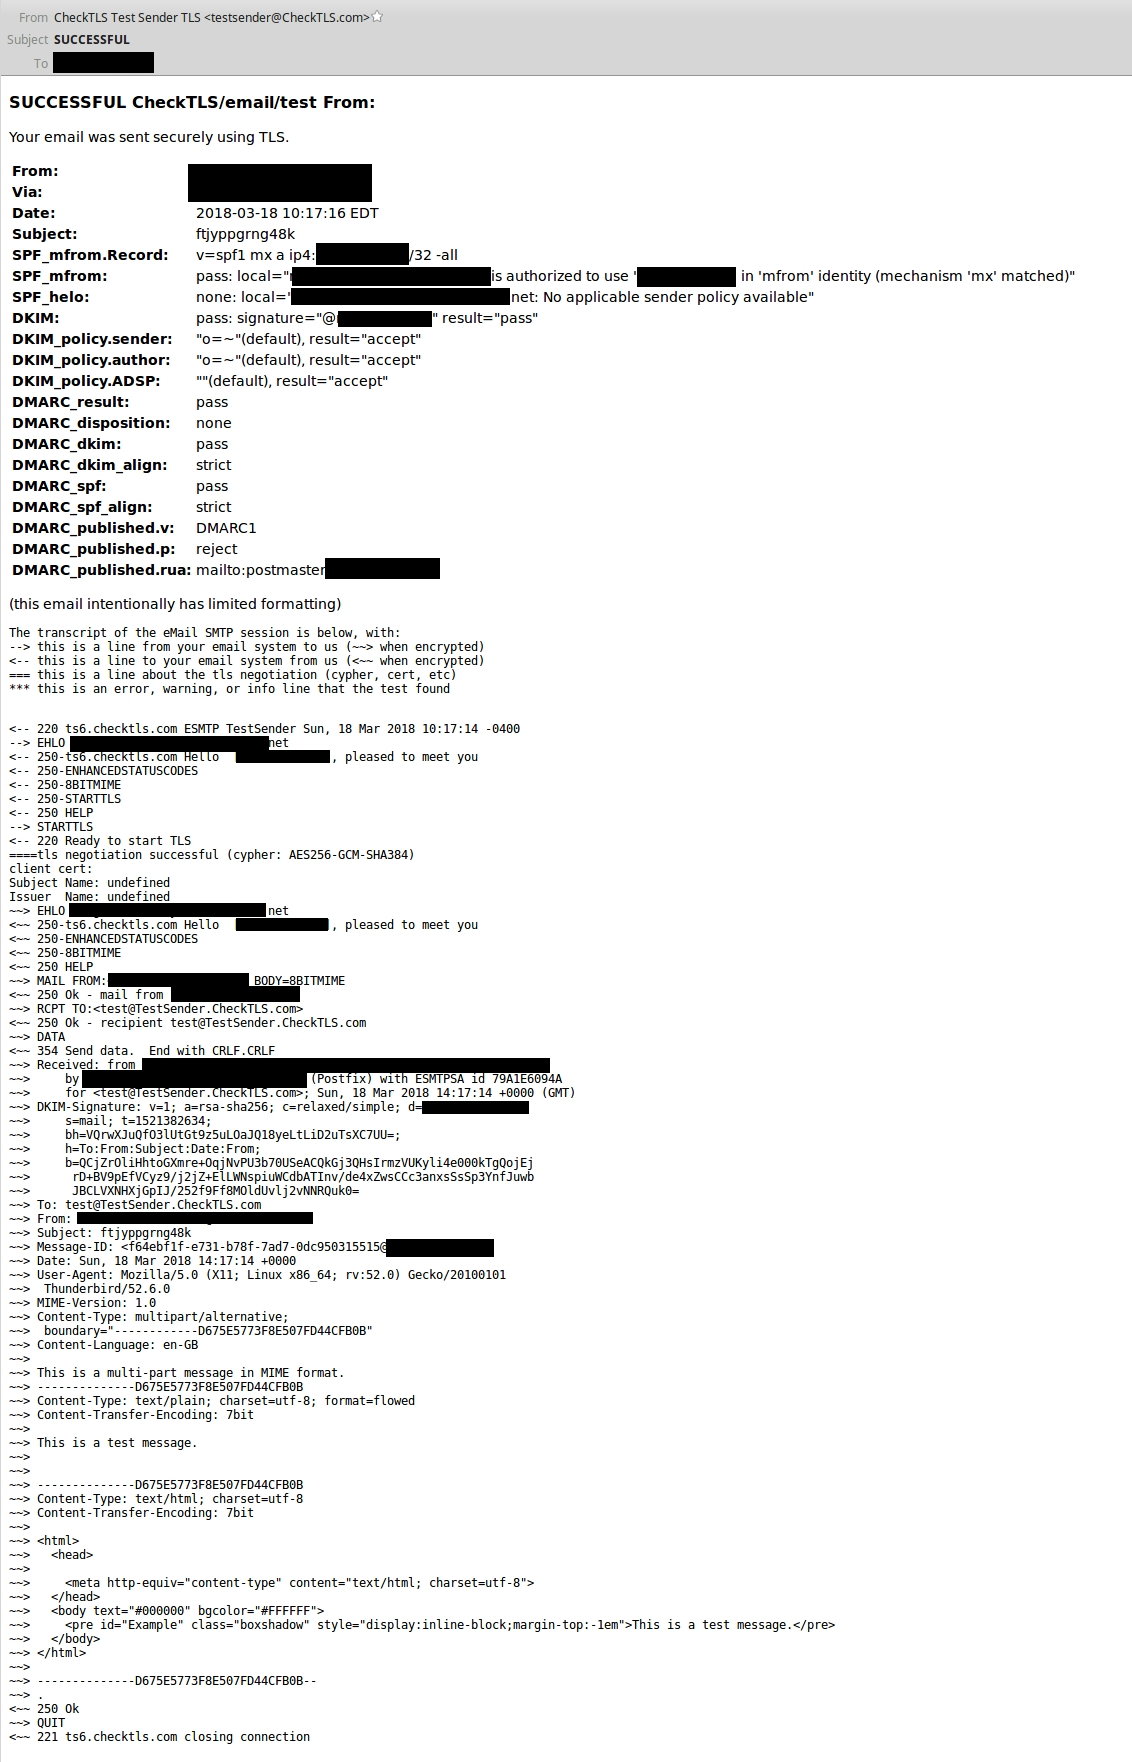
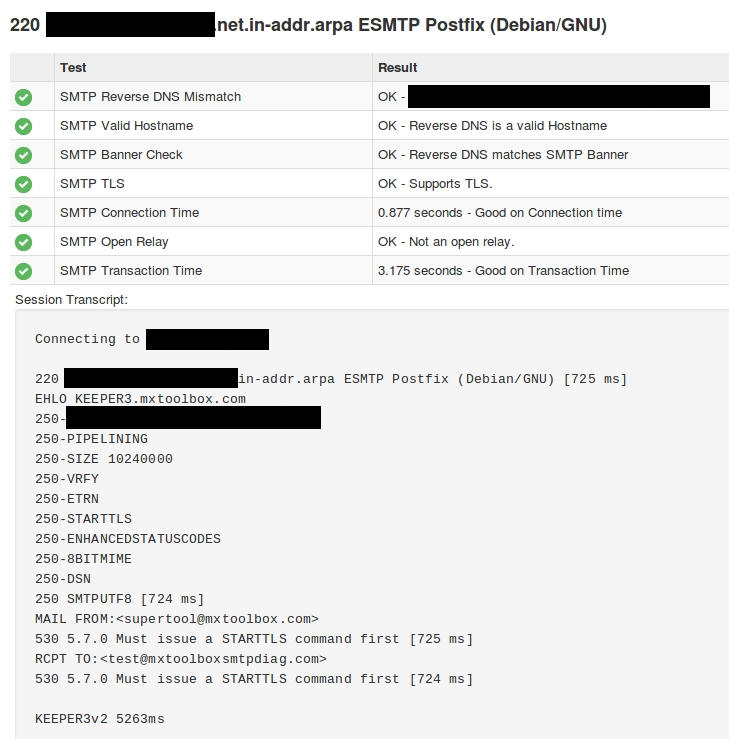
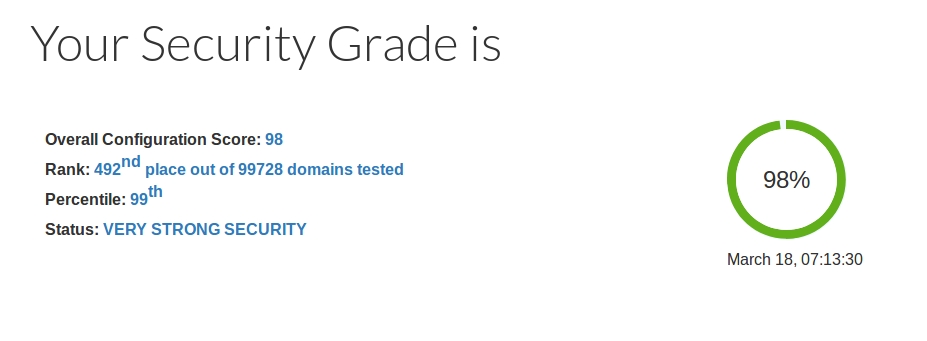
Now at this point we should have a functioning email server. You can try sending and receiving some test emails.

The following commands will output your alterations to the default configurations.

sudo postconf -n

sudo dovecot -n

But we still have much to do…

Part IX - DKIM, SPF & DMARC

DKIM

Domain Keys Identified Mail (DKIM) is needed otherwise you will find messages you send to other people come with alarming warnings saying the sender could not be verified.

DKIM enables a person or organisation to associate a domain name with an email message. This, in effect, serves as a method of claiming responsibility for a message.

Enter the following command.

sudo nano /etc/opendkim.conf

Make the changes as shown at the top of the file.

# This is a basic configuration that can easily be adapted to suit a standard
# installation. For more advanced options, see opendkim.conf(5) and/or
# /usr/share/doc/opendkim/examples/opendkim.conf.sample.

# Log to syslog
Syslog                  yes
# Required to use local socket with MTAs that access the socket as a non-
# privileged user (e.g. Postfix)
UMask                   002

At the bottom of the file remove this one line.

UserID opendkim

And now add in the this entire text block at the bottom of the file.

AutoRestart             Yes
AutoRestartRate         10/1h
SyslogSuccess           Yes
LogWhy                  Yes

Canonicalization        relaxed/simple

ExternalIgnoreList      refile:/etc/opendkim/TrustedHosts
InternalHosts           refile:/etc/opendkim/TrustedHosts
KeyTable                refile:/etc/opendkim/KeyTable
SigningTable            refile:/etc/opendkim/SigningTable

Mode                    sv
PidFile                 /var/run/opendkim/opendkim.pid
SignatureAlgorithm      rsa-sha256

UserID                  opendkim:opendkim

Socket                  inet:12301@localhost

Exit and save the file.

Enter the following command.

sudo nano /etc/default/opendkim

Uncomment the last line shown.

# Command-line options specified here will override the contents of
# /etc/opendkim.conf. See opendkim(8) for a complete list of options.
#DAEMON_OPTS=""
#
# Uncomment to specify an alternate socket
# Note that setting this will override any Socket value in opendkim.conf
#SOCKET="local:/var/run/opendkim/opendkim.sock" # default
#SOCKET="inet:54321" # listen on all interfaces on port 54321
#SOCKET="inet:12345@localhost" # listen on loopback on port 12345
#SOCKET="inet:[email protected]" # listen on 192.0.2.1 on port 12345
SOCKET="inet:12301@localhost"

Exit and save the file.

Enter the following commands.

sudo mkdir /etc/opendkim

sudo mkdir /etc/opendkim/keys

sudo nano /etc/opendkim/TrustedHosts

Enter the following text.

127.0.0.1
localhost
192.168.0.1/24

*.planetexpress.net

Exit and save the file.

Enter the following command.

sudo nano /etc/opendkim/KeyTable

Add the following text.

mail._domainkey.planetexpress.net planetexpress.net:mail:/etc/opendkim/keys/planetexpress/mail.private

Exit and save the file.

Enter the following command.

sudo nano /etc/opendkim/SigningTable

Add the following

*@planetexpress.net mail._domainkey.planetexpress.net

Exit and save the file.

Move to the keys directory.

cd /etc/opendkim/keys

Enter the following commands.

sudo mkdir planetexpress.net

cd planetexpress.net

opendkim-genkey -b 4096 -s mail -d planetexpress.net

sudo chown opendkim:opendkim mail.private

sudo la -la

You should see the following two files

mail.private mail.txt

and the permissions for them should look like this

-rw------- 1 opendkim opendkim  888 Mar 11 00:09 mail.private
-rw-r--r-- 1 root     root      319 Mar 11 00:08 mail.txt

If the mail.private file does not have the permissions as shown then

su -s /bin/bash opendkim

chmod 600 mail.private

exit

Now output the contents of mail.txt

cat mail.txt

And copy it into a text editor.

Go to your domain registrars DNS configuration page.

Create a TXT record with the name shown and add the portion of text from the copied file between the two brackets.

![Selection_014](file://media/705496706.jpeg)

You can check if this worked (you may have to wait for DNS propagation) at

Now edit the main.cf file with

sudo nano /etc/postfix/main.cf

And uncomment the last four lines so it looks like this.

#The following settings are used by DKIM
milter_protocol = 2
milter_default_action = accept

smtpd_milters = inet:localhost:12301
non_smtpd_milters = inet:localhost:12301

Then restart DKIM with

sudo service opendkim restart

if you send a few more test messages and look inside the mail.log with

sudo tail -f /vat/log/mail.log

you should see the following

opendkim[7193]: A80166007D: DKIM-Signature field added (s=mail, d=planetexpress.net)

SPF

SPF (Sender Policy Framework) is a DNS text entry which shows a list of servers that should be considered allowed to send mail for a specific domain.

This is simple. Go to your domain registrar DNS control panel and add the following TXT record.

Name = planetexpress.net

Value = “v=spf1 mx a ip4:123.456.789.012 ~all”

This entry can be more complex. You can experiment with record creation at http://www.spfwizard.net/

On the server side install the following

sudo apt-get install postfix-policyd-spf-python

Add the following to the end of the master.cf file to enable the SPF policy service.

sudo nano /etc/postfix/master.cf

policy-spf  unix  -       n       n       -       -       spawn
     user=nobody argv=/usr/bin/policyd-spf

Save and exit the file.

Now edit the main.cf file with

nano /etc/postfix/main.cf

and uncomment the following line check_policy_service unix:private/policy-spf, as shown

smtpd_recipient_restrictions =
   permit_mynetworks,
   permit_sasl_authenticated, 
   reject_unauth_destination,
   reject_non_fqdn_sender,
   reject_non_fqdn_recipient,
   reject_unknown_sender_domain,
   reject_unknown_recipient_domain,
   reject_unauth_pipelining,
   reject_invalid_hostname,
   reject_non_fqdn_hostname,
   reject_rbl_client zen.spamhaus.org,
 #check_policy_service inet:127.0.0.1:10023,
  check_policy_service unix:private/policy-spf,
 #check_sender_access hash:/etc/postfix/blacklist,
   permit

Exit and save the file then restart postfix.

sudo service postfix restart

DMARC

DMARC stands for “Domain-based Message Authentication, Reporting & Conformance”, is an email authentication, policy, and reporting protocol. It builds on DKIM & SPF.

This is simple. Go to your domain registrar DNS control panel and add the following TXT record.

Record name = _dmarc.planetexpress.net

Value = “v=DMARC1; p=reject; rua=mailto:[email protected]”

You can experiment with record creation at http://www.kitterman.com/dmarc/assistant.html

You can test your newly created records at https://mxtoolbox.com/SuperTool.aspx

1 Like

Part X - Postgrey

Time for some anti-spam control.

Enter the following command.

sudo nano /etc/default/postgrey

Change the --delay= value to whatever you like or leave it alone. I like 60 seconds personally.

# postgrey startup options, created for Debian

# you may want to set
#   --delay=N   how long to greylist, seconds (default: 300)
#   --max-age=N delete old entries after N days (default: 35)
# see also the postgrey(8) manpage

POSTGREY_OPTS="--inet=:10023 --delay=60" 

# the --greylist-text commandline argument can not be easily passed through
# POSTGREY_OPTS when it contains spaces.  So, insert your text here:
#POSTGREY_TEXT="Your customized rejection message here"

Exit and save the file. This reduces email delay to 60 seconds.

The delay is critical to the functioning of postgrey.

When an email arrives at your server, postgrey says “Please come back later”. Any kosher email server will say “Fine, I will do that”.

When the email is resent after a the specified delay it is accepted.

Once an email is accepted that sender is recorded by postgrey so their will be no delay in future.

Spammers email servers don’t bother (on the whole) to retry emails that are not delivered right away so they get binned.

Enter the following command.

sudo nano /etc/postfix/main.cf

And uncomment the line check_policy_service inet:127.0.0.1:10023, as shown.

smtpd_recipient_restrictions =
   permit_mynetworks,
   permit_sasl_authenticated, 
   reject_unauth_destination,
   reject_non_fqdn_sender,
   reject_non_fqdn_recipient,
   reject_unknown_sender_domain,
   reject_unknown_recipient_domain,
   reject_unauth_pipelining,
   reject_invalid_hostname,
   reject_non_fqdn_hostname,
   reject_rbl_client zen.spamhaus.org,
   check_policy_service inet:127.0.0.1:10023,
   check_policy_service unix:private/policy-spf,
 # check_sender_access hash:/etc/postfix/blacklist,
   permit

Then restart postfix.

sudo service postfix restart

If you have a look in the log with

sudo cat /var/log/mail.log | grep postgrey

You should see entries like this once a mail server has resent the email for the third time

postgrey[424]: action=pass, reason=triplet found

1 Like

Part XI - Spamassassin

Assign the Spamassassin process to a non-privileged user

sudo groupadd -g 5555 spamd

sudo useradd -u 5555 -g spamd -s /sbin/nologin -d /usr/local/spamassassin spamd

sudo mkdir -p /usr/local/spamassassin/log

sudo chown spamd:spamd -R /usr/local/spamassassin

Now turn the process on

sudo nano /etc/default/spamassassin

And set the option “ENABLED=0” to “ENABLED=1”.

Now edit the Spamassassin conf file

sudo nano /etc/spamassassin/local.cf

Then uncomment and change the following valuesas needed.

#   Add *****SPAM***** to the Subject header of spam e-mails
#
  rewrite_header Subject *****SPAM*****
#   Save spam messages as a message/rfc822 MIME attachment instead of
#   modifying the original message (0: off, 2: use text/plain instead)
#
  report_safe 0
#   Set the threshold at which a message is considered spam (default: 5.0)
#
   required_score 3.0
#   Use Bayesian classifier (default: 1)
#
  use_bayes 1

#   Bayesian classifier auto-learning (default: 1)
#
  bayes_auto_learn 1

Now edit the postfix master.cf file again.

sudo nano /etc/postfix/master.cf

Change the following line

smtp inet n - y - - smtpd

to

smtp inet n - y - - smtpd -o content_filter=spamassassin

Finally add the following text block to the end of the file.

spamassassin unix - n n - - pipe
  user=spamd argv=/usr/bin/spamc -f -e /usr/sbin/sendmail -oi -f ${sender} ${recipient}

Close as save the file. Now restart the services.

sudo service spamassassin restart

sudo service postfix restart

And finally make sure the service starts at boot.

sudo systemctl enable spamassassin

Junk folder redirection

This section will automatically move spam marked as junk to the junk folder rather than it ending up in your inbox.

Check that the following software is installed.

sudo apt-get install dovecot-sieve

Enter the following command.

sudo nano /etc/dovecot/conf.d/15-mailboxes.conf

Make sure that the junk folder is uncommented. You should not have to make changes here if I recall correctly.

  mailbox Junk {
    special_use = \Junk
  }

Now edit the file 90-sieve.conf

sudo nano /etc/dovecot/conf.d/90-sieve.conf

and comment out the following line.

# sieve = ~/.dovecot.sieve

Exit and save the file.

Enter the following command.

sudo nano /etc/dovecot/conf.d/90-plugin.conf

Add the following to the bottom of the file.

plugin {
    sieve = /etc/dovecot/sieve/default.sieve
}

Exit and save the file.

Enter the command.

sudo nano /etc/dovecot/conf.d/15-lda.conf

Add the word “sieve” to the end of the text block as shown or add the enter text block if it is not present.

protocol lda {
  # Space separated list of plugins to load (default is global mail_plugins).
  mail_plugins = $mail_plugins sieve
}

Exit and save the file.

Enter the command.

sudo nano /etc/dovecot/conf.d/20-lmtp.conf

Add the word “sieve” to the end of the text block as shown or add the enter text block if it is not present.

protocol lmtp {
  # Space separated list of plugins to load (default is global mail_plugins).
  mail_plugins = $mail_plugins sieve
}

Exit and save the file. Now execute the following commands.

sudo mkdir /etc/dovecot/sieve/

sudo nano /etc/dovecot/sieve/default.sieve

Paste in the following text.

require "fileinto";
if header :contains "X-Spam-Flag" "YES" {
    fileinto "Junk";
}

Exit and save the file. Run the following commands.

sudo chown vmail:vmail /etc/dovecot/sieve/ -R

sudo service postfix restart; service dovecot restart; service spamassassin restart

Now send a test mail to your email address on the server from a different email account with the subject

XJSC4JDBQADN1.NSBN32IDNENGTUBE-STANDARD-ANTI-UBE-TEST-EMAILC.34X

It should go into the Junk folder with Thunderbird closed.

The /var/log/mail.log file should confirm.

dovecot: lmtp([email protected]): HBEtNNhtrlrvBwAAgKOcAQ: sieve: msgid=CAKnfiF+JVQz3hGo99ce=ruQ-BOokP5j0647SRZeRbARnc_oQ=w@mail.gmail.com: stored mail into mailbox 'Junk’

Updates

Create a script to keep spamassassin upto date.

Enter the following commands.

sudo su

nano /root/spamassassin-update

Paste the following text into the file.

#!/bin/bash
PATH=/usr/local/sbin:/usr/local/bin:/usr/sbin:/usr/bin:/sbin:/bin
sa-update
sa-compile
service spamassassin restart

Exit and save the file.

Enter the following commands

chmod+x /root/spamassassin-update

crontab -e

Enter the following to the bottom of the file.

0 23 * * * sh /root/spamassassin-update

Exit and save the file.

Test the script with

sh /root/spamassassin-update

1 Like

Part XII - Blacklist

Postgrey does not have a blacklist function but postfix does. So for any messages that make it past postgrey and spamassassin you have a third final line of defence.

One such spam email came from “[email protected]”.

Enter the following command

sudo cd /etc/postfix

sudo nano blacklist

Add the spam address to the file “blacklist”.

[email protected] REJECT

Quit and save the file.

Enter the following command.

sudo nano main.cf

Uncomment check_sender_access hash:/etc/postfix/blacklist,

smtpd_recipient_restrictions =
   permit_mynetworks,
   permit_sasl_authenticated, 
   reject_unauth_destination,
   reject_non_fqdn_sender,
   reject_non_fqdn_recipient,
   reject_unknown_sender_domain,
   reject_unknown_recipient_domain,
   reject_unauth_pipelining,
   reject_invalid_hostname,
   reject_non_fqdn_hostname,
   reject_rbl_client zen.spamhaus.org,
   check_policy_service inet:127.0.0.1:10023,
   check_policy_service unix:private/policy-spf,
   check_sender_access hash:/etc/postfix/blacklist,
   permit

Exit and save the file. Then reload the blacklist.db and restart postfix.

sudo postmap hash:blacklist && service postfix restart

That’s it.

Every time you add a new address to the blacklist file remember to run the following command inside the /etc/postfix directory.

sudo postmap hash:blacklist && service postfix restart

1 Like

Part XIII - Testing

I found the following websites very helpful for testing and overall confidence of the solution.

At the end of all your labour you should have a secure and reliable email server.

https://www.checktls.com

https://mxtoolbox.com/diagnostic.aspx

http://www.emailsecuritygrader.com

1 Like

Part XIV - Summary

Below is a list of the relevant packages and their versions that were used in thie guide.

||  Name                          Version                        Architecture Description
ii  postfix                       3.1.8-0+deb9u1                 amd64        High-performance mail transport agent
ii  postfix-mysql                 3.1.8-0+deb9u1                 amd64        MySQL map support for Postfix
ii  postfix-policyd-spf-python    2.0.1-1                        all          Postfix policy server for SPF checking
ii  postfix-sqlite                3.1.8-0+deb9u1                 amd64        SQLite map support for Postfix
ii  dovecot-core                  1:2.2.27-3+deb9u2              amd64        secure POP3/IMAP server - core files
ii  dovecot-imapd                 1:2.2.27-3+deb9u2              amd64        secure POP3/IMAP server - IMAP daemon
ii  dovecot-lmtpd                 1:2.2.27-3+deb9u2              amd64        secure POP3/IMAP server - LMTP server
ii  dovecot-mysql                 1:2.2.27-3+deb9u2              amd64        secure POP3/IMAP server - MySQL support
ii  dovecot-pop3d                 1:2.2.27-3+deb9u2              amd64        secure POP3/IMAP server - POP3 daemon
ii  dovecot-sieve                 1:2.2.27-3+deb9u2              amd64        secure POP3/IMAP server - Sieve filters support
ii  libmariadbclient18:amd64      10.1.26-0+deb9u1               amd64        MariaDB database client library
ii  mariadb-client                10.1.26-0+deb9u1               all          MariaDB database client (metapackage depending on the latest version)
ii  mariadb-client-10.1           10.1.26-0+deb9u1               amd64        MariaDB database client binaries
ii  mariadb-client-core-10.1      10.1.26-0+deb9u1               amd64        MariaDB database core client binaries
ii  mariadb-common                10.1.26-0+deb9u1               all          MariaDB common metapackage
ii  mariadb-server                10.1.26-0+deb9u1               all          MariaDB database server (metapackage depending on the latest version)
ii  mariadb-server-10.1           10.1.26-0+deb9u1               amd64        MariaDB database server binaries
ii  mariadb-server-core-10.1      10.1.26-0+deb9u1               amd64        MariaDB database core server files
ii  libopendkim11                 2.11.0~alpha-10+deb9u1         amd64        Library for signing and verifying DomainKeys Identified Mail signatures
ii  opendkim                      2.11.0~alpha-10+deb9u1         amd64        Milter implementation of DomainKeys Identified Mail
ii  opendkim-tools                2.11.0~alpha-10+deb9u1         amd64        Set of command line tools for OpenDKIM
ii  postgrey                      1.36-3                         all          greylisting implementation for Postfix
ii  spamassassin                  3.4.1-6+deb9u1                 all          Perl-based spam filter using text analysis
ii  spamc                         3.4.1-6+deb9u1                 amd64        Client for SpamAssassin spam filtering daemon

I will welcome constructive criticism. I am sure I have done lots of stuff that could be improved.

3 Likes

Thanks for the hard work. I’ll use this someday.
PS; Planetexpress is for sale.