Outcome
We want a robust and reliable home server that makes it as easy as possible to run whatever services are relevant to us (NextCloud, Plex or Emby, Syncthing, VSCode server, whatever!) but that is also easy to manage and update.
It should ideally consume less than 50 watts of electricity nominally and maybe as little as 10-15 watts when idle, but awake. It should also be silent, or nearly so, and work with little worry about maintenance or security.
Yes, it can be easily remotely accessible across all your devices but not accessible to the internet at large.
In the video, I covered 3 different home-appropriate (and wallet-friendly) configurations that may be appropriate
Background
We’re using TrueNAS Scale for this build. iX systems is a company that really knows what they’re doing when it comes to ZFS and storage servers. Think: Large scale commercial deployments.
The software platform that is built on is called TureNAS. There is TrueNAS core, which is based on the FreeBSD operating system; and Truenas scale, based on Debian Linux.
People, like me, tend to want to go “off script” and use it in ways that are not intended.
TrueNAS is an excellent platform and to get the result for this project I wanted, I selected TrueNAS Scale. Why scale? It is a little more flexible for going “off script” than TrueNAS core.
TrueNAS has a lot of excellent “creature comfort” features built in – disk reliability monitoring (SMART drive variables monitoring), containers, virtualization, a decent gui for managing NFS and windows shares.
We’ve done several other bits of content on TrueNAS that you can check out if you need a little more background on what it can do for you.
“The Plan” for Your Home Server
We will setup two mechanical drives in a mirrored configuration for redundancy. Optionally, we can use two nvme drives, also in a mirror, to store the metadata. The metadata special device can dramatically speed up lookup operations by storing all file metadata. It must be mirrored as it is just as important as file storage itself.
A rich ecosystem of “containers” is also evolving. TrueNAS has TrueCharts – an extension for TrueNAS that lets it run plugins in containers. This is cool, but how thing are evolving with TrueNAS and its container system is a bit at odds with how things are evolving with Docker and Kubernetes.
The folks behind TrueNAS have sort of re-imagined the container system and how it should work.
I don’t really care for it and, generally, think that a Docker-based solution with Portainer for container management is a better fit for most users.
It makes sense why this would be clunky for TrueNAS – historically TrueNAS has been a rock-solid bulletproof file and storage solution whether you want raw storage, nfs, iscsi, you name it.
Also hosting user apps ? That’s like using a Ferrari to haul pig manure! Or so the engineers probably think.
We will use the “Virtualization” option to deploy Debian, Docker and Portainer.
Doing this solves a couple of problems.
Because the under-hood of TrueNAS Scale is Linux, it is possible to install Docker on the host. However I don’t recommend this for a few reasons. First, it doesn’t survive updates. Second it means that iX can’t make certain assumptions about the system when doing upgrades or updates; an update may clobber your important data in unpredictable ways and it is a reasonable request that Users Not Do That to minimize support headaches. Second, some tuning has been done to the system that puts security groups and contexts a bit at odds with how it is done TrueNAS. There are some additional minor reasons.
Another annoyance is that support for TailScale remote access has not yet been added to TrueNAS. It is possible to add it “directly” on FreeBSD
There are a couple reports from our community that when asking in “official” TrueNAS support channels about these kinds of features (run something that is better able to manage containers; run tailscale for vpn) the topics are unceremoniously closed or dismissed out of hand ("you want to haul what now??*) .
So I will recommend Docker inside a VM. It will Just Work, will be reliable, and will be forward compatible as you update and maintain the host TrueNAS operating system.
Running Docker in a VM does have some negative tradeoffs: the memory can’t be shared with the host in an efficient way as it is with containers; and the storage system, by default, is inside a relatively opaque virtual machine file. If one creates containers on this VM, their persistent volumes exist in a relatively fragile Virtual Machine hard disk file.
This is not super convenient – bordering on annoying. Fortunately, we can overcome that by configuring the Docker VM to store the containers on an NFS volume exported from TrueNAS. Sound crazy? Perhaps a bit – but the network traffic never leaves the machine and this virtual network interface solves two problems for us simultaneously.
The first is that our ZFS volume(s) will be accessible to Docker containers in the VM as we need them to be (think Docker Container that indexes and catalogs media, for example, which is convenient to have as a bunch of loose file in a ZFS dataset).
The second problem is the problem with Tailscale. We can run the Tailscale Docker VM, and bridge it to our LAN. This will give our Tailscale clients access not just to the Docker Containers and Docker VM, but also our TrueNAS host and everything accessible on the lan to which the Docker VM belongs (thanks to two layers of bridged networking).
Because the interface GUI is more complete and more well-planned than the TrueNAS gui for containers, this type of setup is no problem at all.
Step by Step Getting Started
Debian 11 VM on TrueNAS:

I opted to create a 100gb virtual hard disk, and gave it 1 cpu / 12 cores / 12 threads.
All we really need on the system to start is ssh:
I picked debian because it’s the same kernel version as the host OS.
Installation complete
From there, we install docker:
We’re going to use NFS (v4) from TrueNAS to store everything we care about, though.
Setting up NFS for Portainer
I’d recommend setting your Docker VM IP statically. If you ran through the defaults on the install it is possible to do a command like
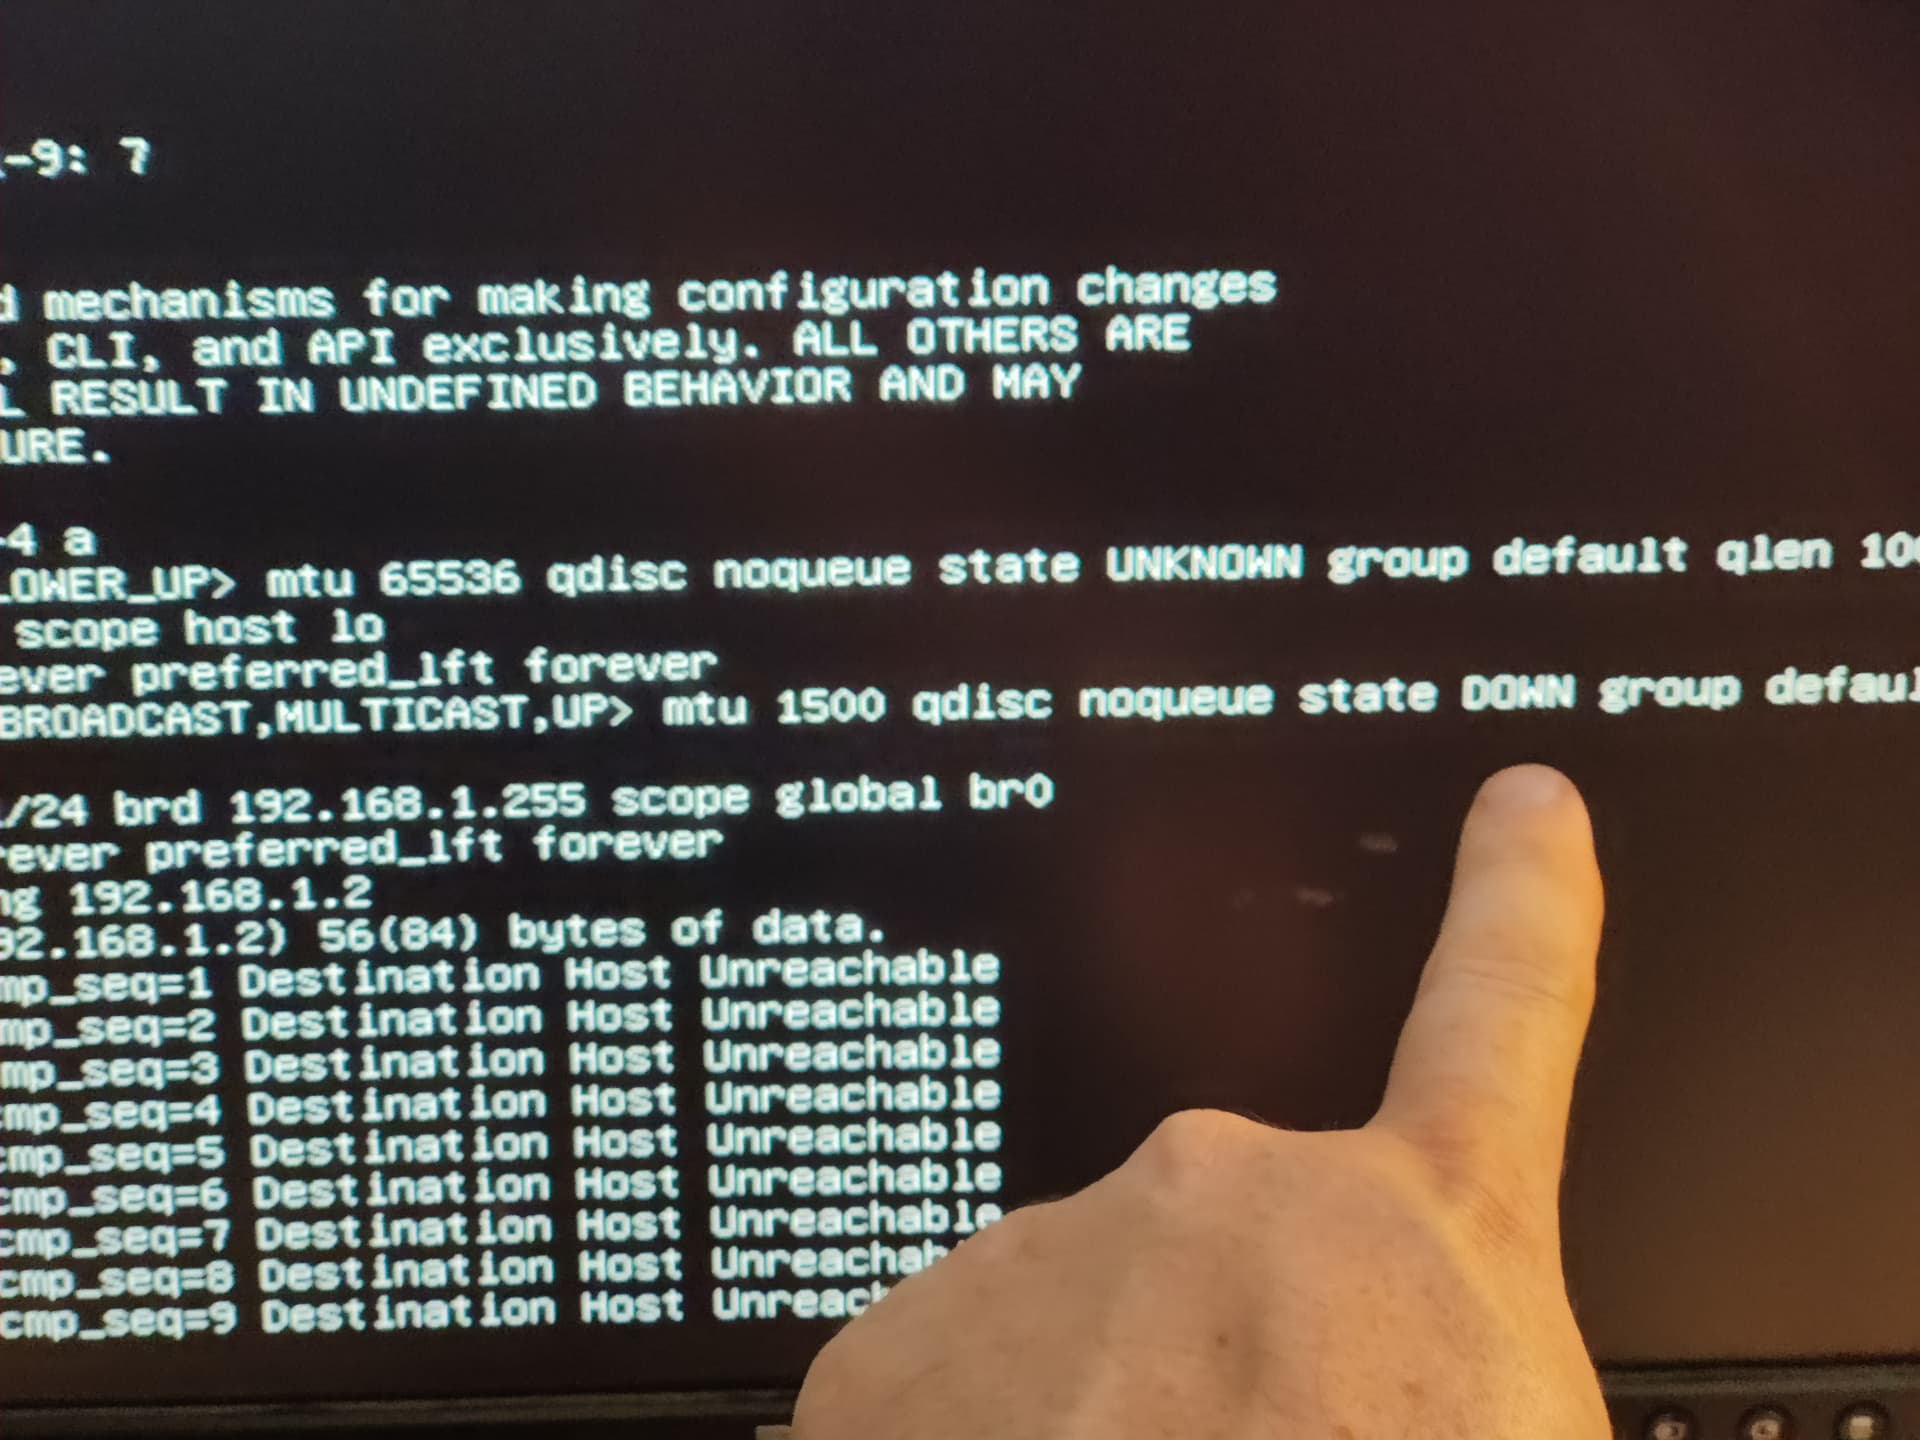
ip -4 a
to confirm your DHCP server handed out an IP on your lan. This is called bridge-mode meaning that TrueNAS bridged the virtual nic on your VM to your local lan as if it is plugged into the lan (it is possible for the network to be connected “behind” the TrueNAS machine via nat meaning the VMs and containers share the LAN IP of TrueNAS. We do not want that in this case.)
I’d recommend setting your TrueNAS host box to something like 192.168.1.1 and the docker VM to 192.168.1.2, for example, if your local lan was 192.168.1.xxx and your DHCP server was not handing out addresses in the 192.168.1.1 - 192.1681.1.10 range.
Oh but wait
If you dig into what I’m about to you show you, you will see that there are probably a few hundred posts on the internet with people experiencing various versions of this issue with TureNAS scale for the past 2-3 years. So this is part of why I broke the how-to out into its own video.
So if you ping your TrueNAS host, 192.168.1.1 for example, from the VM. It doesn’t work. What on earth?
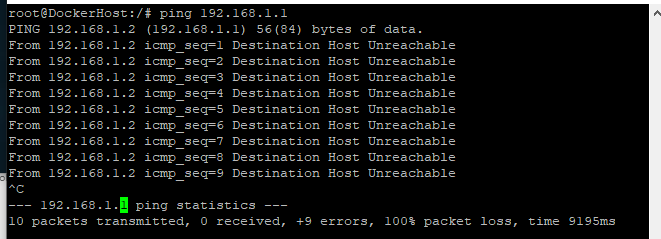
It is important for me to help you understand how it is failing so you can a) not be frustrated and b) level up your troubleshooting skills when encountering problems adjacent to this problem set.
This whole class of problems stems from having a poor mental model of host networking, virtualization and the glue that binds all that together. Without someone revealing the inner workings it can be quite difficult to intuit what on earth could be wrong.
Yes, this absolutely insane default has been gatekeeping people for two years and counting that just want to do what I’m trying to do for years and the fix seems not to be forthcoming.
It’s actually impressive that it is broken this way because debian + virtualization a la KVM out of the box does not come this broken since circa 2008 (when containers were starting to come in vogue). You have to work to set this up in a broken way. I think the architects need a bit more Linux experience or misunderstand how the out-of-box defaults should be.
Users should not really have to deal with this.
Not to worry, we’ll fix it.
What we have to do is create a bridge and then assign our physical ethernet interface to the bridge. The bridge will automatically attach to the virtual network stack that’s on the VM we previously created. That’ll let us mix our real and virtual interfaces.

Note: If you have multiple nics, as on the dual nic Supermicro system from Microcenter, it is totally fine to use one nic for the “host” (not in a bridge) and an IP-less interface in the bridge. What is shown here works fine for single-nic setups, though.
The next thing to be aware of is the web gui for networking/bridge for this is a buggy piece of crap. Don’t bother. Use the console.
In setting this video up I went through 5 systems total (the 3 in the video, a dual 2011 system, etc. and they all had various problems getting the bridge setup.
The most reliable method is to use the CLI/console to set it up.
Step 1, disable DHCP on the primary nic.
Step 2, create a new interface with N, bridge, and set the alias to 192.168.1.1/24 (or whatever is appropriate for your network).
Step 3. Apply the changes, and hit p to persist.
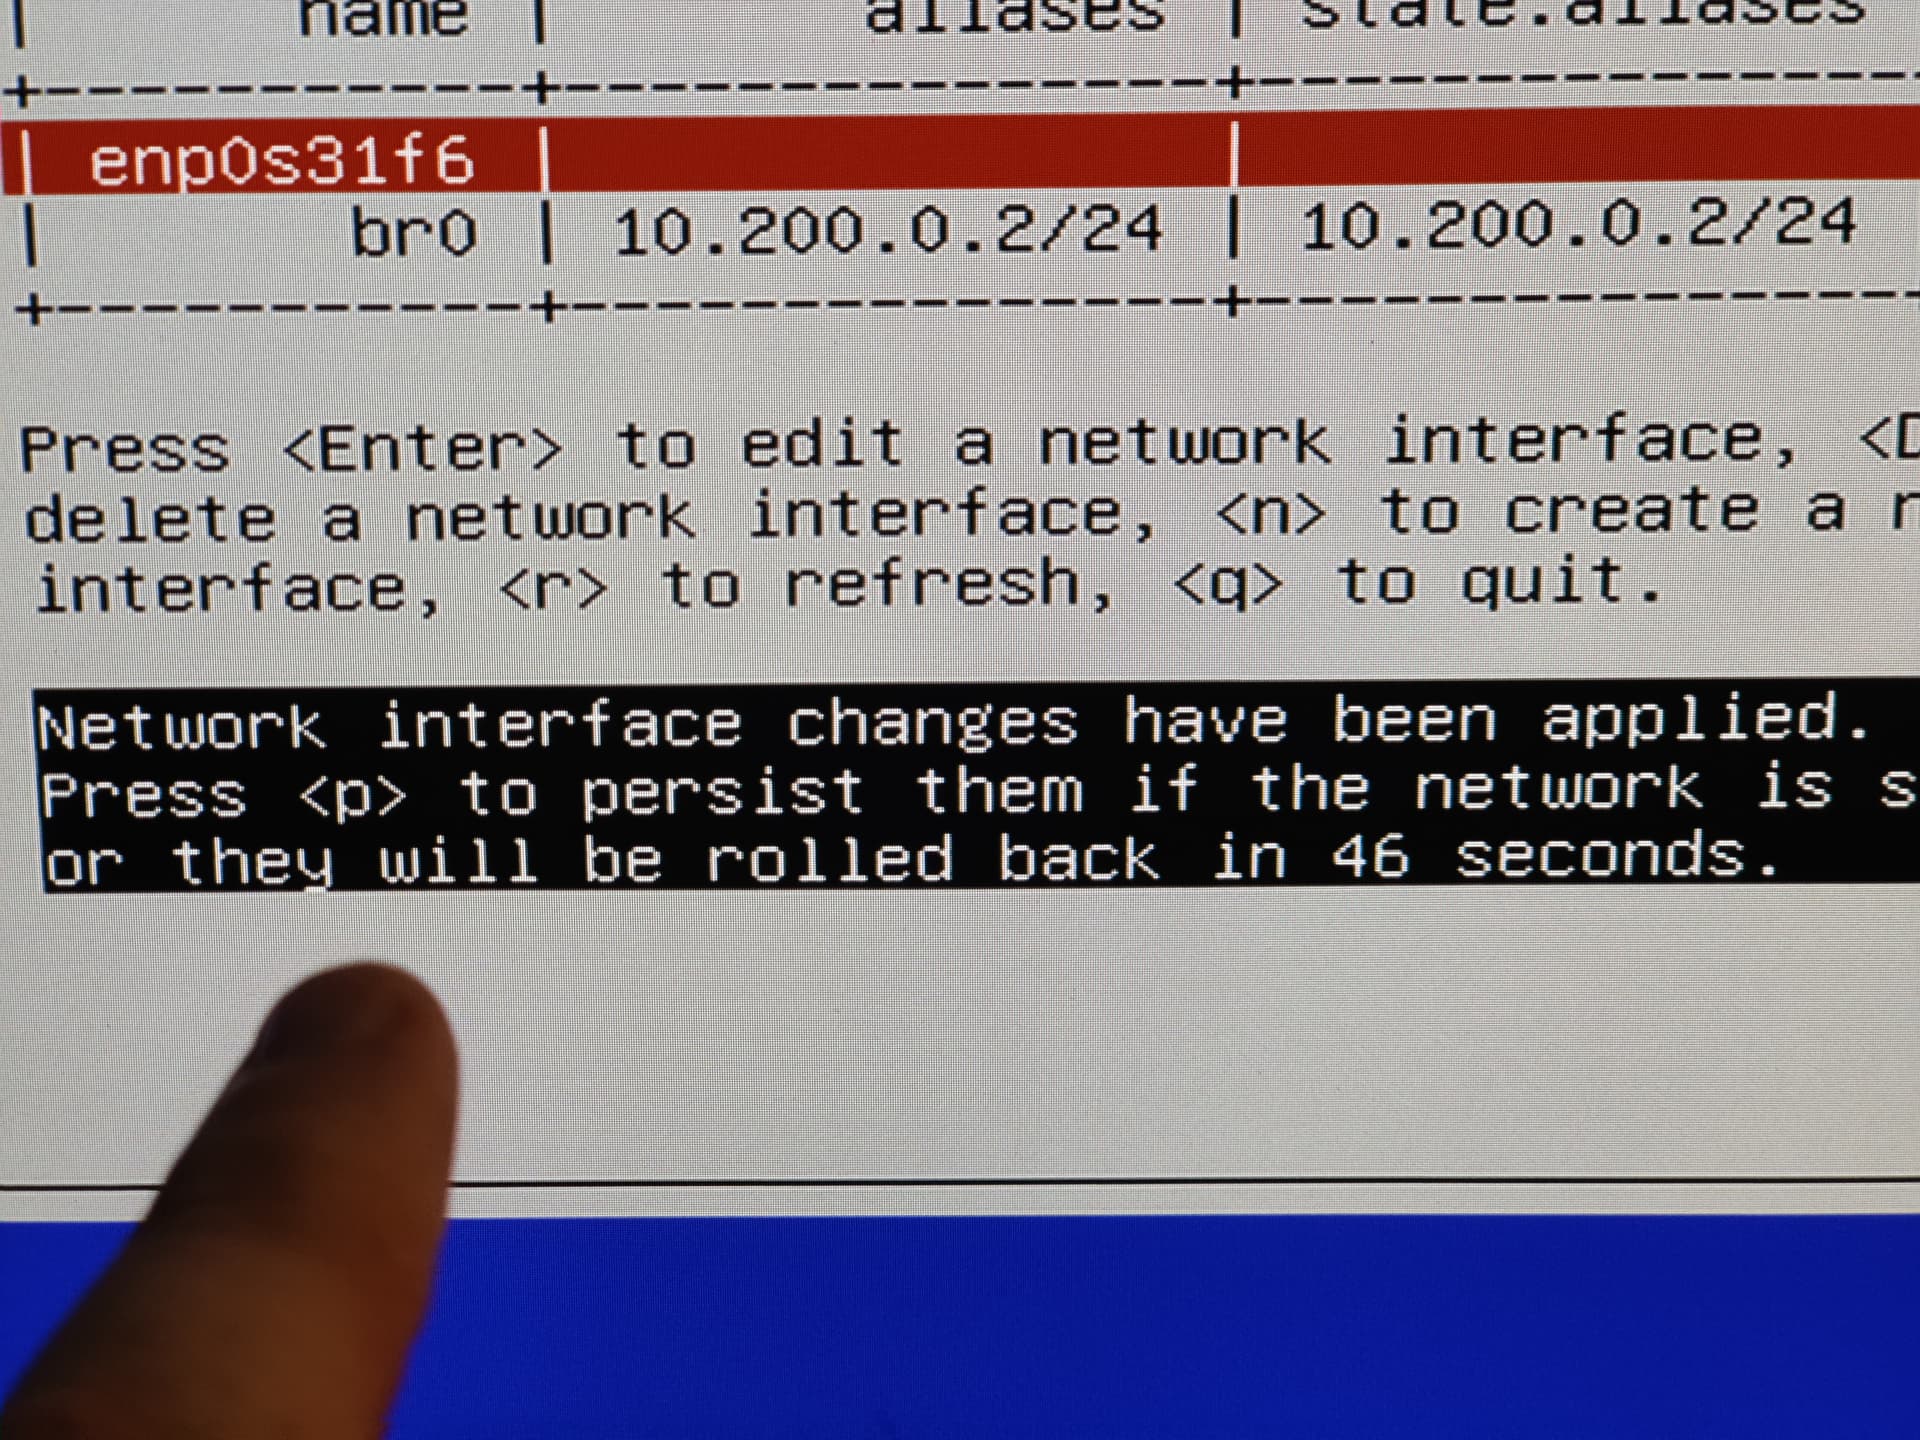
There is some bug here where the bridged interface never actually enters the forwarding state. Even if the web gui works properly, it will time out and revert the changes.
So, once you “P” to persist the changes, reboot.
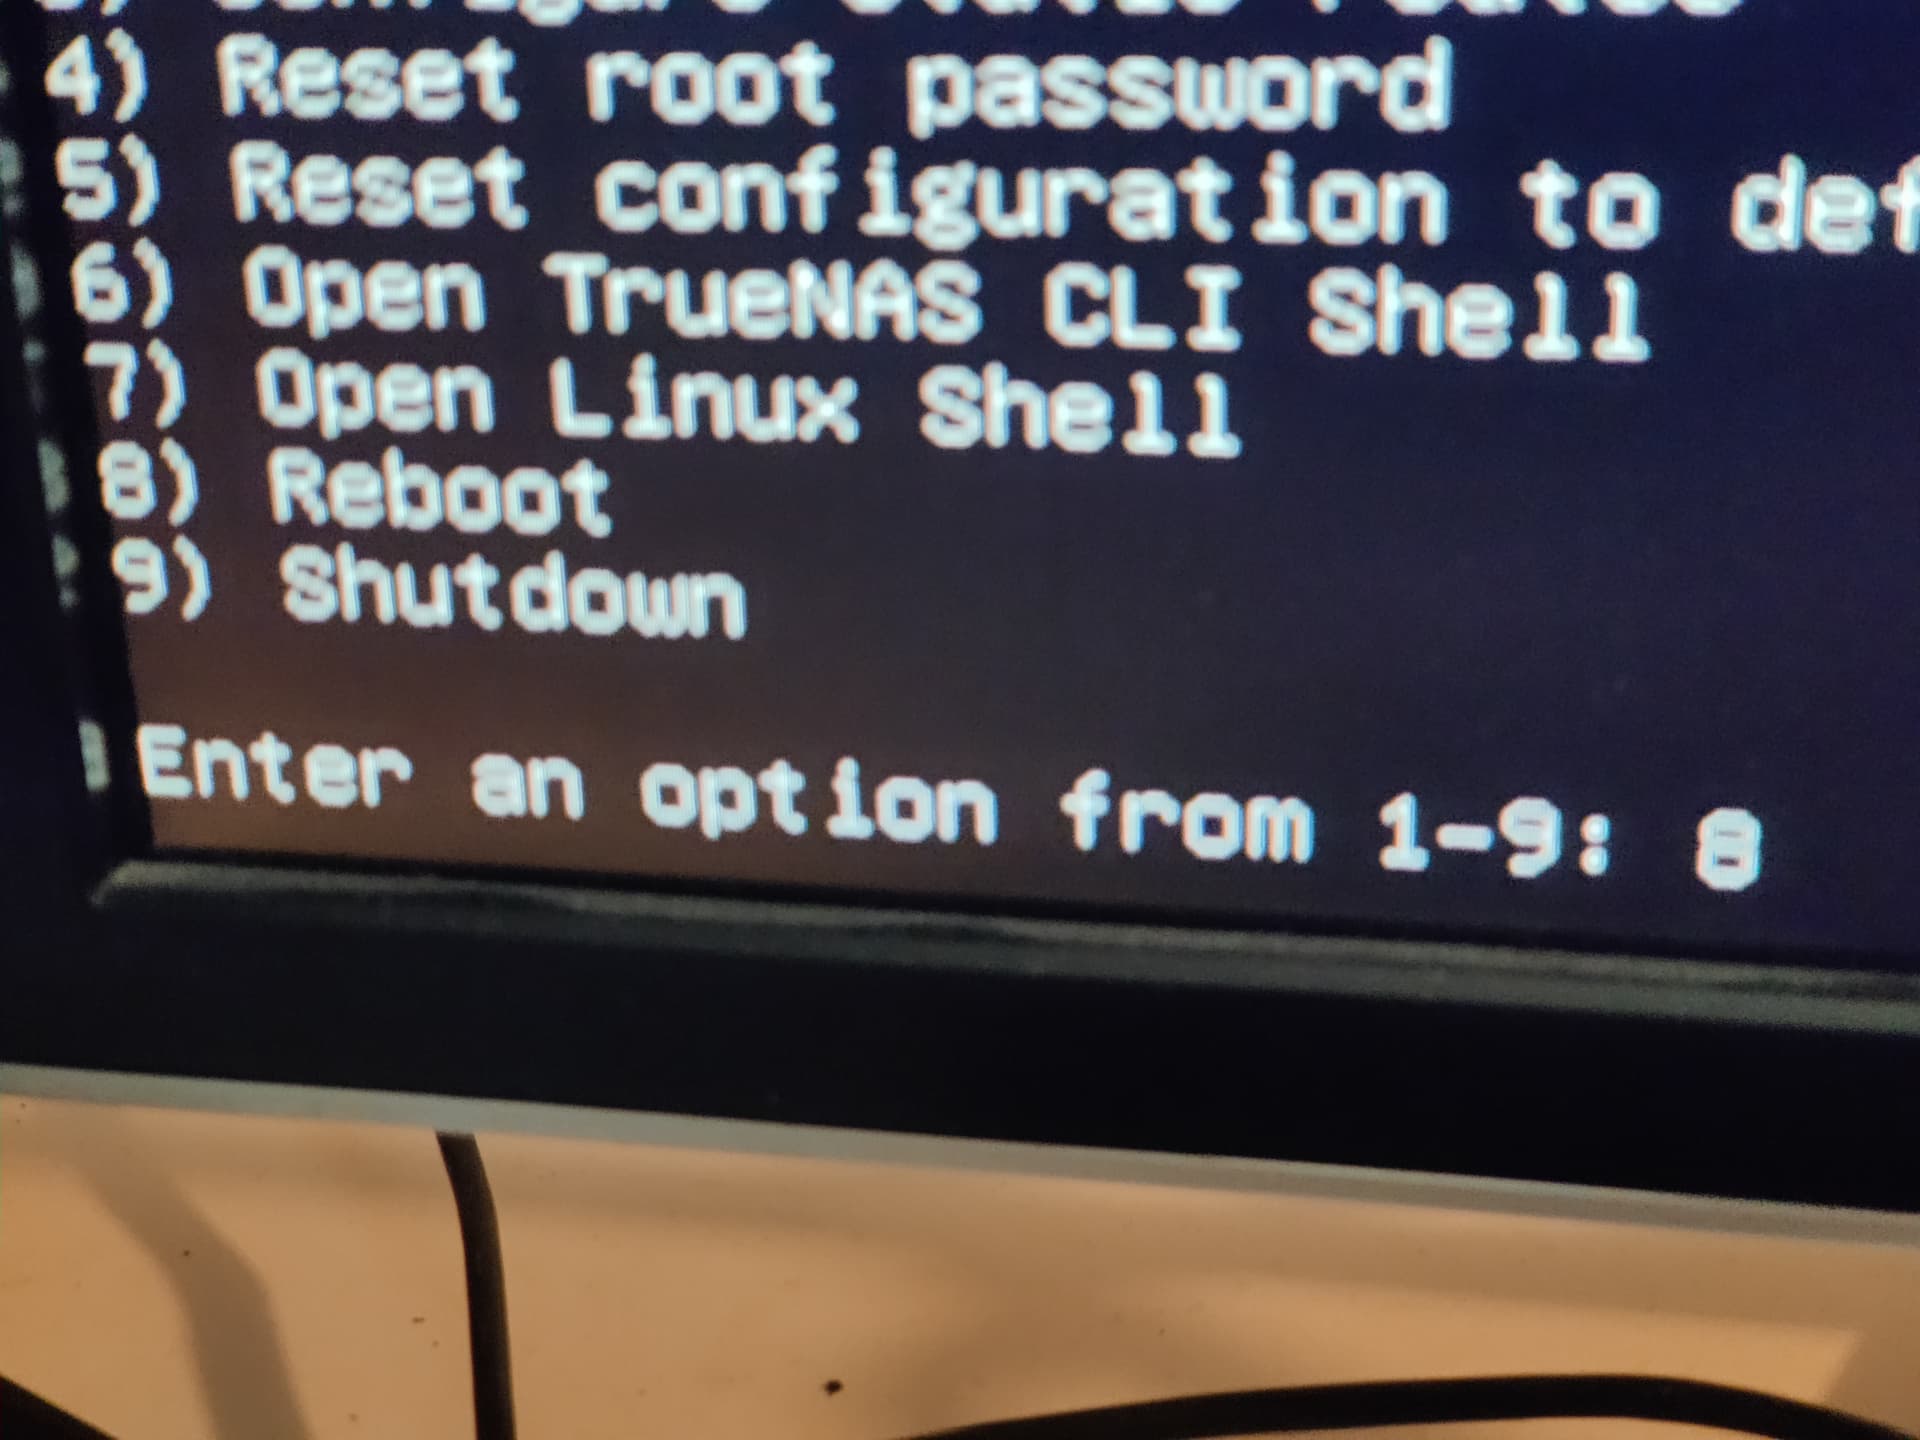
You should, hopefully, see “(interface name) entered the forwarding state” after you reboot. Drop to a linux shell and ping other things on your network.
It’s working! And it was only mildly horribly painful for no reason!

Confugure TrueNAS NFS
After doing all that, it is necessary to go into the VM gui and edit the nic to attach it to br0, the bridge just created:
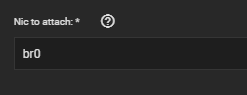
and start (or stop and start [not restart]) your Debian Docker Host VM.
Now that your VMs can talk to the host, and access SMB and NFS shares, we can create a new NFS dataset and share it with our Docker VM’s IP.
ping 192.168.1.1 # or whatever your truenas machine is
It should be working now? If not post below.
Next we need to setup NFS so that you can get to file shares on TrueNAS from the VM(s).
Go back to the TrueNAS Gui and enable NFS share (and start NFS if it wasn’t running.
Setting up the NFS share on TrueNAS.
Go to Storage and click the vertical “…” for the storage pool. Click add Dataset. I called mine NFSdocker.
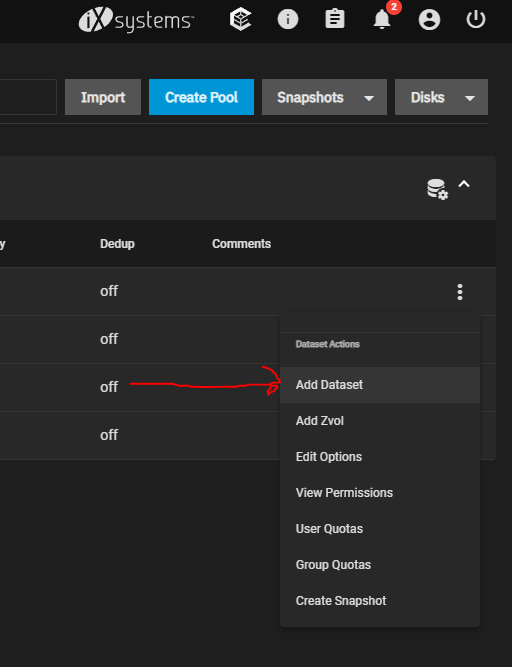
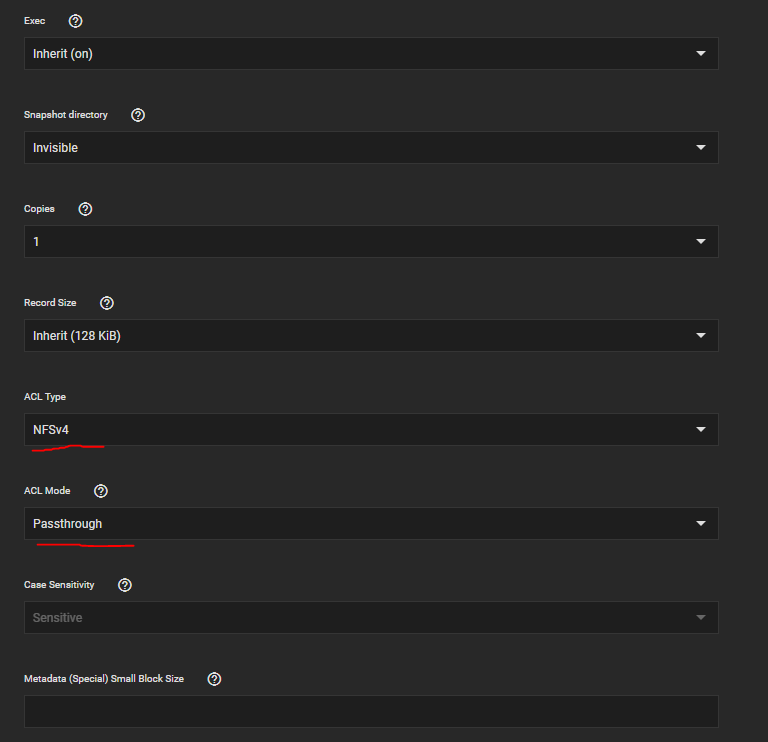
It is necessary to go to the advanced options and set the ACL type to NFS4 and mode to passthrough for the docker storage to work properly.
In the server service option I also had to check “enable NFS v4” for the overall NFS service.
Be sure to allow-host the Docker VM by IP.
For the next part, we return to the Debian VM:
apt install nfs-common

mkdir /nfs
If you set things up similar to how I showed in the video, this should work:
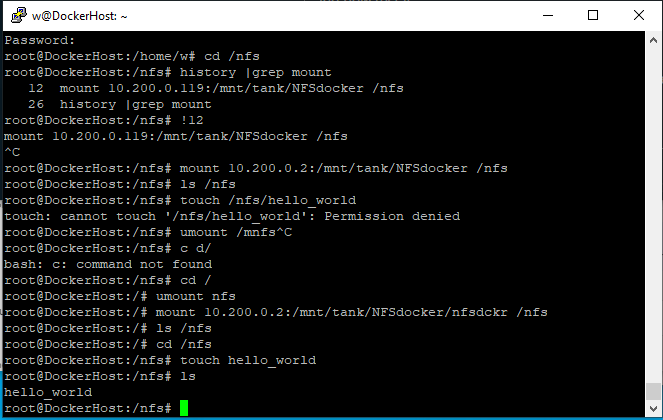
mount 192.168.1.1:/mnt/tank/NFSdocker /nfs
You can dump a file or two in there, and verify it is working:
touch /nfs/hello_world then browse on another machine:
Oh no, no permissions.
touch: cannot touch '/nfs/hello_world': Permission denied
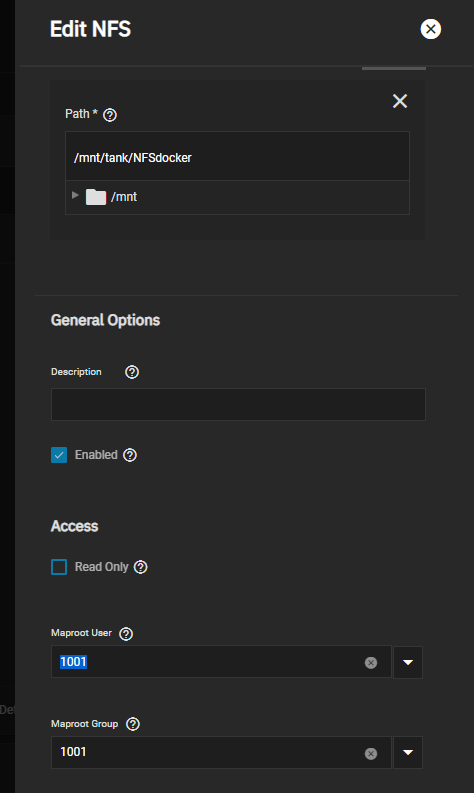
That’s okay. It’s a “best-practice” to create a user (“credential”) on the TrueNAS host for this VM to do its work. This is a two step process.
- create the user,

Set the home directory to what you set previously. In my case it is the NFSdocker dataset.
- Tell the NFS share system to treat the “root” user on the client as root on this system. Map user and Map root should both be set to rot.
Note that you can just type the username where it says 1001 and it should autocomplete.
You can also set the default user/group to be the one you created earlier.
Now, from the Debian VM if we do an ls of /nfs we can see that TrueNAS has created a home directory inside of NFSdocker for our user. We can re-mount /nfs to be this folder instead:
umount /nfs
mount 192.168.1.1:/mnt/tank/nfsDocker/nfsdckr /nfs
and now test it:
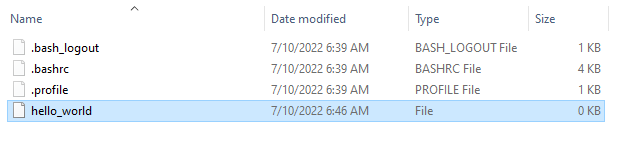
touch /nfs/hello_world
and it should not error out, and show hello_world when browsing the share via smb or the shell on the TrueNAS host:
aaand
Now we’re ready to add Portainer, for Docker Gui Management
Now, one small note. We are doing this NFS thing so that our docker containers can store their persistent volume data outside the VM and actually on our truenas host.
So in the above how to it talks about creating a volumne as part of the initial deployment.
We will modify that slightly to create the volume at /nfs.
So from the CLI on your Debian VM do something like this:
mkdir /nfs/portainer_data


docker run -d -p 8000:8000 -p 9443:9443 --name portainer --restart=always -v /var/run/docker.sock:/var/run/docker.sock -v /nfs/portainer_data:/data portainer/portainer-ce:latest
Note that the -v part of the command for portainer data has been modified slightly from the guide. We are explicitly telling it to store the volume on NFS. ALSO notice the -ce for community edition. Portainer for business costs $ and is well worth it, but for home labs? CE is where it’s at.
You can do it the same way as you add other containers to the system, or even have the Docker containers directly attach to NFS on the TrueNAS host – but we’ll talk more about that in a moment.
If this command produces an error, it is possible something is wrong with the user, map root setting, or ACL type on the dataset. All that can be checked from the TrueNAS Gui.
If this is working, we need to take a moment and make this /nfs mount permanent. Remember that we mounted it manually – to get it to persist we need to edit /etc/fstab
I added this line to the end of my file:
192.168.1.1:/mnt/tank/NFSdocker/nfsdckr /nfs nfs rw,async,noatime,hard 0 0
(The options there cause processes using NFS to retry forever if something goes wrong, but still be interruptable (ctrl+c to quit-able). )
At this stage I’d recommend rebooting.
Reconnect and log back in. Then run docker ps -a from the CLI. You should see the Portainer VM. It is worth checking that /nfs came back so ```ls -l /nfs`` is in order to confirm.
If it isn’t back, fix that before proceeding further.
Portainer should be accessible at:
https://192.168.1.2:9443/
it will want you to set a username and password:
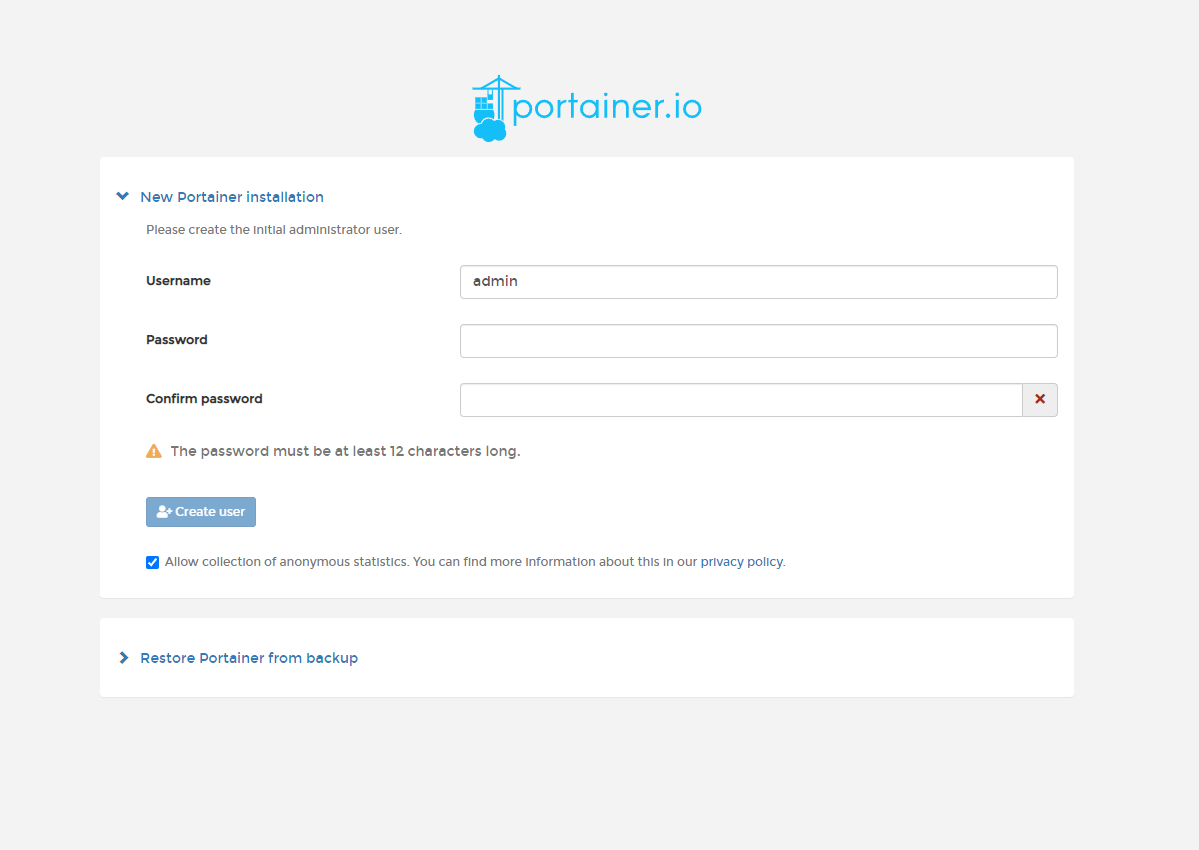
The world of portainer is pretty awesome.
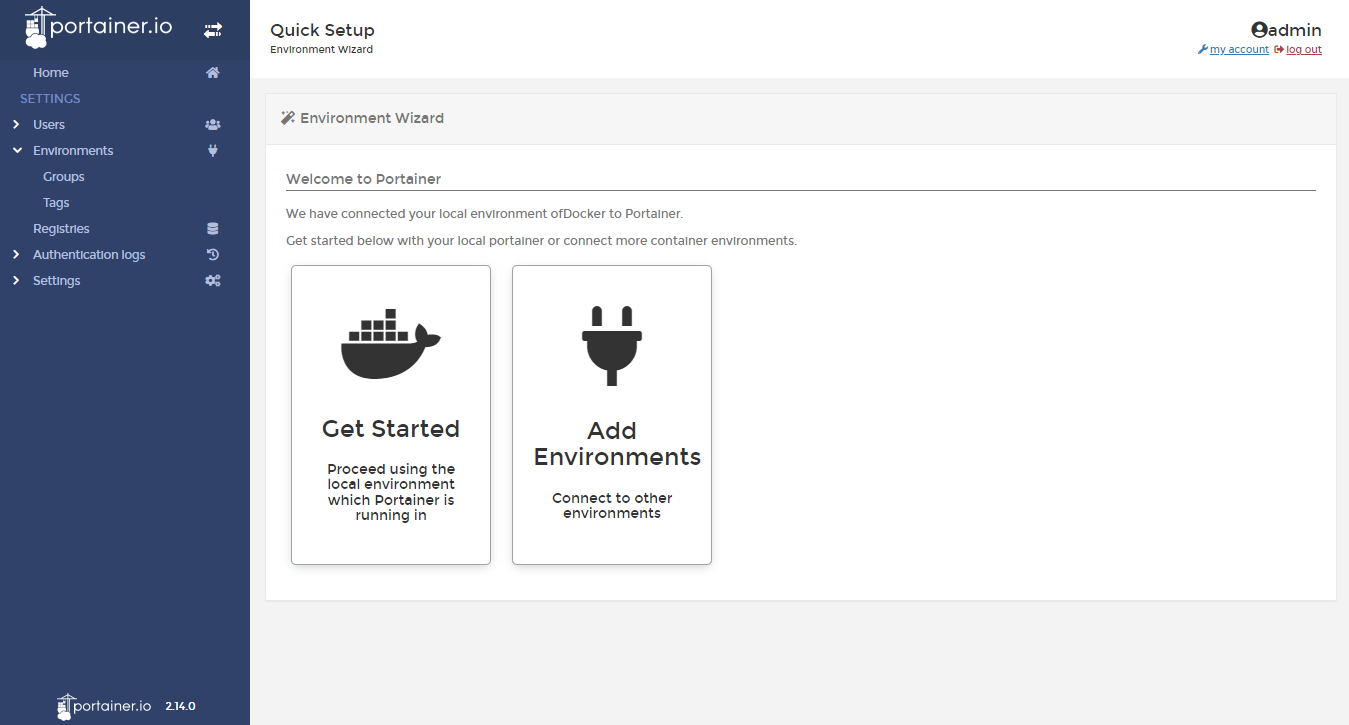
We shall waste no time and now setup NextCloud and Tailscale for remote access.
Nextcloud Stack / Docker-compose.yml for Portainer
version: '2'

volumes:
  nextcloud:
  db:

services:
  db:
    image: mariadb:10.5
    restart: always
    command: --transaction-isolation=READ-COMMITTED --binlog-format=ROW
    volumes:
      - /nfs/nextcloud/database:/var/lib/mysql
    environment:
      - MYSQL_ROOT_PASSWORD=changeme123123123
      - MYSQL_PASSWORD=changechangememe123
      - MYSQL_DATABASE=nextcloud
      - MYSQL_USER=nextcloud

  app:
    image: nextcloud
    restart: always
    ports:
      - 8080:80
    links:
      - db
    volumes:
      - /nfs/nextcloud/data:/var/www/html
    environment:
      - MYSQL_PASSWORD=changechangememe123
      - MYSQL_DATABASE=nextcloud
      - MYSQL_USER=nextcloud
      - MYSQL_HOST=db
At this point I noticed that NextCloud was initalizing slowly in the logs. After some digging I realized that nextcloud was doing lots and lots of small file IO. The writes are synchronous meaning that they are done one at a time. The only output on the logs was
Initalizing nextcloud 24.0.2.1 ....
This is normally a < 1 minute operation when NOT using -v volumes to persist data.
I decided to disable synchronous writes on that zfs dataset for the time being:
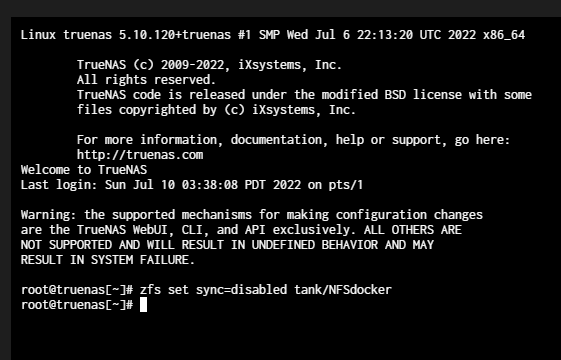
Within seconds NextCloud finished initalizing.

There is a small risk of data corruption with disabling synchronous writes. If you wish you can turn it back on after the installation is complete.
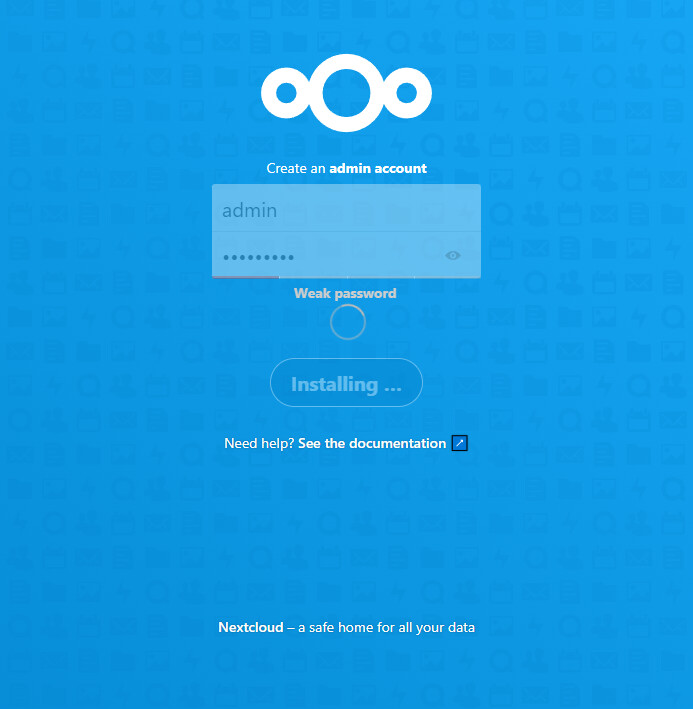
With that, we can finish installation in the web browser:
Enter Tailscale
As we’ve done in past tutorials, next we would walk you through exposing these services to the internet. We aren’t going to do that here – we’re going to use TailScale to setup a device-to-device VPN. This is a really fast and light-weight way to connect every device we have to every other device, but also keeping the internet at large out with a deny-by-default setup.
I love deny-by-default from a security perspective.
Setting up Tailscale
Before we can setup the docker container, we need to generate an authkey the container will use to connect. It is a bit unusual and the UI hides the option from you.
Login to tailscale and navigate to:
https://login.tailscale.com/admin/settings/keys
and generate an auth key.
We also need to configure our Docker VM to forward and masquerade traffic for us according to the tailscale setup guide:
From an SSH session on the Debian Docker host:
echo 'net.ipv4.ip_forward = 1' | sudo tee -a /etc/sysctl.conf
echo 'net.ipv6.conf.all.forwarding = 1' | sudo tee -a /etc/sysctl.conf
sudo sysctl -p /etc/sysctl.conf
… but be sure to read the docs on general Tailscale setup if you need forwarding to the rest of your LAN subnet.
Set up the Tailscale Docker Container
With the authkey in hand, we can setup a new stack:
version: '3.8'
services:

  tailscaled:
    container_name: tailscaled
    user: "0:0"
    privileged: true
    cap_add:
        - NET_ADMIN
    volumes:
        - '/nfs/tailscale/SettingsFolder:/var/lib'
        - '/dev/net/tun:/dev/net/tun'
    network_mode: "host"
    image: tailscale/tailscale
    command:
        - tailscaled
    restart: unless-stopped
    environment:
      - PUID=1000
      - PGID=1000
      - TS_USERSPACE=true
      - TS_AUTH_KEY=
      - TS_ROUTES=192.168.1.0/24
You must update this to make sense for your setup. Paste in your auth key, confirm the volume path for the settings, and the TS_ROUTES which is the subnet route(s) that this docker container will advertise. We are using host networking so this container is also bridged to your lan.
Now once my containers came up and I used the log icon in Portainer I could see that it never actually brought up the tunnel.
So I connected via ssh to the docker VM and ran

… after that the Tailscale gui showed that the container was connected.
Because I ALSO want to route my subnet, it must be enabled from the tailscale website:
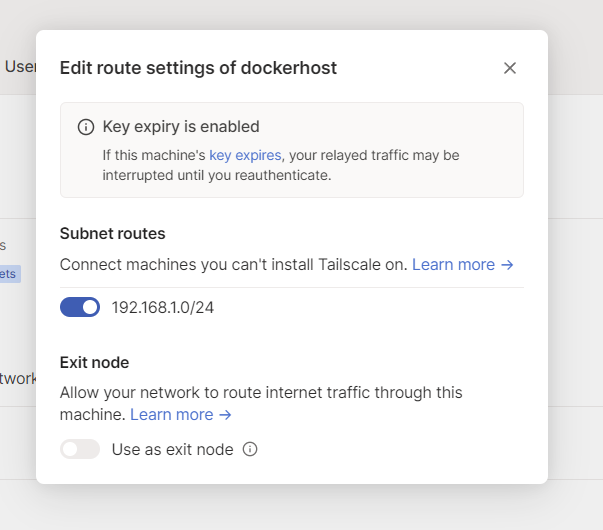
That was off by default, and I had to toggle it on. If you don’t see your subnet, here’s the Debian Docker Host Cheatsheet:
docker exec tailscaled tailscale up --accept-routes --advertise-routes=192.168.1.0/24
Next I connected my Phone, and my LAN IPs were accessible!
I could get to NextCloud from my phone without exposing it to the internet.


