Let’s talk hardware for a sec.
Raspberry Pi all the things
OK, one concern I have is that everywhere you turn online is someone shoving a raspberry pi headlong into a project regardless of whether or not an RPi is the best fit for the problem you’re trying to solve.
However, for $35-$75 they are a good deal because they have a modest amount of compute and are friendly on power. They are a cheap and effective way to add whole-house audio or whole-house CO2 sensors.
There is a vibrant bazaar of raspberry pi devices that may be useful in the context of Ultimate Home Server/Knowledge Keeper:
I am using Raspberry Pis in my setup. Two things I try to do for quality-of-life
Netboot Raspberry Pi - Why?
Local storage, and managing local storage, when you have more than one raspberry Pi is a pain. There is no need. Since the RPi 3b+ it is possible to boot from the network if you have a storage server somewhere on your network. This makes it much easier to upgrade or replace hardware, to manage backups and ease-of-restore, and to scale out your network (more than one pi).
Why might you want a small army of raspberry pi in your house? Whole house audio, for one. But there are many, many whole-house audio packages/projects for raspberry pi and that’s not what we’re covering (yet).
This is all an important leadup to servers are cattle, not pets.
I get it. No one wants to be a sysadmin at home. Neither do I (okay, we both knew that’s not true, but… I get it). Having the RPi boot from the network is worth the setup headache at least because it makes the setup much more maintainable over a 5-10 year period. SD cards eventually wear out. When it dies, can you be up and running immediately?
If you want to share your experiences or setup you have, please do! I am sure everyone would love to see.
Raspberry Pi PoE
So the PoE had makes it so you can just plug your raspbery pi into a switch that provides power. One wire. This makes it easy to put your RPI in a wall, attic, or anywhere you could run a cat5e/cat6 network cable. The PoE hats out there don’t have a lot of spare power, though, so be careful if you add any USB devices to your RPi. I had trouble even using a z-wave USB dongle with mine because it drew too much power for the standard PoE hat. Symptoms of this malfunction included hard lockups.
Raspberry Pi devices aren’t really built for 99.999% uptime, either. With the PoE switch it is possible to write a script to reboot the port (by toggling power), too. (More on that later).
Understanding Netboot
Your Raspberry Pi may or may not be configured to boot from the network. Generally newer RPi 4 and 3B+ come configured to netboot but that wasn’t always true especially with the first 4/5 of the production runs of the 3B+. You will need to do an initial setup on an SD card, boot the pi, log into it, and configure it for netbooting. Sorry. 4 and later should be configured out-of-the-box to netboot without this initial setup.
Netbooting starts with your DHCP server. The DHCP server is what hands out IP addresses. On the Pi itself there is something that kickstarts a process called PXE booting. PXE stands for Pre-boot execution environment and, just like it sounds, it is meant to bootstrap the device, get a DHCP lease (IP address) and to get the configuration from the DHCP server as to where it can pull and boot from a bootable image.
The bootable image comes from a TFTP Boot server. TFTP is trivial file transfer protocol. It is very unforgiving of bad or flaky connections so if you have intermittent problems it may be a sign you have a bad cable somewhere.
TFTP just gives you the boot image and kernel. Once the system starts booting, it needs to mount the root file system. NFS, network filesystem, is just the thing. I found this writeup from 2020 with more info.
This guide also has more info:
Hack-a-day guide (older)
Another important note – the TFTP server has pi-specific configuration files. The RPi uses a file named for the serial # of the specific Pi in order to download configuration specific to that device. This is how it is possible for one boot image to many differen RPi devices.
Also, if you have a Synology nas (or even another nas with similar features), you can use it as the server that serves both the tftp image as well as NFS.
Of course if you have a Linux server or other server, you can use that too.
To be clear, it is not necessary to use the Synology as your DHCP server. PfSense and many other router distros support adding custom records to the DHCP server for netbooting.
You might also want a setup for your home network that allows machines other than your Raspberry Pi machines to boot from the network. It is useful for whole-machine backup imaging, bare metal backup/restore, and much more.
I expect to cover more of that kind of thing in this series.
So, in a nutshell the process is
PXE (on the RPI) > Query your DHCP server > DHCP record points to TFTP server > TFTP boot image > TFTP Rpi config (serial # specific) > nfs mount / based on that config.
The Actual How To
I think it is very important that the reader understand what we are doing before we start copy-pasting commands. This guide is a great starting point if you understand the moving parts.
The tutorials talk about updating eeprom. I didn’t need to do that on mine. Newer RPi probably won’t need it, but if yours isn’t booting or trying to boot, check the eeprom settings stuff.
raspi-config has a ‘boot order’ option that accomplishes the same thing:
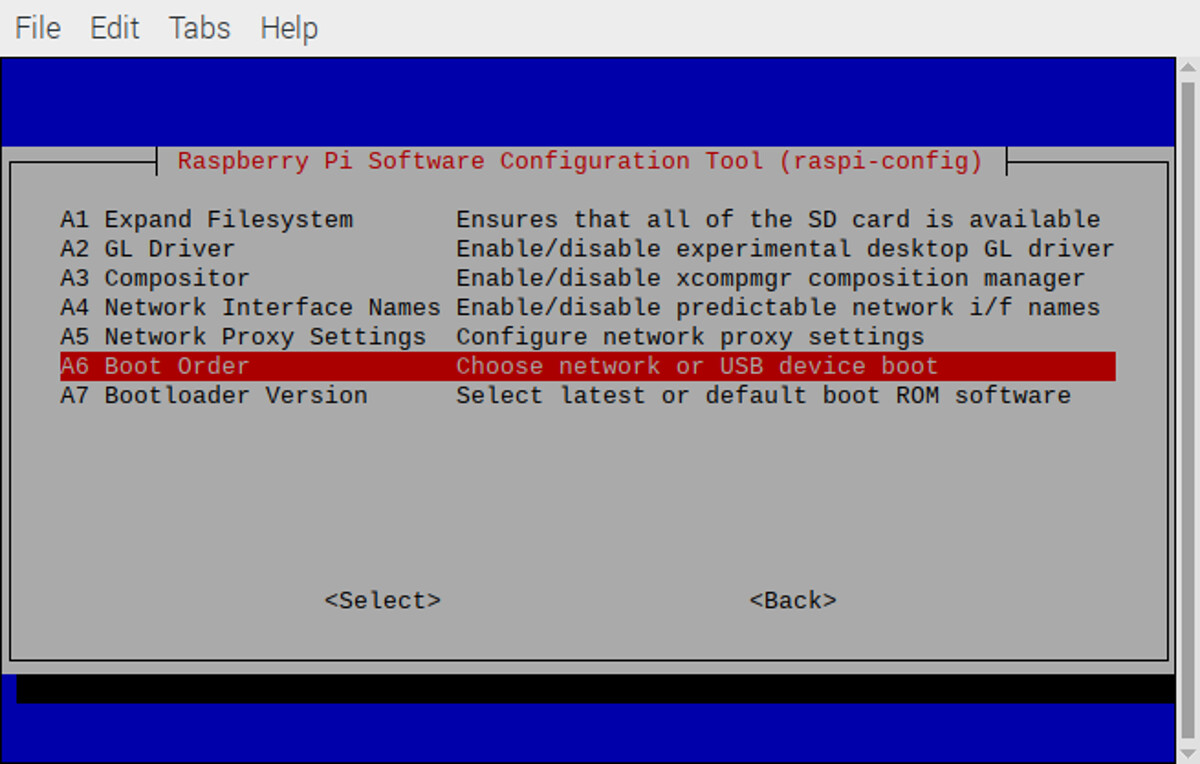
… but if you don’t see that or can’t set network boot order THEN you might need to update your RPi eeprom! which is tedious.
Still working on this
- Setup TFTP Server and NFS server (empty folders) (add nfs share for tftp boot folder and root file system)
- DHCP server set option 66 , add a reservation for the mac address(es) of the Pi to the dhcp server
- configure the nfs server allow read/write only from the IP address(es)
- get the raspberry pi serial # and make a directory tftpboot/rpi serial
- use rsync to copy /boot to the tftp boot folder; use rsync to copy / to the root fs nfs share
I created two shares:
rpi-tftpboot
and
rpi-pxe
rpi-tftpboot contains directories – one for each pi that is the serial (output of the command vcgencmd otp_dump | grep 28: | sed s/.*://g )
e.g. rpi-tftpboot/f00f0021
and rpi-pxe contains the hostname of each of my pis. so the first one is rpi1, rpi2 and so on.
I created /nfs back on the raspberry pi (booted from sd card) and mounted:
/nfs/boot > nfs-server/rpi-tftpboot/f00f0021
/nfs/root > nfs-server/rpi-pxe/rpi1
first rsync /boot/* from the running pi to /nfs/boot
and
rsync / --exlude /nfs / to /nfs/root
It is necessary to then modify cmdline.txt in /nfs/boot to be something like:
console=serial0,115200 console=tty1 root=/dev/nfs nfsroot=1.2.3.4:/nfsroot/rpi-pxe/rpi1 rw ip=dhcp elevator=deadline rootwait
and further to modify /nfs/root/etc/fstab to be something like:
proc            /proc           proc    defaults          0       0
#PARTUUID=f6242238-01  /boot           vfat    defaults          0       2
#PARTUUID=f6242238-02  /               ext4    defaults,noatime  0       1
1.2.3.4:/nfsroot/rpi-tftpboot/c494cf03  /boot           nfs    defaults          0       2
1.2.3.4:/nfsroot/rpi-pxe/rpi1  /               nfs    defaults,noatime  0       1
# a swapfile is not a swap partition, no line here
If you have a synology or other nas, you can do the nfs/tftp setup right through the gui.
In my case I only had to set DHCP option 66 with the IP of the tftp server.
The tftp boot process is somewhat complex. Other tutorials talk about un-gzipping vmlinuz or setting eeprom options or setting other dhcp options. In 2022, I don’t believe any of those extra steps are necessary.
It is necessary to run raspi-config and go to advanced > boot order and enable network booting, proably. If you plug in your RPI but it seems to be stuck and not doing anything on your network with HDMI plugged in port 0, but no SD card, then it is likely either a DHCP option that is missing or you need to run raspi-config and pick netboot.
Froom here if you need to netboot other RPi, all you need to know is their serial #. I recommend setting a fixed IP via DHCP and only allowing NFS write from that specific IP. If you do those two things all that’s necessary is to copy the boot folder and root folder to new names and then your other raspberry pi should be good to go.
Of course it is a best practice to enable OS updates on those and none of that really goes away with this. All we’ve done, so far, is eliminate the need for an SD card with your Raspberry Pi. (Allthough you might need one initially to copy the /boot and root partitions, and to configure booting from network…)
Some Extra Steps for Truenas 13 and later:
A user wrote in and we did some troubleshooting:
On my install I can not check the ‘All dirs’ check box if there is more than one path listed and to complicate matters further, I cannot create two shares with the same root path, TureNAS tells me they must be separate datasets.
Working solution – TrueNAS 13.0 BETA1
Instead of dropping to shell and creating the require directories using mkdir
Create dataset ‘nfs’ on storage pool ‘tank’
Create sub-dataset ‘rpi-pxe’ under ‘nfs’
Create sub-dataset ‘rpi-tftpboot’ under ‘nfs’
Create individual NFS shares of both rpi-pxe and rpi-tftpboot, set ‘Maproot User: root, Maproot Group: wheel and tick the ‘All dirs’ checkbox
Everything else should be fine.


