I’m looking for some advice on how to actively cool the Ethernet controller on the ML server that I built.
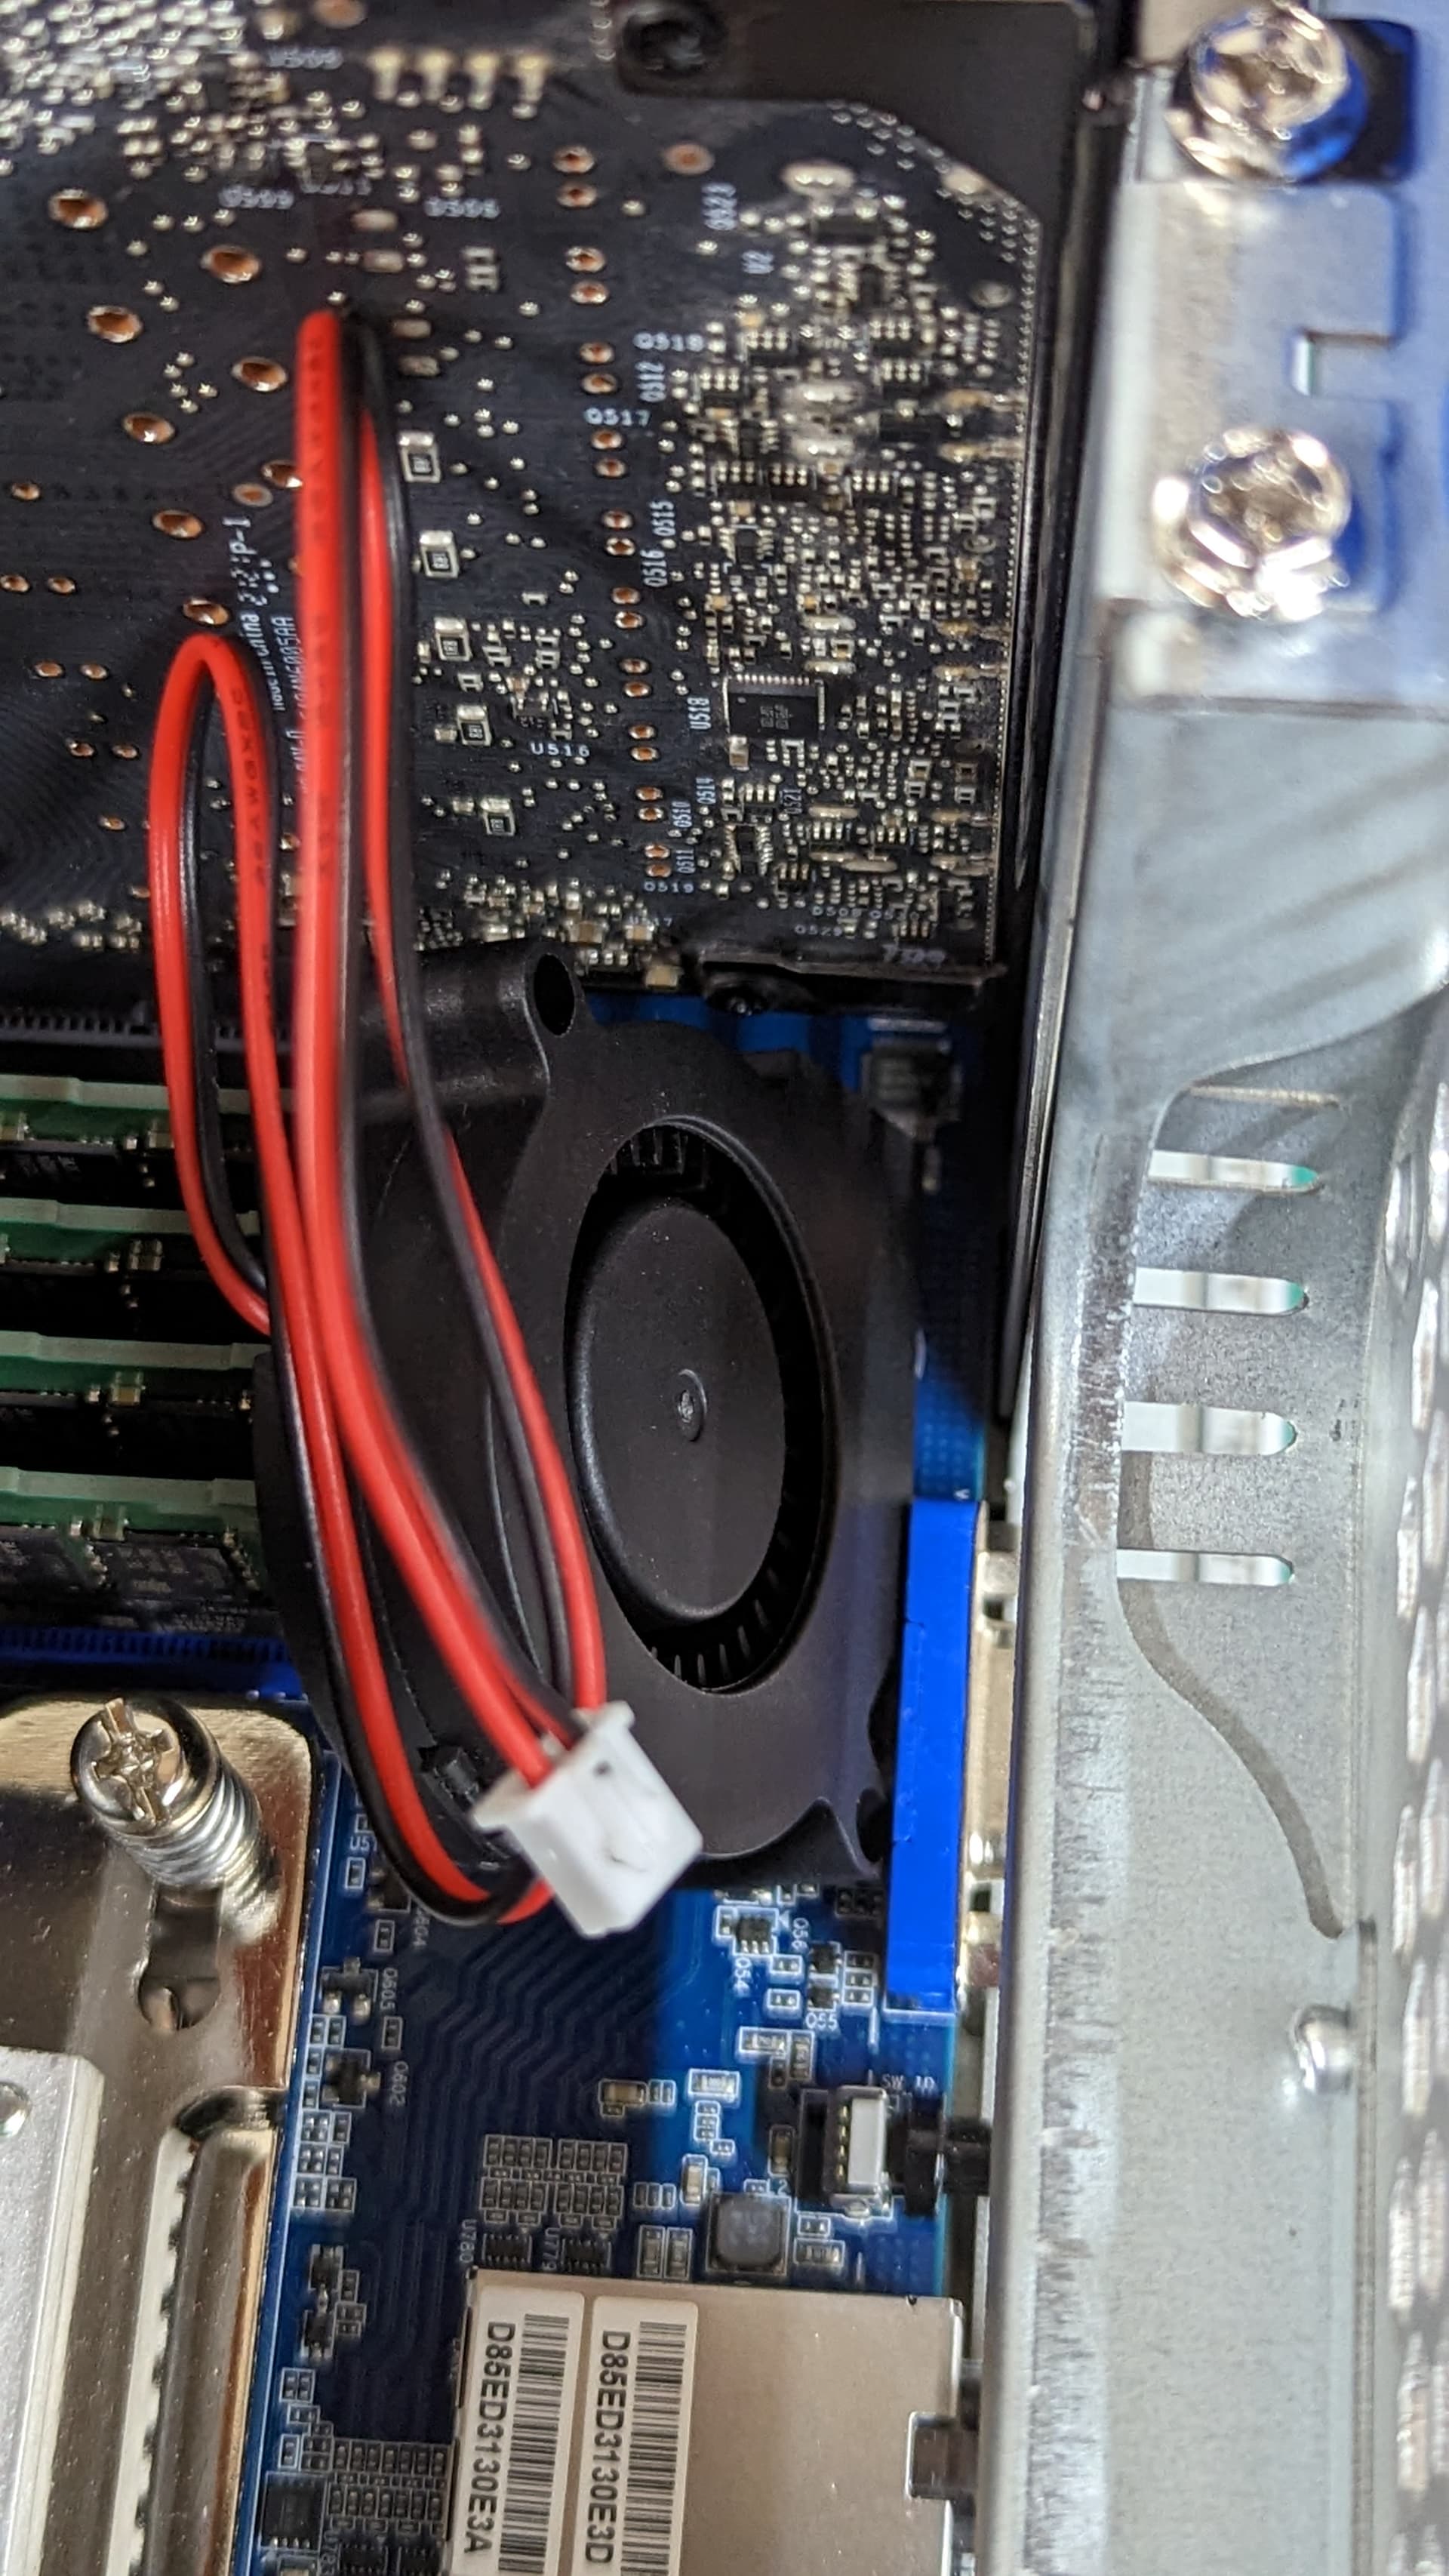
I’ve built the rig out of a MZ72-HB0 v3, with 5x RTX A4000 GPUs installed. The thermals aren’t amazing, but the A4000s seem happy enough to cook at around 90-95°C. Unfortunately the ethernet controller lives in the little bit of board space between the PCIe slots and the rear of the case, and it’s cooled with a rather tiny little heat sink, as shown in the photo below.
The problem that I’m having is that when the GPUs are under load, the Ethernet controller starts throwing errors, and I lose network connectivity.
I attempted to fix this by swapping out my 3x 120mm case fans with some very high static pressure (and subsequently very loud) replacement fans, but unfortunately this didn’t do the trick. So far the only way that I’ve been able to get it working is to run it sitting on my workbench with the chassis lid removed and a comically large box fan sitting on top.
Has anyone else here run into a similar issue? Otherwise does anyone have any advice for removing heat from the ethernet controllers without having to reduce GPU count or move them to an external enclosure?
I started looking into a custom loop for this build, and it would be rather pricey. Even using cheapo Bykski water blocks I’ll still be looking at around $1800-$2000. For that cost I can’t help but wonder if I shouldn’t replace the motherboard with one that won’t have this problem.
Depending on how handy you are and what tools you have, it’s possible to take a larger aluminum/copper heatsink, and cut it to size and drill some holes, so you have some actual surface are to dissipate heat with. Then use polyimide (kapton) adhesive tape on the bottom to prevent bad touches. Make sure it won’t hit anything above it.
Alternatively or in addition to this, you could maby get a 12v blower fan in that gap between GPU’s. They come in all sorts of widths, something between 10-15mm should work. A pin type heatsink would allow better flow from the side, but even without that the difference should be significant.
Also have you tried repasting the heatsink with some decent long life paste? Are there any thermal sensors that correspond with what’s under there?
Is steeper fan curves for the GPUs an option or is the noise gonna be an issue?
Because if they move air fast enough for the air not to get too hot and thus heating up the ethernet controller.
Either that or build a dirty diy windtunnel around the ethernet controller from cardboard or something (not pvc because that might build up an electrical charge on the surface).
Problem isn’t too smol surface area of the heatsink, but rather since the heatsink effectively works in reverse as in it takes the heat from the surrounding environment and heats up the controller underneatg you need to prevent that from happening somehow.
No thermal sensors that I’ve been able to find, sadly.
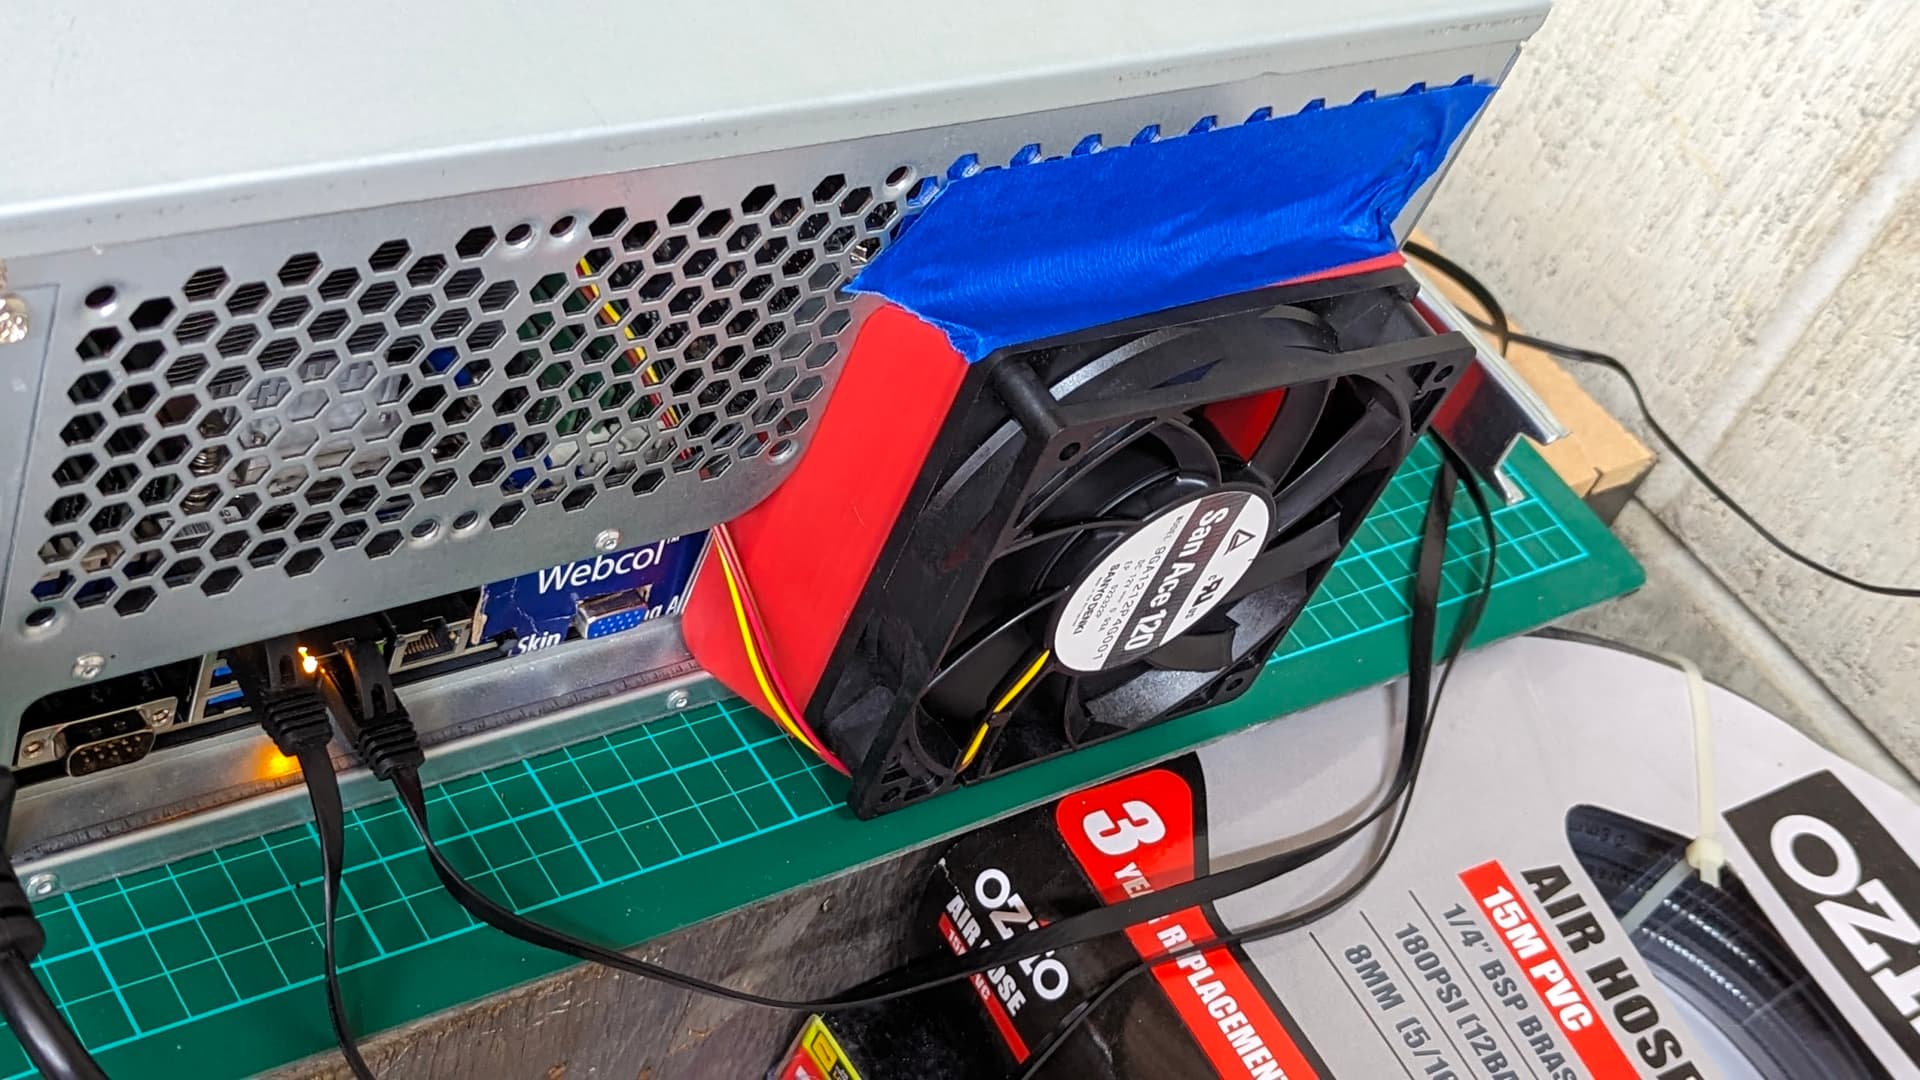
I’m starting to think a blower fan is probably the way to go. I can 3D print a little shroud for it if necessary, but I think if I get one that’s got decent airflowz I can just place it by the RAM, as shown in the photo below.
Unfortunately the one in the photo is too small and rated for 24V, but I suspect that a bigger one with a bit of a shroud on it (to increase air speed) will probably work.
Fan curves are already at 100% for everything on the rig and still no joy. Noise is somewhat of an issue, but this lives in a rack in my garage. Unfortunately my kitchen, dining room, and living room live directly above my garage, so I can’t go too crazy.
would be interesting for the shopping list, 4 byski coolers for your gpu’s are 600€ alone, 1 mora 3 about ~240€, a good pump ~100€. 180€ for fans. dont wanne look further.
maybe just think about just cooling the chip with watercooling, i think that would be the cheapest option but getting a cooler for this, u have to find some1 willing to cnc this.
Eh, the list wasn’t anything special. It was mostly EKWB parts, but Byksky blocks for the GPUs.
The GPU blocks were far and away the largest part of the bill. I also didn’t finish my list, as it was just too disheartening.
I’m almost tempted to cobble together separate GPU chip and VRM blocks, but I think the reliability of a setup like that would still be highly questionable. Also the high number of joints/fittings with cheap parts increases the probability of leaks far more than I’d be comfortable with.
Thanks for that - I recently came up with a similar idea (external chassis fan), but hadn’t put it to action yet. Nice to see that someone else has tried it. I’ll give it a shot. Should save me a bit of CAD work, too!
As for progress, I picked up a larger 12V blower fan and placed it as wendell suggested. With the blower fan, and after thoroughly cleaning and repasting all five cards the system is stable after a half hour load test with gpu_burn, but the cards are throttling like crazy. The test starts off with each card at around 40 TFLOPS (half precision tensor core test), and finishes with all but the one in the double width slot at around 8 TFLOPS.
I think the extra pressure drop of the external puller fan will probably do the trick. As I said in my original post, the $100 fans that I grabbed off of DigiKey seemed to work great for airflow, but they also make a very audible whine that can be heard throughout my house, so unfortunately I’ll need to find a quieter middle ground. I’ve got a few fans to test with, but I have a feeling that I’ll wind up picking up one of those “industrial” high static pressure Noctua fans.
tl;dr: I’ll try printing that shroud and report back on how it goes - thanks heaps!
Looks like it’s a success, at least partially. I can burn in now for 30 minutes and the cards peak temps average out to around 85°C.
I say partially however because the cards aren’t reducing their power budgets, but they are throttling a little bit (around 170 TFLOPS compared to 200 TFLOPS when cool). I can live with that, but the fan in question is super loud. That said, finding the right fan (or setting a quieter curve) is definitely a more tractable problem.
PS: Let’s maybe not talk about the cardboard box partial I/O shield. The used board came with an incorrect shield, and the replacement that I ordered seems to have been lost in transit.
Nice, glad it helped the Noctua iPPC fans are a good shout, or perhaps one of the Phanteks T30 (120x30mm) fans would also be worth a look, they seem to rate pretty highly.
Another random thought, at least re: the overheating ethernet controller - might be worth sourcing a really thick thermal pad (overly thick so it squishes a bit) to put between the motherboard and the motherboard tray, under the controller?
The controller seems to be working fine for the moment, but I do need to order some thermal pads, as the ones in the GPUs didn’t fare as well as I’d have liked in the repastening. I’ll chuck some extras in the order and give it a try.
As a longer term solution that will maybe leave me with some room to grow, I’m also considering grabbing a Dell C410X external GPU enclosure for a remarkably cheap purchase price off of eBay.
My biggest hesitation aside from the likely cost of shipping to NZ (107lb/49kg package weight) is that I’m not sure if the PCIe 2.0 bandwidth will be an issue. The C410X appears to use 4x PCIe 2.0 x16 host cards for a total of 64 lanes split out over 16 possible devices. I assume that will give each card the equivalent of an x4 connection, or 20GT/s per card vs the current 256GT/s. If this was a mining rig I wouldn’t bat an eye, but with a ML workload I worry about starvation.
I guess I’ll have to do some benchmarks to find out, although I’m not super confident that I’ll be able to come up with numbers that give a definitive answer.
@some_rando I want to build a similar server, how do you find the CPU thermals with the inline heatsinks? Does the downstream one run hotter? I haven’t built mine yet but I was thinking you’d have to put in baffles or run the fans in opposite directions to avoid blowing hot air into the second CPU.
Yeah, the rear one runs a bit hotter. In a rack mount chassis, I would still recommend front-to-back airflow, as otherwise you’ll be sucking in the exhaust from other servers in the rack.
I think if you add baffles you’d run the risk of choking out the rear fan, as there isn’t a ton of space between the two of them.
If you aren’t rack mounting it, I suppose you might have better luck by using two different coolers with one that has a fan mounted at 90° from the other, or by drawing in air from the rear of the case, but I have a feeling that would make the VRMs run a bit hot. Best bet if you really want consistent temps would be to water cool it, but that will definitely be much more expensive.
Does the heatsink use a thermal pad or paste? It’s spring tensioned so maybe try paste if it isn’t
Repasting might be worth it if it is, just make sure there aren’t any surface mount components that make contact, capton tape can take care of that
If you can get heat to the heatsink faster then that’s more it can cram into the air