Work in Progress DRAFT comments welcome.
Wait, this is a how-to??
It is a How-t’Review let’s say Be sure to check out the video and follow along with our thoughts here.
Full review writeup here:
In this writeup, I’m going to suggest some improvements you can do to your 45 drives setup. This post sort of took off. It’s some very good quality-of-life improvements!
- Enable “Previous Versions” tab for Windows Shares using ZFS Snapshots
- Portainer “Docker” Interface (Using PodMan as a drop-in Docker replacement / Setup Guide)
- Steam Cache (LAN Cache)
- Pi-hole DNS Blacklist
- Customize Houston Left Tabs to link to Portainer
- Other Cockpit plugins that are useful?
- Adding users – Also smbadduser fix?
- How to configure Multipath for external disk shelves
- How to Configure Bifrucation on the Supermicro X11SPL-F (it’s non-obvious!)
- Install lm-sensors (may not be needed in the stock config)
… keep reading!
Quality of Life Improvements with 45Drives Ubuntu 20.04-based install
Being the armchair well akssually blowhard computer janitor that I am, let me suggest some improvements or call out some bugs so they can be fixed.
Install lm-sensors
I am not sure why lm-sensors was not installed by default? I suppose out of the box it doesn’t pick up much more than cpu temp, which was already there via the Houston GUI.
Ram Temperature is also correctly reported, which is nice. ECC DDR4 can get hotter than one might think.
When I installed it, it picked up additional sensors such as those on the IPMI (though it does not report PSU power temps correctly) and the add-in network card. (Knowing if your NIC is thermal throttling is nice.)
Kanban Todo: Add more lm-sensor data to 45Drives system tab. While we’re in there, pages like:
should really contain smartctl info as well:
=== START OF SMART DATA SECTION ===
SMART overall-health self-assessment test result: PASSED

SMART/Health Information (NVMe Log 0x02)
Critical Warning:                   0x00
Temperature:                        35 Celsius
Available Spare:                    100%
Available Spare Threshold:          10%
Percentage Used:                    16%
Data Units Read:                    466,093,979 [238 TB]
Data Units Written:                 287,774,446 [147 TB]
Host Read Commands:                 2,806,650,612
Host Write Commands:                4,375,414,223
Controller Busy Time:               72,934
Power Cycles:                       63
Power On Hours:                     13,173
Unsafe Shutdowns:                   49
Media and Data Integrity Errors:    0
Error Information Log Entries:      0
Warning  Comp. Temperature Time:    0
Critical Comp. Temperature Time:    0
Temperature Sensor 1:               35 Celsius
Difficulty: < 1 day of work.
I’ve added NVMe for ZFS Metadata reasons, but those have sensors for temperature that should be monitored as well.
That reminds me – not seeing smart monitoring in the Houston GUI. It will be there for the Storinator chassis itself – it just doesn’t show for the disk shelf I added. Nor for the NVMe.
Kanban Todo: Add Smartctl monitoring of smart device status. This will be a little more involved – creating a service to monitor the SSDs. Though, iirc, RedHat already had a web management thing for reporting on drive failure and notifying you proactively either via system logs or email. TODO for me: research that fruther.
One of the drives I added to the system has 1 bad sector. It’s weird. I’ve tested it to the nth degree and it’s fine and the performance is good but for whatever reason it has a bad sector. Just the one.
I noticed that when I use that drive in an array, many other software platforms warn me about it. Most of the time it is along the lines of "Hey, so uh SMARTCTL says this drive is OK but it has a bad sector.
Be aware of that… maybe go ahead and replace it" That’d be nice in this gui, too. I get why they might do that.
User Creation Bug… maybe? No Access to SMB Shares for Users via Houston
So when you create a user, it doesn’t automatically allow that user to access SMB/Samba users. Is this a bug or a feature? I had to go to the terminal and smbadduser -a user for the ```user`` I had created. This is not a problem if you join your 45Drives box to a pre-existing windows domain as that would do user auth and it’s not going to be a problem, or at least the same problem, in that scenario.
Quality of Life Improvement - ZFS Snapshots as Shadowcopy Snaps
So, first off, the 45Drive UI for browsing datasets and ZFS stuff is actually quite good as-is. It seems to have been based off of a now archived project:
Optimans' Cockpit ZFS Manager
but 45Drives has forked that Cockpit plugin and created their own with what appears to be significant active development on it:
I found this post by Optimans over at STH – I hope he’s getting paid by 45Drives. Sounds like some cool stuff is in the works: Cockpit ZFS Manager | ServeTheHome Forums
It is easy to create a new dataset, toggle options and do all the housekeeping. They’ve put a fair bit of work into that and kudos is due.
We have a script around here at Level1 for folks looking to DIY their ZFS snapshots. It’s a script and guide for setting up a cron job that’ll run your snapshot script at specified times and name them in a way that’s compatible with what windows expects. Further, ther’s a VFS Object bridge that Samba supports with these types of snapshots – you just have to enable it and tell samba to use it.
Here’s a mini version of that same guide, as it applies to 45Drives:
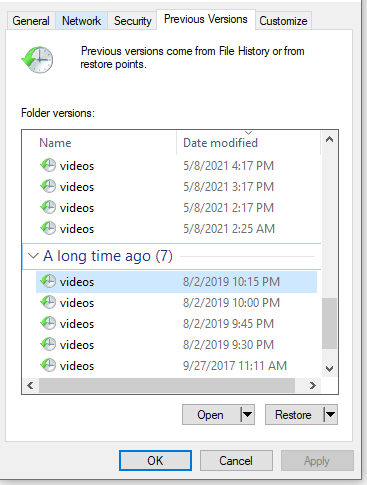
ZFS Snapshots → Previous Versions Tab on Samba
Go from this:
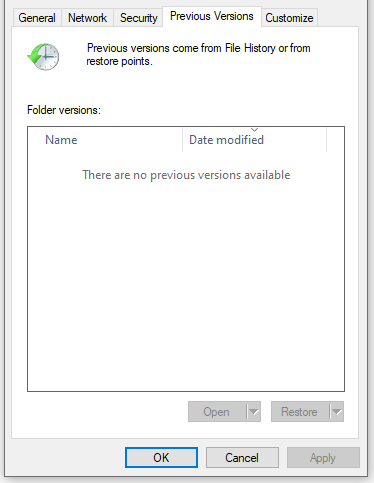
to this:
The first you need the ZFS Auto Snapshot script:
from the terminal on the 45Drives UI all you need to do is:
git clone the above repo. The instructons there are good to follow, but do note: It is no longer necessary to do the git merge origin/leecallen changes. It can now work out of the box with recent enough Samba, which we have on Ubuntu 20.04 LTS
cd into zfs-auto-snapshots and make install
It’ll copy scripts around the system for you:
This script obeys the ZFS dataset property for auto-snapshots. Don’t forget to set that on dataset(s) you want to snapshot.
e.g.
 zfs set com.sun:auto-snapshot=true elbereth/videos
 zfs set com.sun:auto-snapshot=true elbereth/lancache
Lancache contains our steam cache. No need to snapshot that!
This is just basic cron job manipulation 101, but if you’re lost comment below and I’ll try to helo.
This takes care of the actual ZFS snapshotting… but we need to glue it to the samba UI.
Technically, out of the box, the package for shadowcopy/previous versions is not a required package. It may not be installed on your system, but it was on mine. If you’re missing it you can install ``ap install samba-vfs-modules```
When went to do this for this guide, I found that Samba’s VFS objects package was already installed on my 45Drives system without me having to do anything. Nice!
…but it wasn’t enabled. Do do that edit /etc/ssamb/smb.conf and enable shadow options in the [global] section:
  shadow: snapdir = .zfs/snapshot
   shadow: sort = desc
   shadow: format = -%Y-%m-%d-%H%M
   shadow: snapprefix = ^zfs-auto-snap_\(frequent\)\{0,1\}\(hourly\)\{0,1\}\(daily\)\{0,1\}\(monthly\)\{0,1\}
   shadow: delimiter = -20
… just paste that toward the end of that section. And restart the samba service(s).
This format should match the automatic snapper script format without you having to do any work. This is a bit abbreviated – the full how-to here and on github is more comprehensive.
There’s one last step to enable the previous versions tab, but it can be done via the gui.
Go to configure the samba share for the dataset(s) you have enabled auto-snapshot on and add this under ‘additional’ in the ui:
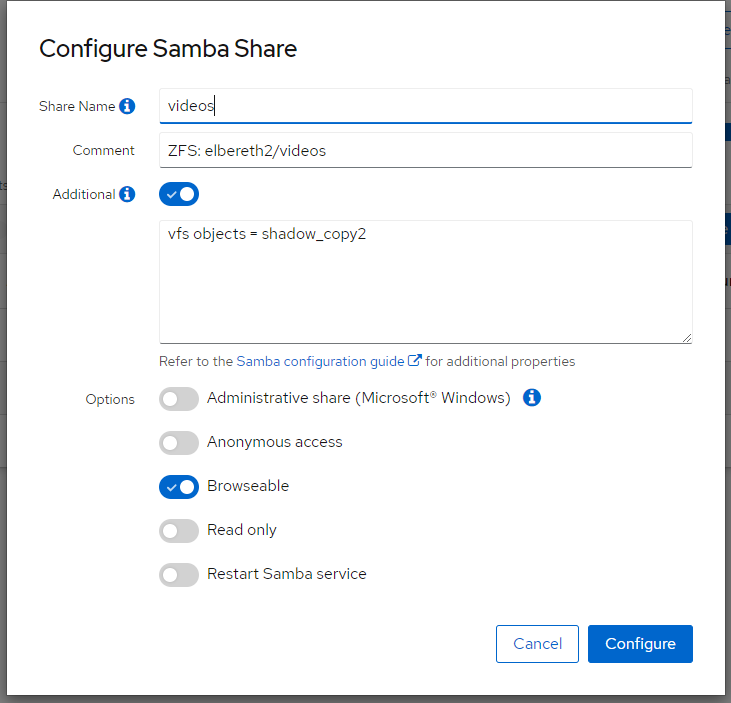
vfs objects = shadow_copy2
This will enable the previous versions functionality for any share you have enabled ZFS snapshots on.
With this, you can right-click on your 45Drives SMB shares and use the ShadowCopy tab to browse point-in-time snapshots.
Your users don’t have to be remotely technical.
If they accidentally deleted something, they can pull it out of the previous versions tab without having to do anything special.
Further, old automatic snapshots are also purged automatically. Awesome!? you bet.
That warm glow you’re feeling isn’t some unseen lump of uranium – that’s the love from Level1!
Out of the box, though, that snapper script generates a lot of snapshots. I find for my use case that about 2 snapshots a day is fine. Edit the cron jobs to suit your taste.
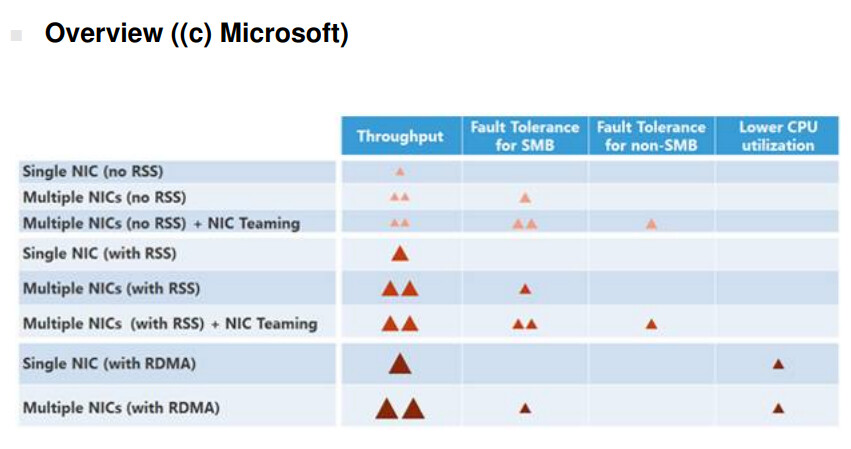
Qualitty of Life Improvement - SMB Multichannel
Why is this not on by default?
I need the big red triangles of throughut. I HAVE TO HAVE THEM.
It’s a one-line fix to the [global] section of /etc/samba.smb.conf
   # multichannel
   server multi channel support = yes
For maximum stability I’m not sure if SMB Multichannel can be recommended, or not. We’ve been using it with a 2x10gb IntelNic on the ol’ yeller for years and no corruption (that we know of…).
Quality of Live Improvement - Portainer
TODO
- Install PodMan (drop-in replacement for Doker)
- Install Portainer (gu for containers)
- Configure Firewall to allow access to portainer
3b. Show how to store Docker stuff on ZFS
– this opens up an extradimensional rabbit hole about performance, zfs-specific Docker/Overlay Plugins and 5th dimensional chess… Need to think about how to do this while minimizing pitfalls for people that just want to copy-paste commands… - Set Username(s) and Password(s) for SMB
- Install Lancache
- Install PiHole
- Install… ? Other stuff.
- Might be nice to have log forwarding daemon running as a container so your other machines can forward all their logs here? maybe? Could be a portainer thing.
Hourston built-in Virtual Machine GUI
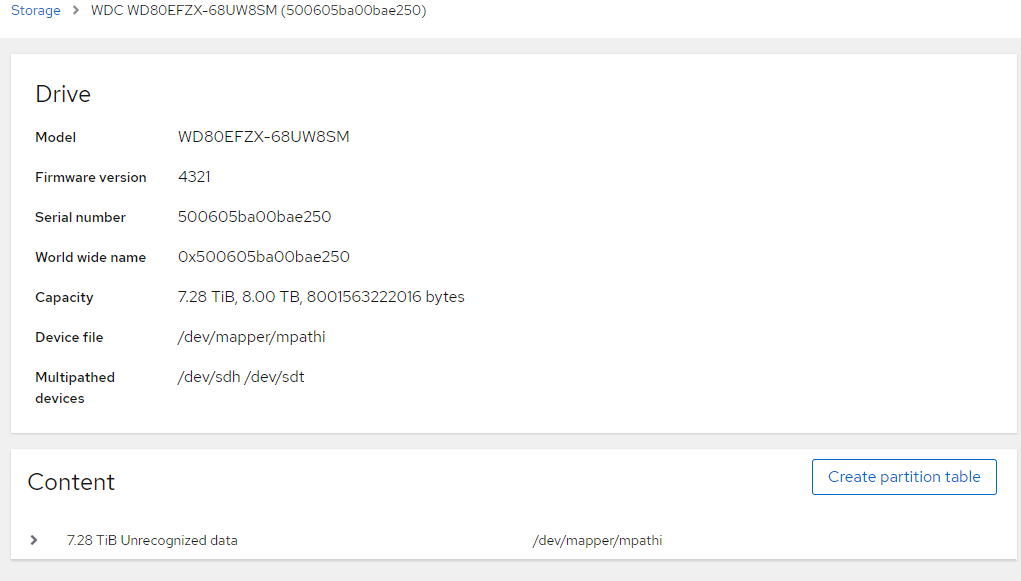
How to Configure Multipath
One thing I really REALLY like about the LSI 4243 and 4248 disk shelves are that they enable mulitpath even with lowly SATA disks. What is multipath? It means that the physical drive is reachable through more than one disk controller. So the physical disk shows up in the system twice and multipath makes sure that Bad Things Do Not Happen. This is great because an array can remain online even when a controller pops.
The 45Drives chassis/controller setup is not, by default, designed to do this. The 30 onboard drive slots are not multipath. To be perfectly frank, Multipath adds a lot of complexity and overhead. 30 or 45 disks is not that many disks anymore. I like having multipath, but I can live without it.
It makes sense that multipath is going away in systems like this – if you’re BackBlaze with an army of these storage pods, you have distributed replication anyway. If a primary path goes offline – you might as well chuck the entire storage group and rely on the distributed clustered nature of the overall storage pool to handle that situation while technicians work on restoring the faulted hardware. You simply don’t need the cost or complexity of Multipath because the redundancy instead comes from other storage pods in your facility.
Fortunately for us, the relative openness here means that configuring multipath anyway is easy – you can run it and it’ll create a configuration file saved in /etc. When you’re creating your ZFS Array, you can use the multipath path and then data will be routed through any functional path (or even both paths! If you prefer to run both at once active/active for performance reasons!).
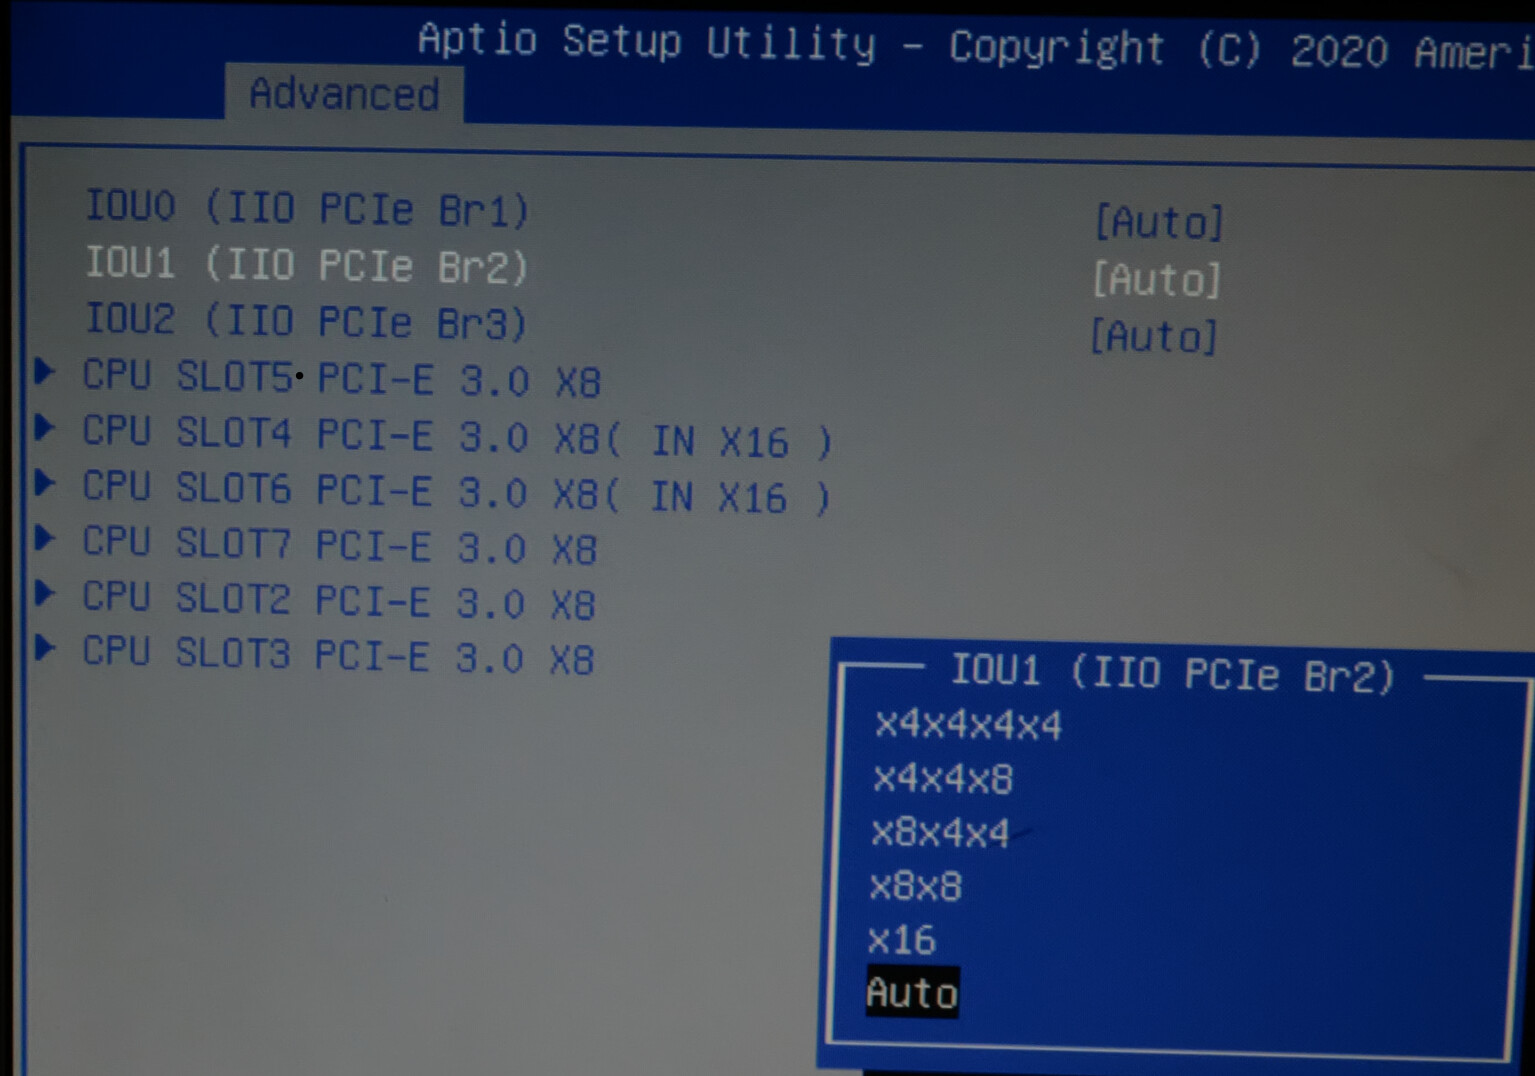
About SuperMicro Obfuscated Bifrucation Options on the X11SPL
So this is an Intel thing and Supermicro didn’t put a lot of work building an elaborate or logical UI around it. There are three PCIe root ports on Cascade Lake that are 16 Lanes wide. The options in bios let you pick x8x4x4 and x4x4x8 (among other options). The x16 slots are never x16 electrically. Every single slot on this motherboard is x8 electrically (to the cpu) except for the farthest one, which is x8 physical, x4 electrical, to the chipset.
Note: The x8 slots are also not open ended. That’s the one silly oversight on Supermicro’s part. If the slots were open-ended, any x16 card could physically fit in the x8 slots.
It may take some experimentation on your part (it did on mine) because, in the manual, the motherboard block diagram refers to the x16 ports differently than the bios does. One uses letters and numbers – the other numbers and letters. And also the numbers start from 0 in the bios, and 1 on the motherboard block diagram. I get what they were talking about, but going off-script here for even a seasoned admin would probably be frustrating if someone didn’t explain it to you.
Here’s what the bios looks like:
Here’s what the Block Diagram looks like:
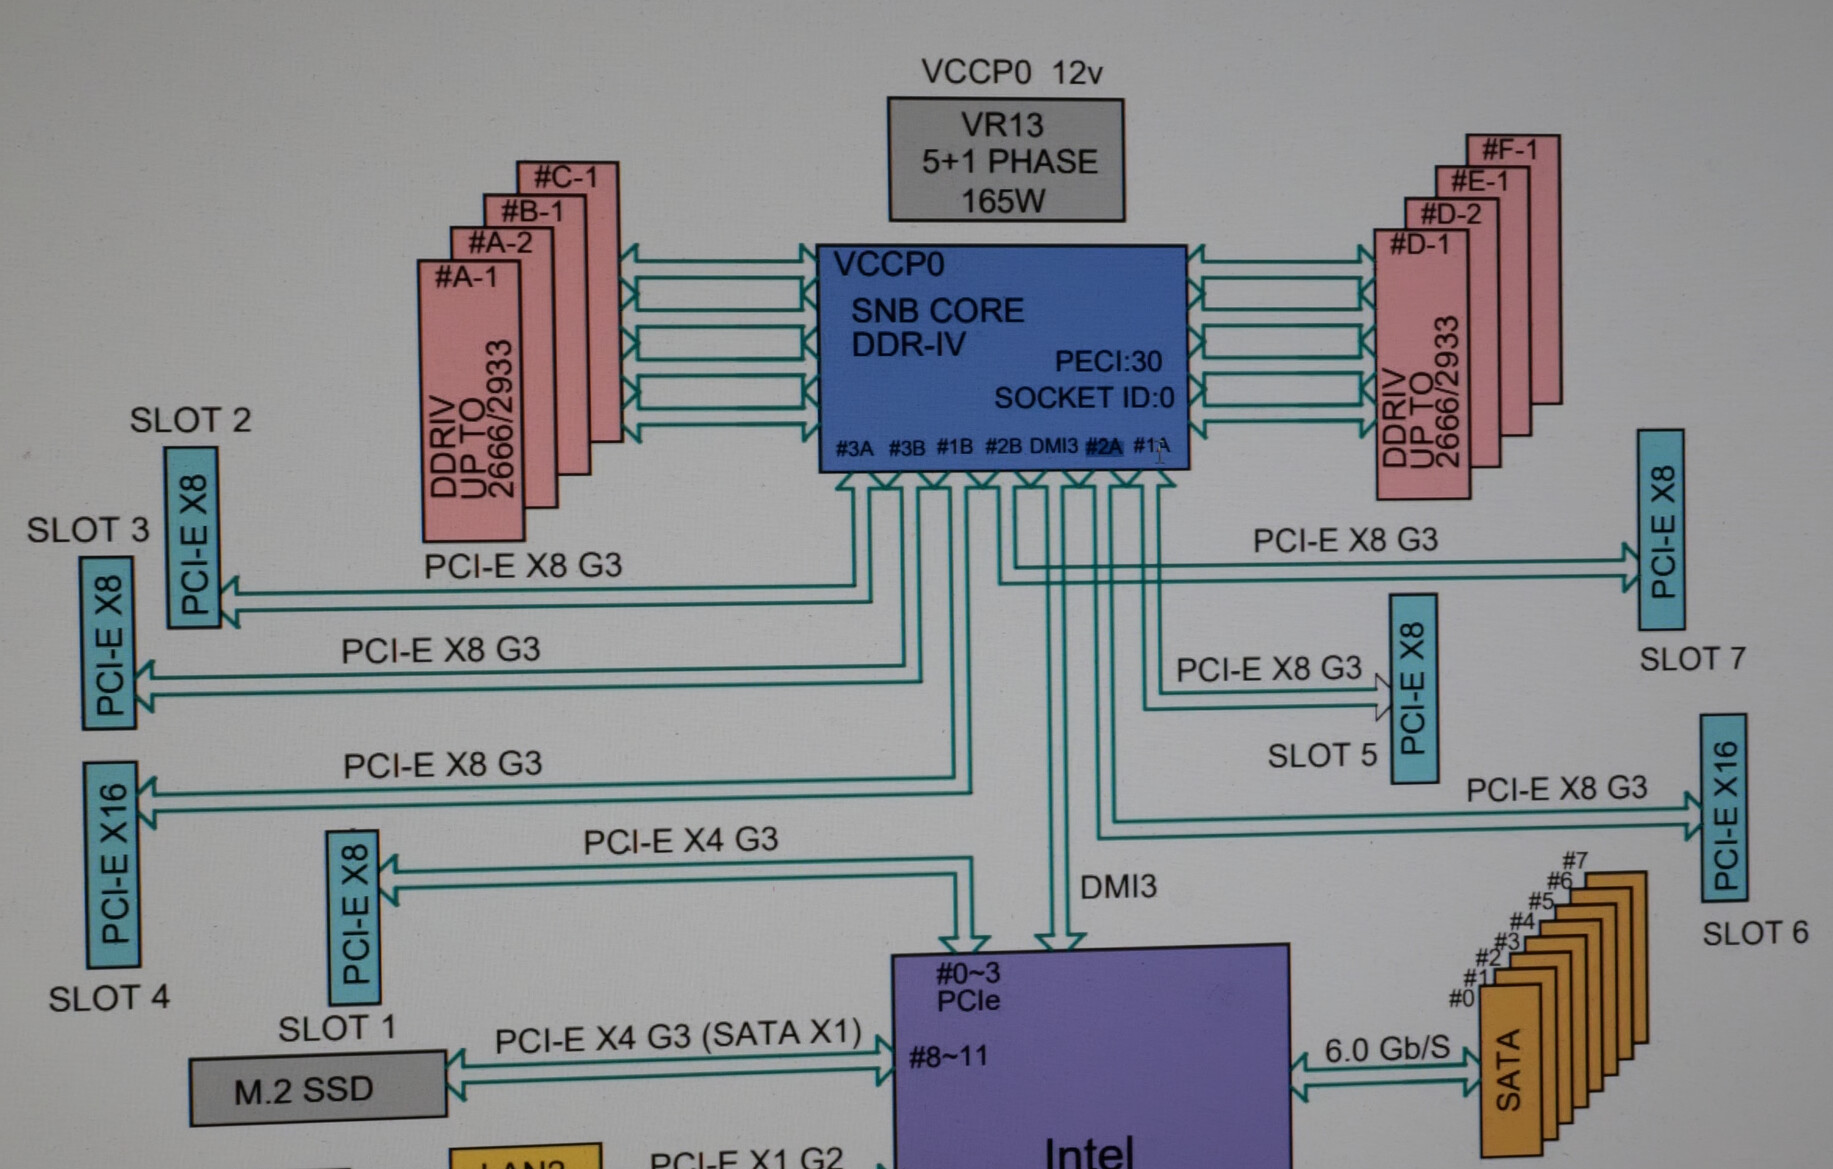
Do you see the issue? The labeling is not consistent on the CPU side of things between the bios and the block diagram. You can work it out by looking at the slot numbers, and then if that’s the “A” or “B” channel on the port, and working backwards from there.
That was what I needed to do to get a simple x8 → x4x4 NVMe adapter to work in the system while keeping everything else at x8.
Also, the “x16” option on the bios menu is borderline nonsensical because in order to get an x16 slot here you’d have to run two x8 riser cables to recombine two x8 slots back into x16. (Neither x16 slot is “also” wired to be electrically x16 even if the corresponding other slot is unoccupied, as you might have expected from desktop boards. That’s perfectly okay though.)
Configure Container Support (Podman)
So the situation with containers on Ubuntu 20.04 is a bit of a mess. Previously cockpit-docker was what you’d use. It was deprecated, and pulled from 20.04. There is no direct replacement.
In 2021, there is now cockpit-podman, which is a gui for podman, which is sort of meant to replace the container management here. It’s not quite at feature parity with cockpit-docker but as of 5/2021, it’s close enough imho.
You should be aware this is a bit of a no-mans-land, however. Docker-ce “should” be the better route to go here, but it just isn’t for 20.04. Ubuntu 20.10 has native support for podman (and cockpit-podman) but I’m not sure I want to go away from an LTS distro for my storage server.
What I plan to do with this is run Lancache, LancacheDNS, PiHole and other similar Docker containers. These are not mission critical and it isn’t the end of the day if some LTS breaks. You need to reason through your own scenario to make the choice here, though. Full disclosure.
And Podman is compatible enough with docker that alias docker=podman works just fine.
Setting up Podman on Ubuntu 20.04.
OpenSuse (!?) has done the work here for us.
# General Steps for setting up PodMan on Ubuntu 20.04
sudo bash
source /etc/os-release
sh -c "echo 'deb http://download.opensuse.org/repositories/devel:/kubic:/libcontainers:/stable/xUbuntu_${VERSION_ID}/ /' > /etc/apt/sources.list.d/devel:kubic:libcontainers:stable.list"
wget -nv https://download.opensuse.org/repositories/devel:kubic:libcontainers:stable/xUbuntu_${VERSION_ID}/Release.key -O- | sudo apt-key add -
apt update
apt install podman

# verify it works
podman --version
Finally, wget and apt install /your/local/path the deb referenced in this github thread (which is worth a read)
wget https://launchpad.net/ubuntu/+source/cockpit-podman/25-1~ubuntu20.10.1/+build/20407508/+files/cockpit-podman_25-1~ubuntu20.10.1_all.deb
apt install `pwd`/cockpit-podman_25-1~ubuntu20.10.1_all.deb
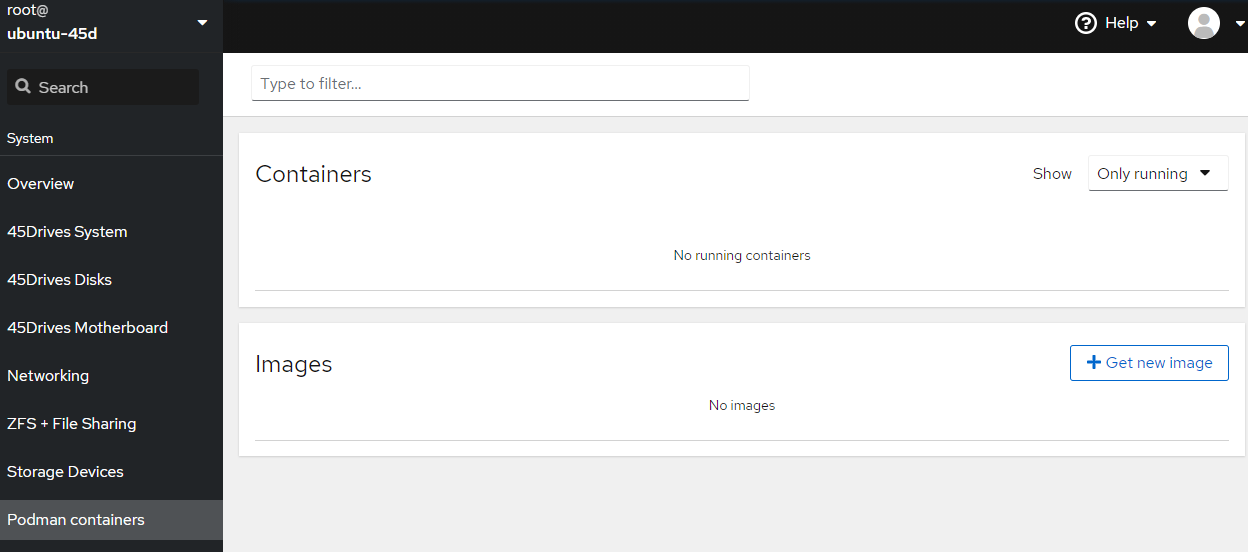
… and then you should see a new option when you refresh the screen:
… Yes, note this is technically meant for ubuntu 20.04. It’s not the best thing we’re doing here. I would have preferred to go with cockpit-docker for 20.04 and then done another writeup for podman and cockpit-podman for 20.10 and beyond. But here we are…
Also, I would ask you to think about where podman is going to store things. Out of the box that’s on your raid1 SSDs mounted at /
It is possible to store these on your ZFS pool without too much headache, but that’s a how-to for another day.
Install PIHole
Note: PiHole works at a DNS level. As does LanCache. You have to understand what you’re doing or you’ll have problems that will be difficult to resolve because you don’t understand the magic behind the curtain.
DNS is a hierachy. It is really easy to create an infinite loop if you aren’t paying attention. I think the ‘ideal’ setup it something like
DNS Request > Pi Hole > [ ISP or Google or Open DNS if it’s a general query OR LanCAche if it’s a game query ]
If it’s a game query for blizzard or steam, that dns record will be redirected back onto your lan instead of going to the internet. But if for some reason lancache can’t or won’t provide dns, you still need a working path that goes to the internet (not BACK to pi hole! that’s the infinite loop! don’t do that!). So you end up specifying the “upstream” dns in the hierarchy in two places – for lancache’s dns as well as for pi hole.
TODO setup PiHole via Containers Cockpit Gui on 45 Drives
Install Lancache
If you want PiHole too, be sure to read that FIRST as it will affect some of the things you do here! PiHole works at a DNS level and ideally PiHole sits somewhere in the dns chain here.
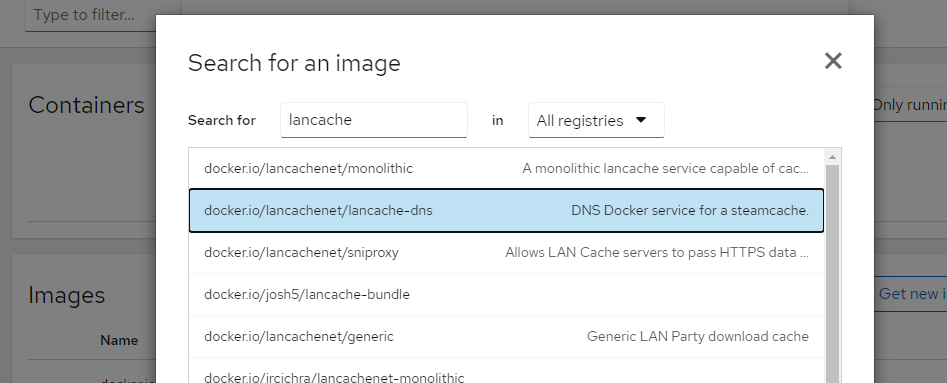
Add the containers for lancache-dns and monolithic, minimally.
It’s probably a good idea if you look over their docs:
… but as you read be aware you’re using it a little differently than they intended ![]()
In their docs it looks like:
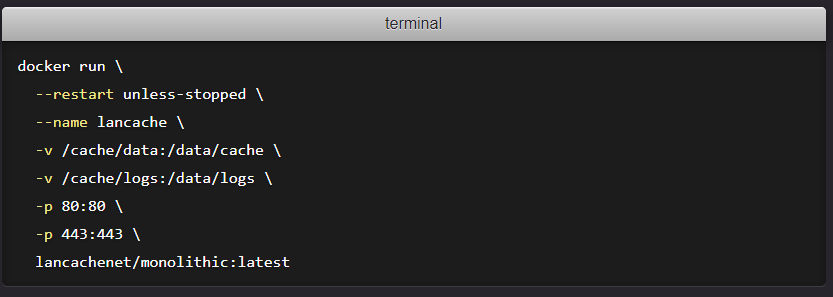
But how you’d translate that, for here, it would be:
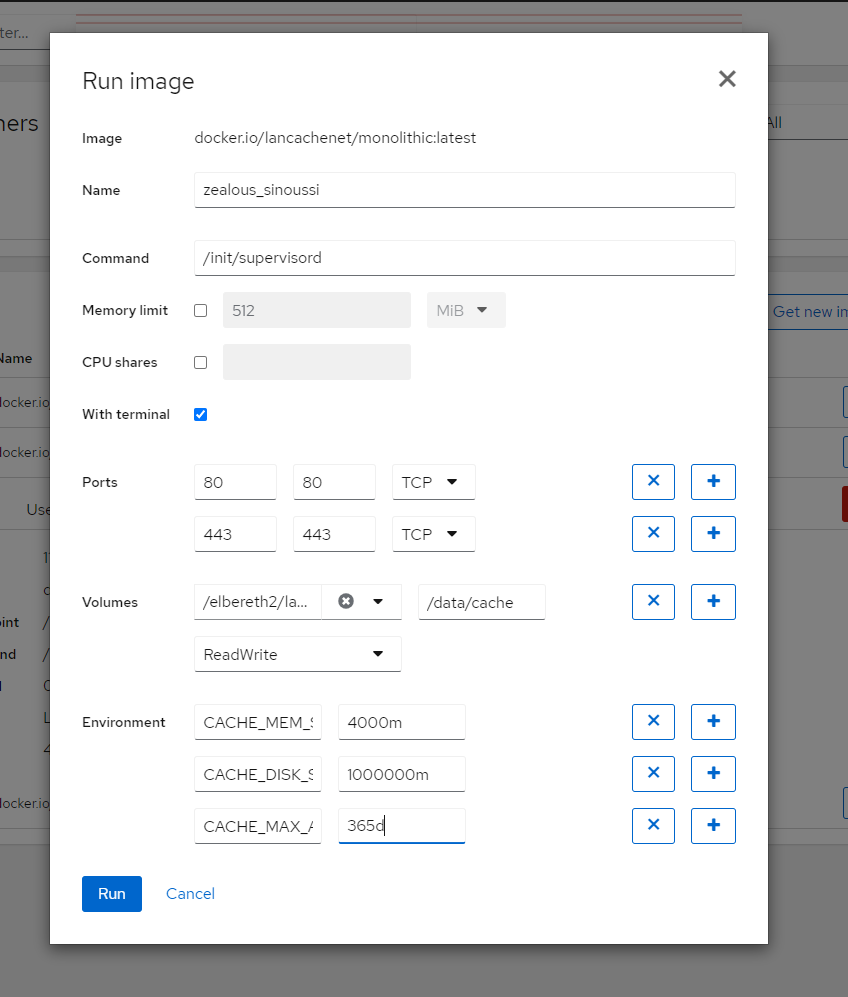
… and for DNS:

NOTE: If you get an error about port 53 being in use, specify
192.168.xxx.yyy:53 (whatever your local IP of the 45 drives box is)
[ SystemD has a DNS proxy running on 127.0.0.1:53 so… can’t bind to *:53 … don’t need to anyway ]
… if you find the gui is broken and will only let you type one dot, allow me to personally apologize for this software. Go to the terminal:
# Remember! Substitute IPs that make sense for your setup!
podman run --name lancache-dns -p 192.168.xxx.yyy:53:53/udp -e USE_GENERIC_CACHE=true -e LANCACHE_IP=192.168.xxx.yyy lancachenet/lancache-dns:latest -d
Now you should see lancache-dns in the gui, and running normally:

In order for your computers to use this dns cache, they must use the local IP address of this machine for DNS service. Or you can set the ‘dns forwarder’ on your router to this.
But how do I know Lancache is working?
Go to terminal and run this:
podman exec -it lancache tail -f /data/logs/access.log
# where lancache is the name of your lancache docker. it might have an hilarious auto-generated name like quizzical-duck
# so just change lancache to that if thats the case
you’ll see something like this while a game is downloading:

TODO


")


 )
)