background
I bought a new ssd and forgot how I did it previously.
After rereading my posts this time, I decided document the process better so that it’s easier for the third time. My goal was to swap my desktop drive with the new one
This guide assumes the following:
- you are familiar with burning a livecd to a usb drive
- have a usb drive for the live cd
- have a old drive you wish to clone from
- have a new drive you wish to clone to
- are comfortable using the terminal
clonezilla
follow these instructions
https://clonezilla.org/show-live-doc-content.php?topic=clonezilla-live/doc/03_Disk_to_disk_clone
my instructions are adapted from the link above
- start by by burning the clonezilla iso following the instructions from the clonezilla live page url. I used fedora media writter, but you can also use your preferred burning software. On windows, I use rufus.
- with your clonezilla usb prepped, power off the computer with the drive you want to clone.
- connect your replacement drive to computer.
- If your mottherboard has additional m.2 ports plug it in. In my case I didn’t, so I used a m.2 to usb key and plugged it into a usb super speed port.
- plug in your usb key
- power on your pc, interrupt the default boot command to open the boot
- in my case, it was F11
- within the boot menu, select your usb drive with clonezilla
- clonezilla will show a boot menu
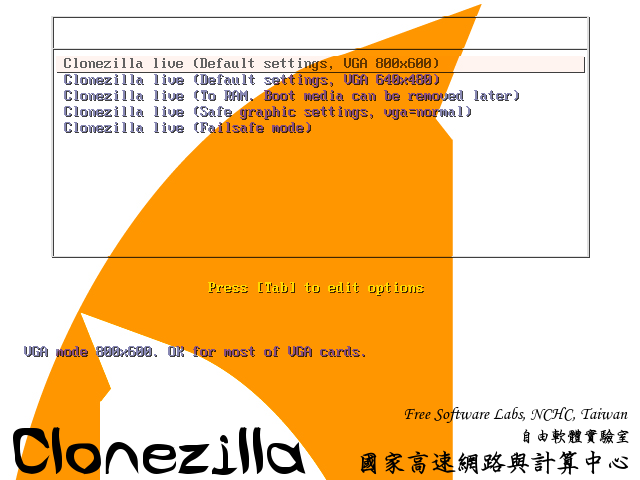
- within tthis boot menu select the
Clonezilla live (default settings, VGA 800x600)
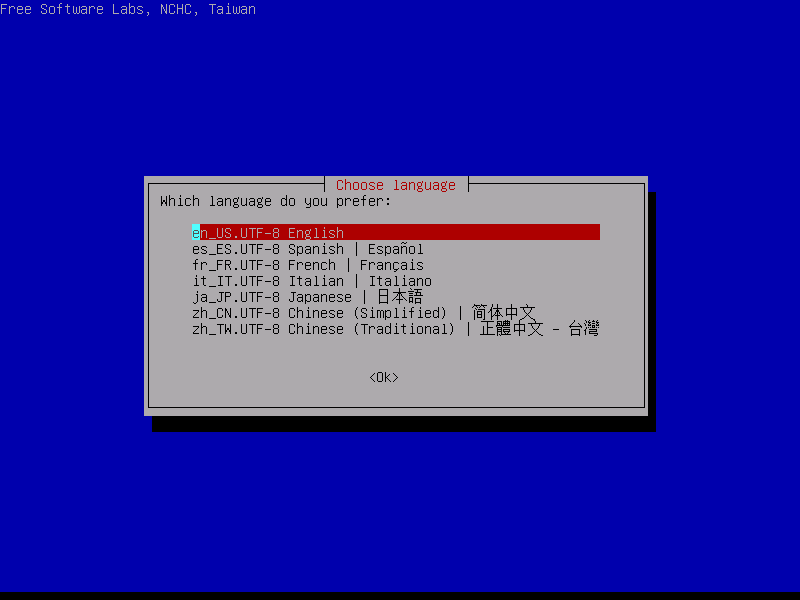
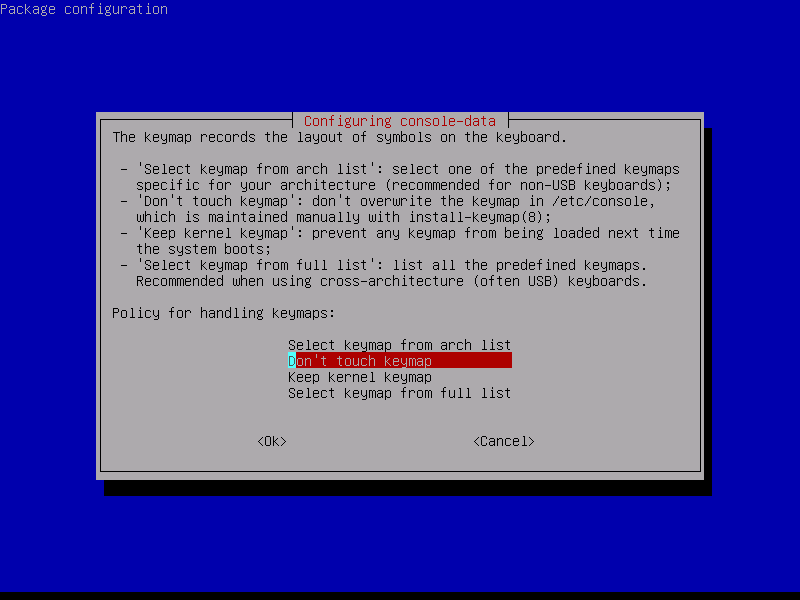
- select your preferred language and keyboard mapping
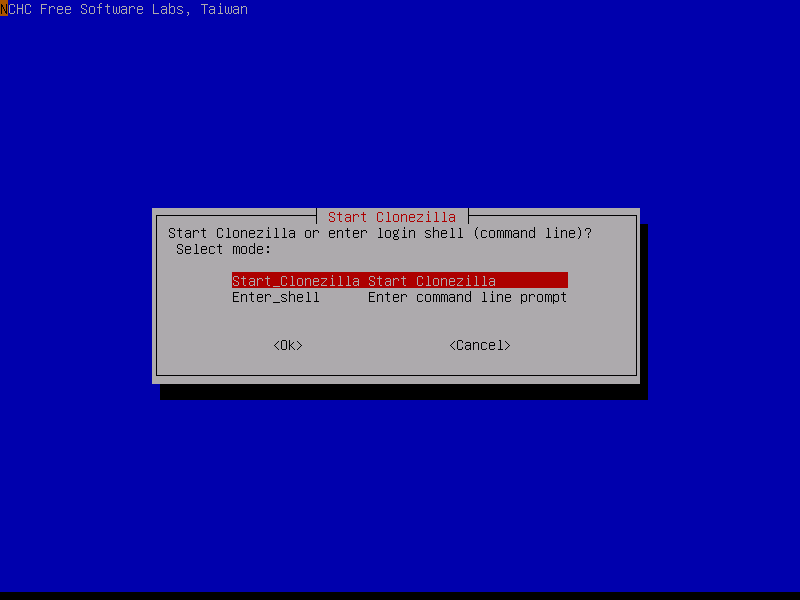
- with your language and key mapping selected, select
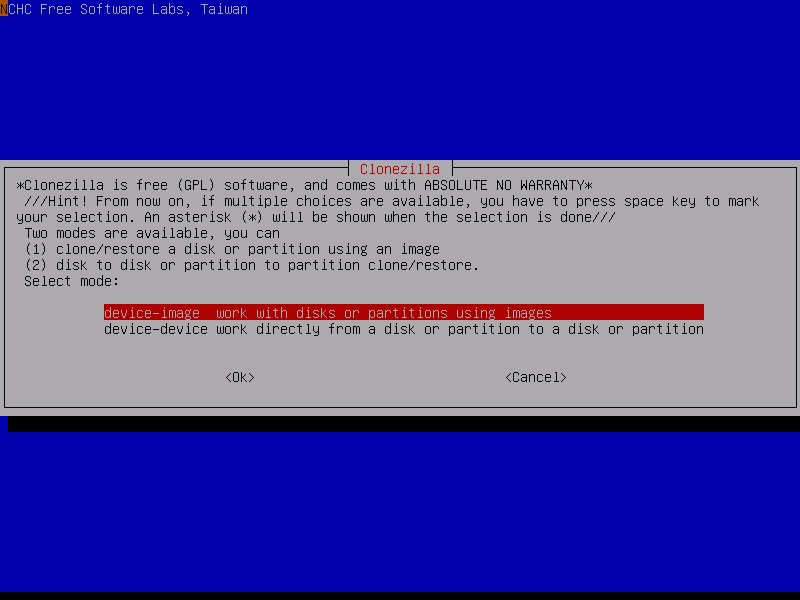
start clonezilla - with clonezilla started, it will ask you to select the mode, in our case, select the
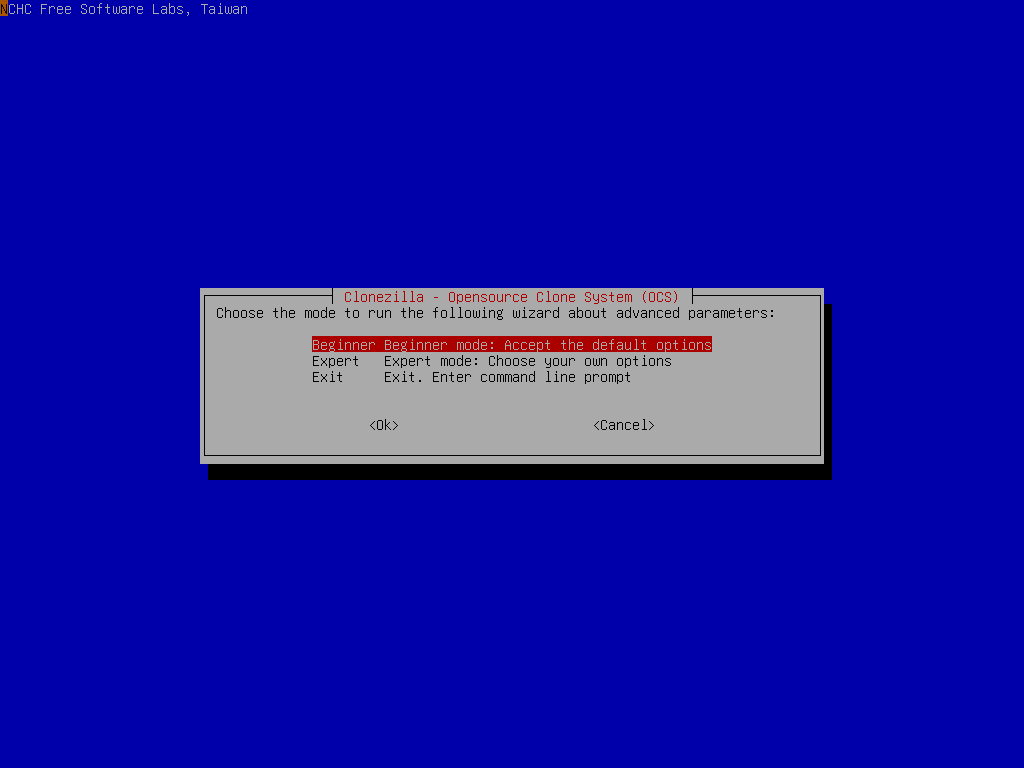
device-device work directly from a disk or partition or partition to a disk or partition - after selecting the mode, select beginner
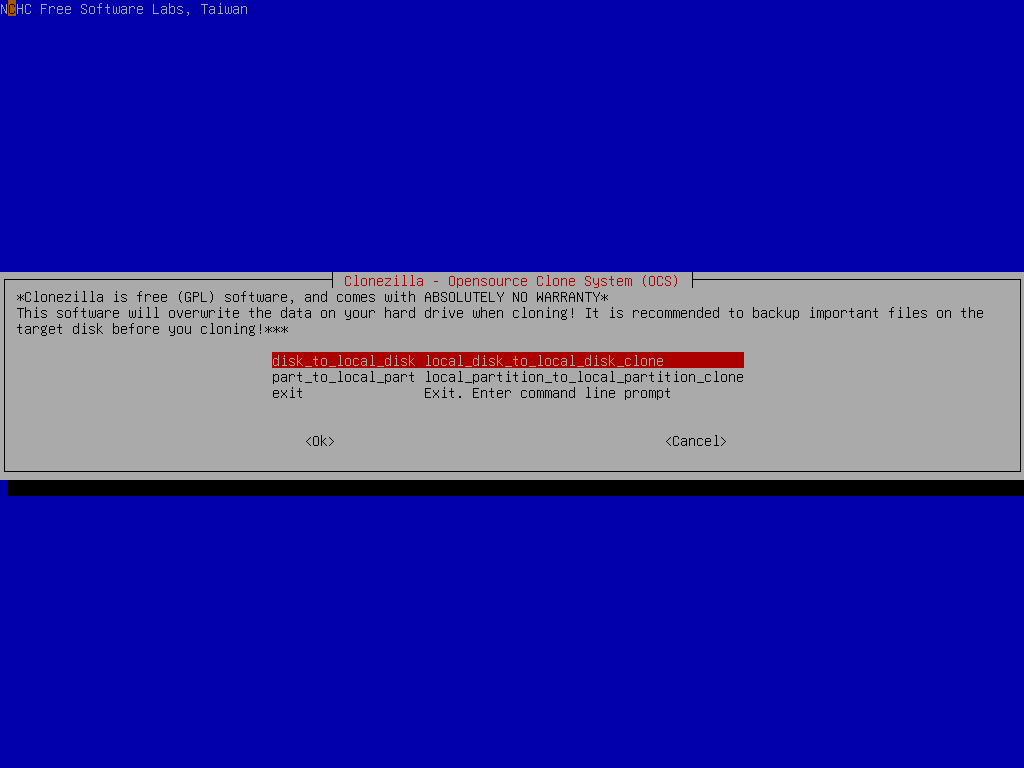
- next you’ll be prompted to select a mode, select
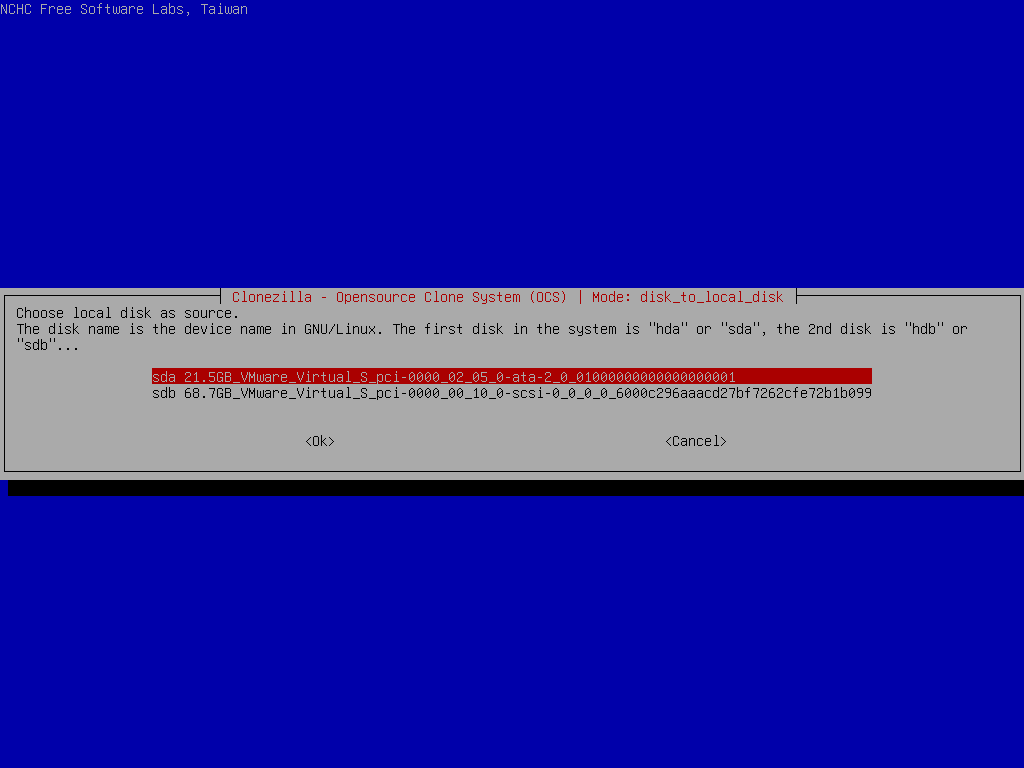
disk_to_local_disk - you’ll now be prompted to select your source disk (this is the disk you want to copy
- in this example they select 21.5 gb
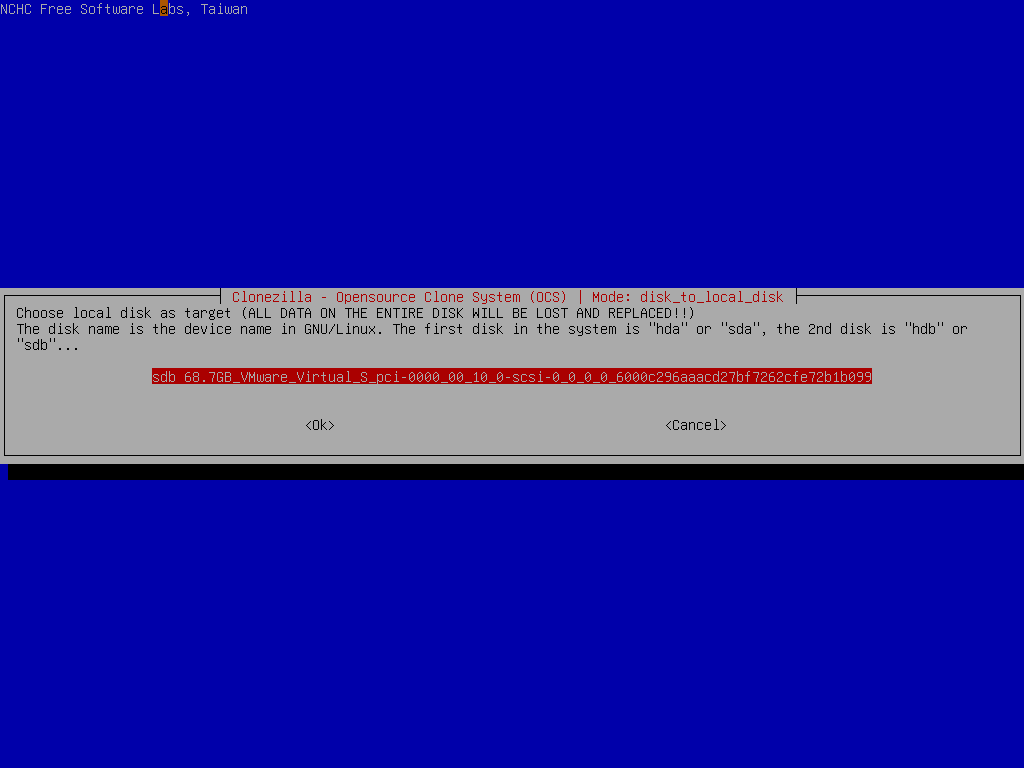
- once you select your disk, you’ll be prompted to select the target disk
- in this case they selected the 68.7 gb disk
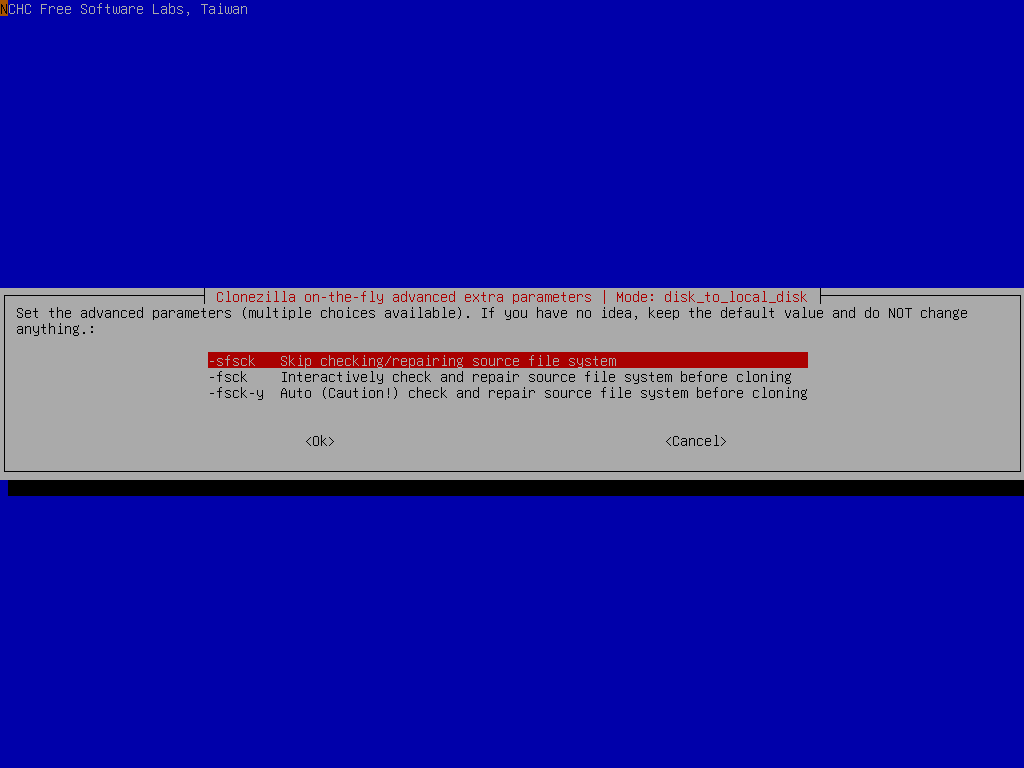
- with your disks selected, you’ll be prompted to select the advanced parameters
- I selected
fsck-y Auto, but if you need it quick, selectskip checking
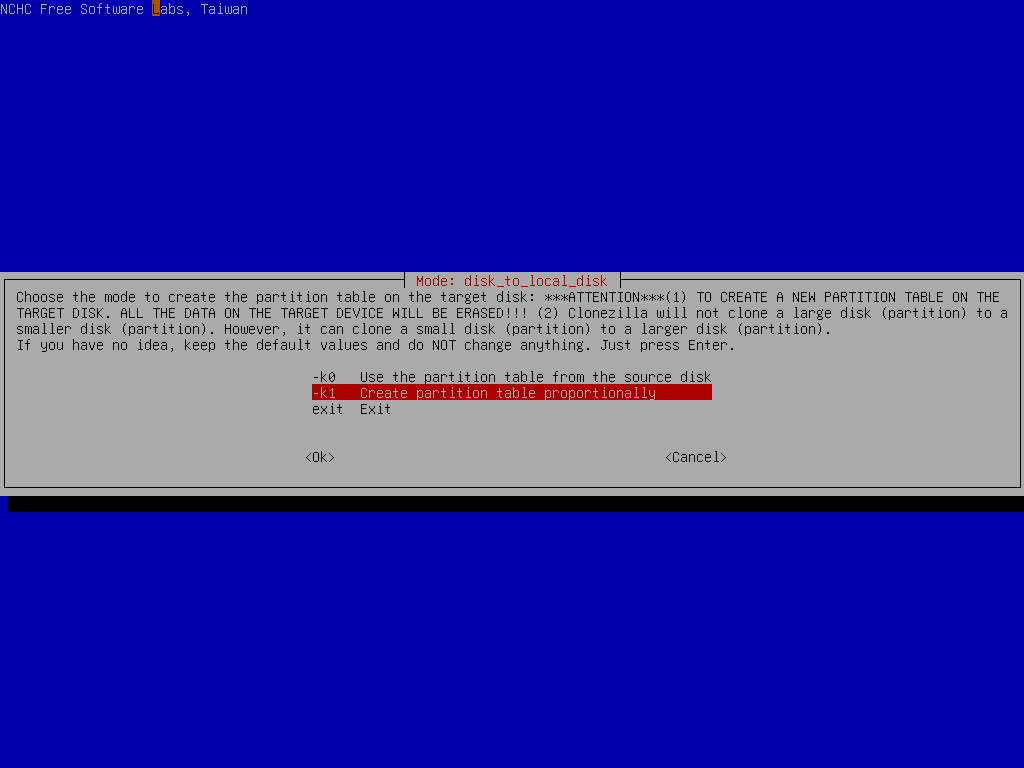
- after passing the advanced parameters, you’ll be prompted with creating a partition table. Select
-k0- in theory,
-k1should be selected if you are moving to a drive of a different size, but in my experience, I have had trouble booting into fedora when I selected-k1. It’s much easier to resize partitions in fedora than from the emergency shell. I sunk a ton of time trying to fix the partition from the dracut emergency shell and should have cut my losses earlier.
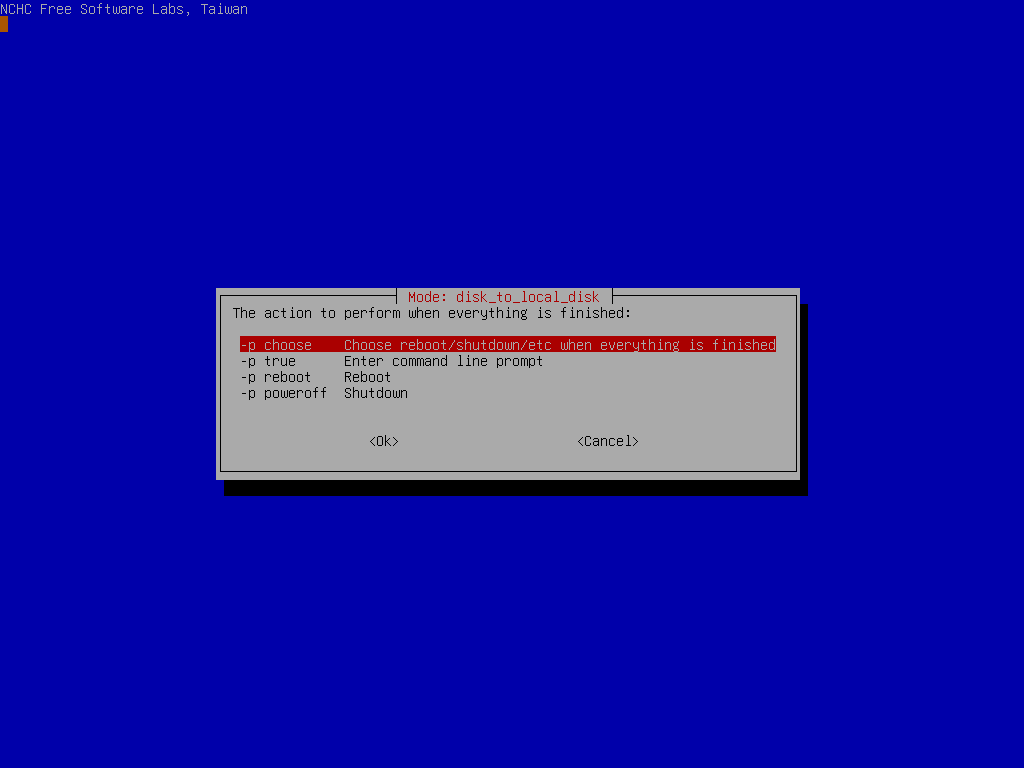
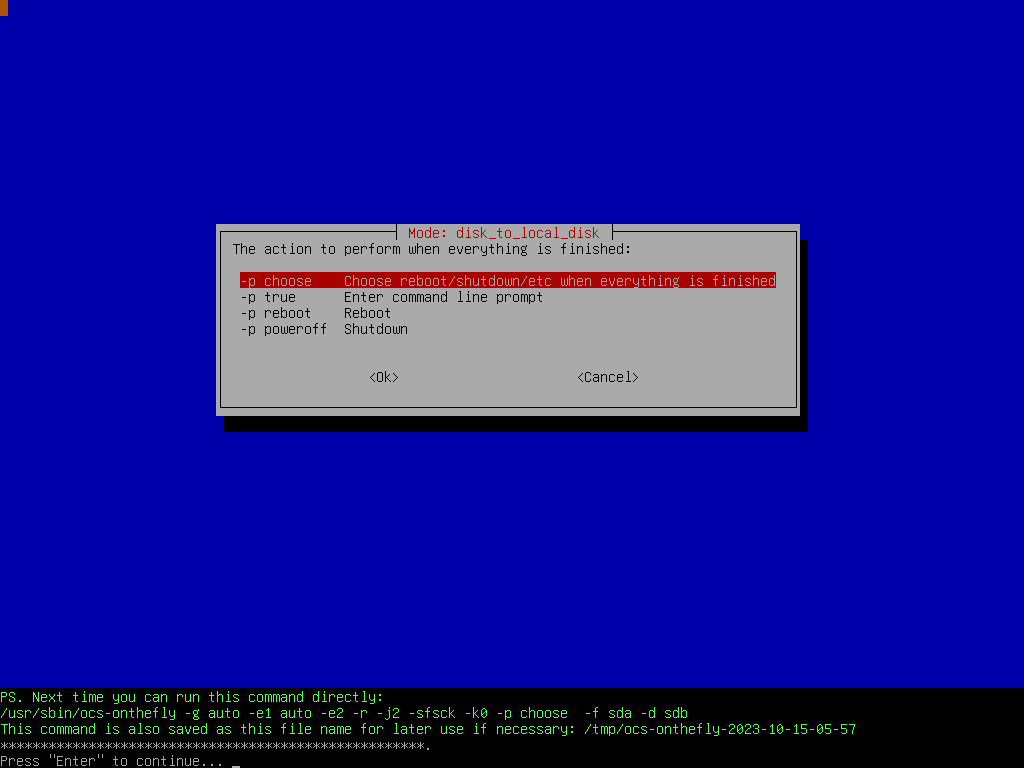
- after setting the partitions, you’ll be prompted to select a action when clonezilla is finished.
- I selected
choosebecause if clonezilla finishes faster than I expect or if glitches out I’d rather have it restart than needing to reboot and get into the clonezilla live cd
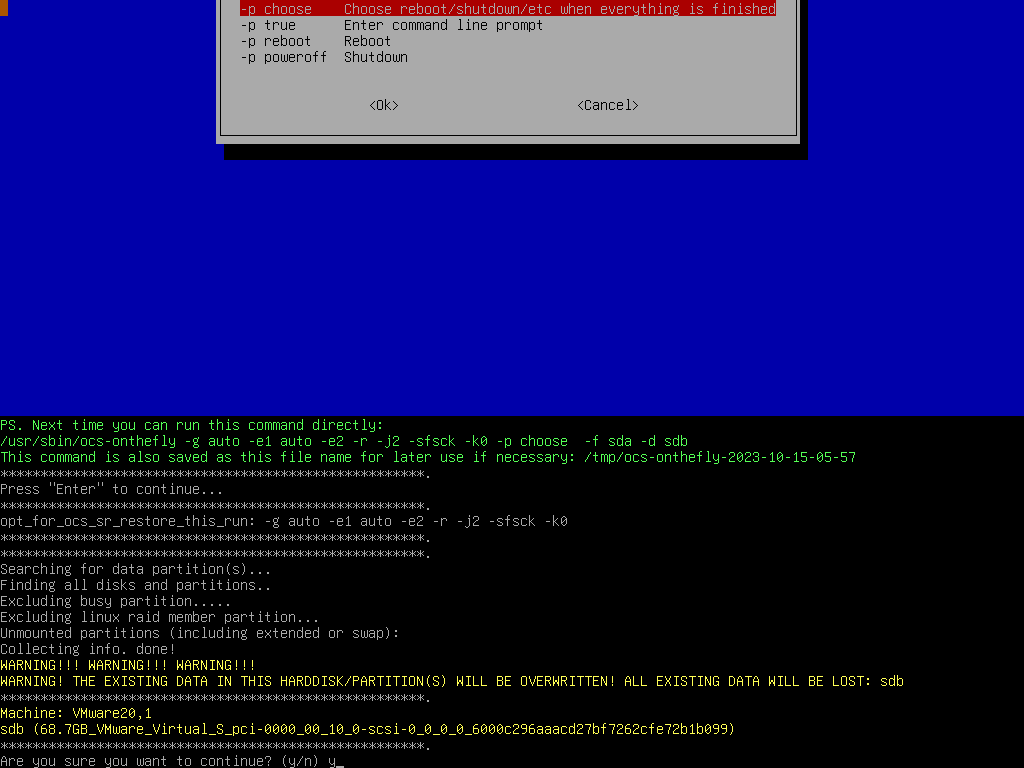
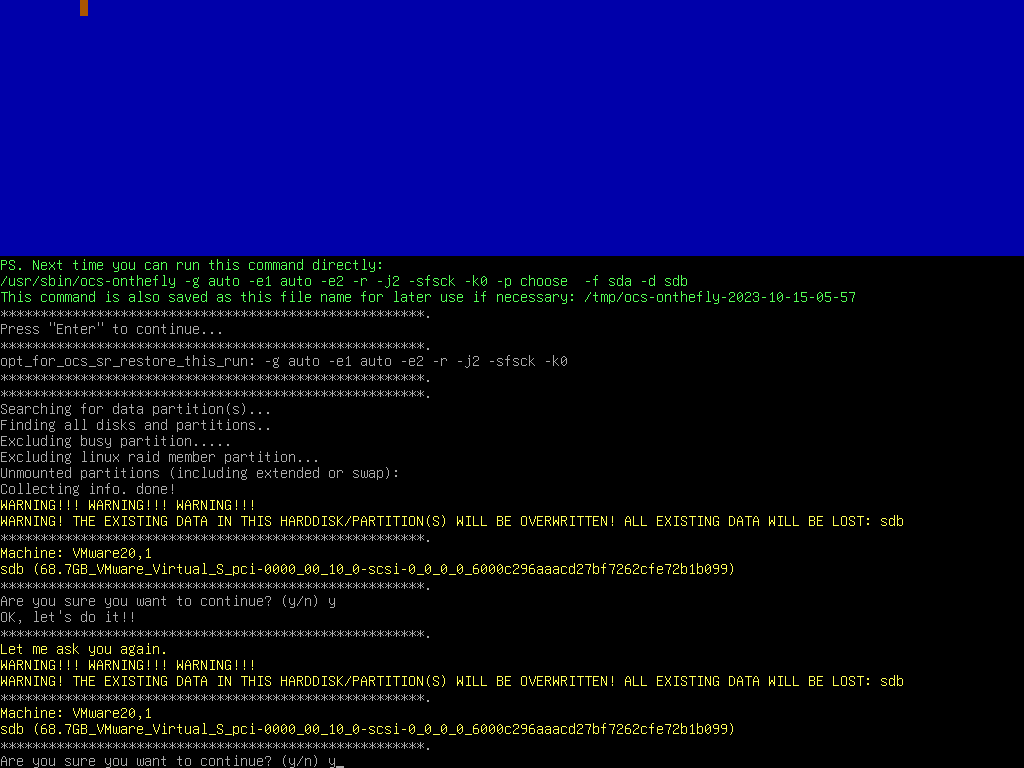
- with your settings set, you will be given a final warning before clonezilla initiates cloning, hit enter and read the warnings
- make sure the drive you want to target drive matches the name of your drive
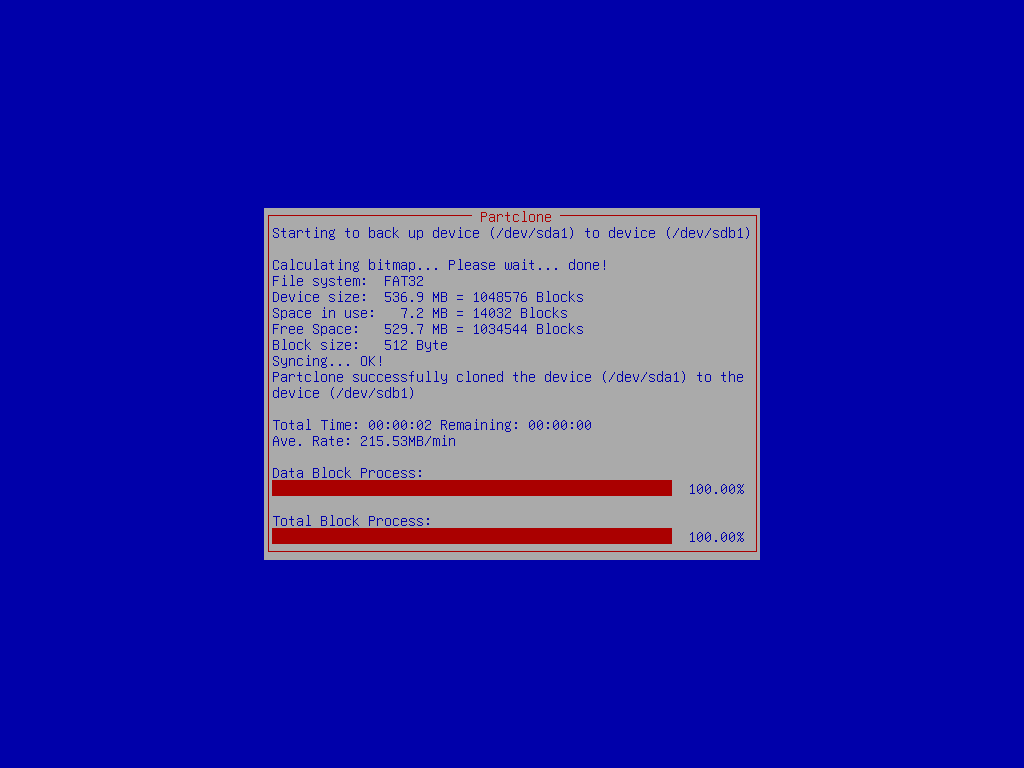
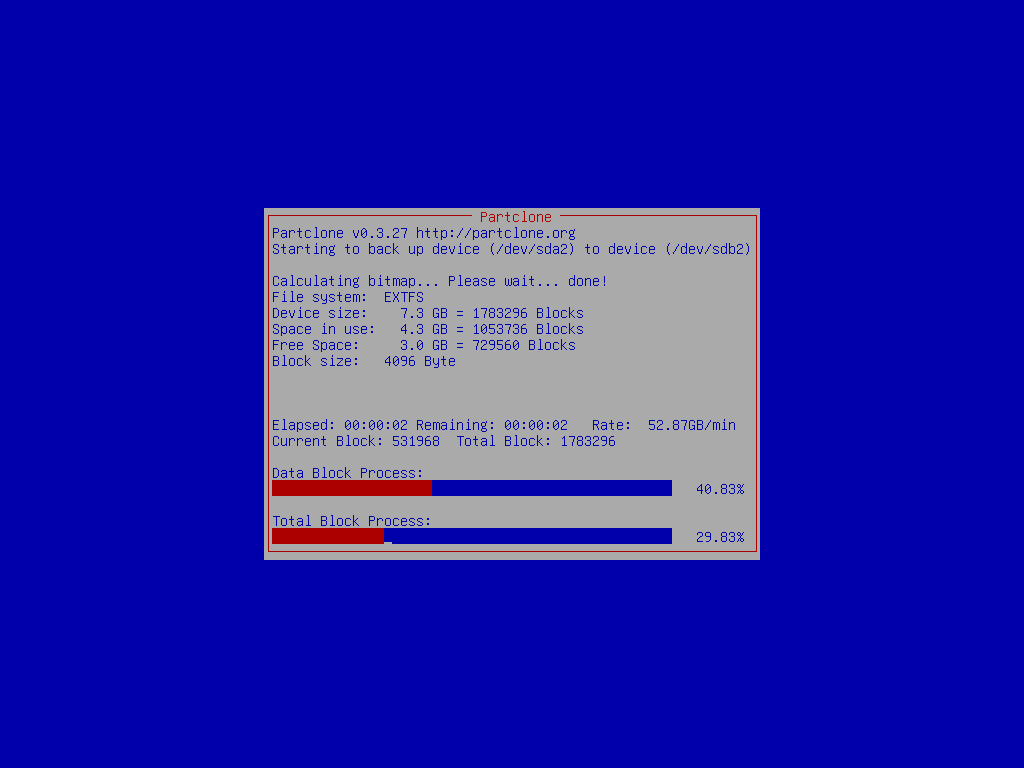
- wait for clonezilla to scan and clone the drive
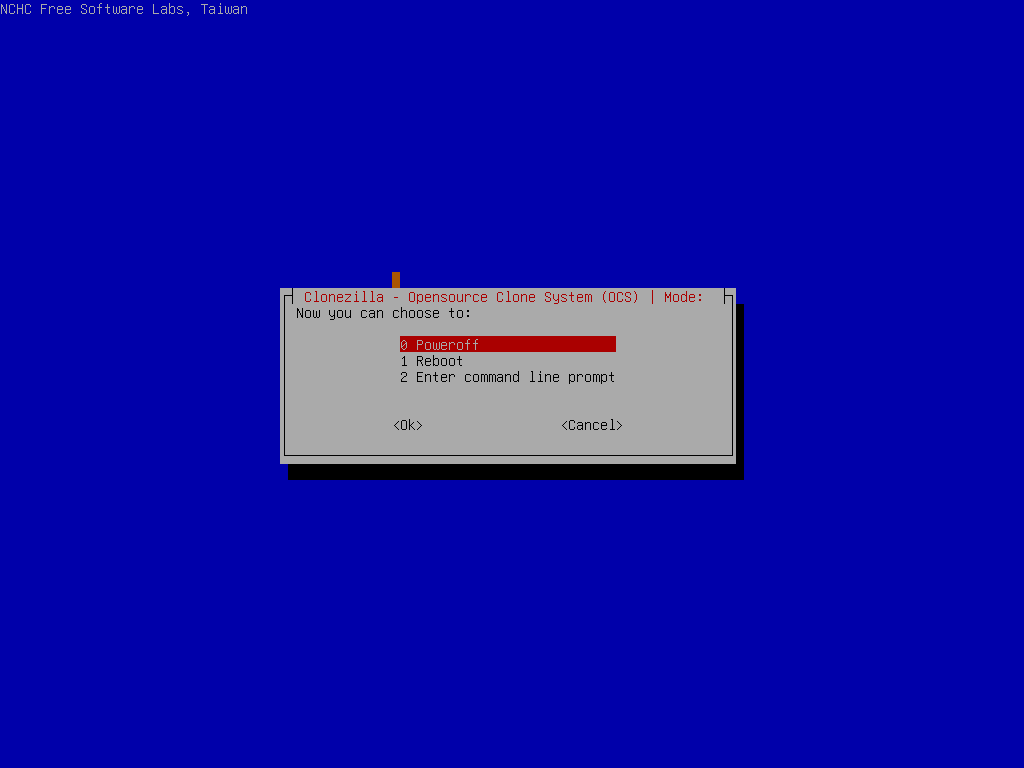
- once clonezilla is finished, it will prompt you with next steps, pick power off if it didn’t throw any errors
- I found that at usb super speed, it will take 10-20 minutes for a half filled 500gb ssd
- power off your pc
- remove the old drive from your pc and boot
- avoid having both drives at the same time, as it will confuse the boot manager
what to do if you get stuck in the emergency shell
if you accidentally have the 2 drives or something is misconfigured, you might enter the fedora emergency shell.
you might see error such as
/dev/mapper/fedora-root does not exist
/dev/mapper/fedora-swap does not exist
/dev/mapper/fedora-home does not exist
the errors you might see at boot (hit escape while you see the fedora symbol at boot to see the service startup sequence)
I found the section “The Dracut Emergency Shell” from this article to help debug it for me
These commands were helpful
ls /dev/mapper
the ls command tells us what the boot manager has loaded
lvm lvscan
the lvscan command tells us what lvm are active and detected
lvm lvchange -a y fedora/root
the lvchange command tells the shell to use the inactive lvm from lvscan
expanding the partition
I’ve adapted these instructions from this post.
I’ve added notes for the what the commands do
- Inspect Current Disk
- notes: this command will list all the partitions the system can see
- Command:
lsblk -o NAME,FSTYPE,SIZE,MOUNTPOINT,LABEL,UUID /dev/nvme0n1 - Sample Output:
NAME            FSTYPE        SIZE MOUNTPOINT  LABEL   UUID
nvme0n1                     476.9G
├─nvme0n1p1     vfat          600M /boot/efi          6542-F15B
├─nvme0n1p2     ext4            1G /boot              08fa06a0-672f-4231-b84e-b3ca6a832cbe
└─nvme0n1p3     LVM2_member 236.9G                    UwB9Uf-03PH-pbh8-q0F8-WllR-h8FN-Sh4PzL
- Partition the Unallocated Space
- notes: this command will create a initialize a linux filesystem on the drive from the command line (you can also use any gui tool too, but it will have a different name in the later steps)
- Command:
sudo fdisk /dev/nvme0n1 - Steps:
- Enter
nto create a new partition - Press
Enterto accept the default partition number - Press
Enteragain to accept the default first sector - Press
Enteronce more to allocate the entire remaining space, or specify a specific size/end sector if desired. - Type
wto write changes and exit.
- Enter
- Command:
* Sample output (at the end)
Created a new partition 4 of type 'Linux' and of size XXX.XX GiB.
- Create Physical Volume on Unallocated Space:
- notes: this command will tell the os to use the partition and create a physical volume
- Command:
sudo pvcreate /dev/nvme0n1p4 - Sample Output:
WARNING: ext4 signature detected on /dev/nvme0n1p4 at offset 1080. Wipe it? [y/n]: y
Wiping ext4 signature on /dev/nvme0n1p4.
Physical volume "/dev/nvme0n1p4" successfully created.
- Verify Physical Volumes and Available Space:
- notes: this command checks to confirm if our past commands worked
- Commands:
sudo pvs - Sample Output:
PV             VG                    Fmt  Attr PSize    PFree
/dev/nvme0n1p3 fedora_localhost-live lvm2 a--  <236.89g      0
/dev/nvme0n1p4                       lvm2 ---   238.46g 238.46g
sudo vgdisplay | grep "Free PE"
Free PE / Size 61046 / 238.46 GiB
- notes: if you get a empty output from vgdisplay, use
sudo vgdisplay fedora_localhost-live | grep "Free PE / Size" - Sample Output
Free PE / Size 183140 / 715.39 GiB
- Extend Logical Volume (root):
- notes: this command will tell the os how much of the partition should be used for our directories. in this example we are expanding the root directory. Repeat this step for the other partitions (for example home and swap)
- Command:
sudo lvextend -l +50%FREE /dev/mapper/fedora_localhost--live-root
Sample Output:
Size of logical volume fedora_localhost-live/root changed from 70.00 GiB (17920 extents) to 189.23 GiB (48491 extents).
- Verify Changes:
- notes: check if there’s a new partition in the new nvme partition, in our case it should be on nvme4
- Command:
lsblk -o NAME,FSTYPE,SIZE,MOUNTPOINT,LABEL,UUID /dev/nvme0n1
Sample Output:
NAME                            FSTYPE        SIZE MOUNTPOINT LABEL UUID
nvme0n1                                     953.9G
├─nvme0n1p1                     vfat          600M /boot/efi        6542-F15B
├─nvme0n1p2                     ext4            1G /boot            08fa06a0-672f-4231-b84e-b3ca6a832cbe
├─nvme0n1p3                     LVM2_member 236.9G                  UwB9Uf-03PH-pbh8-q0F8-WllR-h8FN-Sh4PzL
│ ├─fedora_localhost--live-root ext4        427.7G /                19ef8134-2f63-4c22-ba02-e0cf0409e853
│ ├─fedora_localhost--live-swap swap          7.9G [SWAP]           f6ed0d66-b805-4eb4-86ee-9e1245539caf
│ └─fedora_localhost--live-home ext4        337.8G /home            c60a9949-e17f-46a3-be7b-7c51e346113a
└─nvme0n1p4                     LVM2_member 715.4G                  8t13xm-NHfU-qhbS-j8NG-6ztw-wnoL-zHelot
  ├─fedora_localhost--live-root ext4        427.7G /                19ef8134-2f63-4c22-ba02-e0cf0409e853
  └─fedora_localhost--live-home ext4        337.8G /home            c60a9949-e17f-46a3-be7b-7c51e346113a
- Resize the Filesystem for Root to Utilize the New Space:
- notes: this will add the extra space to your file system. rerun the command substituting
rootwithhomeorswapif you expanded it in theExtend Logical Volume (root):step from earlier - Command:
sudo resize2fs /dev/mapper/fedora_localhost--live-root - Sample Output:
- notes: this will add the extra space to your file system. rerun the command substituting
Resizing the filesystem on /dev/mapper/fedora_localhost--live-root to 49638400 (4k) blocks.
The filesystem on /dev/mapper/fedora_localhost--live-root is now 49638400 (4k) blocks long.