VFIO in Fedora 2020 - yet another way
This is (yet?) another writeup on enabling Nvidia Geforce RTX GPU passthrough from a Fedora 32 Server('ish) QEMU/KVM Host to a Windows 10 guest. Please excuse a derivative post from a new member of the community, If I go on for too long here maybe it’s because I’m trying to share too much in one go.
This follows on from BansheeHero’s Fedora/VFIO post covering a similar topic, which itself was an update on Wendel’s PoPOS! VFIO setup guide
I’m doing my best to write a supplement to the above posts, rather than another full walkthrough. This writeup focuses more on areas where the posts above either differ or omit.
NB: Honestly, for a better Fedora/Cent OS/Red Hat info then I would actually suggest you don’t read my post at all and just read the following instead:
- BansheeHero’s Fedora VFIO setup guide
Wendel’s PoPOS! VFIO setup guide- RHEL 7: Virtualization Deployment & Adminstration Guide
- Linux KVM Documentation
- Arch Wiki: PCI Passthrough via OVMF
- Enabling Host-Guest Networking with KVM, Macvlan, & Macvtap
- Fixing GPU Passthrough on Windows 10 VM in Proxmox
- And for completeness, the r/VFIO wiki keeps another collection links
For non Fedora/RH distros these details apply only partially.
Where this route differs:
- will share my own hacks, struggles, and routes towards my specific requirements
- I’ll be preferring & linking RedHat Admin documentation to BansheeHero’s & Wendel’s original PoP!_OS derived instructions (this means no modification to initrrd; no messing with dracut; no vfio-pci-override.sh driver install)
- specific list of bugs and challenges from previous posts
Ultimately, my goal will be different from most others. My goal is NOT gaming; I’m not chasing a high framerate VFIO solution. I want only to run Fusion 360 in a fullscreen or windows VM accessible from my normal gnome-shell desktop experience so that Fusion 360 used the GPU for 3d tasks. In the end I found that the least painful option was using virt-viewer with Spice drivers for all IO

I lucked out with Fusion 360, as I’ve found that even on a login session that uses the Basic display driver, Fusion 360 will use an installed GPU by default for its rendering tasks. I tried checking if Blender did the same but found it would not run in this kind of sesssion - but that is no issue for me as I don’t use Blender, and would just use it on Linux if necessary.
The goals I hit in this walkthrough allowed me to:
- start Virtual Machine Manager
- roughly tune a qemu/kvm Windowns Home 10 guest
- manage the display & input via Spice
- establish host/guest network connectivity
- load the login session via Spice default display drivers… but power Fusion 360 with the RTX 2060
This will NOT give you a gaming experience - but for my productivity tasks is perfectly acceptable.
What’s the setup?
BansheeHero & Wendel did a good job at sharing their hardware setup, so here is my starting point:
tldr; I’m working with an AMD x399 Threadripper 1st gen w/ multi Nvidia Geforce RTX GPU setup on a “roughly” Fedora server/workstation build. All components are consumer grade + some RedHat software’isms.
erickj’s setup:
- Threadripper 1920X CPU (12 core x 2 thread)
- ASRock Taichi x399 mobo
- 128 GB memory
- MSI RTX 2080 primary GPU
- Gigabyte RTX 2060 secondary GPU
- Storage:
- 500 GB NVME SSD (/ & /home mount)
- 8 TB Stratis pool across 2 SATA hard drives
- 4 TB Stratis pool #2 across other drives
- Peripherals:
- USB dongle connected wireless keyboard & mouse (Logitec K850 & M720)
- multipl display outs via primary GPU, HDMI + dIsplay port
- OS: snowflake Fedora 32 Server install + lots of other packages, so that it’s more resembling Fedora Workstation
$ cat /etc/os-release
NAME=Fedora
VERSION="32 (Server Edition)"
ID=fedora
- loginctl / X11 session
- pulseaudio running under my login user
$ ps -ef | grep pulseaudio
erick      28533    2391  1 00:10 ?        00:00:55 /usr/bin/pulseaudio --daemonize=no
- kernel:
$ uname -r
5.8.10-200.fc32.x86_64
Unlike BansheeHero, I am not specifically installing virtualization software during this setup via $ sudo dnf install @virtualization. I’m working with previously installed KVM, QEMU, & Virt-manager packages, however that command will roughly get you to where I am starting from.
$ dnf group info virtualization
Last metadata expiration check: 0:02:23 ago on Sat 26 Sep 2020 01:39:37 AM CEST.

Group: Virtualization
 Description: These packages provide a graphical virtualization environment.
 Mandatory Packages:
   virt-install
 Default Packages:
   libvirt-daemon-config-network
   libvirt-daemon-kvm
   qemu-kvm
   virt-manager
   virt-viewer
 Optional Packages:
   guestfs-browser
   libguestfs-tools
   python3-libguestfs
   virt-top
SSH Remote Access
BansheeHero & Wendel also mention this, but be sure you can SSH into your machine before proceeding.
This tutorial updates grub configs & graphics drivers, proceed with knowledge.
I’ll copy/paste some setup here… but I personally have not followed these particular steps recently (i.e… IMO SSH server setups entails more than this, but that’s outside the scope of this post)
sudo dnf install openssh-server
sudo firewall-cmd --add-service=ssh --permanent
sudo firewall-cmd --reload
sudo systemctl start sshd
sudo systemctl enable sshd
The next step of course is to verify that you can actually login to your machine remotely via SSH.
Enable IOMMU from Bios & Linux
Lots has already been written on IOMMU, and there is little room for me to expand upon. If you already are familiar then skip ahead to “Grub Config Edits”, otherwise:
tldr; Restart and enable IOMMU in your Bioa/UEFI (for Threadripper/Asrock x399 it was under “Northbridge Settings” on AsRock FW). Next add to GRUB_CMDLINE_LINUX amd_iommu=on in /etc/sysconfig/grub & rebuild grub.cfg
See Red Hat 16.1 PCI Devices for instructions, but for more background see BansheeHero’s Fedora VFIO setup guide (search in page “amd_iommu=on” & “ls-iommu.sh”). The common goal is to update the grub Linux kernel command line parameters to include:
GRUB_CMDLINE_LINUX_DEFAULT="quiet amd_iommu=on"
For my install, I’m not a fan of the dnf reinstall kernel recommendation. Instead I did:
$ sudo emacs -nw /etc/sysconfig/grup
$ sudo grub2-mkconfig -o /boot/grub2/grub.cfg
$ grub2-editenv list
...
kernelopts=root=/dev/mapper/fedora-root ro resume=/dev/mapper/fedora-swap rd.lvm.lv=fedora/root rd.luks.uuid=luks-5f8f4e1c-e8f2-4329-bc24-f56bf78cf515 rd.lvm.lv=fedora/swap rhgb quiet  rd.driver.blacklist=nouveau amd_iommu=on
...
Now reboot.
NB: I have a BIOS install & not UEFI, which would require a different path for the grub2-mkconfig command.
How to verify IOMMU is enabled in the Bios on Fedora 32 / AMD builds:
$ dmesg | grep AMD-Vi
[    0.702375] pci 0000:00:00.2: AMD-Vi: IOMMU performance counters supported
[    0.702424] pci 0000:40:00.2: AMD-Vi: IOMMU performance counters supported
[    0.727975] pci 0000:00:00.2: AMD-Vi: Found IOMMU cap 0x40
[    0.727976] pci 0000:00:00.2: AMD-Vi: Extended features (0xf77ef22294ada):
[    0.727979] pci 0000:40:00.2: AMD-Vi: Found IOMMU cap 0x40
[    0.727982] pci 0000:40:00.2: AMD-Vi: Extended features (0xf77ef22294ada):
[    0.727983] AMD-Vi: Interrupt remapping enabled
[    0.727983] AMD-Vi: Virtual APIC enabled
[    0.728173] AMD-Vi: Lazy IO/TLB flushing enabled
VIew your IOMMU groups in dmesg
$ dmesg | grep -i iommu
[    0.000000] Command line: BOOT_IMAGE=(hd0,msdos1)/vmlinuz-5.8.10-200.fc32.x86_64 root=/dev/mapper/fedora-root ro resume=/dev/mapper/fedora-swap rd.lvm.lv=fedora/root rd.luks.uuid=luks-5f8f4e1c-e8f2-4329-bc24-f56bf78cf515 rd.lvm.lv=fedora/swap rhgb quiet rd.driver.blacklist=nouveau amd_iommu=pt vfio_iommu_type1.allow_unsafe_interrupts=1 pci-stub.ids=10de:1f08,10de:10f9,10de:1ada,10de:1adb
[    0.000000] Kernel command line: BOOT_IMAGE=(hd0,msdos1)/vmlinuz-5.8.10-200.fc32.x86_64 root=/dev/mapper/fedora-root ro resume=/dev/mapper/fedora-swap rd.lvm.lv=fedora/root rd.luks.uuid=luks-5f8f4e1c-e8f2-4329-bc24-f56bf78cf515 rd.lvm.lv=fedora/swap rhgb quiet rd.driver.blacklist=nouveau amd_iommu=pt vfio_iommu_type1.allow_unsafe_interrupts=1 pci-stub.ids=10de:1f08,10de:10f9,10de:1ada,10de:1adb
[    0.295023] iommu: Default domain type: Translated
[    0.702375] pci 0000:00:00.2: AMD-Vi: IOMMU performance counters supported
[    0.702424] pci 0000:40:00.2: AMD-Vi: IOMMU performance counters supported
[    0.702464] pci 0000:00:01.0: Adding to iommu group 0
... more lines elided
[    0.703555] pci 0000:44:00.2: Adding to iommu group XYZ
[    0.727975] pci 0000:00:00.2: AMD-Vi: Found IOMMU cap 0x40
[    0.727979] pci 0000:40:00.2: AMD-Vi: Found IOMMU cap 0x40
[    0.729838] perf/amd_iommu: Detected AMD IOMMU #0 (2 banks, 4 counters/bank).
[    0.729858] perf/amd_iommu: Detected AMD IOMMU #1 (2 banks, 4 counters/bank).
If you startup and do NOT see similar messages, then do not proceed until you do.
RedHat says “amd_iommu=pt”
- Enable IOMMU kernel support
Appendamd_iommu=ptto the end of the GRUB_CMDLINX_LINUX line, within the quotes, in/etc/sysconfig/grubso that AMD IOMMU specifications are enabled at boot.
https://access.redhat.com/documentation/en-us/red_hat_enterprise_linux/7/html/virtualization_deployment_and_administration_guide/chap-guest_virtual_machine_device_configuration#sect-Guest_virtual_machine_device_configuration-PCI_devices
After checking that amd_iommu=on yields the expected output try and update GRUB_CMDLINE_LINUX_DEFAULT to use amd_iommu=pt. This allows passthrough to be both subject to “optimizations” (I’ve only read that, but have lost the link) and manageable by kvm xml “managed” device assignments.
If you are able to verify amd_iommu=pt then continue with this write up.
The success criteria for me was this:
$ ls-iommu.sh | grep -i nvid
IOMMU Group 14 08:00.0 VGA compatible controller [0300]: NVIDIA Corporation TU106 [GeForce RTX 2060 Rev. A] [10de:1f08] (rev a1)
IOMMU Group 14 08:00.1 Audio device [0403]: NVIDIA Corporation TU106 High Definition Audio Controller [10de:10f9] (rev a1)
IOMMU Group 14 08:00.2 USB controller [0c03]: NVIDIA Corporation TU106 USB 3.1 Host Controller [10de:1ada] (rev a1)
IOMMU Group 14 08:00.3 Serial bus controller [0c80]: NVIDIA Corporation TU106 USB Type-C UCSI Controller [10de:1adb] (rev a1)
IOMMU Group 32 42:00.0 VGA compatible controller [0300]: NVIDIA Corporation TU104 [GeForce RTX 2080] [10de:1e82] (rev a1)
IOMMU Group 32 42:00.1 Audio device [0403]: NVIDIA Corporation TU104 HD Audio Controller [10de:10f8] (rev a1)
IOMMU Group 32 42:00.2 USB controller [0c03]: NVIDIA Corporation TU104 USB 3.1 Host Controller [10de:1ad8] (rev a1)
IOMMU Group 32 42:00.3 Serial bus controller [0c80]: NVIDIA Corporation TU104 USB Type-C UCSI Controller [10de:1ad9] (rev a1)
The RTX 2060 and 2080 appear in different IOMMU groups, 14 & 32 respectively.
NB: Each physical card comprises 4 functional devices, video/audio/usbx2. I’ll only be attaching the video device, 08:00.0 / 10de:1f08 to my vm.
Links for Background Info & Guides
- see the RedHat/KVM Documentation on enabling IOMMU here
- find general Linux Kernel parameter docs here (find-in-page “intel_iommu” or “amd_iummo”)
- Arch Wiki: Setting Up IOMMU
- See the
ls-iommus.shscript in Wendel’s original VFIO in 2019 Pop!_OS writeup
As an aside for community members… does anyone know why ‘amd_iommu=on’ is NOT a documented value? Is that a documentation bug?
If so I’m happy to report it… but would like outside input first.
More Info
See man lspci &man 5 sysfs for more info
No Initial Ramdisk For Us
For background read “The Initial Ramdisk And You” from Wendel’s original post and Banshee Hero’s post
This is the point where I diverge from Wendel & BansheeHero for 2 reasons:
- I was not comfortable making so many edits to the initrd which may not hold up well against future upgrades
- did not believe my requirements would need this, because…
See RHEL VIrtualization Administration 16.1
According to RedHat, we’re now going to stub the PCI/E devices in the kernel parameters and then add them to our libvirt XML config. This means that instead of following the path which writes a new script (vfio-pic-override.sh), modifying dracut, and defining vfio.conf… instead we are going to modify more kernel parameters via GRUB_CMDLINE_LINUX_DEFAULT in /etc/sysconfig/grub.
Tldr; this is going to be equivalent to the method Wendel defined, but IMO less work.
Locating GPU device ids
In my case I’ve added pci-stub.ids=10de:1f08,10de:10f9,10de:1ada,10de:1adb". The value 10de:1f08 is from my 2nd GPU’s lspci video fuction id. The other values are its secondary functions (audio & USB), while I don’t plan to pass those through to the VM I have added them for completeness. You can find for these values with lspci
$ lspci -vnn | grep 2060
08:00.0 VGA compatible controller [0300]: NVIDIA Corporation TU106 [GeForce RTX 2060 Rev. A] **[10de:1f08]** (rev a1) (prog-if 00 [VGA controller])
After edits and sudo grub2-mkconfig -o .... I get:
$ sudo grub2-editenv list
...
rd.lvm.lv=fedora/swap rhgb quiet  rd.driver.blacklist=nouveau amd_iommu=pt pci-stub.ids=10de:1f08,10de:10f9,10de:1ada,10de:1adb
NB: At this point I may have had to do
modprobe vfio-pci. I could use some feedback here from more senior community members on whether or not this step would be necessary here and specficially “why”? I really don’t claim to have anything more than an empirical understanding of dealing with the kernel.
NB #2: u/TheCakeIsNaOH asked below "What is the reason for using
pci-stubrather thanvfio-pci? AFAIK, vfio can put the devices in a low power state and is overall a better-designed stub driver thanpci-stub" … and the answer right now is “I don’t know”, so heads up.
You should be able to use vfio-pci.ids=10de:1f08,10de:10f9,10de:1ada,10de:1adb
Reboot and verify everything still seems “normal”.
Sucess criteria here can be checked with lspci again:
$ lspci -vnn | grep -A 13 NVIDIA
08:00.0 VGA compatible controller [0300]: NVIDIA Corporation TU106 [GeForce RTX 2060 Rev. A] [10de:1f08] (rev a1) (prog-if 00 [VGA controller])
	Kernel driver in use: vfio-pci
	Kernel modules: nouveau, nvidia_drm, nvidia

... a bunch of devices ...

42:00.0 VGA compatible controller [0300]: NVIDIA Corporation TU104 [GeForce RTX 2080] [10de:1e82] (rev a1) (prog-if 00 [VGA controller])
        ...
	Kernel driver in use: nvidia
	Kernel modules: nouveau, nvidia_drm, nvidia
Notice that the first GPU (the RTX 2060 passthrough) is using driver vfio-pci and the second GPU (my primary RTX 2080) is using driver nvidia (in my case). This should be the same for each of the 4 device/functions in each GPU’s IOMMU group
For more/better info on verifying here, also read RHEL Virtualisation/Admin 16.1.1. Specficially about using virsh nodedev-list --cap pci to see a list of libvirt formatted PCI device ids to:
- dump xml device configurations, e.g.
virsh nodedev-dumpxml pci_0000_08_00_3
NB: I found I needed to run the command twice (back-to-back) to produce non-error output:
04:31:43 [erick@jupiter:~]
$ virsh nodedev-dumpxml pci_0000_08_00_3
error: Could not find matching device 'pci_0000_08_00_3'
error: Node device not found: no node device with matching name 'pci_0000_08_00_3'

04:40:33 [erick@jupiter:~]
$ virsh nodedev-dumpxml pci_0000_08_00_3
<device>
  <name>pci_0000_08_00_3</name>
  <path>/sys/devices/pci0000:00/0000:00:03.1/0000:08:00.3</path>
  <parent>pci_0000_00_03_1</parent>
  <driver>
    <name>vfio-pci</name>
  </driver>
  <capability type='pci'>
    <class>0x0c8000</class>
    <domain>0</domain>
    <bus>8</bus>
    <slot>0</slot>
    <function>3</function>
    <product id='0x1adb'>TU106 USB Type-C UCSI Controller</product>
    <vendor id='0x10de'>NVIDIA Corporation</vendor>
    <iommuGroup number='14'>
      <address domain='0x0000' bus='0x08' slot='0x00' function='0x2'/>
      <address domain='0x0000' bus='0x08' slot='0x00' function='0x0'/>
      <address domain='0x0000' bus='0x08' slot='0x00' function='0x3'/>
      <address domain='0x0000' bus='0x08' slot='0x00' function='0x1'/>
    </iommuGroup>
    <numa node='0'/>
  </capability>
</device>
- confirm that your device can be detached from the host:
$ sudo virsh nodedev-detach pci_0000_08_00_3
Part 2: VM Setup & Tweaks
From this point on, I had moments where I considered
- should I sell the RTX GPU & buy a cheap Radeon Pro or Quadro card?
- do I need to upgrade to Windows Pro?
- even… do I need to return my 1 month old monitor?
The answer to all of these were “no”… sort of. I found that from this point on the most painful configuration struggles made me question why I’m even doing this.
In this section, I won’t try to duplicate the info in Wendels original post(search “Configuring the Virtual Machine”). Instead I’m just going to provide my commentary on these recommendations from that link:
Notes on The Boot Process: UEFI/CSM
Browse your apps and run the Virtual Machine manager. Click
Create New Vritual Machineand set the parameters that are appropriate. I’d recommend 4-6 CPU Cores and 8-16gb ram but you don’t want to use too much of your system’s main memory and CPUs.On the very last step, it is critical that you don’t accept the defaults and start the VM. You must modify the config. Mainly, you must pick OVMF/Q35 for your chipset at the VM Config.
CPU Topology
tldr; Just read the RHEL 7 Virtualization CPU Performance and Options docs
The first issue I found was that on the Windows 10 Home license that I have, there is a limit on the number of CPU sockets to 1. So in the following screenshot, even though I was setting “CPUs” to 6 only 1 was picked up by the Windows VM - this was because configuration was assigning 6 sockets.
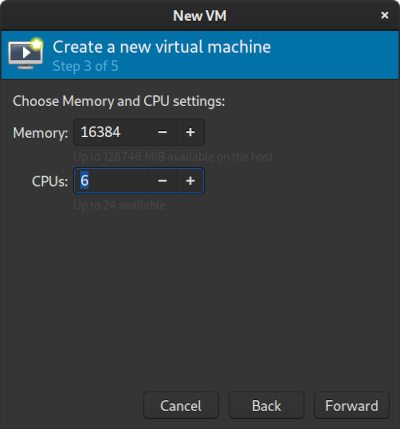
This thread on linuxquestions ultimately had the answer (from poster rknichols), however it was difficult to find before considering “do I need to upgrade to Windows Pro?”
Instead, I needed to manually tweak the topology after the setup wizard. Either directly in the XML or in the UI. In my case these settings work:
$ sudo virsh dumpxml win10 | grep -A4 "<cpu"
  <cpu mode='custom' match='exact' check='full'>
    <model fallback='forbid'>EPYC-IBPB</model>
    <vendor>AMD</vendor>
    <topology sockets='1' dies='1' cores='3' threads='2'/>
or via the Virt-Manager config UI:
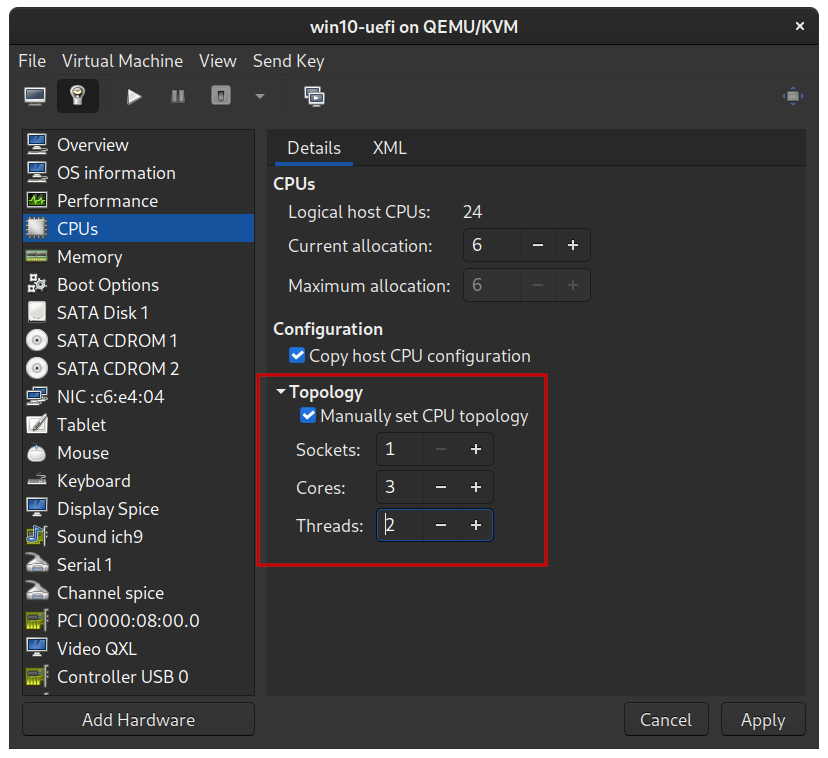
NB: As you change the topology values in the UI you’ll also need to change the “current allocation” field as well.
I highly suggest doing this BEFORE proceeding with the Windows install as it makes things move much quicker.
BIOS vs UEFI install
tldr; I tried guests on both BIOS & UEFI, BIOS worked better for my use case.
From Wendel’s guide:
On the very last step, it is critical that you don’t accept the defaults and start the VM. You must modify the config. Mainly, you must pick OVMF/Q35 for your chipset at the VM Config.
This one is tough for me to evaluate with an informed opinion other than… “it worked for me [derp]” and I think I “lucked out” in the end for my setup. But I took this to mean that Wendel’s guide is recommending UEFI over BIOS:
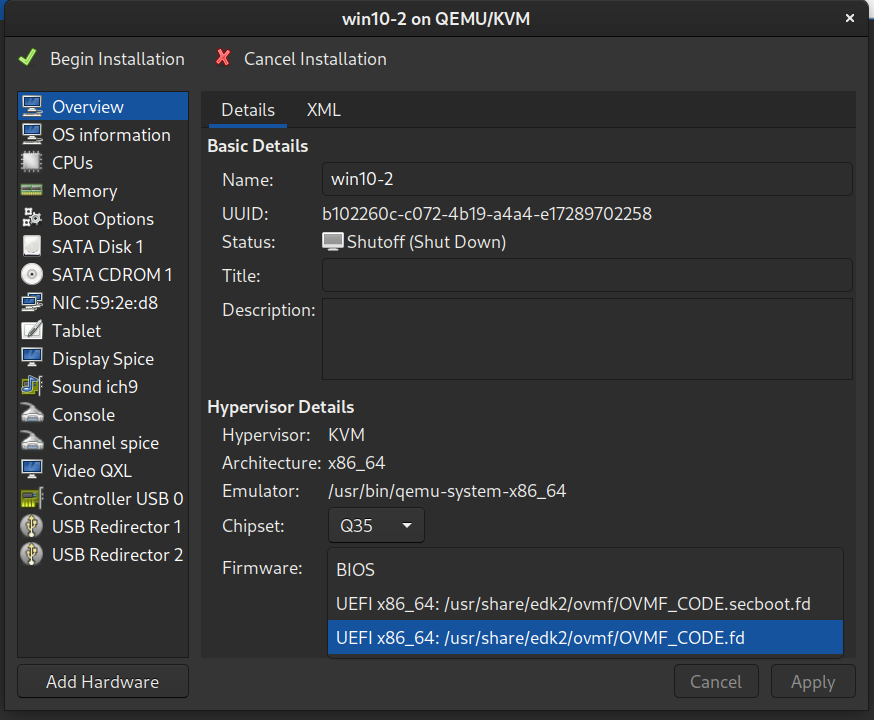
I personally found that I had equal amounts of the same difficulties in both UEFI & BIOS installs. In both cases I was able to get the PCI device recognized in device manager & drivers installed. I found that that the BIOS install boots faster, but my deciding factor was that BIOS allowed screen resolution to be set natively after Windows install without needing additional virtio drivers.
With UEFI, I found that after adding the GPU PCI devices to the guest and installing Nvidia drivers that the system became very unstable if Windows VirtIO drivers were also installed
http://www.linux-kvm.org/page/WindowsGuestDrivers/Download_Drivers
The instability is something I’ll talk about below, but this effectively made UEFI barely useable as it was stuck in 800x600 over virt-viewer
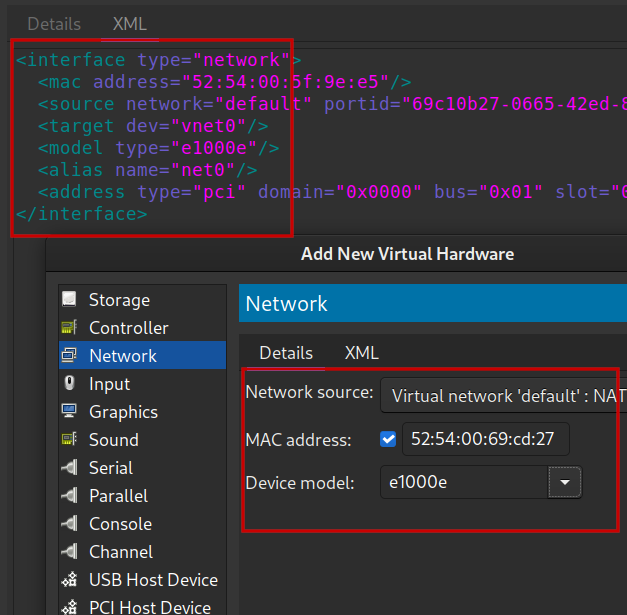
Networking Setup with Host/Guest Communication
tldr; On the guest I use network source ‘default: NAT’, with device model e1000e and auto assigned MAC address. On the host ensure device virbr0 is up and use a macvlan device for the host link. Ensure IP routes are setup over virbr0 for the network
Huh what? Read this blog post and the RHEL 7 Virtualization Networking docs for more.
Verifying Guest Networking
Once you start the guest you should be able to open a command prompt immediateily and ping 1.1.1.1 or nslookup forum.level1techs.com.
If those work, and you can load webpages, then skip the rest of this section.
If not then I start troubleshooting by verfying the ‘default’ (in my case) libvirt network definition and status.
On the guest machine check ipconfig in cmd, you should see an ip address assignment:
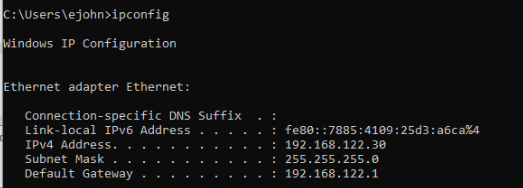
If that looks ok, try to ping the gateway
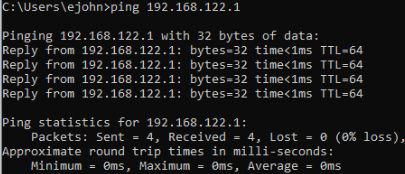
Back on the host machine:
$ sudo virsh net-list --all
 Name      State    Autostart   Persistent
--------------------------------------------
 default   active   yes         yes
If default were not started then perhaps sudo virsh net-start default would fix the issue. Also make sure to sudo virsh net-autostart default for your network to ensure it is restarted after reboots.
Otherwise check the network bridge definition in the default newtork xml config sudo virsh net-dumpxml default:
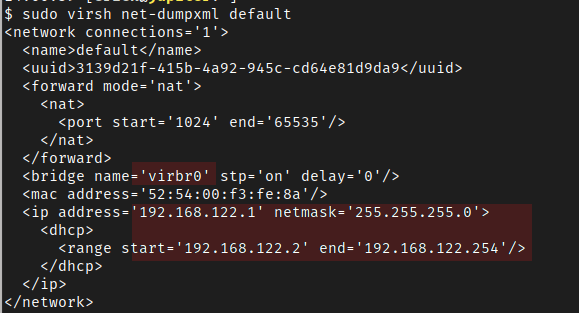
Particularly check the bridge name and dhcp assignment range. The virbr0 bridge will be added to the host when libvirt brings up the default network, you should see it in the output of ip link or ip addr, e.g:
$ ip addr
...
5: virbr0: <BROADCAST,MULTICAST,UP,LOWER_UP> mtu 1500 qdisc noqueue state UP group default qlen 1000
    link/ether 52:54:00:f3:fe:8a brd ff:ff:ff:ff:ff:ff
    inet 192.168.122.1/24 brd 192.168.122.255 scope global virbr0
       valid_lft forever preferred_lft forever
Verify the device is up. At this point your guest should be assigned an IP address and using the virbr0 bridge on the host as a gateway.
For more info see man virsh and look for the “net-” commands.
Adding a new Host Device
See the macvlan.sh script from this post.
NB: I don’t actually recommend running the script, only using as a reference. e.g. it’s unnecessary to flush default routes and it really shouldn’t be set up as a service as that author does.
To add a device to the host that can communicate over virbr0 I added a new macvlan device in bridge mode, read more about bridges & macvlans here.
To set it up on the host, first check your existing devices using ip link. Then:
sudo ip link add macvlan0 link virbr0 type macvlan mode bridge
sudo ip addr add 192.168.122.2 dev macvlan0
sudo ip link set dev macvlan0 up
NB: I’m being very lazy and statically assigning 192.168.122.2 to the device… this could clash with a guest dhcp IP assignment, but I just manually verify it doesn’t. Also this will not persist across reboots. I should use a systemd netdevice definition for this, but… lazy. See
man systemd.netdev.
At this point you should be able to ping the host FROM the guest, but not yet vice versa.
Verify that by opening a cmd prompt in the guest and ping 192.168.122.2.
File Sharing via Guest -> Host networking
What this let’s me do is run a simple bash function to start a webserver on the host:
$ which webserver
webserver ()
{
    port="${1:-9000}";
    ruby -run -e httpd . -p $port
}
NB: there’s a python oneliner for this too, i forget it of the top of my head.
I do this from directories that I want to share into the guest. I prefer this method over shared directories because it’s transient and allows me to safely & easily access any directory/file on the host from the guest.
If I just open http://192.168.122.2:9000 in my guest’s browser, then I get an index of files in the CWD that server command is currently running.
Verifying Host -> Guest Ping
If for some reason you want to ping the guest from your host, you’ll need to disable the Windows 10 ICMP firewall rules. I used this blog post as a guide.
The GPU Passthrough, Code 43, and The real dredded error
Setup was actually quite a bit more mundane than I expected. Once the VM was running I simple opened the hardware details panel from virt-viewer and clicked the ‘Add Hardware’ button to select the GPU device.
Alternatively I could have just written the <hostdev> xml manually, noting the the bus, slot, and function values which map the output from lspci -vnn to the <address> xml attributes:
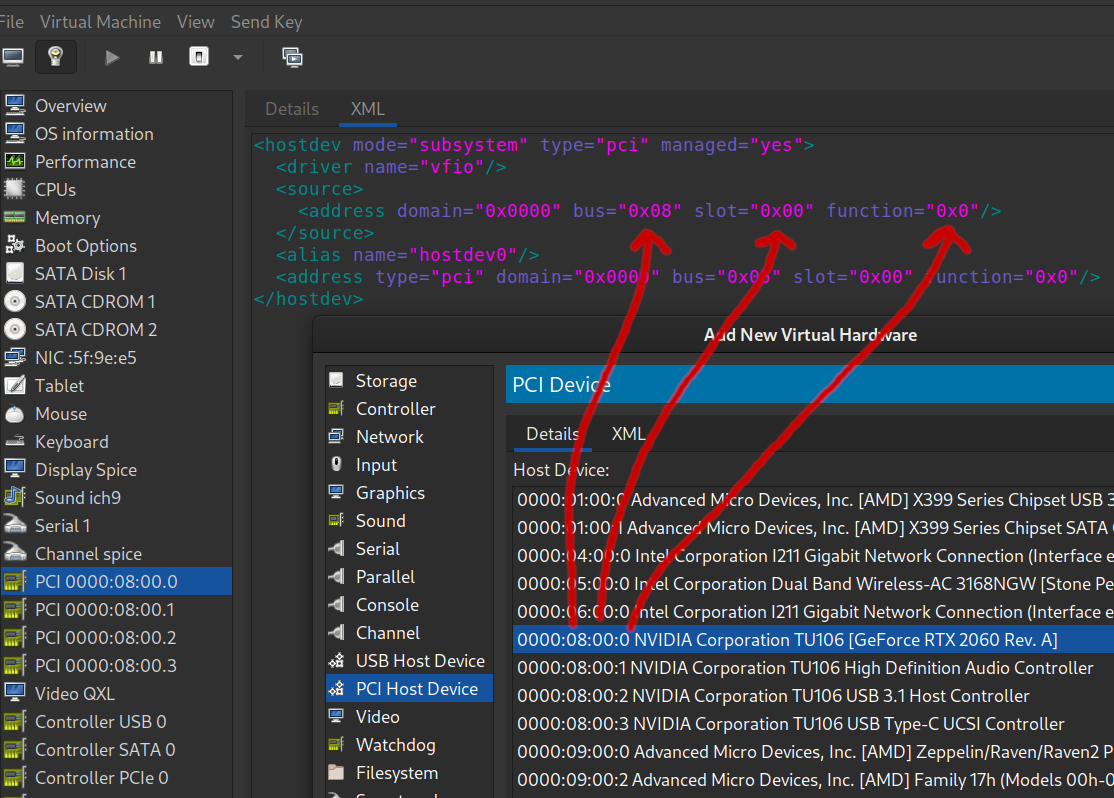
In my case the RTX 2060 comprises 4 functions (08:00:0, 08:00:1, 08:00:2, 08:00:3 for video, audio, & 2 USB functions). I added all 4 devices.
You can verify this stage by checking device manager in the guest VM. At this point you should see “Code 43” with something like this:
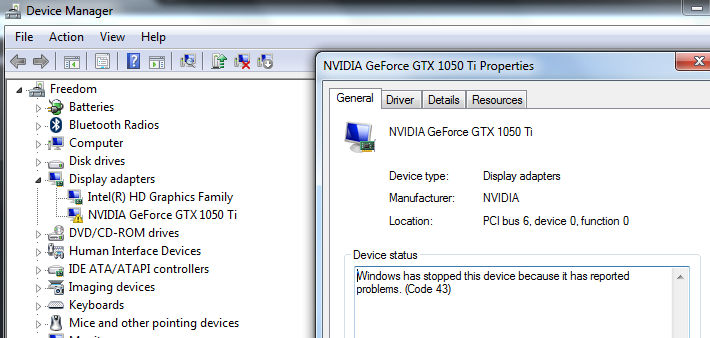
Fixing Code 43 for Nvidia GeForce cards
tldr; see the arch wiki’s writeup on solving Code 43 for Nvidia GPUs
I have nothing more to add on top of the arch wiki. This is my XML config for the relevant elements
...
  <features>
    <acpi/>
    <apic/>
    <hyperv>
      <relaxed state="off"/>
      <vapic state="off"/>
      <spinlocks state="off"/>
    </hyperv>
    <kvm>
      <hidden state="on"/>
    </kvm>
    <vmport state="off"/>
  </features>
  <clock offset="localtime">
    <timer name="rtc" tickpolicy="catchup"/>
    <timer name="pit" tickpolicy="delay"/>
    <timer name="hpet" present="no"/>
    <timer name="hypervclock" present="no"/>
  </clock>
...
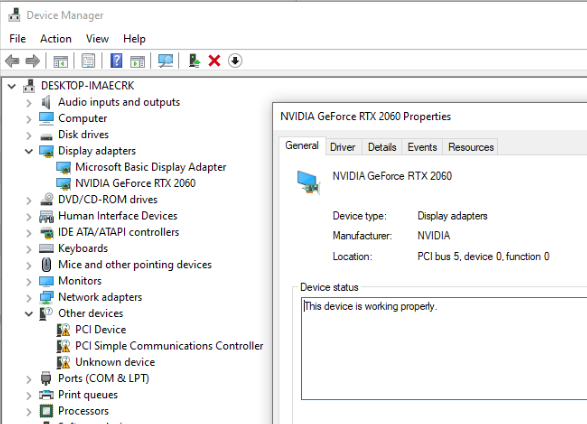
After changing these values in the libvirt machine XML, restart the guest. Windows should detect the Nvidia GPU automatically and install drivers.
You should now also be able to update the driver with new drivers from Nvidia’s website.
You can verify this from device manager:
Bypassing the real Nvidia bug
VIDEO TDR FAILURE NVLDDMKM.SYS BSOD
I won’t say “fixing” here, because I’m still very wary as to whether or not this issue will come back again. I spent by far the most amount of time working on diagnosing this final issue.
After installing Nvidia drivers I had installed Fusion 360 and was verifying that it was using the RTX GPU for rendering tasks. See the first screenshot at the top of the post for that process.
After just a few minutes of seeing load on the GPU though… BSOD. Terror. After rebooting a few times I saw the same instability. At this point I went down a 4 or 5 hour rabbit hole, trying UEFI installs, directly connecting the GPU to other displays, strange mystic incantations, and carefully scripted clicks and keypresses… mostly to frustration and no avail.
Then I found these posts by user “TorqueWrench”:
- https://forum.proxmox.com/threads/proxmox-6-2-nvidia-gpu-passthrough-crashes-after-nvidia-driver-update.70531/post-316719
- https://forum.proxmox.com/threads/nvidia-gpu-passthrough-no-longer-working-with-windows-10-guest-vm.70477/
- https://forums.engineerworkshop.com/t/fixing-gpu-passthrough-on-windows-10-vm-in-proxmox/207
The last one of which had the answers that worked for me:
- Update
GRUB_CMDLINE_LINUX_DEFAULT, addingvfio_iommu_type1.allow_unsafe_interrupts=1similar to how those edits were made above. Reboot your host machine.
NB: redhat documentation has this to say about
allow_unsafe_interrupts
“Platform support for interrupt remapping is required to fully isolate a guest with assigned devices from the host. Without such support, the host may be vulnerable to interrupt injection attacks from a malicious guest. In an environment where guests are trusted, the admin may opt-in to still allow PCI device assignment using theallow_unsafe_interruptsoption to thevfio_iommu_type1module.”
-
Intentionally cripple your GPU with code 43… what was once a fearsome bug is now a feature.
- If you try and restart the guest immediately you will still see BSODs, however you can’t just detach the device from the guest yet because we need some values from its hardware device details tab
- I instead, just forced it back into error Code 43 state, simply hand editing the
<timer name="hypervclock" present="no"/>present state from ‘no’ -> ‘yes’ whenever I wanted to enforce this state.
-
With the GPU in a crippled code 43 state, we need to get the “device instance path” from the device manager properties window of the GPU. From this step on follow the steps under "Enabling MSI (Message Signaled Interrupts) on an Nvidia GPU in Windows 10
In short, you’re going to follow the steps on that link to create a new registry entry under:
HKEY_LOCAL_MACHINE\SYSTEM\CurrentControlSet\Enum\PCI\<device-value-from-details-device-instance-path>\Control\Device Parameters\Interrupt Management:
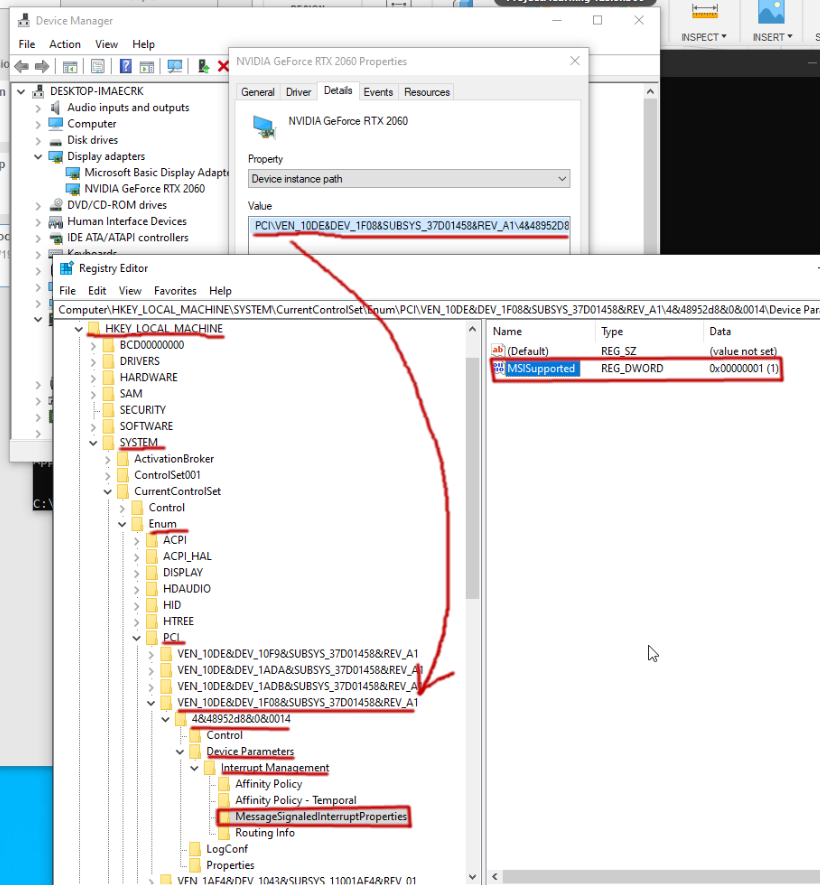
I needed to create new key MessageSignaledInterruptProperties, then new DWORD value MSISupported. Then update MSISupported value to be 1.
Save it and shutdown the guest.
- Uncripple the GPU device by undoing what you did in step 2. Restart the guest.
Success here is no BSOD, so it’s pretty clear if it worked.
From this point on I’ve been using the install for Fusion 360 work, and it’s great.
Good luck.
