READ FIRST: Original thread got replaced
@wendell has created a new version that is focusing on Fedora.
It is now the most up-to-date thread.
At least until I get my new HW and get going on a new one 
VFIO Passthrough thread for Fedora and 2019
Original thread by @wendell
Status: Just started! If you are interested feel free to BM it and come back later. There is plenty of work to be done and this was the best way I knew how to start it.
Why am I branching the original thread?
I find that Fedora Workstation (and RHEL 7) is in my heart. It also happens to be one of the best options for both gaming and VFIO setup for every level of a power user. Pop!_OS by System76 might be the desktop distribution we will all know for years to come and I am sure the original thread will grow further.
Mission statement
Find new notes (not just from the original thread) and test them on your setup. Then we will try to integrate them in this thread in the same manner as @wendell did with just a little bit of that RedHat fever
The Ultimate (Same GPU) VFIO Passthrough Guide for 2019 (now notes on getting samey graphics cards working)
What are we doing? What is VFIO/Passthrough?
If you are an absolute newbie – all the hub-ubb is about being able to run Linux as your primary OS, with a Windows virtual machine running under Linux for everything else.
The key aspect here, though, is that you are running a computer with two graphics cards and full control over one graphics card is given to the Windows virtual machine.
That means you can run games and GPU-accelerated apps (like the Adobe creative suite) just like they were running on a full computer, but in a virtual machine.
Windows in a VM gives you great flexibility for backups, snapshots and versioning. It gives you better control over your privacy and what the operating system might be doing and it means that Windows only runs on your computer when you have to.
I’ve been running VFIO for about 10 years and I have found that I rarely even need Windows for much of anything in my personal computation needs these days (even for gaming).
Still, there is some usefulness in having the ‘security blanket’ of being able to get to your old Windows install exactly as it was before you switched operating systems without having to reboot.
Fedora Workstation
For this guide we are using Fedora Workstation as our distro of choice. It reflects both HW needs and the approach to such a setup. No matter how affordable and stable VFIO gets, this still requires an ambition comparable to a workstation rather than a desktop.
Our Hardware
Setups will differ for this guide and I will try keep a list here.
For now I am going to mention few notes:
- Personally i cannot test the identical GPUs.
- Get at least 256GB SSD for Win 10, even if you have iSCSI/NAS for additional space.
- At least 16GB and 6 threads to even bother with it. CPU penalty is
still pretty heavy for fast GPUs - Make sure that all your displays can be run from your iGPU (I did not have such luck with my antique DVI-D Dell Ultrasharp)
- Plan ahead for the advantages of VM infrastrure.
- NAS/Drive to handle snapshots and take them regularly.
- Clone systems rather then go wide with a single installation. You can run one for each GPU, but it takes just a “reboot” of the guest.
BansheeHero’s rig:
- 7700K @ 4.5Ghz (Fedora Workstation 30, netinstall, KDE workspace)
- Z270F GAMING with iGPU enabled.
- 32GB RAM
- GTX 1080
- Storage:
- TLC SSD 256GB (Win10, VirtIO, raw and source for snapshots)
- TLC SSD 256GB (Games, VirtIO, raw)
- TLC SSD 128GB (Linux root, swap, usr)
- 2TB HDD (home, lvm for snapshots)
- NAS iSCSI and NFS for data
- Peripherals
- Chicony PS/2 Keyboard
- Steelseries Sensei RAW (USB non-HID)
- Dell Ultrasharp (DVI-D for 1600p, USB Hub)
- Lenovo Thinkpad keyboard with trackpoint
Identical GPUs? Tricky
Yes, most VFIO guides (ours, up till now, included) use two different GPUs for the host. The VFIO stub drivers that must be bound to the device take a PCI Vendor and Device ID to know which device(s) they need to bind to. The problem is that, in this case, since the GPUs are identical, they will have the same ID.
Instead, we will use the device address instead of the device ID.
Also note that if you have a Vega GPU, or Radeon VII, there can be some additional quirks you may have to overcome. Generally, AMD is getting to be favored on Linux because of their attitudes around open drivers, but these GPUs don’t always work the best when passed through to a Windows virtual machine from a Linux host.
Getting Started
Since we’re going to be mucking about with the video drivers, I’d recommend making sure you can SSH into your machine from another machine on the network just in case things go wonky. Any little mistake can make it difficult to access a console to fix stuff.
1: Remote Access
Chances are SSH server is up and running for you already. Here is the basic setup.
sudo dnf install openssh-server
sudo firewall-cmd --add-service=ssh --permanent
sudo firewall-cmd --reload
sudo systemctl start sshd
sudo systemctl enable sshd
and make sure you can ssh in
ssh [email protected]before going farther in the guide.
You’ll also want to make sure your IOMMU groups are appropriate using the ls-iommu.sh script which has been posted here and elsewhere:
#!/bin/bash
for d in /sys/kernel/iommu_groups/*/devices/*; do
  n=${d#*/iommu_groups/*}; n=${n%%/*}
  printf 'IOMMU Group %s ' "$n"
  lspci -nns "${d##*/}"
done
If you don’t have any IOMMU groups, make sure that you’ve enabled IOMMU (“Enabled” and not “Auto” is important on some motherboards) as well as SVM or VT-d.
We also need to enable IOMMU on the Linux side of things.
Checking for IOMMU enabled during system start:
dmesg | grep -i -e IOMMU | grep enabled
I find no difficulty setting this up in Fedora, the process is pretty automated. Let me know if you did.
Adding the
intel_iommu=onoramd_iommu=onintoGRUB_CMDLINE_LINUXsudo vim /etc/sysconfig/grub sudo dnf reinstall kernel grub2-editenv list
(I trust you know if you have an Intel or AMD system? 
Installing Packages
It is entirely possible to do almost all of this through the GUI. You need not be afraid of cracking open a terminal, though, and running commands. I’ll try to explain what’s going on with each command so you understand what is happening to your system.
First, we need virtualization packages and use the Fedora’s own maintainers. Personally I like to offload this work for smaller projects, but if any of you want to create a specific list of packages, I will add the list here.
# sudo dnf install @virtualization
User settings are not adjusted, if you user is not in wheel it will require further groups to operate KVM and other aspects of this project.
The Initial Ramdisk and You
I know what some of these words mean? Yeah, it’ll be fine. So as part of the boot process drivers are needed for your hardware. They come from the initial ram disk, along with some configuration.
Normally, you do configuration of the VFIO modules to tag the hardware you want to pass through. At boot time the VFIO drivers bind to that hardware and prevent the ‘normal’ drivers from loading. This is normally done by PCIe vendor and device ID, but doesn’t work for this System 76 system because it’s got two identical GPUs.
It’s really not a big deal, though, we just need to handle the situation differently. Early in the bootprocess we’ll bind vfio to one of the RTX 2080 and the audio device via a shell script. The RTX cards also have USB/serial devices which will need to be bound, since they are in the same IOMMU group.
This script will have to be modified to suit your system. You can run
# lspci -vnn
to find the PCIe device(s) associated with your cards. Normally there is a “VGA compatible controller” and an audio controller, but with RTX cards there are up to 4 devices typically:
My setup:
01:00.0 VGA compatible controller [0300]: NVIDIA Corporation GP104 [GeForce GTX 1080] [10de:1b80] (rev a1)
01:00.1 Audio device [0403]: NVIDIA Corporation GP104 High Definition Audio Controller [10de:10f0] (rev a1)
04:00.0 USB controller [0c03]: ASMedia Technology Inc. ASM2142 USB 3.1 Host Controller [1b21:2142]
42:00.0 VGA compatible controller: NVIDIA Corporation GV104 [GeForce GTX 1180] (rev a1)
42:00.1 Audio device: NVIDIA Corporation Device 10f8 (rev a1)
42:00.2 USB controller: NVIDIA Corporation Device 1ad8 (rev a1)
42:00.3 Serial bus controller [0c80]: NVIDIA Corporation Device 1ad9 (rev a1)
Note that my devices showed up at 0000:41 and 0000:42 and 0000:42 was the primary card (meaning we want to pass through the 4 devices under 0000:41)
We will want to be sure that we bind vfio to all of these – they are likely to be grouped in the same IOMMU group anyway (forcing all the devices to be bound to VFIO drivers for passthrough).
The script will help us make sure the vfio driver has been properly attached to the device in question.
This is the real “special sauce” for when you have two like GPUs and only want to use one for VFIO. It’s even easier if your GPUs are unalike, but this method works fine for either scenario.
Modify DEVS line in the script (prefix with the 0000 or check out /sys/bus/pci/devices to confirm if you like) and then save it to /usr/sbin/vfio-pci-override.sh
#!/bin/sh
PREREQS=""
DEVS="0000:01:00.0 0000:01:00.1 0000:04:00.0"
for DEV in $DEVS; do
        echo "vfio-pci" > /sys/bus/pci/devices/$DEV/driver_override
done

modprobe -i vfio-pci
Note: Xeon, Threadripper or multi-socket systems may very well have a PCIe device prefix of 0001 or 000a… so double check at /sys/bus/pci/devices if you want to be absolutely sure.
With the script created, you need to make it executable and add it to the initial ram disk so that it can do its work before the nvidia driver comes lumbering through to claim everything. (It’s basically the spanish inquisition as far as device drivers go).
Since Fedora is using dracut to manage initram, we will do these steps later, for now we will just change the ownership and rights.
run
sudo chmod 755 /usr/sbin/vfio-pci-override.sh
sudo chown root:root /usr/sbin/vfio-pci-override.sh
So we’ll need to add that driver to the initial ramdisk. VFIO and IOMMU type1 is there, so that’s good, at least.
Checking the statu of initram:
sudo lsinitrd | grep vfioUpdating initram once by command:
sudo dracut --add-drivers "vfio vfio-pci vfio_iommu_type1" --forceUpdating initram configuration (permanent):
Add following lines to new configuration file:
force_drivers+="vfio vfio-pci vfio_iommu_type1"
install_items="/usr/sbin/vfio-pci-override.sh /usr/bin/find /usr/bin/dirname"sudo vim /etc/dracut.conf.d/vfio.confRebuild initram by force:
sudo dracut --force
Checking configuration prior reboot:
sudo lsinitrd | grep vfio
etc/modprobe.d/vfio.conf
usr/lib/modules/5.2.9-200.fc30.x86_64/kernel/drivers/vfio
usr/lib/modules/5.2.9-200.fc30.x86_64/kernel/drivers/vfio/pci
usr/lib/modules/5.2.9-200.fc30.x86_64/kernel/drivers/vfio/pci/vfio-pci.ko.xz
usr/lib/modules/5.2.9-200.fc30.x86_64/kernel/drivers/vfio/vfio_iommu_type1.ko.xz
usr/lib/modules/5.2.9-200.fc30.x86_64/kernel/drivers/vfio/vfio.ko.xz
usr/lib/modules/5.2.9-200.fc30.x86_64/kernel/drivers/vfio/vfio_virqfd.ko.xz
usr/sbin/vfio-pci-override.sh
Comments from Wendell:
I always like to verify the initial ramdisk does actually contain everything we need. This might be an un-needed step, but on my system I ram:
This tells me two important things. One, that the bind_vfio script will run with the initial ramdisk (yay!) and that vfio-pci is missing (boo).
This is an end of a first chapter, after rebooting PC should be ready for VFIO and your GPU free for VM use.
Reboot at this point, and use
# lspci -nnv
to verify that the driver has been loaded:
42:00.0 VGA compatible controller [0300]: NVIDIA Corporation GV104 [GeForce GTX 1180] [10de:1e87] (rev a1) (prog-if 00 [VGA controller])
        Subsystem: Gigabyte Technology Co., Ltd TU104 [GeForce RTX 2080 Rev. A] [1458:37a8]
        Flags: bus master, fast devsel, latency 0, IRQ 5, NUMA node 2
        Memory at c9000000 (32-bit, non-prefetchable) [size=16M]
        Memory at 90000000 (64-bit, prefetchable) [size=256M]
        Memory at a0000000 (64-bit, prefetchable) [size=32M]
        I/O ports at 8000 [size=128]
        Expansion ROM at 000c0000 [disabled] [size=128K]
        Capabilities: [60] Power Management version 3
        Capabilities: [68] MSI: Enable- Count=1/1 Maskable- 64bit+
        Capabilities: [78] Express Legacy Endpoint, MSI 00
        Capabilities: [100] Virtual Channel
        Capabilities: [250] Latency Tolerance Reporting
        Capabilities: [258] L1 PM Substates
        Capabilities: [128] Power Budgeting <?>
        Capabilities: [420] Advanced Error Reporting
        Capabilities: [600] Vendor Specific Information: ID=0001 Rev=1 Len=024 <?>
        Capabilities: [900] #19
        Capabilities: [bb0] #15
        Kernel driver in use: **vfio-pci**
        Kernel modules: nvidiafb, nouveau, nvidia_drm, nvidia

42:00.1 Audio device [0403]: NVIDIA Corporation Device [10de:10f8] (rev a1)
        Subsystem: Gigabyte Technology Co., Ltd Device [1458:37a8]
        Flags: bus master, fast devsel, latency 0, IRQ 4, NUMA node 2
        Memory at ca080000 (32-bit, non-prefetchable) [size=16K]
        Capabilities: [60] Power Management version 3
        Capabilities: [68] MSI: Enable- Count=1/1 Maskable- 64bit+
        Capabilities: [78] Express Endpoint, MSI 00
        Capabilities: [100] Advanced Error Reporting
        Kernel driver in use: **vfio-pci**
        Kernel modules: snd_hda_intel
(Bold added for emphasis – it should not say nvidia for the device you intend to pass through. Device address 42.0 in my case.)
Configuring the Virtual Machine
You can use the gui to add the PCIe graphics card to the VM. If you have a second USB mouse and keyboard, you can pass those through to the VM. (Later we can install software like Synergy or Looking Glass to handle seamless switching of input between guest and host).
Add an ISO and install your operating system, or boot off the block device into the pre-existing operating system (you want to uninstall platform specific drivers like chipset drivers/ryzen master/intel xtu/etc if you plan to dual boot the same windows installation both physically and virtually).
Because I almost always use a real physical disk with my VM, I usually just use the Wizard for initial setup and select PXE boot (then drop to the CLI and link the disk up to the real device).
For the wizard, check the tick box to configure before saving.
Be sure to select OVMF (not bios) . For my system I configured 16gb ram, 28 cores/56 threads on a manual config.
Once that saves (Did you remember to enable SVM or VT in the UEFI) , run virsh edit [vmname] (in my case virsh edit win10 )
 <disk type='block' device='disk'>
      <driver name='qemu' type='raw'/>
      <source dev='/dev/nvme1n1'/>
      <target dev='sda' bus='sata'/>
    </disk>
Save the XML, exit, and try to boot your VM and/or install your Windows OS. (ISO installation is recommended. USB installation can be… annoying).
Initial Setup of Windows VM
The easiest thing to do for installing Windows is to get the Windows ISO (not install from USB, believe it or not). https://www.microsoft.com/en-us/software-download/windows10ISO This link will allow a licensed Windows machine to download the current version of Windows 10. It will allow you to make an install USB, or an ISO file. You want the ISO file for virtualization.
Once you have the ISO, it is necessary to use the Virtual Machine Manager in Pop!_OS (or Ubuntu, or anything) to actually begin to setup the VM.
Notes on The Boot Process: UEFI/CSM
Browse your apps and run the Virtual Machine manager. Click Create New Vritual Machine and set the parameters that are appropriate. I’d recommend 4-6 CPU Cores and 8-16gb ram but you don’t want to use too much of your system’s main memory and CPUs.
On the very last step, it is critical that you don’t accept the defaults and start the VM. You must modify the config. Mainly, you must pick OVMF/Q35 for your chipset at the VM Config.
It is not yet necessary to assign the PCIe device tot he VM. In the default config, the VM will run with graphics in a window and I think that setting up windows this way, before the PCIe passthrough, will be easier on you.
In terms of “how much ram and CPU is right for me?” that depends on what you’re going to do with the system and what your host system is.
this System76 PC is a dream and purrs like a kitten. On this other thread, Iactually passed through 28c/56t of 32c/64t to the Windows VM to demonstrate that Windows in a VM is faster on a 2990WX than Windows on “bare metal” on a 2990WX due to windows’ sub par handling of the NUMA topology of this system. That’s a fun sidemission, if you’re interested.
For games and general productivity you often don’t need to dedicate more than 8-16gb ram and 4-6 CPU cores unless you know why you need more than that.
Setting up the VM for long term use
At this point you should have a VM installed and setup the basic Windows 10. In the following chapters we will focus on getting everything to work.
Using virsh edit and changes to the XML
Backing up your XML should be the first step:
sudo virsh dumpxml win10 > Documents/WinVM/win10_$(date -I'minutes').xml
Changing the validation schema is the next step, this will allow us more detailed configuration steps. virsh uses your default editor and will check syntax once you exit it.
- Backing up your XML should be the first step:
sudo virsh edit win10
- Replace
<domain type='kvm'>with:
<domain type='kvm' xmlns:qemu='http://libvirt.org/schemas/domain/qemu/1.0'>
NVidia and DRM regarding VFIO
NVidia does not allow GeForce to be used in server housing environment and they build a check for hypervisor. This will result in your GPU not working and being stuck in device manager with error 43.
To resolve this problem we will tell QEMU not to announce the hypervisor.
Fire up virsh edit and add 2 new lines into the last element
<qemu:commandline> and if it does not exist yet, create it.
Results should look similar to this:
      <qemu:commandline>
        <qemu:arg value='-cpu'/>
        <qemu:arg value='host,hv_time,kvm=off,hv_vendor_id=null'/>
      </qemu:commandline>
    </domain>
Setting up sound directly without opening virt-manager
This will allow you to start the VM from a command or at the start and start putting sound through your user and pulseaudio.
Guide is taken mainly from here:
[https://wiki.archlinux.org/index.php/PCI_passthrough_via_OVMF#Passing_VM_audio_to_host_via_PulseAudio](http://ArchWiki PCI Passthrough)
After this step you will not be able to use Spice anymore so you should have GPU pass-through ready.
Following easy steps are necessary:
- Reconfigure Libvirtd user.
- Enable audio when there is no picture.
- Change pulse audio to be running under your user.
- Remove Spice and additional items from the VM.
- Configure your VM to use PulseAudio server.
1. & 2. Reconfiguring libvirtd user and enabling audio.
Open the configuration file:
sudo nano /etc/libvirt/qemu.conf
Add following line after: #user="root"
user = "BansheeHero"
Change the following line to 1:
nographics_allow_host_audio = 1
3. Change pulse audio to be running under your user.
4. Remove Spice and additional items from the VM.
5. Configuring your VM to use PulseAudio server.
Fire up virsh edit and add 4 lines to the <qemu:commandline>element.
Results should look similar to this:
      <qemu:commandline>
        <qemu:env name='QEMU_AUDIO_DRV' value='pa'/>
        <qemu:env name='QEMU_PA_SAMPLES' value='8192'/>
        <qemu:env name='QEMU_AUDIO_TIMER_PERIOD' value='99'/>
        <qemu:env name='QEMU_PA_SERVER' value='/run/user/1000/pulse/native'/>
      </qemu:commandline>
    </domain>
Performance Tuning
The out-of-the-box config on Ubuntu/Pop!_OS needs a bit of tweaking for best VM performance. It’s worth doing this for the learning opportunity. If you like to do as little tweaking as possible, a distro like Fedora might be better because the RedHat folks really have this down – no doubt because of their roots of working in business/the enterprise. The older guides here still work fine on Fedora 30 – if anything it’s easier. The initial ramdisk works a bit different there – see those other guides. For Pop!_OS though, let’s press on…
Notes on Disk/SSD/Storage
If you have the capability, passing through a raw SSD (sata or NVMe) will offer the best performance. There are advantages to using a disk image file (qcow2, raw, etc) such as easier snapshots/backups. But for a performance-oriented VM, try to pass through an entire device.
You can run a Windows utility such as Crystal Disk Mark to benchmark the virtual hard disk. Generally, the VM should remain as usable and responsive as if it were on “bare metal” while the benchmark is running. If not, you may have some fine-tuning or troubleshooting to do.
Techbro, do you even hugepages?
Hugepages can make a big difference for the better in terms of performance on modern hardware, and it is pretty easy to do. This is another thing we have RedHat and specifically Alex Williamson to thank for these hints and tips. (Learn more about hugepages here and here .)
To make a long story short, when you’re doing highly memory intensive operations the default Linux kernel size of 4kb is perhaps a bit too slow. Modern hardware has mechanisms to quickly and efficiently shuffle around much larger blocks of data. This can be important in switching between guest and virtual machine contexts.
In my own Threadripper 2990WX testing with the Windows scheduler and Indigo, it was possible to achieve a ~1.9x speedup over windows on bare metal buy lying to windows about the CPU topology and enabling hugepages.
Enabling it is a several-step process. First, check if you need to enable it. Some distros enable by default:
# cat /proc/meminfo  |grep Huge
AnonHugePages:    129024 kB
ShmemHugePages:        0 kB
HugePages_Total:       0
HugePages_Free:        0
HugePages_Rsvd:        0
HugePages_Surp:        0
Hugepagesize:       2048 kB
If your output looks like that, and you have nothing in HugePages_Total and AnonHugePages seems like kind of a lot, you probably aren’t using hugepages.
You can give the linux kernel a hint about how many huge pages you might need:
# /etc/sysctl.conf
vm.nr_hugepages=8192
vm.hugetlb_shm_group=48
Check /etc/sysctl.conf for entries like these. In our case these values are appropriate for ~16gb memory passed through to a virtual machine. A general rule of thumb is about 1 huge page for every 2gb memory you intend to pass through. (“For example, if I would want to reserve 20GB for my guests, I would need 20 1024 1024/2048 = 10240 pages.” More info here. )
As is recommended by Redhat, you can disable the old ‘transparent hugepages’
echo 'never' > /sys/kernel/mm/transparent_hugepage/defrag
echo 'never' > /sys/kernel/mm/transparent_hugepage/enabled
I googled those commands – doing it at boot up is annoying and… well… systemd doing it for us is probably the best way.
This blog has a quickie how to that creates a systemd daemon to disable this at boot. It’s not much harder
than init (my old habits with init die hard…)
That blog also describes creating /hugepages and mounting it via /etc/fstab at boot, if you want to do that.
Now, you need to update your KVM VM configuration to use huge pages. This is pretty easy.
# virsh edit win10
<memoryBacking><hugepages/></memoryBacking>
Add that line to your config just after the directive. Mine looks like:
...
 <memory unit='KiB'>16384000</memory>
  <currentMemory unit='KiB'>16384000</currentMemory>
  <memoryBacking>
    <hugepages/>
  </memoryBacking>
...
In that area.
If you haven’t already rebooted, now is the time.
Use lstopo to pick what Cores to Pin
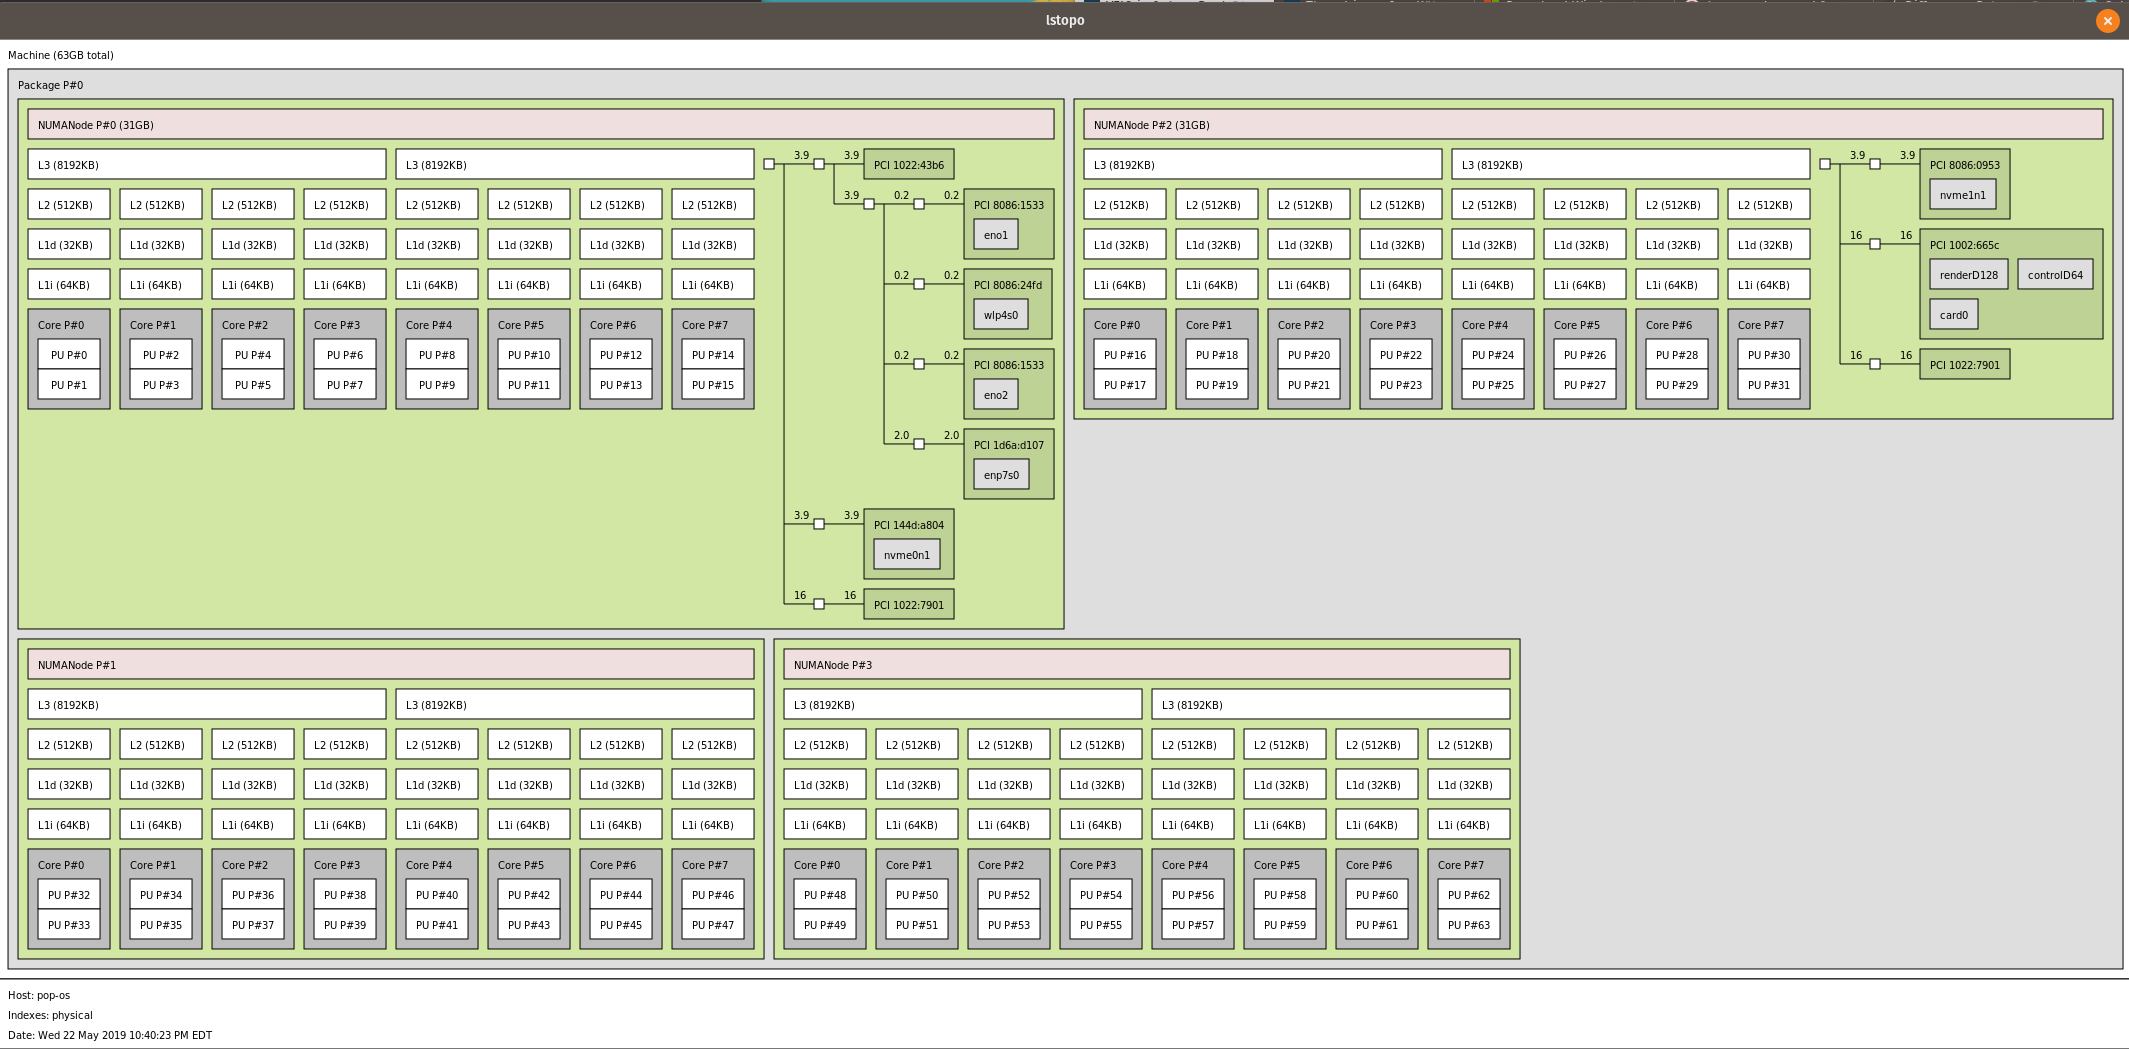
lstopo is a utility you can apt install hwloc that will give you an idea of what cores/nodes are atached to memory and peripherals.
For example, on the system in the video the RTX 2080 for the VM is on the second node. So we can see what cores and threads that’s associated to (PU 16-32). It would be best performance to pin the VM’s CPUs to these physical CPUs since they are closest to the GPU. Linux will take care of the memory locality for us as long as we don’t exceed (in my case) 31gb of memory. (see right side of image, match up PCIe device IDs, tada, done).
QEMU Tweaks (Host)
Driver Tweaks (in Windows)
TODO: AMD tweak to reserve stuff for Looking Glass
TODO
Introducing Looking Glass
TODO
Closing Thoughts
TODO
Troubleshooting
With the VM setup, sometimes GPUs don’t want to “de-initalize” so they could be booted again. On VEGA-based GPUs this typically manifests as a card that just doesn’t work until you hard reset the system (“The Vega Reset Bug”). On Nvidia GPUs you can usually work around any of these types of issues by simply dumping the GPU’s rom for UEFI booting mode and specify that.
TODO Specify GPU Rom example
Audio
Audio is often a problem in VMs due to the real-time nature and a whole host of Qemu bugs. Our own local @gnif has been responsible for helping fix a number of bugs and has done a few writeups on it. For me personally, my monitor has audio out (spdif and 3.5mm) so I’ve always used the on-gpu hardware audio facility and that’s worked great. Not everyone can manage that, though, so let’s cover some tips and tricks for a good non-choppy audio experience in a VM:
TODO
Of course, you could always pass through a USB audio device as well.
If the disk is very slow, … TODO
Be sure to check out the comments below for common problems and solutions. I’ll update this guide with fixes for issues folks encounter, or link to Q&A fix threads. Be sure to use the search function here as there are many helpful threads. Help the community out so we can have a central repo for good guides.