Introduction
Wow! What a ride. I’ve recently reviewed two very different portable computing devices built around 128gb of ram and the 16 core Ryzen AI MAX 395+
This guide is focused around the very capable HP G1A laptop. It looks like a thin-n-lite laptop but in reality it’s kind of an intimidating monster. It is qualified for Ubuntu 24.04 LTS by HP but this guide is mainly about getting Arch Linux working on it, with all the bells and whistles:
- Working Fingerprint Logins
- BTRFS Snapshots and Subvolumes
- Suspend/Resume
- Hibernate (!!!)
- Mediatek Wifi Reasonably Stable
- ISP Camera Working (TODO)
This HP laptop can be a first class Linux experience. I get why AMD’s codename for this is Strix *Halo *
The keyboard backlight controls? They work.
The keyboard screen brightness controls? Yep.
Microphone and speaker control? Yes
TLP and power management? Flawless.
And Fingerprint Reader?!?!? Also flawelss.
This is a first class Linux laptop. The weakest point is the Mediatek Wifi, but as of 5/10/2025 this guide will walk you through what you need for the Mediatek Wifi to work properly even in Wifi 7 scenarios.
I’ve noticed that this laptop is somewhat misunderstood because laptops that have up to 16 cores and 128gb ram are usually much more aptly described as a portable desktop, because of the bulk, than a laptop. Not so for this!
I hope that doesn’t discourage product designers. This laptop is effectively a desktop replacement, even for people like me.
Note that even though this guide was essentially written for the HP G1A, it will mostly apply to other AMD Strix Halo devices out there, too.
Repairability
Even though the ram is soldered, the SSD and battery are easily replacable. HP has a good field-service manual. Props for that, and that gives the ground-truth of the repairability and serviceability of this machine.
Arch Install
This was done using the March 01 ArchInstall ISO. You should be familiar with the general Arch Install document and the arch wiki
Networking
iwctl
# then inside iwctl:
device list
station wlan0 scan
station wlan0 get-networks
station wlan0 connect YOUR_SSID
Disk Partitioning
I want sleep-then-hibernate to work to preserve battery life. There are security implications of writing memory to disk, and this guide doesn’t cover whole disk encryption. If you explore that please comment, though.
Because of that I often opt for a separate swap partition. In this case we use 128gb and hibernating takes a while to write that out.
cgdisk /dev/nvme0n1
- EFI: 512MB (type EF00)
- Root: rest of the disk -132G (type 8300)
- Make a swap partition ≥ your RAM (e.g. 128GB)
You can specify a negative number for the ending sector with cgdisk. So -132G will give us 128G + padding. If your laptop is 32G or 64G you can size appropriately. I like to give it an extra 1-4GB of padding just because I’m paranoid, but exact sizing should be fine here.
Formatting:
mkfs.fat -F32 /dev/nvme0n1p1         # EFI
mkfs.btrfs /dev/nvme0n1p2             # Root
mkswap /dev/nvme0n1p3
The other thing I like to do with BTRFS is use snapshots and subvolumes, rather than partitions. We’ll come back to that. I like this approach better than having a separate /home partition.
Subvolumes + Snapshots
Use subvolumes instead of directories for /home, /var/log, etc., even without separate partitions. This helps with snapshotting and system rollback.
mount /dev/nvme0n1p2 /mnt

btrfs subvolume create /mnt/@
btrfs subvolume create /mnt/@home
btrfs subvolume create /mnt/@log
btrfs subvolume create /mnt/@cache
btrfs subvolume create /mnt/@pkg

#  I used to do this last one manually, but snapper now
#  has to do it, so don't create @snapshots if you
#  btrfs subvolume create /mnt/@snapshots

umount /mnt
Now we can mount our /mnt to prep for the pacstrap
mount -o compress=zstd,noatime,space_cache=v2,ssd,subvol=@ /dev/nvme0n1p2 /mnt

mkdir -p /mnt/{boot,home,var/log,var/cache,var/lib/pacman/pkg}

mount -o compress=zstd,noatime,space_cache=v2,ssd,subvol=@home       /dev/nvme0n1p2 /mnt/home
mount -o compress=zstd,noatime,space_cache=v2,ssd,subvol=@log        /dev/nvme0n1p2 /mnt/var/log
mount -o compress=zstd,noatime,space_cache=v2,ssd,subvol=@cache      /dev/nvme0n1p2 /mnt/var/cache
mount -o compress=zstd,noatime,space_cache=v2,ssd,subvol=@pkg        /dev/nvme0n1p2 /mnt/var/lib/pacman/pkg


mount /dev/nvme0n1p1 /mnt/boot
You should be able to genfstab -U /mnt >> /mnt/etc/fstab and then verify that your fstab looks proper:
UUID=ROOT_UUID   /              btrfs  rw,noatime,compress=zstd,space_cache=v2,ssd,subvol=@           0 0
UUID=ROOT_UUID   /home          btrfs  rw,noatime,compress=zstd,space_cache=v2,ssd,subvol=@home       0 0
UUID=ROOT_UUID   /var/log       btrfs  rw,noatime,compress=zstd,space_cache=v2,ssd,subvol=@log        0 0
UUID=ROOT_UUID   /var/cache     btrfs  rw,noatime,compress=zstd,space_cache=v2,ssd,subvol=@cache      0 0
UUID=ROOT_UUID   /var/lib/pacman/pkg btrfs rw,noatime,compress=zstd,space_cache=v2,ssd,subvol=@pkg    0 0

UUID=EFI_UUID    /boot          vfat   defaults                                                       0 2
UUID=SWAP_UUID   swap           swap   defaults                    0 0
Use blkid to spot check UUIDs if anything says ‘none’ . If swap says ‘none’ you forgot to mkswap. Do that now and put the uuid in the fstab
The Rest of the Arch Install
pacstrap -K /mnt base linux linux-firmware systemd-boot networkmanager vim snapper linux-firmware mokutil
genfstab -U /mnt >> /mnt/etc/fstab
echo "your_laptop_name" >> /etc/hostname


arch-chroot /mnt

ln -sf /usr/share/zoneinfo/Region/City /etc/localtime
hwclock --systohc

echo "en_US.UTF-8 UTF-8" >> /etc/locale.gen
locale-gen
echo "LANG=en_US.UTF-8" > /etc/locale.conf


cat <<EOF > /etc/hosts
127.0.0.1   localhost
::1         localhost
127.0.1.1   archlaptopname.localdomain archlaptopname
EOF


systemctl enable NetworkManager

# add your user, set passwords

# set arch root password
passwd

useradd -mG wheel yourusername
passwd yourusername
visudo and uncomment %wheel ALL=(ALL:ALL) ALL
…these should be familiar to you from having read the arch install wiki
One last step is going ahead and enabling snapshots
sudo snapper -c root create-config /
then edit /etc/snapper/configs/root
SUBVOLUME="/"
SNAPSHOT_CREATE=yes
TIMELINE_CREATE=yes
TIMELINE_CLEANUP=yes
We’ll enable timed snapshots later after first boot.
Secure boot with GRUB
pacman -S sbctl

sbctl status
# output looks like
# Secure Boot: disabled
# Setup Mode: enabled
# ...
# Vendor Keys: none

sbctl create-keys

# -m is important here because it also enrolls Microsoft's signing keys
sbctl enroll-keys -m
Understand that the next reboot after having done enroll-keys -m secure boot will attempt to be secure boot enabled. If you did something wrong, you must clear the secure boot keys to go back into setup mode to try again. So don’t reboot until you’ve completed all the steps. We’re still in the arch chroot.
Sign Everything and Setup Grub
sudo grub-mkconfig -o /boot/grub/grub.cfg
grub-install --target=x86_64-efi --efi-directory=/boot --bootloader-id=GRUB --modules="tpm" --disable-shim-lock


sbctl sign  /boot/EFI/GRUB/grubx64.efi
sbctl sign  /boot/EFI/BOOT/BOOTX64.EFI
sbctl sign  /boot/vmlinux-linux

# verify everything has a green check
sbctl verify
This will be needed for snapshots:
sudo systemctl enable grub-btrfs.path
… And now you should be ready for your first reboot. Reboot the system. It should work. If not, skip to the secure boot troubleshooting section and we’ll go from there.
Some Recommended Packages
I use KDE on Arch, so I’d recommend also installing these packages:
pacman -Syu \
  plasma-meta kde-applications-meta \
  sddm xorg xdg-desktop-portal xdg-desktop-portal-kde \
  networkmanager bluez bluez-utils \
  pipewire wireplumber \
  power-profiles-daemon \
  mesa vulkan-intel vulkan-radeon libva-mesa-driver mesa-vdpau \
  powerdevil \
  konsole dolphin ark spectacle okular \
  fprint \
  amd-ucode \
  chromium
Note the amd-ucode package here. Intel-ucode would work for an intel system if you’re adapting these instructions to something that isn’t Strix Halo
fprint is for the fingerprint sensor.
and then enable some services:
systemctl enable sddm
systemctl enable NetworkManager
systemctl enable bluetooth
systemctl enable fstrim.timer
After first boot
Snapshots
Enable timed snapshots:
sudo systemctl enable --now snapper-timeline.timer
sudo systemctl enable --now snapper-cleanup.timer
In /etc/fstab add/uncomment the snapshots line:
# in fstab a line such as
# use blkid to confirm the uuid, should be copy paste
# from the line above
UUID=...  /.snapshots  btrfs  subvol=@snapshots,compress=zstd,noatime,space_cache=v2,ssd  0 2

sudo mkdir -p /.snapshots
sudo mount -a
If you’d like to test the snapshots:
sudo snapper -c root create --description "Test snapshot"
then to view snapper -c root list
Testing Suspend / Resume
systemctl suspend
systemctl hibernate
Does the system wake and sleep? Does it suspend (after probably 45 seconds of writing to disk? 128gb ram first world problems, huh?) Congratulations this is a better experience than 95% of Linux users (and 50% of windows users) enjoy.
Working suspend/sleep/wake is half the reason people buy Apple laptops it seems…
Troubleshooting Secure Boot
Did something go wrong after first reboot and the system won’t boot? Not to worry – reboot the laptop and spam Fn+F10 to get back into setup. Go to Secure Boot and check the “clear Secure boot” checkbox. Save and Exit.
Troubleshooting Lockup After Resume on the G1A
I noticed in my journey from kernel version 6.14 > 6.15 > 6.16 bleeding edge that, at some point, there was a good chance that resume from hibernate would lock the machine. I think this is a regression, and it may occur when the machine hardware clock passes the midnight boundary. I am still investigating. Stay tuned…
Hibernate, Suspend and Kernel Versions
Right now (2025-06-10) it still seems like kernel 6.14.9 is the best bet for a stable sleep/wake and hibernate function. The linux-cachyos kernel from the AUR was okay, but there seems to be some type of regression in 6.15.0 and 6.15.1 wrt sleep/wake and suspend/resume.
For the webcam that means you’ll need the dkms driver I did for both the i2c bus (amd_isp4) and the webcam (ov5c.c) … The dkms driver should be uninstalled when using newer kernels however. Its a bit of a mess right now… stay tuned.
More post Install Quality of Life
The last big remaining thing is the webcam. It uses an interface called ISP, which is lower latency and more efficient than USB. It is open source, but it is not well documented how to enable it:
This has been added to kernel 6.16 finally, so one could yay -S linux-next-git linux-next-git headers
In the mean time
Here is a DKMS version of the module I built. Note that I recommend you pull the lib camera repo from above and build it, and build it with v4l2 emulation support.
Note: I have taken this down for the moment as I created a situation for myself when I upgraded 6.14.4 > 6.14.5 > 6.15 with this setup. Something is not right…
cat /sys/bus/acpi/devices/OMNI5C10\:00/status
The sensor on my G1A appears as OMNISC10, and I get status code 15 from the above.
I tried to extract the ispkernel 4.0 stuff from the above kernel but it was a little more involved than I expected. The driver I wrote doesn’t bind/find the ISP bugs, maybe because ispkernel4.0 is also missing…
cam -l doesn’t show any cameras even after I managed to get the module to load. I also sort of expected the intel ov05c10 would be compatible with the OMNI 5c10 and maybe Id just have to add an acpi name or something to the module, but that didn’t work either.
So, for now, kernel 6.16 is the path of least resistance on arch. OR building the older ubuntu 24.04 LTS kernel for your arch distro.
(Did I just become the maintainer of linux-g1a on aur? pls nooooo)
Update: 6/19: Ulgh, I got this working on 6.14 but now on 6.15 the amd_isp bus stuff is present in this kernel version, but the camera driver is now not loading, or is different. I think the intel driver was basically working as-is, but is now not. Not sure why. Investigating…
More Recommended Packages / Setup
- TLP or auto-cpufreq
- Timeshift
- FirewallD/UFW
- snap-pac
OpenVPN (and VPNs in General)
Some enterprise VPNs (looking at you Fortinet) advertise a default route (meaning that traffic is sent that way rather than via the internet) but your corporate firewall rules don’t always permit traffic. Sometimes the default config with OpenVPN is this way on pfsense. Consider the following output of ip route :
default via 10.39.1.1 dev tun0 proto static metric 50
default via 192.168.117.232 dev wlp193s0 proto dhcp src 192.168.117.201 metric 600
10.79.78.0/24 dev tun0 proto kernel scope link src 10.79.78.9 metric 50
10.200.0.0/24 via 10.79.78.1 dev tun0 proto static metric 50
69.254.111.42 via 192.168.117.232 dev wlp193s0 proto static metric 50
192.168.117.0/24 dev wlp193s0 proto kernel scope link src 192.168.117.201 metric 600
192.168.117.232 dev wlp193s0 proto static scope link metric 50
When the VPN is active one can reach VPN resources but not the internet. This is because the metric 50 is below metric 600 that Arch is using by default on mediatek wlp193s0. Dumb, but not for the reasons you think. (Sometimes the metric is 100).
We want to explicitly tell network manager to use a low value for the metric so it is the “first pick” for outbound traffic in this kind of a scenario. To change metric 600 to metric 25 just do this:
edit /etc/NetworkManager/conf.d/10-route-metric.conf and make it contain
[connection]
ipv4.route-metric=25
ipv6.route-metric=25
then systemctl restart NetworkManager and that is unlikely to be an issue again.
Steam!?
vi /etc/pacman.conf and uncomment multilib. then pacman -S steam and login!
Known Quirks
Wifi
With Kernel 6.14.3 and linux-firmware from 5/1 or newer, most of the Mediatek woes are gone. However there are some quirks if your access point is IPv6 and in scenarios where you are doing multi in/out. The Mediatek Wifi7 does not always have best performance on Linux and (for the most part) ASPM must remain disabled to have a good wifi experience. The HP laptop meets those criteria out of the box, but other Strix Halo devices may not. It is possible to disable ASPM via kernel parameter if it is not an accessible setting in bios, and the IPv6 bug is a known issue and will probably be fixed soon. If you trip over the ipv6 bug, it is possible to disable ipv6 with a kernel parameter and sidestep the bug for good wifi experiences.
I recommend the following tweaks to make the experience a bit smoother:
TODO
Benchmarks
I was able to benchmark the memory at @ 215 gigabyes/sec. I was able to achieve about 3.1 tokens/s on Deepseek R1 (unsloth 70gb). On a laptop
Update: Up to 5.5 tokens/sec WOOO!
Useful resources in no particular order:
specifically for 1151:
and
has some useful background from march until the present.
this is a useful self-contained pytorch wheel for 1151:
which would give you a quick and dirty shortcut.
time llama.cpp-vulkan/build/bin/llama-bench -fa 1 -m ~/models/shisa-v2-llama3.3-70b.i1-Q4_K_M.gguf
ggml_vulkan: Found 1 Vulkan devices:
ggml_vulkan: 0 = AMD Radeon Graphics (RADV GFX1151) (radv) | uma: 1 | fp16: 1 | warp size: 64 | shared memory: 65536 | int dot: 1 | matrix cores: KHR_coopmat
| model | size | params | backend | ngl | fa | test | t/s |
|---|---|---|---|---|---|---|---|
| llama 70B Q4_K - Medium | 39.59 GiB | 70.55 B | Vulkan,RPC | 99 | 1 | pp512 | 79.98 ± 0.69 |
| llama 70B Q4_K - Medium | 39.59 GiB | 70.55 B | Vulkan,RPC | 99 | 1 | tg128 | 5.33 ± 0.00 |
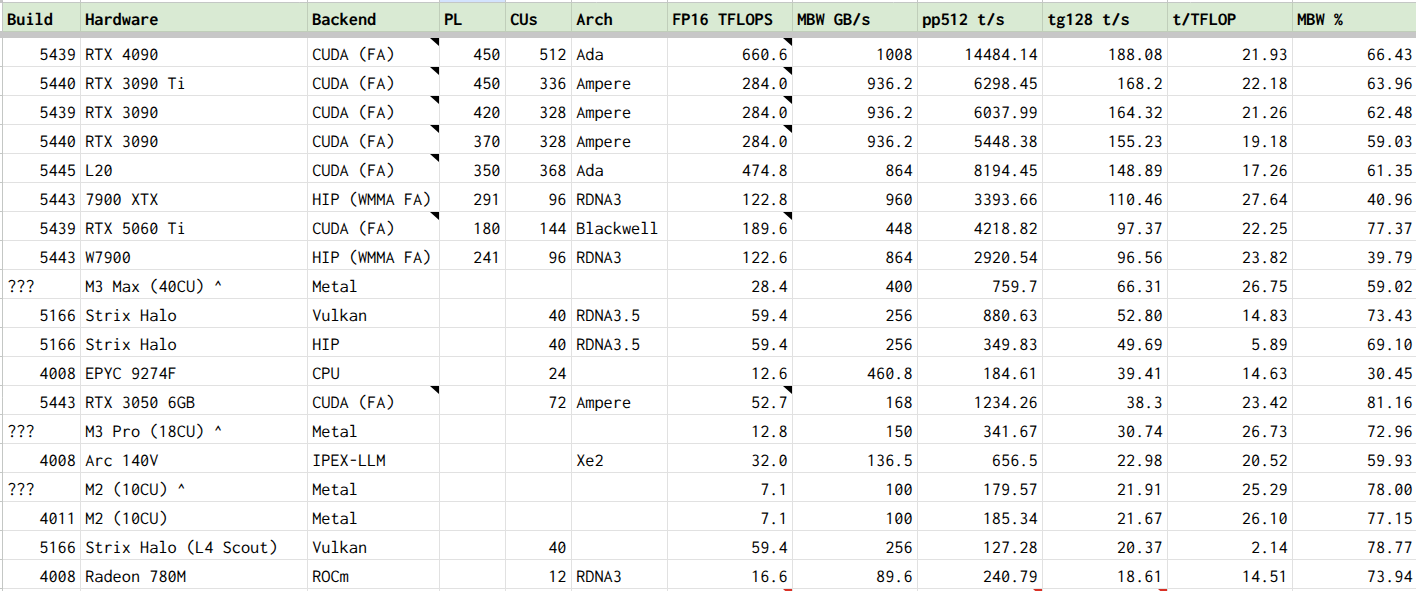
The Ryzen AI Max 395’s Radeon 8060S has 40 RDNA3.5 CUs.
Max clock is 2.9GHz so thats a peak of 59.4 FP16/BF16 TFLOPS:
512 ops per clock per cpu times 40 CUs times 2.9ghz = 59.392 FP16 TFLOPS
But the catch is you have to have WMMA or wave32 VOPD otherwise the max is halved.
In a lot of AMDs marketing I noticed that they were plugging rocm support but they meant the npu. Of course rocm cpu also works fine but that leaves a lot of perf on the table, too.
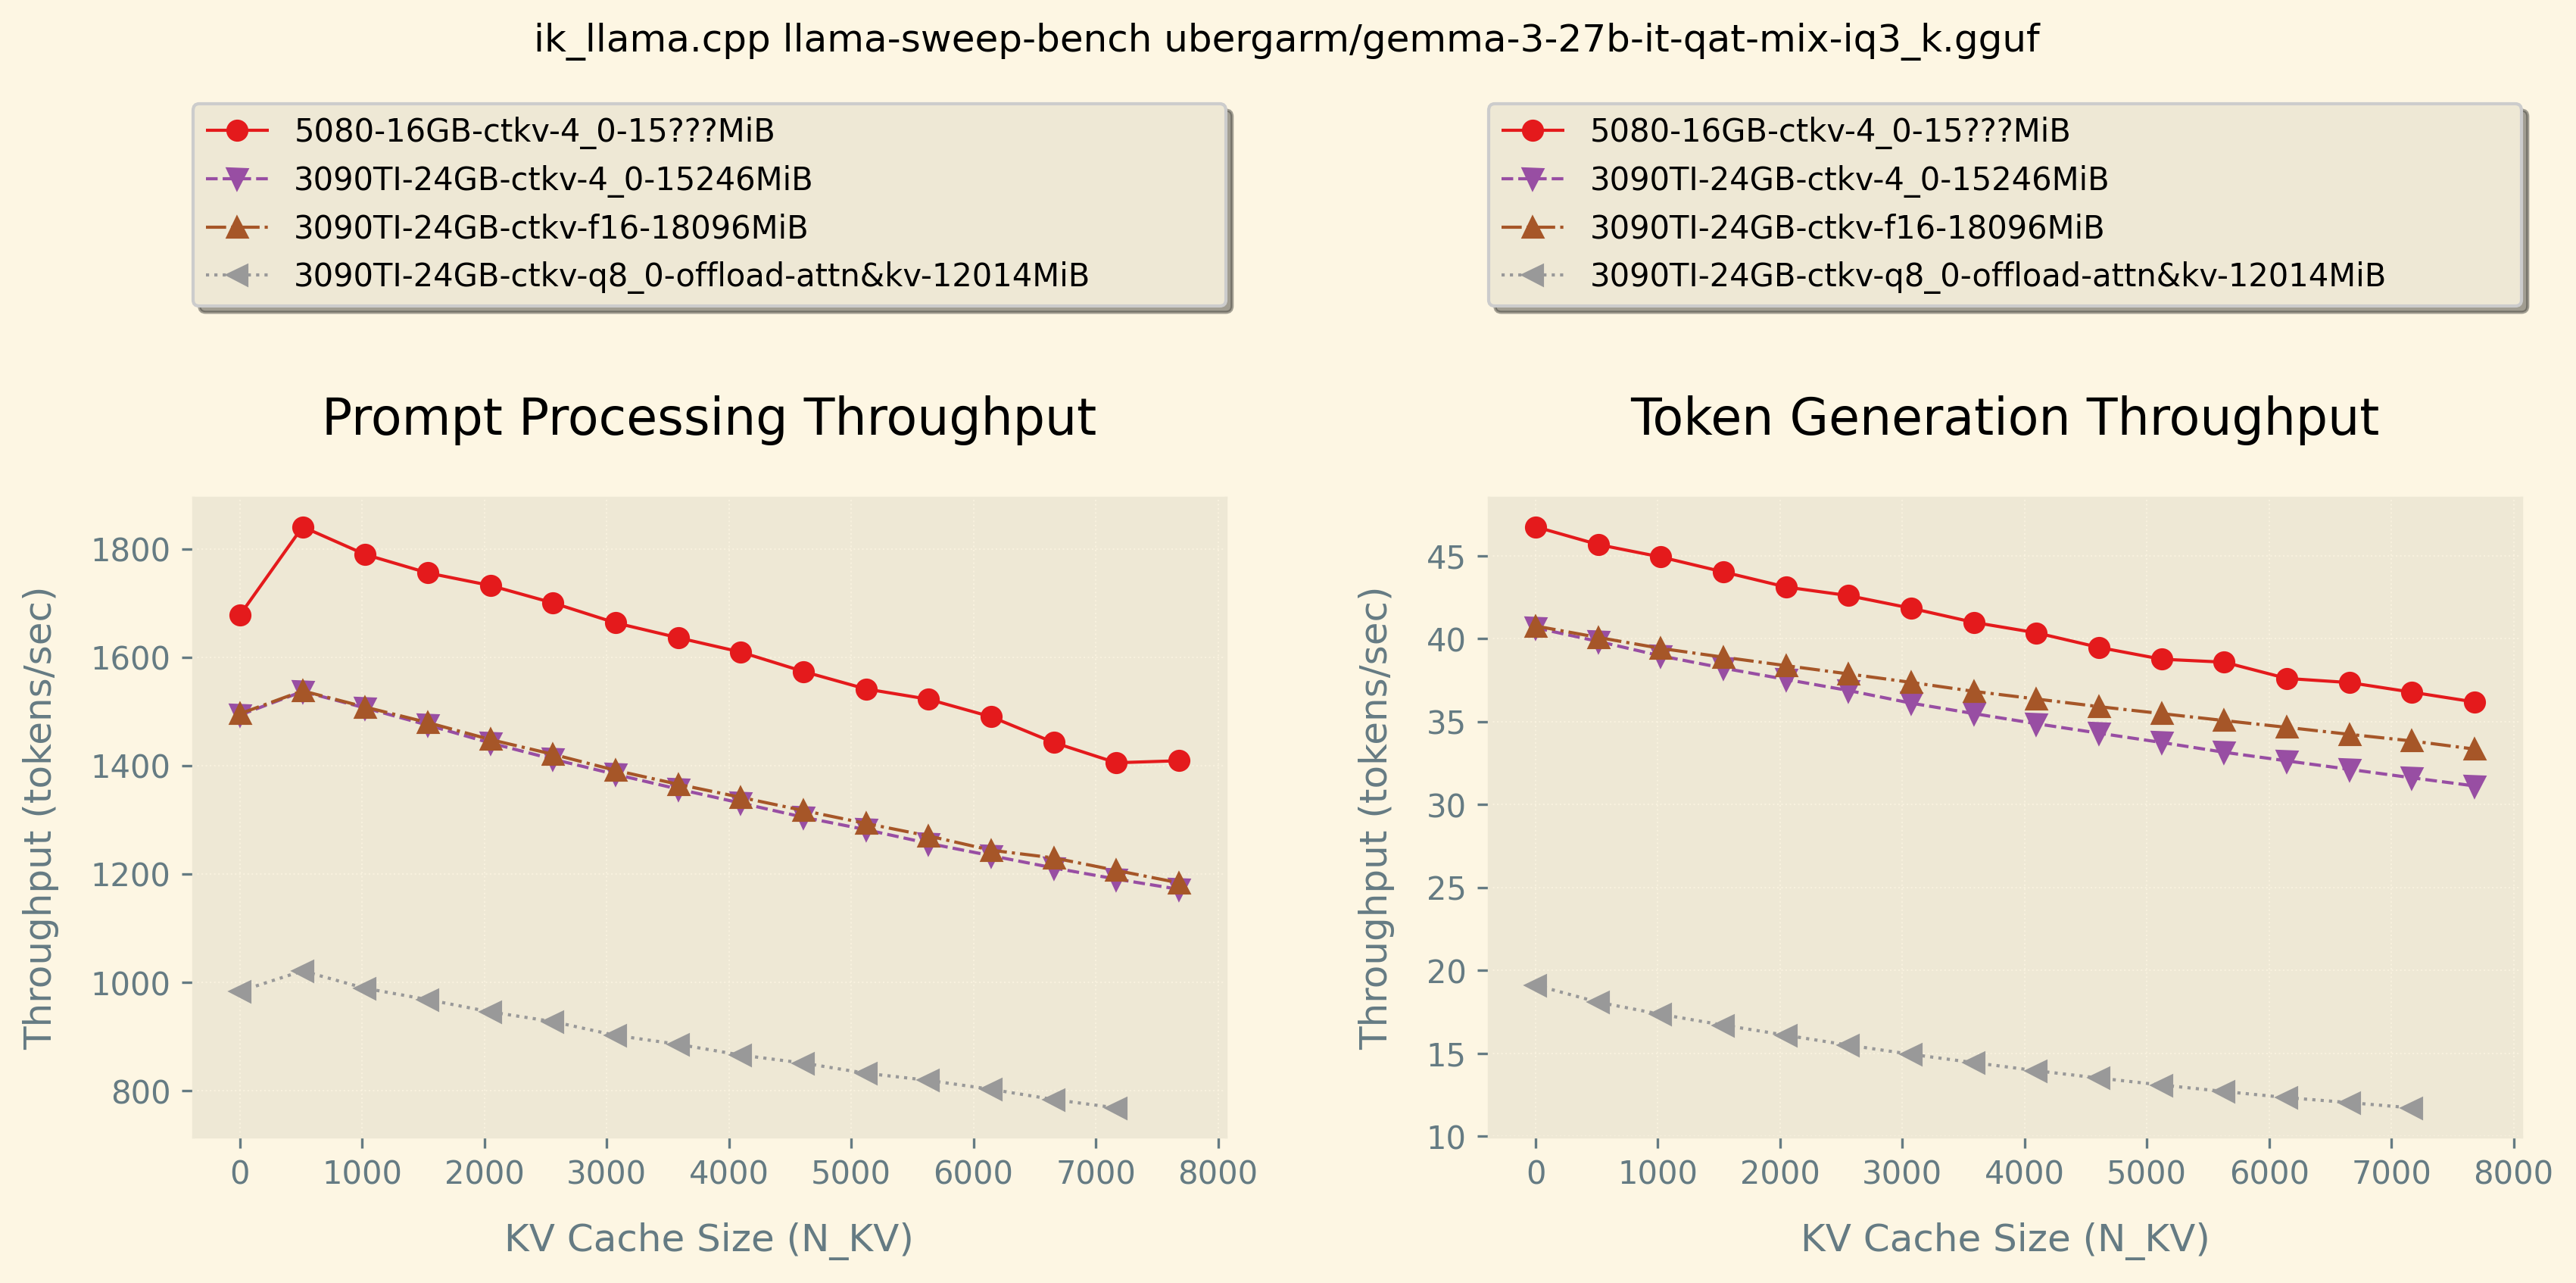
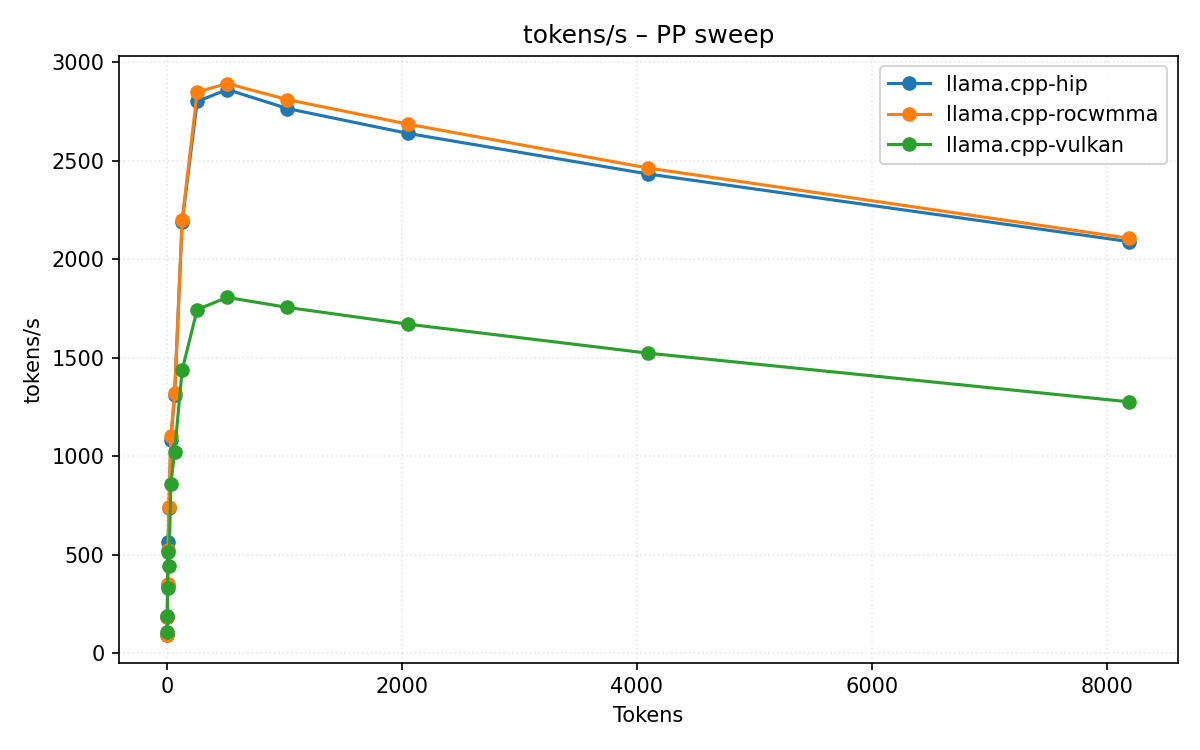
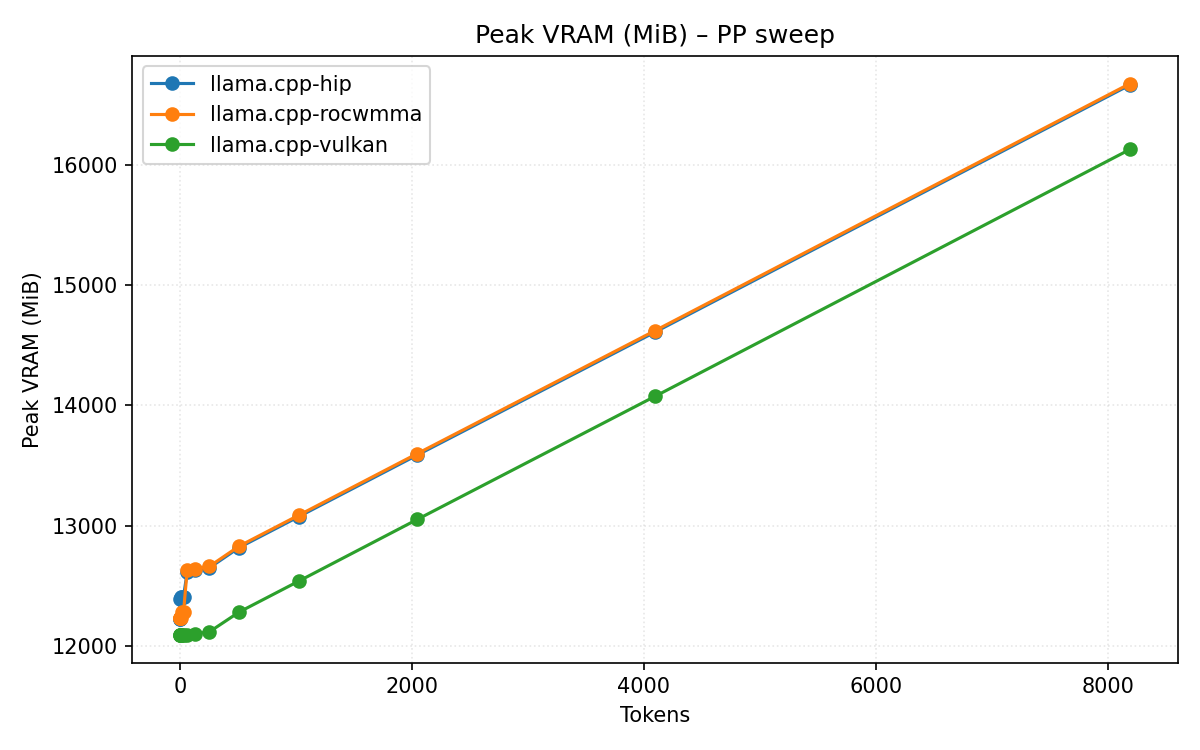
Theoretically the hip backend is faster? But in reality I found vulkan to be better. Ymmv.
TODO