Intro
In this installation, it’s all QEMU, libvirt and KVM. It’s been a long wait and I really do hope it’s been worth it. This is the part where I’m actually going to guide you through working with libvirt, using virt-manager for most of our work. This can be done by anyone because it’s so simple.
Software requirements
Before we get into the conceptual discussion, I’m going to be outlining a bit of the software that we’re going to need to follow this guide.
- libvirt and virt-manager (usually found as
libvirtandvirt-managerin your package manager) - QEMU (usually found as
qemuin your package manager) - fedora-packaged virtio drivers, an ISO which is obtainable at this link. I normally download the latest variant, because I’ve had better results, but you should be okay with either.
- OVMF, this is your UEFI firmware that the VM is going to run. Some distributions have it as a package, search your package manager for
ovmforedk2to see if you have it. If not, you’re going to have to extract an RPM for it. The binary files don’t require any libraries, as they’re firmware.
Moving on, you’re going to need to do some configuration so that libvirt can find the OVMF images that we installed. This will be discussed in a later section.
Conceptual Discussion
Alright, this one’s going to be a lot shorter than the previous since there’s not quite as much to cover here. The tricky part is the implementation.
First up is KVM, the Kernel-based Virtual Machine. It’s feature of the Linux kernel that allows you to get near-native performance on same-architecture virtualization. Your hardware must have virtualization extensions (Intel VT or AMD-V) to take full advantage of KVM. That said, you can’t use KVM directly. KVM is more of an ABI (application binary interface) that exposes system calls than a user-executable program.
That’s where QEMU (Quick Emulator) comes in. QEMU is software that emulates CPU’s by translating binary instructions and extends the KVM ABI. QEMU will allow you to emulate a number of different CPU’s, be it of the same or a different architecture. QEMU also allows you to emulate a large number of different devices from disks (HDD, floppy and cdrom drives), NICs, displays and HID (human interface devices, IE: keyboard and mouse) to PCI hubs and TPM devices. QEMU is also capable of redirecting the host machine’s USB devices and PCI devices that have not already been initialized or claimed by a driver.
Now that we’ve got an understanding of the underlying technology, we need something to manage it. That’s where libvirt comes to the rescue. libvirt is software that maintains configuration and manages VM states. Paired with virt-manager as a GUI front-end, you can easily provision and maintain virtual machines on your system. libvirt uses XML to store VM configuration. This makes the config easy to modify outside the front-end, which we may have to do at some point.
Windows 10, UEFI and your GPU in a VM.
It’s time. You’ve quite possibly been waiting upwards of 3 months for this series to get to this point. It’s time to guide you through making a Windows 10 VM with UEFI and stick a GPU in it so we can play windows games on Linux. First thing’s first. I’m going to be assuming you’ve got the Windows 10 ISO and a valid license. (I know, I know)
Before we start our services, we’ve got to make sure that libvirt is configured properly. First thing’s first, we need to make sure that libvirt knows where to find the OVMF files. You’ll need to edit /etc/libvirt/qemu.conf as root and append the following:
nvram = [
    "/usr/share/ovmf/ovmf-x86_64.bin:/usr/share/ovmf/ovmf-x86_64-vars.bin"
]
If your OVMF binaries are in a different location, go ahead and adjust accordingly. Once you’ve got that completed, we’re going to go ahead and make sure that libvirt is enabled by executing systemctl status libvirtd. You’ll get output similar to this:
libvirtd.service - Virtualization daemon
   Loaded: loaded (/usr/lib/systemd/system/libvirtd.service; enabled; vendor preset: disabled)
   Active: active (running) since Mon 2017-01-16 05:19:13 PST; 7h ago
     Docs: man:libvirtd(8)
           http://libvirt.org
 Main PID: 1635 (libvirtd)
    Tasks: 18 (limit: 512)
   CGroup: /system.slice/libvirtd.service
           ├─1635 /usr/sbin/libvirtd --listen
           ├─1899 /usr/sbin/dnsmasq --conf-file=/var/lib/libvirt/dnsmasq/defa...
           └─1900 /usr/sbin/dnsmasq --conf-file=/var/lib/libvirt/dnsmasq/defa...
It’s showing me that it’s running and has been enabled to start on boot (under the Loaded: … section, it says enabled;)
If your output says disabled;, you’ll need to enable it with:
systemctl enable libvirtd
This will allow libvirt to start on boot. We still need to manually start it this time though, so you’ll need to run, as root:
systemctl start libvirtd
Now that we’ve started libvirt, we can load up virt-manager and start configuring our VM.
Before we do that, however, I’d like to stop and take a quick look at a few different storage options. I’m currently using pure SSD storage for my VM’s, but you may want to choose a mix of SSD and HDD for yours. Also, be sure that you’re not using BTrFS to host your VM image, or if you must, disable copy-on-write with chattr +C on the directory you’re storing the image in. I’m going to use the default directory (/var/lib/libvirt/images) for my VM’s C:/ Drive, with a raw storage format. raw disks will give us the best performance. I’m going to be assuming you’ve got a windows 10 ISO downloaded and have access to it.
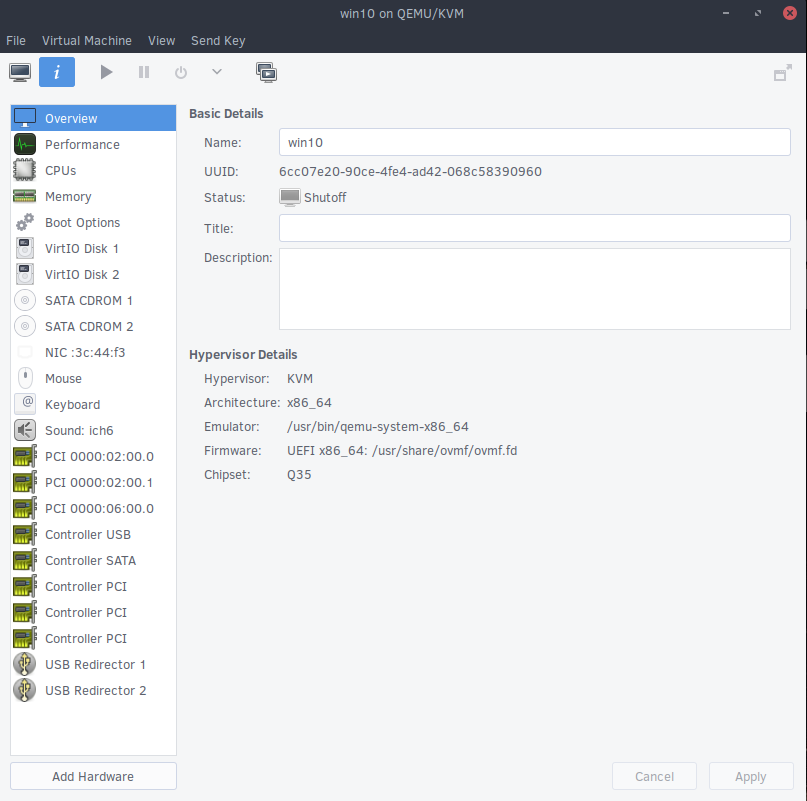
Now that we’ve got our storage more or less figured out, we can go through the VM creation process. Go ahead and set up your VM as you’d like but be sure that before you click “finish” you check the box for “Customize configuration before install”. This will allow us to get the VM set up exactly as we need it. You should now have a window with a large number of options listed down the left side.
Configuring the VM’s hardware
The first thing we need to do is change the firmware and chipset. We want to select UEFI for the firmware and Q35 for the chipset. You can safely ignore the warning that Q35 is less tested. I’ve never seen a hardware configuration where Q35 needs to be disabled, however, if you find this to be the case, please let me know so I can update this guide accordingly.
Once that’s done, let’s move on to the CPU configuration. We want to check the box about halfway down the window where it says “copy host CPU configuration” and set the topology to something logical for your CPU. I’ve got a quad-core with hyper threading, so I’m going to use 1 socket, 4 cores and 1 thread.
Moving on to memory, go ahead and set it to 8192MB (8GB). You can do what you want here, but I’ve found that my system runs best with 8GB of ram allocated to it.
Now let’s configure our disks. Under advanced options for each disk, we need to change HDD 1 to virtio and change the CDROM to sata. From there, we also want to add a secondary CDROM device and mount the virtio driver CD (obtainable here) there. Again, set this device to use the sata bus. We also want to use unsafe caching and threads for the IO mode.
Leaving the virtual network device set to NAT will be the best configuration for most cases. What we want to do, though, is change the device model to virtio, as with the disks above.
Now we’ve got a bunch of superfluous devices that can be removed. Remove the following devices:
- Mouse
- Display Spice
- Console
- Channel Spice
- Video QXL
Next step is to configure the Controller USB to work in USB 3 mode. From there, make sure you’ve got a RNG device at the bottom and continue to the next step. If you don’t, you’ll need to add a RNG attached to /dev/random via the Add Hardware button.
Adding the GPU
Before we take another step forward, it’s important to mention that if you have an AMD GPU, you’ll potentially run into PCIe Bus reset errors, which means you’ll have to cold boot the Linux host every time you want to reboot the VM. This issue won’t cause any damage to your system, but it’s a hardware flaw, so there is no software workaround. To the best of my knowledge, the RX 4xx series is not affected by it and from personal experience, the R9 380 and Fury line of cards suffer this issue.
Now, AMD is easiest to work with on the software side of things because AMD doesn’t purposely kill the drivers if it detects it’s in a VM. This means you don’t have to do any trickery to get the GPU to work properly, and in fact, you’ll probably have better performance with an AMD GPU than an Nvidia.
Time to add the GPU. Go into Add Hardware and choose PCI Host Device from the left side menu, find the PCI address of your device, usually something like 0000:01:00.0 or the like and add it. You’ll need to add both the GPU and the HDMI audio device or you won’t be able to get the drivers to work. The HDMI audio will almost always be attached at .1 on the same lane. So if you’ve got your GPU at 0000:01:00.0, your HDMI audio will be at 0000:01:00.1. Always add the GPU first, then the HDMI audio second. That way, the devices get addressed properly.
Starting the VM
This is it, the moment we’ve all been waiting for. The fifth symphony, The force awakens. Make sure you’ve got a monitor connected to the GPU you’re passing through and click Begin Installation. If you’ve got an Nvidia GPU, stop the VM after you’ve verified that there’s output on the screen. AMD users can continue with the installation below at the “Installing Windows 10” section.
Hiding KVM from Nvidia
Nvidia took the high-ground in trying to sell quadro cards to consumers by not allowing their GTX series GPUs to work if the driver has detected KVM or Hyper-V extensions. How can we solve this heinous act of terror, you ask? We’re just going to disable and hide the KVM and Hyper-V extensions. Unfortunately, this means that the VM will have slightly lower performance, but the difference in performance is about 1%. If you’re that concerned about 1%, consider Vega.
Now, on to solving the problem.
We need to open up the config file for the VM, so exit out of all the virt-manager windows, open up your terminal and execute sudo virsh edit win10, replacing win10 with your VM name. Next, go down to the very bottom of the file, you’ll see </domain>. Just above that line, insert the following:
<qemu:commandline>
<qemu:arg value='-cpu'/>
<qemu:arg value='host,hv_time,kvm=off,hv_vendor_id=null'/>
</qemu:commandline>
This directly appends CPU configuration to the QEMU command that virt-manager executes. On the third line, the host argument is telling QEMU to emulate the host cpu, so if you’ve got a skylake processor, the VM will see the CPU as skylake. The hv_time argument is a paravirtualized real time clock that can be used to help sync the VM’s time with the host. The kvm=off argument is telling QEMU to disable KVM extensions for this VM. This is where you see a bit of performance dip, but it’s not huge and will allow your GPU to work. The hv_vendor_id=null argument is hiding hyperv extensions from the VM since this is one of the features that the Nvidia drivers look for.
Save and quit the editor, then go ahead and load up virt-manager again and move on to the Windows installation process below.
A note on input devices
libvirt allows you to hot-plug USB devices to the VM. By default, you are allotted two, but you can add additional slots by adding another USB Redirector and restarting the VM. If you want to plug in a USB device, click the Add Hardware button and select USB Host Device, which is just above the PCI Host Device option that was used to install the GPU. My recommendation is to have a secondary keyboard and mouse for your VM while we go through the installation process. This will make it easier to work with your host system during the install process. Of course, this can be done with only one keyboard and mouse, but you’ll need to shut down the VM in order to restore control over the host system.
Installing Windows 10
Now, how about we get windows installed? The windows install process is going to be pretty normal, except for the part where we configure the storage. Windows doesn’t carry drivers for the virtio storage devices by default, so you’re going to have to install them from the ISO that we mounted earlier. When you get to the unsettlingly empty disk selection screen, choose Load Driver from the bottom of the window, where you can find viostor and choose the proper directory for your Operating System. Click through the rest of the process and you’ll find yourself back at the disk selection menu with a shiny new virtio disk showing up empty. Continue on with the install process and we’ll rejoin when the VM is at the desktop.
Installing additional drivers
Now that you’ve got windows installed, you’ll notice that you’ve got no network devices. This is, again, due to the fact that we chose virtio for the network device type and Windows doesn’t carry drivers for this device. We can right click the start menu button, choose Device Manager and find the devices that windows couldn’t assign a driver to in the menu. From there, right click it, install a driver, tell the system to look locally, browse to your CD drive with the drivers, choose the root of the CDROM, click OK, check the box to search recursively within the CD and you’re off to the races. Repeat this process for all the other devices that are unknown except your GPU.
Once you’ve installed drivers for all the KVM machines, you’ll need to install your GPU drivers, so navigate to your respective vendor, download their driver package and install it. AMD users please note that I’ve heard reports of the ReLive drivers having issues in VMs, so if you encounter problems, try the Crimson drivers for the time being. I don’t imagine this problem lasting too long. Once your drivers are installed, go ahead and reboot your VM and we’re done with the install.
QEMU Audio
Passing audio from the VM to Linux is a pain in the ass. I can’t guarantee it will work for you, but I’m happy to give you the methods that have worked for me.
Before we go into the instructions, OpenSUSE just works. If you’re not married to a distro, give it a try, it’s quite nice.
Only follow the steps below if you’re having issues with passing audio through.
Libvirt, by default, only allows you to pass audio if you’ve got a virtual display on the VM. Remember how we removed Display Spice? That also removed our ability (in the default state) to have audio. So, to fix that, we need to go into /etc/libvirt/qemu.conf and append the following:
nographics_allow_host_audio = 1
This will give us the ability to have audio in many instances.
The next problem is only for Pulse users. Pulseaudio doesn’t normally allow audio streams from any services. Normally it only allows connections from the current user, which is a problem, since libvirt and QEMU need to run as root. We solve this by editing two files. The first is /etc/pulse/default.pa. Append the following to it:
load-module module-native-protocol-tcp auth-ip-acl=127.0.0.1
The second file is /etc/pulse/client.conf and we’re appending this:
default-server = 127.0.0.1
Now, reboot your host machine and give it a go. If you’re still encountering issues with audio after following this guide, feel free to leave a comment or shoot me some hatemail.
Synergy
I’ve got a love-hate relationship with Synergy for multiple reasons I won’t get into right now, but it’s definitely the easiest method to share your keyboard and mouse. I recommend setting it up if you want to easily share keyboard, mouse and clipboards, but I’m not going to be able to give a tutorial and still get this out today, so I’m just going to leave it at that. If enough people want a tutorial, I’ll make one. If not, so be it.
Future articles
I’m coming towards the end of the planned articles in the Pragmatic Neckbeard series. I do intend to do an article on the pi-based C&C module, but I want to wait until I’ve got it a bit more stable. I’ve got some stuff in the pipelines, but with the FIRST build season going on right now, I’ve got about 12 high school kids to help with C++ programming and 5 to oversee at the mill. Don’t expect much from me in the next two months.