Originally, I was going to create a Threadripper ESXi build to run pfSense, FreeNAS, and a Windows Gaming VM all on one box (detailed here). However, I found out about the Asrock X470 Taichi Ultimate and found it fit everything i needed, and being that I was looking into replaying my Ryzen system’s motherboard anyway, I found it a perfect fit.
The Build
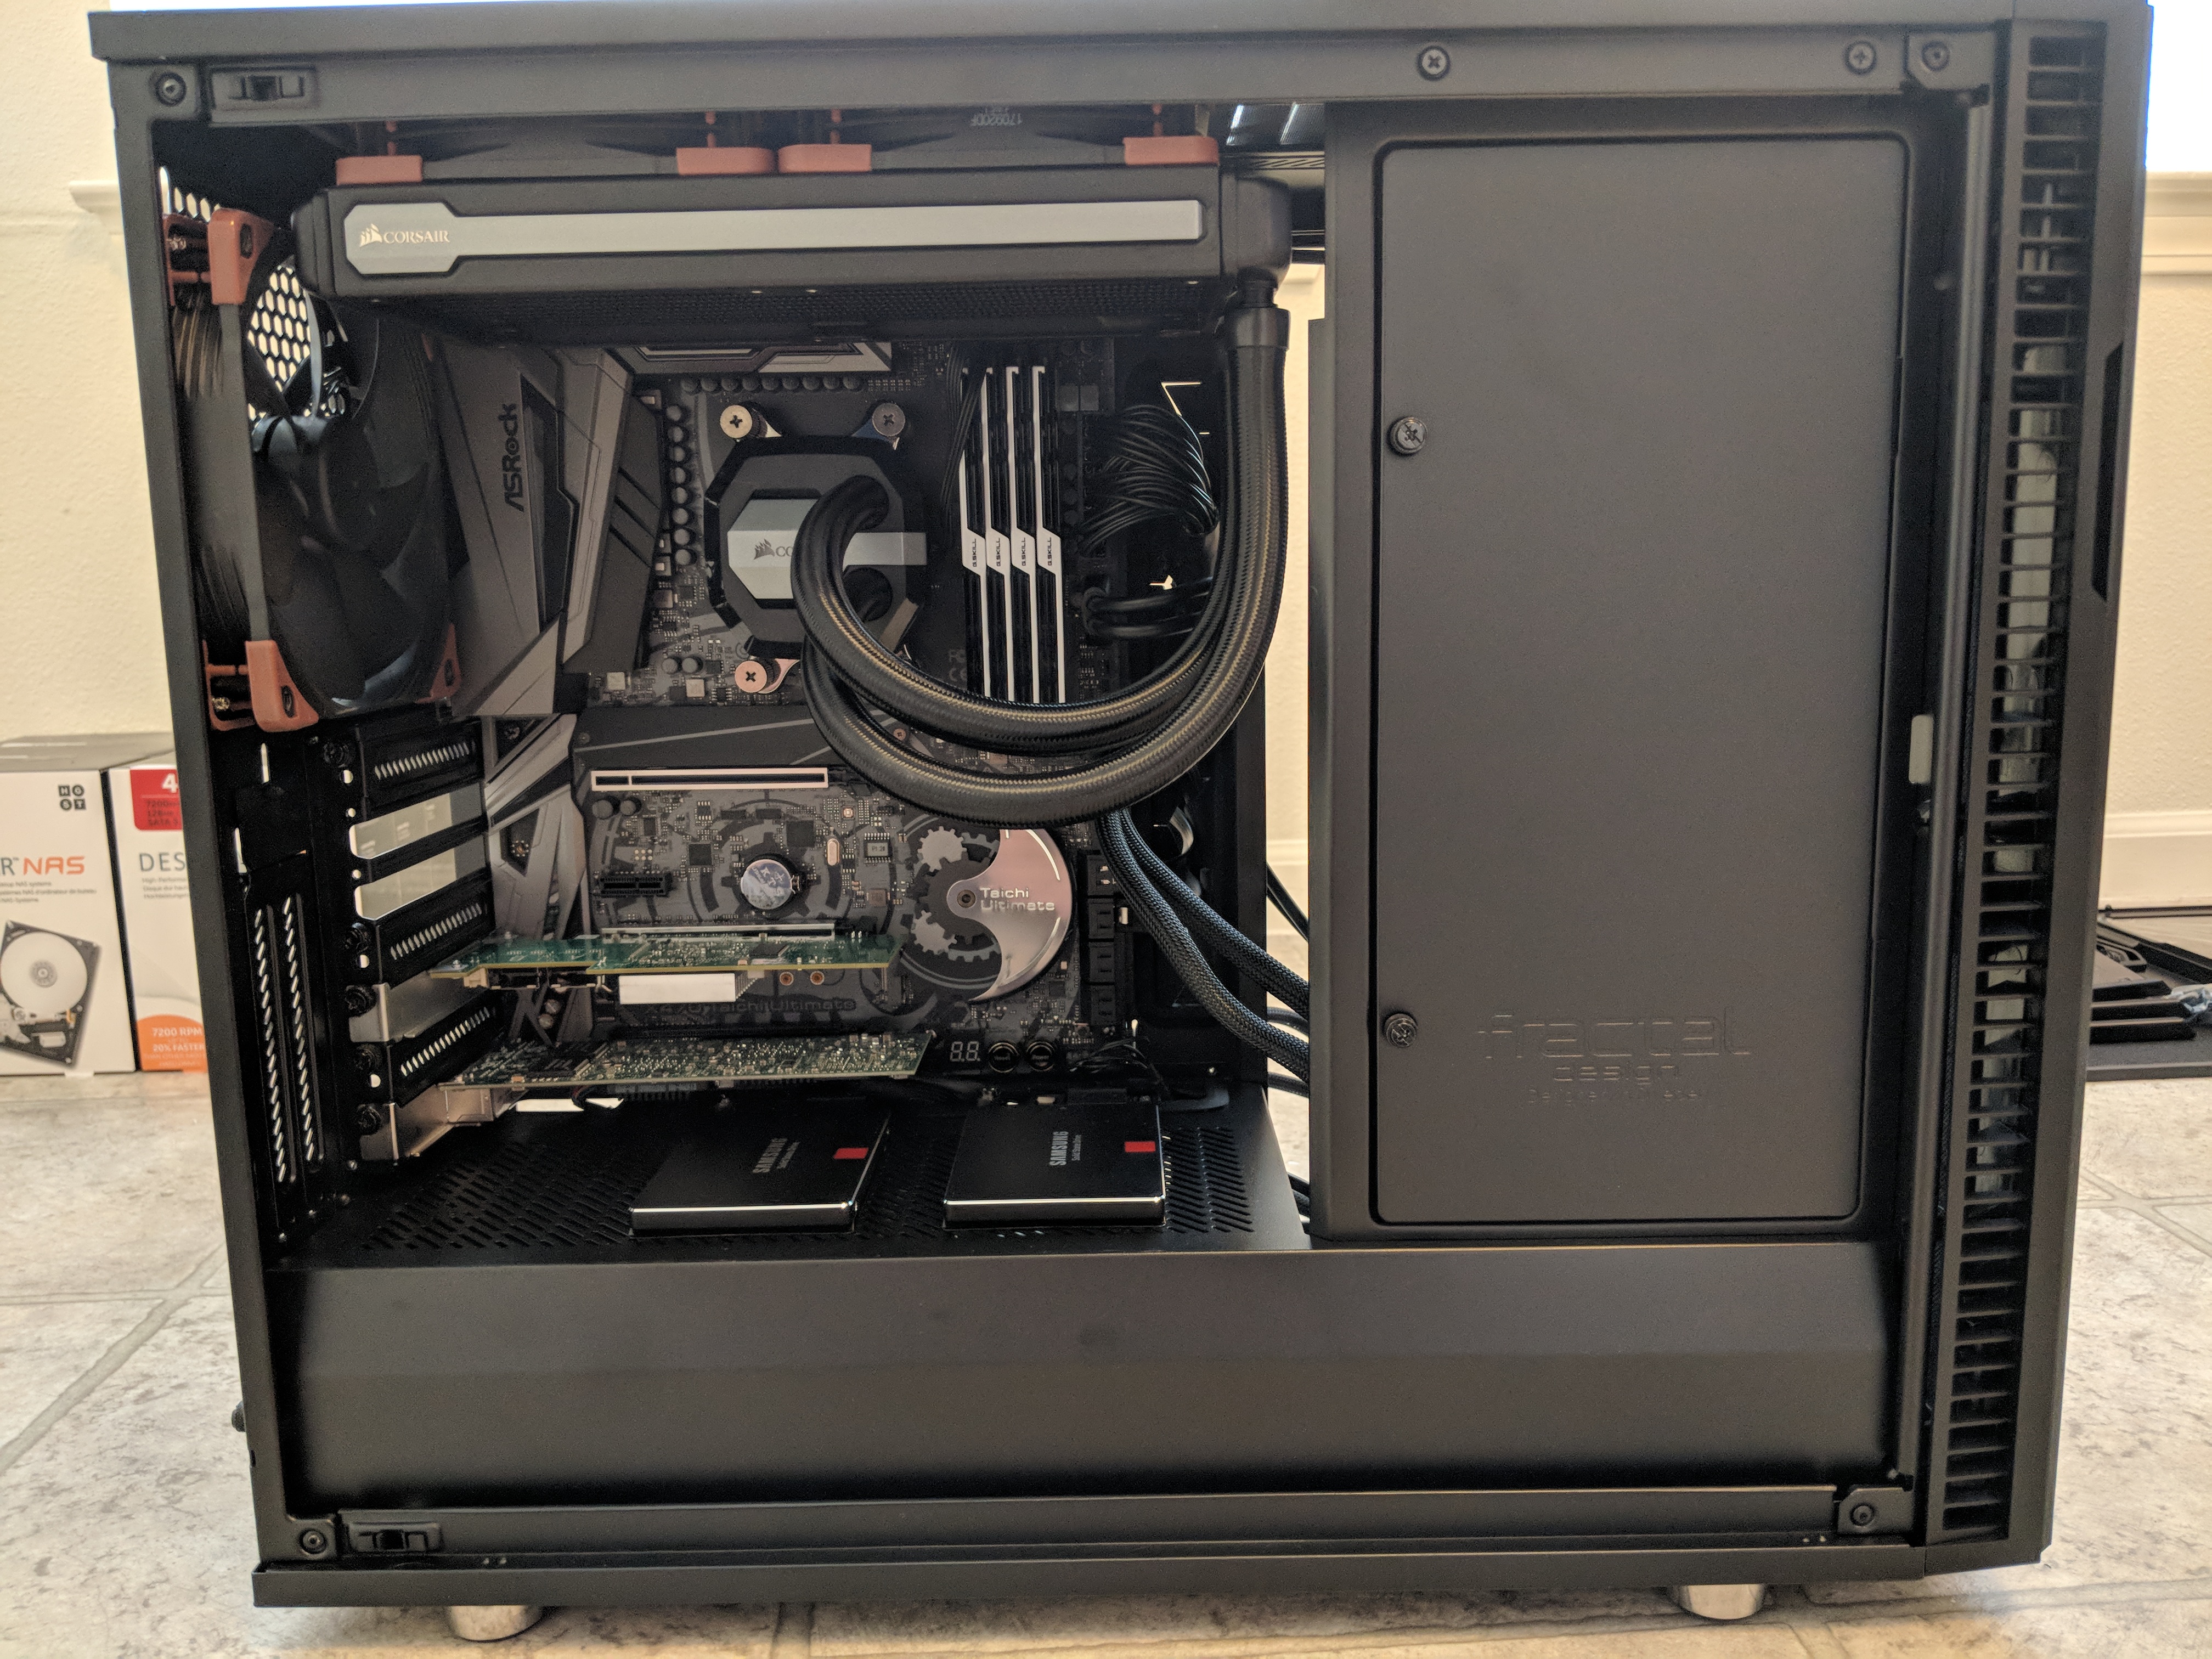
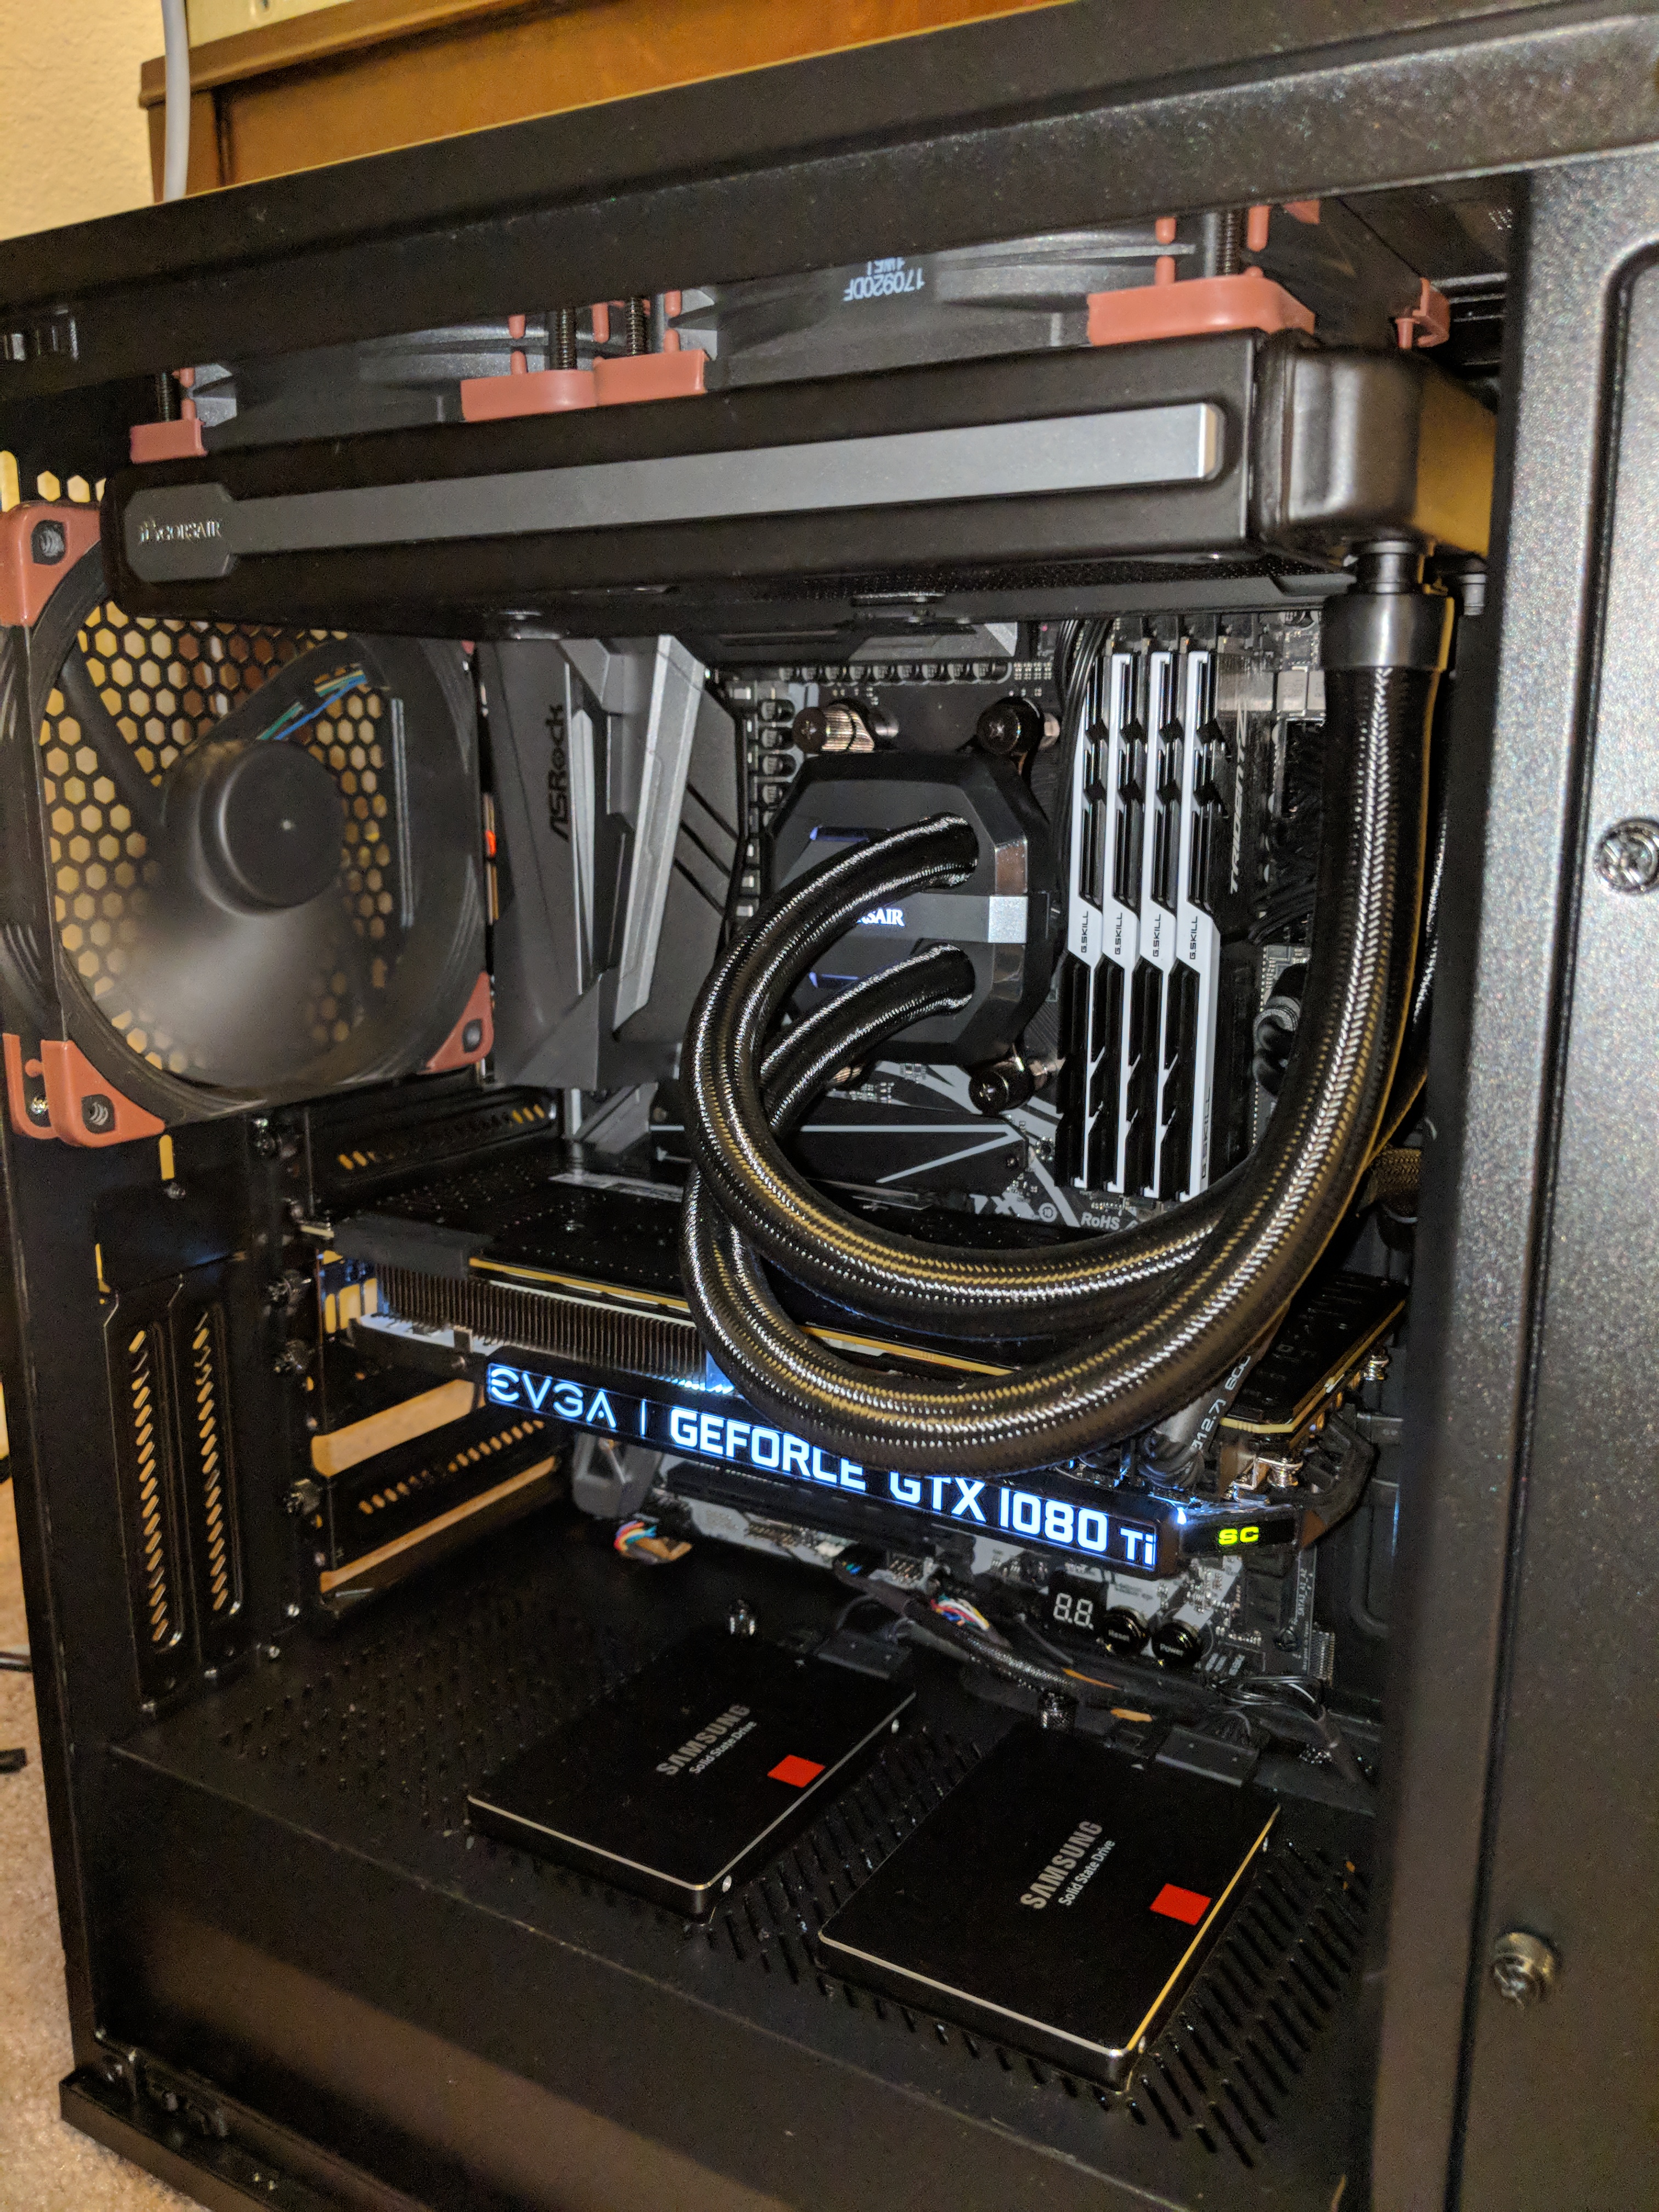
CPU: Ryzen 7 1700 (all core overclock tentative after testing) from previous build
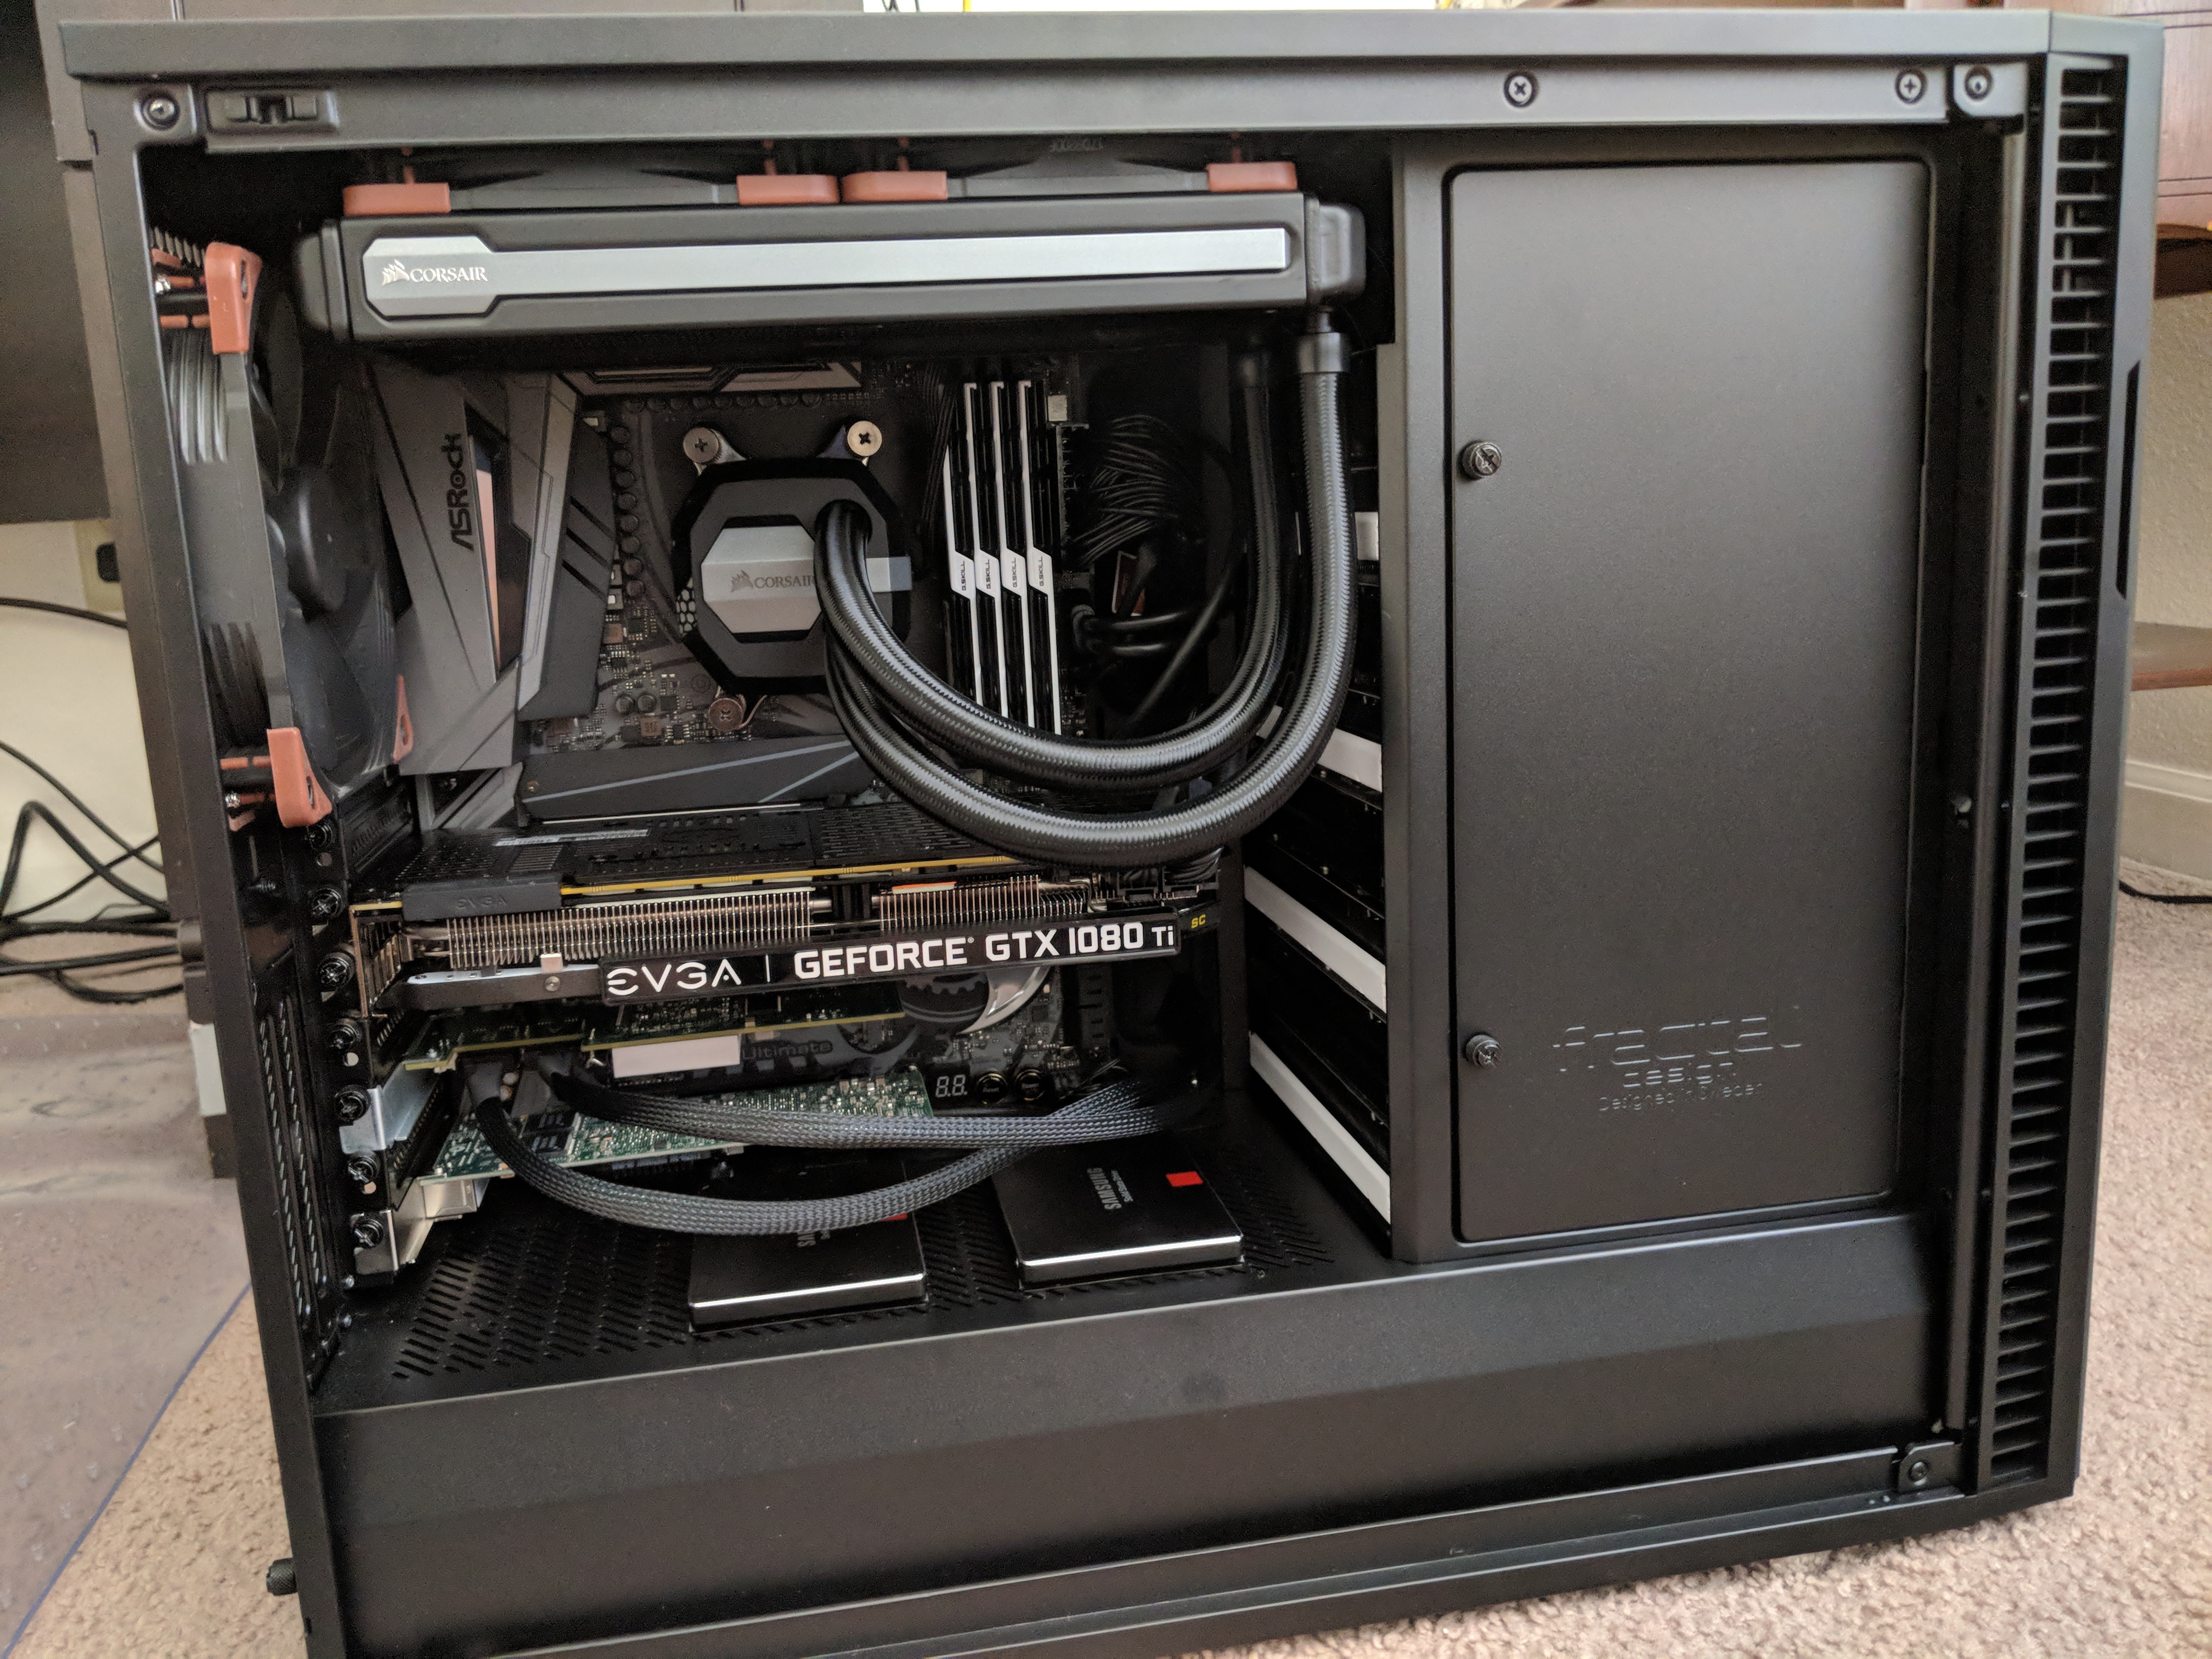
CPU Cooler: Corsair H100i v2 from previous build
RAM: 64 GB at 3200 MHz (settings may change after testing) from previous build
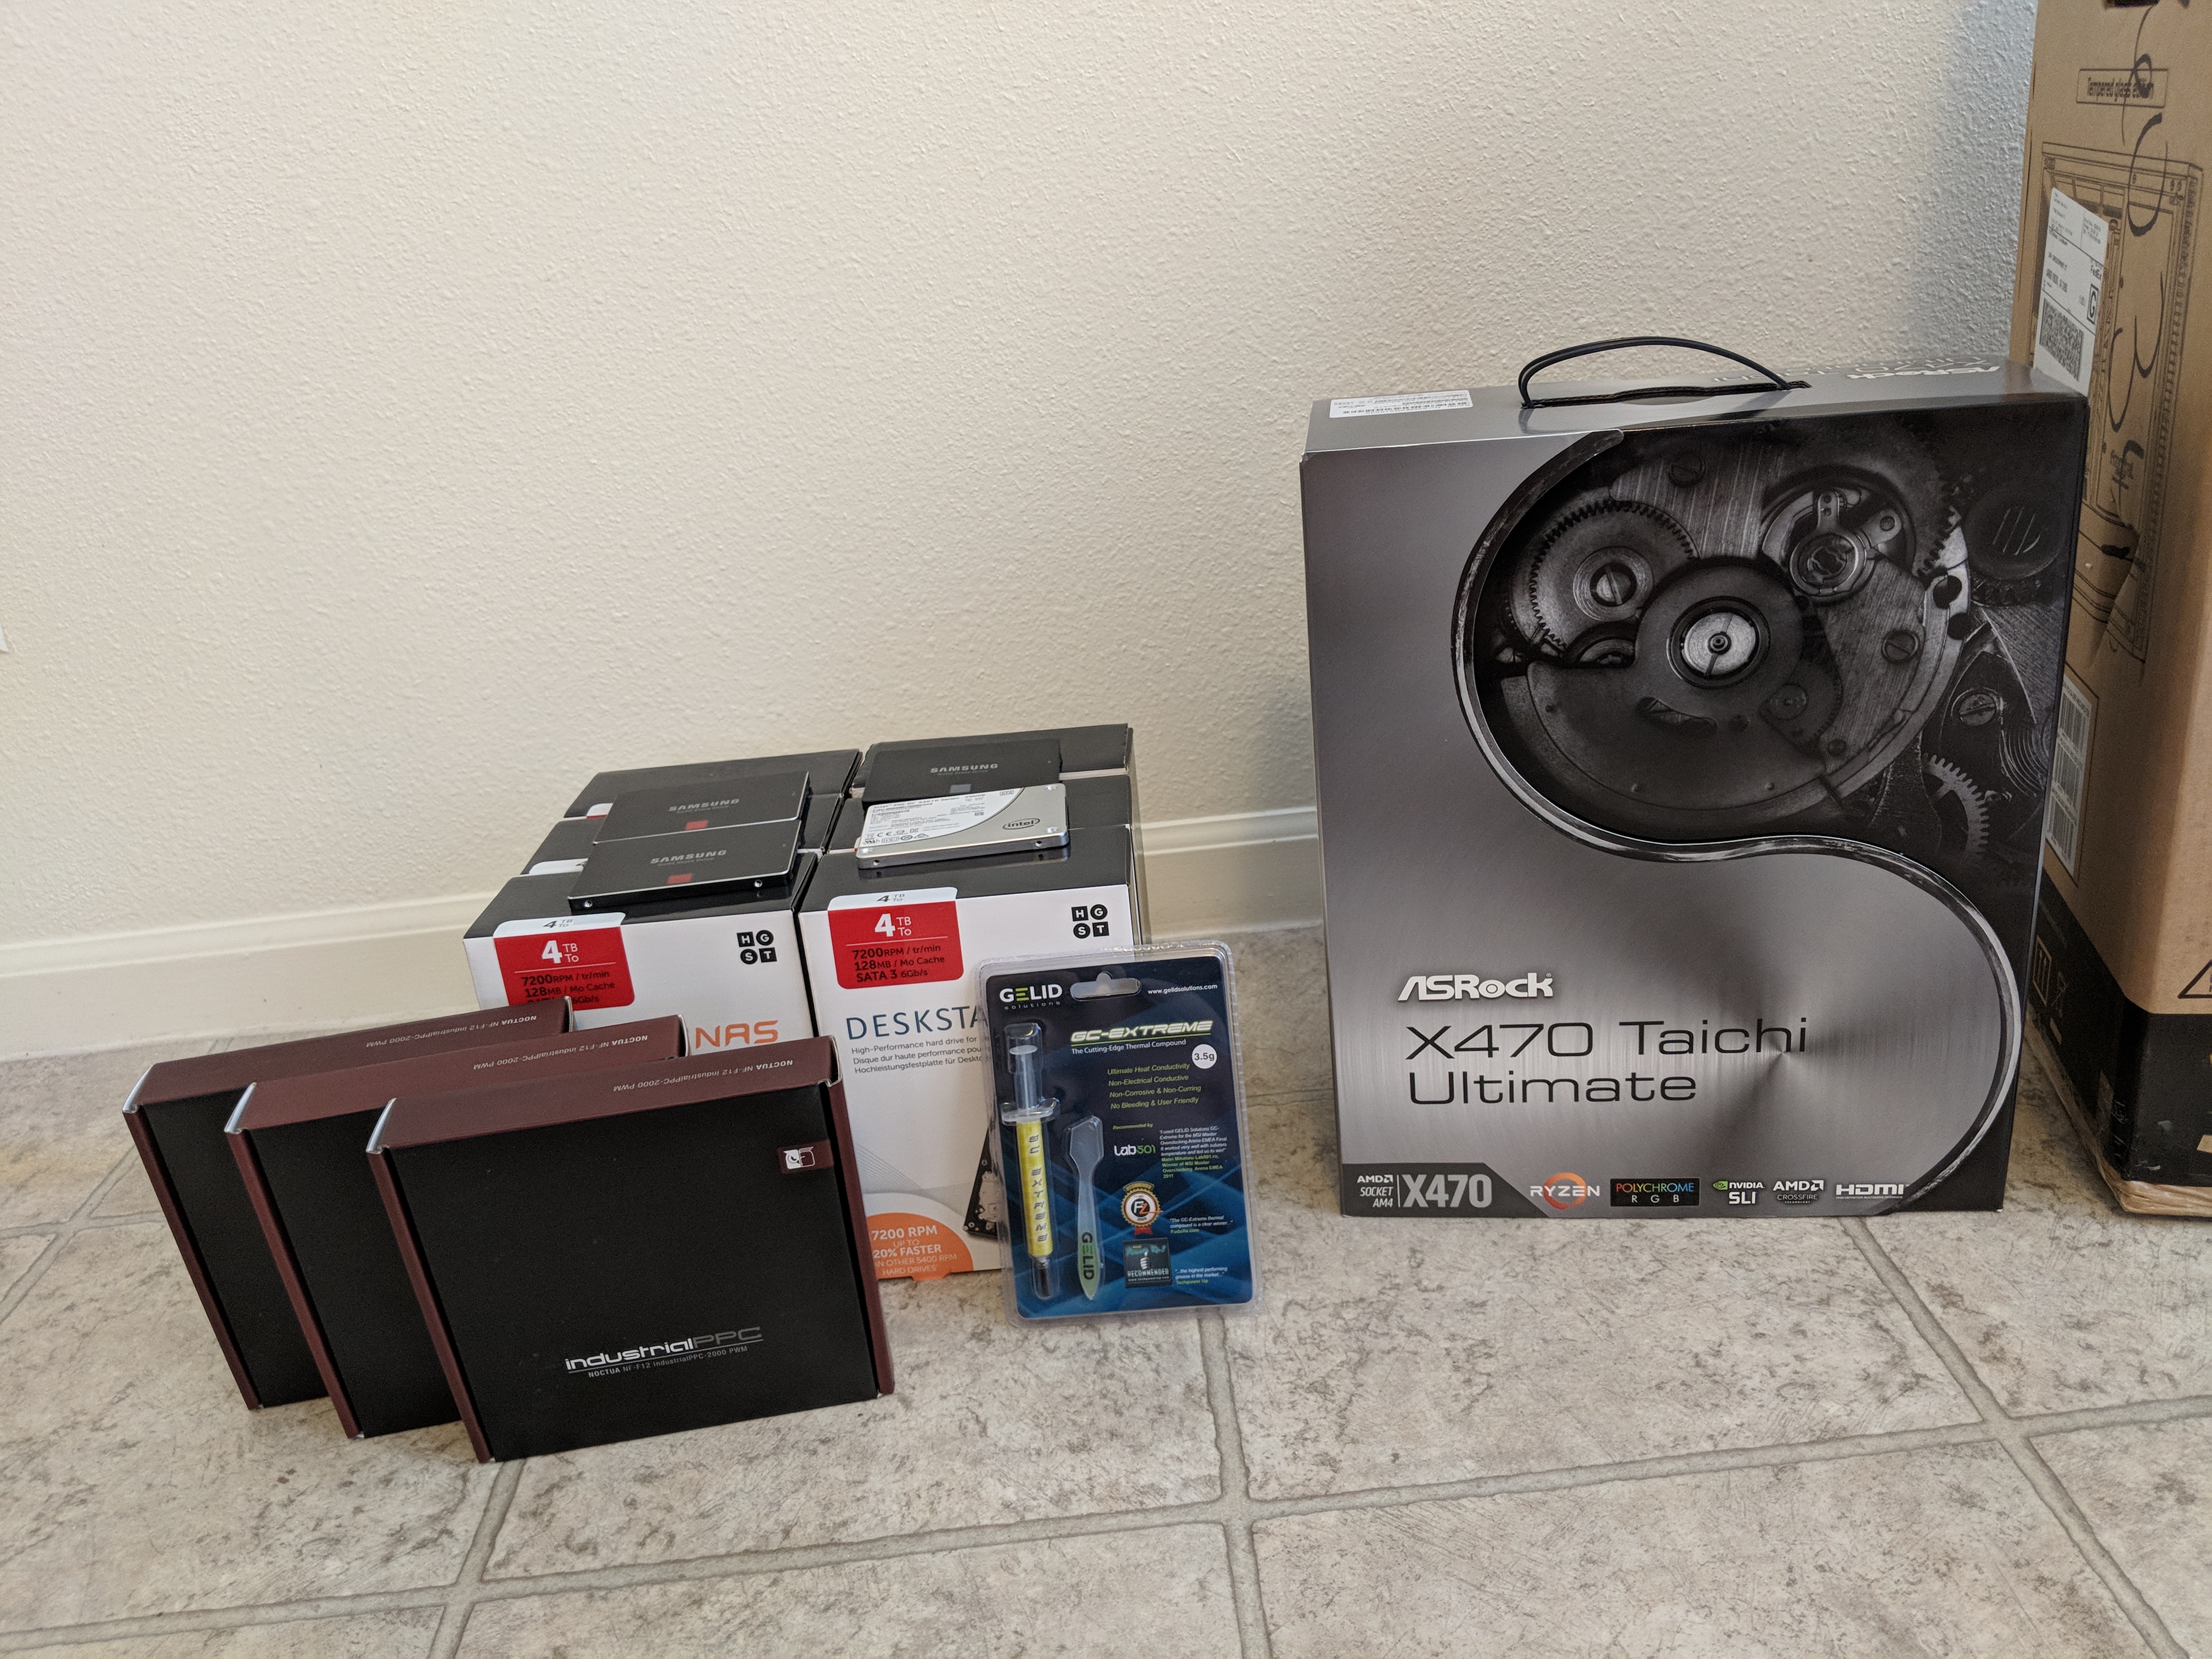
Motherboard: Asrock x470 Taichi Ultimate
PSU: EVGA SuperNOVA 650 P2 from previous build
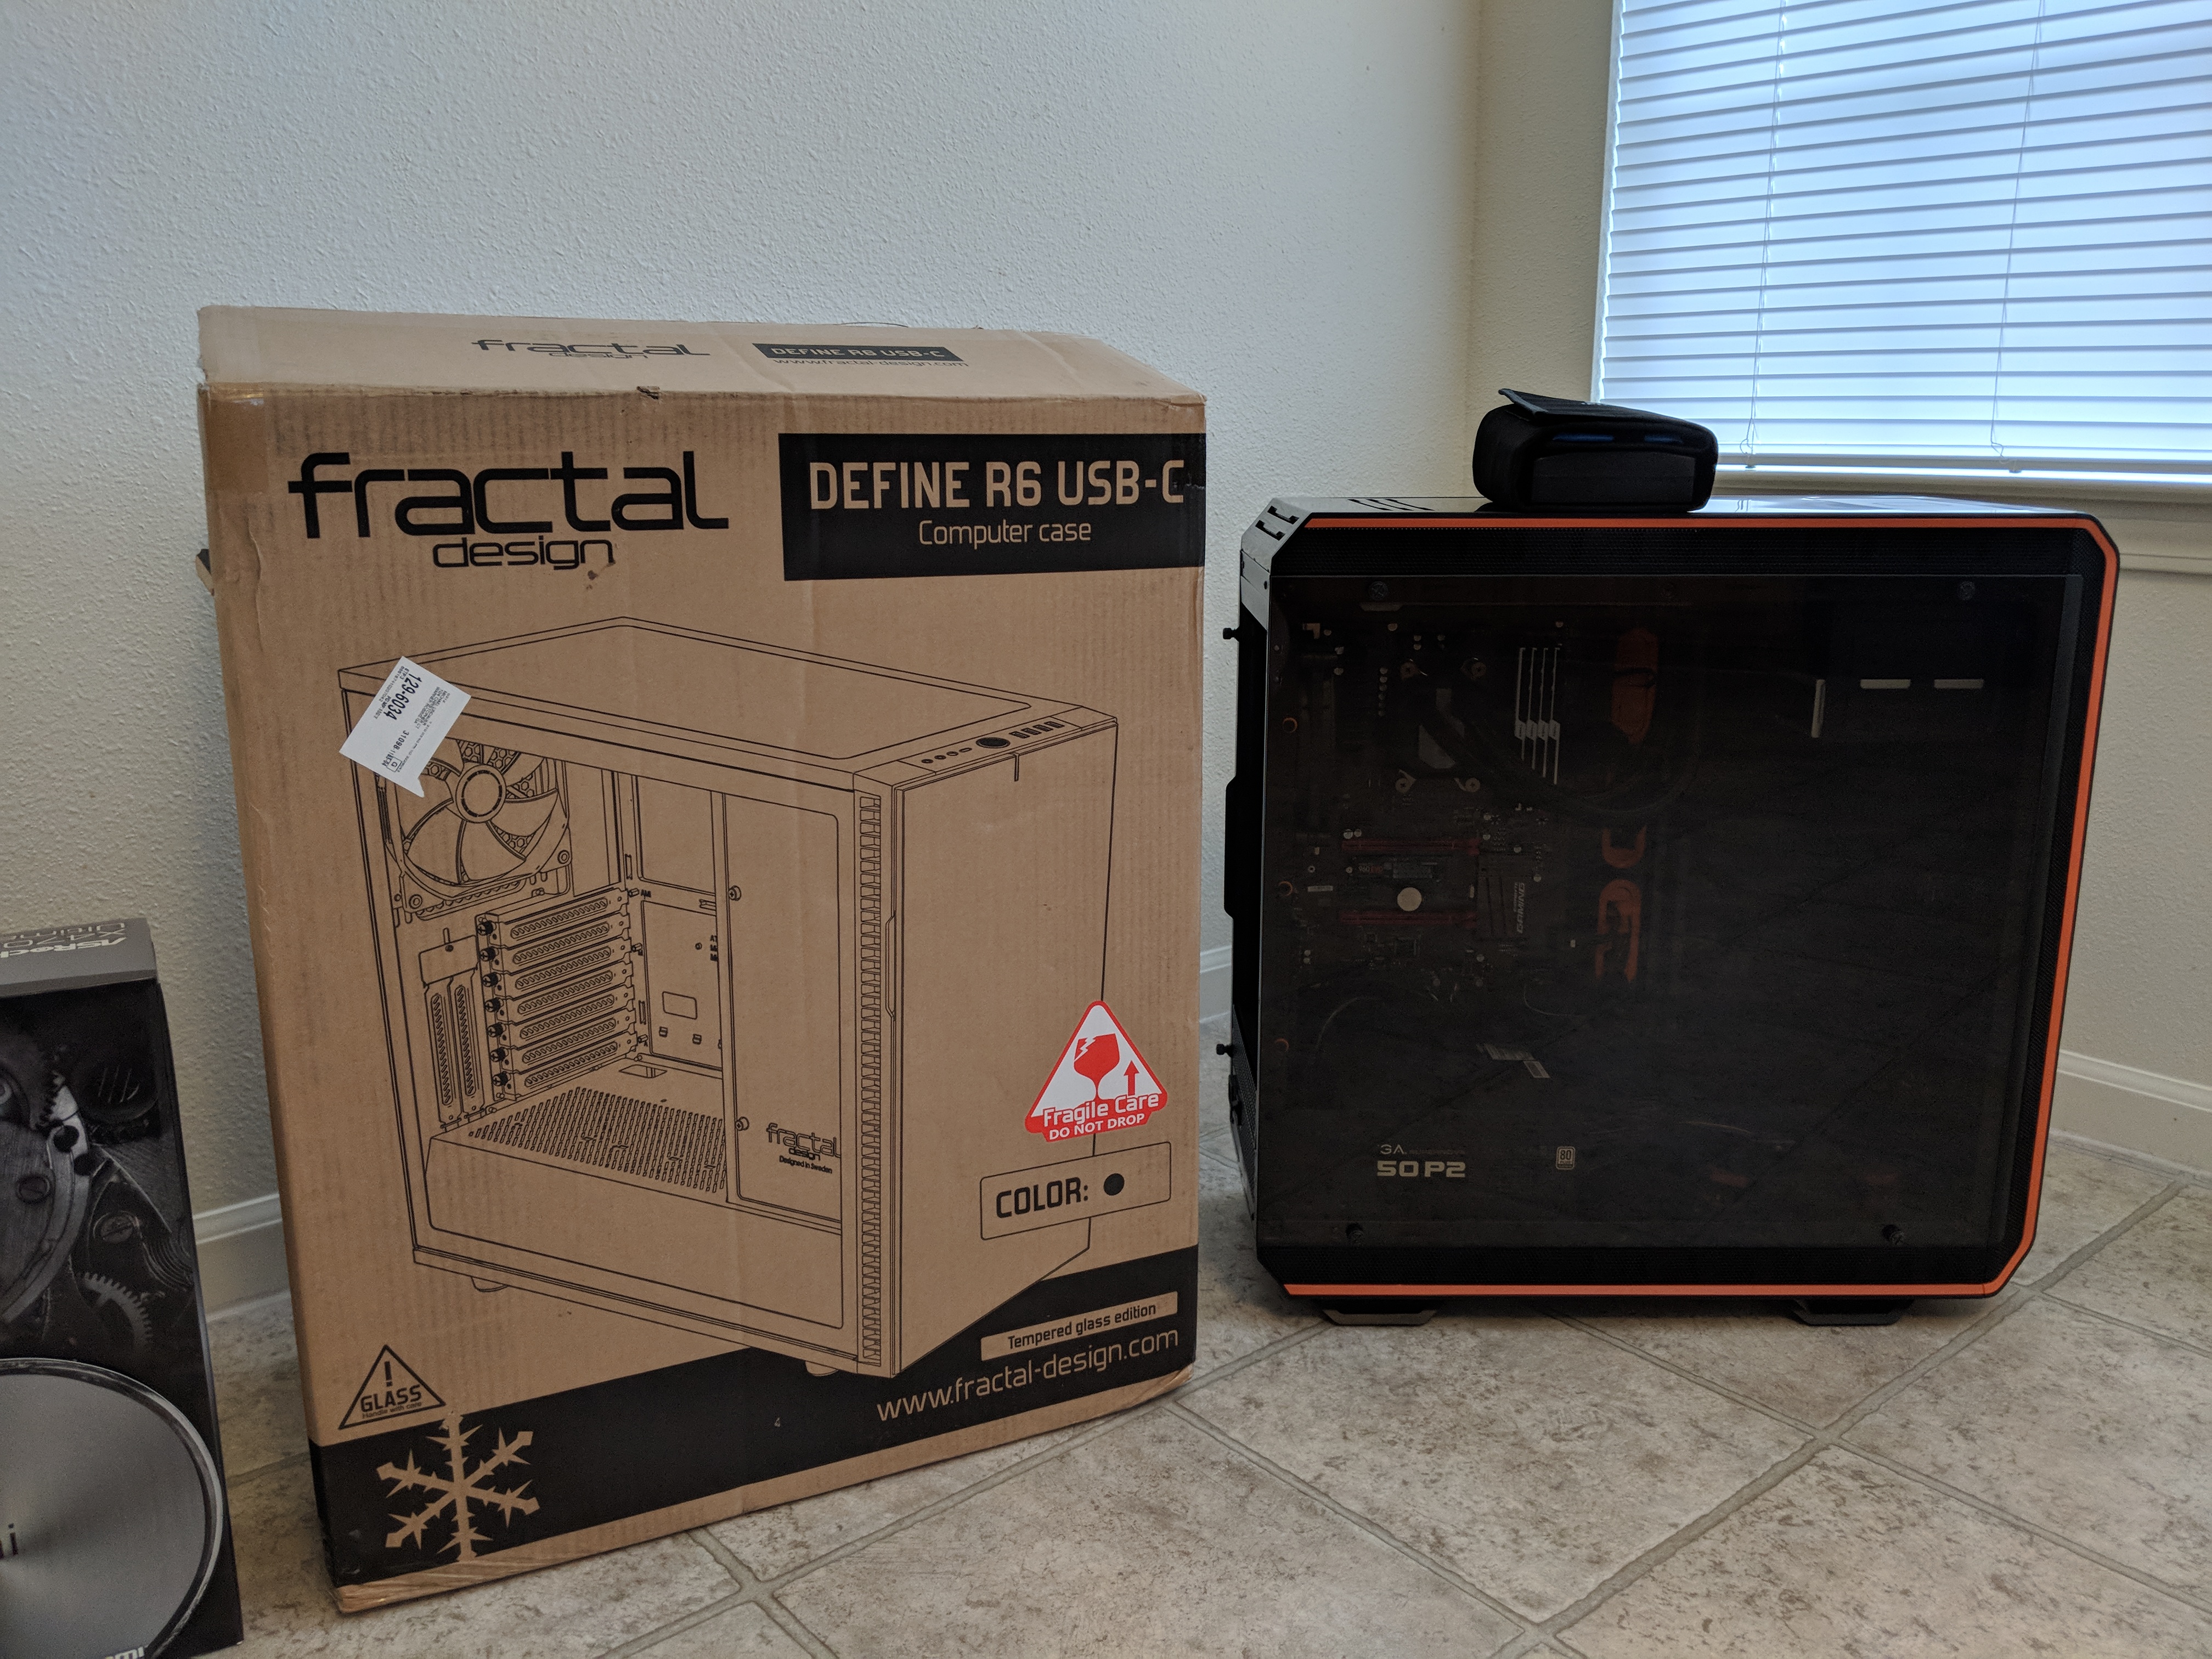
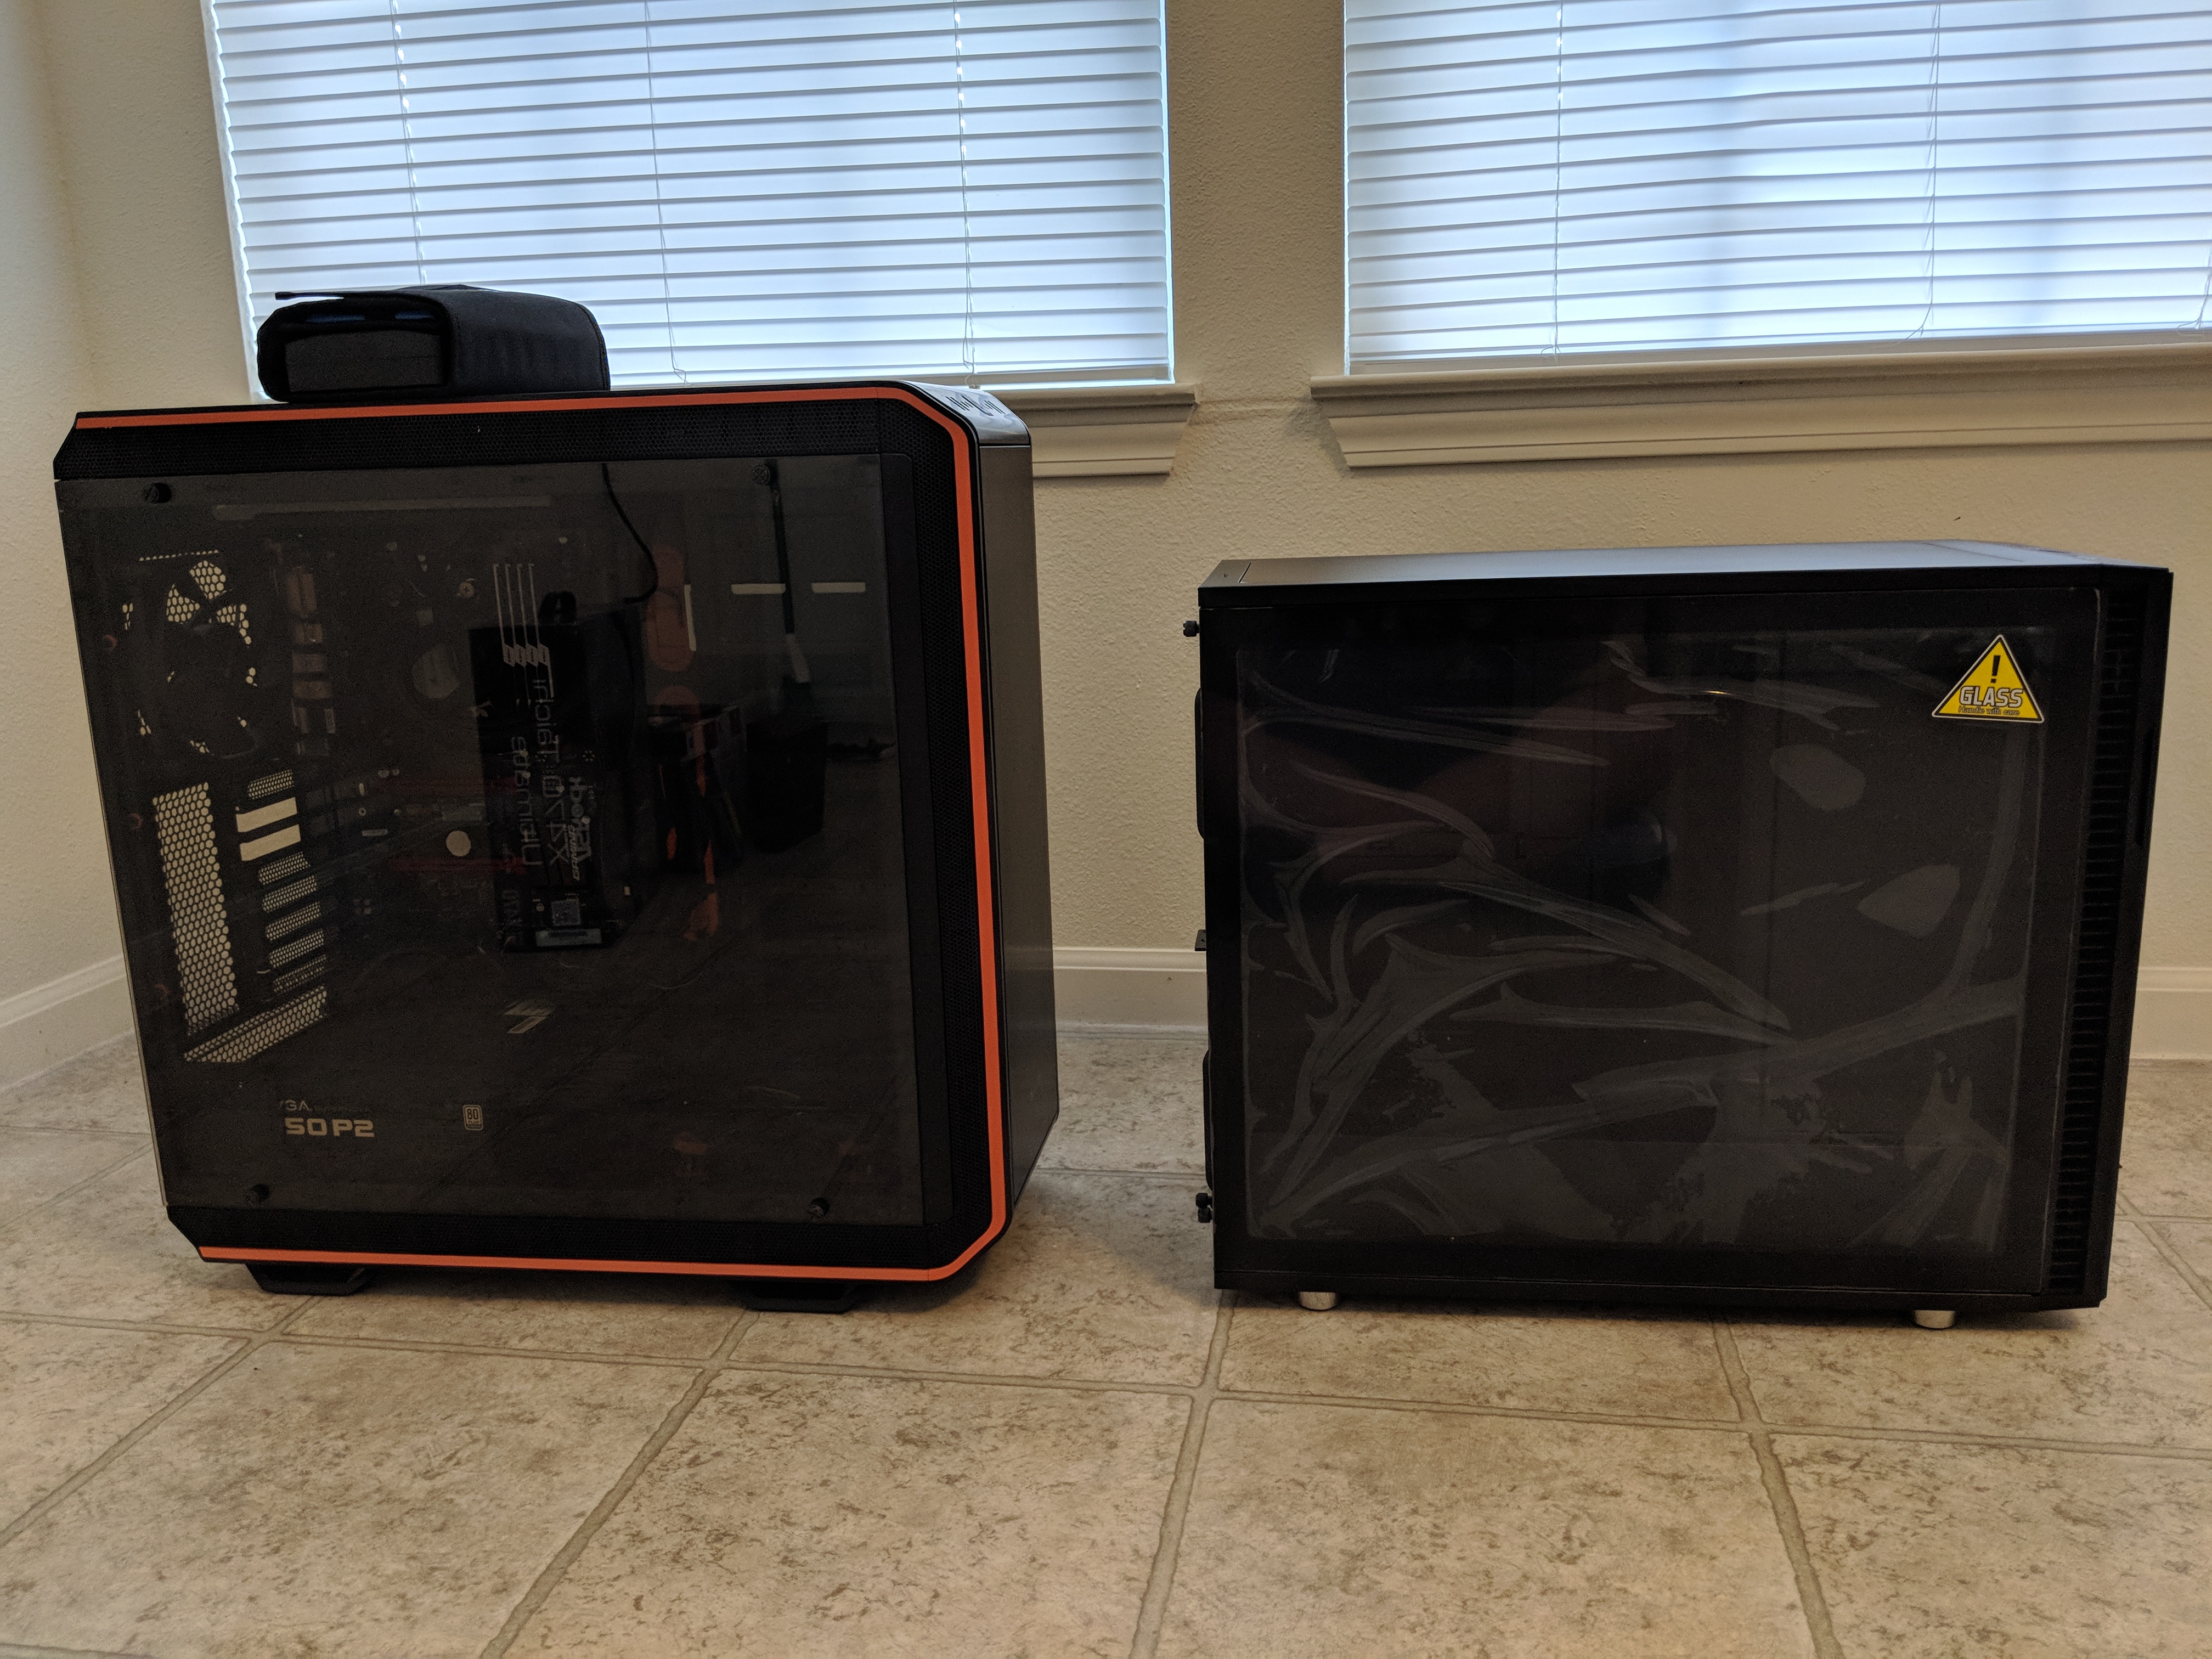
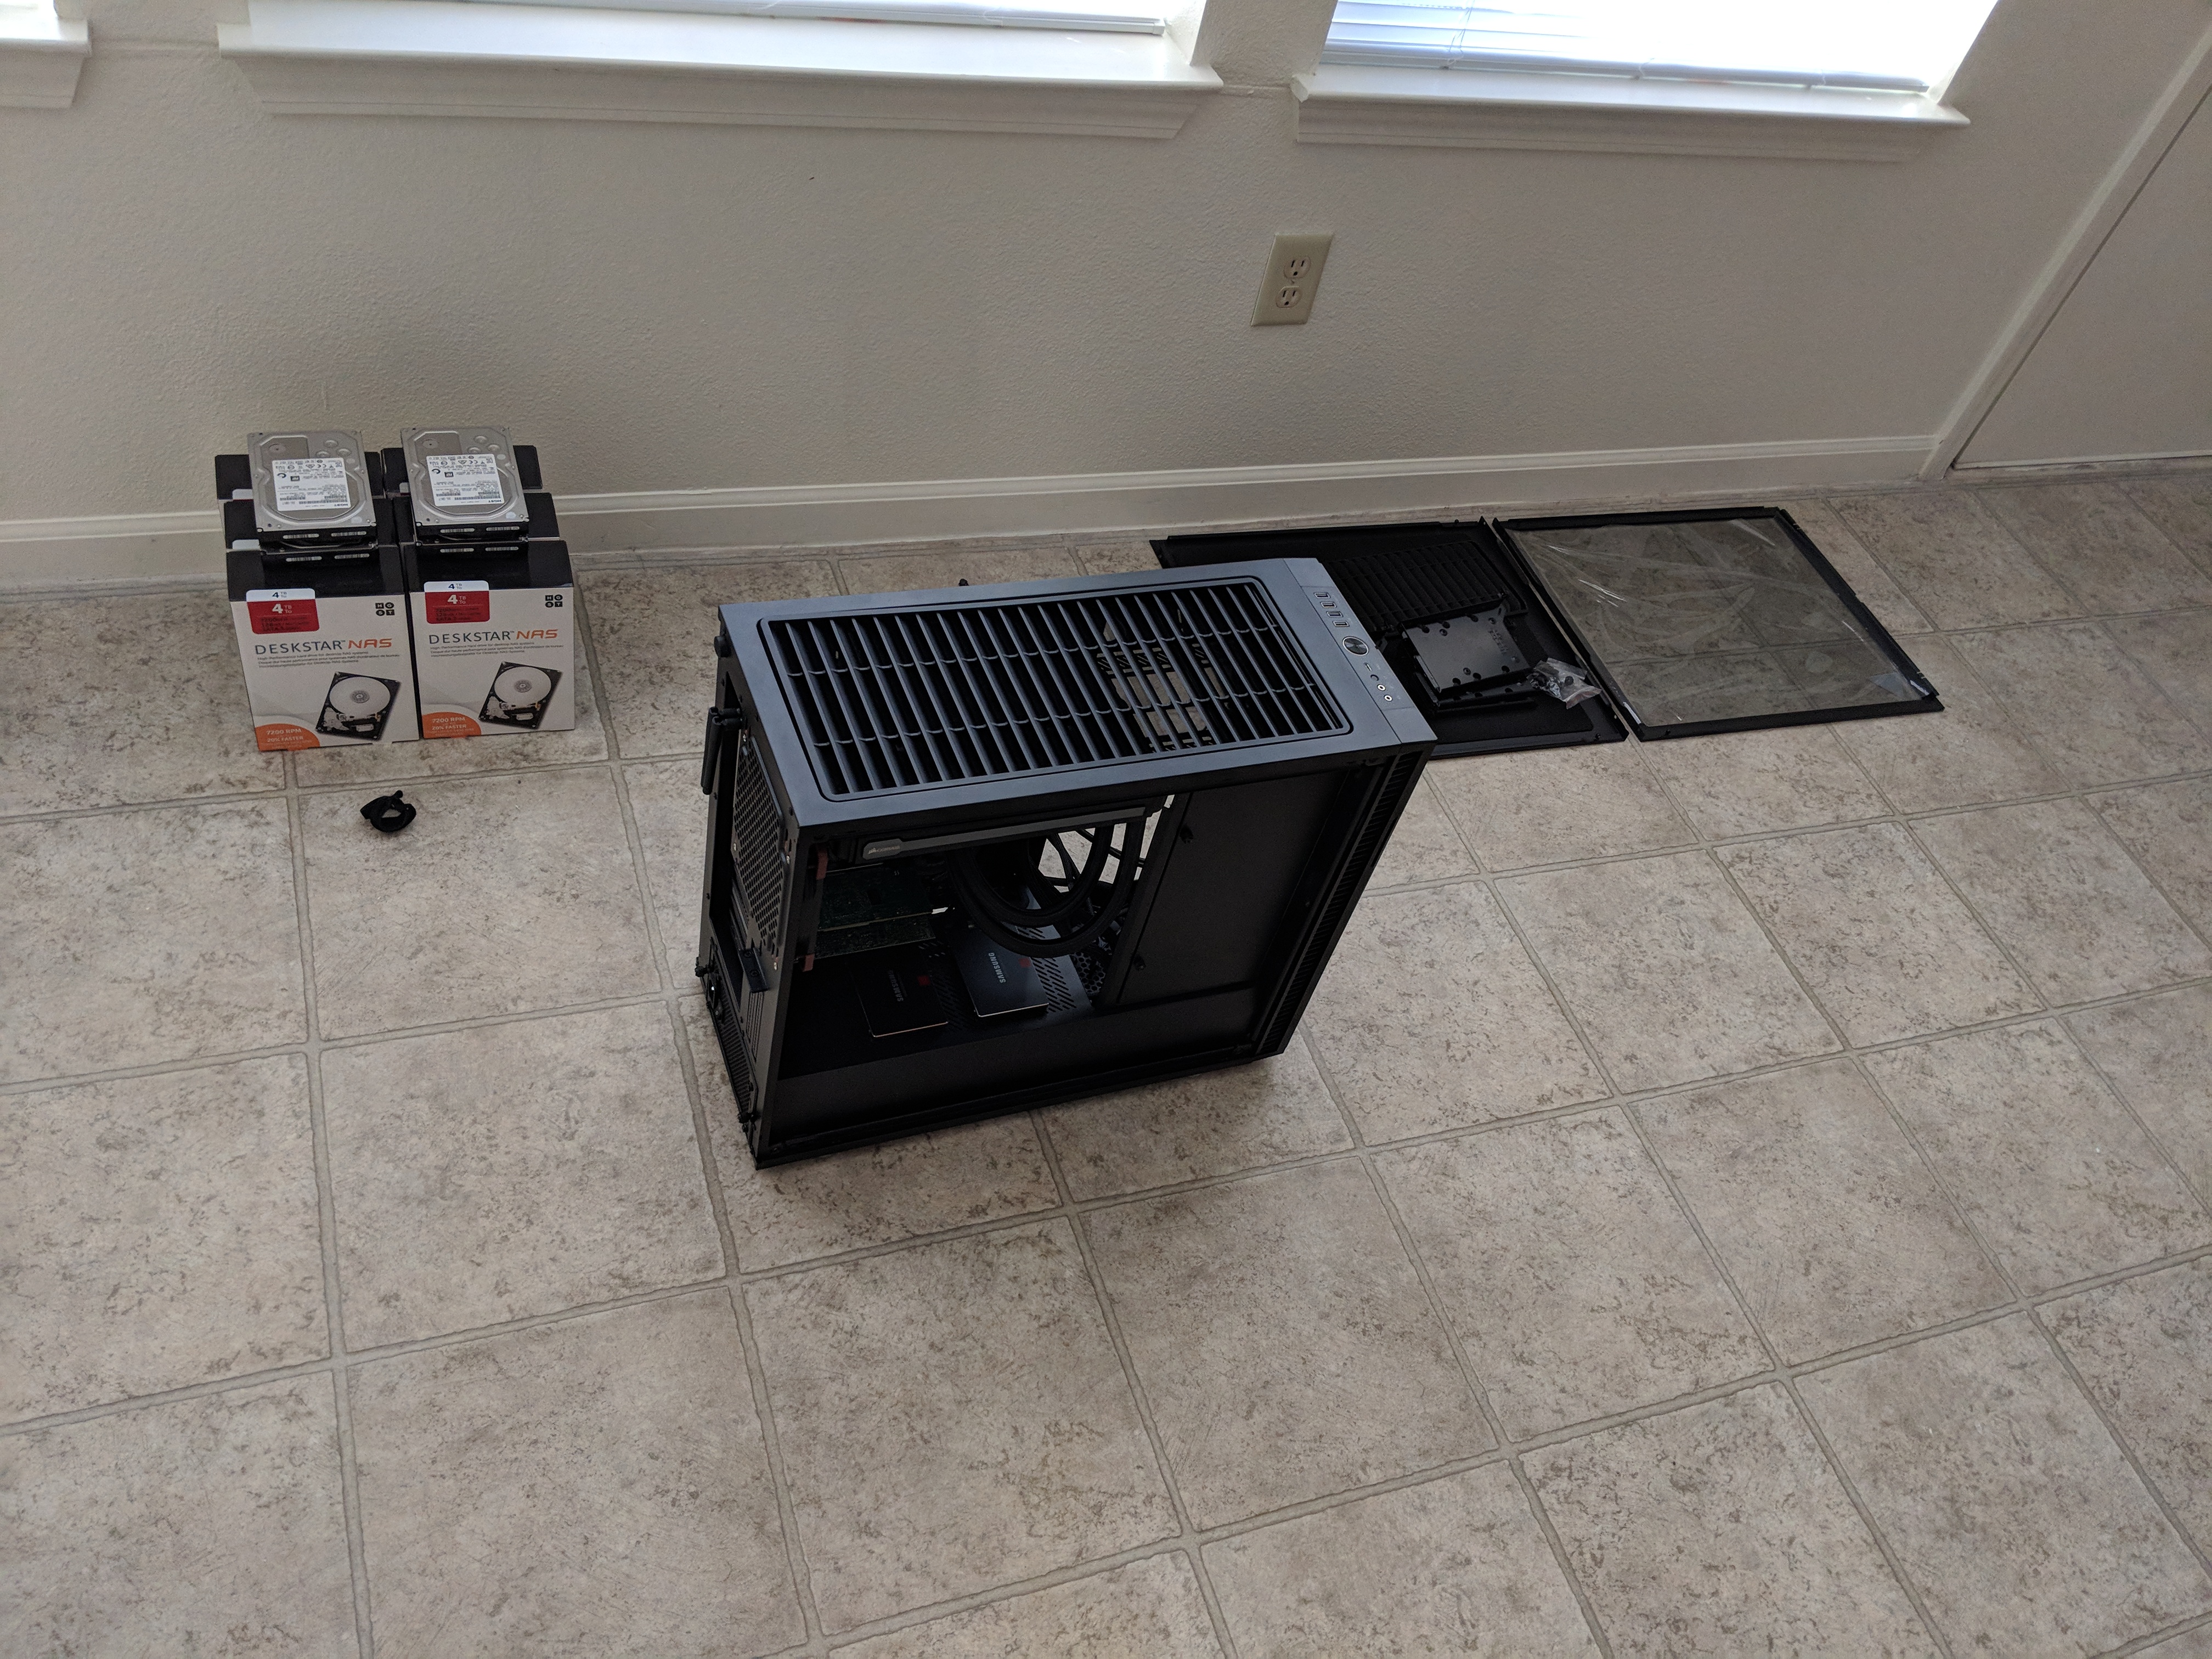
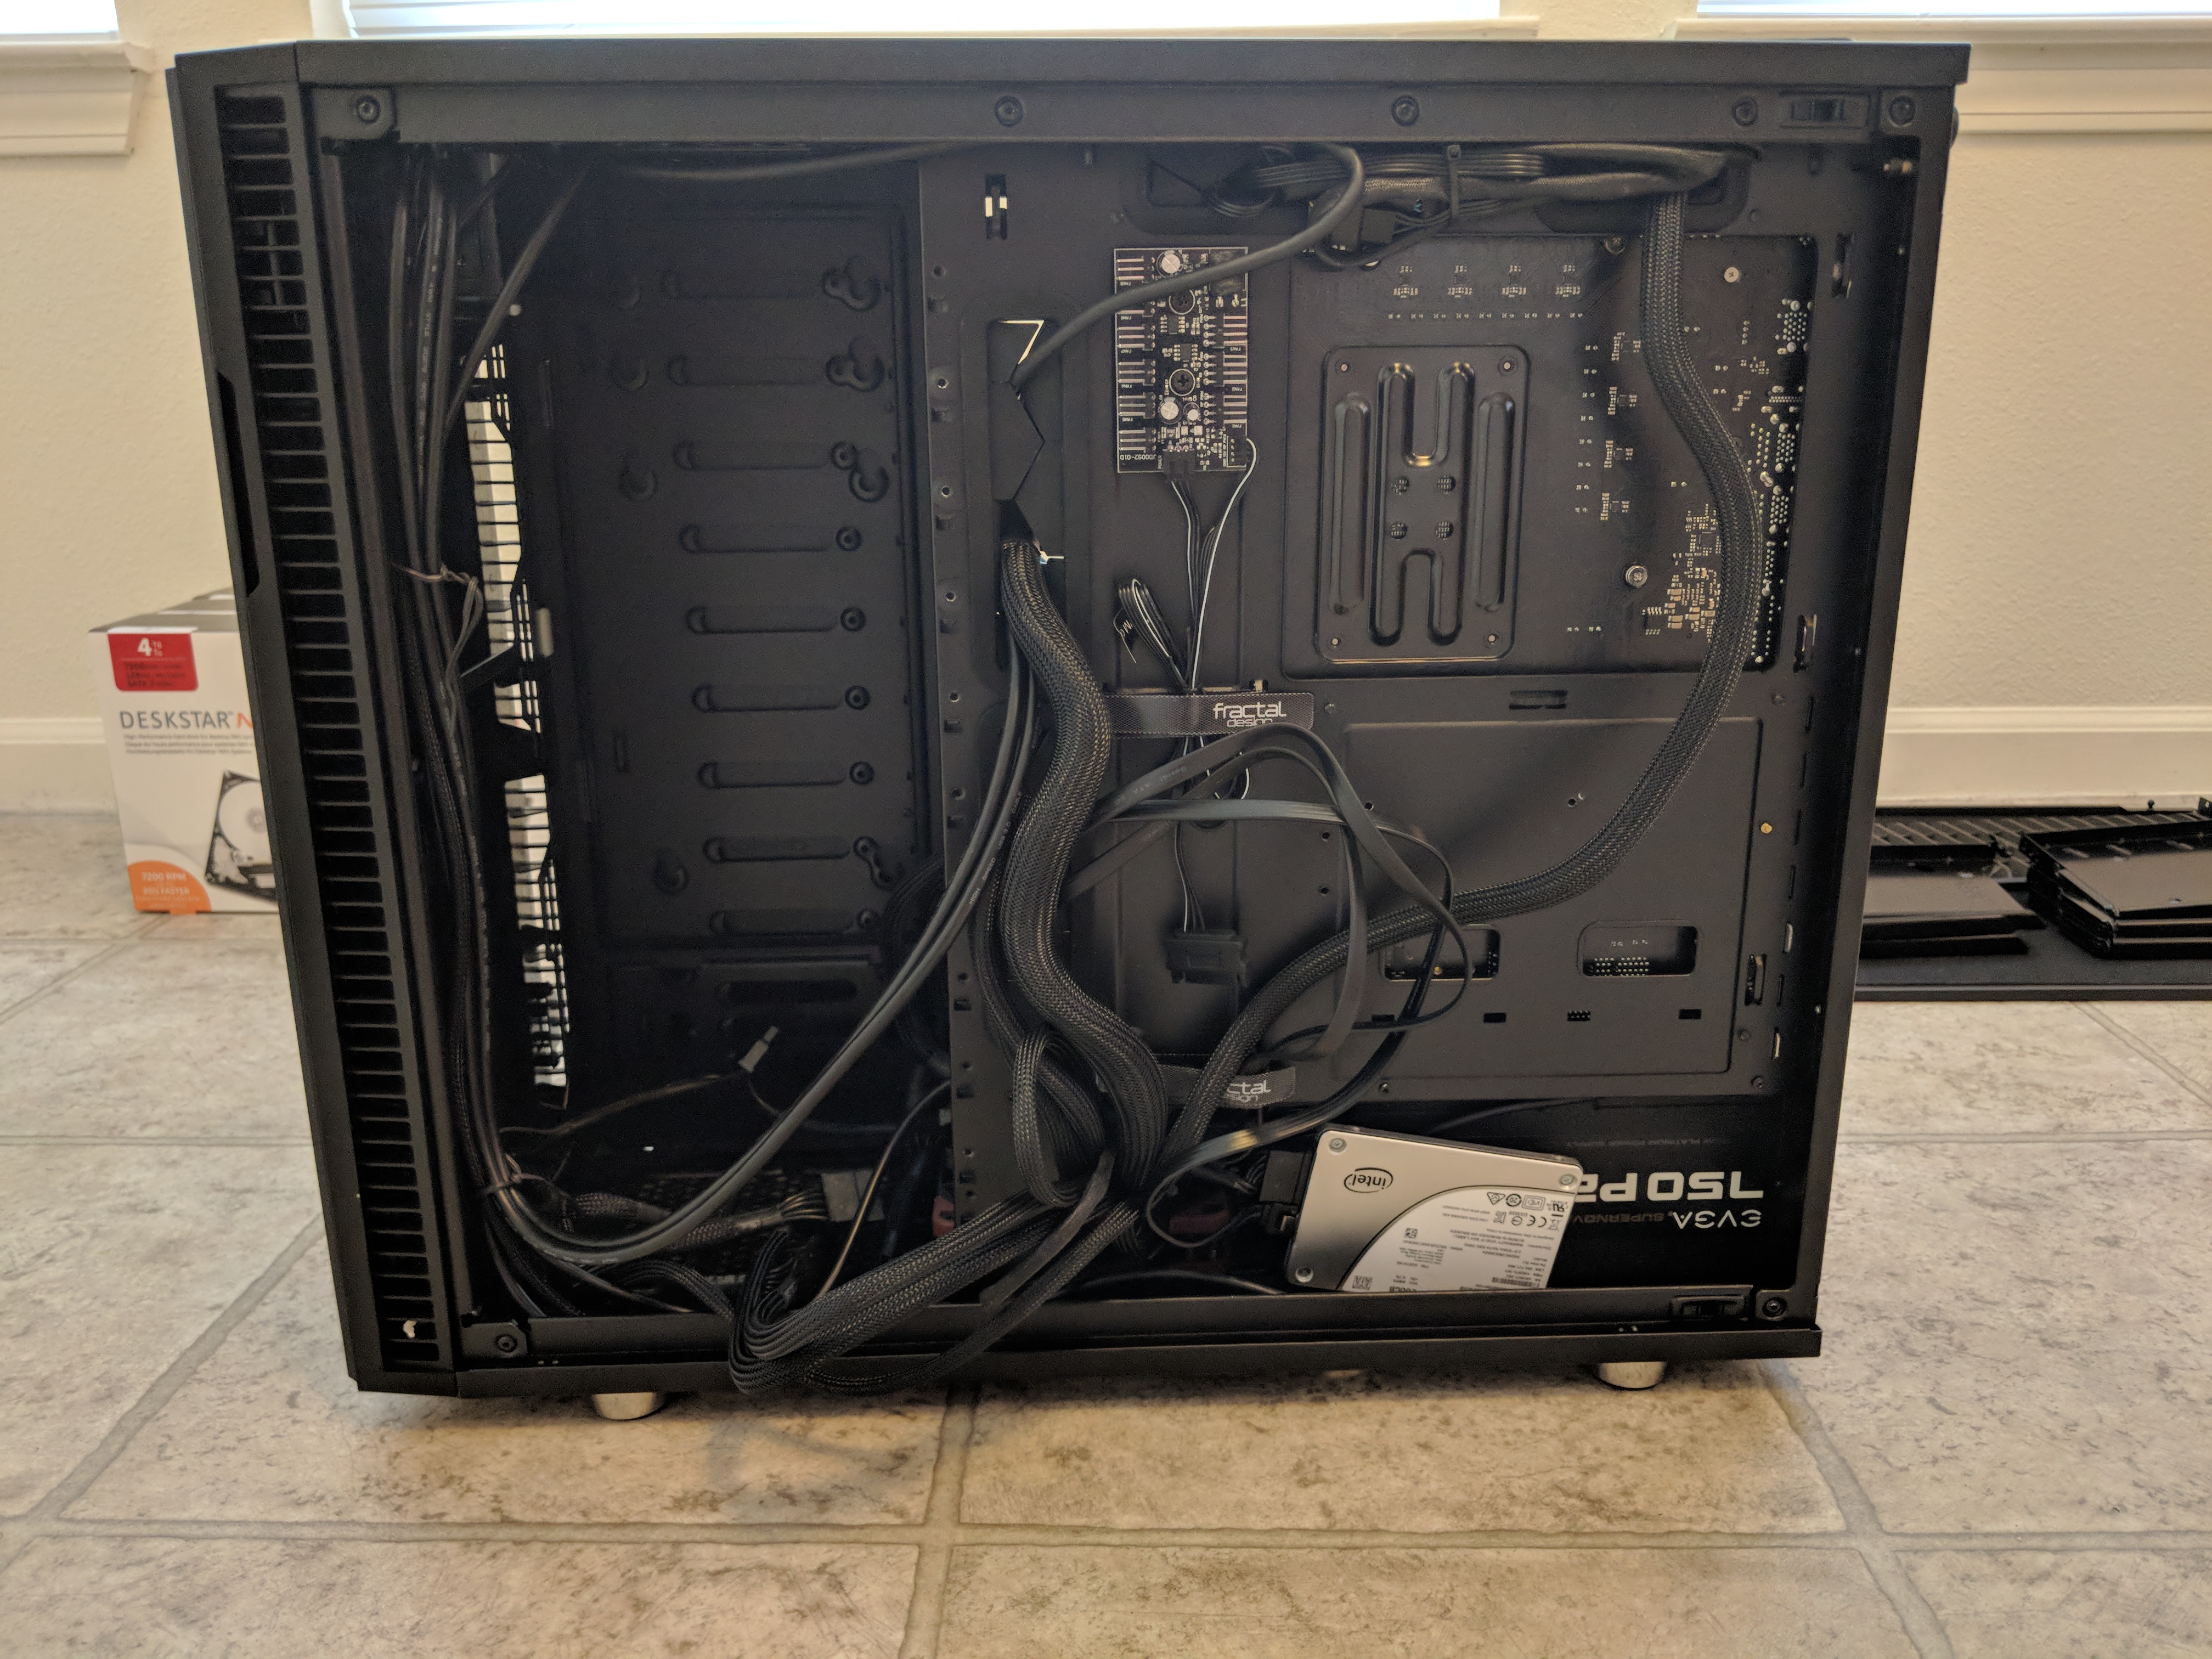
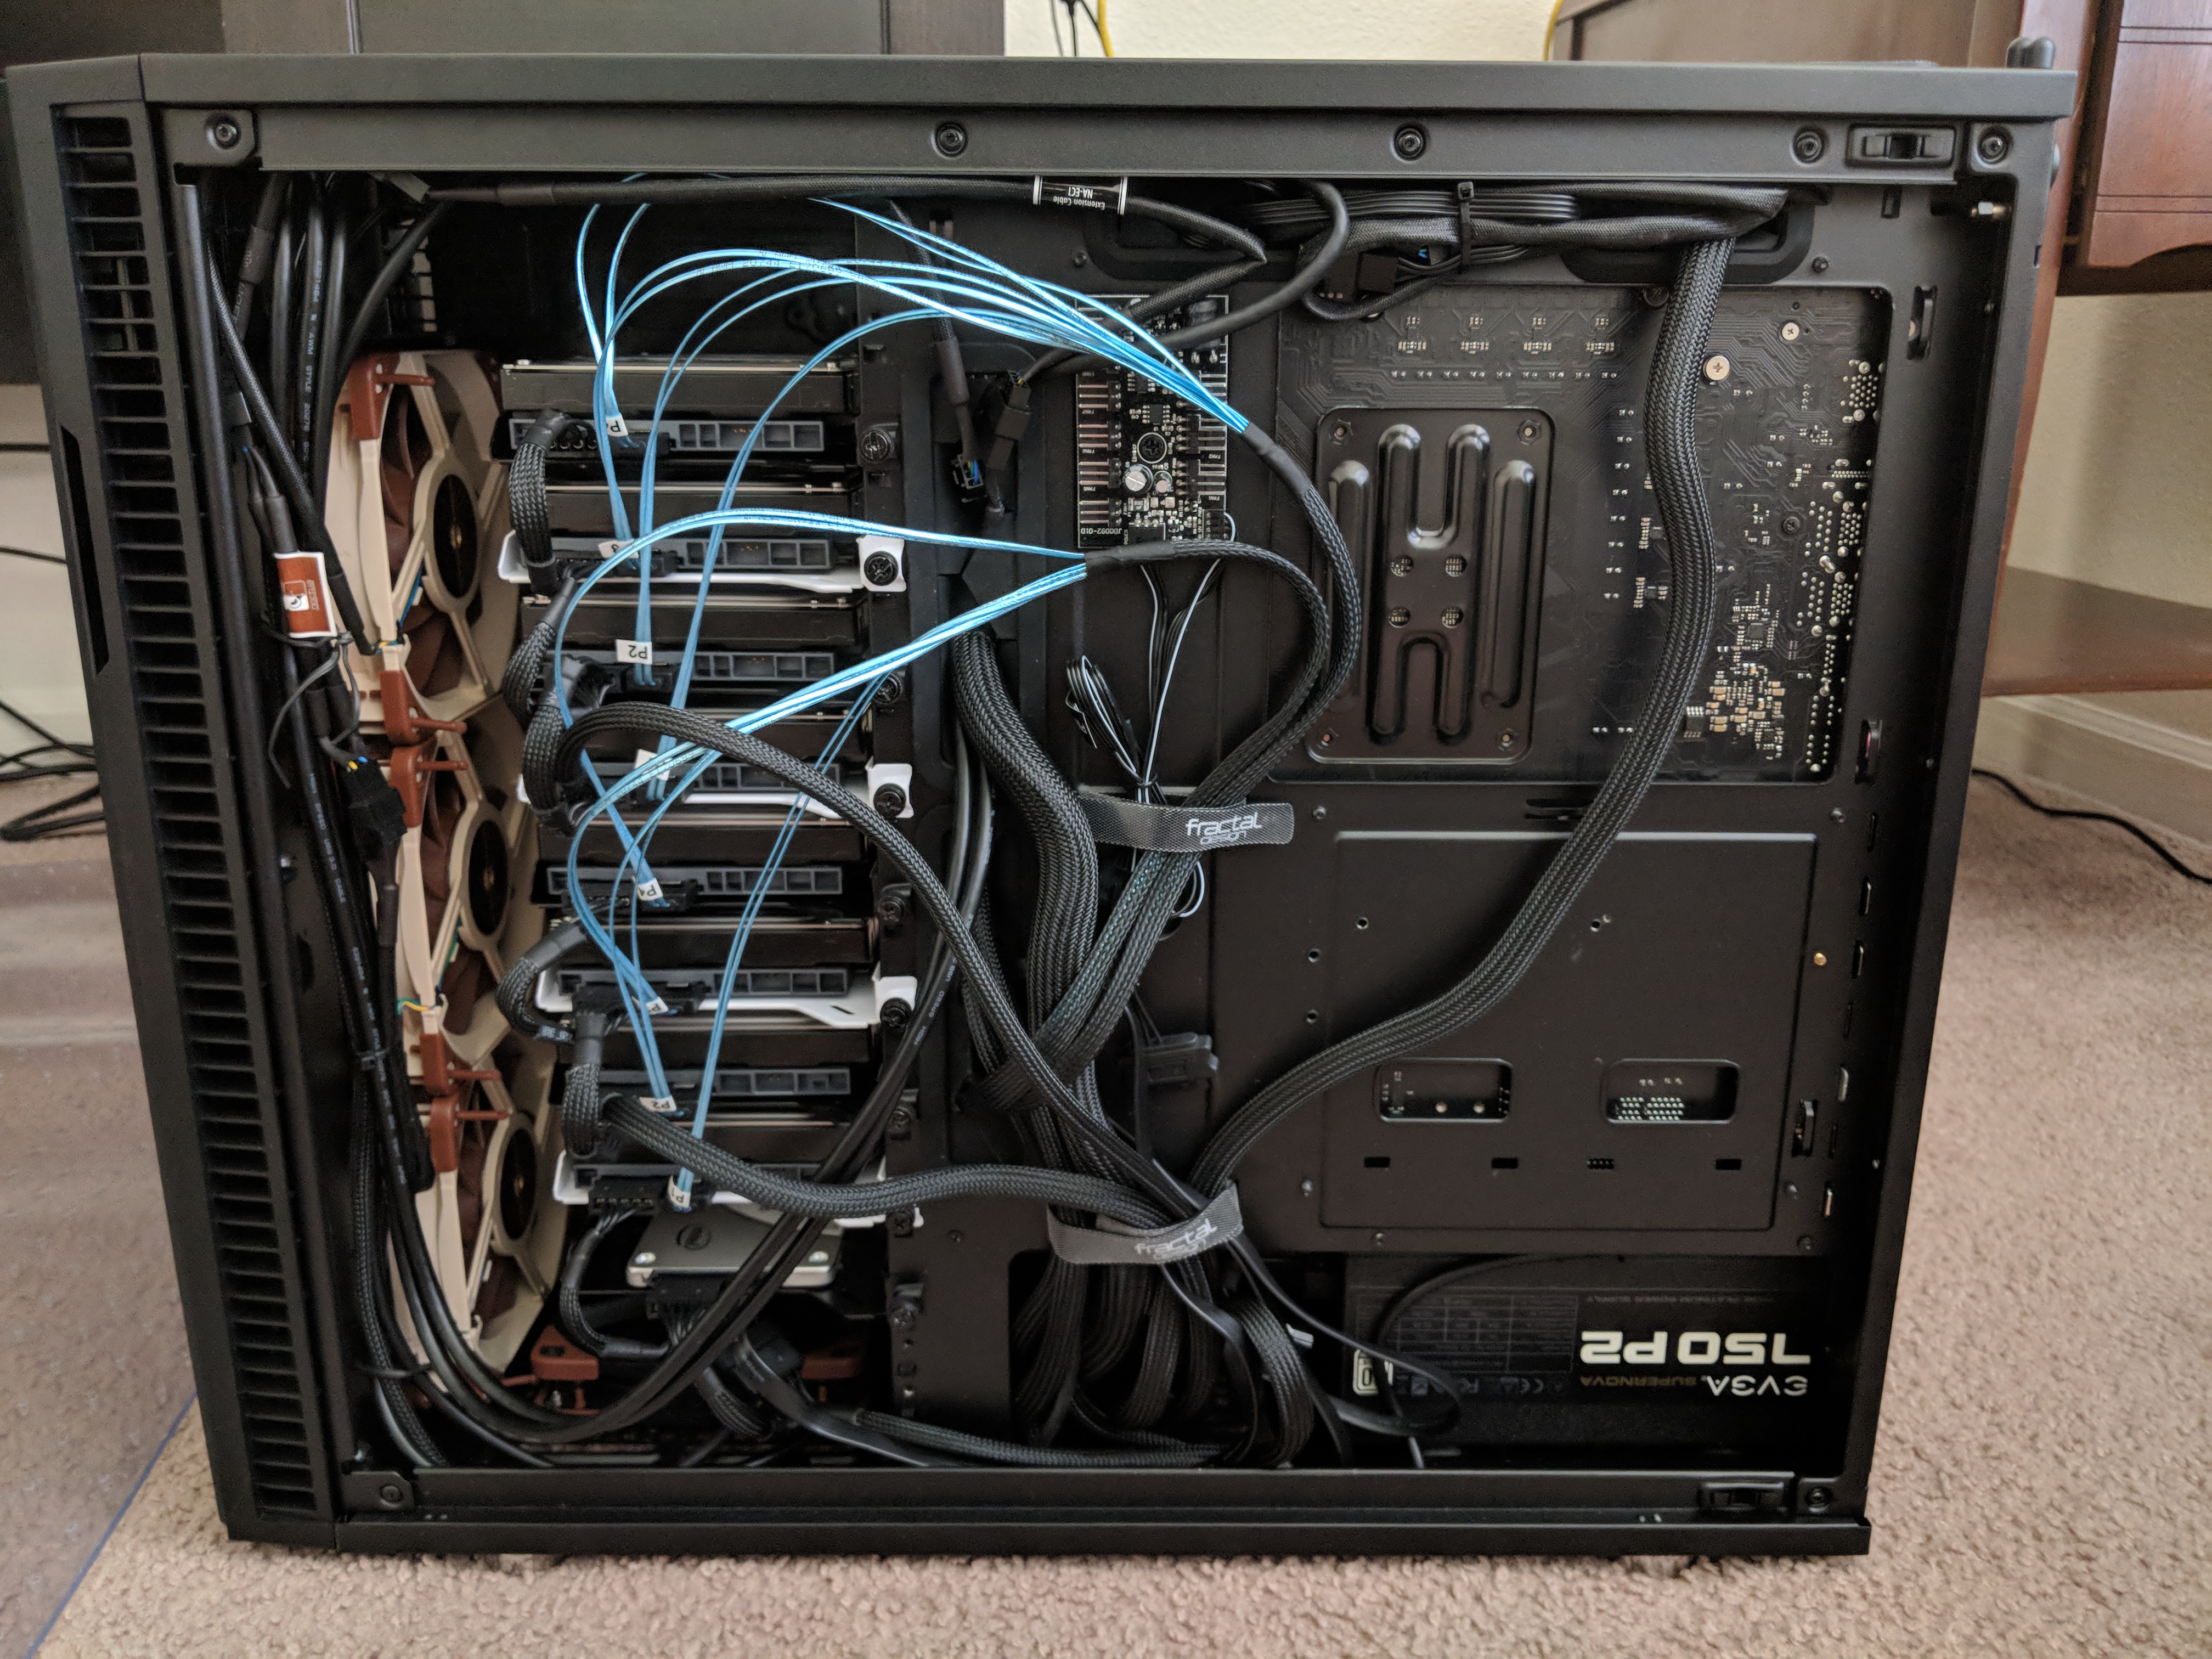
Case: Fractal Design Define R6
Case Fans: 3 x Noctua NF-A12 Industrial PWM, 1 x Noctua NF-A14 Industrial PWM from previous build, 3 x Noctua NF-A12x25
GPU: EVGA 1080 TI SC (PCIe Passthrough to VM)
FreeNAS HBA: Dell Perc H200 flashed to IT mode (PCIe Passthrough to VM) from previous build
OS Drive: Intel S3610 200GB SSD, loaded with ESXi 6.7 from previous build
Datastore: Samsung 850 Pro SSD 500GB x 2, RAID 1 from previous build
FreeNAS HDDs: 8 x 4TB HGST Deskstar NAS drives 4 from old NAS, adding 4 more
Windows Primary Drive: Samsung 960 Evo 1TB (PCIe Passthrough to VM; RDM not possible)
pfSense NIC: Intel 1000VT 4 x 1Gbit NIC
TL;DR from my previous post is ESXi runs as the hypervisor, pfSense and FreeNAS are on local datastore with their indicated hardware passed through to them, and Windows runs raw off its hard drives
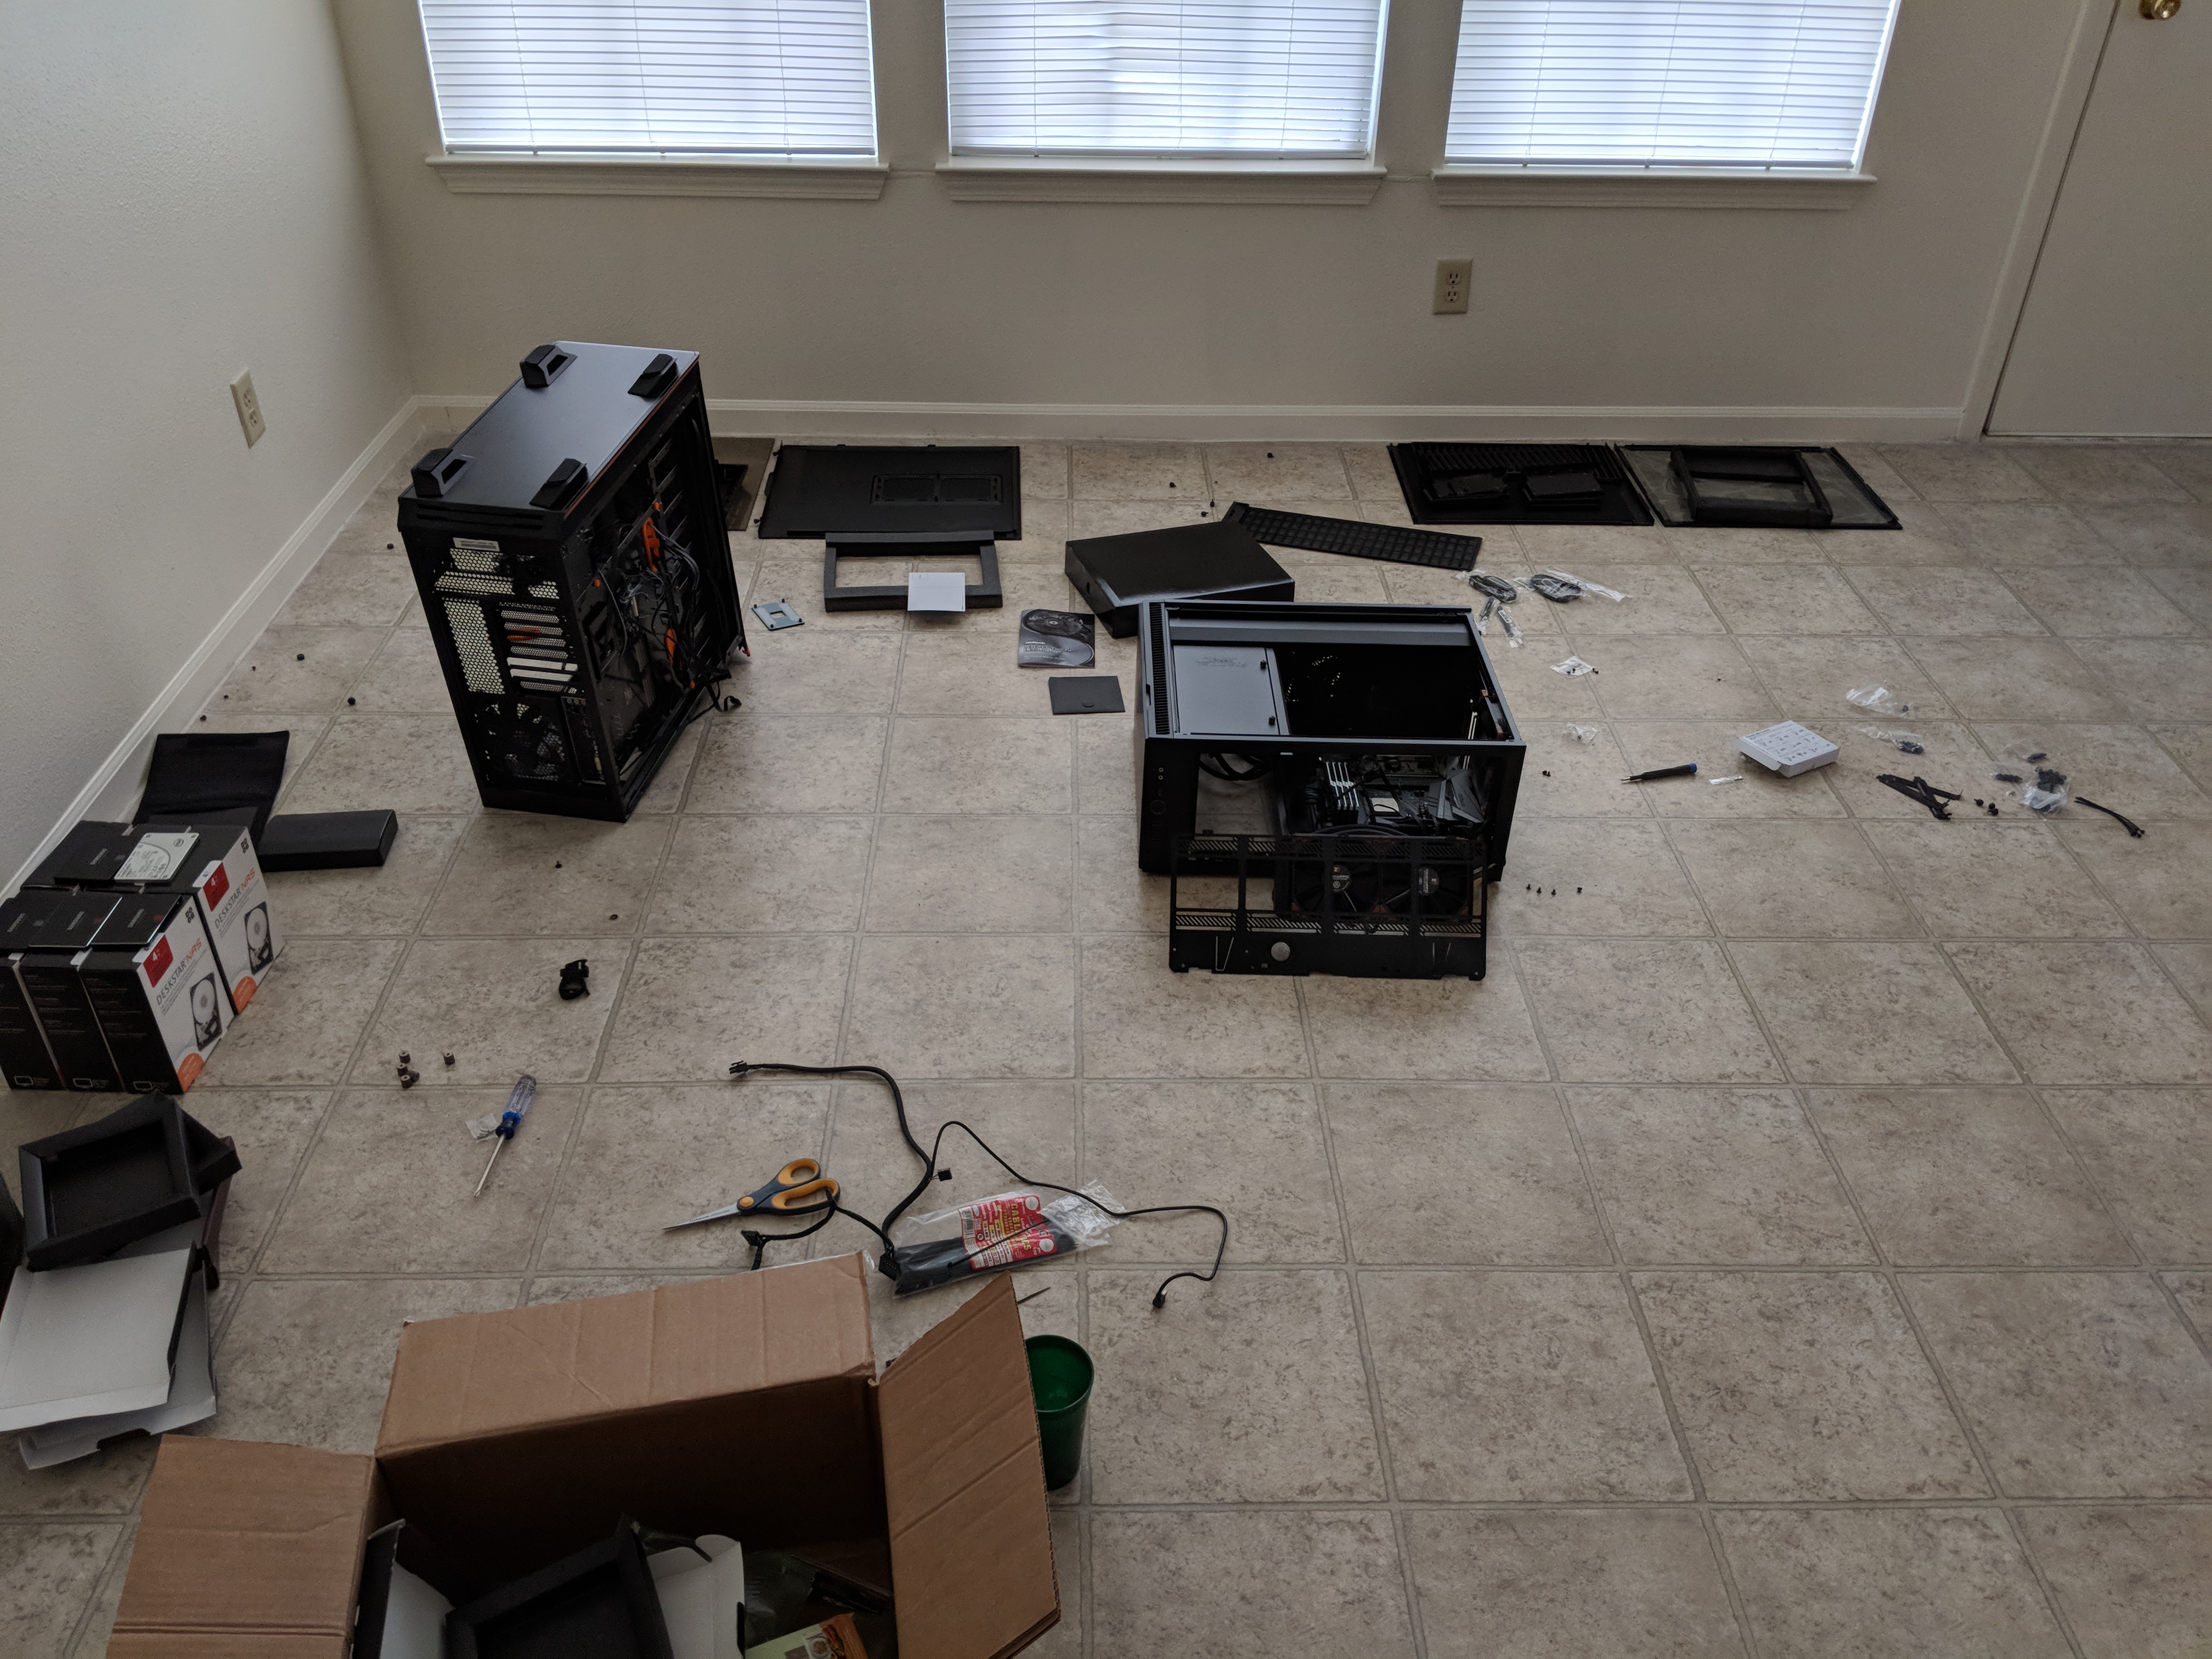
Build Log Day 1 - Moving Day
Overall, working in the Define R6 was pretty easy. The was only three things that gave me any sort of trouble:
-
When installing the H100i, the motherboard needs to be installed, the CLC mounted to the bracket, and positioned in such a way that you screw on the cold plate to the CPU without mounting the bracket back onto the top of the case yet. This needs to be done in this order to be able to pass through the fan cables of the CLC
-
If mounting the SSDs to the front of the case on the power supply shroud, the SSD on the right will have clearance issues with the SATA cable and any motherboard pins (such as the power/reset pins) that run along the bottom. I may move these, as originally I was going to mount 2 in the front and 2 in the back, but realize I don’t have enough SATA power cables on my power supply to do this (my intel drive is just free floating behind the motherboard tray to get power)
-
Very minor, but the top dust filter won’t snap back on, I believe this is due to the screws of my CLC though. As in, they are not flat head screws, so they press up on the filter a bit, causing it to not sit 100% flush
The reason I moved to the Define R6 in the first place was primarily due to drive capacity. I am going to be running 10 x 3.5" drives and 3 2.5" SSDs, while the Darkbase 900 can only officially support I believe 7 3.5" drives. Additionally, there are some defects with my DB 900 in that some of the screws were screwed on so tight, they may as well be riveted. My 5.25" drive caddy has 1 screw that basically would require to be drilled out in order to remove. Additionally, it is a bit bulkier than I want, and due to my own poor fan placement, both thermals and noise were not good in it.
Overall, it took me about 3.5 hours to remove all the parts i needed from my old system, mount everything in the new one, and clean up. And eat, because eating is important on occasion.
The GPU should be arriving tomorrow and I can make sure everything POSTs and is recognized. NF-A12x25s are going to be the 3 front intake fans, and are arriving later in the week, and the rest of the parts are arriving next Tuesday, and I’ll update the post with additional Build Logs when I get and install those parts. At least I will know tomorrow if I bricked something and if all of the components are recognized. I did mess up a bit on the Asrock Board in that I plugged the front panel 3.1 USB connector into the right facing instead of top facing USB port slot, and ended up cracking the casing and bending some pins. I am hoping it hasn’t screwed up the board, but will see tomorrow when the GPU arrives.
_Build Log Day 2 - The only easy day, was yesterday
The GTX 1080 Ti came in at about 1PM here, and I’ve been hacking away trying to get this to work for the last 9 hours or so, and have come to find there’s some oddities with ESXi and PCIe passthrough for motherboard devices:
-
To Start with, I was having odd video output issues for the first 3 or so hours. Once i swapped out my monitor I was using for the one I was going to replace it with anyway, had no more issues. For about 2 hours I thought I was getting a bad post code, but found out that the post code is actually showing that I was in the UEFI BIOS. About a 3 hour waste trying to figure out why my hardware wasn’t POSTing reliably due to that.
-
Windows Gaming VM: This is where I spent about the last 5 hours of my time troubleshooting. The TL;DR is that the USB controller on the motherboard I was able to pass through to the VM will work just fine for a single power on of the VM. If the VM is shut down for any reason, the ESXi host needs to be rebooted, and then the Windows VM can start and work just fine. I’m guessing this is due to being a part of the motherboard chipset, rather than a PCIe device that is designed to be turned off individually. I tested rebooting the Windows VM with just my Samsung 960 EVO and the GTX 1080 Ti and had no issues repeatedly rebooting the system, it was only the Motherboard’s USB controller. I’ve ordered a 4 port USB controller and will see if this is allow the VM to restart properly.
Among the peculiarities with passing through components on the motherboard, I found that the following items of interest cannot be passed through. It enables you to toggle them, but they perpetually will say the host needs to be rebooted:
- Aquantia 10g NIC
- Intel Dualband Wireless-AC
- ASMedia SATA and USB controllers
The pfSense VM I plan on getting up tomorrow. The FreeNAS VM still needs some necessary parts to complete, but I can at a minimum see if the Perc H200 works properly. Really hoping since I had no troubles with restarting the Windows VM with the other devices that the other VMs won’t have any troubles like the Gaming VM did (though, honestly, I expected things to not be that easy with Windows).
I’ll be running some gaming benchmarks and doing some overclocking with the Ryzen 7 1700 and XMP profiles to see what I can get to run stable after I get pfSense running tomorrow, which I don’t anticipate being a problem. At current I’ve set the Ryzen 7 1700 to 3.8GHz all core overclock @ 1.3v and the DDR4 to 2933 (need to look up CL timings, will add these tomorrow)
Build Log Day 3 - Adventures in Overclocking
Short post for this one. The 3.8GHz @ 1.3v seems to be my best performance per watt option, as I need to push my voltage over 1.375v to get to 3900. I prefer the lower temps and to see if I can push the voltage even lower.
Big project for today is getting the DDR4 overclocking. I grabbed a spare SSD and loaded windows onto it to do some native hardware testing without ESXi shenanigans. Additionally, I wanted to do this to verify my voltage readings, as yesterday I loaded up HWiNFO64 in the Windows VM and it was reporting a core voltage of 1.55v, much higher than what I had set it to. I figured this was just hypervisor shenanigans and the native windows install confirmed this by reporting the correct voltage I set in the BIOS
Unfortunately, while my Ryzen CPU seems to be a pretty decent overclocking, the RAM is not. I am running 4 x 16gb non-Samsung B-Die (8gb DIMMs only for Samsung) at 2800 MHz 14-16-16-50 @ 1.35v at current. Memtest is running but this will take at least 4-5 full passes for me to call this overclock good. This testing may bleed into tomorrow, just depending on how long it takes to find the limit. 2866MHz threw errors not even 8% into the test, so it looks like 2800 MHz or lower is what I’m looking at. Hopefully I’ll be able to get the ram timings a bit tighter
I decided to do my RAM overclocking now, as I want this to be 100% stable prior to installing FreeNAS. pfSense can wait.
Build Log Day 4 - pfSense, Above 4G Decoding, and other shenanigans
Added the Intell 1000VT 4x1g NIC back into the system. I first attempted to do PCIe passthrough with the NIC, but since the PCIe 2.0 slot at the bottom is provided by the chipset, this resulted in the same problems as most of the other motherboard chipset provided in the perpetual Enabled Pending Reboot bug. Instead, I divided up the NIC ports into a two seperate vSwitches and Port groups, 1 for WAN, 3 for LAN. I then assigned 2 virtual NICs to the pfSense VM, again, one for WAN and one for LAN. pfSense installed and had no issues, outside of needing to reboot my modem to ensure the WAN port grabbed an address from my ISP, but this is a fault of the modem, nothing ESXi or pfSense did.
Initially, I was having some difficulties getting the Network card recognized. I turned on Above 4G Decoding and Above 4G MMIO to see if this would alleviate the issue. While the NIC did get recognized after that reboot, I ran into another issue. The monitor issue I had on the first day, which I thought was due to my monitor, turns out it was the Above 4G Decoding (screen would no longer display until the VM was started). I cleared the CMOS and tried enabling one thing at a time and found it to the Above 4G Decoding to cause the issue.
Currently, I am having some troubles with the Nvidia card’s kernel crashing, and it may be the Above 4G MMIO, so I am going to continue to investigate that. Hope to find the cause soon.
UPDATE: I loaded a new WIndows VM, this time with Windows 10 instead of 8.1, and for whatever reason it is no longer throwing the Nvidia Kernel Stop and Restart errors I was getting with 8.1 (WIndows Error Event ID 4101). Things I did the same was reinstalled all the Visual Studio and Direct3D libraries, installed steam and started the same games. Things I did not was with VMware Tools. I ONLY loaded the VMXNet3 driver for the Virtual NIC and deselected all other virtual drivers. My suspicion is that the SuperVGA driver is doing something funky with Windows 10, but have not reached a point where I want to test this theory. Will eventually clone this VM and apply the virtual drivers and see if the issue reappears, but that will be a few days/weeks from now, as I want to make absolutely sure this is stable before writing it off as good.
Additionally, all the rest of my parts came in! FreeNAS build up and config starts tonight, and will do CIFS and iSCSI performance benchmarks tomorrow. After I finish the FF14 benchmarks in the Windows VM
Build Log Day 5 - FreeNAS, Final Cleanup, and Conclusion on the Project
FreeNAS, like pfSense, installed and worked just fine. PCIe Passthrough had no problems whatsoever, and the FreeNAS VM can be restarted, unlike the Windows VM (the USB controller that is able to be passed through is the reason that the entire host must be rebooted if the Windows VM shuts down, not the GPU). Below are the Crystal Disk Mark benchmark results.
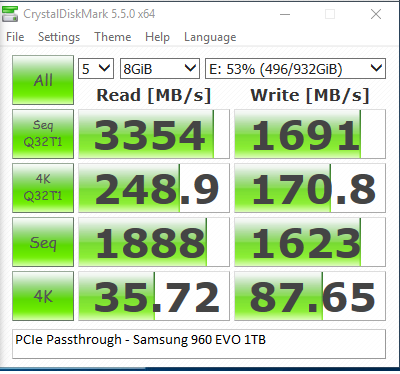
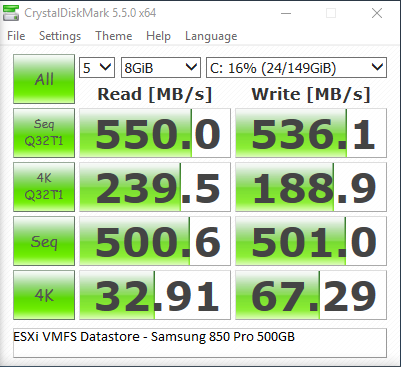
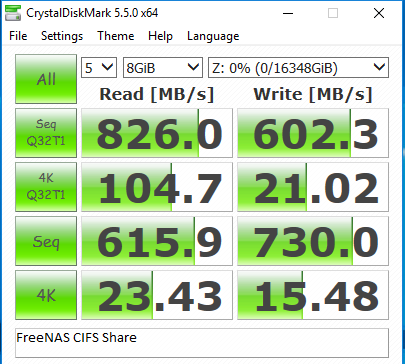
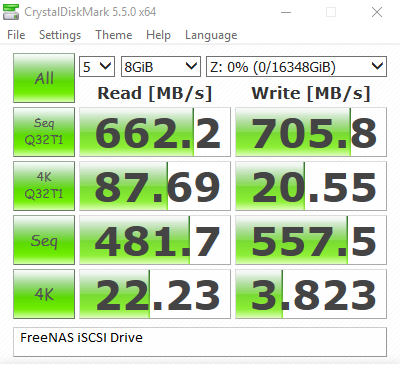
Interestingly, the CIFS share does better than the iSCSI drive, which was contrary to what I found when hosting FreeNAS on my Dell R710. I believe this is due to the difference in CPU single threaded performance and taking the physical networking limitations, as the FreeNAS and Windows VMs are local on the same box, theoretically giving the highest possible performance that FreeNAS could offer a Windows box.
Below are the tests after trying to get the ARC cache to work as best as it can
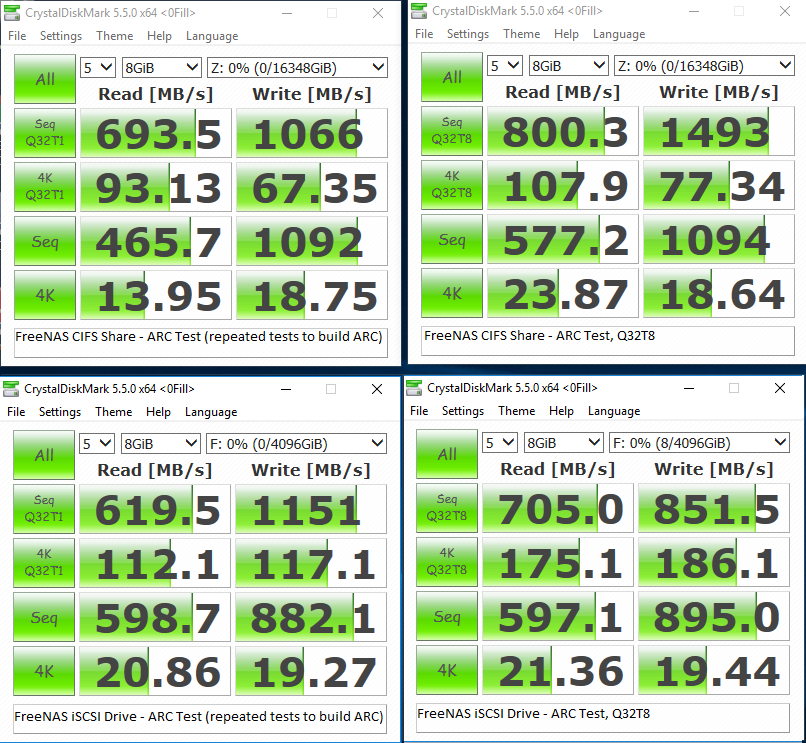
I was honestly expecting much higher performance out of the ARC cache, but this could just be limitations of the test, or due to not manually setting up Tunables. I did enable Auto Tunables, and ran the test 5 times each in order to ‘train’ the tunables on the FreeNAS VM and see if I could get any more performance out of it. Still, this did result in a sizable performance gain.
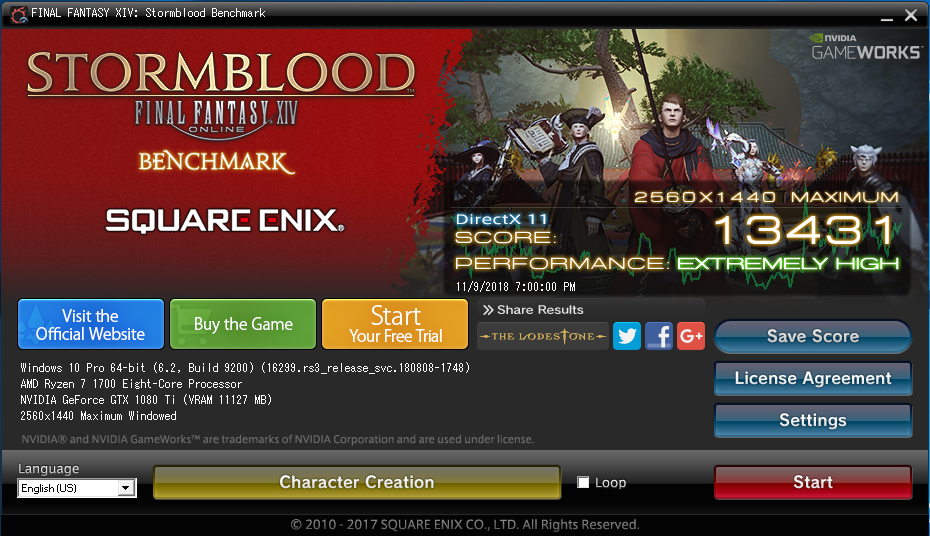
For Gaming Performance, I decided to go with the FF14 benchmark. This particular benchmark had very consistent run to run variance, of no more than about 0.6%. Conservatively, I’d say that variance higher than 1.2% would be an improvement. Unfortunately, I can’t call these results 100% consistent, as the Baremetal results were run on a mix of Windows 8.1 and Windows 10. From personal observation, the variance due to windows was only about 0.2% which could be chalked up to run to run variance, but I still thought I’d mention it. One last note about he FF14 benchmark is that it shows a total time to load all of the scenes, so I could also compare the loadtimes of each of the hard drives as well.
Here’s the Baremetal results (remember, this is with 8c/16t):

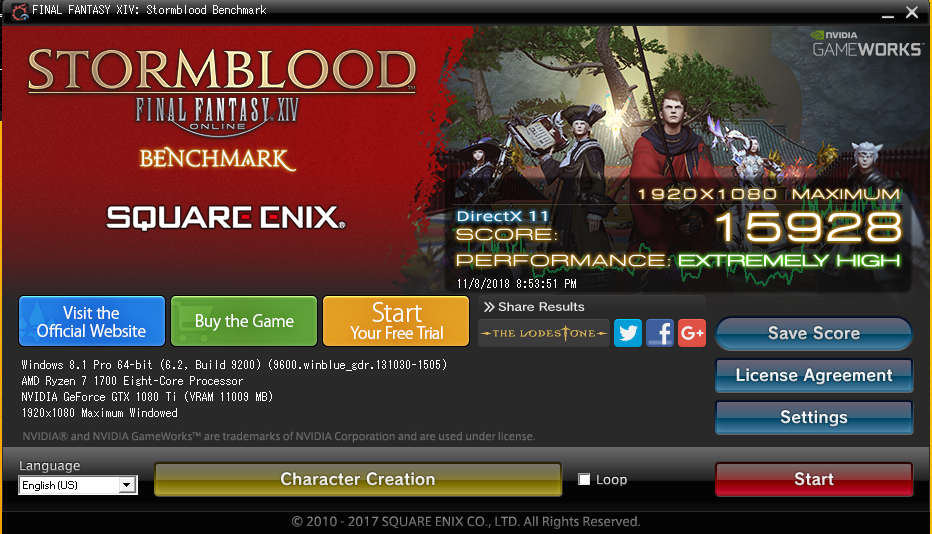

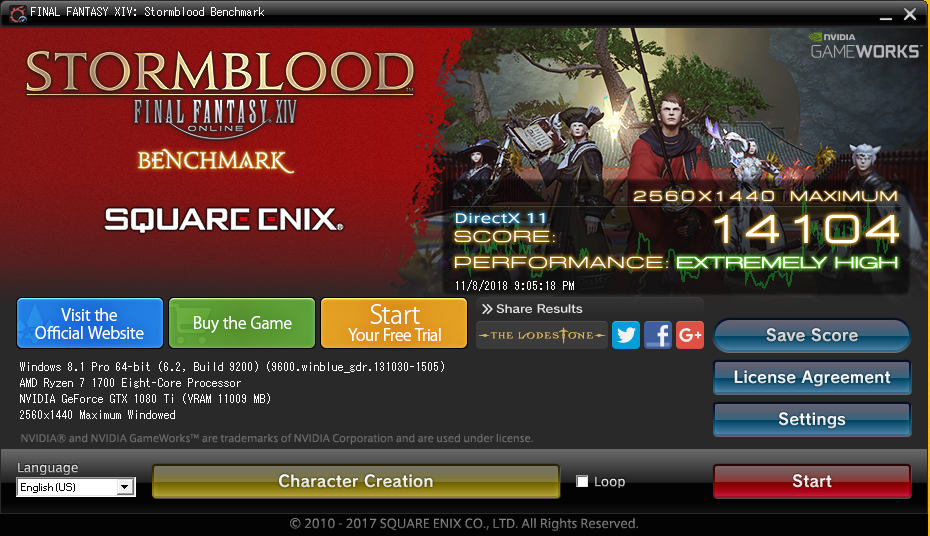
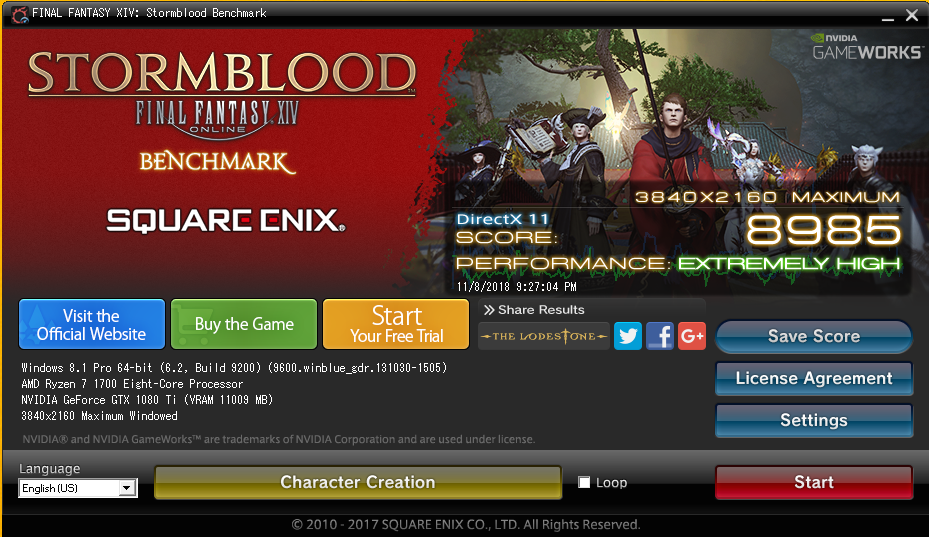

I decided to include GPU OC and non OC runs. 1080p and most of the 1440p scenes didn’t really benefit from the OC. The first and last scenes are the only scenes that are able to tax the GPU up to 100% utilization, so this is more or less expected at these resolutions. At 4k, the GPU has to work much more throughout the benchmark. For reference, a score of 10000 means an average FPS of 60.
Here’s the results for the Windows Gaming VM


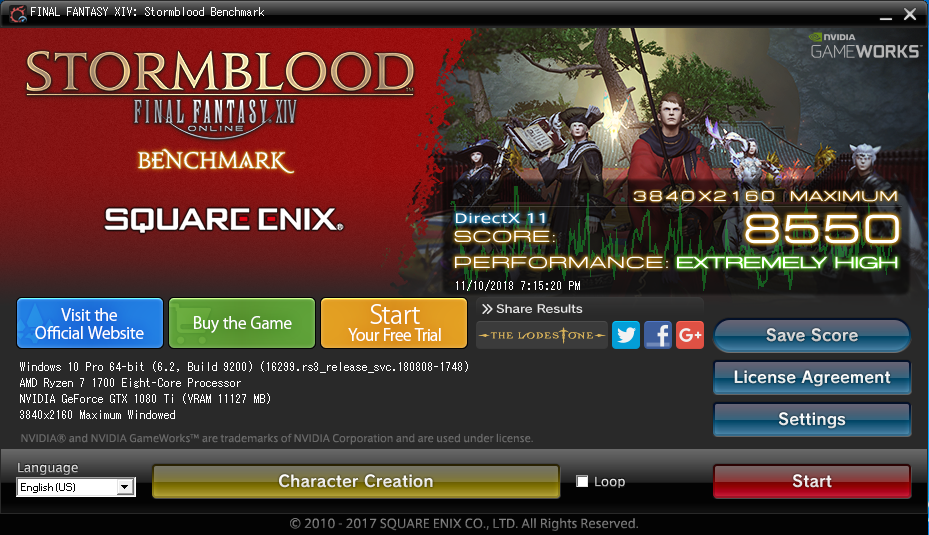
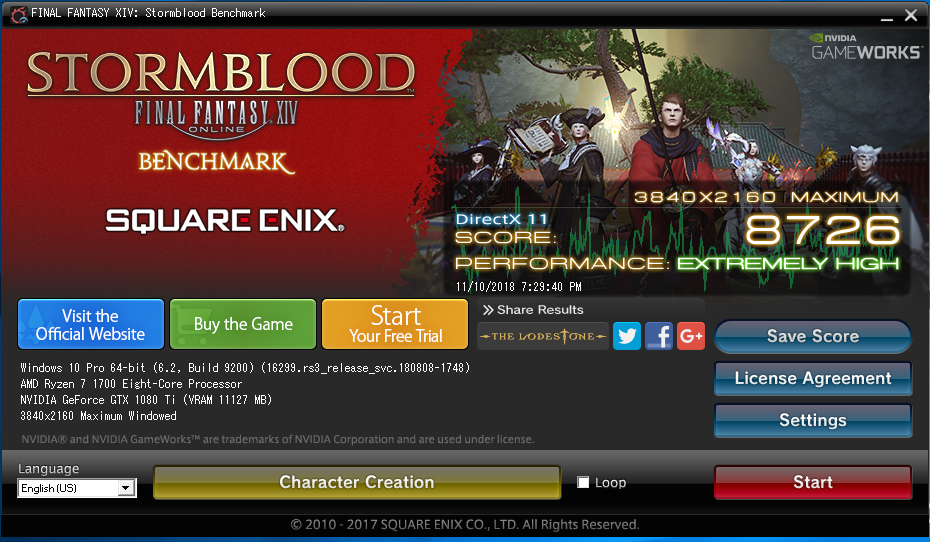
While the scores are lower, which I expected, I was more concerned with finding if there was any microstuttering or noticeable hangs while the benchmark was running. In all of the VM tests, there was no microstuttering while the benchmark was running, so quite happy with the results considering the VM is running on 8c/8t and has the hypervisor layer to deal with.
Loadtimes were within run to run variance and were as follows:
Samsung 960 EVO 1TB - 16.7-17 seconds
Samsung 850 PRO 500GB - 17.3-17.8 seconds
FreeNAS iSCSI Drive - 25.8 seconds
FreeNAS iSCSI CIFS - 26 seconds
Finally, after making sure all VMs were stable and working correctly, all that was left to do in ESXi is to setup the Auto-start function so in the event I need to reboot the host I no longer have to go into the hypervisor, and final clean up of the PC and my desk space
Conclusion Time:
The Good:
- It works! Kinda. More on that in the next two section
- PCIe passthrough works perfectly for anything that is wired directly to the CPU (GPU, HBA, and NVMe drive)
- pfSense, FreeNAS, and Windows (10) all operate very well
- With Auto-start configured, starting the computer will also start all 3 VMs, and pressing the power button while it is on will shutdown all 3 VMs and the host properly. No need to go into ESXi for daily use
- Very space efficient in terms of space consolidation
- Energy efficient
The Bad:
- All items that are tied into the main chipset cannot be passed through, due to all being in the same IOMMU group and having ineligible devices for passthrough in that same group. These devices include: Most USB ports (all but two of them on the back of the machine), both NICs, PCIe 2.0 x 16 slot at the bottom, the bottom M.2 drive, Bluetooth + Dual-band Wireless, HD Audio, and all SATA ports
- ESXi has no drivers for the Aquantia NIC, effectively making it unusable. Thoughts on this in the next section
- The SATA controllers cannot do Raw Device Mapping to VMs. This is due to ESXi assigning the disk as a SCSI drive to the VM, which means the SATA controller needs to have SCSI addressing capabilities, which SATA controllers generally don’t need. It may be possible that setting the controller to RAID mode would enable this, but this would defeat my main purpose of RDM my existing drives (cannot mix AHCI and RAID drives due to RAID shenanigans). It MAY be possible to do RDM with a SATA addon card on the chipset’s 1x slot, if there is a SATA 1x slot card, but I don’t have a significant desire to test this at the moment. Perhaps if I REALLY want to add a ZIL drive to the FreeNAS VM, then I may try it out
- The USB controller on the motherboard that you CAN passthrough makes restarting the VM it is assigned to impossible to restart. If you restart the VM with it assigned, it will hang indefinitely, forcing a power-off in ESXi for a hard reboot of the box. This is honestly the worst part of the whole thing from a convenience factor. Needing to shutdown the entire host and restart it, just so Windows can restart is a pain
- Above 4G encoding on this motherboard will no longer display the AsRock post screen, or give any video output until the Windows VM was loaded. An odd, but noteworthy issue (Post code A9 means you’re in the BIOS btw!)
The Lessons Learned and Possible Improvements:
- A powered USB 3.0 hub is a necessity if you want any hotplugable devices. Only 2 USB 3.0 ports are able to be passed through on this board, as a reminder. This is especially necessary if you want to connect external hard drives.
- The Aquantia 10g NIC has Linux drivers; In the event that 10g is an absolute necessity, then I will probably try running a KVM hypervisor setup instead (such as UNRAID)
- ESXi is nice for some things, and a pain in the ass for others. Mainly the driver support.
- If AsRock were to isolate and put each component in it’s own IOMMU grouping, this board would be perfect. As it stands, it is JUST usable for my absurd project. However, for me, this board and the Asus Crosshair 6/7 hero are the only non-threadripper boards that was able to do what I needed. Not everything I wanted, but everything I needed. It’s a solid motherboard, definitely recommend if you can work with the limitations stated
- If you install ESXi on an SSD, it will allocate the excess space as a local datastore. Didn’t know this, as I had always installed it on a USB/SD Card
- ESXi requires 4GB of RAM free to run. Learned this while trying to give FreeNAS more of my RAM capacity (PCIe Passthrough requires all RAM on the VM be reserved, and I just did it for all the VMs just cuz)
Would I recommend this for someone to try? Honestly, that depends on if you’re nuts like I am. It works, but it has drawbacks too. If you want it to just work and especially if you are building an entirely new system, save yourself a lot of headache and just go with a Threadripper 1920x and AsRock X399 Professional Gaming (if you need 10g networking, Taichi if not), and things will be much easier for you.
I’ll follow this post probably in a few weeks/months afterwards as a follow up, but until then, time for a drink and some video games. Have fun everyone!

Verdict on Windows gaming VM as daily driver
So Windows 10 gaming VM behaved well. I really didn’t have much trouble with it doing anything. The only time the VM had any type of difficulties was when I open and closed Slime Rancher. I couldn’t start the game back up until I rebooted the VM (and thus the host due to USB ports).
Linux daily driver revisit
Now I originally wanted to use a Linux distro, but unfortunately there was issues getting it to work with the Nvidia card initially. I decided to revisit it and see if I could get it working, and it appears to be picky about how to initially set things up. Below are my steps to get Linux Mint 19.1 installed and working:
- Create VM in ESXi. Select Ubuntu 64-bit
- Edit newly made VM. Set CPU cores to desired amount/affinity, set RAM amount and reserve all RAM, changed storage controller to LSI SAS, changed NIC to VMXNET3, and edit advanced config to add hypervisor.cpuid.v0=FALSE
- With NO passthrough devices added to VM config, start up and install the base OS like normal
- Once installed and rebooted, open up terminal and do the usual sudo apt update && sudo apt upgrade -y to get things updated, and then run sudo apt install open-vm-tools
- Shutdown VM and edit the VM options. Add the Nvidia GPU and USB ports, and then edit the advanced config and change svga.present=TRUE to svga.present=FALSE
- Linux Mint should start up and be running fine now with passthrough
Once things were up and running, I ended up hunting down and installing more recent proprietary versions of the driver than those. 396.54 was the latest one i could run without an issue in any of my games. Lutris, wine, proton and DXVK all working just fine in the VM environment, so I’d say things are pretty good. USB reset bug with the passedthrough ports is still a thing, but I wasn’t expecting this to change.
Will update after a few more months with any additional quirks, but things have been working quite well for the last 2 weeks.
Some minor quirks of note
- When PCIe devices are passed through and anything is adjusted in the UEFI BIOS, this can cause hanging issues for the device passed through. I believe this is what was happening to my Windows 8.1 install. The remediation for this is to remove the PCIe device from the VM, toggle the device to disable passthrough, reboot, enable device for passthrough, reboot, and then add it back to the VM. A pain in the ass, but shouldn’t need to be much once you’ve dialed in your settings
- If you notice the gaming VM hang on occasion, this can be caused by two VMs accessing the same physical core at the same time. This is remediated by pinning the gaming VM (or all VMs) to their own physical and hyperthreaded cores
- Some USB 3.0 devices may have issues with the passed through USB ports. I noticed this primarily with some USB drives. Haven’t noticed any issues with USB 2.0 USB drives though.
OMG More updates?
So I’ve ended up swapping back to Windows from Linux a month or so ago. There’s too many games I want to play that require too much fiddling with or just don’t work (yet). Perhaps I’ll do a revisit to it in a year or so. Note this is prior to trying out Linux Kernel 5.0 or Proton 4.2, so mabye some things are better, but I’ll let things mature a bit more
I did this build using the P1.50 (AGESA 1.0.0.4) BIOS version, which I found out about just today after checking. I decided to flash the BIOS to P2.0 (AGESA 1.0.0.6) and my memory can no longer overclock, like at all. I believe this is due to how the board is validating the RAM, as it does so from Cold Boot now, before it would do it with a Warm Boot. This sucks from a performance standpoint, as there was about a 12% performance drop going from DDR4 2800, 14-16-16-50 to 2133 15-15-15-38
RAM Overclocking Update
I decided to see if there was anything I could do about the RAM overclocking issue and hit Google for the upteenth time. This time, I ran across a Ryzen RAM Overclocking Calculator and decided to do some testing and see if I could at least get my old overclock back. After a few hours, I managed to get RAM overclocking working again, with a higher overclock of 2933@14-15-15-38. Tried 3200 but it threw errors immediately on memtest86. Also managed to get CPU to [email protected] volts stable as well after the DRAM changes. Looks like P2.00 changed some defaults from P1.5, but the DRAM overclocking guide changed whatever they were back (whatever caused the computer to only validate RAM overclocks with cold boots)
Reset bug with USB Motherboard Ports SOLVED!
TL;DR - This post works to solve the USB ports in the Security Device’s IOMMU group problem with VM resets. This allows the VM with them passed through to restart correctly \o/
Additionally, I updated the BIOS to P3.20 and applied the above fix to allow the GPU to be passed through once again, and it had the side effect of also fixing the USB problem. Additionally, I was able to enable the USB 3.0 XHCI settings in BIOS and passthrough the USB ports and they now operate at USB 3.0 speeds instead of USB 2.0 
Will update again once I get my Ryzen 3000 series CPU and if ESXi 6.7u2 works with it
Ryzen 3000 series - PCIe Shenanigans
So BIOS P3.20 had some odd coding errors with the way the PCIe slots work. TL;DR, P3.30 the main problems with PCIe slots has gone away, however RAM overclocking is troublesome. Hopefully it improves with future AGESA updates
FreeNAS Jails and ESXi shenanigans
If anyone decides to try and install the Plex plugin on a FreeNAS VM, you MUST enable both Promiscuous mode and Forged transmits in order to get Jail VNET interfaces to interact with anything attached to that vSwitch. VNET and allow_raw_sockets is required on Plex in FreeNAS 11.2U5 in order to properly transcode and fetch metadata for media.
One Year Later
So, it’s been a whole year since I did this project, and I figured a year in review was in order
So, how is it, really?
Surprisingly, it’s been quite good. Once the BIOS and ESXi configuration is properly finished, and these don’t need to be touched anymore, then it’s actually quite nice to use. Yes, it takes a full 2 minutes to go from power on to using the desktop, but for me, this is a non issue. I’ve had no issues with any games or software relating to the build since the Ryzen 3000 AGESA issues were resolved for the BIOS, and that was more or less expected for being on the bleeding edge.
Yeah, but what was bad about? It can’t all be sunshine and rainbows
There are some very obvious drawbacks to this setup:
- All eggs in 1 basket. If the motherboard/PSU/CPU kicks the bucket, everything is down. I personally didn’t mind this much, as it isn’t critical if this happens to me, just an inconvenience
- High power consumption if left on 24/7. I don’t need to keep my computer on 24/7, so this wasn’t an issue for me, but the passed through GPU will always consume much more power when idling and not really have an idle state, resulting in higher power consumption if left on when not using it. For reference, my build idles at about 220w, and peaks at 440w at full GPU and CPU utilization
- Restricted IO. My primary Windows VM has the GPU and 2 USB ports passed through to it. I need to use a USB hub in order to connect all my peripherals, and can’t use any of the others. If you need more than this, then an HEDT system would be better, or just not run a hypervisor build like I did
- Minor hit to raw performance. Yes, it is relatively small, and side by side, only the most MLGPro gamers would likely ever notice, assuming you’ve not underallocated somewhere, but it is there on paper
Welp, that’s about it. I don’t think I have much reason to update this post and will wrap it up there. If you try something similar, by all means shoot me a message


