I had a hard time finding a guide to mod in NVME support for an older UEFI motherboard that covered everything I needed to know, so I pieced together a few other guides to upgrade my Z77 MPower. It worked, so I retraced my steps and wrote it up hoping it might help somebody else.
This guide is only directly applicable to the Z77 MSI MPower with an ADATA SX8200 but may be applicable to other boards. You need to be much more cautious if your motherboard does not have dual BIOS, since you could brick your motherboard by flashing modified firmware. There are alternatives to BIOS modding such as using the NVME drive as a secondary drive, or by using a bootloader like GRUB on a SATA or USB device to boot from the NVME drive indirectly. You have safer but less convenient options, and thus have been warned. You may have to use UEFI booting for everything that boots from the NVME, but I’m not sure.
After performing the modifications described below, I switched the MPower back to the latest (unmodified) BIOS from MSI and found the NVME drive disappeared from my boot list while my SATA-based windows UEFI installs showed up. Due to this, I needed to modify the MPower BIOS to get it to boot from NVME, as expected. I’ve heard rumours that some Samsung NVME drives will boot on unsupported motherboards using AHCI as a fallback, but have not verified this, or whether my ADATA SX8200 has a similar compatibility feature. Regardless, it was necessary to modify the BIOS to get it bootable on my MPower.
You need to connect the NVME SSD to the motherboard. If it’s a PCIE drive you’re fine. If it’s an M.2 drive and your motherboard doesn’t have an M.2 slot, buy an M.2 to PCIE adapter like this:
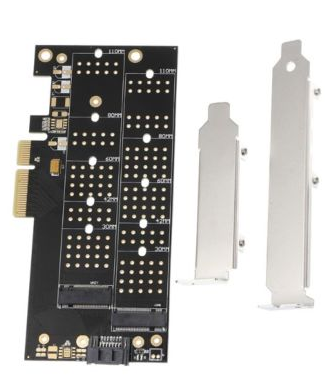
This adapter has a second slot for SATA-based M.2 SSDs and a corresponding SATA data port. These are optional. What matters is that it’s a PCIE-x4 slot which won’t bottleneck my PCIE 3.0-x4 SX8200.
UEFI Firmware files are structured in a series of modules and other files. To read and boot NVME drives your BIOS requires one or more modules. To get the module files I needed, I used the Z97 MSI MPower’s latest BIOS because it is as similar to the Z77 MSI MPower as possible but has NVME boot support. I got the latest BIOS/UEFI firmware from MSI’s support website and extracted the zip files they provide. The readme indicates which files are the actual BIOS.
To get the NVME modules, I used UEFITool 0.21.5. There are more recent versions of UEFITool, but at the time of writing they don’t let you modify the firmware files for some reason. You can look for UEFITool 0.21.5 here:
https://overclocking.guide/download/uefitool-v0-21-5/
In UEFITool, open the newer motherboard’s BIOS file (Z97 MPower for me, E7915IMS.1B0). You should see a screen like this which has “Intel image” in the “Structure” box:
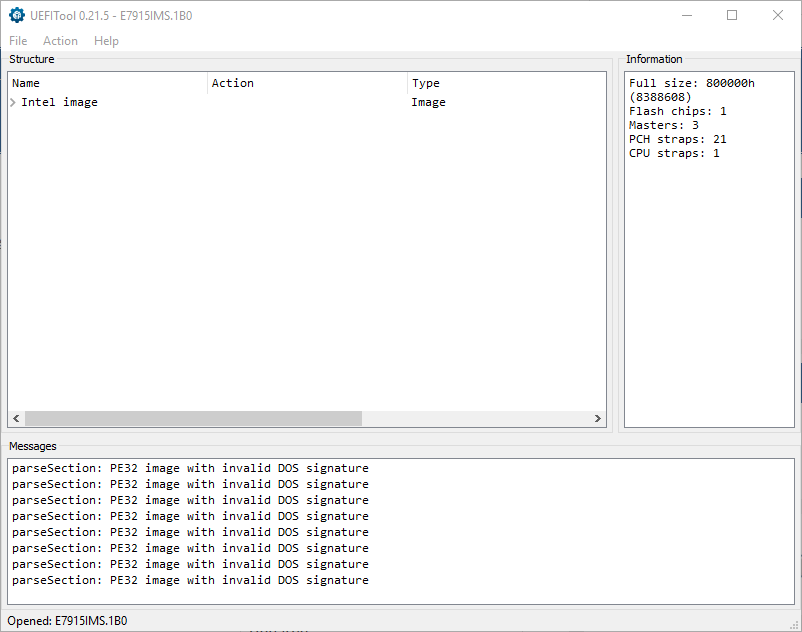
You may have error messages about a PE32 image with an invalid DOS signature. I don’t know what those mean and ignoring them didn’t have any apparent consequences. In File -> Search, open the Text tab and type “nvme” with “Unicode” checked and “case sensitive” unchecked. In the messages section, double click on the results to find them in the Structure section. You’re looking for items with Subtype “DXE Driver” and Text “Nvme”, “NvmeSmm”, and “NVMEINT13” in my case, shown here:
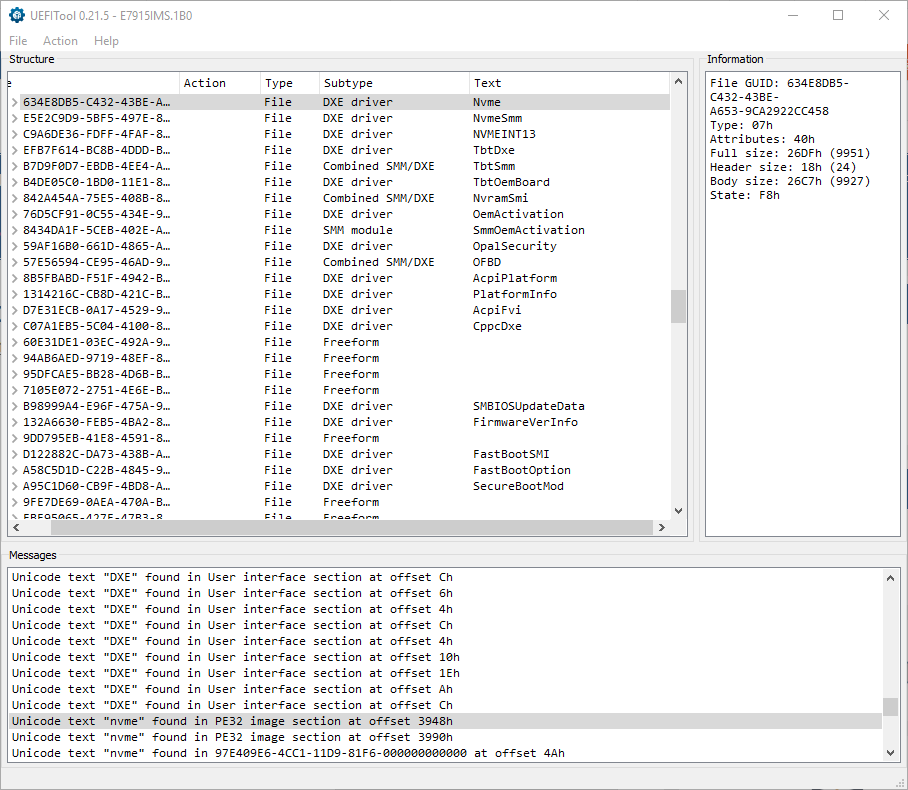
You may find other hits such as those in the “User interface section”. From what I can tell those are related to GUI options and help menu text which are not needed or necessarily compatible with other boards. For the 3 lines with subtype “DXE driver” and Type “File” with Text “Nvme”, “NvmeSmm”, and “NVMEINT13”, I right-clicked each Name (e.g. 634E8DB5…) and clicked “extract as-is”, saving them with “_Nvme”, “_NVMESmm” and “_NVMEINT13” in the filename to keep them straight. I don’t know if these modules are the same for other motherboards, but feel free to compare the MD5sums of what I extracted:
1237c599b3699b636746fcea9bfe4278 E7915IMS.1B0 (The Z97 MPower BIOS)
f568e0942be151bc16b2e7b616d17333 Nvme_dxe_driver_z97_mpower.ffs
d8c70c3d482a68371a9ca0ac4b6311ac NvmeSmm_dxe_driver_z97_mpower.ffs
776460f6aa1135f5b1b3a49475cb5b61 NVMEINT13_Z97_Mpower.ffs
Now open another instance of UEFITool and load the older (Z77 in my case, E7751IMS.HC0) motherboard. In File -> Search, open the Text tab and type “dxe” with “Unicode” checked and “case sensitive” unchecked. In the messages section, double click on the results to find them in the Structure section. Double click the last result and scroll up until you see the last entry with Subtype “DXE driver”. In my case, this was “MFLASH DXE” but yours should vary:
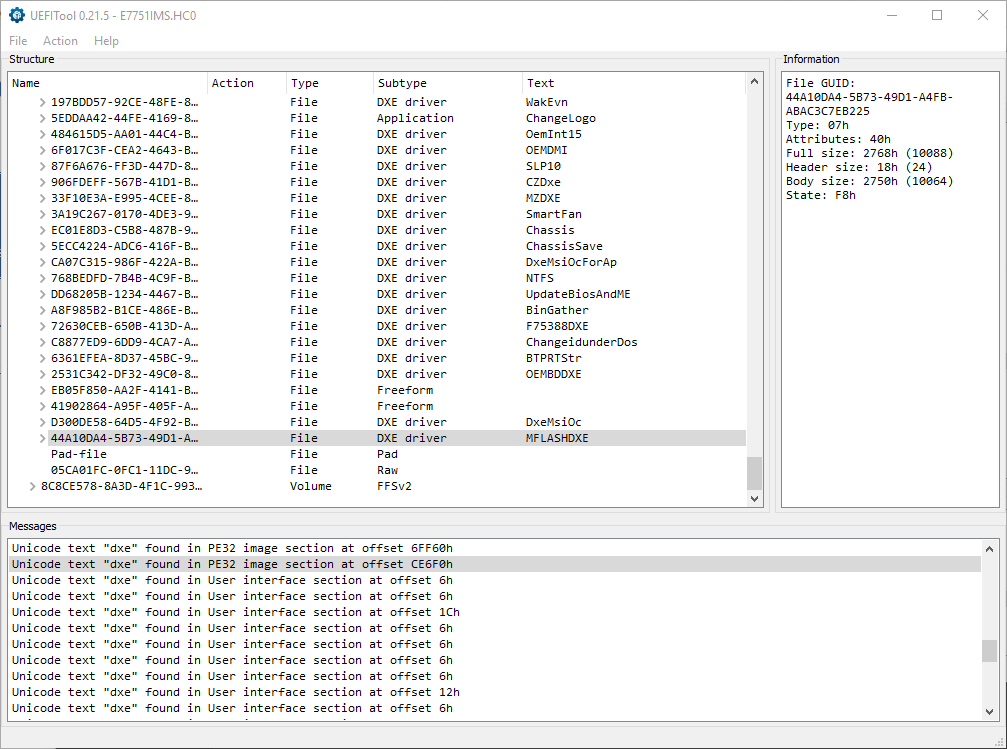
Note the “Pad-file” following the last DXE driver. This is blank space to ensure the firmware fills the entire BIOS chip. If you have enough space, you can add the NVME modules and get NVME support (see “Additional Reading” below if you have issues with running out of space in the BIOS). Right click the last DXE driver and click “insert after”, then add the first .ffs file you extracted from the new motherboard. Rinse and repeat for the other modules (2 in my case). It may be important to insert them in the same order you found them in the newer motherboard BIOS, so use the same order just in case. You should see 1 line added with Action “Insert” below the last DXE driver, like so:

Once all the modules are inserted, go to File -> Save Image and select the filename. Note that this option should say “Save Image As” because it won’t overwrite the original like “Save” normally would. I used an underscore in the modified BIOS filename and was unable to flash it in the UEFI Setup menu (MFlash for MSI), so I suggest changing as little as possible about the filename. I flashed a modified BIOS with the original filename, so if you’re having issues try using the same filename. MD5sums for the original and modified Z77 MPower BIOS are as follows:
9e4c8c453b1fb93a3070a7f8a933ff53 E7751IMS.HC0
d4c686b5e5e7a4996f8081952a142b7a E7751IMSnvme.HC0
The filesizes (neglecting compression) should be identical. At this point, the modified image you saved should have NVME support. Flash it to the motherboard however you like, I suggest using the UEFI setup menu as I’ve had issues with Windows-based tools for BIOS flashing in general. Again, you should have a backup plan in case the motherboard won’t POST after flashing. If you have a dual-bios motherboard, know what steps you need to take to switch and repair the bricked BIOS.
After doing all this, I didn’t see the NVME drive as a bootable legacy (non-UEFI) device, however I was able to install Windows and Linux directly to it, then it would show up as a UEFI HDD. I suggest doing a test OS install on the NVME drive after the BIOS mod with no USB or SATA devices plugged in besides what you need to install the OS to verify the NVME booting is working.
One quirk I noticed on my modified Z77 MPower is that when Intel SATA RAID is enabled, the NVME boot entries won’t show up in the BIOS. However, disabling Intel SATA RAID, saving and rebooting made the NVME boot entires show up. Once they show up I could re-enable Intel SATA RAID and boot from both NVME and SATA RAID devices like normal.
I also had with fast boot settings preventing booting some OS’ using GRUB. If you’re having issues, disable fast boot.
Hopefully this helps.
Additional Reading/Sources:
https://www.overclock.net/forum/6-intel-motherboards/1571271-tutorial-how-add-nvme-support-any-ami-uefi-bios-intel-chipset.html
https://www.win-raid.com/t871f50-Guide-How-to-get-full-NVMe-support-for-all-Systems-with-an-AMI-UEFI-BIOS.html
https://www.win-raid.com/t871f50-Guide-How-to-get-full-NVMe-support-for-all-Systems-with-an-AMI-UEFI-BIOS-107.html
^Look here if you don’t have enough room to fit the NVME modules