Hey all, I need help modifying the HP Z420 motherboards bios file, to support Xeon E5 V2 CPU’s. There’s a bit of information on this online, but me being a complete noobie is making it hard to do.
What I need to do: “replace boot block contents (FF0000-FFFFFF) with that from newer bios revision and write that onto one of your new bios chips” (according to user MtothaJ).
I have 0 idea what programs can open this file and actually allow me to edit it, and also, what to edit. Any help with this would be great. Thank you
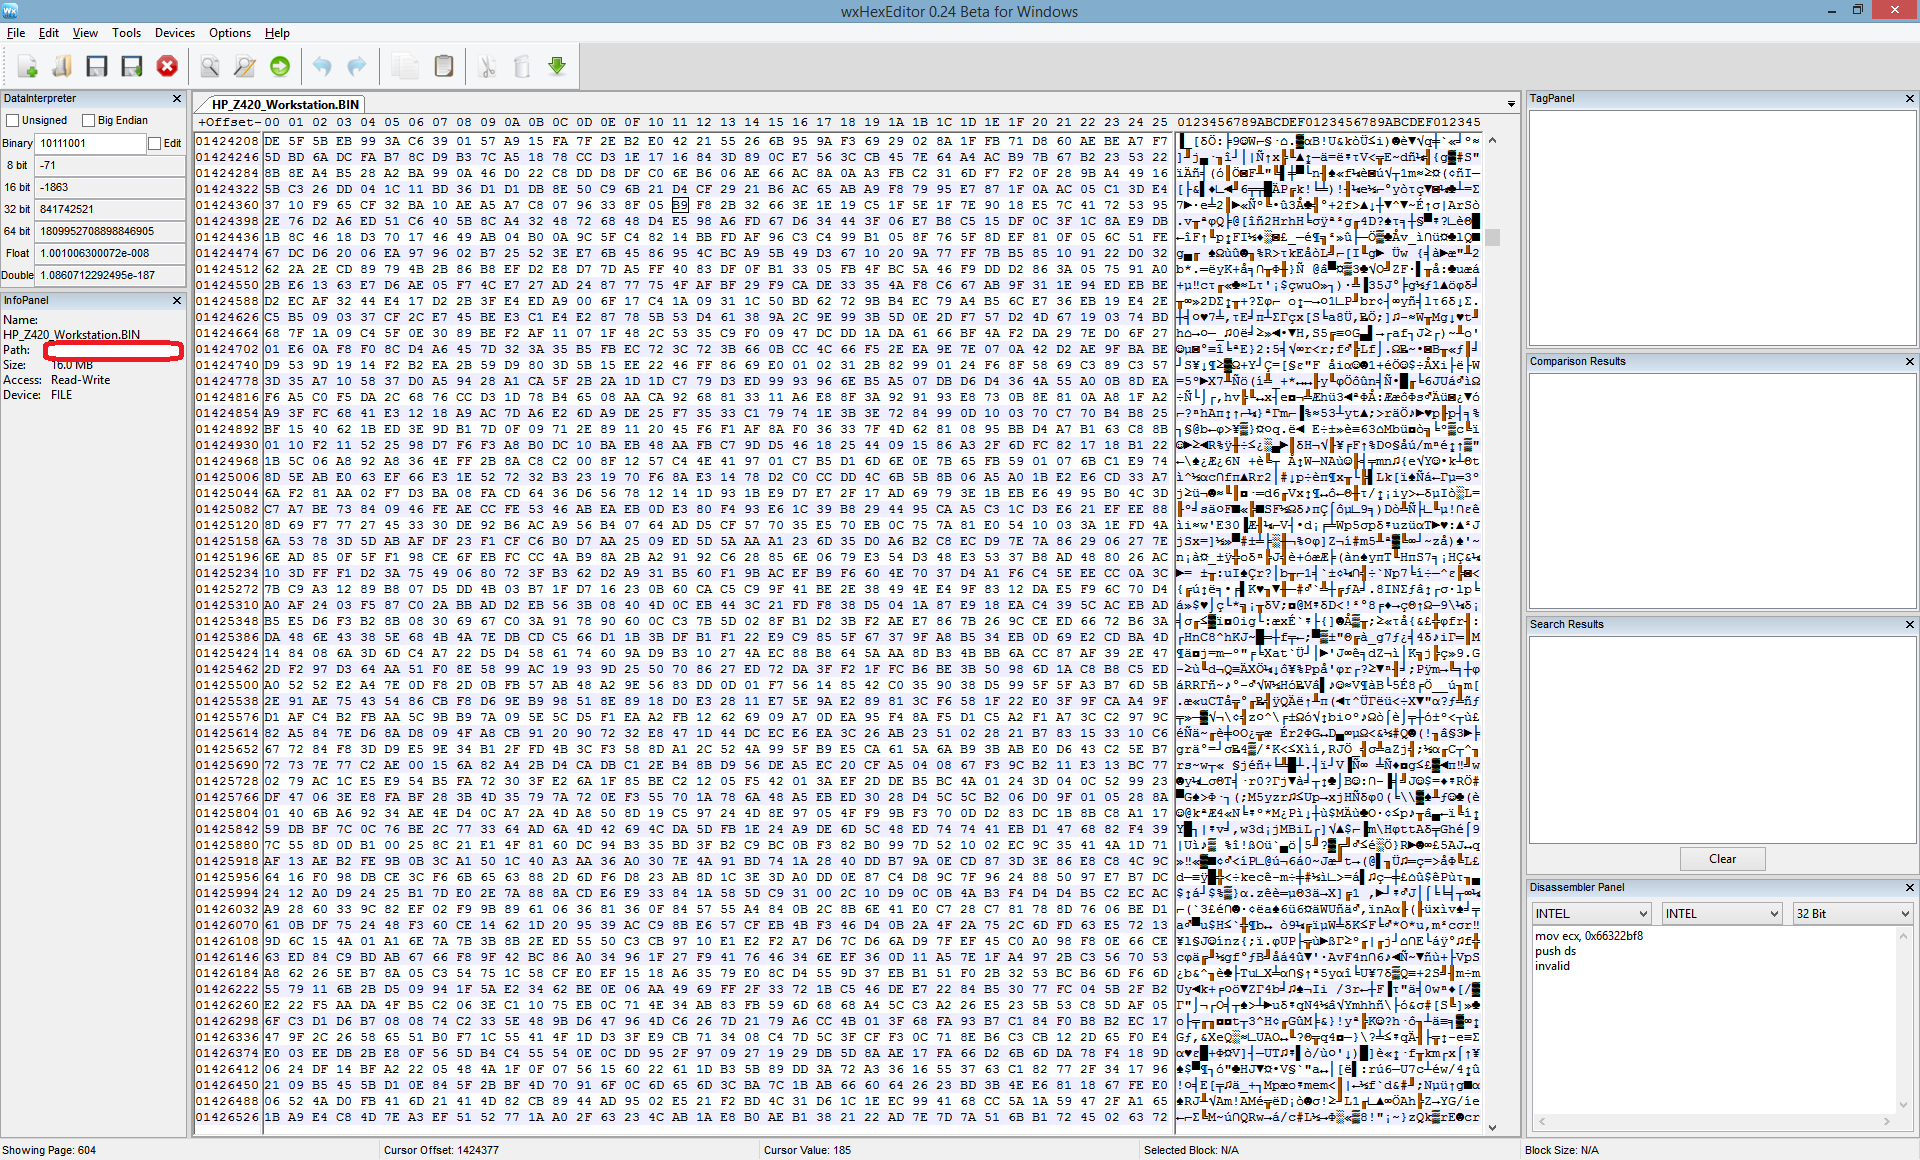
So I just installed wxHexEditor , and it seems to open the file mostly fine, however, the data under the “012345679ABCDEF012” column seems to be off? Not sure if it’s suppose to look the way it does. I was expecting that far right column to be in plain text, and one of them mention the “boot block”
So I can’t use the .bin files that I linked to create a modded bios supporting the E5 V2 CPU’s? I would have thought the .bin files would be identical and contain the exact same information as the actual bios chip (once the .bin has been flashed to the IC)?
Does that also mean I will need a motherboard supporting the E5 V2 CPU’s to do this?
I’ve been looking at this a lot recently. For HP Z420, Z620, and Z820, it’s entirely possible, people have done it. The only difference between Zx20 version 1 (sandy bridge Xeons only) and Zx20 version 2 (sandy or ivy bridge Xeons) seems to be the boot block version: 2011 or 2013. HP haven’t absolutely confirmed this but I couldn’t find any actual differences between the boards discussed, only how exactly similar they are. Same goes for the Z620’s second CPU riser.
I can’t link it, but look up “HP z820-e5-2600-v2-ivy-bridge-upgrade” and read through it, especially pages 5 to 10 . A couple of people there successfully flashed their BIOSes.
There are three overall options.
Disable the 0xFF0000 to 0xFFFFFF boot block write protection using the jumper on the motherboard and flash in Linux or Windows using a tool like flashrom or FPT. You get one shot to do this right, as a failed flash will probably result in a soft-bricked motherboard! You would then need to do 2) or 3) to recover.
Use a SOIC16 clip and a programmer like CH341a, BusPirate, or a Raspberry Pi. Use flashrom to flash the 2013 boot block after updating the normal way to a suitable E5 v2-supporting BIOS version. Similar to what people do to flash libreboot onto laptops like Thinkpad T60 / X60. You will need to supply 3.3v to the flash chip, from what I’m reading the RPi3 and other devices can’t keep up with the passive drain of the powered off motherboard and so external 3.3v power might be needed.
2b) Desolder the BIOS SPI flash and then clip onto it - easier to get a good clip and avoids the 3.3v drain of the motherboard
Desolder the BIOS SPI flash and solder in a new one from ebay. Allows one to avoid the flashing stage and might be easier for the more hardware inclined.
Before doing any of these, read up on how flashing BIOS chips works in general. The specific SPI flash chip you have matters and its worth looking at the datasheet of the chip and how SPI wiring works.
Disconnect everything from the motherboard before doing option 2) or 3). Possibly even the CMOS battery too, just to be cautious.
Flashing just the boot block is imporant because it seems there may be system-specific information stored on the BIOS flash like MAC addresses. If flashing the entire BIOS file, one would need to hex-edit the MAC addresses and whatever else back in.
Regarding the 3.3v drain of the motherboard, on ThinkPads it appears this can be avoided by disconnecting the 3.3v from the Pi (don’t want competing 3.3v!) and plugging the AC power adapter in. For desktops it appears the only power supplied with the PSU off would be 5v standby (per ATX standard which HP/Dell often ignore). So there probably isn’t a way to get the motherboard to power the SPI chip without booting up. For guaranteed success of powering the flash chip it probably takes either a good 3.3v external supply, desoldering the 3.3v pin, or desoldering the whole chip.
Somewhat related is modding of the BIOS, for example to add M2 NVMe boot support. I don’t think it’s impossible but HP seems to have started using checksumming of sections of the BIOS by the time these workstations came out. Not sure what happens if a checksum fails, perhaps no boot at all.
When I get my Z620 I’ll see if I can get as far as dumping the bios. Don’t think I have the courage to potentially brick it yet by writing anything to the flash chip.
Hope mods don’t shut this down for necro, because your reply is amazing.
Disable the 0xFF0000 to 0xFFFFFF boot block write protection using the jumper on the motherboard and flash in Linux or Windows using a tool like flashrom or FPT. You get one shot to do this right, as a failed flash will probably result in a soft-bricked motherboard! You would then need to do 2) or 3) to recover.
When I was researching how to do this last year, I had no idea that I could flash the ROM this way. This is great to know.
If I go the SOIC16 clip method, I’d avoid this just because my hot air rework station is trash and I’d be afraid of melting the nearby PCIe slot connector.
I’ve thought about this, or even buying a pre-flashed one, but sadly no one on EBay appeared to sell the 2013 boot block version.
Is it possible to flash only certain parts of the IC’s memory, or does the whole IC need to be rewritten to, to make changes to it? How would I solely flash just the boot block? (haven’t looked into this subject since about 1y ago). Also I guess what I last attempted by loading the whole BIN file into that program was the wrong approach?
That would be great to read someones all-in-one guide on how to dump the memory (and maybe even flashing!) as I couldn’t find one (I think, from what I remember).
Me too - although I will just open a new topic later if they do . These workstations have a lot of potential. The Ivy Bridge Xeons go up to 10c/20t and 12c/24t, and there are even some 4GHz turbo 6c12t or 8c16t parts that I imagine will start to get very affordable in the next couple of years.
It seems like some people flash their laptop BIOSes all the time from the OS, so I hope this in-OS, no soldering method turns out to be reliable. Apparently flashing the boot block from the OS, even for OEM bios updates, used to be pretty normal?
I definitely want to avoid any soldering on an $100+ motherboard, but it seems hard to get around. I don’t even have a hot air station, I’d have to do all 16 pins with the iron (or lift the Vcc pin).
I don’t think the BIOS chip is that near the PCIe though. Isn’t it sort of above the middle of the line of SATA connectors? Probably marked “winbond”. That said it is a pretty busy part of the board with the SATA, jumpers, and caps.
I’m still not 100% sure which methods allow just 0xFF0000 to 0xFFFFFF to be flashed, but in the end it’s the same result as flashing the entirety of a modified dumped BIOS.
Reading the HP forum it seems like SalSimp put the new boot block into a dumped BIOS and desoldered the original chip to flash with a programmer, while Scoobis used a BusPirate with the 3.3v Vcc pin lifted to directly write to 0xFF0000 - 0xFFFFFF.
I think using a hex editor is the right approach, but you want to dump the BIOS you already have, make a backup, and copy the 2013 boot block from 0xFF0000 - 0xFFFFFF of an update’s BIOS bin to the same region of your dumped BIOS. Then flash using one of the methods.
It’s definitely still at the level of “legends in the forums once told of a way…”. Once we get past the HP-specific stuff it should be the same as flashing any GPU / motherboard / router, and guides for those situations should be relevant. I’ll try to make a video by December of what I’ve found so far and dumping the BIOS (not much time for weekend long projects while im at university).
In all the situations it seems like I’ll be buying a SOIC16 clip and perhaps some practice/spare SPI chips.
Another thing to note about Zx20 boot block upgrades is the Intel ME (Management Engine), the Intel corporate PC backdoor management feature. People on the HP forums, for several different products’ Sandy->Ivy boot block uprades, aren’t sure whether you need to make sure to update the Intel ME firmware from v7 to v8 too or not. From what I read Ivy Bridge is meant to ship with ME v8 firmware, but with the ME not in use it really shouldn’t matter anyway.
I’ve been thinking a bit more of how to supply external 3.3v if the SPI chip needs it, and what the easiest low-cost but safe option would be. I get the feeling it probably involves a 5v USB phone charger, or 12v wall wart, because everyone has one of those. That makes the AC->DC part easy, but the X DC -> 3.3v DC is trickier.
Can anyone recommend a good 5v->3.3v or 12v->3.3v converter? The MB102 seems common, but so do reviews saying the MB102 likes to put out 10v on the 3.3v output. Would a cheap stepdown converter or variable voltage board from aliexpress do the job?
Supposedly a raspberry pi 3 can get a good 200-500mA of 3.3v out, hopefully beyond what the motherboard can passively drain away.
To merge the two files, I would try using dd (very carefully) to combine them. A hex editor would be more useful for verifying the file afterwards, before flashing it. I’ve used this approach in the past to split firmware files for emulators. Essentially, just follow this guide:
So the goal here is to extract bytes 0x000000 thru 0xFEFFFF from the old file (16711680 bytes decimal), and extract bytes 0xFF0000 thru 0xFFFFFF from the new file (65536 bytes decimal). Then stick them together (you can use cat for this) and you should get a 16777216-byte file (decimal)—bytes 0x000000 thru 0xFFFFFF. This would be useful if you want to flash the entire chip’s storage; you can just take the section from the new bios if you find a way to do a partial flash.
RE: hex editors, it seems like you haven’t used them much. Apologies in advance if not, this will probably sound pretty pedantic if that’s the case. In a standard hex editor, the left pane is the file represented in hexadecimal. Each digit (0 thru F) represents four bits, so two make up a byte. This is why they’re in pairs. The right pane is an ASCII representation of the file (since each ASCII char is one byte). It’s good for spotting string literals and stuff, but not really for making edits or reading numerical data. The left margin has the address, or offset, of the first byte in each row, so you know where you are in the file. Each column is numbered as well, and in hex no less—you might notice that the two panes have the same number of columns. This keeps them synced up. I like to size my window so that the number of columns is an exact multiple of sixteen (0xF), it keeps the offsets tidy.
I unfortunately don’t have any recommendations for 3V3 supplies. A lab bench supply would be ideal, but impractical unless you already own one. However, since a soft-brick can be fixed by methods 2 or 3, I would try the software approach first, hopefully sidestepping the entire issue. If it fails, the direct methods are no less viable, right?
Good luck. This is a really cool project.
P.S. I just noticed that you seem to be using Windows; if you don’t have a *nix system then my above advice is moot. You can very likely copy-paste the 0xFF0000-thru-0xFFFFFF section using two open hex editor windows, but I would triple-check the file afterwards (length, diff against sources, etc) to makes sure it worked, since there are fewer in-between steps to individually check on.
I personally have a whole bunch of old PSU’s with dead 12V rails but the 3.3v and 5v rails are still working, so I was thinking that I could just disconnect whatever rails weren’t needed (snipping the wires or pulling them out of the connector), and shorting PS_ON to Ground to get the PSU to manually turn on. I personally wouldn’t go the buck converter route because they often have a high amount of noise.
You’re right about me not being experienced in this subject! No apologies needed!
Just as my primary O.S for my devices, but I do have a bit of experience on CentOS and Debian.
So the goal here is to extract bytes 0x000000 thru 0xFEFFFF from the old file (16711680 bytes decimal), and extract bytes 0xFF0000 thru 0xFFFFFF from the new file (65536 bytes decimal).
Where would I get said “old” and “new” files? I guess it’s not as simple as editing the .bin and replacing like 1-2 lines?
If I provided the .bin (which would be the one from HP’s website), would that be of any use?
I looked into this a bit but I couldn’t find a good answer as to how safe it is to leave an ATX PSU turned on with no significant load (eg on the 5V or 12V rail). It would be really convenient if we could use the PSU the computer already has or an external ATX PSU.
To simplify things I’ll define 4 BIOSes. I’m assuming the motherboard is still at a relatively old BIOS revision.
backup.bin: The BIOS you dump before doing anything at all, just to be safe. (Not strictly required, but from my 3DS hacking days I know it never hurts to take a backup of your unique firmware)
update.bin: The BIOS update you download from HP’s website, for example version 3.85 is the last sane version [*1]
dumped.bin: The BIOS you dump from your motherboard after updating to an Ivy Bridge capable version. The BIOS code now knows what to do with Ivy Bridge, it just needs the 2013 boot block.
patched.bin: Take dumped.bin and replace 0xFF0000 to 0xFFFFFF (boot block) with the same range from update.bin. You now have your own BIOS with your MAC addresses and such, but a 2013 boot block. This is the bin file to flash to the SPI chip.
0xFFFFFF is the last byte of the Z420/Z620 BIOS (not sure about Z820), so you could also take the first 0xFF0000 bytes of dumped.bin and append the last 0x00FFFF bytes of update.bin and that would work too. The first 0xFF0000 bytes is the bytes from 0x00000 to 0xFFEFFF, so 0xFFEFFF is the last byte you use from dumped.bin.
So you do want an updated BIOS from HP’s website, first to update to that version, and then to extract the 2013 boot block from it.
0x00FFFF in hex is 65535 decimal. That’s exactly 64 kibibytes, or 65.536 kilobytes. If that was space for ASCII text, you could probably fit a few chapters of a book in there.
[*1] The latest revision is 3.95, but everything above 3.9 is basically only performance-reducing Spectre/Meltdown fixes. Furthermore, 3.88 has a very trouble message: Adds a mechanism to detect unsupported combinations of processor and Management Engine firmware. In such cases, system will display an error message and fail to boot. • Adds a mechanism to detect unsupported combinations of processor and Management Engine firmware. In such cases, system will display an error message and fail to boot. [*2]
So in 3.88 HP seems to have added a check for ME v7 and an Ivy Bridge CPU, like what we’re trying to do, and will refuse to let the system boot. Not good, so we want to stick to versions before 3.88.
Not having the BIOS security patches is not ideal, but I don’t think the threats involved apply that much to home use cases.
Version 3.05 is when they added the 2013 boot block, so that’s the minimum. From then to 3.69 there’s a ton of various bug fixes. Version 3.8 has a note that “prior BIOS versions cannot be installed onto the system.”, as does 3.84. Basically, any BIOS version after 3.85 is potentially going to block Ivy Bridge CPUs and will also definitely reduce down performance.
I’m not sure if the “This BIOS verison cannot be downgraded” messages apply to us if we directly flash back to an old version, but we probably need to be careful about it.
[*2] Yes, HP really put the same note twice in their website’s Z420/Z620 patch notes. Perhaps an engineer wanted us to notice? There’s also this gem:
• Fixes an issue where system would reboot continually when a PCIe error occurred in PCIe Slot 1. (THIS PCIe Slot 1 FIX ONLY APPLIES TO Z820 AND SHOULD ONLY BE INCLUDED IN Z820 RELEASE NOTES)
I’m in the planning stages of a Python program to handle all the gnarly byte moving involved. I think it’s still important to be able to manually inspect the results, though.
Wow. Thank you 1000 times over for everything. Your responses have been so damn in depth and explain pretty much everything so clearly.
I think I last updated the bios around July 2018, so hopefully I wasn’t stupid and flashed the ROM which prevented changes to the boot block… Hopefully later this week I can find out, but now I’m a bit worried I may have screwed myself with installing the V2 CPU…
Thank you so much @hashcollision & @MrFigs . I’ll try to respond back later this week (have a shit ton of school work, and actually haven’t touch the Z420 system in months) with what version of the bios I have.
No worries. Writing this out is for my own good too, lest I forgot to take a backup or that the Vcc is 3.3v.
It should be possible to flash back to an old version (eg 3.84) - we would need to extract your MAC and SAS addresses, and maybe some others, and edit those into a patched.bin too though.
In general should be easy enough to see what the BIOS flashing process leaves alone, and thus what we need to not lose, by comparing the downloaded BIOS bin and a dumped BIOS of the same version. And having a programmer means we should be able to go back to the original working dump at any time.
I don’t think HP can stop us, it’s just a matter of getting everything in order.
The management engine is flashable too, it’s only recently (Coffee Lake) that Intel started preventing downgrade attacks to the ME. I think I’ll take the chance to disable it as much as possible anyway. Still not 100% sure how it works, I guess there’s the ME firmware in the BIOS, which is for the BIOS to talk to the completely seperate, fully functioning computer that is the ME?
My incoming Z620 is on v2.07 according to the seller’s screenshots, so I can get dumps of a few BIOS versions safely.
No rush, I’m going to be waiting for my SOIC16 clip and 3.3v power supply to arrive from China so I’ll probably only be clipping onto my motherboard in late November.
Always check EVERY voltage of these chinese chips to make sure they put out what they’re meant to
If dumping a ROM, do it 3 times and make sure their sha256sums match because sometimes the dump works but there’s incorrect bytes
be gentle with the cheap Chinese tools (be careful to not short out pins, be gentle with the clip because it isn’t well made)
That post also exposed me to a semi rare USB->3.3v board, which can be found by “ams1117 USB”. Hopefully won’t need it and the Pi 3 works fine, but I’m interested in trying multiple methods.


 . These workstations have a lot of potential. The Ivy Bridge Xeons go up to 10c/20t and 12c/24t, and there are even some 4GHz turbo 6c12t or 8c16t parts that I imagine will start to get very affordable in the next couple of years.