This is my first guide post, so please bear with me.
Bulding a Frigate NVR on a BD795i SE with hardware acceleration
I wanted to share my experience with setting up a Frigate NVR server on the Minisforum BD795i SE as the first step in creating an all-in-one home server host. This was quite an experience so I thought I could save someone a lot of effort in tracking down all the solutions that I have been working on the past few days.
The hardware:
- I am using a Minisforum BD791i SE motherboard which is a Ryzen 9 7945HX with a Radeon 610M.
- I installed 96 GB of DDR5 5600 memory
- This board doesn’t have any SATA ports, so I am using an m.2 SATA adapter with an ASMedia ASM1166 controller on it to connect 2x 20TB hard drives for NVR recording storage.
- In the second m.2 storage slot I have a Samsung 970 Pro as my local boot storage.
- Because this will include an NVR and Frigate has great Google Coral support, I have a Coral Dual Edge TPU installed in the E-key m.2 slot where a WiFi chip would normally go.
- An important note here: The E-key slot on this motherboard is only wired with a single x1 PCIe connection, so only 1 of the 2 TPU chips on this card are usable. Because I needed one of the m.2 slots for nvme storage, I did not have room for an m.2 adapter that would provide connectivity for both TPU chips.
- I have an NVIDIA RTX A4000 installed in the PCIe x16 slot for later local home-AI assistant use.
- All of this is installed in a 2U case made by Sliger
The BD795M might provide a better experience, given it’s onboard SATA support, but I’m unsure of it’s PCIe layout, BIOS, etc and some of the steps I took for passthrough may be more or less difficult on that board.
The goals of this exercise are as follows:
- Setup Proxmox on the host and setup a Frigate VM on top of it.
- Passthrough the integrated Radeon GPU to Frigate for encoding/decoding acceleration
- Passthrough the Google Coral TPU for object/motion detection acceleration
Lets start with the BIOS
My hardware was sent with BIOS Version 1.09, and I have not updated it beyond that at this time.
The very first thing we need to do is set up the required BIOS settings.
- Navigate to Advanced > Onboard Devices setting
- Set “Re-Size BAR Support” to
Disabled - Set “Above 4G Decoding” to
Enabled - Set “PCI SR-IOV” to
Enabled
- Set “Re-Size BAR Support” to
- Navigate to Advanced > AMD CBS > NBIO Common Options
- Set “IOMMU” to
Enabled - Navigate deeper to GFX Configuration
- Set “iGPU Configuration” to
UMA_SPECIFIED - Set “UMA Frame buffer Size” to your desired VRAM allocation. I used 2G.
- Do not use “Auto”
- Set “iGPU Configuration” to
- Set “IOMMU” to
- Navigate to Advanced > AMD PBS > Graphics Configurations
- Set “Primary Video Adaptor” to
Int Graphics (IGD) - Set “Special Display Features” to
Disabled
- Set “Primary Video Adaptor” to
- Navigate to Security > Secure Boot
- Set “Secure Boot” to
Disabled
- Set “Secure Boot” to
Save your changes and reboot
Now setup Proxmox
Install Proxmox as you usually would
I installed and developed this guide on Proxmox VE version 8.3.5
I ran the community script to utilize non-subscription repositories:
This is point where you will want to also set up your NVR recording storage. I created a ZFS mirror of my 2x 20TB SATA disks in my case.
IMPORTANT: Now, ensure you have SSH & Web access to Proxmox. This guide cannot be completed using the local console because we will be reassigning the iGPU which will prevent Proxmox from displaying anything on the screen.
And after completing the basic setup, we need to prep Proxmox for PCIe passthrough.
-
First, edit
/etc/default/gruband update the kernel parameters to look like the following:GRUB_CMDLINE_LINUX_DEFAULT="quiet iommu=pt pcie_asmp=off initcall_blacklist=sysfb_init video=efifb:off textonly" -
Now edit
/etc/modulesto look like the following:vfio vfio_iommu_type1 vfio_pci vfio_virqfd kvmgt xengt vfio-mdev
Now we need to blacklist drivers to prevent Proxmox from interacting with the hardware. To start, let’s find our device ids that will need to be provided to these config files.
-
Run
lspci -nnwhich will print a list of all the pci hardware on the server. At the end of each device line is a device id like the following:[1ac1:089a], which we need to record for later. Look for the following devices and record the ids for future use.3a. The Google Coral will look like “Global Unichip Corp. Coral Edge TPU [1ac1:089a]”
3b. The Radeon iGPU will look like “Advanced Micro Devices, Inc. [AMD/ATI] Raphael [1002:164e] (rev d8)”
3c. There is an accompanying HDMI audio device that will look like “Advanced Micro Devices, Inc. [AMD/ATI] Rembrandt Radeon High Definition Audio Controller [1002:1640]”
IMPORTANT: The device ids shown here may not be exactly the same in your case. Please pay attention to anywhere I use a device id in this guide and replace it with your own. I will continue to use my ids as examples.
-
Create a new file at
/etc/modprobe.d/blacklist.confand add the following contents:blacklist nouveau blacklist nvidia blacklist nvidiafb blacklist nvidia_drm blacklist amdgpuNOTE: This will blacklist Proxmox from loading any of these drivers. This means after init, Proxmox will not be able to use the iGPU for local console access. On a physical display it will look like the system is frozen, but this is not the case, it simply has disconnected from the GPU. SSH/Web access is unaffected.
-
Create a new file at
/etc/modprobe.d/blacklist-apex.confand add the following contents:blacklist gasket blacklist apex options vfio-pci ids=1ac1:089aReplace the device id here with the id of your Google Coral device.
Now we need to configure VFIO to passthrough our hardware.
-
Create a new file at
/etc/modprobe.d/vfio.confand add the following contents:options vfio-pci ids=10de:24b0,10de:228b,1002:164e,1002:1640 disable_vga=1 softdep radeon pre: vfio-pci softdep amdgpu pre: vfio-pci softdep snd_hda_intel pre: vfio-pciThe long string of device ids here are the video and audio devices of all connected GPUs. There should be 2 ids per GPU. In my case, I have 4 because I have attached an RTX A4000 to the system, as well as the Radeon iGPU.
-
Run
update-initramfs -u -k all ; update-grubto update the initramfs and grub settings so everything gets applied. -
Reboot Proxmox to load all of the settings we just changed. The console should “freeze” on startup but web and SSH access will come up normally.
-
Verify which driver is being used by Proxmox for the hardware, use
lspci -nnkto list drivers in use. When VFIO is capturing the hardware properly it should look like this:07:00.0 VGA compatible controller [0300]: Advanced Micro Devices, Inc. [AMD/ATI] Raphael [1002:164e] (rev d8) Subsystem: Advanced Micro Devices, Inc. [AMD/ATI] Raphael [1002:164e] Kernel driver in use: vfio-pci Kernel modules: amdgpu
Time to create the guest VM
I will be using Ubuntu 24.04 for the guest, and can’t provide support for other distros since I have not tested their provided drivers.
- In Proxmox create a new VM, and provide your Ubuntu 24.04 .ISO file.
- On the “System” tab set the following options:
2a. Machine:q35
2b. BIOS:OVMF (UEFI)
2c. Add EFI Disk:Checked
2d. EFI storage: Select your local SSD LVM
2e. Pre-Enroll Keys:Unchecked
2f. Qemu Agent:Checked
Everything else can be left default - On the Disks tab I recommend the following settings, though they aren’t required:
3a. Cache:Write through
3b. Discard:Checked
3c. IO thread:Checked
3d. SSD emulation:Checked
3e. Add a second disk from with your NVR recording storage
3e. On your NVR disk set “Backup” toUncheckedto prevent backing up all the recorded media. - On the CPU tab set the “Type” field to
Hostand define your number of cores. I set 4 for my Frigate VM. - On the Memory tab set “Ballooning Device” to
Uncheckedand set your memory capacity. - Set your network settings as appropriate.
- Do not attach any of your PCIe devices yet.
- Boot your VM and setup the OS as usual, including performing a full update.
Build the drivers
Google’s Coral compiled drivers are out of date, so we need to build our own from source. The following commands will build and install the gasket driver required for the Coral TPU to function:
git clone https://github.com/google/gasket-driver.git
sudo apt install devscripts debhelper dh-dkms
cd gasket-driver
mk-build-deps
debuild -us -uc -tc -b
cd ..

sudo apt install dkms

sudo dpkg -i gasket-dkms_1.0-18_all.deb
You may need to replace the version number on the final dpkg command in the future.
Install Docker
Now install docker using the official instructions:
Passthrough the PCIe devices
Now we will get the passthrough completed and prepare to setup frigate.
- Shutdown the Guest VM completely.
- Edit the VM hardware and add your PCIe devices as passthrough hardware. Do this under Hardware > Add > PCI Device
2a. Select “Raw Device” and then select the correct PCIe devices from the list.
2b. Check the “PCI-Express” checkbox for each device you add.
2c. Ensure the “ROM-Bar” option is checked for each device you add. (It should be by default)
2d. Do not select “Primary GPU” on anything, that will break the Proxmox VNC console. - Leave the VM powered off
Obtain the VBIOS
In our case, the guest virtual machine will be unable to load the VBIOS from the iGPU because it is shadowed by Proxmox, meaning it won’t load up and the drivers will fail. To solve this, we have to provide Proxmox with the VBIOS file to present to the VM as a ROM file.
You can extract this VBIOS file yourself from any firmware update provided by Minisforum, using a tool called VBiosFinder to extract it from the “DRFXI.BIN” file provided in the BIOS update package.
The tool can be found here, but requires a Ruby build environment and several dependencies:
If you are using the EXACT same Minisforum board, with the EXACT same Radeon iGPU, I have provided the extracted ROM file for your convenience.
vbios_1002_164e_1.zip (24.5 KB)
I cannot be sure this file is the same in the future, or different revisions of the product. Use at your own risk.
Add the BIOS to Proxmox
Now that we have the VBIOS file we need, let’s add it to Proxmox.
- SCP/SFTP the *.rom file into
/usr/share/kvm/ - Name the file using your device ids for example
vbios_1002_164e_1.romwhere my id was 1002:164e - Edit the file
/etc/pve/nodes/<your_node_name>/qemu-server/<your_vm_id>.conf
Modify the line for the pci device to include the romfile name, such as:
hostpci0: 0000:07:00.0,romfile=vbios_1002_164e_1.rom,pcie=1 - Save the file and boot your guest VM.
Verify the devices are available
If the drivers loaded successfully and everything is working you should be able to see the following:
ls /dev/dri/renderD128should return the same name if the iGPU drivers are working.ls /dev/apex_0should return the same name if the Coral Gasket driver is working.
These two files are what you will use for passthrough into Docker.
Setting up Frigate
Almost done now, all we have left is to setup the Frigate container, pass in the devices and enable hardware acceleration.
-
Create a folder for the Frigate application
mkdir /apps/frigate/
and another for the configuration:mkdir /apps/frigate/config -
Create your Frigate config file
nano /apps/frigate/config/config.ymland give it the following contents:detectors: coral: type: edgetpu device: pci ffmpeg: hwaccel_args: preset-vaapiFill out the rest of configuration as needed, documentation can be found here:
Frigate Configuration | FrigateThe example provided here is NOT a complete configuration file, only the required settings for hardware acceleration.
-
Create your docker compose file:
nano /apps/frigate/docker-compose.ymlusing the following settings:services: frigate: image: ghcr.io/blakeblackshear/frigate:stable restart: unless-stopped stop_grace_period: 30s privileged: true shm_size: "2048mb" # Scale based on your deployment environment: - LIBVA_DRIVER_NAME=radeonsi # Defines the driver for FFMPEG ports: - "8971:8971" # Web UI - "8554:8554" # RTSP - "8555:8555/tcp" # WebRTC over tcp - "8555:8555/udp" # WebRTC over udp volumes: - ./config:/config - ./mnt/nvr:/media/frigate # Point to your NVR disk mount - type: tmpfs target: /tmp/cache tmpfs: size: 1000000000 # 1GB of RAM cache devices: - /dev/dri/renderD128:/dev/dri/renderD128 - /dev/apex_0:/dev/apex_0This is a BARE MINIMUM compose file, you will need to expand on it to be functional. I am not providing my entire compose file because I use Traefik as a reverse proxy, mount additional volumes for TLS/SSL, and have my Frigate NVR attached to a separate VLAN for my cameras.
Verify in Frigate
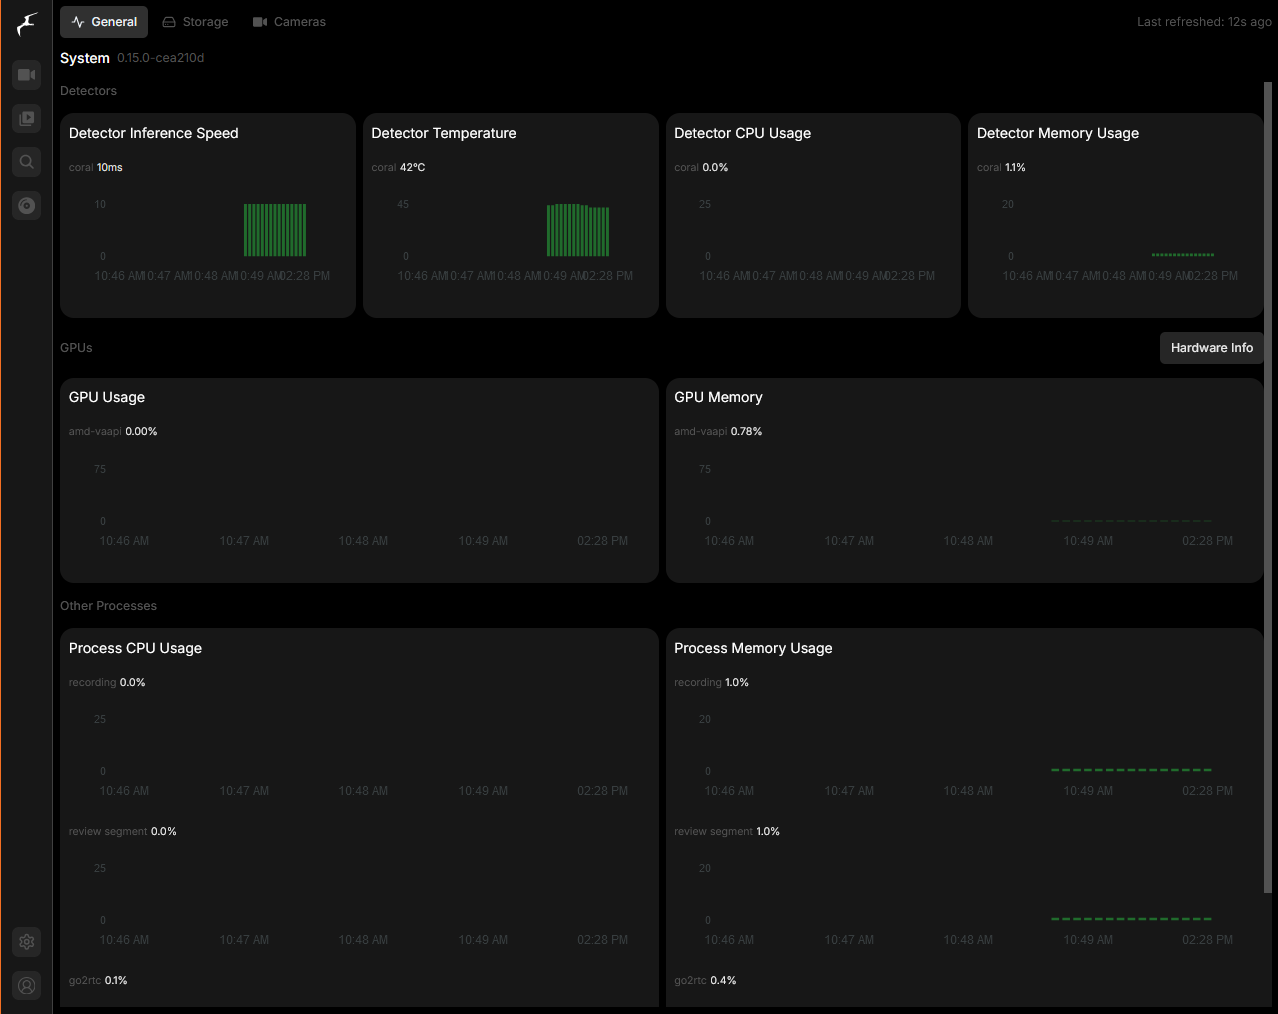
If everything went well, you should have a Frigate instance running with hardware acceleration enabled which you can verify by opening the Frigate Web UI and going to the settings menu > “System Metrics”
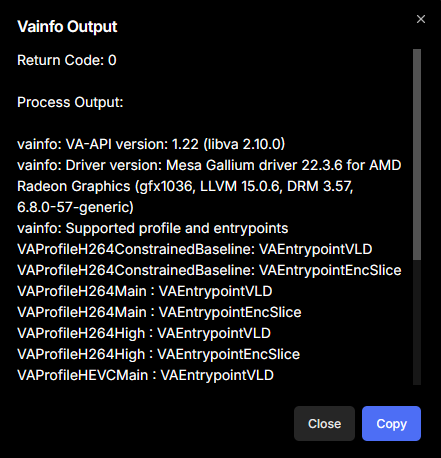
And under “Hardware Info” you should see VA-API returning successfully:
Complete!
I hope this helps someone else, I hit a lot of hurdles due to lacking Minisforum documentation, outdated drivers, conflicting information from various Proxmox users, and a general lack of AMD iGPU passthrough documentation. This has worked consistently for me, however, so I hope it helps you as well.
Troubleshooting tips
If you run into any issues, you might verify if the VM is communicating with the GPU correctly, check dmesg for any errors. A good initialization should look something like this:
amdgpu 0000:01:00.0: amdgpu: Fetched VBIOS from ROM BAR
[    3.987217] amdgpu: ATOM BIOS: 102-RAPHAEL-008
[    3.993237] [drm] VCN(0) decode is enabled in VM mode
[    3.993240] [drm] VCN(0) encode is enabled in VM mode
[    3.995010] [drm] JPEG decode is enabled in VM mode
[    3.995036] amdgpu 0000:01:00.0: amdgpu: Trusted Memory Zone (TMZ) feature disabled as experimental (default)
[    3.995075] [drm] vm size is 262144 GB, 4 levels, block size is 9-bit, fragment size is 9-bit
[    3.995083] amdgpu 0000:01:00.0: amdgpu: VRAM: 2048M 0x000000F400000000 - 0x000000F47FFFFFFF (2048M used)
[    3.995086] amdgpu 0000:01:00.0: amdgpu: GART: 1024M 0x0000000000000000 - 0x000000003FFFFFFF
[    3.995100] [drm] Detected VRAM RAM=2048M, BAR=256M
[    3.995102] [drm] RAM width 64bits LPDDR5
[    3.995182] [drm] amdgpu: 2048M of VRAM memory ready
[    3.995185] [drm] amdgpu: 7977M of GTT memory ready.
[    3.995202] [drm] GART: num cpu pages 262144, num gpu pages 262144
[    3.995327] [drm] PCIE GART of 1024M enabled (table at 0x000000F400200000).
[    4.002103] [drm] Loading DMUB firmware via PSP: version=0x05000F00
[    4.002468] [drm] use_doorbell being set to: [true]
[    4.002482] [drm] Found VCN firmware Version ENC: 1.30 DEC: 3 VEP: 0 Revision: 4
[    4.002487] amdgpu 0000:01:00.0: amdgpu: Will use PSP to load VCN firmware
[    4.024909] [drm] reserve 0xa00000 from 0xf47e000000 for PSP TMR
[    4.088153] amdgpu 0000:01:00.0: amdgpu: RAS: optional ras ta ucode is not available
[    4.094066] amdgpu 0000:01:00.0: amdgpu: RAP: optional rap ta ucode is not available
[    4.094068] amdgpu 0000:01:00.0: amdgpu: SECUREDISPLAY: securedisplay ta ucode is not available
[    4.095564] amdgpu 0000:01:00.0: amdgpu: SMU is initialized successfully!
[    4.095567] [drm] Seamless boot condition check passed
[    4.095773] amdgpu 0000:01:00.0: [drm] Unsupported Connector type:21!
[    4.095776] amdgpu 0000:01:00.0: [drm] Unsupported Connector type:21!
[    4.095777] amdgpu 0000:01:00.0: [drm] Unsupported Connector type:21!
[    4.095778] amdgpu 0000:01:00.0: [drm] Unsupported Connector type:21!
[    4.095780] amdgpu 0000:01:00.0: [drm] Unsupported Connector type:21!
[    4.095798] [drm] Display Core v3.2.266 initialized on DCN 3.1.5
[    4.095799] [drm] DP-HDMI FRL PCON supported
[    4.096528] [drm] DMUB hardware initialized: version=0x05000F00
[    4.097800] [drm] kiq ring mec 2 pipe 1 q 0
[    4.099840] [drm] VCN decode and encode initialized successfully(under DPG Mode).
[    4.099860] [drm] JPEG decode initialized successfully.
[    4.100778] kfd kfd: amdgpu: Allocated 3969056 bytes on gart
[    4.100788] kfd kfd: amdgpu: Total number of KFD nodes to be created: 1
[    4.100926] amdgpu: Virtual CRAT table created for GPU
[    4.101529] amdgpu: Topology: Add dGPU node [0x164e:0x1002]
[    4.101531] kfd kfd: amdgpu: added device 1002:164e
[    4.101540] amdgpu 0000:01:00.0: amdgpu: SE 1, SH per SE 1, CU per SH 2, active_cu_number 2
[    4.101543] amdgpu 0000:01:00.0: amdgpu: ring gfx_0.0.0 uses VM inv eng 0 on hub 0
[    4.101545] amdgpu 0000:01:00.0: amdgpu: ring comp_1.0.0 uses VM inv eng 1 on hub 0
[    4.101546] amdgpu 0000:01:00.0: amdgpu: ring comp_1.1.0 uses VM inv eng 4 on hub 0
[    4.101547] amdgpu 0000:01:00.0: amdgpu: ring comp_1.2.0 uses VM inv eng 5 on hub 0
[    4.101548] amdgpu 0000:01:00.0: amdgpu: ring comp_1.3.0 uses VM inv eng 6 on hub 0
[    4.101549] amdgpu 0000:01:00.0: amdgpu: ring comp_1.0.1 uses VM inv eng 7 on hub 0
[    4.101550] amdgpu 0000:01:00.0: amdgpu: ring comp_1.1.1 uses VM inv eng 8 on hub 0
[    4.101552] amdgpu 0000:01:00.0: amdgpu: ring comp_1.2.1 uses VM inv eng 9 on hub 0
[    4.101553] amdgpu 0000:01:00.0: amdgpu: ring comp_1.3.1 uses VM inv eng 10 on hub 0
[    4.101554] amdgpu 0000:01:00.0: amdgpu: ring kiq_0.2.1.0 uses VM inv eng 11 on hub 0
[    4.101555] amdgpu 0000:01:00.0: amdgpu: ring sdma0 uses VM inv eng 12 on hub 0
[    4.101556] amdgpu 0000:01:00.0: amdgpu: ring vcn_dec_0 uses VM inv eng 0 on hub 8
[    4.101557] amdgpu 0000:01:00.0: amdgpu: ring vcn_enc_0.0 uses VM inv eng 1 on hub 8
[    4.101558] amdgpu 0000:01:00.0: amdgpu: ring vcn_enc_0.1 uses VM inv eng 4 on hub 8
[    4.101560] amdgpu 0000:01:00.0: amdgpu: ring jpeg_dec uses VM inv eng 5 on hub 8
[    4.102595] [drm] Initialized amdgpu 3.57.0 20150101 for 0000:01:00.0 on minor 1
[    4.105266] amdgpu 0000:01:00.0: [drm] Cannot find any crtc or sizes