Elementary OS 5.0 / Ubuntu 18.XX - VFIO PCIe passthrough guide / tutorial

This is essentially edited and a bit extended version of original tutorial, which was written by Wendell for Ubuntu 17.04 and which can be found here:

https://forum.level1techs.com/t/ubuntu-17-04-vfio-pcie-passthrough-kernel-update-4-14-rc1/119639

This guide should work with Ubuntu 18.04 as well


I tried this on Nvidia 970 (host) + Nvidia 450 (vm) setup and in the end ran into a problem of Nvidia 450 not initializing when starting up virtual machine, this was due to it having old BIOS, but when i added Ubuntu installation iso, it managed to initialize display when booting into it.

Update: Later on i did go through this with 970 + 760 and also RX580 + RX570 without any boot/init issues :slight_smile:


Each section of this guide / tutorial will be split into separate post, so its easier to navigate through it.

Note that i am not even close to be as epic with linux as Wendell is, so please, if this guide is missing something, tell me, so others wont run into issues later on

If you’re doing this first time, i suggest reading each step first, ask questions if needed and then try it on your own :slight_smile:

9 Likes

Install UKUU - Ubuntu Kernel Update Utility

sudo apt-add-repository -y ppa:teejee2008/ppa
sudo apt-get update
sudo apt-get install ukuu

Then start it (should be in your list of installed apps). After it fetches updates you will be given nice window showing all available kernels and also the one you’re running. My installation was on 4.15.30.32

so i decided to YOLO it and install the latest one.

If you won’t be able to boot or will have issues with latest one, you can always boot into older kernel version from GRUB screen or downgrade using UKUU

Select kernell you want to install and press “install”. Gray window should pop out:

image

After update is complete, text saying Close window to exit will pop up.

REBOOT


after reboot you can open UKUU to make sure you’re running kernel you selected

Virtualization

  1. make sure you have vt-d/vt-x/svm or “virtualization” enabled (and your CPU supports it) in your BIOS/UEFI. On my setup, it was called SVM (Secure Virtual Machine)

  2. make sure you have IOMMU enabled (and your board supports is) in BIOS/UEFI. On my setup it was under “chipset” tab simply called IOMMU

  3. Install Virt-manager and following packages

sudo apt-get install virt-manager qemu-kvm ovmf

installation may take a while

don’t try to run virt-manager directly after install, it will most probably end up throwing error at you.

reboot

After you rebooted, open virt manager (should be in list of your installed apps). It should start without any error giving you nice tiny window.

If you encounter some errors, just google your way out of it, may be missing some packages or having wrong user rights

(excuse czech language on the screen :D)

you can close it again now, or if you’re bored, you can try running a VM to see if it works without GPU passed to it.

Enable IOMMU in GRUB

Most Linux distros do not enable IOMMU by default.
You will need to update your grub bootloader config to support IOMMU.

sudo nano /etc/default/grub

and add following to the GRUB_CMDLINE_LINUX_DEFAULT line:

A) for Intel CPU:

iommu=pt iommu=1 intel_iommu=on

B) for AMD CPU:

iommu=pt iommu=1 amd_iommu=on

so it looks like this: (in my case, i put amd_iommu, cuz i am on AMD platform)

GRUB_CMDLINE_LINUX_DEFAULT="quiet splash iommu=pt iommu=1 amd_iommu=on"

result:

save file (ctrl + x, y, ENTER) and run:

update-grub

REBOOT


If your GPUs are in the same IOMMU group after you have completed this section of a guide, continue here: https://forum.level1techs.com/t/elementary-os-5-0-beta-vfio-pcie-passthrough-guide-tutorial/131420/17 , then proceed with next section (“Check if IOMMU is working”)

Check if IOMMU is working

it is a good idea to check to see that IOMMU grouping is working properly. This script from Wendell will help you:

cd ~
nano iommu-check.sh

and copy following:

#!/bin/bash
for d in /sys/kernel/iommu_groups/*/devices/*; do
  n=${d#*/iommu_groups/*}; n=${n%%/*}
  printf 'IOMMU Group %s ' "$n"
  lspci -nns "${d##*/}"
done

save and exit.

then run:

sh iommu-check.sh

If all is good you should see something like this:

Now you need to find your 2 GPUs (including their audio interfaces). In my case:

Nvidia 970 is in Group 14:

IOMMU Group 14 07:00.0 VGA compatible controller [0300]: NVIDIA Corporation GM204 [GeForce GTX 970] [10de:13c2] (rev a1)
IOMMU Group 14 07:00.1 Audio device [0403]: NVIDIA Corporation GM204 High Definition Audio Controller [10de:0fbb] (rev a1)

Nvidia 450 is in Group 15:

IOMMU Group 15 08:00.0 VGA compatible controller [0300]: NVIDIA Corporation GF106 [GeForce GTS 450] [10de:0dc4] (rev a1)
IOMMU Group 15 08:00.1 Audio device [0403]: NVIDIA Corporation GF106 High Definition Audio Controller [10de:0be9] (rev a1)

Possible edge case scenarios:

A) GPUs are sharing same group, or IOMMU is not working, follor this guide:

https://forum.level1techs.com/t/elementary-os-5-0-beta-vfio-pcie-passthrough-guide-tutorial/131420/17


B) cards with identical IDs (for example, my RX580 and 570 have same ID).

SKIP NEXT STEP OF THIS GUIDE

you wont be assigning any IDs, because they are same. Instead follow guide at link bellow and after its done, one of your cards will have vfio-pcie driver assigned to it.

Also, you will probably need to enable SECURE BOOT, if you cant get it to boot afterwards and get MODSIGN: Couldn't get UEFI db list error

https://forum.level1techs.com/t/vfio-in-2019-pop-os-how-to-general-guide-though-draft/142287

^^ after you complete it, you can continue here https://forum.level1techs.com/t/elementary-os-5-0-ubuntu-18-xx-vfio-pcie-passthrough-guide-tutorial/131420/7

** FOLLOW THIS STEP ONLY OF YOUR GPUs HAVE DIFFERENT PCI IDs **

otherwise use workaround from this guide: https://forum.level1techs.com/t/vfio-in-2019-pop-os-how-to-general-guide-though-draft/142287


Assigning VFIO driver to a GPU

We are ready to setup our devices to be used inside a virtual machine.

To do this, we must bind the vfio-pci driver to the device(s) we want to pass through to the virtual machine, and this is most easily done by PCI device ID.

In my case PCI device IDs of my Nvidia 450 and its audio interface are:

[10de:0dc4] and [10de:0be9]

To get around system using its own Nvidia (or AMD) driver. Wendell wrote us yet again nice tiny guide.

But first, you have to check, which driver is used for your GPU:

run:

lspci -nnv |less

and finda GPU you want to pass in the list:

Notice the Kernel driver in use is nvidia. Thats what you have to use while editing following config file

sudo nano /etc/initramfs-tools/modules

and add following lines at the end of file.

Replace nvidia on first and last line, if your kernel driver in use is different. Replace your PCI IDs with the GPU and its audio interface you want to use for virtual machine. Example:

softdep nvidia pre: vfio vfio_pci

vfio
vfio_iommu_type1
vfio_virqfd
options vfio_pci ids=10de:0dc4,10de:0be9
vfio_pci ids=10de:0dc4,10de:0be9
vfio_pci
nvidia

save and exit.

Now edit:

sudo nano /etc/modules

and add following and don’t forget to change IDs again

vfio
vfio_iommu_type1
vfio_pci ids=10de:0dc4,10de:0be9

save and exit


We will also create explicit configurations for the modules in /etc/modprobe.d

A) for AMD GPU:

sudo nano /etc/modprobe.d/amdgpu.conf 

and add following:

softdep amdgpu pre: vfio vfio_pci

B) for NVIDIA GPU

sudo nano /etc/modprobe.d/nvidiagpu.conf 

and add following:

softdep nvidia pre: vfio vfio_pci

even more configs to edit!

sudo nano /etc/modprobe.d/vfio_pci.conf

and add following: REPLACE IDS, AGAIN

options vfio_pci ids=10de:0dc4,10de:0be9

then run:

sudo grub-mkconfig; sudo update-grub; sudo update-initramfs -k all -c

REBOOT AND PRAY

image

1 Like

after reboot run:

lspci -nnv |less

and look for GPU you want to pass to a VM.

If all went well, it should be using vfio-pci driver now and it shouldn’t even be seen by Nvidia control panel in my case

image

And Nvidia control panel is showing only host GPU:

Configuring AppArmor

Before we setup our virtual machine, we need to deal with AppArmor first. App Armor, in a nutshell, prevents programs from doing suspicious things.

sudo nano /etc/apparmor.d/abstractions/libvirt-qemu

find following lines (by pressing CTRL + W and typing usb access) and edit them like so:

# for usb access
/dev/bus/usb/** rw,
/etc/udev/udev.conf r,
/sys/bus/ r,
/sys/class/ r,
/run/udev/data/* rw,

Note that if you intend to pass through a “real” block device to QEMU/libvirt, you will also need to open up things a bit more, adding lines such as:

/dev/sda rw,

If, for example, you intend to use /dev/sda as a passthrough block device with your virtual machine. If you are using a qcow2 or image file, you don’t need to do this.

save and exit


restart AppArmor with:

sudo service apparmor restart

any issues with AppArmor can be found in /var/log or run dmesg and watch for errors related to virtualization

If you find AppArmor is still causing problems, you can remove it entirely (not recommended):

service apparmor stop
service apparmor teardown
update-rc.d -f apparmor remove
apt remove apparmor

Setting up VM

Start Virtual Machine Manager and create new VM file -> new virtual machine

Select your installation method - most probably from local media.
Continue and select .ISO file you want to install from.

Windows 10 ISO can be downloaded here:

https://www.microsoft.com/software-download/windows10


On next screen you can assign CPU threads and amount of RAM your VM will be given.


Next you will be asked for maximum storage size of your VM


Now you’re on last screen make sure to check customize configuration before install

continue, config window will pop up


First, on Overview tab, we need to change Firmware to UEFI: dont forget to click Apply

image


Remove Display Spice device
Remove Video QXL device
Remove Channel Spice


Now click add hardware at the bottom.

Window will pop up.

Select PCI Host Device and add your GPU.
Repeat this step to add you’r GPUs AUDIO interface as well

image

They should be both in your list like so:

Make sure you have monitor plugged in into your passed GPU

Click Begin installation on top and pray it f*cking works

As mentioned above, i did this guide with old Nvidia 450, which turned out not to be ideal, becouse it would initialize only when booting into Ubuntu live CD, not on VM power up, which meant i couldn’t install Windows on it

Code 43 fix (Nvidia cards)

You may need to edit your VM config manually, using virsh, if you have trouble with Nvidia being ass or for other specific changes.

run:

sudo virsh

then type

edit win10

replace win10 with your VM name. If you installed Windows 10 and did not edit its name, it should be that*

you will be asked what editor you want to use, suggest selecting nano. Vim for hardcore oldschool dudes.

Nice long config will fill your screen.

find hyperv section and add following:

<vendor_id state='on' value='fknvidia'/>

and add new section under features

<kvm>
  <hidden state='on'/>
</kvm>

so it all looks like this:

image

this should get your around Nvidia code 43

If your windows installation BSODs (well, reboots), try changing CPU topology from host-passthrough to lets say… EPYC (depends on your cpu model)

1 Like

hopefully this covers it all, feedback welcome.

Yet again, keep in mind, i am not some linux wizard like some of you may be :smiley:

4 Likes

so what do i do when i got 2*GeForce 660 and both got the same PCI IDs?

i dont think its possible to have 2 same gpus for passthrough, for this exact reason

Update: It is possible, guide to 2 gpus with same IDs below

Not sure if anyone else has had an issue with the CPU allocation to the VM but just in case, the CPU Topology may need to be set manually in Virt-manager.
Up until recently, I have been used to having a limited number of cores on my i7-4790K+Vega64 Windows gaming VM I didn’t think much of the VM’s performance.

Now I’m running GPU passthrough on an Intel - Xeon E5-2683 V3 2 GHz 14-Core CPU workstation, the Virt-Manager default CPU Topology had a very noticeable performance impact. I found that when I passed the VM 12 of the 28 threads expecting to see 12CPUs on the VM, it registered 12 sockets and 2 CPUs at 2GHz each. The 2 CPUs would almost always be near 100% usage making the VM very slow.

Once I manually set the topology to
On the Xeon

Sockets = 1
Core = 6
threads = 2

On the i7-4790K

Sockets = 1
Core = 3
threads = 2

The both VMs became much smoother
5708f07a0071e5335597f860f4aee128e2f3b57a_1_646x550 .

3 Likes

If You Have a Vega GPU You Can Work Around the Vega Reset Bug

I did find something with a Vega 64 (ASUS Strix) on redit where someone was able to reset their vega by removing it, then re-scanning, kind of like removing a device in device manager in windows then re-scanning for hardware changes to reinstall the device.

I have not gotten this to work for me yet with my PowerColor RedDevil Vega 64 but others with other brands of Vega have. In my case following these steps I am able to restart the VM but don’t get any video output. I have only tried it the one time and I did this long after I shutdown the VM so it may have been why it didn’t work. It apparently has to be done as soon as you shut down the VM rebooting the VM won’t work.

These are the steps the person took on Ubuntu 18.04 (Kernel: 4.15.0-38-generic) so exact same as elementaryOS

Shut down the VM

In a terminal window, Remove/Power off the Vega GPU
echo "1" | sudo tee -a /sys/bus/pci/devices/0000\:0a\:00.0/remove # <-GPU
echo "1" | sudo tee -a /sys/bus/pci/devices/0000\:0a\:00.1/remove # <-HDMI/DP audio device
where “a” is the device address/ID
e.g
echo "1" | sudo tee -a /sys/bus/pci/devices/0000\:04\:00.0/remove
echo "1" | sudo tee -a /sys/bus/pci/devices/0000\:04\:00.1/remove

Now Suspend Linux to RAM

sudo systemctl suspend

Now log back into Ubuntu/elementary and rescan PCIe devices by entering the following in the terminal

echo “1” | sudo tee -a /sys/bus/pci/rescan

or the following 2 commands if you get a permission denied error message

sudo chmod 777 /sys/bus/pci/rescan
sudo echo 1 > /sys/bus/pci/rescan

Check that the Vega GPU has been reset
lspci -vv | grep vfio -B 12

You should be able to restart the VM next time you want to now.

If the VM does not start because virt-manager can’t locate the GPU you will need to restart Libvirt so the virt manager can see the GPU again

sudo systemctl stop libvirt-bin
sudo systemctl stop libvirt-bin.socket
sudo systemctl start libvirt-bin

The if the GPU has reset the VM will restart. However, like I said, my problem is that I got no video output signal, but his may be because I did ran these steps a least 3 days after I had shutdown the VM. I plan to retry this later today and will post back with the result.

EDIT::
I have tried the commands immediately after shutting down the VM and can confirm that it works on my Vega 64 and you shouldn’t have to restart libvirt-bin.
Thanks to @blackjok3r you should also be able to run this from a shell script

cat /usr/bin/reset_vega.sh

#!/bin/bash
echo “1” | sudo tee -a /sys/bus/pci/devices/0000:0d:00.0/remove
echo “1” | sudo tee -a /sys/bus/pci/devices/0000:0d:00.1/remove
systemctl suspend
read input
echo “1” | sudo tee -a /sys/bus/pci/rescan

If like me this last line doesn’t throws permission or invalid argument errors, you will need to replace the line with

sudo chmod 777 /sys/bus/pci/rescan
sudo echo 1 > /sys/bus/pci/rescan

EDIT:
I deleted the script I uploaded because it only partially works.

1 Like

Manually Compile Linux Kernel with ACS Override Patch Applied

This is an extension to the section on “Enable IOMMU in GRUB

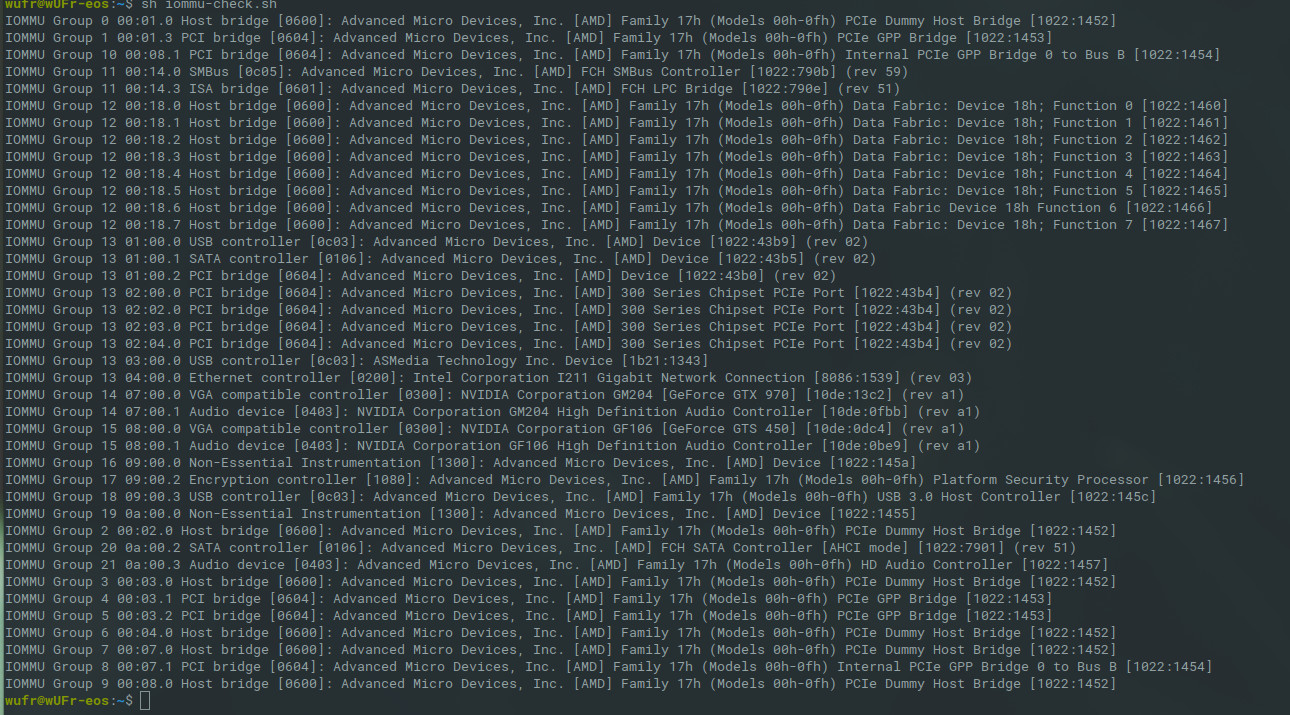
If your GPUs are in the same IOMMU group after you have completed the section of this guide covering how to “Enable IOMMU in GRUB”, then, like me you have an older CPU (in my case an intel i7-4790K) where IOMMU support is hit and miss. Even though your CPU and motherboard support vt-d, the older CPUs can be hit and miss with how assign IOMMU groups are assigned. This situation may have improved from the Haswell refresh or 5th Gen-intel CPUs when DDR4 RAM became hardware requirements. I am not sure if AMD APU/CPUs have this issue, but this solution should work for AMD too.

So, you find that after enabling IOMMU your GPUs are in the same IOMMU group. Not to worry, you can still use GPU passthrough, you will just need to manually compile your kernel from source and apply the ACS patch. This is actually easier than it sounds at first.

To do compile your Linux kernel from source, you will first need to install a number of build dependencies

sudo apt-get install linux-source libqt4-dev build-essential libssl-dev flex bison

Next, download the ACS override patch that best matches the Linux kernel you want to install from:

ACS override patches

https://queuecumber.gitlab.io/linux-acs-override/

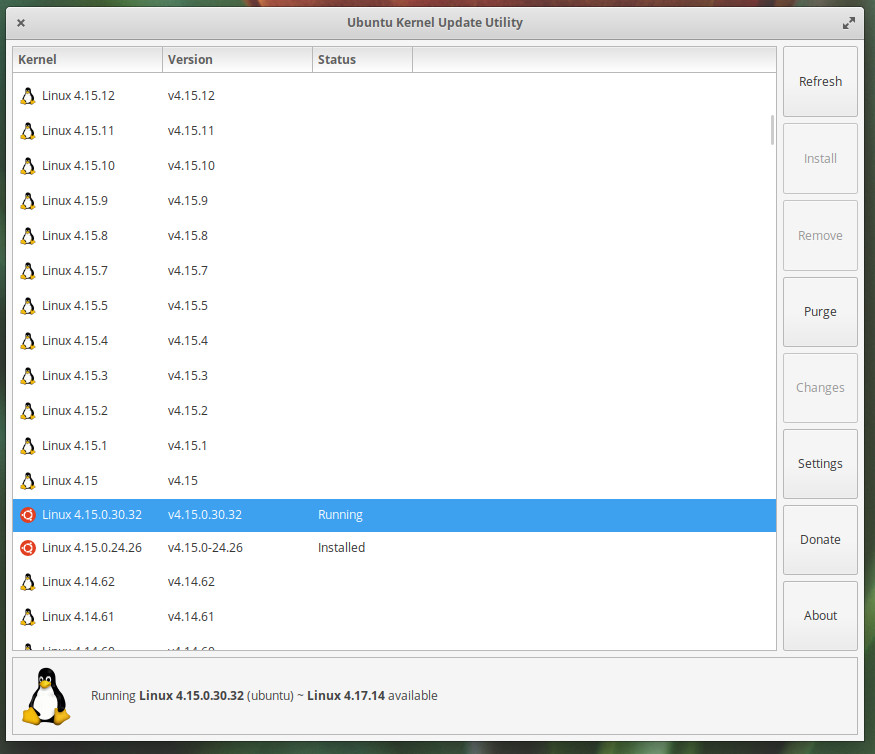
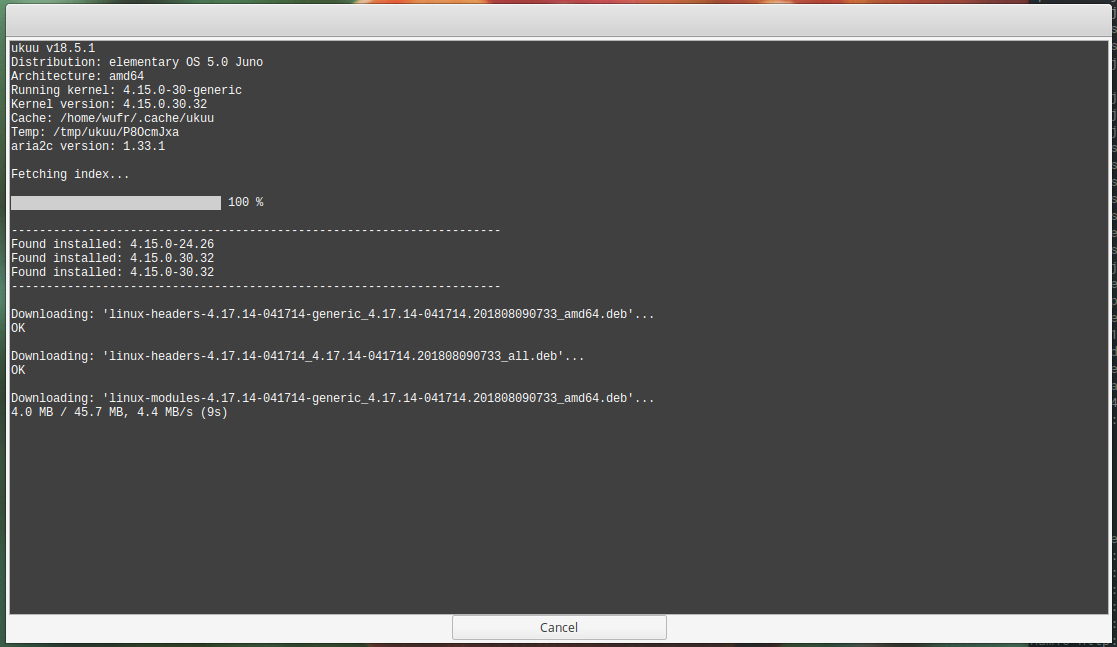
Then download the source files for the latest stable Linux kernels and latest release candidate from

http://www.kernel.org

Older release candidates can be downloaded from

https://git.kernel.org/pub/scm/linux/kernel/git/torvalds/linux.git/

Once downloaded extract the Linux kernel. I have put the commandline commands here but it is much easier to do these using “Files” also included.

For example

tar -xvzf linux-4.20-rc7.tar.gz

Or

Right click on the tarball in your download folder and select extract here

Then go into the extracted folder

cd /linux-4.20-rc7

Or

Right click on the extract folder and select “open in terminal”

Next apply the acs override patch you downloaded earlier by typing in the terminal BUT DON’T hit ENTER /return yet

patch -p1 <

Next drag and drop the acs override patch from the download folder into the terminal. Your final command should look something like this

patch -p1 < ‘/home/USERNAME/Downloads/acso.patch’

Hit ENTER to apply the patch.

Now run

make xconfig

Ctrl+F and search for KVM.

Make sure it is checked.

For some fun search for logo and enable the boot logo uncheck the last two logos (16bit and black and white).

Now search for version and double click to change the version string to -acs-patch. Hit ENTER/return and click save in the top and close the window.

Now to compile your patched kernel: Still in the terminal where you applied the patch, type

make -j4 deb-pkg

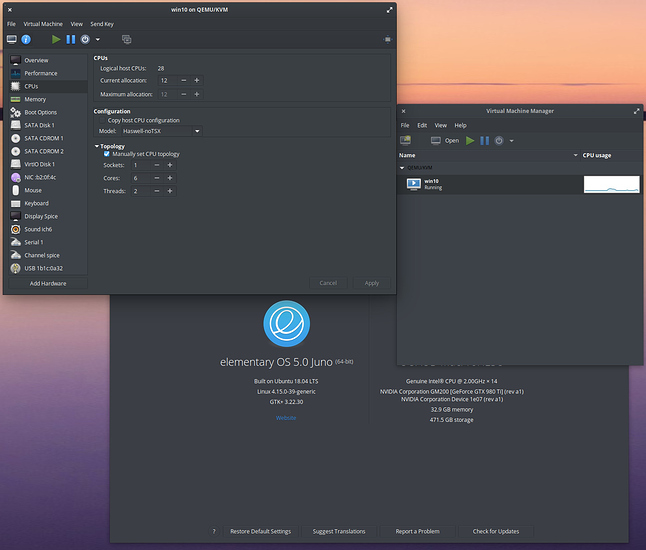
If you have a multi-thread CPU with more than 4-cores you can change the -j4 to -j6 if you have 6-cores. The compile can take anything from 25mins to a couple of hours depending on your CPU’s speed.

If your build stops with an error about SSL keys, edit the config file manually with

nano .config

Ctrl+W to search for CONFIG_SYSTEM_TRUSTED_KEYS and comment out the line, save and try to recompile again.

Once the acs patched kernel has been compiled you will find a number of deb packages in you Downloads folder or the folder one level up from the kernel source folder. You will only need the linux-image and linux-headers.

In the terminal type the following BUT DON’T hit ENTER yet

sudo dpkg -i

Now drag and drop the linux-image and linux-headers deb packages into the terminal.

Your terminal command will look something like this

sudo dpkg -i ‘/home/USERNAME/Downloads/linux-4.20-rc7-acs-patch-linux-image.deb’ ‘/home/USERNAME/Downloads/ linux-4.20-rc7-acs-patch-linux-headers.deb’

Hit ENTER to install the packages.

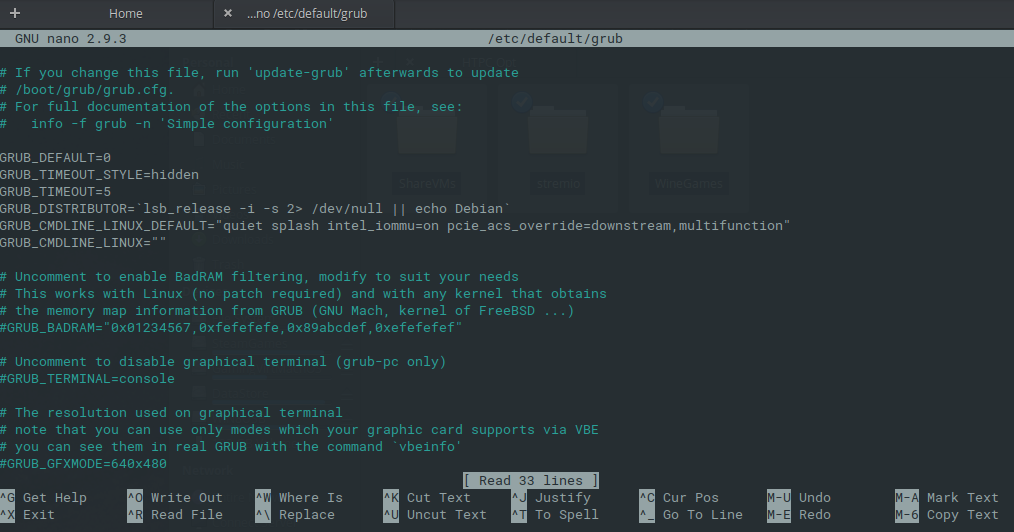
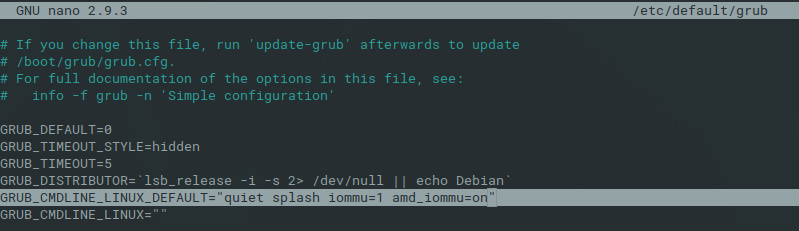
Once the kernel is installed, you will now need to edit the grup to use the acs override. In the terminal type the following

sudo nano /etc/default/grub

and add following to the GRUB_CMDLINE_LINUX_DEFAULT line:

pcie_acs_override=downstream,multifunction

save file (ctrl + x, y, ENTER) and run:

sudo update-grub

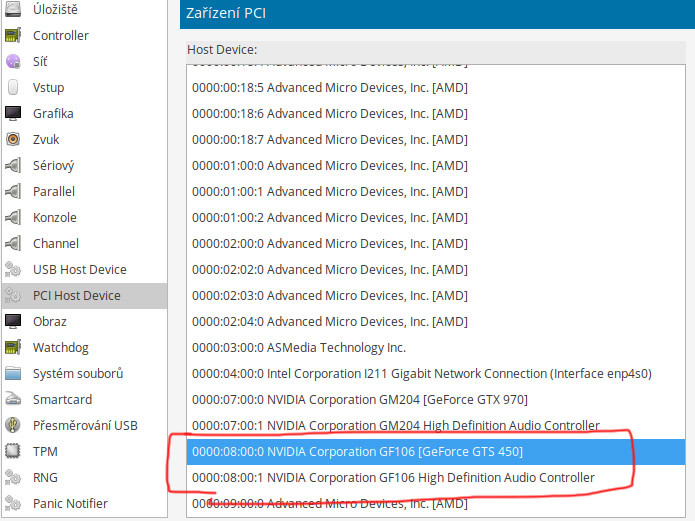
Reboot and confirm you have your devices are in separate IOMMU groups as described in the section of this guide titled “Check if IOMMU is Working

Just as a heads up:

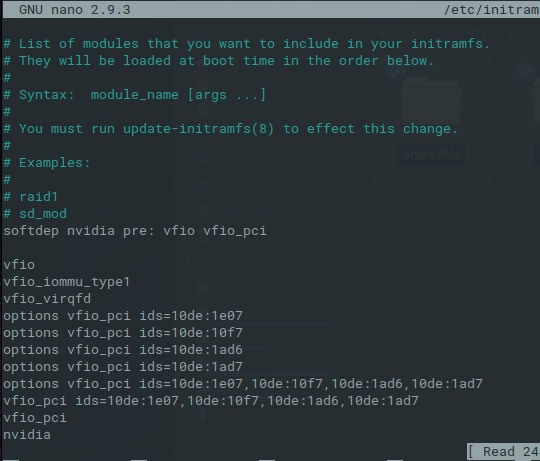
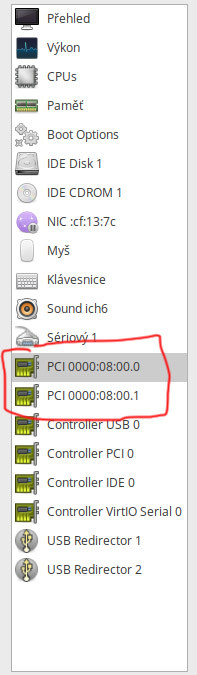
The downstream call enables the asc override, and multifunction call forces all components or functions of a PCI device to be assigned to separate IOMMU. The multifunction call is needed if you are passing an Nvida GPU through to your VM. AMD GPUs tend to separate the VGA, Audio and other components of the GPU into separate IOMMU groups by default but with Nvidia they tend to be bunched together. For Pascal (i.e. GTX 10##) and older Nvidia cards this is not an issue for the VM, however with the Turing (i.e. RTX) GPUs the VGA, Audio, USB-C, and USB controller will all be under the same group if the “multifunction” call is not included in your grub default. As a precaution to prevent issues in or booting the VM, I would assign all 4 functions/device IDs of the RTX cards to the VFIO-PCI driver. The USB controller may still say it is using the xhci_hcd driver but it should pass straight though to the VM as a host PCI device.

47

2 Likes

added link to original tutorial to make it easier for people to navigate through, awesome work

1 Like

Thank you so much for this tutorial. I’ve got Windows installed and running, the Nvidia drivers are working, etc.

I’m wondering what your keyboard and mouse setup is, though. In order to setup Windows, I had to PCI passthrough my mouse and keyboard.

Of course, this doesn’t allow me to easily disconnect the two. There must be a better way, right? Are the normal mouse and keyboard in the devices panel supposed to work after Windows is installed?

You could get a kvm switch that allows you to use the same devices on both Linux and Windows at the flick of a switch.

https://www.amazon.ca/TESmart-HDMI-Ultra-Switch-3840x2160/dp/B07G883R35/ref=sr_1_5?ie=UTF8&qid=1547142226&sr=8-5&keywords=kvm+switch

There are probably good cheaper ones too that may better suite your setup.

In my case, where the VM is just for gaming and monitors have multiple video inputs with a relatively easy way to switch between input sources, it is just easier to have 2 cordless keyboards and mice (one for main use and one really cheap). So the switch seems like overkill.

Isn’t ElementaryOS 5 amazing? I am really in love with this OS. Great guide!

2 Likes