hopefully this covers it all, feedback welcome.
Yet again, keep in mind, i am not some linux wizard like some of you may be 
Yet again, keep in mind, i am not some linux wizard like some of you may be
so what do i do when i got 2*GeForce 660 and both got the same PCI IDs?
i dont think its possible to have 2 same gpus for passthrough, for this exact reason
Update: It is possible, guide to 2 gpus with same IDs below
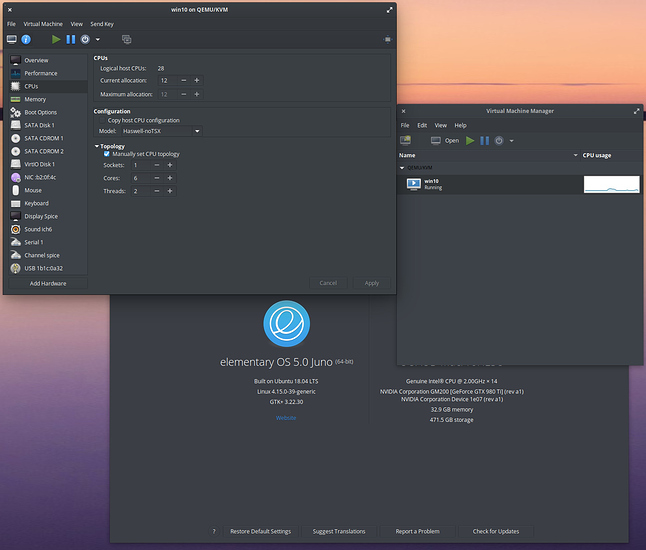
Not sure if anyone else has had an issue with the CPU allocation to the VM but just in case, the CPU Topology may need to be set manually in Virt-manager.
Up until recently, I have been used to having a limited number of cores on my i7-4790K+Vega64 Windows gaming VM I didn’t think much of the VM’s performance.
Now I’m running GPU passthrough on an Intel - Xeon E5-2683 V3 2 GHz 14-Core CPU workstation, the Virt-Manager default CPU Topology had a very noticeable performance impact. I found that when I passed the VM 12 of the 28 threads expecting to see 12CPUs on the VM, it registered 12 sockets and 2 CPUs at 2GHz each. The 2 CPUs would almost always be near 100% usage making the VM very slow.
Once I manually set the topology to
On the Xeon
Sockets = 1
Core = 6
threads = 2
On the i7-4790K
Sockets = 1
Core = 3
threads = 2
The both VMs became much smoother
 .
.
If You Have a Vega GPU You Can Work Around the Vega Reset Bug
I did find something with a Vega 64 (ASUS Strix) on redit where someone was able to reset their vega by removing it, then re-scanning, kind of like removing a device in device manager in windows then re-scanning for hardware changes to reinstall the device.
I have not gotten this to work for me yet with my PowerColor RedDevil Vega 64 but others with other brands of Vega have. In my case following these steps I am able to restart the VM but don’t get any video output. I have only tried it the one time and I did this long after I shutdown the VM so it may have been why it didn’t work. It apparently has to be done as soon as you shut down the VM rebooting the VM won’t work.
These are the steps the person took on Ubuntu 18.04 (Kernel: 4.15.0-38-generic) so exact same as elementaryOS
Shut down the VM
In a terminal window, Remove/Power off the Vega GPU
echo "1" | sudo tee -a /sys/bus/pci/devices/0000\:0a\:00.0/remove # <-GPU
echo "1" | sudo tee -a /sys/bus/pci/devices/0000\:0a\:00.1/remove # <-HDMI/DP audio device
where “a” is the device address/ID
e.g
echo "1" | sudo tee -a /sys/bus/pci/devices/0000\:04\:00.0/remove
echo "1" | sudo tee -a /sys/bus/pci/devices/0000\:04\:00.1/remove
Now Suspend Linux to RAM
sudo systemctl suspend
Now log back into Ubuntu/elementary and rescan PCIe devices by entering the following in the terminal
echo “1” | sudo tee -a /sys/bus/pci/rescan
or the following 2 commands if you get a permission denied error message
sudo chmod 777 /sys/bus/pci/rescan
sudo echo 1 > /sys/bus/pci/rescan
Check that the Vega GPU has been reset
lspci -vv | grep vfio -B 12
You should be able to restart the VM next time you want to now.
If the VM does not start because virt-manager can’t locate the GPU you will need to restart Libvirt so the virt manager can see the GPU again
sudo systemctl stop libvirt-bin
sudo systemctl stop libvirt-bin.socket
sudo systemctl start libvirt-bin
The if the GPU has reset the VM will restart. However, like I said, my problem is that I got no video output signal, but his may be because I did ran these steps a least 3 days after I had shutdown the VM. I plan to retry this later today and will post back with the result.
EDIT::
I have tried the commands immediately after shutting down the VM and can confirm that it works on my Vega 64 and you shouldn’t have to restart libvirt-bin.
Thanks to @blackjok3r you should also be able to run this from a shell script
cat /usr/bin/reset_vega.sh
#!/bin/bash
echo “1” | sudo tee -a /sys/bus/pci/devices/0000:0d:00.0/remove
echo “1” | sudo tee -a /sys/bus/pci/devices/0000:0d:00.1/remove
systemctl suspend
read input
echo “1” | sudo tee -a /sys/bus/pci/rescan
If like me this last line doesn’t throws permission or invalid argument errors, you will need to replace the line with
sudo chmod 777 /sys/bus/pci/rescan
sudo echo 1 > /sys/bus/pci/rescan
EDIT:
I deleted the script I uploaded because it only partially works.
Manually Compile Linux Kernel with ACS Override Patch Applied
This is an extension to the section on “Enable IOMMU in GRUB”
If your GPUs are in the same IOMMU group after you have completed the section of this guide covering how to “Enable IOMMU in GRUB”, then, like me you have an older CPU (in my case an intel i7-4790K) where IOMMU support is hit and miss. Even though your CPU and motherboard support vt-d, the older CPUs can be hit and miss with how assign IOMMU groups are assigned. This situation may have improved from the Haswell refresh or 5th Gen-intel CPUs when DDR4 RAM became hardware requirements. I am not sure if AMD APU/CPUs have this issue, but this solution should work for AMD too.
So, you find that after enabling IOMMU your GPUs are in the same IOMMU group. Not to worry, you can still use GPU passthrough, you will just need to manually compile your kernel from source and apply the ACS patch. This is actually easier than it sounds at first.
To do compile your Linux kernel from source, you will first need to install a number of build dependencies
sudo apt-get install linux-source libqt4-dev build-essential libssl-dev flex bison
Next, download the ACS override patch that best matches the Linux kernel you want to install from:
ACS override patches
Then download the source files for the latest stable Linux kernels and latest release candidate from
Older release candidates can be downloaded from
https://git.kernel.org/pub/scm/linux/kernel/git/torvalds/linux.git/
Once downloaded extract the Linux kernel. I have put the commandline commands here but it is much easier to do these using “Files” also included.
For example
tar -xvzf linux-4.20-rc7.tar.gz
Or
Right click on the tarball in your download folder and select extract here
Then go into the extracted folder
cd /linux-4.20-rc7
Or
Right click on the extract folder and select “open in terminal”
Next apply the acs override patch you downloaded earlier by typing in the terminal BUT DON’T hit ENTER /return yet
patch -p1 <
Next drag and drop the acs override patch from the download folder into the terminal. Your final command should look something like this
patch -p1 < ‘/home/USERNAME/Downloads/acso.patch’
Hit ENTER to apply the patch.
Now run
make xconfig
Ctrl+F and search for KVM.
Make sure it is checked.
For some fun search for logo and enable the boot logo uncheck the last two logos (16bit and black and white).
Now search for version and double click to change the version string to -acs-patch. Hit ENTER/return and click save in the top and close the window.
Now to compile your patched kernel: Still in the terminal where you applied the patch, type
make -j4 deb-pkg
If you have a multi-thread CPU with more than 4-cores you can change the -j4 to -j6 if you have 6-cores. The compile can take anything from 25mins to a couple of hours depending on your CPU’s speed.
If your build stops with an error about SSL keys, edit the config file manually with
nano .config
Ctrl+W to search for CONFIG_SYSTEM_TRUSTED_KEYS and comment out the line, save and try to recompile again.
Once the acs patched kernel has been compiled you will find a number of deb packages in you Downloads folder or the folder one level up from the kernel source folder. You will only need the linux-image and linux-headers.
In the terminal type the following BUT DON’T hit ENTER yet
sudo dpkg -i
Now drag and drop the linux-image and linux-headers deb packages into the terminal.
Your terminal command will look something like this
sudo dpkg -i ‘/home/USERNAME/Downloads/linux-4.20-rc7-acs-patch-linux-image.deb’ ‘/home/USERNAME/Downloads/ linux-4.20-rc7-acs-patch-linux-headers.deb’
Hit ENTER to install the packages.
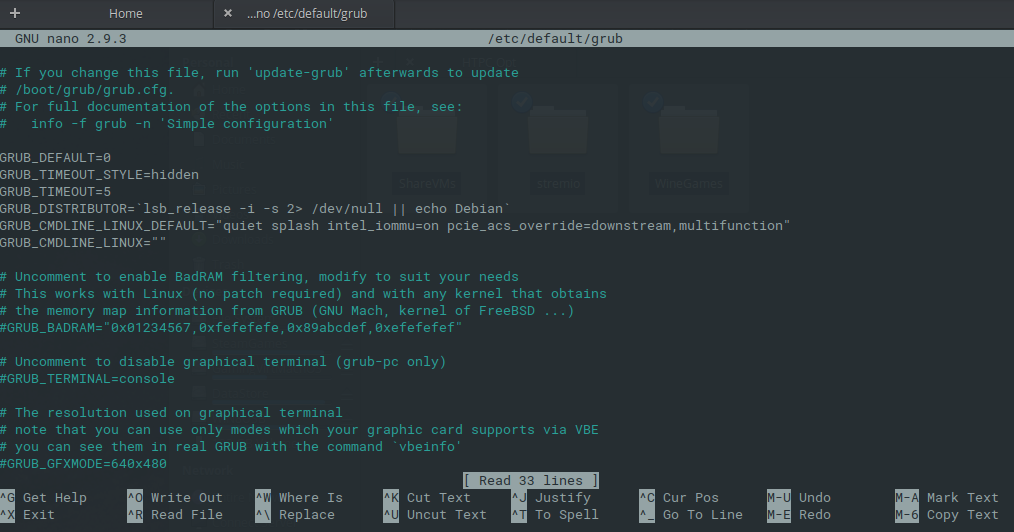
Once the kernel is installed, you will now need to edit the grup to use the acs override. In the terminal type the following
sudo nano /etc/default/grub
and add following to the GRUB_CMDLINE_LINUX_DEFAULT line:
pcie_acs_override=downstream,multifunction
save file (ctrl + x, y, ENTER) and run:
sudo update-grub
Reboot and confirm you have your devices are in separate IOMMU groups as described in the section of this guide titled “Check if IOMMU is Working”
Just as a heads up:
The downstream call enables the asc override, and multifunction call forces all components or functions of a PCI device to be assigned to separate IOMMU. The multifunction call is needed if you are passing an Nvida GPU through to your VM. AMD GPUs tend to separate the VGA, Audio and other components of the GPU into separate IOMMU groups by default but with Nvidia they tend to be bunched together. For Pascal (i.e. GTX 10##) and older Nvidia cards this is not an issue for the VM, however with the Turing (i.e. RTX) GPUs the VGA, Audio, USB-C, and USB controller will all be under the same group if the “multifunction” call is not included in your grub default. As a precaution to prevent issues in or booting the VM, I would assign all 4 functions/device IDs of the RTX cards to the VFIO-PCI driver. The USB controller may still say it is using the xhci_hcd driver but it should pass straight though to the VM as a host PCI device.
added link to original tutorial to make it easier for people to navigate through, awesome work
Thank you so much for this tutorial. I’ve got Windows installed and running, the Nvidia drivers are working, etc.
I’m wondering what your keyboard and mouse setup is, though. In order to setup Windows, I had to PCI passthrough my mouse and keyboard.
Of course, this doesn’t allow me to easily disconnect the two. There must be a better way, right? Are the normal mouse and keyboard in the devices panel supposed to work after Windows is installed?
You could get a kvm switch that allows you to use the same devices on both Linux and Windows at the flick of a switch.
There are probably good cheaper ones too that may better suite your setup.
In my case, where the VM is just for gaming and monitors have multiple video inputs with a relatively easy way to switch between input sources, it is just easier to have 2 cordless keyboards and mice (one for main use and one really cheap). So the switch seems like overkill.
Isn’t ElementaryOS 5 amazing? I am really in love with this OS. Great guide!
to be honest, i had to tweak it a lot. Single click to open folders/files just sucks, changed to typical double-click, then switched to dark theme, added minimize button back into UI and moved all header buttons to the right, but overlay im happy with it 
Used my own tutorial at work while moving to linux, since i need Windows VM to run Photoshop + for testing as well i guess (web dev)
Runs fine, Windows VM has few BSODs, but whats weird that photoshop keeps freezing up from time to time, but that could be related to something else, cuz im loading files from SMB share from my linux host, so windows may be just derping connecting to that
i was thinking about this a lot, first tried just RDP into Windows VM, but quality+performance was poor even connecting to local VM, then had KVM in mind, but that would be too much work to keep switching between host/client all the time. Decided to just buy synergy instead, works fine
but it really depends, if your VM has dedicated monitor, kvm switch/synergy would be fine, if you have fake monitor plug, guess you could try setting up looking glass.
I decided to just dedicate one monitor, since i had one monitor just for photoshop when i was full Windows anyway
@elixir77 I thought about getting a KVM switch but instead I’m using a “soft switch”, essentially just run a script to disconnect / connect the moose and keyboard from the VM. There’s a little bit of delay but at the moment I have to physically swap the monitor connection (another cable is coming soon) between Mobo and GPU so it’s fine.
I can write up a little guide for that if anyone’s interested.
@wUFr yeah I’ve been planning on trying out synergy but it doesn’t support Wayland yet which is unfortunate. Luckily it’s not too difficult to switch back to X for the time being. I’ll probably use synergy when I get my new monitor.
One more thing, wanted to share these guides. Have some useful information for optimization.
also, decided to change title of this thread a bit, since all this should work on Ubuntu 18+ as well and removed “beta” since i managed to set this all up in fully released EOS 5
update on my setup
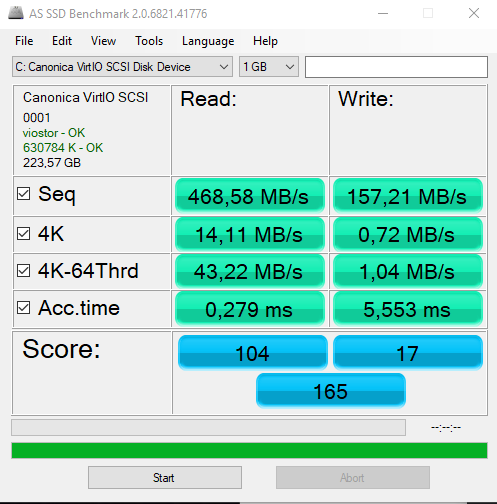
everything works fine, except storage, which i assume is VIRTIO driver issue in Windows 10 VM, sometimes it gets terrible read speeds or even BSODs… to be fair i may f-cked it myself, when i was trying to use memory balooning feature, which seemed broken. It would still use all the ram in host OS and Windows VM ram would still show 16GB with only difference it being almost always full - which i assume was some driver issue… idk
kinda sad, considering hyper-V can do dynamic memory with Windows VM, so im gonna blame VIRTIO drivers 
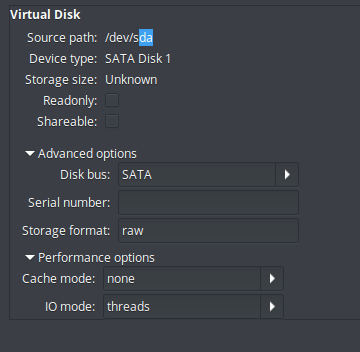
PS: Windows VM drive is dedicated sata SSD
wasnt it because of gpu passthrough you cannot use dynamic memory at the same time? i think it was the same on hyper-v but not sure, cant remember…
virtio drivers are latest?
idk. Drivers should be latest, but i dont even remember, where i pulled them from by now. I think i had to dig them from some redhat site
ok, tried these settings and it seems to work way better now

I followed this guide but only the audio device seems to have the correct kernel driver identified.
06:00.0 VGA compatible controller [0300]: NVIDIA Corporation GP104 [GeForce GTX 1080] [10de:1b80] (rev a1)
(prog-if 00 [VGA controller])
Subsystem: eVga.com. Corp. GP104 [GeForce GTX 1080] [3842:6288]
Flags: bus master, fast devsel, latency 0, IRQ 97, NUMA node 0
Memory at de000000 (32-bit, non-prefetchable) [size=16M]
Memory at c0000000 (64-bit, prefetchable) [size=256M]
Memory at d0000000 (64-bit, prefetchable) [size=32M]
I/O ports at 6000 [size=128]
[virtual] Expansion ROM at 000c0000 [disabled] [size=128K]
Capabilities: [60] Power Management version 3
Capabilities: [68] MSI: Enable+ Count=1/1 Maskable- 64bit+
Capabilities: [78] Express Legacy Endpoint, MSI 00
Capabilities: [100] Virtual Channel
Capabilities: [250] Latency Tolerance Reporting
Capabilities: [128] Power Budgeting <?>
Capabilities: [420] Advanced Error Reporting
Capabilities: [600] Vendor Specific Information: ID=0001 Rev=1 Len=024 <?>
Capabilities: [900] #19
Kernel driver in use: nvidia
Kernel modules: nvidiafb, nouveau, nvidia_drm, nvidia
06:00.1 Audio device [0403]: NVIDIA Corporation GP104 High Definition Audio Controller [10de:10f0] (rev a1)
Subsystem: eVga.com. Corp. GP104 High Definition Audio Controller [3842:6288]
Flags: bus master, fast devsel, latency 0, IRQ 5, NUMA node 0
Memory at df080000 (32-bit, non-prefetchable) [size=16K]
Capabilities: [60] Power Management version 3
Capabilities: [68] MSI: Enable- Count=1/1 Maskable- 64bit+
Capabilities: [78] Express Endpoint, MSI 00
Capabilities: [100] Advanced Error Reporting
Kernel driver in use: vfio-pci
Kernel modules: snd_hda_intel
weird, id say check all configs again, if you put in both PCI-E IDs and without typos then see