
Important Resources
| Project Page | Jellyfin · GitHub |
| Donation Portal | Jellyfin - Open Collective |
| Official Documentation | Introduction | Jellyfin |
| NVidia Driver Documentation | NVIDIA Driver Installation Quickstart Guide :: NVIDIA Tesla Documentation |
| CUDA Documentation | NVIDIA CUDA Installation Guide for Linux |
Backstory
The Jellyfin project was started as a result of Emby’s decision to take their code closed-source, as well as various philosophical differences with the core developers. Jellyfin seeks to be the free software alternative to Emby and Plex to provide media management and streaming from a dedicated server to end-user devices.
Objectives
- Install jellyfin
- Enable jellyfin behind a reverse proxy
- Enable hardware acceleration
- Custom compile ffmpeg with CUDA (optional)
Scope
- Jellyfin will be installed as a Systemd service on a virtual machine
- Jellyfin will run on a minimal install of Rocky Linux (EL8)
- Traefik is used for the proxy
- An Nvidia Quadro will be used for hardware acceleration
Installation
System Dependencies
- Firstly, make sure you system is up to date. Reboot if necessary.
sudo dnf update --assumeyes
- Next, install some basic tools as well as the epel repo data.
sudo dnf install --assumeyes dnf-utils dnf-plugins-core vim tar lsof net-tools wget epel-release
- Then enable
epelandpowertoolsrepositories.
sudo dnf config-manager --set-enabled epel
sudo dnf config-manager --set-enabled powertools
- Next, install the system dependencies of the jellyfin rpms. Don’t know why these are required but they are.
sudo dnf install --assumeyes at libicu
Now we can move on to the ffmpeg step.
FFMPEG Dependencies
- Enable the installation of
ffmpegvia the addition of the rpmfusion free/non-free repositories. It is important that theffmpegpackage is visible to rpmdb because the jellyfin rpm’s list this as required. You can customize the the path to the ffmpeg binary later to use a custom one, which I will display later. Note: the ffmpeg version currently in the fusion repo is 4.2 which is sufficient for jellyfin <=10.7.7 but if you are trying to use >10.8.0-beta then you need ffmpeg >= 4.4 so you will need to get a higher version that what is currently available. Likely, you will have to roll your own.
sudo dnf install --assumeyes https://download1.rpmfusion.org/free/el/rpmfusion-free-release-8.noarch.rpm
sudo dnf install --assumeyes https://download1.rpmfusion.org/nonfree/el/rpmfusion-nonfree-release-8.noarch.rpm
- Enable the rpm fusion repositories.
sudo dnf config-manager --set-enabled rpmfusion-free-updates
sudo dnf config-manager --set-enabled rpmfusion-nonfree-updates
- Install ffmpeg
sudo dnf install --assumeyes ffmpeg
Nvidia Dependencies
- Blacklist noveau driver in your
/etc/default/gruband regen your grub config.
GRUB_CMDLINE_LINUX="rd.driver.blacklist=nouveau"
- Download required devel packages.
sudo dnf install --assumeyes kernel-devel-$(uname -r) kernel-headers-$(uname -r)
- Download LTS Nvidia packages (AT this post in time the Long-Lived driver is 470.)
# add the CUDA repo it has everything we need from them
sudo dnf config-manager --add-repo https://developer.download.nvidia.com/compute/cuda/repos/rhel8/x86_64/cuda-rhel8.repo

# clear the cache
sudo dnf clean expire-cache

# install the latest dkms driver package
sudo dnf module install nvidia-driver:470-dkms
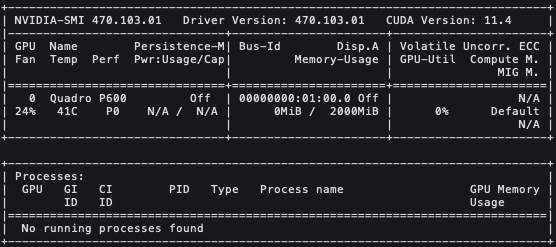
- Reboot your system and then check to see your drivers have been correctly initialized. If all goes well you should see something like the following when you run the SMI tool.
sudo nvidia-smi
Installing CUDA (optional unless you plan to custom compile ffmpeg)
I am using a GP107GL [Quadro P600] so I need to target the 11.4 CUDA packages as identified by the CUDA VERSION: in the previous screenshot above.
- Note: this will download like ~1 GiB of packages so this one might take awhile.
sudo dnf install --assumeyes nvidia-gds-11-4
sudo dnf install --assumeyes cuda-11-4
- Add the following to your
.bashrcto include cuda in your PATH
export PATH="/usr/local/cuda/bin:$PATH"
export LD_LIBRARY_PATH="/usr/local/cuda/lib64:$LD_LIBRARY_PATH"
-
Reboot again
-
Confirm you see the cuda compiler
nvcc --version
Custom Compile FFMPEG (optional, comes after CUDA)
![]() This is going to be arduous. Make some coffee.
This is going to be arduous. Make some coffee. ![]()
Largely ripped off from here but with a few extra steps.
- Install dependencies.
sudo dnf install --assumeyes nasm yasm autoconf automake bzip2 bzip2-devel cmake freetype-devel gcc gcc-c++ git libtool make pkgconfig zlib-devel libass-devel libdav1d-devel
- Create your project workspace.
sudo mkdir -p /opt/custom-ffmpeg/{src,bin,build}
sudo chown -R $USER:$USER /opt/custom-ffmpeg

BIN_DIR=/opt/custom-ffmpeg/bin
SRC_DIR=/opt/custom-ffmpeg/src
BUILD_DIR=/opt/custom-ffmpeg/build
- libx264
cd $SRC_DIR
git clone --branch stable --depth 1 https://code.videolan.org/videolan/x264.git
cd x264
PKG_CONFIG_PATH="$BUILD_DIR/lib/pkgconfig" ./configure --prefix="$BUILD_DIR" --bindir="$BIN_DIR" --enable-static
make
make install
- libx265
cd $SRC_DIR
git clone https://bitbucket.org/multicoreware/x265_git.git
cd x265_git/build/linux
cmake -G "Unix Makefiles" -DCMAKE_INSTALL_PREFIX="$BUILD_DIR" -DENABLE_SHARED:bool=off ../../source
make
make install
- libfdk_aac
cd $SRC_DIR
git clone --depth 1 https://github.com/mstorsjo/fdk-aac
cd fdk-aac
autoreconf -fiv
./configure --prefix="$BUILD_DIR" --disable-shared
make
make install
- libmp3lame
cd $SRC_DIR
curl -O -L https://downloads.sourceforge.net/project/lame/lame/3.100/lame-3.100.tar.gz
tar xzvf lame-3.100.tar.gz
cd lame-3.100
./configure --prefix="$BUILD_DIR" --bindir="$BIN_DIR" --disable-shared --enable-nasm
make
make install
- libopus
cd $SRC_DIR
curl -O -L https://archive.mozilla.org/pub/opus/opus-1.3.1.tar.gz
tar xzvf opus-1.3.1.tar.gz
cd opus-1.3.1
./configure --prefix="$BUILD_DIR" --disable-shared
make
make install
- libvpx
cd $SRC_DIR
git clone --depth 1 https://chromium.googlesource.com/webm/libvpx.git
cd libvpx
./configure --prefix="$BUILD_DIR" --disable-examples --disable-unit-tests --enable-vp9-highbitdepth --as=yasm
make
make install
- nv-codec-headers
cd $SRC_DIR
git clone https://github.com/FFmpeg/nv-codec-headers
cd nv-codec-headers
# this installs the headers system wide
sudo make install

# now copy them to the build directory
sudo cp -avr /usr/local/include/ffnvcodec $BUILD_DIR/include/
sudo cp -av /usr/local/lib/pkgconfig/ffnvcodec.pc $BUILD_DIR/lib/pkgconfig
sudo chown -R $USER:$USER $BUILD_DIR
This allows the ffmpeg configure script to auto detect all nvidia encode/decode flags
- Compile ffmpeg (you should all nvidia enabled options in the hwaccel area)
cd $SRC_DIR
git clone https://github.com/FFmpeg/FFmpeg.git ffmpeg
cd ffmpeg
git checkout n5.1.3
PATH="$BIN_DIR:$PATH" PKG_CONFIG_PATH="$BUILD_DIR/lib/pkgconfig" ./configure \
  --prefix="$BUILD_DIR" \
  --pkg-config-flags="--static" \
  --extra-cflags="-I$BUILD_DIR/include" \
  --extra-ldflags="-L$BUILD_DIR/lib" \
  --extra-libs=-lpthread \
  --extra-libs=-lm \
  --bindir="$BIN_DIR" \
  --enable-gpl \
  --enable-libfdk_aac \
  --enable-libfreetype \
  --enable-libmp3lame \
  --enable-libopus \
  --enable-libvpx \
  --enable-libx264 \
  --enable-libx265 \
  --enable-libass \
  --enable-libdav1d \
  --enable-nonfree

make
sudo make install
Congratz! ![]()
Now our custom ffmpeg is installed to /opt/custom-ffmpeg/bin/ffmpeg. This can literally convert any media you throw at it now.
Install and Setup Jellyfin
- Here is jellyfin’s official download page. It’s nice and pretty but for us RedHat folk we don’t get no frills. We go here → Jellyfin Stable CentOS Packages
We need to get the current latest stable, v10.8.10, download both the jellyfin-web and jellyfin-server.
cd /tmp
wget https://repo.jellyfin.org/releases/server/centos/stable/server/jellyfin-10.8.10-1.el7.x86_64.rpm
wget https://repo.jellyfin.org/releases/server/centos/stable/web/jellyfin-web-10.8.10-1.el7.noarch.rpm
- Now this is important, we must install the
webrpm before theserverrpm. If all goes well, it won’t complain about missing dependencies.
sudo rpm -Uvh /tmp/jellyfin-web-10.8.10-1.el7.noarch.rpm
sudo rpm -Uvh /tmp/jellyfin-10.8.10-1.el7.x86_64.rpm
- Setup the service and enable to run on boot
sudo systemctl enable --now jellyfin.service
- Open up firewall ports. Here is a description for what they are and their function:
- 8096/tcp is used by default for HTTP traffic. You can change this in the dashboard.
- 8920/tcp is used by default for HTTPS traffic. You can change this in the dashboard.
- 1900/udp (ssdp) is used for service auto-discovery. This is not configurable.
- 7359/udp is also used for auto-discovery. This is not configurable.
sudo firewall-cmd --zone=public --add-port=8096/tcp --permanent
sudo firewall-cmd --zone=public --add-port=8920/tcp --permanent
sudo firewall-cmd --zone=public --add-port=1900/udp --permanent
sudo firewall-cmd --zone=public --add-port=7359/udp --permanent
sudo firewall-cmd --reload
- SELinux (???)
- I have it disabled on mine because I use a different mitigation strategy but if someone wants to help contribute please let me know and we’ll get it added.
- Run a quick test to see if you get the jellyfin page. You should see the contents of
index.htmlpage.
curl -L http://127.0.0.1:8096
-
Proceed with the first time setup welcome splash page and you should be good to go

-
Enable Hardware Acceleration (optional)
Login as the admin user and go to [server] -> [playback] -> [transcoding].
Check all of those sexy boxes and set your hardware accelerator to Nvidia NVENC.


Behind the Reverse Proxy (Traefik)
I use Traefik with the dynamic file provider configuration for my setup. I use Saltstack to manage the contents of the traefik.yml file but that is out of scope for this guide. Bellow is my following config for Jellyfin.
Pretty simple TBH. Just point what ever load balancer you use to what ever port you expect to use jellyfin on (:8096) and be sure to reference it correctly.
global:
  checkNewVersion: true
  sendAnonymousUsage: false
serversTransport:
  insecureSkipVerify: true
log:
  level: info
  filePath: /var/log/traefik/traefik.log
accessLog:
  filePath: /var/log/traefik/access.log
api:
  insecure: true
entryPoints:
  web:
    address: :80
  websecure:
    address: :443
certificatesResolvers:
  letsencrypt:
    acme:
      email: REDACTED
      storage: /etc/traefik/acme/acme.json
      keyType: EC384
      dnsChallenge:
        provider: cloudflare
        delayBeforeCheck: 0
providers:
  file:
    directory: /etc/traefik/dynamic/
traefik_dynamic:
  http:
    routers:
      jellyfin:
        rule: "Host(`jellyfin.example.com`)"
        service: jellyfin
        tls:
          certResolver: letsencrypt
    services:
      jellyfin:
        loadBalancer:
          servers:
            - url: http://<fqdn or ipv4>:8096
