[Devember2021] Brewing Stats Server

Hello All!

This is my Devember2021 entry so let’s get started!

The Problem:
I have a home made heating solution for my beer brewing running on an original Raspberry Pi. It uses a mains relay, lizard heaters, two temperature probes, some python and hopes and dreams.

At every pre-defined interval, the system reads the beer temperature probe then compares this value to a target value and turns on or off the heater accordingly. It then spits out the heater status, beer temp and ambient temp to the terminal as well as the time in seconds.

Currently, to access this info, I have to SSH into my home network jump box, SSH into the Beer Pi, resume the screen session and read the last few minutes of data before detaching the screen and closing the SSH tunnels. This is very laborious for what should be a quick check.

Let’s improve this!

The Goals:

MVP

  • Set up a web server to display output using the simplest stack possible (I hate bloat and there will be no npm install whale-carcass)

  • Have python write to a data store of some kind. CSV at very minimum.

Stretch Goals

  • Set up a Database and have the web server and python interact with that for data.

  • Add in functionality to view brewing recipes

  • Include POST functionality to add notes, adjust temperature and other useful items.

  • Move the web server and DB portions to Linode for extra brownie points and to reduce stress on Pi(s).

  • Make it look prettier - I hate GUI/front end development and whatever I make will undoubtedly be function first so if there’s time, I’ll try and improve the CSS.

So this is my project! I’ll aim to update this regularly as and when I can. I will create a Git towards the end once my code is reasonably presentable.

9 Likes

Photo of beer or it doesn’t count… lol

This is actually pretty cool idea good luck with your entry

2 Likes

Pictures are mandatory of course!

But more importantly is the date for tasting the beer? :wink:

3 Likes

Update 15/10/2021

So, first update.

I think my updates will be sporadic but hopefully reasonably consistent as I balance life(work and family) and fun(Devember).

So what’s happened? Well, Huston, we have a Git!

I have added the initial code:

hotBoi.py
temper.py

temper.py - This is the class to control our temperature sensors and is based of Scott Campbell’s code (Raspberry Pi DS18B20 Temperature Sensor Tutorial - Circuit Basics) and I make no claims of ownership over his code. I only wish to point out the starting point for my own. Fortunately, the hardware chips do most of the heavy lifting and all we have to here is address the right sensor and grep our way to victory!

hotBoit.py - This is the boi that started it all. This code instantiates an object for the external and brewing vessel temperature probes, defines our time and temperature parameters, defines and controls our relay in charge of heating and runs all this in a while loop updating and outputting at predefined intervals. We put in sensible delays to stop our relays from being spammed and set a time in seconds for the heating to be run over.

And what’s this? MVP for our hardware?!?!?

datHotBoi.py - mmm dat hot boi! As promised here is the MVP for our hardware control. This code does everything hotBoi.py does and all that was minimally promised! This time we read our heating profile in from a csv file called “heatingProfile” and output to a record csv file called “tempeatureRecord”.

In the next update expect some wiring and hardware information and hopefully the beginnings of a Rusty server.

1 Like

I’m starting to sound like a broken record…

Simplify your “automation”.

You don’t need Linux and user space and Python and filesystems for a few hardware loops.

… you could write some yaml to get esphome to expose your sensors and relays through a simple web UI (potentially you could pucker it up with CSS); and/or mqtt; and/or using native home assistant protocol.

(all you need is a $2 pcb with an esp32 or a esp8266 or similar)


That way, you have split up the control hardware from your database/storage computers.

1 Like

I agree with RISK,

A real time graph as well as historical data in a dash board on your phone or tablet would be super easy to setup here, and some basic automation which presents it self as a yaml in home assistant.

I have been working with HA for a little while now so feel free to should out if you want some help!

I setup a water schedule yesterday for some chilli plants, it runs at a abse line unless the temp gets above 25c, then it adds extra watering until the temp cools down.

Great project idea, wheres the beer?

Especially where proto-types are concerned, I highly recommend people dont pass judgements on what languages and scripting is used, whatever the prototype developer is comfortable with is the best possiblity of seeing a successful conclusion to the project being complete.

Notes, Yes. Judgements, No.

Once completed, notes and lessons learned will gaurentee a differing approach, even if only slightly.

As for being worried about “taxing the RPi”, dont - if a RPi 0 could only process at MAX one (1) “ten year old pine tree”, this project barely qualifies as a “toothpick”, more like a “pine neddle”, in comparison, and in this analogy a average RPi can handle “four (4) x 10yo pine tree” (yes, I am using “pinus radiata” in this example).

For anyone else looking at this sort of project, done in this sort of way, take a look at the Explaining Computers YT channel, the greenhouse monitoring system, or wheather monitoring system, for detailed examples, and outcome evaluations.

For those that say yaml is a must have in this situation, I say “then why are you not using Ansible to automate it?”.

Then stop putting them on the player (there is a reason they are broken - in this case that is a passive aggresive comment, ie not needed).

@nestleToiletWater looking forward to your continued installments on this project, it seems likely that many will find it useful, even if the implimentation is not to their taste. Having been a participant in the the brewing and bottling of 17 dozen per 2 weeks for 16 weeks, I can appreciate the application of your monitoring and creation of this project.

Cheers

Paul

PS for those that want to make comments, notes, suggestions, etc, I recommend posting them as Issues on the projects GitHub page, that way they will have more value in the future, and can be debated more freely (specific to that topic), thus freeing up this thread for project updates and installments .

2 Likes

Apologies, my intent was to offer an (in my opinion technically better) alternative, in the hopes it’d be interesting for the OP to consider.

Thats the thing with computer related projects, there is always a better way, always . Isn’t it also true that no mater the commercial hardware or software we spend our money one, we always say “awe, I which it had this/that function”, wheather its years down the line or before we even make the purchase, or any time in between …

Due to the type of project this is, I believe a second/beta version (or a fork) will be refactored in some way that will reflect better knowledge of the problem learn along the way, including coding constructs. But in the meantime this project would have been completed because the developer didn’t have to learn a new toolset halfway throught the initial development cycle.

@nestleToiletWater apologies for hijacking your project page

3 Likes

So I’m quite sad to see that I have to justify my choices for something that I’m building entirely for my self and just happen to be sharing with others in case they are interested in it or want to use anything I have created. However, I want to try and avoid my project page devolving into an argument or a series of rants about why what I’m doing is stupid. I am not calling out anyone here, I just want to nip this in the bud so I can get back to enjoying my project before anything escalates. To aide this and to hopefully add some clarity to my project, I will add some background info about my project and my choices.

The quickest and most efficient (both in time and money) way to solve my problem is to buy an off the shelf temperature control unit that has a heating and cooling plug (there are many such devices available for very reasonable prices) then get some kind of cheap heating device, be it fan heater or lizard mat and install this and the temperature probe from the controller in a fridge. Plug the heater into the hot plug and the fridge into the cool plug. Done.

But that’s not the point of Devember or my project.

The point of Devember is to develop something and learn new skills. Not to create the most efficient product that utilises the best technologies and meets all end user demands.

So to be clear, the main reason I am doing this is to learn new things and have fun and I am sharing my jounrey and code in case you are interested or want to use my stuff. So please refrain from potentially ruining that for me.

To address my technology stack choices so far, I wanted to learn more about programming automation and hardware on the Raspberry Pi. I have many of these spare and I’m a big fan of them which was the main reason for choosing the Raspberry Pi as the workhorse (I am well aware of all the other small boards out there, I just happen to like and have the Raspberry PI). I also wanted my solution to be modular and reasonably simple so that I can replace and upgrade parts if needed. Which is why I went for parts that are easy to obtain, replace and upgrade. Speaking of which, at some point in future when I have more space, I will be incorporating a fridge to achieve the cooling aspect but this won’t be for a year at least. My Dad also brews and he uses such a method but the controller he has is crap (but very cheap) and often needs replacing and I looked at that and thought what a waste; mine will be better than this.

I have gone for python as the control language because it’s great at what it does and does it without too much bloat (though it’s a pretty fat snake!). I have the skills and experience to write this all in C or assembly but I am not going to because I like python and that is what I have chosen.

As to home assistant, I really don’t like it. The most important part of that previous sentence is “I” and note the absence of the word “you”. There are loads of pre-existing platforms to easily achieve a web dashboard but that wouldn’t be fun, I wouldn’t learn new things and (as per previously stated) would not even be the most efficient way of doing things for this specific use case.

So spoiler warnings for future posts (boo for making me spoil future posts!) but a big part of why and how I am doing this as part of Devember is because I already know that I’m going to write this in Rust and also use a database even though the CSV aspect works fine now. This is comes back to the point of Devember, to learn new things. I have also avoided Rust because of my proficiency in C/C++ and other languages but it’s gained a lot of popularity and I agree with my friends who love it about why it’s good. So I thought this would be a good opportunity to force myself to learn a bit or Rust. Likewise, I know a lot about databases but have never set one up from scratch and have never integrated my own code with a database so I want to use this project as an excuse to do that. I also know that I kind of need one to achieve storing my recipes and other data. I could do it without but it would make things better if I had one and again, I mostly just want the experience of setting it all up.

So if my project offends you, please feel free to ignore it and let me enjoy it. While I appreciate positive engagement, I do know what and why I’m doing things and have chosen what I’m doing for reasons specific to me. So please don’t spam this page or the GitHub I made; just fork it. The code I have written is licensed under GPLv3 or higher so feel free to use that to make your own thing using my code.

I also promise to post some beer pics in the next update as everyone is very thirsty for them apparently.

I hope everyone has fun and learns lots!

6 Likes

2nd November 2021 Update

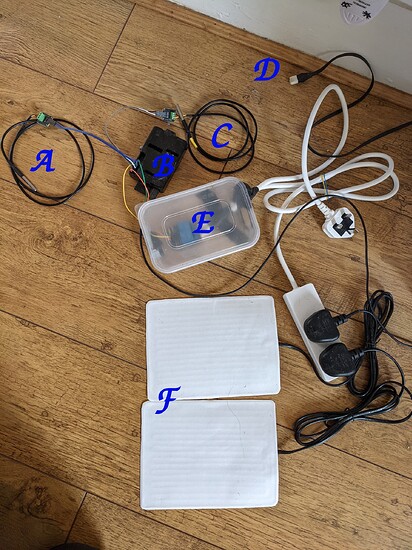
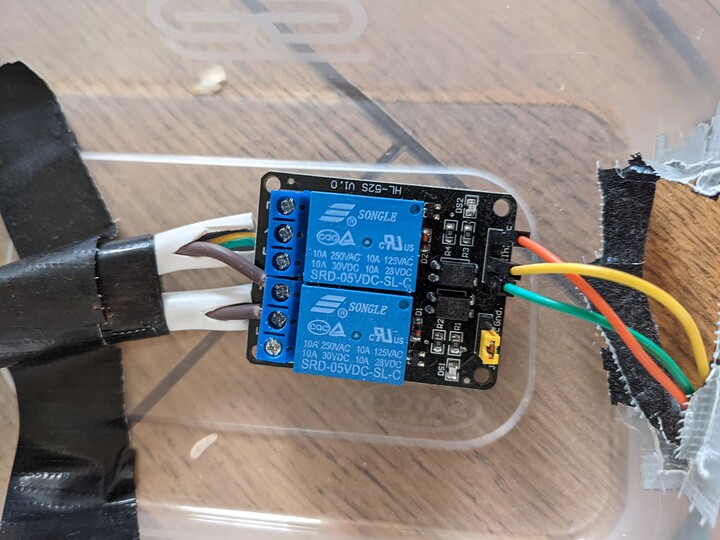
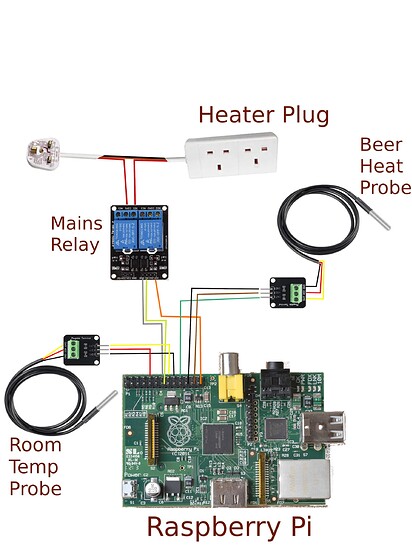
So, here is the incredibly questionable wiring and hardware part of my project. I’m posting here so you can see how not to wire up live UK (230V) mains electricity! This works for me but mains voltage can kill you so copy my designs at your own risk.

Parts list

Annotated Mess:

Inside Shot of Questionable Mains Wiring

A wiring diagram of sorts

The Trials and Tribulations of Web Server Software

So one of my main goals was to have a secure web server with the least amount of bloat. I initially asked around on some other unnamed forum what people thought was a good fit for some ideas. The best suggestion there was GNU Guile. I looked into it and like all GNU software, ideologically it was perfect. And like a lot of GNU software the reality of using it was awful. Also, Lisp gags. When I realised that I didn’t have recommended number of gangrenous toenails to chew on (don’t Google Stallman toenail chew interview) to make it through reading the manual/FAQ page, I gave up on GNU Guile.

I next contacted a friend who’s idea of a personal desktop is Gentoo and still uses Solaris seriously without irony. This friend is also a massive Rust pervert and begun preaching to me from the book of Rocket. I sat through his sermon until he started getting excited about the potential for API integration and quickly excused myself to do some Duck Duck Go ing. I liked what I saw and noted how the Rocket Framework is very similar to Python’s Flask in many ways. I have sat through many previous sermons so I also know how great Rust is just (as previously mentioned) I have avoided it so far due to not needing it. I thought this would be a good opportunity for me to learn Rust at last and be brought into the decaying folds.

I quickly got Rust and cargo installed on my ancient Raspberry Pi and very soon had a basic example ready to go. The eldridge horrors then unleashed themselves in a wave of corruption upon my poor Pi and after valiantly compiling 25+ hidden sub dependencies of Rocket it fell over at the “HTTP” library. The marks of the corruption remain but a reboot brought the Pi back to life or something closely resembling life.

So this rather defeats one of my main goals “F**k node js and it’s npm pit of hell”. I’m quite disheartened by this hidden bloat but not entirely perturbed yet. I also run a personal website where I create comics basically no one reads. Because I’m a techy nerd I have a staging environment for this on my home server. So I installed Rust and Rocket there and it kept the eldridge hordes at bay and ran fine.

So the options I’m considering now are:

  • Run host the web server on Linode and have the Pi upload data there.
  • Cross compile the web server for my Pi and hope it will at least run.
  • F*ck it use Flask.

I haven’t mentioned this yet but I’m quite familiar with flask and have used a number of times for making tools that needed Web interactions. The reason I had discounted it is because I don’t really consider it a real web server. I’ve run into it’s limits many times and I’d like a robust system as possible.

While I consider this, please feel free to add your two cents worth on which web server software you like or why Rust will fail always or why I should give in use Flask. My main criteria are security, simplicity and robustness. As previously mentioned, the main point in this project is creating a web server front end with dynamic functionality so again, I want to build this myself and not use something like Home Assistant etc.

[Edit: After looking at the Devember threads I can see someone has had a very similar idea to me and that they are/will be using Flask. This is enough for me to avoid using Flask and stop b*tching about Rust’s bloat. “F*ck it; we’ll do it live!”]

And last but not least… The much requested home brewed beer

This is a lemon pale ale I brewed on the hardware set up shown here. As this is a tech forum and not a beer forum, I won’t go into beer details but will say that the recipe and notes will be available for viewing on my final website.

2 Likes

Looks delicious.

I’ve seen some folks online using MOSFETs to drive 3d printer bed heaters. How do you get the temperature to be consistent throughout the volume or throughout time… how sensitive is beer/how accurate do you need to be. Have you run into any issues with the heating mats working too quickly, or not fast enough?

Thanks. It tastes pretty good though not without room for improvement to the recipe.

So this is still quite hacky in it’s approach.

The better the control on temperature, the better the beer but that comes with huge diminishing returns after a certain point. So as a home brewer, I only need it to be good enough.

I don’t have a fridge yet so cooling isn’t yet an automated option and for insulation, I’m relying on sleeping bags and coats which work surprisingly well.

In terms of responsiveness and accuracy, I’m at the very edge of acceptable for home brewing. I have one temp sensor on the outside of the middle vessel and am heating from underneath via conduction. Ideally, I’d be taking measurements from inside at multiple levels and heating uniformly.

However, it works well enough to keep the temperatures where I need them to be and the system has so far been good about bringing things back up to heat.

Mini update - 8 November 2021

Rusty Web Servers

So getting a simple static site up was plain sailing using the rocket example code and lead me into a false sense of hope.

In order to have dynamic content with the Rocket framework, the Templates library is recommended. There may be other ways but I found templates and quite like the paradigm in use so decided to stick with it.

Linode have a deceptive tutorial:

After hours of messing around, I realised a few things. One, I had to use the older version of rocket (0.4.7) and couldn’t use the latest (0.5). I also had to specify a main function and add in the routes to the new functions. The latter was missing from the example code and took me ages to figure out. So Rust noobs be warned! But after many hours of messing around and looking longingly at simpler web frameworks, I got the example code working! So I now have a dynamic example app. Yay!

In the background to this, I’ve been doing some simple designing of how I want my web page to look. I’ve created a few mock ups and have created an SVG for the header border.

I’ve also been looking at Rust frameworks to plot graphs. I have so far found “plotters” and the next step will be to try and integrate this with the rocket framework though I don’t know if the two will play nicely.

One thing I’ve been dismaying at is the huge number of hidden sub libraries required to compile an app. I was hoping for simplicity and avoiding dependency hell. Speaking of which, I noted that I had to install quite a few additional programs and libraries on the host OS in order to allow these many sub libraries to compile. This only furthered my dismay. When I think about it in context however it’s no worse than Python, it’s just a lot more visible to the end user.

So next post hopefully a basic working web site with dynamic graph generation and the beginnings of a database.

2 Likes

Mini update: 12th November 2021

Fuck this bloat!

Plotters is such a mess. As a library, it’s pretty cool but good grief the bloat is something else!

It got to the point where my options were, implement and code a whole fucking function to use one font or try and block out the font library and re-write all the example code to get a basic graph working. This is another re-occuring theme in Rust examples; many of them don’t work with copy and paste like every other language does. There’s a lot of extra things that need doing or re-writing.

HTML5 to the rescue! HTML5 SVG has come a long way and with Rust Rocket, it’s really easy. So I’m going to go with this as it reduces the bloat and is very simple.

2 Likes

just a quick tip: you can wire your DS18B20 sensors in parallel so that they share a single GPIO pin for communication (hence the so-called ‘1-wire’ bus).

1 Like

That’s amazing! Thanks for the tip.

That’s very useful.

Mini update: 15 November 2021

I’ve been battling with SVGs and CSS. My initial excitement was somewhat premature.

After a lot of fighting, I’ve got a nice line graph rendering without getting too crazy into the HTML5 weeds. Unfortunately however this limits me to 300 data points if I want the render to look readable. I was toying with idea of boxing/averaging/sampling my temp data for the graph. This is not so mad as I’ll likely want a separate variable text display showing the current time and temp and the min and max. So an average graph showing the rough trends of the temp data is pretty handy and does the job. Especially considering current temp is the most important and I really am only interested in a general picture of the historic data.

I spent ages uming and ahing but this will add overhead either on the Pi or on the web server as temp data is taken every 10 seconds or so. So there will be a lot of data processing going on in the background even when no one is asking for a graph. And the end result doesn’t look particularly great.

I have caved on my morals I am ashamed to say. Unfortunately CanvasJS is really good. I really hate JavaScript and want to avoid it wherever possible but CanvasJS is so much better than my SVG solution sadly. With December rapidly approaching, I don’t have much time and need to progress with working code. So I’m going to compromise. CanvasJS will allow me to keep a JSON blob of temp data and this will be very easy to write to/create from an array.

I’m sure setting up the DB will not be trivial so I don’t want to waste any more time.

Time to pour one out for the death of my moral standards.

Mini update: 16 November 2021

We have a database!

I have decided to use the mysql for my DB because it’s pretty good and is way more capable than SQLite (the other DB option I was considering). I have also decided to dockerise it for some extra protection and to make migration of the DB hopefully easier should I need to.

My “beers” table currently looks like this:

brewTempMax FLOAT(9), # Max Brew temp
brewTempMin FLOAT(9), # Min Brew temp
brewTempNow FLOAT(9), # Current Brew temp
brewTempTarget FLOAT(9), # Brew target temp
heaterStatus BOOL, # Status of heater
name VARCHAR(150) NOT NULL, # Name of the beer
brewDayNotes TEXT(10000), # Brewday notes
tastingNotes TEXT(10000), # Tasting notes
beerTempData MEDIUMTEXT, # Brewing temp data for beer(max length 16,777,215 chars)
ambientTempData MEDIUMTEXT, # Brewing temp data for room(max length 16,777,215 chars)
preBoilGravity FLOAT(8), # PBG of the beer
originalGravity FLOAT(8), # OG of the beer
finalGravity FLOAT(8), # FG of the beer
brewDate DATE, # Brewday date of the beer
bottlingDate DATE, # Bottling date of the beer
PRIMARY KEY (name) # Make the name the primary key

I’ve created a read only user for reading to display and a read,write,update,delete user for data entry and altering.

I’ve got some example code for Rust and Python3 to hook into mysql using the msql and pymysql libraries respectively.

I was considering looking into Rust libraries for API so python would talk to the web server via an API but I don’t have a lot of time so I’m going use wireguard and IPTables to allow python to directly connect to the mysql DB on the web server. At the moment this is not an issue as my staging environment is on the same local network as the Pi but when I move to production in the cloud, I’ll need the wiregaurd tunnel to give the Pi access to the DB.

Next steps will be to get Rust and Python3 playing nicely with the DB then fix up my HTML(including adding auth to rust rocket) a bit more and then I should be ready for cloud deployment.

1 Like

Mini update: 20 December 2021

Wow! It’s done! F*ck me that was wild!

I have dragged myself through the last month kicking and screaming and Googling like a madman for compile errors but it’s done.

The database is mysql running in a docker container. This took way long to expose! Pro- tip when trying to expose a port use “-p 0.0.0.0:3306:3306” otherwise you won’t be able to access it also IPv6 will wreck you so avoid that if you can. I went from no access beyond direct exec-ng into the container to local access to external access. I used ubuntu firewall to expose the ports to specified network range. Also remember to specify the networks (or yolo wildcard with % when creating DB users). I’m using a docker volume to also help with data transfer but others have found this an issue when debugging due to ownership so be warned.

On the python side, we run our heating software and periodically write temp data to the database using our pre-defined write_user.

Rust is hell and the mysql library is its ninth circle. Good grief! What an ordeal it was to get it working. The current examples don’t work and it took a lot of googling with my local Rust priest to get it to work but it compiles now and looks good to go!

On the web display side I am not using Canvas.js as its proprietary and paid for (Fail fail) but am using chart.js. I hate using JavaScript, especially other peoples but this works so well compared to my crappy SVGs. I have included exact versions and an integrity hash so that minimises the risk as much as possible with this nonsense.

Other than that, the staging environment is ready wooooo!!! Now on to production deployment!

The production deployment will be on Linode for extra brownie points though they are not the cheapest so I don’t know if I will stay with them as I usually use Hetzner but we’ll see I may even end up entirely self hosting on another raspi once the Linode creds run out or maybe I’ll stick if it turns out as great as everyone says they are.

The only additional nice to have improvements that are potentially feasible would be SSL and CSS tweaks in the production deployment. Currently the web app’s only input is the beer name and it displays that beers live/historic data so it doesn’t need to be encrypted; it would just be really nice if it is! The CSS is fine for phone resolution and the chart works even though it’s not pretty. The rest looks good though so I’ll tweak if I get time.

I’ll post again when I have a working production deployment or hilarious last minute fail and will also post the code (which is at least complete!) to my git hub then.

1 Like