You’ve probably heard of Plex. Have you ever wondered about what parts to get for a Plex server? Or using handbrake with the digitized version of your physically bought dvds & blu rays? Or labelled your media to make sure the scrapper picks up your files and shows on your server?
This guide is for you.
Table of Contents
What is Plex?
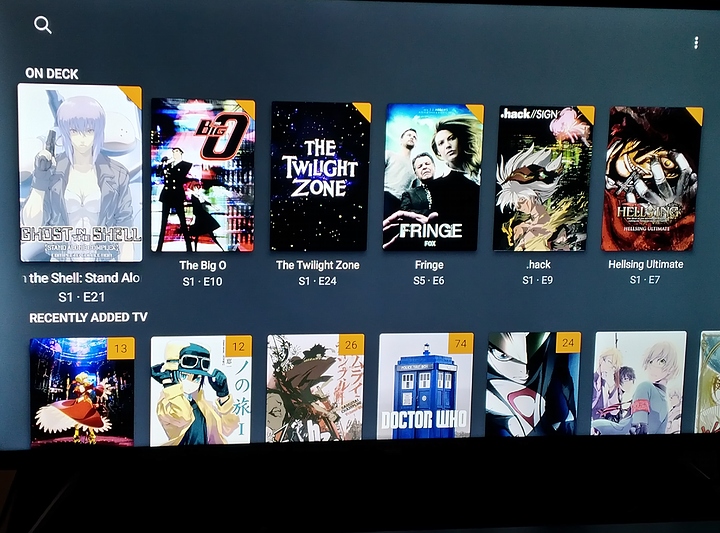
Plex in simple terms is software that allows you to set up a Netflix like experience for your own legally owned dvd and blu ray collection. Once set up and you’ve digitized some of your bought physical content, dvds and blu rays, it looks like this when you access your Plex Server from the Plex App on Roku/Android TV:
Why use Plex
Every hate when something you like to watch is removed from a streaming service? Well with your own Plex server you don't have to worry about it. Its the content you put on it and the only way it'll go away is if you remove it.The thing you need to understand is building out your Plex Server Library takes time. it will not happen in one day. This is not for the faint of heart or if you don’t have patience.
Building or Buying a Plex Server
Take a look at both the Plex Server Requirements Page and What kind of CPU do I need? from Plex official support website.
These should give you a good idea of what type of system to build or buy.
Buying a prebuilt or a used server is an option. Bare in made with servers, there are hard drive limits and you’ll need to look those up.
Building your own is an option. The key is to build what works for you. Are you going to be just streaming to one device? How about streaming in 4k? And the really big one is how much hard drive space are you going to need? The last one is really important because video files even with compressing do take a space and it adds up quickly.
On the subject of hard drives remember one very important thing.
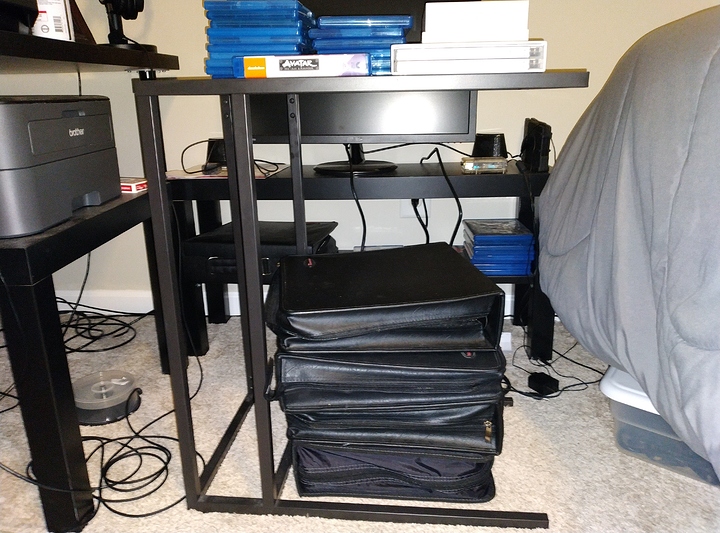
All hard drives fail. It is just a matter of time. Have back up redundancy drives. If you have 20 TB of media on Hardrives. You really need to have back up drives for that data for the day the hard drives do fail. It may take years for the drives to fail but that day will come.
Setting up Plex
The official guide for installing from Plex Website:
And if you ever have to move your server to another machine:
About the Bandwidth of Streaming Content
While you will be streaming your content in home, you need your internet to be able to handle it. It is highly recommended you connect your Plex Media Server directly by Ethernet cable to your router/wireless router. This will allow for the best case when streaming content from it. Note that by default sets itself to stream at 720P and you have to go in and set it to 1080p for both the server and the app your use to access it.
Digitizing your DVDs and Blurays with MakeMKV
Regardless of the size of your DVD or Blu ray collection, either small or big, there are two applications you need for digitizing them. MakeMKV and Handbrake.
Before we talk about those let’s focus on the device you’ll need to do it:
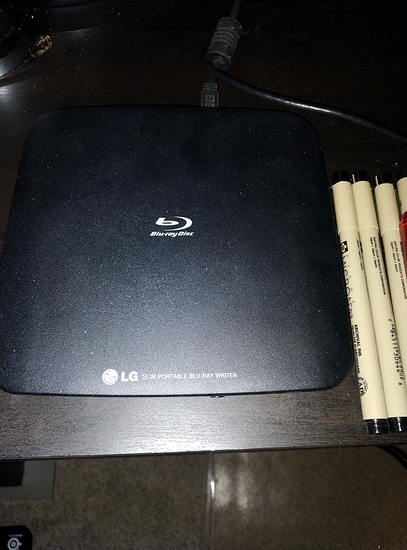
A blu ray drive for the computer. This is critical in digitization your dvd and blurays.
A word on the state of digitizing with Ultra HD Blu rays
On the whole it's iffy, costly, and you got to flash the drive with custom firmware. Right now it is not recommended to get an Ultra HD Blu ray drive for computer for digitizing efforts until it becomes more stable and easier to do.MakeMKV - The First Application and only one you have to buy
MakeMKV is the best application and only software to use to digitizing your blu ray and dvds. It does cost money for a license to use it after the 30 day free trial ends. Once you get that key license save a copy of that info somewhere so that when you move to a new computer and reinstall it you have the info you need to use it. Lets cover the basics and somethings to be aware of. There will be an advance troubleshooting area near the end of this wiki.
Digitizing Films with MakeMKV
This is mostly a straightforward process. First take the dvd or blu ray and put it into your blu ray drive. Open MakeMKVClick on File and then open disc
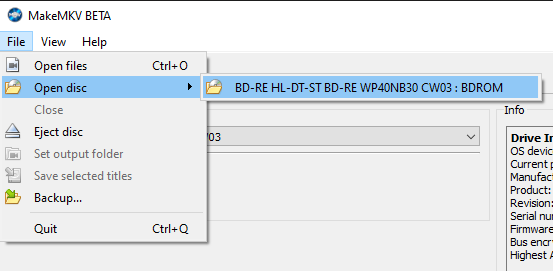
It’ll take a little bit for MakeMKV to open it
Look for the largest file - That’s one you want to save to your computer.
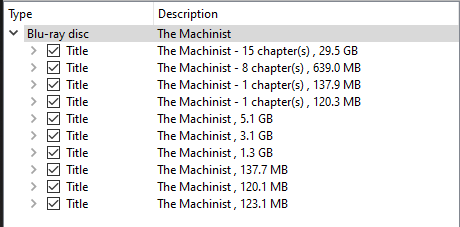
Just have the check box Checked next to the largest file. Then click on save selected titles icon [green down arrow on a hard drive icon]
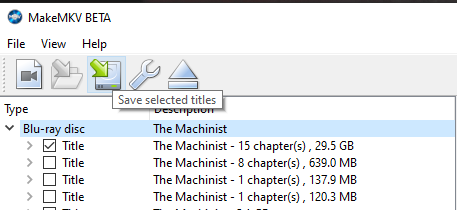
It’ll take time to save the file.
Digitizing TV Shows
This is not a straight forward process because:The vast Majority of TV Shows on DVD and Blu ray video files are out of order.
No that isn’t a joke. What you’ll need to do is after digitizing a dvd or blu ray is to briefly watch each episode. It is highly recommended you go to https://thetvdb.com/ look up the show and get to the episodes area.
However strangely there is one tv show genre this isn’t the case:
Anime
The majority of Anime blu rays and dvd video files are in order. It is still recommended to check each video file just in case.The majority of TV Show Blu Rays and DVDs have the episodes as individual files. Just have those boxes checked and hit save.
With digitizing TV Shows there is one more thing to be aware of:
Sometimes there is one video file on the blu ray or dvd for a tv show
This is a worst case scenario but it is not impossible to troubleshoot this problem. We'll cover it inAdvanced Problem Solving with MakeMKV & Handbrake
Handbrake to reencode the video files
We’ll go over this in
Using Handbrake to Compress
Naming your content for the scrapper
You have to name your digital content for it to be scanned by the the scrappers Plex uses. By default for films it uses The Movie Database. For TV it uses the Television Database.Films and TMDB scrapper
Naming films for plex is one of the easiest things you can do. All you need to do is go onto that website look up the film and copy paste that name. A good idea is to also include the year the film was released in brackets because there have been remakes of films and those years in brackets help find the right film.
Now if there is a mismatch for a film or show it is pretty easy to fix and plex have an already solid guide on how to do that:
TV Shows, TV Specials, and tvdb scrapper
Naming for Television shows is a little more tricky. For shows the easiest thing is to have a master folder to put folders for each tv show in. The Folders for the tv shows should be labeled as the name of the show. Inside that folder you would have the show name followed by season number and the episode number.
Example of what this would like like using the name of the show with episode name from TVdb:
TV Show [Top Folder]
Mr. Robot [Inside top folder]
Mr. Robot - 1x01 eps1.0_hellofriend.mov
For TV Specials or OVAs
Now by default tv specials or anime ovas don't show up unless you name them a certain why.For this example we’ll take a look at Doctor Who because Doctor Who has a lot of Specials. Specifically lets say you digitized your legally bought blu ray copy of Doctor Who Resolution. How do you name it? This is where TVdb comes in. Look up Doctor Who click on Doctor Who 2015 scroll down to specials and click on the link:
https://thetvdb.com/series/doctor-who-2005/seasons/official/0
Wait there are that many Doctor Who Specials? Not really. Not the actually show. Notice how they have 00 and then E with a number? Well you a normal person don;t have time scroll through all that. Tip press the CRTL key and F this will search just that page. Then type: Resolution. You see it is S00E156. The end result will look like this:
TV Show [Top Folder]
Doctor Who (2015) [Special Note you do have to have that year in brackets for Doctor Who 2015 - Now Shows.]
Doctor Who (2015) - 00x156 Resolution
Basically you have to treat specials as a part of a season 0 and find the corresponding episode number for that special.
Using Handbrake to Compress
If you have time, it is highly recommending you take time to read the official handbrake documentation about encoding:
https://handbrake.fr/docs/en/latest/technical/performance.html
Documentation for the current version of handbrake:
https://handbrake.fr/docs/en/
Why encode with handbrake? Its to save space and preserve the quality of the show or film. Understand that depending on the settings you use it can take serious time to reencode and it will push your cpu to the max.

THE IMPORTANCE OF THE AUDIO CODEC
Lets be clear about the sound issues:Handbrakes default audio settings are not ideal
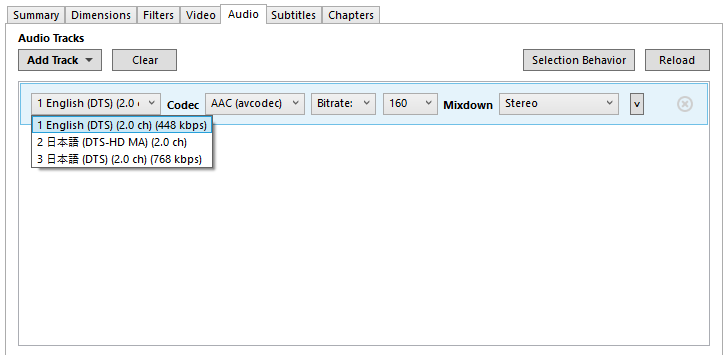
When encoding video with handbrake, you're going to have to deal with messing with the audio each time. You can and should set some better default audio selection behavior, let break down an example of fixing the audio:First take a look at the source audio audio source. Notice that 448 KBs, DTS and 2.0 CH? Well there is just one way to go about this. Go with setting the bitrate to 448:
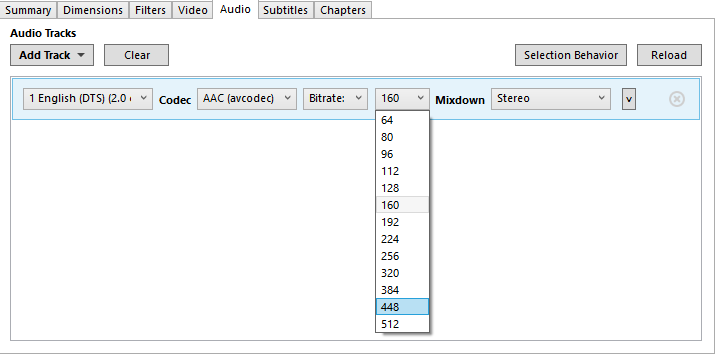
Do not use the Passthrough Audio Codecs
The Passthrough Audio Codecs can create distortions in the audio while you stream the video. It is strongly recommended to just use the AAC, AC3, and E-AC3 audio codecs for reencoding.MAKING SURE YOU GET YOUR SUBTITLES
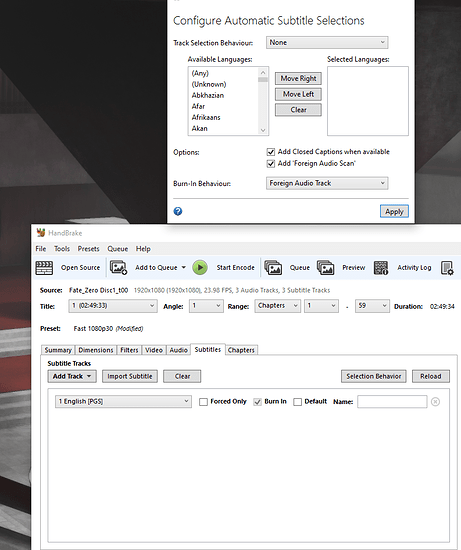
This is where using the live preview feature comes in handy. Out the box Handbrake does not put in the subtitles for foreign audio. What can you do? Well:You got to burn the subtitle to foreign audio if you encode by mp4.
HIGHLY RECOMMEND USING THE LIVE PREVIEW TO MAKE SURE YOU DID IT RIGHT. This is how you get to live preview, first click preview and then live preview:

If you works go forward with the encoding. If not try a different subtitle, cause some subtitle files are empty, and do live preview until you get the subtitles for that audio file.
Short version: You’re going to burn the subtitles to always be with the foreign audio and you can not turn them off for that audio.
Some general recommendations
You could use the default presets but at least tweak them a little and make your own ones cause the default ones have some flows. These are some tweaks you could do:Have Web Optimized and Align A/V Start Checked in Summary
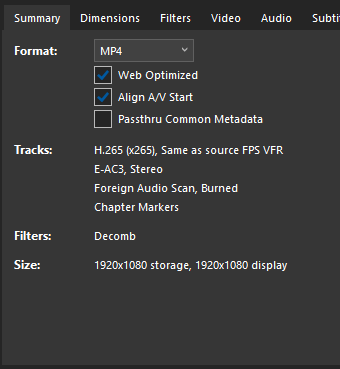
Web Optimized makes it so when you stream your media, the device your watching on it doesn’t have to download/buffer the whole video. Think of it like the device has cache set to access your content immediately.
Align A/V start - when digitizing your media sometimes the audio and video get out of sync, so out of caution always have this checked.
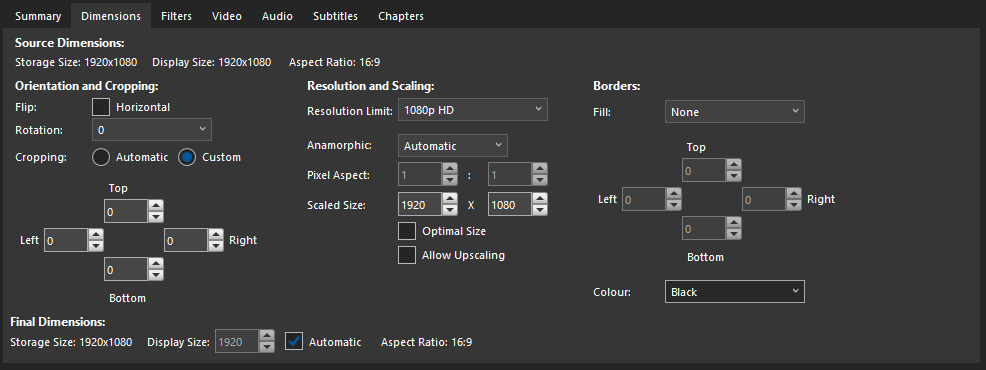
Set Auto Crop to Custom and then all value 0
This is a personal preference but out the box handbrake on all presets autocrops. This means, you loss part of the frame of the show and tv. This does remove the black bars.
For this area I would also recommend having the Resolution Limit set equal to the content you are reencoding. Example blu-ray set to 1080p HD. Having optimal size and Allow Upscale unchecked.
Upscaling
While Handbrake has added the ability to upscale digital content, when it comes to live action to not do it.
The reason for this is the viewer will notice pixelation mess of the face. It’ll seem off and very distracting.
This also applies to CG Animation Content.
However for Hand Drawn Animation, you can upscale safely to a certain extent. Such is going from 480 to 1080. You wouldn’t want to go from 480 to 4k though because you would get a pixelation of what you are watching.
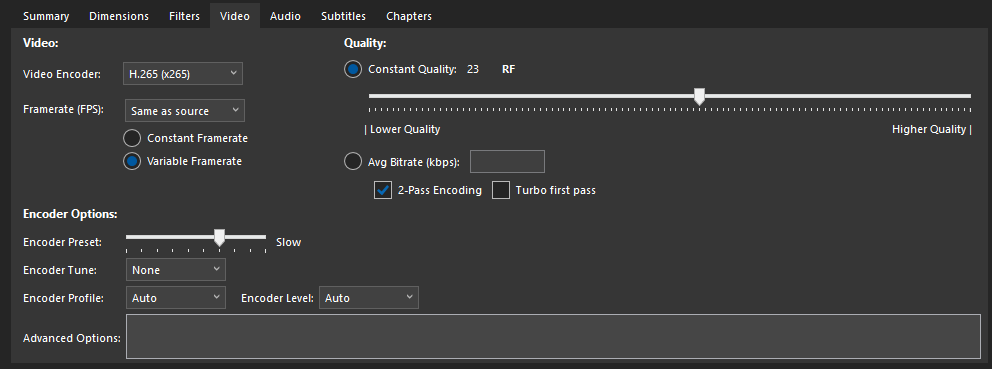
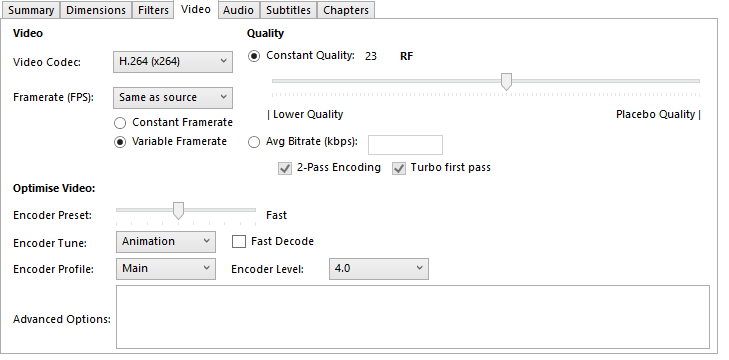
For TV and Film set to 23, match source for frame rate, variable frame rate, and slow
Lets take about that number 23 for a moment. This is what is recommended for HD videos. However you can and should use it for 480 videos as well. Keeps the image sharp. You want to know a secret about frame rates for tv and shows :
The frame rate is not constant
Now there is an average around where it'll be but is not a set rate. Just go with matching the source and variable frame rate. This will ensure the video you encode matches your source video file.Speed of Encode
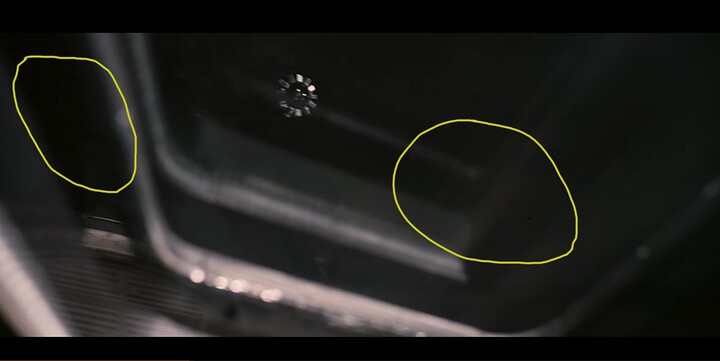
It is critical to have the speed set to at the minimum slow, this is due to shadows and black.If the speed is set too fast, this will degrade the image of the video and on scenes with shadows black you’ll see pixelation of those. It would look like this (The areas of the pixelation are circled in yellow to show you this):
Now image seeing those moving around from scene to scene on shadows and blacks. Setting the speed to slow greatly reduces/eliminates those from happening. Basically the slower the speed you set handbrake to, the better the image quality.
What about the video codec?
Use what works best for you. Also you should really read this to help you determine that: https://handbrake.fr/docs/en/latest/technical/performance.htmlFor Animation Also use the Animation Encoding Setting
You don’t have to do this but it doesn’t hurt when encoding animated video file.
Creating Queues with Handbrake
Seehttps://handbrake.fr/docs/en/1.3.0/advanced/queue.html
Understand how to make queues with handbrake, is very useful when you are reencoding video files for tv shows.
Advanced Problem Solving with MakeMKV & Handbrake
These are special case problems and with digitizing it isn't a matter of if but when you'll run into.Multiple Copies of film on Bluray
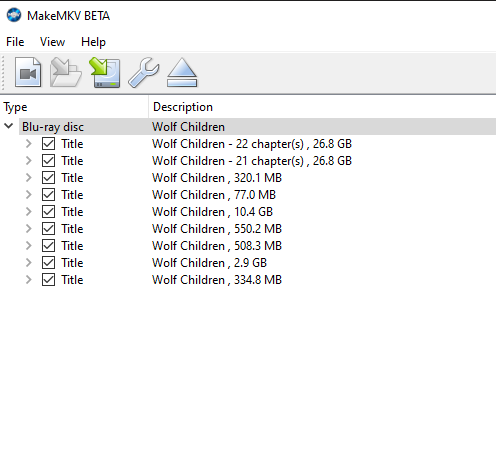
There is only one thing you can do here. We have to save each copy and watch both of them after digitizing MakeMKV to see which one is right. Yes they are both big files but this is the only way to solve this problem.
Recommend downloading VLC to be able to watch the mkv video files.
One Video File for TV Shows on Bluray or DVD
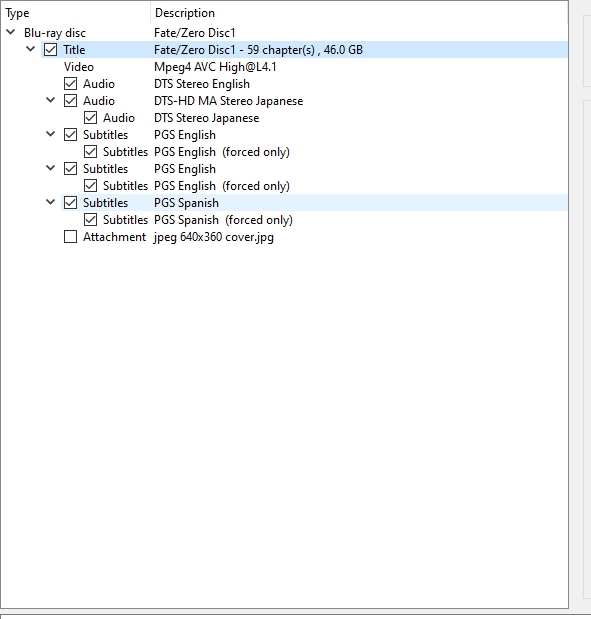
Example: Say you own a blu ray copy of Fate Zero from Aniplex and when you open the blu ray on MakeMKV
Yeah it’s one video file.
This requires a great deal of patience and time to resolve. Here is what you need:
-
TVdb - to reference time from for each episode
-
VLC - to manual scan through the video files for the Chapter numbers for the episodes.
-
Excel spreadsheet or Notepad- to write those numbers on
-
Handbrake - to create queues for each of the episodes you create by way of the chapter breaks. Hit browse save the episode that you made by chapter break name the episode: episode # that # being the number of the episode you are saving. Then click on add queue. Create the next episode by it’s chapter break. Browse. Save. Rinse and repeat till you create the queue for the episodes on that disc.
Hopefully you don’t encounter it too often with digitizing your collection but when you do be ready to take your time to do it.
Contributors
- Created the base wiki and intial text of the wiki
- Provided wolfleben with the extremely valuable documentation resources concerning handbrake.
Change Log
- 13.03.2022 (Note this is using the Europe Dating standard. The Day is first and then month) - @wolfleben Changes were made in the Handbrake section: updated the audio codecs area, added area covering what to select in Summary for Handbrake, added section upscaling, and added information concerning the speed as relates to shadows and blacks.
Rules for Contributing
- Forum members are welcome to edit and add to this wiki.
- Per the rules of the forum Encouraging Piracy Will Not be tolerated.
