TLDR
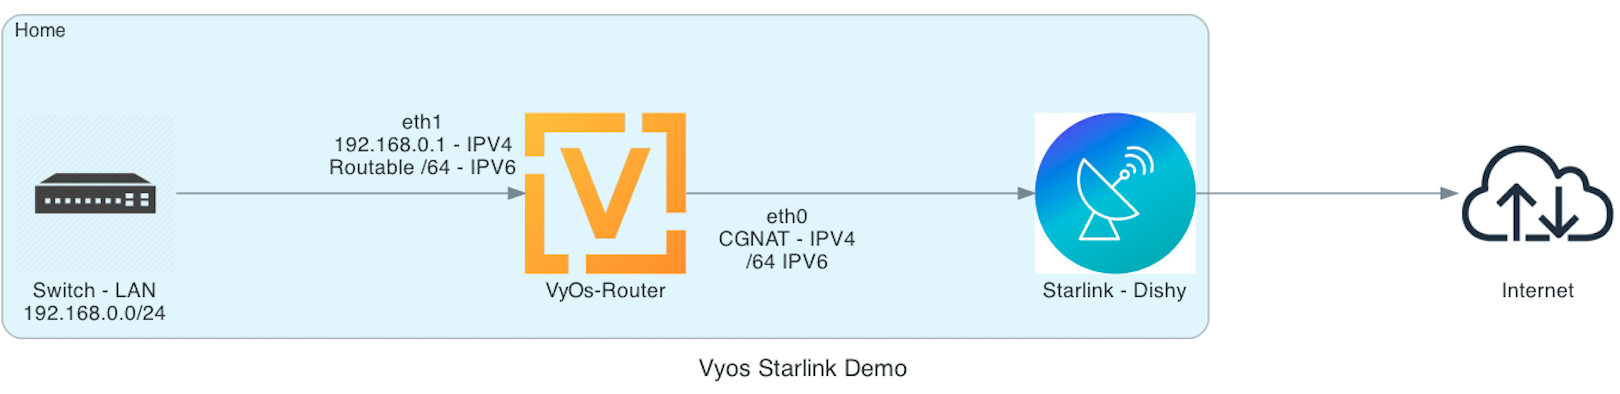
In this tutorial I will show how to configure a VyOS router/firewall appliance to obtain a dual stack (IPV4 behind CGNAT + IPV6 Routed) configuration using SpaceX Starlink as the service provider
Background
Starlink is the SpaceX Internet service that makes use of Satellites to provide connectivity to mutiple countries in multiple continents
The service is aimed at users living in rural/semi rural areas that are not served by traditional Broadband providers, but also to users who are served by Broadband with limited bandwidth/gouging prices
Starlink can provide speeds of 150Mbps Down/30Mbs up and, depending on location of the user terminal vs the Satellites it can have complete coverage (24x7) and/or have some dead spots.
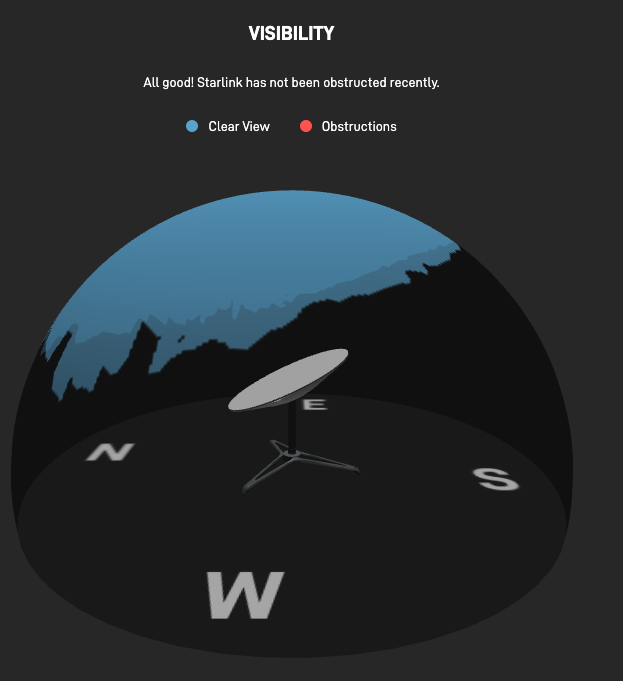
Coverage is also dependent on placing the user terminal (a satellite dish nicknamed ‘Dishy’) in a spot that has unobstructed line of sight to a portion of the Sky
Spacex conveniently provides an app that can test for obstructions before even placing an order … just download the app, place yourself where you would put Dishy, follow instructions and you will have a pretty clear idea of the type of coverage you would get.
Once Dishy is installed, it monitors coverage and can provide a report of obstructions either in Graphic Format:
or in programmatic format
{
  "device": {
    "app": {
      "version": "0.0.0",
      "environment": "production",
      "note": "version info is automatically generated",
      "features": [
        "local_management"
      ]
    },
    "platform": {
      "os": "web"
    },
    "wifi": {
      "ipAddress": "unknown",
      "ssid": null
    },
    "sensors": {},
    "auth": null,
    "account": null,
    "timestamp": 1645094799359,
    "memory": -1,
    "name": "unknown",
    "model": "unknown",
    "deviceId": "unknown",
    "location": {}
  },
  "router": {
    "reachable": false,
    "service": "router",
    "cloud": false,
    "features": {},
    "timestamp": 1645094800363
  },
  "dish": {
    "reachable": true,
    "service": "dish",
    "cloud": false,
    "features": {
      "stowRequested": true,
      "unstow": true
    },
    "timestamp": 1645094799371,
    "deviceInfo": {
      "id": "",
      "hardwareVersion": "rev2_proto4",
      "softwareVersion": "4a931632-9730-4468-9456-c4058cd02081.uterm.release",
      "countryCode": "IT",
      "utcOffsetS": 1,
      "softwarePartitionsEqual": false,
      "isDev": false,
      "bootcount": 40,
      "antiRollbackVersion": 0
    },
    "deviceState": {
      "uptimeS": 374143
    },
    "alerts": {
      "motorsStuck": false,
      "thermalThrottle": false,
      "thermalShutdown": false,
      "mastNotNearVertical": false,
      "unexpectedLocation": false,
      "slowEthernetSpeeds": false,
      "roaming": false
    },
    "gpsStats": {
      "gpsValid": true,
      "gpsSats": 12
    },
    "secondsToFirstNonemptySlot": 0,
    "popPingDropRate": 0,
    "downlinkThroughputBps": 145257.140625,
    "uplinkThroughputBps": 66404.21875,
    "popPingLatencyMs": 38.095237731933594,
    "obstructionStats": {
      "currentlyObstructed": false,
      "fractionObstructed": 0,
      "validS": 373838,
      "wedgeFractionObstructedList": [
        0,
        0,
        0,
        0,
        0,
        0,
        0,
        0,
        0,
        0,
        0,
        0
      ],
      "wedgeAbsFractionObstructedList": [
        0,
        0,
        0,
        0,
        0,
        0,
        0,
        0,
        0,
        0,
        0,
        0
      ],
      "avgProlongedObstructionDurationS": 0,
      "avgProlongedObstructionIntervalS": null,
      "avgProlongedObstructionValid": false
    },
    "stowRequested": false,
    "boresightAzimuthDeg": -0.6298430562019348,
    "boresightElevationDeg": 65.92339324951172
  }
}
that can be interpreted by observability tools like prometheus to, again provide a graphical image of coverage 
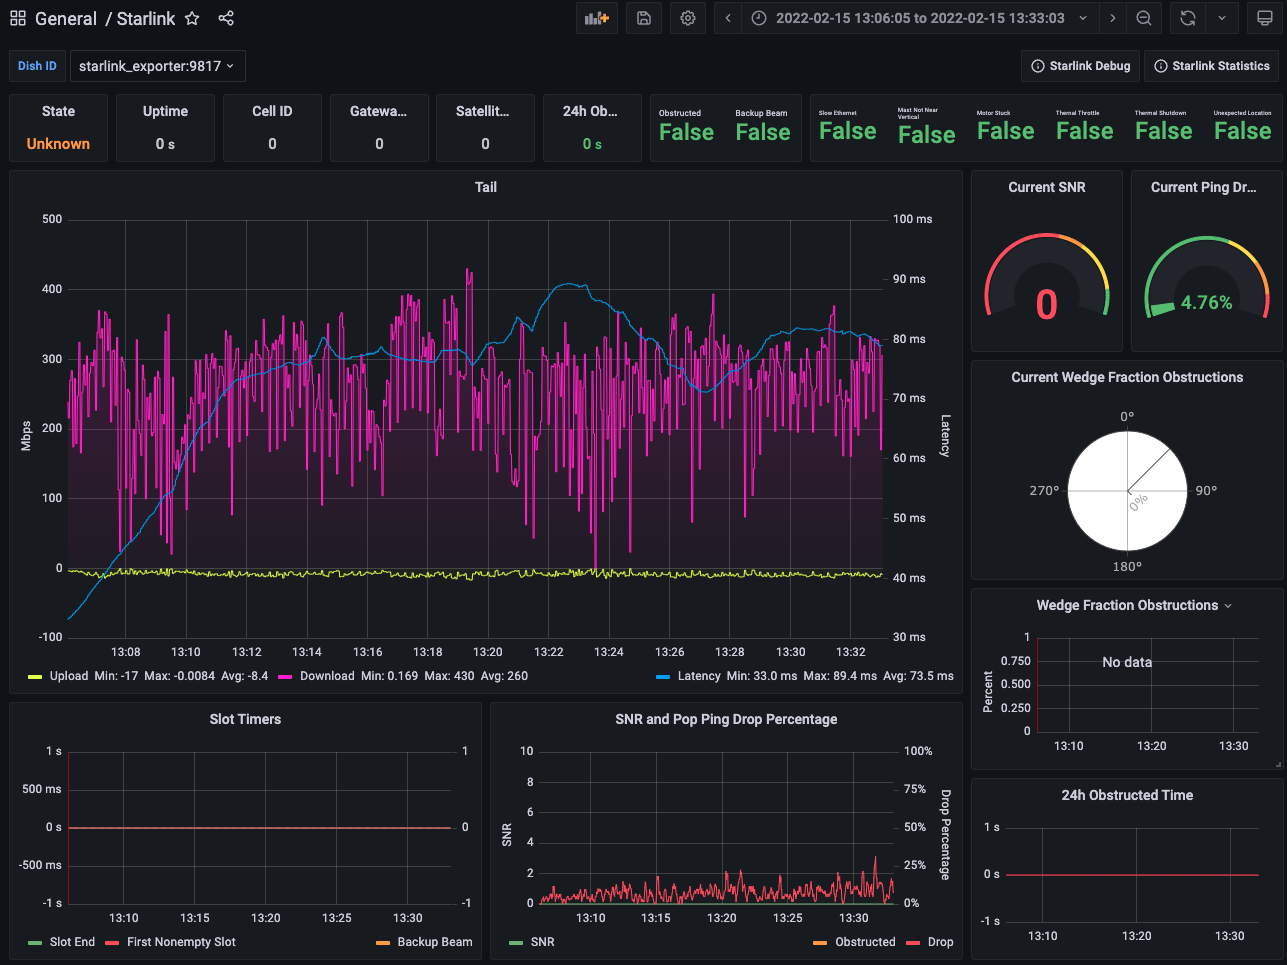
I have been getting speeds way upwards of the announced 150Mbps … my connection can substain 300Mbps down easily, with peaks at over 400Mbps. Latency is in the 30-40s when lightly loaded and it goes up to 60-80s when pushing the Bandwidth Limits
Starlink Router and bypass mode
Once you order Starlink, you used to get Dishy and a separated router, new customers since January only get Dishy, the router has been embedded in the power brick for the DIsh
With the older setup, bypassing the Starlink provided router is easy, you just chuck it into a closet and do not use it
With the new setup, bypassing the router involves ordering an additional (20$) ethernet adapter and disabling the router in the Starlink app. This will activate Bypass mode and will require you to connect dishy to your router
CGNAT and IPV6
Starlink provides internet services by allocating a CGNAT IPv4 address to your router, this means that through IPV4 it is not possible to reach your router from the outside, and port forwarding of any kind is not supported.
Starlink also provides unofficially IPV6 native connectivity (that means, if it works good for you, if it doesn’t, don’t bother opening a ticket with support) that when working allows the allocation of an entire IPV6 routed network .
This means that if you manage to get it working, you will be able to reach your router from the outside without NAT/translation/VPNs
VyOS, and why not PfSense
In this tutorial I will show how to configure a VyOS router/firewall appliance to obtain a dual stack configuration using Starlink as the service provider
VyOS may look like an uncommon platform choice as opposed to the more commonly used pfSense/OPNSense platforms.
You can find an example of PFSense config for this exact use case here:
https://www.reddit.com/r/Starlink/comments/mih62d/how_to_make_ipv6_keep_working_with_pfsense/ , I imagine the setup steps for OPNSense will be similar
I chose to use VyOS (even if I have been a PfSense user for more than 10 years now) because of two reasons:
- PfSense moved from an open source stance to an aggressive commercial stance that I do not agree with, and they handled the Wireguard integration poorly
- PfSense is based on freebsd and that has performance implications when handling >1Gbps links: you can do it but with beefy hardware or by buying Netgate products
What is VyOS
VyOs is an open source network operating system based on Debian Linux
It uses a very different paradigm for the user configuration, namely it doean’t have an official GUI and all config is done through the command line with a syntax that is a mix between Cisco and Juniper network gear, this is a good thing for people with Network engineering background (not me) and a bad thing for everyone else as the learning curve may be very steep and it is harder to build documentation and HOWTOs for it.
Officical Documentation can be found here:
https://docs.vyos.io/en/latest/
What is in this guide
This guide will cover setting up a VyOs appliance to provide IPV4+IPV6 connectivity to a local LAN (presumably connected to the VyOS appliance through a switch)
Requirements
- A place to run the VyOS appliance, it can be physical hardware, a virtual machine. The essential requirement
- two network interfaces one connected to Dishy and the other connected to your LAN. This can be achieved with cables or virtual routing or VLANS, it is your home/lab so you will have to provide the correct setup
- The first network interface (usually eth0) will be the WAN interface, connectedto Dishy
- The second network interface (usually eth1) will be the LAN interface, connected internally
- a storage device with at least 2GB available (will be completely wiped)
- 512MB of RAM
- two network interfaces one connected to Dishy and the other connected to your LAN. This can be achieved with cables or virtual routing or VLANS, it is your home/lab so you will have to provide the correct setup
- A copy of the VyOS installation image - we will be using the current development branch (nightly snapshots in VyOs parlance)
from the nightly Snapshots section of the VyOs site:
VyOS Community
VyOS Installation
- Boot the downloaded iso and, when you get to the vyos console
- Log in (vyos/vyos)
- Install the OS to the storage device
vyos@vyos:~$ install image
Welcome to the VyOS install program.  This script
will walk you through the process of installing the
VyOS image to a local hard drive.
Would you like to continue? (Yes/No) [Yes]: Yes
Probing drives: OK
Looking for pre-existing RAID groups...none found.
The VyOS image will require a minimum 2000MB root.
Would you like me to try to partition a drive automatically
or would you rather partition it manually with parted?  If
you have already setup your partitions, you may skip this step

Partition (Auto/Parted/Skip) [Auto]:

I found the following drives on your system:
 sda    4294MB

Install the image on? [sda]:

This will destroy all data on /dev/sda.
Continue? (Yes/No) [No]: Yes

How big of a root partition should I create? (2000MB - 4294MB) [4294]MB:

Creating filesystem on /dev/sda1: OK
Done!
Mounting /dev/sda1...
What would you like to name this image? [1.2.0-rolling+201809210337]:
OK.  This image will be named: 1.2.0-rolling+201809210337
Copying squashfs image...
Copying kernel and initrd images...
Done!
I found the following configuration files:
    /opt/vyatta/etc/config.boot.default
Which one should I copy to sda? [/opt/vyatta/etc/config.boot.default]:

Copying /opt/vyatta/etc/config.boot.default to sda.
Enter password for administrator account
Enter password for user 'vyos':
Retype password for user 'vyos':
I need to install the GRUB boot loader.
I found the following drives on your system:
 sda    4294MB

Which drive should GRUB modify the boot partition on? [sda]:

Setting up grub: OK
Done!
- Reboot
vyos@vyos:~$ reboot
Proceed with reboot? (Yes/No) [No] Yes
VyOS Configuration
First steps with VyOS
Log in to your VyOS console and enter configuration mode
By default, VyOS is in operational mode, and the command prompt displays a $. To configure VyOS, you will need to enter configuration mode, resulting in the command prompt displaying a #, as demonstrated below:
vyos@vyos$ configure
vyos@vyos#
Commit and Save
After every configuration change, you need to apply the changes by using the following command:
commit
Once your configuration works as expected, you can save it permanently by using the following command:
save
IMPORTANT: If you do not issue a save command all your changes will be gone after a reboot!!!
Set up initial LAN connectivity
You can check which interfaces are available by issuing the ‘show int’ command in operational mode, or the ‘run show int’ in configuration mode
vyos@vyos:~$ sh int
Codes: S - State, L - Link, u - Up, D - Down, A - Admin Down
Interface        IP Address                        S/L  Description
---------        ----------                        ---  -----------
eth0             -                                 d/d
eth1             -                                 d/d
lo               127.0.0.1/8                       u/u
                 ::1/128
Configure eth1 to be on your LAN (in this example 192.168.0.0/24)
vyos@vyos$ configure
vyos@vyos# set interfaces ethernet eth1 address '192.168.0.1/24'
vyos@vyos# set interfaces ethernet eth1 description 'LAN'
vyos@vyos# commit
vyos@vyos:~$ sh int
Codes: S - State, L - Link, u - Up, D - Down, A - Admin Down
Interface        IP Address                        S/L  Description
---------        ----------                        ---  -----------
eth0             -                                 d/d
eth1             192.168.0.1/24                    u/u  LAN
lo               127.0.0.1/8                       u/u
                 ::1/128
Note: from now on I will only include the configuration commands, to be issued in config mode and committed using the commit statement
Configure SSH
set service ssh port '22'
Configure DHCP server on LAN
set service dhcp-server shared-network-name LAN subnet 192.168.0.0/24 default-router '192.168.0.1'
set service dhcp-server shared-network-name LAN subnet 192.168.0.0/24 domain-name 'dishy.local"
set service dhcp-server shared-network-name LAN subnet 192.168.0.0/24 lease '86400'
set service dhcp-server shared-network-name LAN subnet 192.168.0.0/24 name-server '192.168.0.1'
set service dhcp-server shared-network-name LAN subnet 192.168.0.0/24 range 0 start '192.168.0.100'
set service dhcp-server shared-network-name LAN subnet 192.168.0.0/24 range 0 stop '192.168.0.245'
After you commit this, you should be able to connect from a host in your LAN using DHCP , and be able to copy and paste as opoosed to typing command if your console does not have copy and paste capabilities
Configure WAN IPV4
set interfaces ethernet eth0 address 'dhcp'
set interfaces ethernet eth0 description 'STARLINK'
Once you commit this change, and if you got you cabling right, you should already have a CGNAT IP from starlink
vyos@vyos:~$ sh int
Codes: S - State, L - Link, u - Up, D - Down, A - Admin Down
Interface        IP Address                        S/L  Description
---------        ----------                        ---  -----------
eth0             100.66.97.86/10                   u/u  STARLINK
eth1             192.168.0.1/24                    u/u  LAN
lo               127.0.0.1/8                       u/u
                 ::1/128
Configure DNS
set system name-server '127.0.0.1'
set service dns forwarding allow-from '192.168.0.0/24'
set service dns forwarding allow-from '127.0.0.1/32'
set service dns forwarding cache-size '0'
set service dns forwarding listen-address '192.168.0.1'
set service dns forwarding listen-address '127.0.0.1'
set service dns forwarding name-server '2606:4700:4700::1111'
set service dns forwarding name-server '2606:4700:4700::1001'
set service dns forwarding name-server '8.8.8.8'
Configure NAT
set nat source rule 100 outbound-interface 'eth0'
set nat source rule 100 source address '192.168.0.0/24'
set nat source rule 100 translation address 'masquerade'
At this point you should have IPV4 internet connectivity from your LAN, and DNS queries should work as well …
Configure IPV6 on WAN
set interfaces ethernet eth0 address 'dhcpv6'
set interfaces ethernet eth0 dhcpv6-options pd 0 interface eth1 sla-id '0'
set interfaces ethernet eth0 dhcpv6-options pd 0 length '56'
set interfaces ethernet eth0 ipv6 address autoconf
At this point you should have IPV6 connectivity to your router
vyos@vyos:~$ sh int
Codes: S - State, L - Link, u - Up, D - Down, A - Admin Down
Interface        IP Address                        S/L  Description
---------        ----------                        ---  -----------
eth0             100.66.97.89/10                   u/u  STARLINK
                 2a0d:3340:2e27:beef:beef:beef:beef:6dca/64

eth1             192.168.0.1/24                    u/u  LAN
                 2a0d:3340:2e26:beef:beef:beef:beef:27d6/64

lo               127.0.0.1/8                       u/u
                 ::1/128
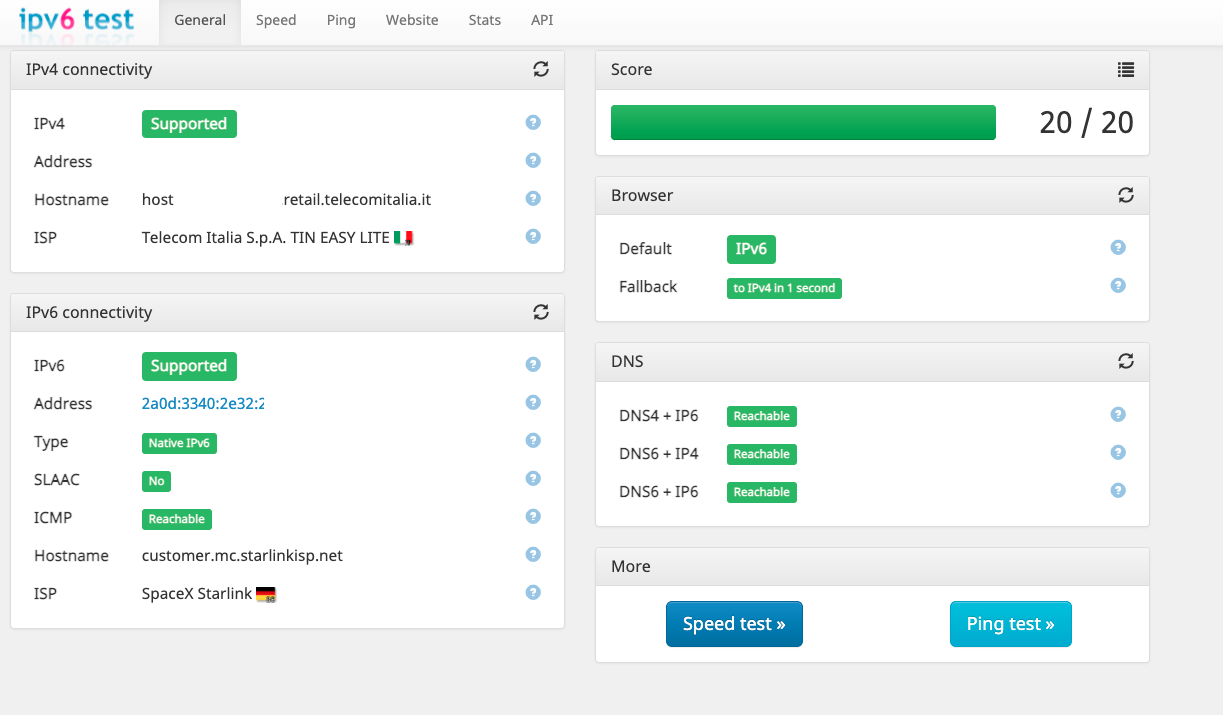
You can test basic IPV6 connectivity by pinging sites
Ping should work and you should see the ipv6 address being used.
Please note we did not have to set up any NAT for IPV6 since we’re natively routed
vyos@vyos:~$ ping www.google.com
PING www.google.com(fra16s53-in-x04.1e100.net (2a00:1450:4001:813::2004)) 56 data bytes
64 bytes from fra16s53-in-x04.1e100.net (2a00:1450:4001:813::2004): icmp_seq=1 ttl=122 time=27.7 ms
64 bytes from fra16s53-in-x04.1e100.net (2a00:1450:4001:813::2004): icmp_seq=2 ttl=122 time=26.2 ms
64 bytes from fra16s53-in-x04.1e100.net (2a00:1450:4001:813::2004): icmp_seq=3 ttl=122 time=28.3 ms
64 bytes from fra16s53-in-x04.1e100.net (2a00:1450:4001:813::2004): icmp_seq=4 ttl=122 time=31.2 ms
^C
--- www.google.com ping statistics ---
4 packets transmitted, 4 received, 0% packet loss, time 3004ms
rtt min/avg/max/mdev = 26.216/28.347/31.200/1.811 ms
vyos@vyos:~$ ping www.facebook.com
PING www.facebook.com(edge-star-mini6-shv-02-frx5.facebook.com (2a03:2880:f12d:181:face:b00c:0:25de)) 56 data bytes
64 bytes from edge-star-mini6-shv-02-frx5.facebook.com (2a03:2880:f12d:181:face:b00c:0:25de): icmp_seq=1 ttl=58 time=26.0 ms
64 bytes from edge-star-mini6-shv-02-frx5.facebook.com (2a03:2880:f12d:181:face:b00c:0:25de): icmp_seq=2 ttl=58 time=30.9 ms
64 bytes from edge-star-mini6-shv-02-frx5.facebook.com (2a03:2880:f12d:181:face:b00c:0:25de): icmp_seq=3 ttl=58 time=29.2 ms
64 bytes from edge-star-mini6-shv-02-frx5.facebook.com (2a03:2880:f12d:181:face:b00c:0:25de): icmp_seq=4 ttl=58 time=27.2 ms
^C
--- www.facebook.com ping statistics ---
Setup router solicitation on WAN
Because of the way IPV6 is configured on the Starlink side, if we don’t send a router solicitation on the WAN side every 3 minutes, we will lose the WAN IPV6 address (and the routing).
So, we need to create a script and make it executable
cat << EOL >>/config/scripts/ipv6raconfig.sh
#!/bin/sh
rdisc6 -q -1 eth0 >&1 | /usr/bin/logger -t starlink_ra_renew
EOL
chmod +x /config/scripts/ipv6raconfig.sh
And then we need to set up a cron job for it to be executed every two minutes
set system task-scheduler task send-starlink-rs executable path '/config/scripts/ipv6raconfig.sh'
set system task-scheduler task send-starlink-rs interval '2m'
Configure LAN Router Advertisement - IPV6 local routed network
set service router-advert interface eth1 default-lifetime '1000'
set service router-advert interface eth1 default-preference 'medium'
set service router-advert interface eth1 dnssl 'home.arpa'
set service router-advert interface eth1 hop-limit '64'
set service router-advert interface eth1 interval max '600'
set service router-advert interface eth1 interval min '200'
set service router-advert interface eth1 link-mtu '1500'
set service router-advert interface eth1 managed-flag
set service router-advert interface eth1 name-server '2001:4860:4860::8888'
set service router-advert interface eth1 name-server '2001:4860:4860::8844'
set service router-advert interface eth1 other-config-flag
set service router-advert interface eth1 prefix ::/64 preferred-lifetime '300'
set service router-advert interface eth1 prefix ::/64 valid-lifetime '900'
set service router-advert interface eth1 reachable-time '900000'
set service router-advert interface eth1 retrans-timer '0'
set service router-advert interface eth1 route ::/0 route-preference 'medium'
Set up DHCPV6 on lan for DNS settings to clients
Discover your IPV6 link loca address on your LAN
ip addr | grep eth1 -A2 | grep inet6 | cut -d " " -f 6
set service dhcpv6-server preference '255'
set service dhcpv6-server shared-network-name LAN common-options domain-search 'my.com'
set service dhcpv6-server shared-network-name LAN common-options name-server '2001:4860:4860::8888'
set service dhcpv6-server shared-network-name LAN common-options name-server '2001:4860:4860::8844'
set service dhcpv6-server shared-network-name LAN subnet <your link local address>
If everything went as planned, you should be getting a routed IPV6 address to clients on your LAN
You can check for IPV6 client connectivity by hitting this page on your browser:
WARNING
With great power comes great responsibility … as in
We did not configure any Firewall rule, so all your network at this pont will be open to connectivity in/out/ For IPv4 it is not a big deal as you’re behind NAT, whereas with IPV6 your LAN will be routed to the world (think not having NAT on your current IPV4 setup and running your LAN with public IPS)
Example: Full config
I am including a complete config that includes minimal firewall rules, but it will be up to you to tweak them to your needs. For example you will need to add additional accept rules to allow IPV6 traffic in from IPV6-enabled hosts you trust
set interfaces ethernet eth0 address 'dhcp'
set interfaces ethernet eth0 address 'dhcpv6'
set interfaces ethernet eth0 description 'STARLINK'
set interfaces ethernet eth0 dhcpv6-options pd 0 interface eth1 sla-id '0'
set interfaces ethernet eth0 dhcpv6-options pd 0 length '56'
set interfaces ethernet eth0 disable
set interfaces ethernet eth0 hw-id '00:a0:98:71:6d:ca'
set interfaces ethernet eth0 ipv6 address autoconf
set interfaces ethernet eth1 address '192.168.0.1/24'
set interfaces ethernet eth1 description 'LAN'
set interfaces ethernet eth1 hw-id '00:a0:98:30:27:d6'
set interfaces loopback lo
set nat source rule 100 outbound-interface 'eth0'
set nat source rule 100 source address '192.168.0.0/24'
set nat source rule 100 translation address 'masquerade'
set service dhcp-server shared-network-name LAN subnet 192.168.0.0/24 default-router '192.168.0.1'
set service dhcp-server shared-network-name LAN subnet 192.168.0.0/24 domain-name 'my.com'
set service dhcp-server shared-network-name LAN subnet 192.168.0.0/24 lease '86400'
set service dhcp-server shared-network-name LAN subnet 192.168.0.0/24 name-server '192.168.0.1'
set service dhcp-server shared-network-name LAN subnet 192.168.0.0/24 range 0 start '192.168.0.100'
set service dhcp-server shared-network-name LAN subnet 192.168.0.0/24 range 0 stop '192.168.0.245'
set service dns forwarding allow-from '192.168.0.0/24'
set service dns forwarding allow-from '127.0.0.1/32'
set service dns forwarding cache-size '0'
set service dns forwarding listen-address '192.168.0.1'
set service dns forwarding listen-address '127.0.0.1'
set service dns forwarding name-server '2606:4700:4700::1111'
set service dns forwarding name-server '2606:4700:4700::1001'
set service dns forwarding name-server '8.8.8.8'
set service router-advert interface eth1 default-lifetime '1000'
set service router-advert interface eth1 default-preference 'medium'
set service router-advert interface eth1 dnssl 'home.arpa'
set service router-advert interface eth1 hop-limit '64'
set service router-advert interface eth1 interval max '600'
set service router-advert interface eth1 interval min '200'
set service router-advert interface eth1 link-mtu '1500'
set service router-advert interface eth1 managed-flag
set service router-advert interface eth1 name-server '2001:4860:4860::8888'
set service router-advert interface eth1 name-server '2001:4860:4860::8844'
set service router-advert interface eth1 other-config-flag
set service router-advert interface eth1 prefix ::/64 preferred-lifetime '300'
set service router-advert interface eth1 prefix ::/64 valid-lifetime '900'
set service router-advert interface eth1 reachable-time '900000'
set service router-advert interface eth1 retrans-timer '0'
set service router-advert interface eth1 route ::/0 route-preference 'medium'
set service ssh port '22'
set system config-management commit-revisions '100'
set system conntrack modules ftp
set system conntrack modules h323
set system conntrack modules nfs
set system conntrack modules pptp
set system conntrack modules sip
set system conntrack modules sqlnet
set system conntrack modules tftp
set system console device ttyS0 speed '115200'
set system host-name 'vyos'
set system name-server '127.0.0.1'
set system ntp server time1.vyos.net
set system ntp server time2.vyos.net
set system ntp server time3.vyos.net
set system syslog global facility all level 'info'
set system syslog global facility protocols level 'debug'
set system task-scheduler task send-starlink-rs executable path '/config/scripts/ipv6raconfig.sh'
set system task-scheduler task send-starlink-rs interval '2m'


set firewall group network-group NET-LAN network '192.168.0.0/24'
set firewall ipv6-name WAN_INBOUND_6 default-action 'drop'
set firewall ipv6-name WAN_INBOUND_6 description 'WAN_INBOUND_6'
set firewall ipv6-name WAN_INBOUND_6 enable-default-log
set firewall ipv6-name WAN_INBOUND_6 rule 10 action 'accept'
set firewall ipv6-name WAN_INBOUND_6 rule 10 description 'Accept Established/Related'
set firewall ipv6-name WAN_INBOUND_6 rule 10 protocol 'all'
set firewall ipv6-name WAN_INBOUND_6 rule 10 state established 'enable'
set firewall ipv6-name WAN_INBOUND_6 rule 10 state related 'enable'
set firewall ipv6-name WAN_INBOUND_6 rule 20 action 'accept'
set firewall ipv6-name WAN_INBOUND_6 rule 20 description 'Accept ICMP'
set firewall ipv6-name WAN_INBOUND_6 rule 20 protocol 'icmpv6'
set firewall ipv6-name WAN_INBOUND_6 rule 30 action 'drop'
set firewall ipv6-name WAN_INBOUND_6 rule 30 description 'Drop Invalid state'
set firewall ipv6-name WAN_INBOUND_6 rule 30 protocol 'all'
set firewall ipv6-name WAN_INBOUND_6 rule 30 state invalid 'enable'
set firewall ipv6-name WAN_LOCAL_6 default-action 'drop'
set firewall ipv6-name WAN_LOCAL_6 description 'WAN_LOCAL_6'
set firewall ipv6-name WAN_LOCAL_6 enable-default-log
set firewall ipv6-name WAN_LOCAL_6 rule 10 action 'accept'
set firewall ipv6-name WAN_LOCAL_6 rule 10 description 'Accept Established/Related'
set firewall ipv6-name WAN_LOCAL_6 rule 10 protocol 'all'
set firewall ipv6-name WAN_LOCAL_6 rule 10 state established 'enable'
set firewall ipv6-name WAN_LOCAL_6 rule 10 state related 'enable'
set firewall ipv6-name WAN_LOCAL_6 rule 20 action 'accept'
set firewall ipv6-name WAN_LOCAL_6 rule 20 description 'Accept ICMPv6'
set firewall ipv6-name WAN_LOCAL_6 rule 20 protocol 'icmpv6'
set firewall ipv6-name WAN_LOCAL_6 rule 30 action 'accept'
set firewall ipv6-name WAN_LOCAL_6 rule 30 description 'Accept DHCPv6'
set firewall ipv6-name WAN_LOCAL_6 rule 30 destination port '546'
set firewall ipv6-name WAN_LOCAL_6 rule 30 protocol 'udp'
set firewall ipv6-name WAN_LOCAL_6 rule 30 source port '547'
set firewall ipv6-name WAN_LOCAL_6 rule 40 action 'drop'
set firewall ipv6-name WAN_LOCAL_6 rule 40 description 'Drop Invalid state'
set firewall ipv6-name WAN_LOCAL_6 rule 40 protocol 'all'
set firewall ipv6-name WAN_LOCAL_6 rule 40 state invalid 'enable'
set firewall name LAN_INBOUND_4 rule 9000 action 'accept'
set firewall name LAN_INBOUND_4 rule 9000 description 'Accept Outbound'
set firewall name LAN_INBOUND_4 rule 9000 source group network-group 'NET-LAN'
set firewall name LAN_INBOUND_4 rule 9000 state new 'enable'
set firewall name LAN_OUTBOUND_4 default-action 'drop'
set firewall name LAN_OUTBOUND_4 description 'LAN_OUTBOUND_4'
set firewall name LAN_OUTBOUND_4 enable-default-log
set firewall name LAN_OUTBOUND_4 rule 10 action 'accept'
set firewall name LAN_OUTBOUND_4 rule 10 description 'Accept Established/Related'
set firewall name LAN_OUTBOUND_4 rule 10 protocol 'all'
set firewall name LAN_OUTBOUND_4 rule 10 state established 'enable'
set firewall name LAN_OUTBOUND_4 rule 10 state related 'enable'
set firewall name LAN_OUTBOUND_4 rule 20 action 'accept'
set firewall name LAN_OUTBOUND_4 rule 20 description 'Accept ICMP'
set firewall name LAN_OUTBOUND_4 rule 20 icmp type-name 'echo-request'
set firewall name LAN_OUTBOUND_4 rule 20 protocol 'icmp'
set firewall name LAN_OUTBOUND_4 rule 20 state new 'enable'
set firewall name LAN_OUTBOUND_4 rule 30 action 'drop'
set firewall name LAN_OUTBOUND_4 rule 30 description 'Drop Invalid state'
set firewall name LAN_OUTBOUND_4 rule 30 protocol 'all'
set firewall name LAN_OUTBOUND_4 rule 30 state invalid 'enable'
set firewall name WAN_INBOUND_4 default-action 'drop'
set firewall name WAN_INBOUND_4 rule 10 action 'accept'
set firewall name WAN_INBOUND_4 rule 10 state established 'enable'
set firewall name WAN_INBOUND_4 rule 10 state related 'enable'
set firewall name WAN_LOCAL_4 default-action 'drop'
set firewall name WAN_LOCAL_4 rule 10 action 'accept'
set firewall name WAN_LOCAL_4 rule 10 state established 'enable'
set firewall name WAN_LOCAL_4 rule 10 state related 'enable'
set firewall name WAN_LOCAL_4 rule 20 action 'accept'
set firewall name WAN_LOCAL_4 rule 20 icmp type-name 'echo-request'
set firewall name WAN_LOCAL_4 rule 20 protocol 'icmp'
set firewall name WAN_LOCAL_4 rule 20 state new 'enable'
set interfaces ethernet eth1 firewall in name 'LAN_INBOUND_4'
set interfaces ethernet eth1 firewall out name 'LAN_OUTBOUND_4'
set interfaces ethernet eth0 firewall in ipv6-name 'WAN_INBOUND_6'
set interfaces ethernet eth0 firewall in name 'WAN_INBOUND_4'
set interfaces ethernet eth0 firewall local ipv6-name 'WAN_LOCAL_6'
set interfaces ethernet eth0 firewall local name 'WAN_LOCAL_4'