So this is basically part 2 to Emigrating to Linux: A guide
In part 1 we did not go in depth into the different Linux Distro's nor explain how easy was easy. So in these Survival Guides I hope to make the reader have an understanding of how easy easy is, and whether or not the end user would appreciate the distro.
Ubuntu 15.10
Getting Ubuntu
The easiest and safest way to get an Ubuntu .iso is thru the www.ubuntu.com website. Once on the website hover over the Download link located at the top right of the page. Click on Ubuntu Kylin. The next page you will see will give you two options to choose from, in regards to which OS version to get. Scroll down a little and download Ubuntu 15.10 by selecting your architecture and saving the file.
If you do not know what architecture your PC is, choose the 32 bit .iso, as it will work on both 32 bit and 64 bit hardware.
After you have downloaded the .iso. you will have a new file called ubuntukylin-15.10-desktop.1386.iso. (If you downloaded the 64 bit .iso it would say ubuntukylin-15.10-amd64.iso.)
Burning the .iso
Burning the .iso in Windows 7/8/8.1
Right click on the .iso file and select Burn disc image from inside the pop up menu. Then select a CD/DVD drive and finally press the Burn button on the bottom of the application.
Burning the .iso in Mac OS X
The CD
What is cool about the Ubuntu CD is that it allows you to try out the Operating System without installing it to your hardware. As things are being read from the CD/DVD drive and not the Hard Drive the experience will be slow, but it is great to test out drivers, hardware compatibility and feel.
Booting to the CD
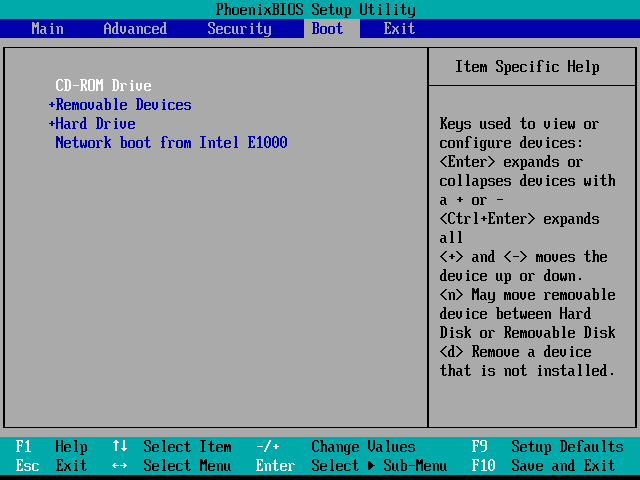
To boot from the CD, insert the disk into your CD/DVD drive and look up your computer model to find out what key you will need to press to access the BIOS. Once you know the key, restart the computer and once the computer starts to boot up press the BIOS key like crazy until you get the BIOS menu. Move your mouse or arrow keys over until you see something along the lines of BOOT.

Then select the CD/DVD ROM Drive and save your changes and restart the computer again. After you tryout/install the OS make sure to change the BIOS back to booting up from the Hard Drive, otherwise you will continue to boot from the CD.
Inside the Live CD
After the Live CD boots up, select your language and click the Try Ubuntu button on the Welcome Screen

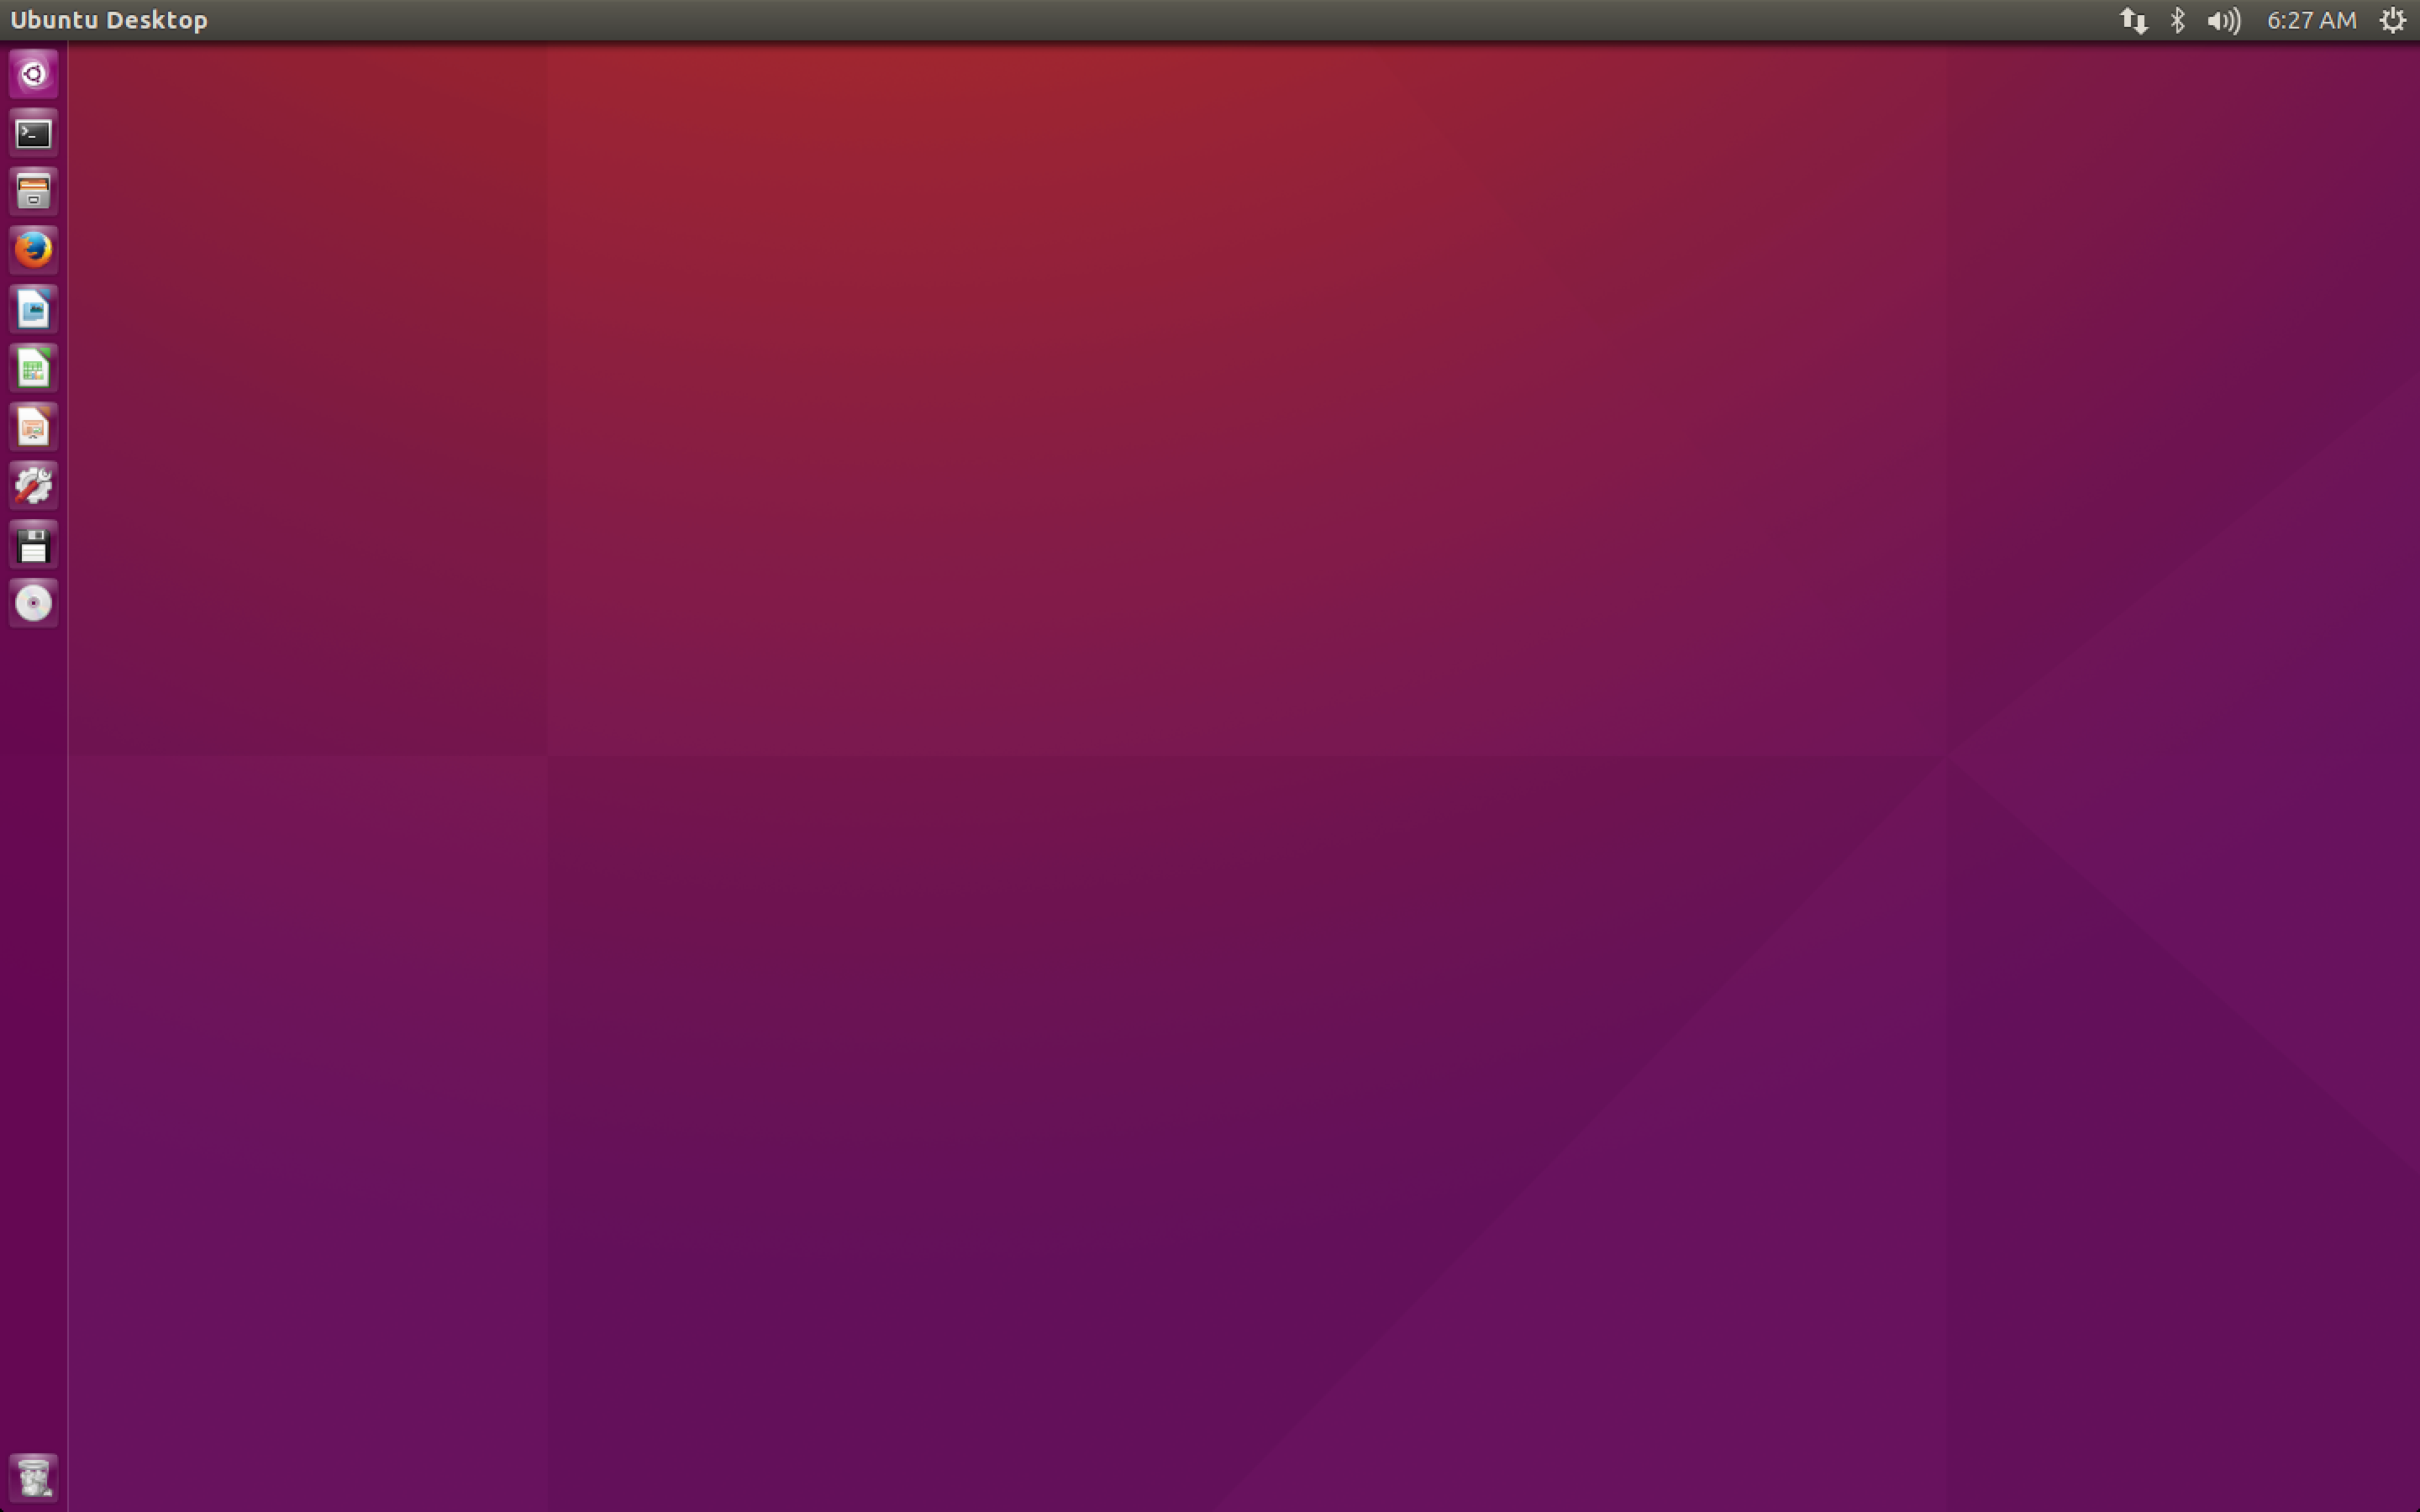
Once you get the desktop, feel free to get comfortable with the environment. None of what you change will be saved.
Once you feel like you get a good feel of Ubuntu, and want to install it, click on the Install Ubuntu icon on the desktop.
Installing Ubuntu
As I said in Emmigrating to Linux:A Guide Installing Ubuntu is just a couple of clicks and very painless.
When installing Ubuntu make sure that you are connected to the internet either by Wi-Fi or via a hard wired connection, to download updates while the installation is taking place and/or to install 3rd party software.
Meeting the system requirements
After clicking the Install Ubuntu icon, you will be presented with the installer. The first of multiple screens you will see, will make sure that you meet the minimum system requirements, as well as ask if you want to Download updates while installing and Install this third-party software checking the latter option includes media codecs.
If you meet the requirements click the continue button.
Partitioning the Hard Drive
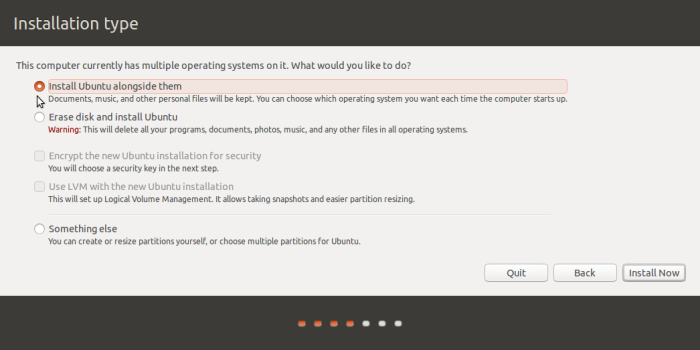
Partitioning can be complicated and in some cases an accidental self-suicide. If you make one mistake you can wipe a partition that had data you wanted to keep, or write over and take over your Windows partition, leaving you with just Ubuntu. The developers realized this and made partitioning simpler by having the CD do it for you. 3 options are available for you to choose from and 2 are options that are autonomous ( Done by the CD ) and 1 option is available for those who want to manually partition the drive(s).

If you want to dual boot with Windows or another Operating System you have installed click the Install Ubuntu alongside them. (Autonomous)
If you just want Ubuntu click the Erase disk and install Ubuntu option. (Autonomous)
If you want to do it yourself choose the Something else option
Once finished click Install now.
Encryption
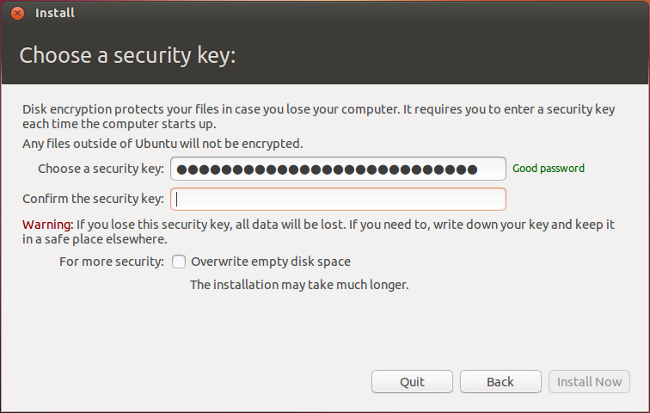
If you selected Encrypt the new Ubuntu installation for security on the Installation type screen, you will be asked to enter a security key.


Time zone
Once you are finished with the partitioning of your drives, select your timezone by clicking on the map, alternatively you can select your timezone.

Keyboard
Next, all you have to do is select what keyboard you are using, Ubuntu automatically tries to find out what keyboard you are using, however you can choose a different option, and test out the layout in the text box. Once satisfied click Forward.
User details
Ubuntu needs to know your name ( you can lie ), the username of the account you are creating, the password for the account you are creating and the name of the computer, as well as whether or not you want an auto-login or manual login experience.
Auto-login - should only be used if you are going to have one person using the computer and said person does not care about security.
Require my password to log in - is selected by default and is the safest log in method. This should be used for those who want to have multiple user accounts on the machine, those who care about user security, and those who want to attach this computer to a network, or for those who like to travel with their laptop.
Slideshow
Instead of just having a progress bar scroll by showing you how much is left to be done, Ubuntu includes a slideshow that scrolls thru what Ubuntu is capable of as well as where you can get help.

After the installation is finished you will be asked if you want to restart the computer, restart. Upon boot up make sure to change the BIOS to boot up with the Hard Drive.
Unity
I described Unity as something that was created out of a hard to understand conversation of what Mac OS X looks like. And I was not far off. There are very few differences between Mac OS X's GUI Aqua and Unity.

The Launcher
The left of the screen plays as home to the Launcher. The Launcher stores "favorite" applications as well as displays opened applications and present external or internal media. After install, the Launcher contains:
- The
Dash - The file manager
Files - The
Firefox Web Browser - The
Libre Office Suite - The
Ubuntu Software Center - The
System Settings - The
Desktop Switcher - The
Trash
The Launcher is also programmed with a progress bar, to show the progress of a remaining download, for example and if an app needs your attention the application icon wiggles. It will also show numbers on top of the app icon if you have multiple of new things. For example, if you have unread e-mail the total number will show on top of your e-mail client's icon and if you are downloading multiple packages from the store the number will show.
Launcher customization
Adding to the Launcher
The Launcher is easy to adapt to the users needs. If you want to add an application to it, simply drag and drop the icon to the Launcher. If the application you want to keep in the Launcher is already opened, right click the icon and click the Keep in Launcher text.
Auto-hide the Launcher
If you want the Launcher to show up only when you want to see it, you can set the Launcher to auto-hide itself. To do so, follow the below steps:
Go to
System SettingsClick
Appearanceunder thePersonalsection of theSystem SettingsWindow.Click the
BehaviorTabSlide the
Auto-hide the Launcheroption toON
If you find yourself always accidentally bringing the Launcher up when it is in Auto-hide mode, you can change the sensitivity. The higher the sensitivity, the more you have to push over to bring the Launcher up.
Changing the size of the Launcher icons
If you need to make the size of the icons bigger or smaller go to System Settings click Appearance under the Personal section of the System Settings window and slide the Launcher icon size slider to increase or decrease the size of the Launcher icons to the size that makes it easier for you to use.
The Dash
What is cool about the Dash is that it is a one place stop for all of your needs.
To open the Dash you can either click the icon on the Launcher or you can hit the Super Key on your keyboard.
Dash can also show keyboard shortcuts by holding down the Super Key on your keyboard, the keyboard shortcuts window will display over any open application.

The Dash opens with the Home Lens by default, which shows recently used Apps,recently opened Files and recent Downloads.

Dash Lenses
Lenses, also known as scopes, provide focus onto one category. By default 6 lenses are available:
- Home Lens
- Application Lens
- Files and Folders Lens
- Video Lens
- Music Lens
- Photo Lens
Dash is an extremely powerful tool aiding you the ability to get what you want. In the Search field, type what you are looking for and results will appear based off of what you are typing. You can even filter results, depending on what lens you are in.
Workspaces
Workspaces are commonly known as Virtual Desktops. Virtual Desktops allow for an easier computing experience by organizing your workflow. By default Ubuntu ships with 4 Virtual Desktops, however more can be added.
To move applications to a different Virtual Desktop, un-maxmize the window and right click on the title bar, and select one of the following options:
- Move to Workspace Left
- Move to Workspace Right
- Move to Workspace Down
- Move to Another Workspace
Menu bar
The Menu bar is the blackish rectangle that spans the entire top of your monitor. It contains the window management buttons, which are your close, minimize and maximize, it also contains the application menus and indicators.
Session Options
- Logging out - Make sure that you have saved all work and finished all downloads before logging off. To log off simply press the
gearicon located in the top right of themenu bar, then select theLog Out...option.