This is adapted from a series of guides that I wrote for my website.
This page will cover how to set up a VPS to be able to self-host services. These services include:
- NextCloud - A do it all self-hosted storage software that can also store contacts and calendars, as well as host a variety of useful services.
- Bitwarden - A self-hosted password manager with great features and a slick app.
- BookStack - A self-hosted but modern and sleek wiki software.
- WordPress - The world’s most ubiquitous blogging software.
- Matrix Synapse - A self-hosted federated chat server.
All of this can be accomplished on a VPS running Docker, a containerization software, and Traefik, a reverse proxy made with Docker in mind. This page is dedicated to the installation and setup of Docker and Traefik, and will not cover installing individual services.
Setup
This guide was written using Linode VPS and Google Domains as service provers. Most of these instructions are applicable to an entirely self-hosted system, or a system running on a different VPS/DNS server provider as well
The first thing to do is head over to https://www.linode.com and set up an account. If you do a web search for “Linode Promo Code” you can quite often find some for up to $20 credit. That will allow you to try the services out for some time before making a financial commitment. As a side note, Linode is typically very easy to cancel if you decide to go that route, so don’t worry about having to deal with an impossible to cancel account that has your credit card number. Once you have an account, you will probably want to select the $5/mo “Nanode” plan. This plan includes a virtual private server with 1 CPU core and 1GB of RAM, as well as 25GB of storage. If you suspect this won’t be enough for your needs, you can seamlessly upgrade to more hardware with only a couple of minutes of downtime.
When setting up the Linode, you will want to choose the Ubuntu 18.04 image, and the server closest to your location. Also, be sure to select a private IP address if it offers you the option, and set the root password to something secure, but that you also will not forget. Once you have it set up, navigate to https://cloud.linode.com/dashboard and click on your Linode. You should see a screen like this:
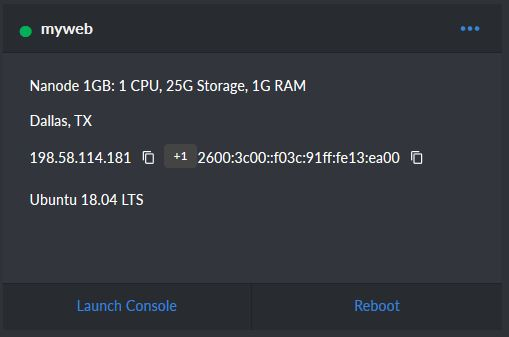
That number on the left, 198.58.114.181 is your IPv4 address. Make sure to write that down or save it somewhere as we will need it in a minute.
Once you’ve created your Linode and started a Nanode plan, the very next thing you will need is a domain name. These typically run from $10-$15 per year. You must purchase your domain name from a registrar. While your Linode account gave you an IP address, the domain name is going to act as a lookup for that IP address. When someone types in “mywebsite.domain” it will automatically navigate to the IP address of your Linode. There’s a multitude of registrars available, and somewhat ironically, we recommend using Google Domains. There’s a multitude of reasons for this. Many registrars operate shady business and billing practices, making it difficult to cancel, raising the price of your domain when it’s up for renewal, and charging extra for privacy. Google Domains has up-front, fair pricing , free privacy protection so that your name and address don’t have to be publicly listed, and a variety of other services such as Dynamic DNS (important if you decide to host from home) that other companies typically charge for. You’re welcome to use any registrar, but it is very much a buyer beware situation. If not using Google for anything is extremely important to you, Dreamhost is a good alternative. They aren’t as feature rich, but their pricing is fair and they are an extremely reputable company that does not engage in any known shady business practices.
Once you have a domain name selected, you need to set it to direct to your Linode’s IP address. How to do this will depend on what registrar you decided to use. For Google Domains, you will want to log in to your account, and select the DNS tab on the domain name:

Once inside the DNS page, you will want to scroll down to “Custom resource records” and we’re going to add a record:

In the field on the left, we’re going to put an @ symbol. This means that anything going to the root domain name that you just purchased will be affected by this DNS record. So any time you type in your website’s domain, this is what the computer will look up to see where to go. In the field on the right, if you click the drop-down menu, there’s a variety of options. Option A indicates that this is an IPv4 address we are redirecting to. IPv4 is a method of IP address distribution that the majority of the internet runs on. IPv6 is becoming more popular, and is indicated by the AAA record. You can have multiple types of records for @ if you want, so you could set it up to work with an IPv4 and an IPv6, both forwarding to your website, but we will just focus on the A record for now. The box that says 1H tells us how long this record will live. We set this to an hour, (1H), so every hour this will update. If you make a change to it, you will have to wait until the next update for the change to become effective. The final box on the right is where you are going to put the IP address of your Linode. So the bottom line is, we’re redirecting any traffic to your domain to go to the IPv4 address of your Linode. Then, on your Linode, we will put the content that we want to display. Make sure to click save, and we can move on to setting up the Linode.
Next, you will want to connect to your Linode and start setting up the software. This is where things start to get fun, since we will be customizing our little home-away from-home on the internet. Since Ubuntu Server (and pretty much all server operating systems) doesn’t have an actual desktop environment to cut down on processing overhead, we will do everything through a command line interface, or shell environment. To connect to this shell, we need to download the PuTTY software. PuTTY is an SSH client. SSH stands for “Secure Shell” and is a secure way to have a terminal on a remote system. You can download PuTTY from here. Grab the file that you need, depending on your operating system, and run it.
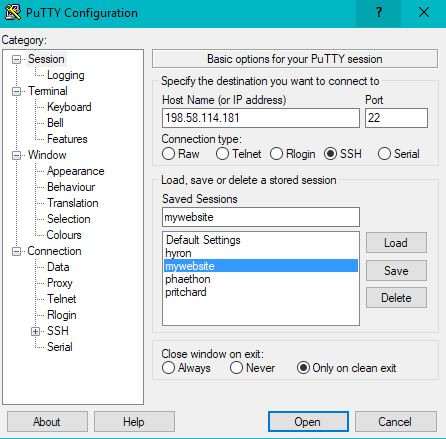
Once you have PutTTY open, you can type your IPv4 address into the Host Name field. Make sure that the port is set to 22, then, in the saved sessions field you can type an easy to remember name, and click the save button. You will need to make sure you have a saved session as we are going to modify it later. Once your session is saved, go ahead and select “Open”.
You may receive a PuTTY Security Alert, telling you that the key is not in your registry. That’s fine, as we have never connected to this host before, so just accept it. If you are using PuTTY frequently, and suddenly this pops up, then it might be cause for alarm because it’s saying that your connection to the server may have been intercepted.
Once connected, a black terminal window is going to appear. It will as you for an account to login as. For this, we’re going to enter “root” and the password is going to be whatever we made our root password when we set up the Linode. You will not be able to see the password characters as you type so don’t freak out if you can’t see them, as it is a security measure. Once you have logged in, you will be greeted with a system message, and a terminal at the bottom of the screen. Congratulations! You’ve now set up your first web server. We now have to get to configuring it.
Securing Your Server
OK, so the first thing we need to do is secure the web server. Right now, the only account is a root account. In Linux, the root account is like having a full administrator account on Windows, but even slightly more dangerous. There’s nothing the root account can’t access, or delete, even critical system files that could break the whole server. For this reason, we want to make a new, non-root account, and then prohibit login to the root account. To do this, we’re going to enter our very first terminal command:
adduser username
Replace username with whatever you would like your username to be. The terminal will prompt you to enter the password for that user – make sure you can remember it. It will then prompt you for other information such as the name, phone number, etc. You can just hit enter without entering any data here to skip it, if you like. It will then ask you to verify if the information is correct. You can just enter “y” and hit enter again, and you should be done.
The next thing we need to do, is modify this user account so that they can run commands as a root user if necessary. This is generally preferred over having a root account because to run rood commands, you must enter the “sudo” command first, as well as your password periodically, for additional security. To make the new user a root user, we are going to enter:
usermod -aG sudo username
…where username is the user you just created, and sudo is the group that we’re adding it to. Now, we’re going to exit the PuTTY application, and reconnect. This time, instead of logging in as root, log in with the username and password that you just made.
The next thing we want to do, is prevent anyone from logging in as the root user. To accomplish this, we need to modify the SSH settings on the server, and tell it not to accept connections from the root account. The settings file is located in the /etc directory on the system. To get there, let’s start by getting our bearings. On the left hand side of the screen, you should see something like username@localhost:~$
The username portion is self explanatory. @localhost tells you you’re logged into the machine called “localhost”, and the :~ tells you that you’re in directory ~. The ~ directory is simply your user’s home directory. You can append the cd command with the directory you want to navigate to. For instance, you could type cd /etc to navigate to the /etc directory. If you typed cd etc without the slash at the front of the etc , it will assume that etc is inside the directory you’re currently in. The / tells it that you want to navigate to a root directory, at the base of the file system.
OK, let’s get our bearings now. If we type the command to list everything inside our current directory (which right now is ~), it shouldn’t display anything, as the directory is empty. So go ahead and type ls and see that nothing happens. Then, type:
cd ..
The cd command tells the computer we would like to change your directory. The … simply means you want to navigate to the parent directory of the one that you’re in. You should now be in the /home directory. If you enter ls again, you should see your user folder. That’s the one that you were just in. Type cd … again, and then type ls one more time. This time, you should see a variety of folders such as bin, var, etc, and the directory you were just in, home. Also, your current directory should just be denoted by a / symbol. That is the root directory of the file system. Everything starts with a / symbol. You can use the / symbol to navigate directly to any directory, from anywhere in the server.
Don’t worry if this is confusing now, you will get the hang of it as you navigate around your server . Let’s get back to business, though. We want to edit the configuration file for the SSH software, which resides in /etc/ssh, so let’s enter:
cd /etc/ssh
This tells the computer that from the root directory, navigate to the etc folder, and then in the etc folder, navigate to the ssh folder. If you type ls inside of that /etc/ssh folder, you should see a list of files, one of which is named sshd_config. We’re going to edit this file, but before we do that, we’re going to make a backup copy, just in case we break it beyond repair. So run the following command:
sudo cp sshd_config sshd_config.backup
The sudo command tells the server that we want to run this command as the root user. We’re doing this because our user doesn’t have access to mess with the sshd_config file, but the root user does. The cp command stands for copy, the first argument is the file we want to copy, and the second argument is the name of the copied file. We didn’t specify a directory, so it will just copy it to the directory we’re currently in. To verify that the backup is there, run ls again. If it’s there, let’s go ahead and edit the original file to make the changes we need to:
sudo nano sshd_config
Again, sudo just says we are doing this with root privileges. Nano is the name of the default text editor on Ubuntu Server, and then the final argument is the name of the file we want to open. It should open up in a text editor. We want to scroll down until you see a section that looks like this:
# Authentication:

#LoginGraceTime 2m
PermitRootLogin yes
#StrictModes yes
#MaxAuthTries 6
#MaxSessions 10

#PubkeyAuthentication yes
The # on some of the lines indicates that they are commented out. Commented lines will be ignored by the software they interact with. It’s a handy method of turning things on and off without having to actually delete them. The only line that isn’t commented is the “Permit Root Login yes” line. We’re going to change that yes to no. It should look like this:
# Authentication:

#LoginGraceTime 2m
PermitRootLogin no
#StrictModes yes
#MaxAuthTries 6
#MaxSessions 10

#PubkeyAuthentication yes
Now, we’re going to save by pressing Ctrl + X. It will ask if you want to save. Type “y” and then keep the same file name when it prompts you for the file name. Now, we’ve updated our SSH configuration, so all that’s left is to restart the SSH service so that it reloads the configurations file. This can be done by entering:
sudo service ssh restart
This is a pretty basic command. Sudo says we’re running it as root, service tells the computer we’re messing with the services, ssh is the service we want to manipulate, and restart is the actual command of what we’re doing. You should not receive any feedback/errors if the command is successful. If you want, you can now exit PuTTY, and try reconnecting, but this time, logging in with the root login. You should receive an “Access denied” message, however, your user account should still work when you try that one.
Installing Docker
One of the problems when using a single server for multiple applications is that many applications have overlapping dependencies. For instance, if you wanted to host a website and a Nextcloud installation, both of those services might rely on the Apache web server. That web server might need a specific configuration for each service, and those configurations may conflict with each other. Or maybe you have two services installed, using PHP 5, but then one updates and requires PHP 7, while the other doesn’t. Then you are forced to run old, outdated software while you wait for the second service to be updated. Or maybe one service you are running goes haywire, or gets hacked, and since it is just sitting in the middle of your Linux installation, it can take down everything with it.
One of the traditional ways to address this problem was to run virtual machines. Virtual machines are quite powerful. They are an operating system within an operating system. Many companies will have beefy hardware setups, and run multiple virtual machines – one for each service. However, virtual machines have a lot of overhead. They require a full, or nearly full installation of the OS and all its dependencies. Then, they need to be run on hardware that supports virtualization. And any type of interfacing must be patched through to the virtual machine. They can easily become quite large and power intensive processes. They quite quickly become inefficient for a self-hoster like us.
Our solution, then, is going to be similar to a virtual machine, but not quite. We are going to use Docker to solve this problem. Docker is a container service. It runs on our Linux installation, and creates containers for each application we use. Each container contains the application, and the dependencies needed to run it, usually preconfigured. There is no real installation to perform, all of our applications are neatly organized and, well, contained. They all have their own version of whatever dependencies they need, so they won’t need to share services, and they’re extremely lightweight, with almost no processing overhead. Docker is nothing short of a miracle, and while it can have a small learning curve, getting started with it right away will save you loads of time and effort when you inevitably decide that you need it in the future.
To install Docker, the first thing we want to do is update our repositories:
sudo apt update
Because we want to have the most recent version of Docker, we are going to install it directly from Docker’s repository, not Ubuntu’s. To do this, we must first tell Ubuntu to check Docker’s repository. However, we also want to verify that it’s actually Docker’s repository we’re communicating with. So we will start by verifying that with their official “GPG” key:
curl -fsSL https://download.docker.com/linux ubuntu/gpg | sudo apt-key add -
The curl command stands for cURL. cURL is a common way to download files from the internet in a Linux terminal. We’re essentially grabbing their GPG key and adding it to our repositories so that we can download directly from Docker, and verify that it’s them we are communicating with it.
Now we need to actually add their repository:
sudo add-apt-repository "deb [arch=amd64] https://download.docker.com/linux/ubuntu $(lsb_release -cs) stable"
Now that it’s in our repository, we’ll update again:
sudo apt update
And then it’s just a simple apt install to download Docker:
sudo apt install docker-ce
Congratulations, Docker is installed. Now that we have Docker, we just want to do a couple of quick housekeeping things. The first is that we want to be able to run Docker commands without having to say “sudo” first. The easiest way to do this is to add our user to the Docker group.
sudo usermod -aG docker username
where “username” is your username.
Next, we want to install Docker Compose. Docker Compose is a Docker service that will let us set up our Docker containers in a static configuration file, and then load that configuration file to install, update, and run them. This is advantageous because with many services, running everything through the terminal becomes very difficult to keep track of. To install Docker Compose, simply run:
sudo apt install docker-compose
And that’s it. Docker is installed and ready to rock.
Installing Traefik
One of the other problems with hosting multiple services from one server is that most web services communicate over port 80 for unencrypted traffic, and port 443 for encrypted traffic. If we have two services relying on the same port, when the communication comes to our server requesting port 80, our server won’t know which service to direct it to. We can solve this with a reverse proxy, which essentially handles all the requests on port 80 and port 443, and uses metadata attached to the requests to figure out what service to direct it to. One nice thing that a reverse proxy will do, as well, is employ HTTPS encryption for all the requests it receives, helping to secure your connection to your web services. Traefik is an extremely modern reverse proxy, made specifically with Docker containers in mind. In fact, it even ships in a Docker container, so we can very conveniently install it and manage it. However, it’s worth noting Traefik can be a little tricky to set up, and their documentation isn’t always the most detailed, so you may find this part very tedious, but thankfully we only have to set it up once.
The first thing we want to do is make our Docker Compose file to tell Docker to install Traefik. We’re going to make the Docker Compose file in a directory that we can use for everything we install with Docker. So go ahead an make a directory in our user home folder from which we can base our Docker setup:
sudo mkdir selfhosted
Next, we are going to navigate to that directory with:
cd selfhosted
Now, go ahead and create your Docker Compose file:
nano docker-compose.yml
Docker Compose files must be named docker-compose.yml to work. YML is a configuration file format. At the top of this file, we’re going to put our Traefik configuration. You can copy and paste this if you like, but please read the explanation of what each command is doing, as you will need to use it later. Also, please be mindful of the indentation, as the configuration file will result in errors if the syntax and indentation isn’t precisely followed:
version: "3"
services:
#Traefik

   traefik:
   container_name: traefik
   image: traefik:alpine
   ports:
     - 80:80
     - 443:443
     - 8080:8080
   restart: unless_stopped
   volumes:
     - ./selfhosted/traefik:/etc/traefik
     - /var/run/docker.sock:/var/run/docker.sock
Here is the breakdown of this configuration:
- The first line, version, tells Docker what version of the Docker-Compose format we’re using.
- Services declares what Docker services we are running. We will add more to this later, but for now, we’re just running Traefik.
- The “traefik:” line is just what we have decided to name our Traefik service.
- The “container_name” is how it will appear in Docker.
- The “image” is the actual program we will be running. This image is downloaded from Docker’s repository. The “:alpine” appended to it tells Docker to download the alpine image, which is an image the Traefik developers have made available that is extremely lightweight.
- The “ports” section tells Docker what ports to forward to this container. The port on the left is the port the container listens on, the port on the right is the one that Docker will forward to it.
- “restart” tells Docker when to restart this container. If something goes wrong that causes it to crash, it will automatically restart with this setting.
- Volumes is a little more complicated. If the Docker container crashes, all the data inside it will disappear. This is bad if we have data we don’t want to lose. Also, accessing the inside of a container is very difficult while it is running. The volumes line allows us to tell the container to store certain files outside of the container, so that if it crashes those files don’t disappear, and it also makes some files available for easy editing. The line on the left is the path outside of the container, and the line on the right is the path on the inside of the container. We’re telling the Docker container that everything stored in /etc/traefik should actually be stored outside the container inside ./selfhosted/traefik
OK, now all we need to do is make that directory that we told Docker to store the files in, as well as make sure some other files are in the right spots, and we should be all set to start Traefik up. We told Docker to store files in ./selfhosted/traefik, we’re already in selfhosted, so go ahead and make that traefik directory:
sudo mkdir traefik
Next, we need to generate a configuration file for Traefik. This file is by default stored in the /etc/traefik folder, so it’ll be in our /etc/selfhosted/traefik folder outside of the container. So go ahead and make that by typing:
sudo nano traefik/traefik.toml
This tells the server to make the file traefik.toml inside the traefik directory, inside the /etc/selfhosted directory that we’re currently in. In the traefik.toml file, enter the following:
defaultEntryPoints = ["http", "https"]

[entryPoints]
[entryPoints.http]
address = ":80"
[entryPoints.https]
address = ":443"
[entryPoints.https.tls]
[entryPoints.api]
address = ":8080"

[api]
entryPoint = "api"

[docker]
endpoint = "unix:///var/run/docker.sock"
domain = "yourdomain.com"
exposedByDefault = false

[acme]
email = "[email protected]"
entryPoint = "https"
storage = "/etc/traefik/acme/acme.json"
onHostRule = true

[acme.httpChallenge]
entryPoint = "http"
[[acme.domains]]
main = "yourdomain.com"
OK, let’s go over this configuration file:
- “defaultEntryPoints” is declaring to Traefik where to listen for traffic. These entry points are further declared below, specifying what ports they are, and what type of encryption to use. We are using HTTPS because it encrypts HTTP traffic over the web, preventing people from intercepting it and seeing things like passwords and credit card numbers. HTTPS relies on other parties issuing the certificates, which we will address further down.
- The “[api]” section simply is telling Traefik to run a small web UI that will allow us to investigate what it is currently detecting.
- The “[docker]” section is basically allowing it to plug into Docker. Be sure to replace “yourdomain.com” with the domain name you registered and pointed toward your web server in the first tutorial. The “exposedByDefault” setting allows new Docker containers to be automatically exposed. We have turned that off as we will manually expose them, because we don’t want all of them exposed.
- The “[acme]” section is how we will generate HTTPS certificates. This uses a service called “Lets Encrypt” which is a free certificate authority. Essentially, what they will do is test to see if the server requesting the certificate is actually the one that the domain name is owned by. Then, if it is, they will issue a certificate verifying this. When your web browser sees this certificate, it knows that it has the right web server for the domain name, and can securely communicate with it. Be sure to set the email to your email that you used to register the domain name, and be sure to set the domain name to the one you purchased.
Go ahead and save this file. Make sure you are in the ./selfhosted directory. Now it’s time to boot up our Docker and get Traefik installed. Run the command for this:
docker-compose up -d
Hopefully, everything will boot up properly. If not, check your configuration files, make sure that the syntax matches what is listed here, and that all your email addresses and domain names are inputted properly. If this doesn’t work, feel free to post your error message in the comments and we will try to help you out. To test out if Traefik is working, navigate to your port 8080 on your domain name in your web browser: mydomain.com:8080
You should see a screen similar to this:

Congratulations! The hard part is over. Now we can install pretty much as many apps and services as we like, in a well organized manner. So what are we waiting for? Lets get Nextcloud installed.