This is an example configuration of a Proxmox host connecting to two TrueNAS storage units utilizing mulitpath NVMe-TCP connections.
TrueNAS Server
Configure NVMe/TCP Shares in TrueNAS Community Edition
Create a ZFS zvol
Access the TrueNAS web interface
Navigate to Storage and create a new ZFS zvol that will be used for the NVMe share
Add NVMe-oF Subsystem
Go to Shares in the menu
Select NVMe-oF Subsystems
Click on Add to create a new subsystem
Configure Subsystem Settings
Namespace: Select the previously created zvol
Access Settings: Disable Allow any host to restrict access
Add the client’s host NQN from /etc/nvme/hostnqn
Enable Require Host Authentication if needed
Assign TCP Port and NAS IP
Set the TCP port to 4420 (default for NVMe/TCP)
Enter the NAS IP addressess for presenting the NVMe/TCP storage
Save and Start the Service
Save the configuration
Start the NVMe-oF service to enable the subsystem
Proxmox Server
/etc/network/interfaces
Example network configuration
auto lo

iface lo inet loopback

iface nic0 inet manual

iface nic2 inet manual

iface nic3 inet manual

iface nic1 inet manual

# Dedicated Storage Network Adapters

auto nic4

iface nic4 inet static

address 10.0.0.155/24

mtu 9000

auto nic5

iface nic5 inet static

address 10.0.0.156/24

mtu 9000

auto nic6

iface nic6 inet static

address 10.0.0.157/24

mtu 9000

auto nic7

iface nic7 inet static

address 10.0.0.158/24

mtu 9000

# Virtual Machine and Management Networks

auto vmbr0

iface vmbr0 inet manual

bridge-ports nic0

bridge-stp off

bridge-fd 0

bridge-vlan-aware yes

bridge-vids 2-20

auto vmbr0.2

iface vmbr0.2 inet static

address 172.16.0.55/24

gateway 172.16.0.1

source /etc/network/interfaces.d/*
Install nvme-cli
apt update && apt install nvme-cli -y
Configure ARP to prevent responses on wrong interfaces on the same subnet
cat > /etc/sysctl.d/99-nvme-tcp-arp.conf << 'EOF'

# ARP configuration for NVMe-TCP multipath

# Prevents ARP responses on wrong interface when multiple NICs share same subnet

# For dedicated physical interfaces

net.ipv4.conf.nic4.arp_ignore = 2

net.ipv4.conf.nic5.arp_ignore = 2

net.ipv4.conf.nic6.arp_ignore = 2

net.ipv4.conf.nic7.arp_ignore = 2

net.ipv4.conf.nic4.arp_announce = 2

net.ipv4.conf.nic5.arp_announce = 2

net.ipv4.conf.nic6.arp_announce = 2

net.ipv4.conf.nic7.arp_announce = 2

# For VLAN interfaces (uncomment if using VLANs instead of physical)

#net.ipv4.conf.ens1f0/100.arp_ignore = 2

#net.ipv4.conf.ens1f1/100.arp_ignore = 2

#net.ipv4.conf.ens1f0/100.arp_announce = 2

#net.ipv4.conf.ens1f1/100.arp_announce = 2

# Global settings

net.ipv4.conf.all.arp_ignore = 2

net.ipv4.conf.default.arp_ignore = 2

net.ipv4.conf.all.arp_announce = 2

net.ipv4.conf.default.arp_announce = 2

EOF
Apply ARP settings immediatly and verify
Apply ARP settings
sysctl -p /etc/sysctl.d/99-nvme-tcp-arp.conf
Verify ARP settings
sysctl net.ipv4.conf.nic4.arp_ignore

sysctl net.ipv4.conf.nic5.arp_ignore

sysctl net.ipv4.conf.nic6.arp_ignore

sysctl net.ipv4.conf.nic7.arp_ignore
Load NVMe kernel modules
modpobe nvme

modprobe nvme-tcp

modprove nvme-core
Make NVMe kernel modules persistent across reboot
cat > /etc/modules-load.d/nvme-tcp.conf << 'EOF'

nvme

nvme-tcp

nvme-core

EOF
Verify NVMe kernel modules are loaded
lsmod | grep nvme
Expected output: nvme, nvme_tcp, nvme_core
Enable multipath
echo 'options nvme_core multipath=Y' > /etc/modprobe.d/nvme-tcp.conf
Verify multiapth is enabled
cat /sys/module/nvme_core/parameters/multipath
Expected output: Y
Discover and mount NVMEe-TCP drives
Display Proxmox host NQN
cat /etc/nvme/hostnqn
Example output: nqn.2014-08.org.nvmexpress:uuid:*********************************
Create discovery.conf with paths
Each line defines one path: host interface → storage portal, note that there are two storage servers and portals, 10.0.0.40 & 10.0.0.150
cat > /etc/nvme/discovery.conf << 'EOF'

# NVMe-TCP Discovery Configuration

# Format: --transport=tcp --traddr=<portal> --trsvcid=<port> --host-iface=<iface> --host-traddr=<host-ip>

# Interface 1 (nic4) -> All Portals

--transport=tcp --traddr=10.0.0.40 --trsvcid=4420 --host-iface=nic4 --host-traddr=10.0.0.155

--transport=tcp --traddr=10.0.0.150 --trsvcid=4420 --host-iface=nic4 --host-traddr=10.0.0.155

# Interface 2 (nic5) -> All Portals

--transport=tcp --traddr=10.0.0.40 --trsvcid=4420 --host-iface=nic5 --host-traddr=10.0.0.156

--transport=tcp --traddr=10.0.0.150 --trsvcid=4420 --host-iface=nic5 --host-traddr=10.0.0.156

# Interface 3 (nic6) -> All Portals

--transport=tcp --traddr=10.0.0.40 --trsvcid=4420 --host-iface=nic6 --host-traddr=10.0.0.157

--transport=tcp --traddr=10.0.0.150 --trsvcid=4420 --host-iface=nic6 --host-traddr=10.0.0.157

# Interface 4 (nic7) -> All Portals

--transport=tcp --traddr=10.0.0.40 --trsvcid=4420 --host-iface=nic7 --host-traddr=10.0.0.158

--transport=tcp --traddr=10.0.0.150 --trsvcid=4420 --host-iface=nic7 --host-traddr=10.0.0.158

EOF
Enable and start the autoconnect service for automatic connection on boot
systemctl enable nvmf-autoconnect.service
Connect all NVMe-TCP drives and verify connections
Connect all NVMe-TCP drives
nvme connect-all
Verify connections
nvme list-subsys
Example expected output:
You should see a line for each physcial NVMe and lines for the paths specified in your /etc/nvme/discovery.conf file
nvme-subsys0 - NQN=nqn.2014.08.org.nvmexpress:********************** SAMSUNG MZVLB512HBJQ-000H1

hostnqn=nqn.2014-08.org.nvmexpress:uuid:******************************

\

+- nvme0 pcie 0000:26:00.0 live

nvme-subsys2 - NQN=nqn.2011-06.com.truenas:uuid:*************************:nvme0f01

hostnqn=nqn.2014-08.org.nvmexpress:uuid:*****************************

\

+- nvme2 tcp traddr=10.0.0.40,trsvcid=4420,host_traddr=10.0.0.155,host_iface=nic4,src_addr=10.0.0.155 live

+- nvme4 tcp traddr=10.0.0.40,trsvcid=4420,host_traddr=10.0.0.156,host_iface=nic5,src_addr=10.0.0.156 live

+- nvme6 tcp traddr=10.0.0.40,trsvcid=4420,host_traddr=10.0.0.157,host_iface=nic6,src_addr=10.0.0.157 live

+- nvme8 tcp traddr=10.0.0.40,trsvcid=4420,host_traddr=10.0.0.158,host_iface=nic7,src_addr=10.0.0.158 live

nvme-subsys3 - NQN=nqn.2011-06.com.truenas:uuid:***************************:nvme0f01

hostnqn=nqn.2014-08.org.nvmexpress:uuid:***********************

\

+- nvme3 tcp traddr=10.0.0.150,trsvcid=4420,host_traddr=10.0.0.155,host_iface=nic4,src_addr=10.0.0.155 live

+- nvme5 tcp traddr=10.0.0.150,trsvcid=4420,host_traddr=10.0.0.156,host_iface=nic5,src_addr=10.0.0.156 live

+- nvme7 tcp traddr=10.0.0.150,trsvcid=4420,host_traddr=10.0.0.157,host_iface=nic6,src_addr=10.0.0.157 live

+- nvme9 tcp traddr=10.0.0.150,trsvcid=4420,host_traddr=10.0.0.158,host_iface=nic7,src_addr=10.0.0.158 live
Create udev rule for automatic IO policy configuration
cat > /etc/udev/rules.d/99-nvme-iopolicy.rules << 'EOF'

# Set IO policy to queue-depth for all NVMe subsystems

ACTION=="add|channge", SUBSYSTEM=="nvme-subsystem", ATTR{iopolicy}="queue-depth"

EOF
Reload udev rules and apply to existing subsystems
udevadm control --reload-rules

udevadm trigger
for subsys in /sys/class/nvme-subsystem/nvme-subsys*; do

echo "queue-depth" > "$subsys/iopolicy" 2>/dev/null || true

done
Verify udev rules
cat /sys/class/nvme-subsystem/nvme-subsys*/iopolicy
Test NVMe-TCP persistent connections with a reboot
Reboot the Proxmox host
reboot
Add new storage to the Proxmox host
Run ‘nvme list to see the NVMe-TCP connected disks and create the volume groups for the disks
nvme list
vgcreate nvme_vg /dev/nvme0? # replace /dev/nvme0? with the name of NVMe device provided from the 'nvme list' command
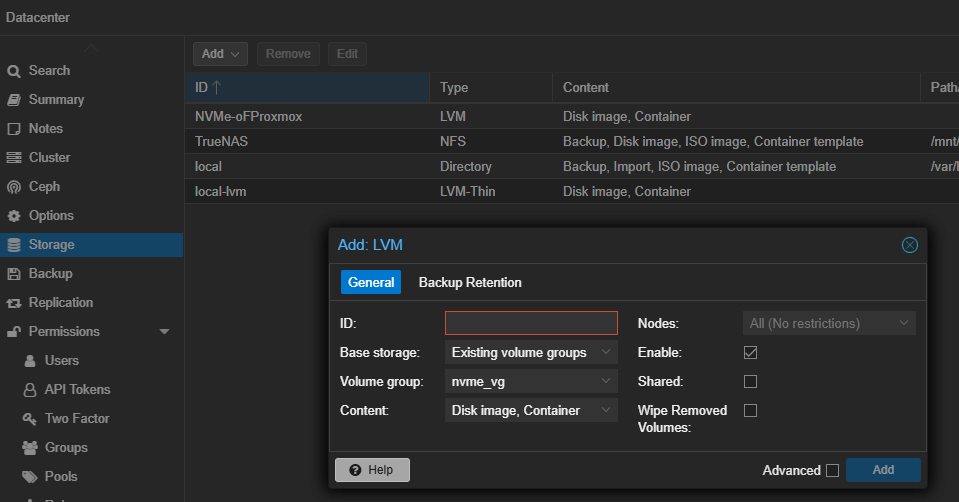
In the Proxmox UI, Datacenter, Add, select LVM storage, nvme_vg
thanks @Glitch001
After reboot, verify that the NVMe-TCP connections reconnected automaticly
nvme list-subsys

nvme list

cat /sys/class/nvme-subsystem/nvme-subsys*/iopolicy
Create a boot pause service to wait on network to come up before autoconnecting to NVMe-TCP
If your network does not come up before the nvmf-autoconnect.service runs, create a service to wait on the network service to come up before running the nvmf-autoconnect.service
cat > /etc/systemd/system/nvmeOF-boot-pause.service << 'EOF'

[Unit]

DefaultDependencies=no

After=nss-lookup.target

Before=nvmf-autoconnect.service

[Service]

Type=oneshot

RemainAfterExit=yes

TimeoutStartSec=60s

ExecStart=sh -c 'until ping -c 1 $HOST; do sleep 1; done' # Replace $HOST with IP address of storage portal

[Install]

WantedBy=nvmf-autoconnect.service

EOF
Enable nvmeOF-boot-pause.service
systemctl enable nvmeOF-boot-pause.service
Reboot the Proxmox host
reboot