Hello all, back again for another cool Linux video.
NVIDIA released a neat feature a while ago that is part of the control panel where you can create custom resolutions for your monitors. Part of this includes the refresh rate of the monitor, so you can enter a custom value to overclock your monitor. Overclocking your monitor will allow you to run the LCD panel higher than 60 Hz, usually up to around 75 to 90 Hz.
The main benefit is that you can run games at higher refresh rates and actually see the difference. You don’t have to buy a 144 Hz monitor to experience higher than 60 FPS, however keep in mind that most popular brands don’t allow their monitors to exceed 60 Hz, and your results will wildly vary.
Windows:
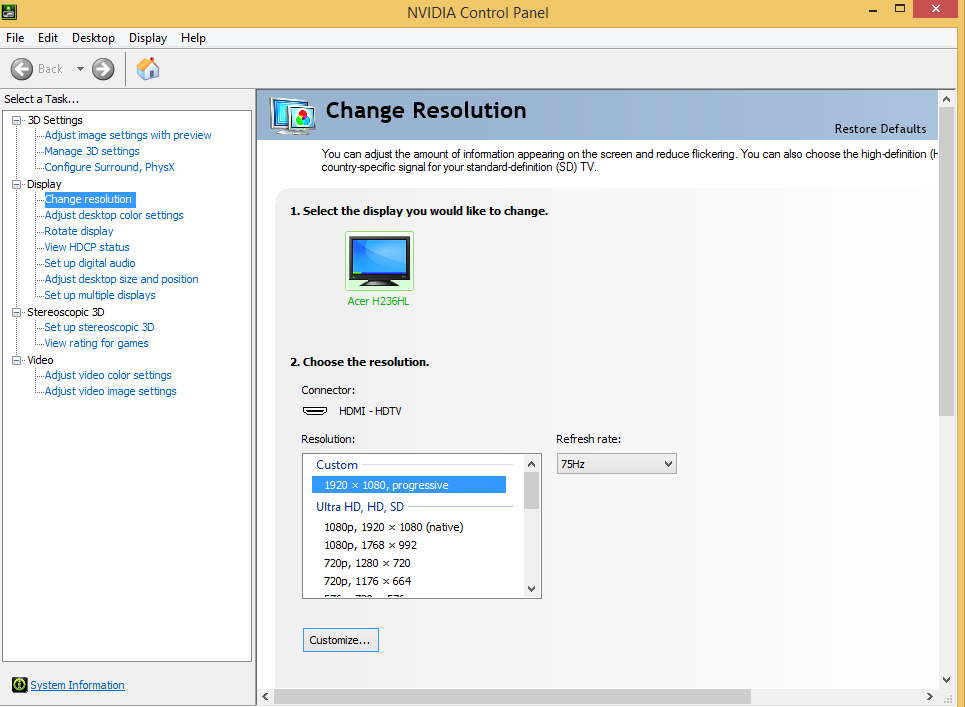
The Windows steps are fairly easy. Just right click the desktop and go to the NVIDIA control panel. Hit “change resolution” on the side panel, and then “customize” at the bottom.
Click “Create Custom Resolution” and bump the refresh rate up by 5. Hit “Test” in the bottom and the GPU will try to output at that refresh rate. If all is well then you should see the “test successful” dialogue box. Repeat this and increase the refresh rate by 5 each time until it stops working or your monitor starts doing weird things.
When you reach your monitor’s limit then hit “Yes” in the test dialogue box to save the custom resolution.
If it doesn’t work at all above 60 Hz, then your monitor probably has a lockout on it to prevent unsupported configurations. So try another monitor.
Anyway hit OK on the customize window and scroll up in the resolution list. Your custom resolution will be at the top with the refresh rate dropdown on the right. Just select the refresh rate you want and hit “Apply”.
Some games won’t recognize the higher refresh rate in fullscreen, and this is usually fixed by running them in windowed borderless so that the display manager is controlling the monitor’s refresh rate.
For Linux, as usual, this is vastly more complicated.
Linux:
NVIDIA released this function on Windows, but the Linux version of the control panel doesn’t have this. So we have to do it manually by using a custom EDID file.
EDID or External Display Identification Data is a file that is stored on the monitor. When you connect a monitor to your PC, the PC reads this file set to know various details about the monitor such as resolution, refresh rate, monitor size, and DPI.
A cool feature of X11’s video server is that you can pass it a custom EDID via xorg.conf with the NVIDIA driver. So the general idea is to read the current EDID from the monitor, edit it with our custom refresh rates, and then link that to X11 for it to use with that monitor.
First step is to read the current EDID from the monitor:
$ sudo dpkg –add-architecture i386 && sudo apt update && sudo apt install wine32 nvidia-settings
Extract the EDID from your monitor. Simply open nvidia-settings, click your monitor on the left, and hit “Acquire EDID”. Save it to the desktop.
Next we are going to use Analogue Way’s EDID editor. Download it from their website:
http://www.analogway.com/en/products/software-and-tools/aw-edid-editor/
Extract the exe somewhere. In the terminal do:
$ wine (drag and drop exe here)
This will open the installer. Run through the installer and make sure “Launch AW EDID Editor” is checked.
Go to the “Detailed Data” tab and click “CVT Wizard” for the first timing block. Change the rate to the same increment of 5 as before, only this time you have to re-save the file and restart the X server each time to test it.
Save it, but make sure to save it as a copy with a different name.
Now to edit your xorg configuration.
$ sudo nano /etc/X11/xorg.conf
Paste this in if it is empty. If there is already configuration in there, just add the EDID option line to the “Screen” section. Edit the “MONITOR” to be the correct display ID. You can get this with the same “xrandr –query” command. The monitor name will be something like HDMI-2, DVI-1, or DP-3 depending on where it is plugged in.
Section "Screen"
    Identifier     "Screen0"
    Device         "Device0"
    Monitor        "Monitor0"
    Option “CustomEDID” “MONITOR:/home/USER/Desktop/modified-edid.bin”
EndSection
Save the file. Log out and log in to apply the changes to X11. If you get a black screen, then you might need to lower the overclock or your monitor might not support it.
If it was successful then edit the EDID file again and try another 5 Hz increase. Repeat this until it stops and you have found the limit of your monitor.
So there it is! Keep in mind a few things that you might experience:
- Overclocking the monitor will not reduce LCD ghosting. Higher refresh rate monitors like the 144 Hz ones have much less ghosting.
- Overclocking the monitor will make it run hotter. The LCD driver board has to run faster than the manufacturer intended, and could reduce its life.
- Certain display interface connectors won’t be able to handle certain resolutions. Single-link DVI can’t handle 1440p at 75 Hz, you need a dual-link cable. HDMI 1.1 can only handle 1440p at 60 Hz as well.
Feel free to suggest topics for future videos, and ask any questions below!