This is just product information & technical data. For any further information, clarification, or explanation, please reference our very detailed FAQ that’s always being updated & checked!
Catalog of items in this post:
Complete Hotkey Lists
Click to Open Section
General
A hotkey command is a short keyboard sequence for selecting a computer, activating computer scan, etc. The KVM interprets keystrokes for hotkeys all the time. A hotkey sequence starts with a Hotkey Leading Code followed by one or two more keystrokes. After the Hotkey Leading Code is detected, the KVM will interpret keyboard commands until the end of the command.
Note 1: For hotkeys a USB-HID compatible keyboard/device must be connected to the white USB-HID ports.
Note 2: Gaming peripherals or other devices may not work in USB-HID, if so just plug it into one of the blue USB 3.2 Gen 1 ports.
Note 3: Don’t use the Num pad on the right side of your keyboard, use the top row instead.
Possible Hotkey Leading Codes:
- L-Ctrl
- R-Ctrl
- Scroll Lock
- Num Lock
ALL KVMs
Click to Open Section
Port Selection
| Key Sequence | Function |
|---|---|
| Hotkey Leading Code + 1 ~ 4 | PC Port Selection 1 ~ 4 |
| Hotkey Leading Code + 0 | Return To Last Selected Computer |
| Hotkey Leading Code + F1 | Auto-Scan Ports |
| Hotkey Leading Code + F2 | Manually-Scan Ports: Allows users to manually switch back anbd forth between power-on computers. Press the |
| Hotkey Leading Code + F3 | Adjust Scan Rate: The KVM switch generates 1 to 4 beeps indicating the duration of scan time (3, 8, 15, and 30 seconds respectively.) |
Audio
| Key Sequence | Function |
|---|---|
| Hotkey Leading Code + F5 | Audio Follow Port Selection (ON / OFF)* |
| Hotkey Leading Code + A | Force Audio Follow to Current Port |
USB
| Key Sequence | Function |
|---|---|
| Hotkey Leading Code + F7 | USB 3.2 Gen 1 Follow Port Selection (ON / OFF)* |
| Hotkey Leading Code + U | Force USB 3.2 Gen 1 Follow to Current Port |
Operation
| Key Sequence | Function |
|---|---|
| Hotkey Leading Code + Alt (hold) + G | Disable/Enable KVM Beeping Sound |
| L-Shift (hold) + Num Lock + Num Lock + (release L-Shift) | Enable Num Lock as a Hotkey Leading Code |
| L-Ctrl + L-Ctrl + Alt (hold) + R-Ctrl + (release) Alt | Change Hotkey Leading Code from L-Ctrl to R-Ctrl |
| R-Ctrl + R-Ctrl + Alt (hold) + L-Ctrl + (release) Alt | Change Hotkey Leading Code Back from R-Ctrl to L-Ctrl |
*The default audio & USB 3.2 port follow status in on, and follows port switching. The user may turn this off so that their USBs stay at their original port.
ALL KMs
Click to Open Section
Mouse Speed Management
| Key Sequence | Function | |
|---|---|---|
| Set mouse DPI (UP Arrow Key) | Hotkey Leading Code + L-Alt (hold) |
1 Beep = -100 DPI (Speed Up) 2 Beeps = Lowest DPI |
| Set mouse DPI (DOWN Arrow Key) | Hotkey Leading Code + L-Alt (hold) |
1 Beep = +100 DPI (Speed Down) 2 Beeps = Highest DPI |
| Mouse DPI Quick Configuration | L-Alt (hold) + S | 1 Beep = “Low” Preset (2400 DPI) 2 Beeps = “Mid” Preset (600 DPI) 3 Beeps = “High” Preset (200 DPI) |
| Mouse DPI Manual Configuration | L-Alt (hold) + “xx” | Examples: “01” DPI = 100 (Highest Speed) “02” DPI = 200 “20” DPI = 2000 “24” DPI = 2400 “48” DPI = 4800 (Slowest Speed) |
Mouse Roaming
| Key Sequence | Function |
|---|---|
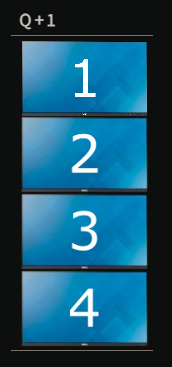
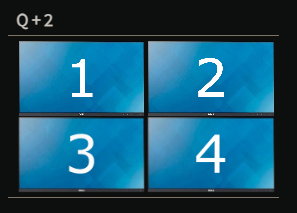
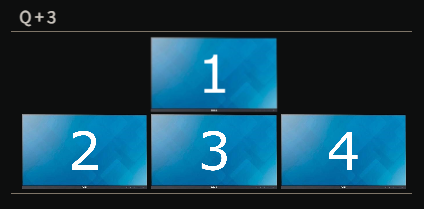
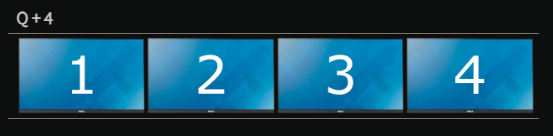
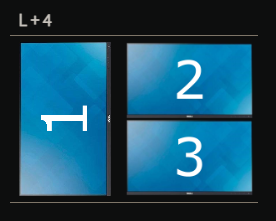
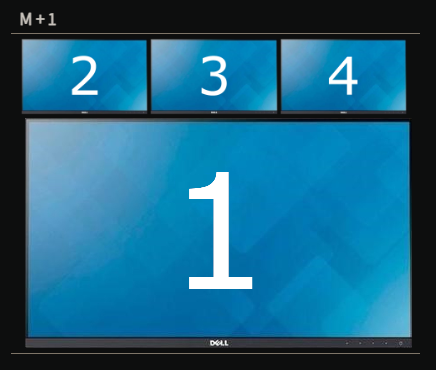
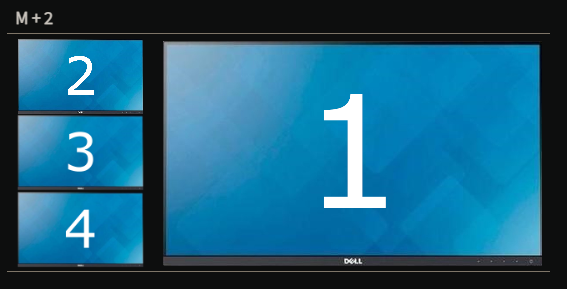
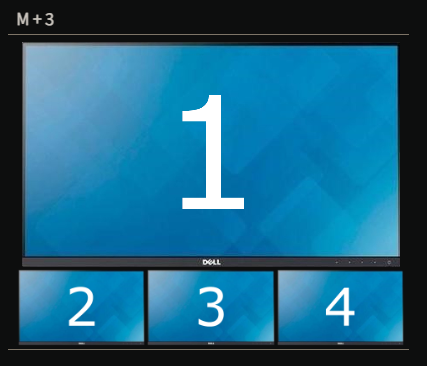
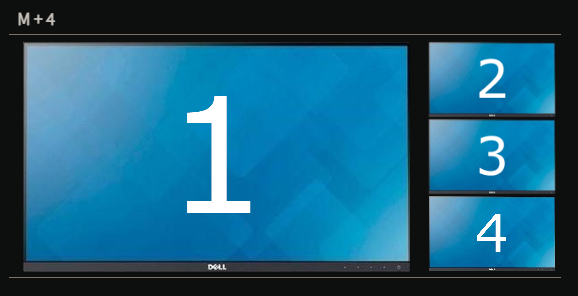
| Hotkey Leading Code + L-Alt (hold) + Q + “1~4” | Monitor Configurations *see below |
| Hotkey Leading Code + L-Alt (hold) + Q + 0 | Disable mouse roaming |
| Hotkey Leading Code + L-Alt (hold) + R | 1 Beep = Borderless Circulation ON 2 Beeps = Borderless Circulation OFF |
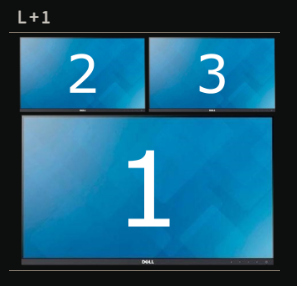
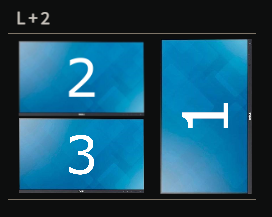
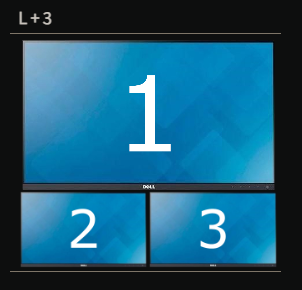
Monitor Configurations
Original KMs Only
Model#s ending in: 304 & 314
Click to Open Section
| Key Sequence | Function |
|---|---|
| Ctrl + Ctrl + Alt (hold) + Q + X + 1 | The preset used will depend on your USB ports: Use ports 1/2/3 to enable 1 - 2 mode. Use ports 2/3/4 to enable 2 - 1 mode. |
Special Monitor Configurations


USB Audio KM Only
Model# ending in: 314
Audio
| Key Sequence | Function |
|---|---|
| Ctrl + Ctrl + A + 0 | Disable USB Audio |
| Ctrl + Ctrl + A + 1 | Enable USB Microphone-In |
| Ctrl + Ctrl + A + 2 | Enable BOTH USB Audio Line-Out & Microphone-In |
Enhanced KM Only
Model# ending in: N334
Click to Open Section
Serial Commands
| Serial Command | Function |
|---|---|
| K= 1~4 ( + Enter) | Select KM (Console) Port 1~4 |
| K < ( + Enter) | Select KM (Console) Previous Active PC Port |
| K > ( + Enter) | Select KM (Console) Next Active PC Port |
| U = 1 ~ 4 ( + Enter) | Select USB 3.2 Ports = Port 1~4 (Stop Following) |
| U = * ( + Enter) | USB 3.2 Ports Follow KM (Console) Selection *Default |
| U + $ ( + Enter) | USB 3.2 Ports Stay at Current Port (Stop Following) |
| A = 1~4 ( + Enter) | Select Audio Port 1~4 (Stop Following) |
| A = * ( + Enter) | Audio Follow KM (Console) Selection *Default |
| A = $ ( + Enter) | Audio Stays at Current Port (Stop Following) |
| N = 1~4 ( + Enter) | Select LAN Port 1~4 (Stop Following) |
| N = * ( + Enter) | Net Follow KM (Console) Selection *Default |
| N = $ ( + Enter) | Net Stays at Current Port (Stop Following) |
| H = R ( + Enter) | Restart the KM Switch |
| B = 1~4 | Equal to Pressing Front KM Button 1~4 |
| B = S / A / N / U | Equal to Pressing: SYNC Button (S), Audio Button (A), NET Button (N), or USB 3.2 Button (U) |
| B = a1 / a2 / a3 / a4 | Equal to Pressing: Audio Button (hold) + PC 1~4 + SYNC Button |
| B = n1 / n2 / n3 / n4 | Equal to Pressing: Net Button (hold) + PC 1~4 + SYNC Button |
| B = u1 / u2 / u3 / u4 | Equal to Pressing: USB 3.2 Button (hold) + PC 1~4 + SYNC Button |
| B = sA / sU | Equal to: Pressing: SYNC Button (hold) + Audio Button / UBS 3.2 Button |
| B = sN1~4 | Equal to Pressing: SYNC Button (hold) + NET Button + PC 1~4 |
Adjust Baud Rate of The KM’s Serial Port
There are 8 bands of baud rates available (9600 ~ 115200).
“Bp3” = The 3rd K/M Button on the front, next to the number 3.
| Baud Rate Band | Key Sequence | Set Rate |
|---|---|---|
| 1a | Hotkey Leading Code + L-Alt (hold) + “Bp3” + A + 1 | Baud Rate = 9600bps |
| 1b | Hotkey Leading Code + L-Alt (hold) + “Bp3” + B + 1 | Baud Rate = 14400bps |
| 2a | Hotkey Leading Code + L-Alt (hold) + “Bp3” + A + 2 | Baud Rate = 19200bps |
| 2b | Hotkey Leading Code + L-Alt (hold) + “Bp3” + B + 2 | Baud Rate = 28800bps |
| 3a | Hotkey Leading Code + L-Alt (hold) + “Bp3” + A + 3 | Baud Rate = 38400bps |
| 3b | Hotkey Leading Code + L-Alt (hold) + “Bp3” + B + 3 | Baud Rate = 57600bps |
| 4a | Hotkey Leading Code + L-Alt (hold) + “Bp3” + A + 4 | Baud Rate = 76800bps |
| 4b | Hotkey Leading Code + L-Alt (hold) + “Bp3” + B + 4 | Baud Rate = 115200bps |
Controlling Another Serial Device via Hotkey Commands
- Ensure baud rate is the same.
- Connect a serial device to the serial port.
- Adjust the baud rate based on the connected device (if necessary)
- Use the console’s USB keyboard to enter**:
L-Ctrl + L-Ctrl + L-Win (hold) + L-Shift (hold) - Enter the serial command with the console’s keyboard (keep holding buttons)
- Release the buttons after finishing the serial commands
** Release L-Shift if lower-case or special symbols are required.
LAN
| Key Sequence | Function |
|---|---|
| Hotkey Leading Code + F8 | NET Follow KM (Console) OFF/ON |
| Hotkey Leading Code + N | Force NET Follow to Current Computer |
| Hotkey Leading Code + L-Alt (hold) + F + A + C | Return to Factory Default |
Mouse Roaming
| Key Sequence | Function |
|---|---|
| Hotkey Leading Code + L-Alt (hold) + Q + L + “1~4” | Monitor Configurations *see below |
| Hotkey Leading Code + L-Alt (hold) + Q + M + “1~4” | Monitor Configurations *see below |
Mouse Control
*You will need a mouse with at least a 4th customizable button to act as your hotkey. (the standard being left (1), middle (2), and, right (3) buttons).
Mouse hotkey leading code = “Bm4”
| Key Sequence | Function |
|---|---|
| Hotkey Leading Code + L-Alt (hold) + Bm4* | Enable mouse control and assign a mouse leading hotkey code |
| Bm4 (hold) + Middle mouse wheel (scroll up) | Select previous PC channel |
| Bm4 (hold) + Middle mouse wheel (scroll down) | Select next PC channel |
| L-Alt (hold) + Left mouse button | Disable mouse control |
Advanced Monitor Configurations
DisplayPort 1.4 KVMs
Model#s beginning with: PAAG
Click to Open Section
DP 1.4 KVMs
| Inputs | Outputs | USB Interface |
|---|---|---|
| 2 PC | 1 Monitor | 5GB / 10GB |
| 2 PC | 2 Monitor | 5GB / 10GB |
| 2 PC | 3 Monitor | 5GB / 10GB |
| 2 PC | 4 Monitor | 5GB / 10GB |
| 4 PC | 1 Monitor | 5GB / 10GB |
| 4 PC | 2 Monitor | 5GB / 10GB |
Features (DP 1.4)
- HDR10 Support
- HDCP 2.2 and HDCP 1.4 Compilence
- Audio Format: 32-channel, 1536 KHz
- Max Bandwidth: 32.4Gbps
- YCbCr (4:4:4) & YCbCr (4:2:0) Support
- DisplayPort 1.4 Standard Features Support:
- VRR (Variable Refresh Rate) - AMD FreeSync & Nvdia G-Sync
- DSC (Display Stream Compression)
- HFR (High-Frame-Rate)
- MST (Multi-Stream Technology)
- Flexible Switching Methods
- Front Push Buttons
- Hotkey Control
- Plug-n-Play Software Driver
- USB 3.2 Gen 1 (5-gigabit KVM - Up to 5Gbps speeds)
- USB 3.2 Gen 2 (10-gigabit KVM - Up to 10Gbps speeds)
DP 1.4 Max Resolutions / Framerates
- 7680 x 4320 @ 60Hz (4:4:4) ( DSC )
- 7680 x 4320 @ 60Hz (4:2:0)
- 5120 x 2880 @ 60Hz (4:4:4)
- 5120 x 1440 @ 120Hz (4:4:4)
- 3840 x 2160 @ 144Hz (4:4:4) (DSC)
- 3840 x 2160 @ 120Hz (4:4:4)
- 2560 x 1440 @ 144Hz (4:4:4)
- 2560 x 1440 @ 120Hz (4:4:4)
- 2048 × 2048 @ 60 Hz (4:4:4) (2K x 2K)
2 Port Specifications (DP 1.4)
| 2 Port Models | 2 PC, 1 Monitor | 2 PC, 2 Monitor | 2 PC, 3 Monitor | 2 PC, 4 Monitor | |
|---|---|---|---|---|---|
| Console Interface | USB HID Port | Rear x3, Front x1) | Rear x3, Front x1) | Rear x3, Front x1) | Rear x3, Front x1) |
| USB 3.2 Port | 3 (Rear), 1 (Front) | 3 (Rear), 1 (Front) | 3 (Rear), 1 (Front) | 3 (Rear), 1 (Front) | |
| Video Output Port | DP 1.4 x1 | DP 1.4 x2 | DP 1.4 x3 | DP 1.4 x4 | |
| 3.5mm Audio Jack | Speaker x1 | Speaker x1 | Speaker x1 | Speaker x1 | |
| Computer Interface | USB 3.2 Port | 5-gigabit: USB-B x2, 10-gigabit: USB-C x2 | 5-gigabit: USB-B x2, 10-gigabit: USB-C x2 | 5-gigabit: USB-B x2, 10-gigabit: USB-C x2 | 5-gigabit: USB-B x2, 10-gigabit: USB-C x2 |
| Video Input Port | DP 1.4 x2 | DP 1.4 x4 | DP 1.4 x6 | DP 1.4 x8 | |
| 3.5mm Audio Jack | Speaker x2 | Speaker x2 | Speaker x2 | Speaker x2 | |
| Front Panel Push Buuton | 1 | 1 | 1 | 1 | |
| Computer On LED (Green) | 2 | 2 | 2 | 2 | |
| Port Selected LED (Red) | 2 | 2 | 2 | 2 | |
| Hot Plug-n-Play | Yes | Yes | Yes | Yes | |
| Hotkeys | Yes | Yes | Yes | Yes | |
| Dimensions H x W x D (mm) | 40 x 160 x 100 | 55 x 160 x 100 | 75 x 160 x 100 | 100 x 160 x 100 |
4 Port Specifications
| 4 Port Models | 4 PC, 1 Monitor | 4 PC, 2 Monitor | |
|---|---|---|---|
| Console Interface | USB HID Port | Rear x3, Front x1) | Rear x3, Front x1) |
| USB 3.2 Gen 1 Port | 3 (Rear), 1 (Front) | 3 (Rear), 1 (Front) | |
| Video Output Port | DP 1.4 x1 | DP 1.4 x2 | |
| 3.5mm Audio Jack | Speaker x1 | Speaker x1 | |
| Computer Interface | USB 3.2 Gen 1 Port | 2 | 2 |
| DP In Port | 4 | 8 (Dual-View x4) | |
| 3.5mm Audio Jack | Speaker x4 | Speaker x4 | |
| Front Panel Push Buuton | 4 | 4 | |
| Computer On LED (Green) | 4 | 4 | |
| Port Selected LED (Red) | 4 | 4 | |
| Hot Plug-n-Play | Yes | Yes | |
| Hotkeys | Yes | Yes | |
| Dimensions H x W x D (mm) | 44 x 220 x 130 | 55 x 220 x 130 |
Required Cables (DP 1.4)
- Display Only Cables (1x per Input, 1x per Output)
For this model of KVM, you will need DisplayPort 1.4 cables specifically. They are usually not marked physically, so be wary of using DisplayPort 1.2 accidentally. This will cause display issues at high resolutions and Hz.
- Data Only Cables (1x per Input)
- USB-A to USB-B 3.0 (Compatible)
- USB-A to USB-B 2.0 (Incompatible)
DisplayPort 1.2 EDID KVMs
Model#s beginning with: PKAG
Click to Open Section
DP 1.2 EDID KVMs
- 2 PC, 2 Monitor
Features (DP 1.2)
- DisplayPort 1.2 Video Supports Most Popular Resolutions Up to 4K@60Hz ( 4:4:4 )
- HDCP Engine Ensures Low-Latency Switch, Uninterrupted Video Playback, and Elliminates Windows’ Relocation Issue
- HDCP 1.4 Compliance
- EDID Management, Including EDID Copy / Auto EDID, Ensures Display Compatibility
- USB 3.2 Gen 1 (Up to 5-gigabit speeds)
- Plug-and-Play without Software or Driver
Max Resolutions / Framerates (DP 1.2)
- 4096x2160@60Hz (4:4:4)
- 3840x2160@60Hz (4:4:4)
Specifications (DP 1.2)
| 2 Port Model | 2 PC, 2 Monitor | |
|---|---|---|
| Console Interface | USB HID Port | Rear x3, Front x1 |
| USB-A 3.2 Gen 1 Port | Rear x3, Front x1 | |
| Video Output Port | DP 1.2 x2 | |
| 3.5mm Audio Jack | Speaker x2 | |
| Computer Interface | USB 3.2 Port | 5-gigabit: USB-B x2 |
| Video Input Port | DP 1.2 x2 | |
| 3.5mm Audio Jack | Speaker x2 | |
| Front Panel Push Buuton | 1 | |
| Computer On LED (Green) | 2 | |
| Port Selected LED (Red) | 2 | |
| Hot Plug-n-Play | Yes | |
| Hotkeys | Yes | |
| Dimensions H x W x D (mm) | 58 x 160 x 100 |
EDID Information (DP 1.2)
Projectors, Radiology displays, and other “special” devices that are DisplayPort, but not exactly, often do not quite respond all the time. The EDID Learning button at the back of the KVM will memorize an EDID at any point in time and then always present that EDID to the computer.
This prevents the computer from “reacting” when a display is active or inactive and does not depend on any software solutions in the computer.
Note: We still recommend software solutions, that is how it is supposed to be per spec, but not everyone follows spec.
Auto-Learning Button (DP 1.2)
EDID Copy will copy and save the current monitor’s EDID. Auto EDID will intelligently detect a connected monitor’s EDID. Unlike the copy though, the Auto EDID is not saved and will be lost on disconnect or power off. If you’re having EDID issues, try the default setting to “reset” your EDID connections.
| EDID Copy | Auto EDID | Default | |
|---|---|---|---|
| EDID Button Hold Time | 3 seconds | 6 seconds | 12 seconds |
| EDID LED (Upon Hold) | Flash Fast | Flash Slow | Flash Fast |
| EDID LED (Normal Operating) | Flash Twice | Flash 3 Times | Flash 3 Times |
Required Cables (DP 1.2)
-
Display Only Cables (1x per Input, 1x per Output)
For this model of KVM, you will need DisplayPort 1.2 or newer cables. DisplayPort 1.4 cables will work; however, they are overkill for what this KVM. You might consider DisplayPort 1.4 cables if your KVM will be positioned several feet from your inputs and outputs. -
Data Only Cables (1x per Input)
- This is a 5-Gigabit model only.
- USB-A to USB-B 3.0 (Compatible)
- USB-A to USB-B 2.0 (Incompatible)
- USB-C to USB-C (Incompatible)
- USB-A to USB-C (Incompatible)
USB-C Power Delivery KVMs
Model#s beginning in: CAAB & CAHBP
Click to Open Section
USB-C KVMs
2 PC, 1 Monitor
2 PC, 2 Monitor - TODO
2 PC, 3 Monitor - TODO
Features (USB-C)
- 20V PD Charging Allows User to Flexibly Arrange Device Power and Keeps PC Charged, Also Supports USB 5V Charging Up to 3A
- USB-C Bandwidth Allocation Switch Allows Wider Compatibility with Two Types - 4K 30Hz + USB 3.2 Gen 1 and 4K 60Hz + USB 2.0
- HDCP 1.4 and HDCP 2.2 Compliance
- HDR10 Support
- USB 3.2 Gen 1 (5-gigabit up to 5Gbps speeds)
Max Resolutions / Framerates (USB-C)
Single PD KVM
4096x2160@60Hz (4:4:4)
3840x2160@60Hz (4:4:4)
Combo Dual / Combo Triple
8K @ 60Hz (4:4:4) ( DSC ) ( DP 1.4 ) ( AUX)
4K @ 60Hz (4:4:4) ( USB C ) ( Main )
Specifications (USB-C)
| 2 PC, 1 Monitor | 2 PC, 2 Monitor | 2 PC, 3 Monitor | ||
|---|---|---|---|---|
| Console Interface | USB HID Port | Rear x3, Front x1) | ||
| USB 3.2 Port | 3 (Rear), 1 (Front) | |||
| Video Output Port | DP 1.4 x1 | |||
| 3.5mm Audio Jack | Speaker x1 | |||
| Computer Interface | USB 3.2 Port | 5-gigabit: USB-B x2, 10-gigabit: USB-C x2 | ||
| Video & USB Input Port | USB-C x2 | |||
| 3.5mm Audio In / Out (USB-Audio Device) | Speaker x1, Microphone x1 | |||
| Power Delivery Modes | 70A:1.25A + 1.75A, 70B: 2.25A + 0.75A, 90: 2.25A + 1.75A, 120: 2.25A + 3.00A | |||
| Front Panel Push Buuton | 1 | |||
| Computer On LED (Green) | 2 | |||
| Port Selected LED (Red) | 2 | |||
| Hot Plug-n-Play | Yes | |||
| Hotkeys | Yes | |||
| Dimensions H x W x D (mm) | 40 x 160 x 100 |
Rear Controls (USB-C)
Power Delivery Modes
The default power supply that is included with your L1Techs KVM is a ~20v, 70w, DC Adapter. With this power supply, you have two 70w options available. The difference between A and B is how you would like to allocate amperage to the USB-C ports for power delivery. The options are listed “Input 1 + Input 2” to show how the amps will be split (3A total):
- 70A - 1.25A + 1.75A
- 70B - 2.25A + 0.75A
If you choose to buy a more potent power supply on your own, you can have access to the other 2 higher wattage options, 90w or 120w. (~5A total):
- 90 - 2.25A + 1.75A
- 120 - 2.25A + 3.00A
USB Modes
It is not possible to support the full DisplayPort 1.4 bandwidth and USB 3.0 5gbps speeds with just one wire. That’s why, on the back of the KVM, you will see a toggle switch in the bottom right. The switch is there to give you the option of what to set bandwidth priority to:
- U2 (USB 2.0) - Prioritizes Video bandwidth. 480mbps USB speed. Full DisplayPort bandwidth.
- U3 (USB 3.0) - Prioritizes USB bandwidth. 5gbps USB speed. Uses 25% of total DisplayPort bandwidth.
*USB 3.0 mode could potentially take your max resolution down from 4K @60Hz → 4K @30Hz. The dual monitor version is recommended for higher-bandwidth situations.
Note: Only change power delivery or USB modes when KVM is unplugged.
Required Cables (USB-C)
- Display & Data Inputs
For this model of KVM, you will only need USB-C to USB-C input cables. Specifically, you will need USB-C cables that support both USB-C and DisplayPort signals. Improper USB-C cables will not work.- USB-A to USB-C (Incompatible)
- Data Only USB-C to USB-C (Incompatible)
- Display & Data USB-C to USB-C (Compatible)
Note: All inputs must be from a USB-C port (e.g., MacBook, GPU USB-C, or iPad) unless you are using the L1Techs USB-Combiner to convert the DisplayPort signal to USB-C.
- Display Only Outputs
For this model of KVM, you will need DisplayPort 1.4 cables specifically. They are usually not marked physically, so be wary of using DisplayPort 1.2 accidentally. This will cause display issues at high resolutions and Hz.
HDMI 2.0 KVMs
Click to Open Section
Features (HDMI 2.0)
Max Resolutions / Framerates (HDMI 2.0)
Specifications (HDMI 2.0)
Rear Controls (HDMI 2.0)
Required Cables (HDMI 2.0)
USB-C Combiner
Click to Open Section
Features (Combiner)
Max Resolutions / Framerates (Combiner)
Specifications (Combiner)
Rear Controls (Combiner)
Required Cables (Combiner)
HDBT CAT 7 Ethernet Extender
Click to Open Section
Features (Extender)
Max Resolutions / Framerates (Extender)
Specifications (Extender)
Controls (Extender)
Transmitter
Receiver
Required Cables (Extender)
HDMI EDID Modifier / Rewriter
Click to Open Section
Features (EDID Modifier)
Max Resolutions / Framerates (EDID Modifier)
Specifications (EDID Modifier)
Controls (EDID Modifier)
Required Cables (EDID Modifier)
DP Repeater + HDMI Splitter
Click to Open Section
Features (Repeater + HDMI Splitter)
Max Resolutions / Framerates (Repeater + HDMI Splitter)
Specifications (Repeater + HDMI Splitter)
Controls (Repeater + HDMI Splitter)
Required Cables (Repeater + HDMI Splitter)
EDID Feeder
Click to Open Section
Features (Feeder)
Max Resolutions / Framerates (Feeder)
Specifications (Feeder)
Controls (Feeder)
Required Cables (Feeder)
End
Just a header to get to the bottom quicker lol