Part II - Netbox install
So please SSH into your brand spanking new server and apply all pending updates. Then also install htop, tree and nfs-common with
sudo apt-get install htop tree nfs-common
PostgreSQL
Netbox uses PostgreSQL as it requires some features which exists in this database which do not exist in MySQL / MariaDB.
sudo apt-get install -y postgresql libpq-dev
Once the install is complete please login to PostgreSQL with the following command
sudo -u postgres psql
We now need to create a blank database, create the netbox PostgreSQL user and grant privileges.
Enter the commands as show after postgres=# I just left that in their to indicate that we are operating inside PostgreSQL.
postgres=# CREATE DATABASE netbox;
postgres=# CREATE USER netbox WITH PASSWORD ‘YOUR-DB-PASSWORD’;
postgres=# GRANT ALL PRIVILEGES ON DATABASE netbox TO netbox;
postgres=# \q
Now we can test that the PostgreSQL user can access the netbox DB
Enter the below command to login to the netbox DB.
psql -U netbox -W -h localhost netbox
You should see
Enter the below command to exit PostgreSQL.
\q
Netbox software prerequisites
Now we install some of the Netbox prerequisites with the following commands
sudo apt-get install -y python3 python3-dev python3-setuptools build-essential libxml2-dev libxslt1-dev libffi-dev graphviz libpq-dev libssl-dev zlib1g-dev
sudo easy_install3 pip
Download Netbox
Please check you still in your home directory with
pwd
You should see
/home/netbox
Now download the application with the following command. At the time of writing this is v2.4.4. Adjust as needed for future versions.
wget https://github.com/digitalocean/netbox/archive/v2.4.4.tar.gz --no-check-certificate
The --no-check-certificate switch is useful if you are behind a proxy. If you have no proxy you can leave it off.
Now unpack the application to /opt with the below command. Adjust as needed for future versions.
sudo tar -xzf v2.4.4.tar.gz -C /opt
Now we need to create a softlink called netbox pointing at the program directory inside /opt
This is essential to make seemless upgrades possible later down the line.
cd /opt
sudo ln -s netbox-2.4.4 netbox
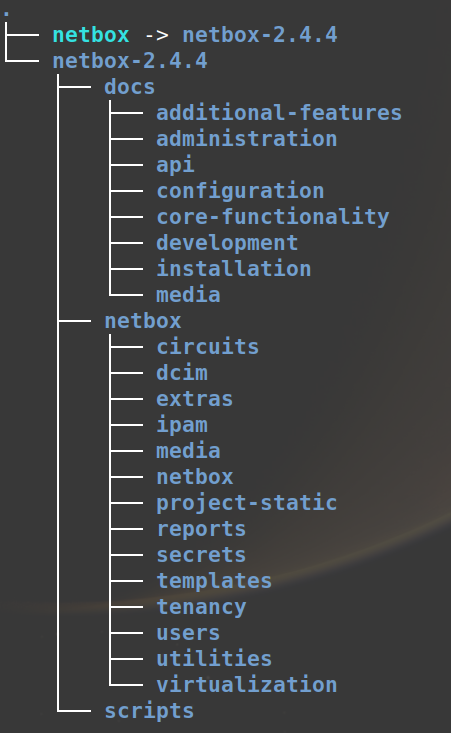
Now double check the folder structure using tree
tree -dL 3
It should look like this.
Python prerequisites
Now we have to install the python prerequisites using the included requirements.txt file
To make sure it is present enter the floowing command
cat /opt/netbox/requirements.txt
At the time of writing it should be identical to the file shown here https://github.com/digitalocean/netbox/blob/develop/requirements.txt
Now install the python prerequisites with the command below.
sudo pip3 install -r /opt/netbox/requirements.txt
Configuration files
Now we move onto making some changes to the applications configuration files. Make a production copy of the example configuration file.
sudo cp /opt/netbox/netbox/netbox/configuration.example.py /opt/netbox/netbox/netbox/configuration.py
Generate a secret key
Now we need to create a secret key which will go in the file we just created. These is used for encrypting secrets in the application.
sudo python3 /opt/netbox/netbox/generate_secret_key.py
Make a note of the output and store in a safe place.
Edit the configuration.py file with the following command.
sudo nano /opt/netbox/netbox/netbox/configuration.py
Change the fields below to match your installation. The IP address, NETBIOS & FQDN names are those of your server.
ALLOWED_HOSTS = ['192.168.0.20', 'netbox-primary', 'netbox-primary.planetexpress.net']

DATABASE = {
    'NAME': 'netbox',               # Database name
    'USER': 'netbox',               # PostgreSQL username
    'PASSWORD': 'YOUR-DB-PASSWORD', # PostgreSQL password
    'HOST': 'localhost',            # Database server
    'PORT': '',                     # Database port (leave blank for default)
}

SECRET_KEY = 'EnterTheSecretKeyYouJustGenerated'
All other sections in the configuration.py file are optional for the operation of the server although you may well want to consider changing the following from ‘False’ to ‘True’
LOGIN_REQUIRED = False
If it is left as false you don’t need a login to be able to see all the data via the website. All you need is the URL.
Create the DB schema
Create the application DB schema with the following command
sudo python3 /opt/netbox/netbox/manage.py migrate
Now we create the initial super user you will need to login to the netbox application via the web GUI.
sudo python3 /opt/netbox/netbox/manage.py createsuperuser
Follow the on screen prompts.
Now we need to load some files into the application.
sudo python3 /opt/netbox/netbox/manage.py collectstatic --no-input
And now load some initial example objects. This is an optional step.
sudo python3 /opt/netbox/netbox/manage.py loaddata initial_data
Create testing instance
You can now test your work so far by creating a test instance.
sudo python3 /opt/netbox/netbox/manage.py runserver 0.0.0.0:8000 --insecure
You should see the following output

and you can access the test instance with the URL provided once you substitute your own servers IP address.
Install the web server
Now we need to provide a premenant web server to run the application.
sudo apt-get install -y nginx
Now we create a site configuration file with
sudo nano /etc/nginx/sites-available/netbox
and paste the following into it, being sure to amend the server_name
server {
    listen 80;

    server_name netbox-primary.planetexpress.net;

    client_max_body_size 25m;

    location /static/ {
        alias /opt/netbox/netbox/static/;
    }

    location / {
        proxy_pass http://127.0.0.1:8001;
        proxy_set_header X-Forwarded-Host $server_name;
        proxy_set_header X-Real-IP $remote_addr;
        proxy_set_header X-Forwarded-Proto $scheme;
        add_header P3P 'CP="ALL DSP COR PSAa PSDa OUR NOR ONL UNI COM NAV"';
    }
}
Now remove the default config file
sudo rm /etc/nginx/sites-enabled/default
And create a soft link to your site
cd /etc/nginx/sites-enabled/
sudo ln -s /etc/nginx/sites-available/netbox netbox
Now restart Nginx with
sudo service nginx restart
Install Gunicorn
According to Wikipedia, “Gunicorn” is “Green Unicorn” a Python Web Server Gateway Interface (WSGI) HTTP server. The Gunicorn server is broadly compatible with a number of web frameworks, simply implemented, light on server resources and fairly fast.
sudo pip3 install gunicorn
Create and edit the gunicorn configuration file with
sudo nano /opt/netbox/netbox/gunicorn_config.py
Paste in the text below, then save and exit the file
command = '/usr/local/bin/gunicorn'
pythonpath = '/opt/netbox/netbox'
bind = '127.0.0.1:8001'
workers = 3
user = 'www-data'
Make the file executeable with
sudo chmod +x /opt/netbox/netbox/gunicorn_config.py
Install supervisor
Supervisor is a client/server system that allows its users to monitor and control a number of processes on UNIX-like operating systems.
sudo apt-get install -y supervisor
Now create the supervisor configuration file
sudo nano /etc/supervisor/conf.d/netbox.conf
Paste in the text below, then save and exit the file
[program:netbox]
command = gunicorn -c /opt/netbox/netbox/gunicorn_config.py netbox.wsgi
directory = /opt/netbox/
user = www-data
sudo service supervisor restart
Make sure your permissions are correct
sudo chown -R netbox:netbox /opt/netbox-2.4.4
sudo chmod -R 775 /opt/netbox-2.4.4
Restart Nginx and supervisor
sudo service nginx restart
sudo supervisorctl restart netbox
Done
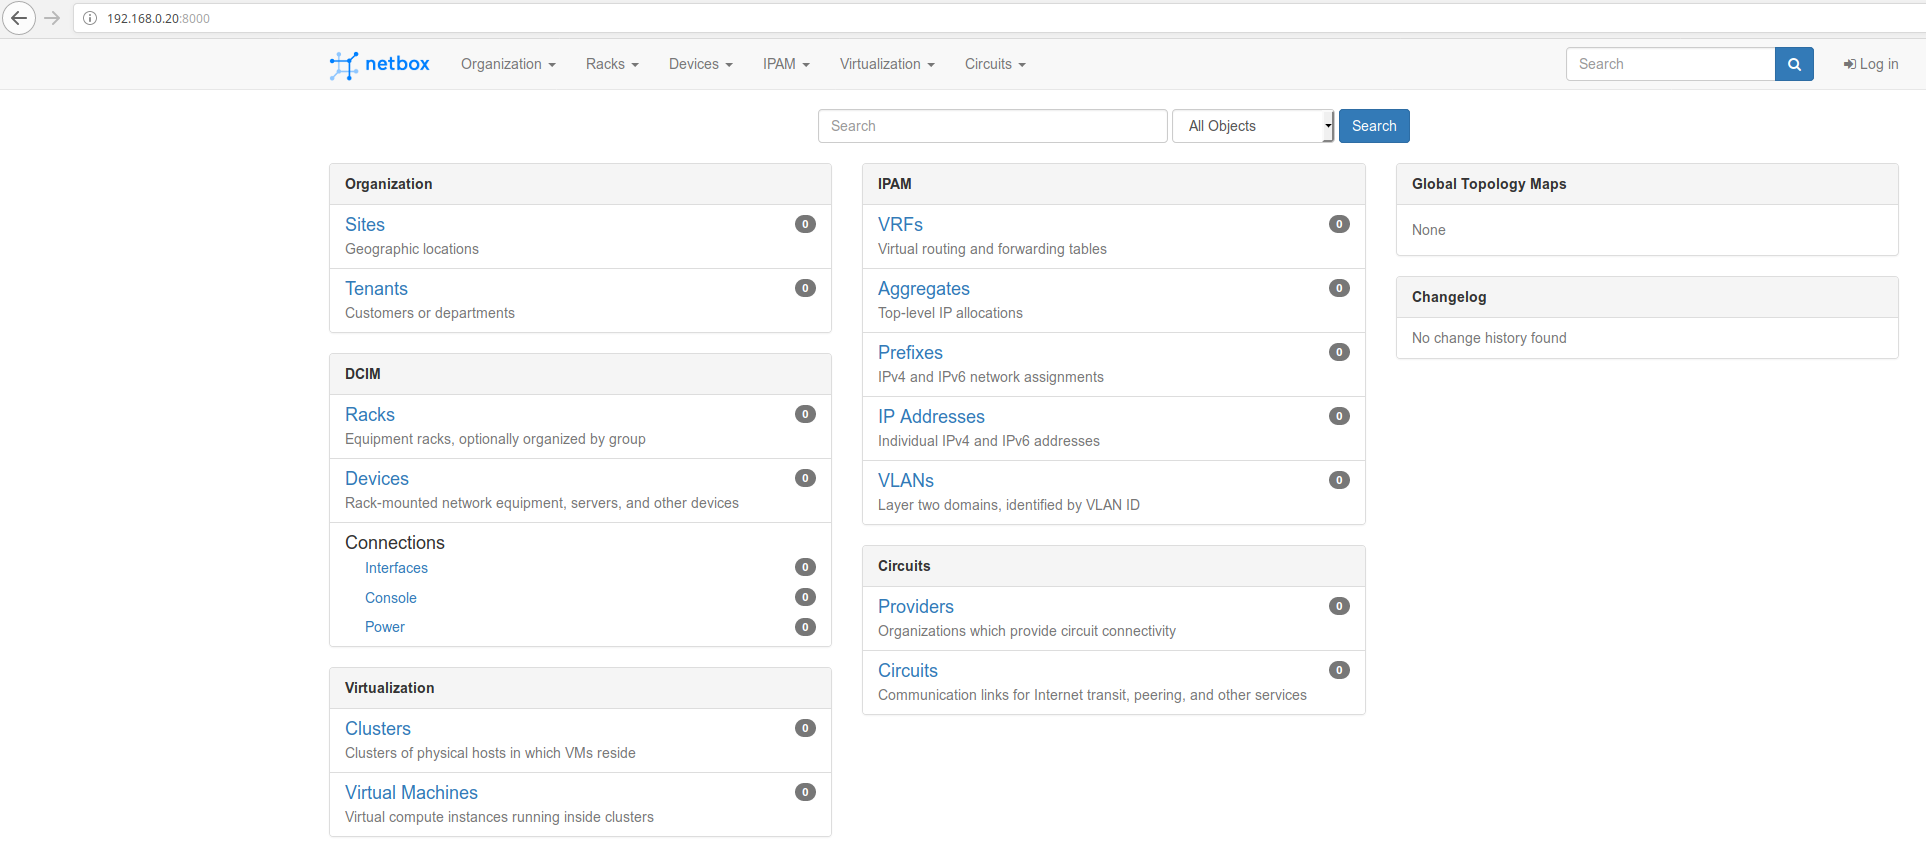
If all is well you should be able to navigate to your application.
Primary
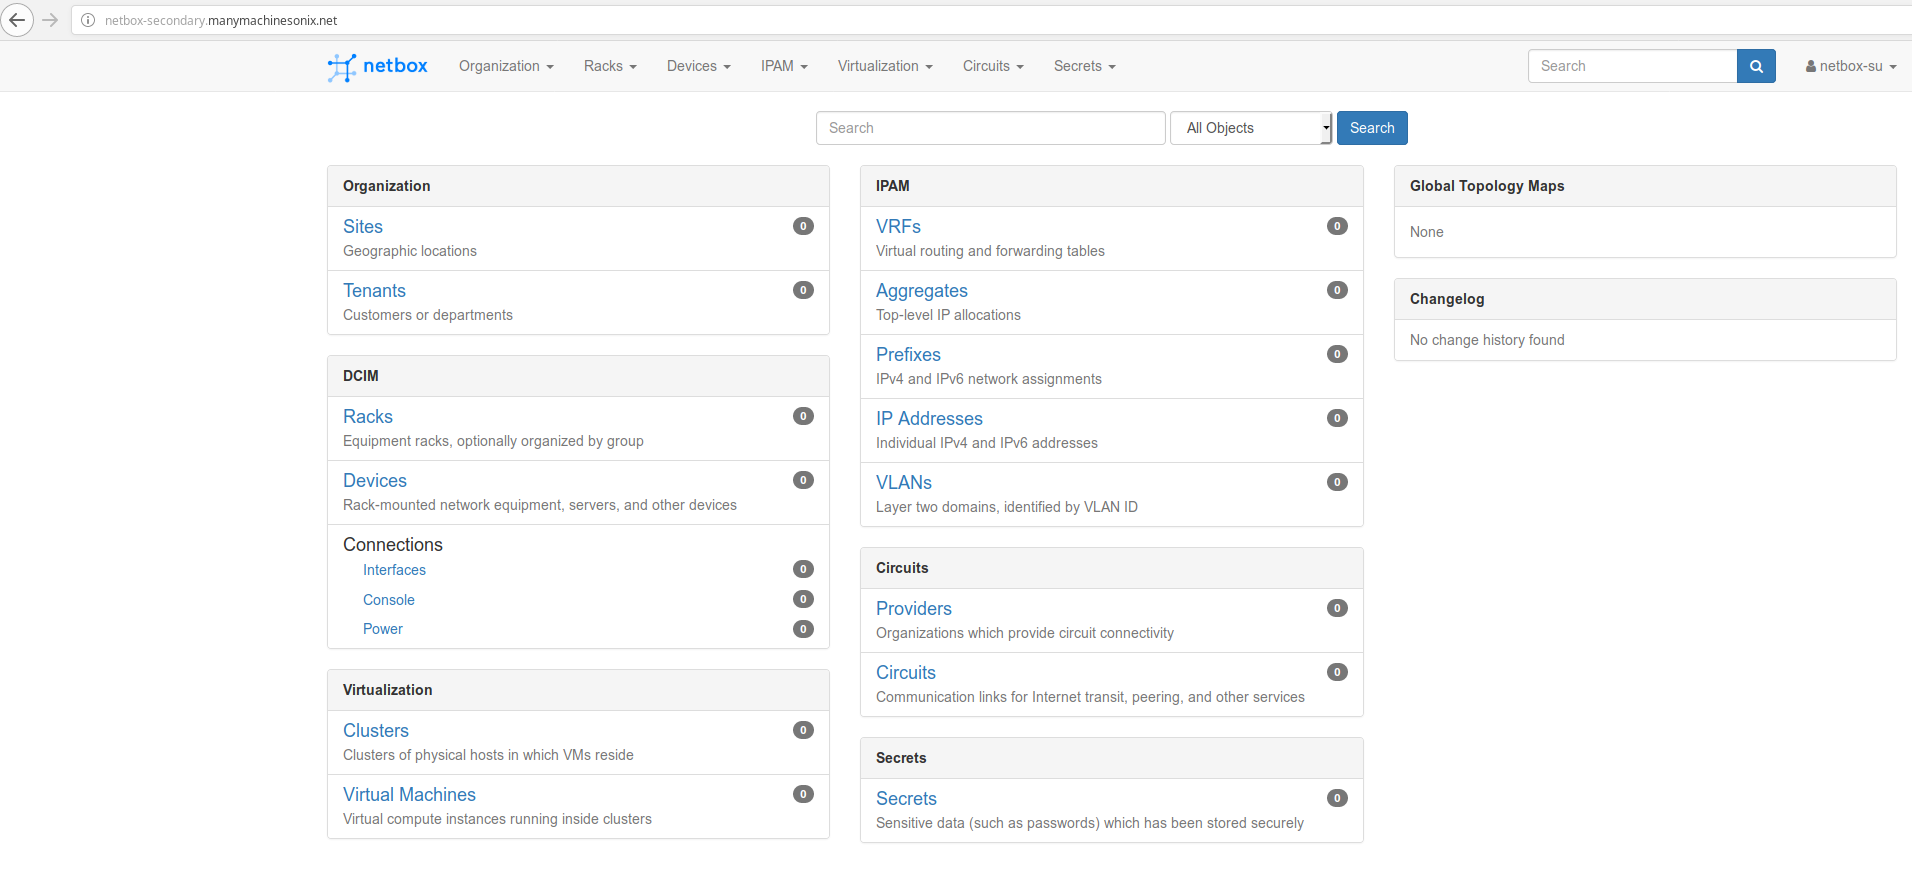
Secondary
Configure LDAP (optional)
Netbox can be configured to authenticate users via LDAP. Most commonly of course this will be Microsoft Active Directory.
First you need to install some more software pre-requisites
sudo apt-get install -y python-dev libldap2-dev libsasl2-dev libssl-dev
sudo pip install django-auth-ldap
Now you need to create an additional configuration file
sudo nano /opt/netbox/netbox/netbox/ldap_config.py
Paste in the following, make changes to reflect the domain, users and groups you are using then exit and save the file.
import ldap

AUTH_LDAP_SERVER_URI = "ldap://mydomain.local"
AUTH_LDAP_CONNECTION_OPTIONS = {
            ldap.OPT_REFERRALS: 0
            }
AUTH_LDAP_BIND_DN = "CN=svc-netbox,OU=Service Accounts,DC=mydomain,DC=local"
AUTH_LDAP_BIND_PASSWORD = "PASSWORDFORACCOUNTABOVE"
LDAP_IGNORE_CERT_ERRORS = True

from django_auth_ldap.config import LDAPSearch

AUTH_LDAP_USER_SEARCH = LDAPSearch("OU=Admin Accounts,OU=Infrastructure Admin,DC=mydomain,DC=local",
                                                    ldap.SCOPE_SUBTREE,
                                                    "(sAMAccountName=%(user)s)")

# You can map user attributes to Django attributes as so
AUTH_LDAP_USER_ATTR_MAP = {
           "first_name": "givenName",
           "last_name": "sn",
           "email": "mail"
                        }

from django_auth_ldap.config import LDAPSearch, NestedGroupOfNamesType

AUTH_LDAP_GROUP_SEARCH = LDAPSearch("DC=mydomain,DC=local", ldap.SCOPE_SUBTREE, "(objectClass=group)")

AUTH_LDAP_GROUP_TYPE = NestedGroupOfNamesType()

AUTH_LDAP_REQUIRE_GROUP = "CN=Admin-Netbox,OU=Admin Groups,OU=Infrastructure Admin,DC=mydomain,DC=local"

# Define special user types using groups. Exercise great caution when assigning superuser status.
AUTH_LDAP_USER_FLAGS_BY_GROUP = {
    "is_active": "CN=Active-Netbox,OU=Admin Groups,OU=Infrastructure Admin,DC=mydomain,DC=local",
    "is_staff": "CN=Staff-Netbox,OU=Admin Groups,OU=Infrastructure Admin,DC=mydomain,DC=local",
    "is_superuser": "CN=SU-Netbox,OU=Admin Groups,OU=Infrastructure Admin,DC=mydomain,DC=local"
}

AUTH_LDAP_FIND_GROUP_PERMS = True
AUTH_LDAP_CACHE_GROUPS = True
AUTH_LDAP_GROUP_CACHE_TIMEOUT = 3600
Lastly correct the permissions of the file.
sudo chown netbox:netbox ldap_config.py
sudo chmod +x ldap_config.py
sudo chmod 775 ldap_config.py
sudo supervisorctl restart netbox