My preparation for the series on de-google yourself [DRAFT]

Fedora small-office, home-office (SOHO) server

This thread will be long and hopefully full of sources and easy to read.
There is no reason to be intimidated as this will allow you to turn your computer into a reliable host. You can replace this whole thing by buying a Synology. If you are a power-user this will be cheaper and will give you more practice in managing systems. It will not make you an knowledge-able outside of SOHO. Be nice to me, English is my second language :slight_smile: .

Motivation

This is my thread of going through setting a new home server. We got a significant power upgrade (Skylake) so it will be ready for anything Level1 will release on the channel. @wendell has announced upcoming de-google videos and I need to clear up my old CentOS 7 system anyway.

Thread statement

My quick draft for VFIO and Plex was quite useful for people so I will introduce those here for a clean install. This will include interesting points from the channel and recommendations from others.

Rolling distro for a server? Have you gone mad?

I strongly disagree with the RHEL 8 policy on removing perfectly functional SATA3 RAID/HBA cards and moved to Fedora for simple integration of new ideas. My first choice was Debian, but that would not fit L1Forums.

Current concepts:

  1. VFIO enabled
  2. Docker for playthings
  3. SnapRAID, Software-RAID, LVM
  4. Subliminal for subtitles
  5. Plex
  6. WireGuard for my family
  7. Syncthing / Rsync daemon

Controversial points:

Why not just install FreeNAS or UNRAID?

The basic idea of Linux and sysadmin work all across the globe:
Layers of simplicity - each task can be incredibly complicated, but provides just simple outcome.
While this setup can take longer - your system is likely to survive upgrade s and distro switching. It will also give you an idea why we do things we do.

LVM or not

I highly recommend LVM for users who are not regular sysadmins. It does have caveats, but not even remotely as bad as ZFS or BTRFS.
Users who have rigid systems can appreciate ignoring even LVM and running just regular ext4 or XFS.

  • The benefits are: Scale-ability, Snapshots, Containing projects into logical volumes.
  • Small benefit is also drive flexibility - LVM does offer you software raid to work of mismatched drives and weird scaling. Synology is using the same idea.
  • The main problem is backup - you need to backup metadata of the LVM on regular basis. This data is necessary for partial or full recovery. system does do backups by itself. It is just a matter of configuration.

Design: Logical and physical devices

My idea for a home server is to have two sets of data: Simple, Robust
The you can add any process or device specific sets of data.

  1. Simple: Regular filesystem (XFS for me), no redundancy, semi-cold-storage.
    This means that the data can be stored slowly and accessed mainly for reading. This is perfect for your home-video archive. :wink:
  2. Robust: Redundancy is key, support for snapshots is a plus, flexibility.
    This for your VMs, containers, personal data, your girlfriends cloud :slight_smile:
  3. Example for a device specific data pool: SSD cache for transcode
  4. Example for a process specific data pool: mdadm design for mismatched speed devices. Digest of photo and video media to a fast SSD with a slower HDD backup.
Preparing HW and BIOS

Memtest

You need to make sure the RAM is running fine - SW raid, SnapRAID depend on it.

Under-clocking your CPU

  • If your CPU has HW acceleration for codecs you need, then clock speed is not necessarily what you want.
  • Intel Boost is your friend, better than SW states.
  • Some MBs will enable changing target TDP.

Multi-core boost

Probably better to turn this off on gaming motherboards, it just introduces extra power drain.

FAN management

  • Set the fans to go from 0 RPM to 600 RPM
  • curve should be based on MB/CPU.
  • Invest into better PWM fans - they are almost as good as Noctua Voltage mods

Network

Consider at least one network card to be stable and follow some of the advice:

  • Use static IP or make the DHCP lease static
  • Consider creating a static bridge if you are planning on a lot of VMs.
  • Enable PXE rom to boot from network
  • Configure your domain or router to provide DNS records for your machine. This will be required for some HTTPS integration.
  • Set up an alias for your server with the public IP
  • Consider having multiple network cards in case you want to try out PFSense and similar projects in VM.

Boot drives

  • I do not recommend using USB stick, with the current price of old SSDs.
  • 2x 32GB SSD for me. Tested and removed all locks using TRIM.
    Warning: all data on the device will be lost!
    blkdiscard /dev/sdX

Data drives

  • 2x 4TB old drives
  • 1x 8TB new drive
  • Spinning rust should be badblocked and then tested for latency. blocks with more than 256ms should be considered as bad blocks and not used for server.

Badblocks

badblocks: Value too large for defined data type invalid end block (7814026584): must be 32-bit value

  • For large drives you will see 512 emulation causing int32 applications to fail. Then we use larger blocks:
  • badblocks -wsv -t 0xaa -b 4096 /dev/sd......

Latency testing

  • originally mHDD32, still recommend netbooting into it.

Clean Fedora install

  • Server ISO, not a live image
  • using the 2 SSDs with RAID 1, boot, EFI and LVM
  • network time
  • no extra packages necessary

Data preparation

I have 3 drives currently in and there is a combination of 4x4TB blocks.
This will allow me to use my existing 4TB drives and provides future-proof solution for my extra 8TB drive.

Preparing the empty 8TB drive build on 512s with 4096 optimal size:

parted /dev/sda mktable gpt;
parted /dev/sda mkpart data4a 2048s 7814037503s;
parted /dev/sda mkpart data4b 7814037504s 100%;

Now I can use the 4 blocks as a lego to build the volumes I want. Options are:

  1. 1x4TB RAID5 + 4TB for simple storage
  2. 2x4TB RAID1 + 0TB for simple storage
  3. 1x4TB RAID1 + 2x4TB for simple storage
  4. Striped 8TB RAID1

Neither of those are perfect and the one that makes the sense for me is 3. This is because 4TB drives will be slowly replaced by 8TB drives - so I want 1x4TB drive to be easily removable. There is also a benefit for powering down the drive for Simple storage - devices not in raid do not drain as much power.

So I will use a compromise and have 1xLVM volume Group Simple and one mdadm RAID1 with LVM volume group Robust.
You can use fdisk to setup types for your partitions to make it easier.

Configuring your host

These steps are common for all your systems and I do recommend learning about this and creating a similar set of instructions for you to set up your machines. You do not need them for other chapters.

Firewall and VPN

SSH

Creating a user for your remote login

Personally I try to have the same UID a GUID on my computers. It is not mandatory and you can also set the user up during installation process.

groupadd -g 1099 bansheehero
useradd -g 1099 -u 1099 bansheehero

Key exchange - do not use passwords

I also have a public-key ready. If you do not, please follow up here:
Part of the Level1Linux video on SSH.

mkdir -p "/home/bansheehero/.ssh/"
echo "ssh-rsa AAAAB3N1yc2 ... EAAAADA.== [email protected]" >> /home/bansheehero/.ssh/authorized_keys
chmod "u+rwX" -R "/home/bansheehero"
chmod "go-rwx" -R "/home/bansheehero"
chown "bansheehero:bansheehero" -R "/home/bansheehero"

Adding password or removing password from sudo

It is not a good idea to store a lot of passwords on remote machines. As they can get compromised as passwords cracked. This vector does not really apply to a small home appliance. So choose yourself.

passwd bansheehero
nano /etc/sudoers;
nano /etc/pam.d/su;

Adding sudo/su privileges

Let the user also have access to admin groups:

usermod -aG "wheel" "bansheehero" > /dev/null 2>&1
usermod -aG "admin" "bansheehero" > /dev/null 2>&1
usermod -aG "sudo" "bansheehero" > /dev/null 2>&1

Testing the connection

Before me move on, we have to make sure that we can remote in. If you fail to login remotely - you will have to get a monitor and a keyboard to you server closet :slight_smile:

ssh bansheehero@Server-IP
Enter passphrase for key '...': 
Last login: Mon Mar  9 19:13:02 2020 from Your-IP
[bansheehero@hrudickova ~]$ sudo su -
[sudo] password for bansheehero: 
[root@hrudickova ~]# 

Setting up SSH daemon

We are first going to remove some options from SSH by editing this file:

nano /etc/ssh/sshd_config
  1. Remove remote root access, search and edit this row PermitRootLogin no
  2. Remove remote password access, search and edit this row PasswordAuthentication no

Now reload the configuration by reloading the server:

systemctl reload sshd

Setting up a fail2ban daemon

While they will not succeed by using passwords, it does not bots from trying. This can be done by a bot that blocks all IP addresses that fail a password too many times. You do not have to worry as you are not using passwords.

dnf install fail2ban.noarch
echo "[DEFAULT]
bantime = 1h
[sshd]
enabled = true" > /etc/fail2ban/jail.d/sshd.conf
systemctl enable fail2ban
systemctl restart fail2ban

You can check that it started by running:

grep "Jail 'sshd' started" /var/log/fail2ban.log

Setting up sensors

These servers are often build for low noise or stuffed into a closet. (Or both :slight_smile: )
This means we should monitor thermals in case we made a mistake in our design:

Installing lm_sensors

dnf install lm_sensors.x86_64 lm_sensors-sensord.x86_64

Configuring sensors

I am kind of screwed with my Z370 motherboard as the chipset does not show-up.

sensors-detect --auto
systemctl enable sensord.service 
systemctl start sensord.service 

Data storage

Simple storage

This will resemble cold-storage: things that are written and rarely read.
For that reason we want to get as close to the HW as possible. The best option for storage like this is to use redundancy that does not require immediate sync. Popular choice is SnapRAID and LVM.
Due to my constraints I will be using simple LVM, but this can change.
Let me know if you want to focus on low power HDD options.

Setting up partition type in 8TB drive

  1. For auto-detection and future reference you want to to have the correct types:
    fdisk /dev/sda
    Command (m for help): t
    Partition number (1,2, default 2): 2
    Partition type (type L to list all types): 31
    Changed type of partition 'Linux LVM' to 'Linux LVM'.
    Command (m for help): t
    Partition number (1,2, default 2): 1
    Partition type (type L to list all types): 29
    Changed type of partition 'Linux filesystem' to 'Linux RAID'.
    Command (m for help): w
    
  2. Backup the partition to the /boot:
    mkdir /boot/backup
    fdisk -l /dev/sda > /boot/backup/CF3BA086-1179-46ED-80BC-7CDCAB340B77
    cat /boot/backup/CF3BA086-1179-46ED-80BC-7CDCAB340B77
    ...
    Disk model: ST8000DM004-2CX1
    Disk identifier: CF3BA086-1179-46ED-80BC-7CDCAB340B77
    ...
    

LVM: Creating a physical volume

The hierarchy of LVM is Physical Volume (PV), then Volume Group (VG) and then Logical Volumes (LV). You can later add PVs, VGs and mainly LVs.
This is why the manual does not create 2 drives right away - there is no need to complicate the process.

pvcreate /dev/sda2

LVM: Creating a volume group (VG)

Groups are mandatory and serve a logistical purpose. Use them to differentiate data based on purpose. I discussed this at the beginning and we want 2 groups: Simple and Robust. As an example: we can also create a group NVM for a fast storage.

Details can be found by running man vgcreate:

  1. autobackup y will backup the data each time they change. This is not recommended for slow(very large) systems or old flash systems. No sense worrying here as we are not changing it often and we do not have a large number of PVs.
  2. pvmetadatacopies 2 is a safety feature in case you accidentally overwrite the beginning of a PV.
  3. metadatacopies all forces the system to use all drives. This would be a bad idea in a situation with a lot of PVs or mismatched drives. No worries here.
vgcreate --autobackup y --pvmetadatacopies 2 --metadatacopies all VG_Simple /dev/sda2 
  Volume group "VG_Simple" successfully created

LVM: Creating a logical volume and formatting it.

Since this is the Simple storage we do not expect to split it up and LVM is a bit of a overkill - it serves pretty much the same function as union filesystems. But that should not discourage us.

  1. Create a large LV that is just a simple linear drive:
    lvcreate --activate y --autobackup y --type=linear --extents 100%FREE --name=LV_Share VG_Simple
    
  2. Format the LV and mount it:
    mkfs.xfs -L Share /dev/VG_Simple/LV_Share
    mkdir /mnt/share
    mount LABEL=Share /mnt/share/
    grep LV_Share /proc/mounts
    
  3. Mount it automatically during start, but do not fail the start if it fails.
    echo -e "LABEL=Share\t/mnt/share\txfs\tdefaults,noatime,nofail\t0 0" >> /etc/fstab 
    umount /mnt/share 
    mount /mnt/share 
    grep LV_Share /proc/mounts 
    
  4. Now you can use the mountpoint /mnt/share for your samba and containers.

LVM: Making sure backups are off LV volumes.

By default Fedora backs up the metadata to following two folders:

backup_dir = "/etc/lvm/backup"
archive_dir = "/etc/lvm/archive"

If you use LVM for / or /etc it is highly recommended to schedule a backup off-drive or even better off-site.

Consider these two directories more important than the data on the LVM

Robust storage

Here is where I recommend using LVM, you do not have to use Software RAID, but I do recommend separating redundancy and LVM from each other.

Creating SW raid with mdadm

mdadm --create /dev/md/robust --level=1 --name=robust --run --raid-devices=2 /dev/sda1 missing
cat /proc/mdstat

Creating LVM

We already went through all the steps, there are few decisions to make:

  • Do you want thin-provisioning (Volume will appear bigger than it is)
  • What are you initial LVs?
  • Space you need (Growing them larger is trivial on XFS)

Warning: Here I am making a new /home and I have moved my existing admin user out of it. Manipulating home directories may lead to you losing remote access to the server (as you move your authorized_keys).

pvcreate /dev/md/robust
vgcreate --autobackup y --pvmetadatacopies 2 --metadatacopies all VG_Robust /dev/md/robust
lvcreate --activate y --autobackup y --type=linear --size 600G --name=LV_Homedirs VG_Robust
mkfs.xfs -L Homedirs /dev/VG_Robust/LV_Homedirs
mount LABEL=Homedirs /home/
grep LV_Homedirs /proc/mounts
echo -e "LABEL=Homedirs\t/home\txfs\tdefaults,noatime,nofail\t0 0" >> /etc/fstab 
umount /home
mount /home
grep LV_Homedirs /proc/mounts 

Starting with PodMan

Intro and main source

PodMan is Docker compatible solution to run containers.

Source: Fedora Magazine
Missing source: Nice analysis on Docker and related security. Could not find it in history.
Source: RedHat on running containers as systemd services.

Installing packages

Fedora maintains it’s own packages:

sudo dnf install podman podman-docker git -y

Testing if it works:

podman run --rm -it fedora:latest echo "Hello world!"

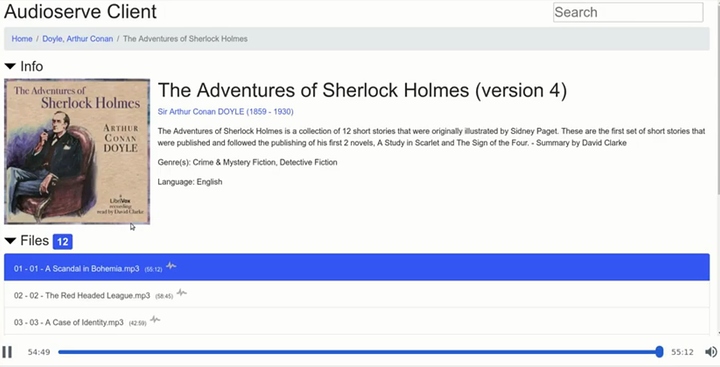
Installing audio-book service Audioserve

Source: Project HitHub page
Author’s video on the project

Why start with this one?

Since this is a home server and public library of audio-books is huge I wanted to use this as a first service we can run on our server.

Benefits over other solutions

  1. Complete package compared to Cloud Services and clients
    • You can browse
    • You can play
    • You can download entire books ready for your Android/iOS players
  2. Keep It Simple Stupid (KISS) design
    • Folders or m4b is all you need
    • Fits well with Linux philosophy for layers
  3. Extremely easy to DIY

Running the build of docker

Creating the main library

You can have multiple collections in my library - I am using both English and Czech books. You can easily do this by having 2 directories at the end of docker command.

  1. Creating a directory: mkdir -p "/mnt/share/audiobooks/"
  2. Creating a directory for Author: mkdir -p "/mnt/share/audiobooks/en/Jules VERNE (1828 - 1905)"
  3. Downloading a public book into the directory: wget -O "/mnt/share/audiobooks/en/Jules VERNE (1828 - 1905)/Doctor Ox's Experiment.m4b" https://ia802704.us.archive.org/6/items/doctor_oxs_experiment_1001_librivox/DoctorOxsExperiment_librivox.m4b
  4. (Optiona) Change the SELinux label for direct access by containers.
semanage fcontext -a -t container_file_t '/mnt/share/audiobooks(/.*)?'
restorecon -R -v /mnt/share/audiobooks/

Creating firewall rule

This is local only, rest will be behind reverse proxy.

sudo firewall-cmd --permanent --new-service=audioserve
sudo firewall-cmd --permanent --service=audioserve --set-short=audioserve
sudo firewall-cmd --permanent --service=audioserve --set-description="Web interface for Audioserve."
sudo firewall-cmd --permanent --service=audioserve --add-port=3000/tcp

Running the official docker

You can run his test_date like this and kill it with Ctrl+C. You can then just start it anytime with podman start audioserve

podman run --name audioserve -p 3000:3000 -v /mnt/share/audiobooks/:/audiobooks -e AUDIOSERVE_SHARED_SECRET=GlobalPassword izderadicka/audioserve /audiobooks/en

Creating a systemd service

We want a systemd global service to easily run pods.

mkdir -p ~/.config/systemd/user
cd ~/.config/systemd/user
podman generate systemd --name audioserve --files
systemctl --user daemon-reload
systemctl --user enable --now container-audioserve.service
systemctl --user status container-audioserve.service

Add it to etc:

sudoedit /etc/systemd/system/audioserve.service

Add to [Service]:

> User=podman
> Group=podman

Now we need to get it to /etc:

sudoedit /etc/systemd/system/audioserve.service

Reloading systemd and enabling the service:

systemctl daemon-reload
systemctl enable audioserve
systemctl start audioserve

Test connection via SSH tunneling

Before we set-up SSL and firewall we can use a simple tunnel to test the library. You can then decide on how you want have it accessed.

ssh username@server -L3000:localhost:3000

Installing torrent client daemon Deluge

Running torrent client in a container does not seem to be a bad idea, Even if the gains are minimal at the start, in the future you can setup selective networking and VPN just for torrent client.

Since we are all about sharing Linux distributions and unlicensed content I am not including that in here.

Creating your own pod

The provided file is designed for Fedora as we are running Fedora as a host and it provides us easy comparison to an installation process you would do on a normal machine. If you are not using a pod - please follow the steps on creating a service and do not run programs as just start.sh.
Source: Setting up deluge daemon with web and logging as service

Create a directory:

mkdir -p ~/pods/deluged

Create a Dockerfile (nano ~/pods/deluged/Dockerfile):

FROM fedora:31 AS deluged
LABEL description="Deluge daemon running daemon and web interface"
#Source: https://deluge.readthedocs.io/en/latest/how-to/systemd-service.html

RUN dnf update -y &&\
    dnf install -y deluge-daemon deluge-web deluge-console

# Included in the Fedora package
#RUN adduser --system  --gecos "Deluge Service" --disabled-password --group --home /var/lib/deluge deluge

# Creating missing directories
RUN mkdir -p /var/log/deluge /data &&\
    chown -R deluge:deluge /var/log/deluge /data &&\
    chmod -R 750 /var/log/deluge /data

VOLUME /data
EXPOSE 49999/udp 49999 58846 8112

USER deluge
# DockerFile allows just one command.
RUN echo "#!/bin/sh" > ~/start.sh &&\
    echo "/usr/bin/deluged --logfile=/var/log/deluge/daemon.log --loglevel=warning" >> ~/start.sh &&\
    echo "/usr/bin/deluge-web -d --logfile=/var/log/deluge/web.log --loglevel=warning" >> ~/start.sh &&\
    chmod 700 ~/start.sh

# Testing run and creating config files
RUN ["/usr/bin/deluged", "--logfile=/var/log/deluge/daemon.log", "--loglevel=warning"]
RUN ["/usr/bin/deluge-web", "--logfile=/var/log/deluge/web.log", "--loglevel=warning"]

CMD ["/bin/sh", "/var/lib/deluge/start.sh"]

Building the pod

This might take some time for the first run, but do no worry caching is enabled by default and next time it only repeats the steps not cached yet.

cd ~/pods/deluged/
podman build . -t deluged

If you receive and error ‘unable to close namespace’, just run the buid again.l

Data directory

We are going to separate all content into a directory. If we need to handle it elsewhere, we should create a hard-link.

mkdir -p /mnt/share/torrents
semanage fcontext -a -t container_file_t '/mnt/share/torrents(/.*)?'
restorecon -R -v /mnt/share/torrents/

PLEX

Plex is going through trouble, but until it gets crushed we can used it.
There are few alternatives, but none of them provide the same features.

Things you want from PLEX

If you do not want any of these, then Plex is a bit of a overkill

  • Ability to sort using online metadata
  • Ability to stream to devices outside of your network without a VPN
  • Ability to stream to devices with App support (PLEX app)
  • Share libraries between users

Install steps

I previously used Plex directly on host, this will be an attempt on running it in a pod.

1. Preparing the host

sudo useradd plex
sudo chmod o-rwx -R /home/plex
sudo usermod -aG share plex
sudo su - plex

2. Preparing the pod from repository

We do want to use bridge networking, there is no point running a network heavy pod with host networking. You are sacrificing so much security.

podman pull plexinc/pms-docker

2. Preparing the pod from scratch