Marandil's Homelab evolution

Perfectly fine reservations. Maybe Alpine with Xen has better support. You’d also get a more minimal and more stable distro.

https://wiki.alpinelinux.org/wiki/Xen_Dom0

I find that the FreeBSD and OpenBSD communities can offer decent support. Normally for routers (and firewalls) I’d go openbsd, unless you really need all the juice you can squeeze out, so you go freebsd (or there are really no drivers for openbsd).

You just edit the XML. You can do so much with virt-manager, as it’s using bare basic qemu and libvirt, like basically all other major systems. OpenStack, OpenNebula, oVirt, virt-manager, probably more, all use libvirt. Proxmox uses qemu, but not libvirt (they have their own utilities). People got passthrough working on it, but no clue how you’d do it (the qemu-server conf for proxmox is not the same xml stuff as libvirt’s).

Yeah… The XML we got from virt-manager was so bad we basically had to rewrite it from scratch. I don’t remember all the details, but the PCIe tree barely had any slots left.

I remember having “editing HTML in word in early 2000s” flashbacks :smiley:

Wow, fun to see someone struggling with similar things that I am because of a similar design!

But no matter how hard I tried, I couldn’t get it to boot properly, it would always stop at the same spot

Yo! This was so frustrating, I would xl create and see xl top showing 100% cpu usage with no output. And yeah BIOS mode seemed to solve if I didn’t also…

while realizing I can’t actually pass any PCI device to the HVM

do that too. I got the same 100% cpu usage there too. I was wondering what flags or settings we are missing. Did you use a kernel with pciback compiled in? I haven’t tried that yet, just as a module

I started working towards running out as a PV, but for some reason I couldn’t get pygrub to recognize root and find the Kernel. After wasting another unspecified amount of time I settled for running it as a PVH with an extracted Kernel. Which worked!

Based on my reading, PV is very not supported for 64-bit os FreeBSD, and I couldn’t find much information on PVH. How did you extract the kernel boot arguments for OPNsense? I couldn’t make much sense for the magic loader.conf, and my attempts to chainload via the loader also failed.

Solution #3 - Just go KVM

I tried this, and was able to go EFI! But I got a lot of core dumps starting up, and weird 500 errors when managing opnsense via the web interface. That required reboots and service restarts, respectively so I’ve temporarily given up on opnsense until I can fix either KVM or Xen.

Solution #2 - Dedicated hypervisor distribution

XCP-NG gave me 100% cpu usage when I passed through my PCIe NICs too

Solution #1 - Linux-based Router OS in PV

I have been tempted towards this direction because of all of this, but I haven’t yet found a reasonable web or gui-managable solution. If you find something, I’d love to know too

I just really wanted to go with Xen initially for the added separation of dom0, but the more I work with it, the less differences from KVM I see.

Exactly why I tried to use xen too!

Just started building kernel, we’ll see.
I ticked all the boxes listed here + marked pciback as * instead of M. We’ll see.

I suspect this may be an issue of some kernel flags, because I initially couldn’t even turn on VFs on the NICs until I added pci=realloc to kernel command line. I think.

In 2010 their documentation listed this as a bug, I assumed something might have changed in the last (check notes) 13 years since Dec. 17, 2010. The “current” version (from 2015) doesn’t have this annotation anymore, just says

As of this release, Xen PV DomU support is not heavily tested; insta-
bility has been reported during VM migration of PV kernels.

As for PVH support and also kernel params, I used this: FreeBSD PVH - Xen

Some more reading on PVH and the spectrum:
https://xenbits.xen.org/docs/4.6-testing/misc/pvh.html
https://wiki.xenproject.org/wiki/Understanding_the_Virtualization_Spectrum

I want to test VyOS, but idk if they have a “nice” GUI interface. CLI is fine for me personally, but I understand it might not be fine for you.

In 2010 their documentation listed this as a bug, I assumed something might have changed in the last (check notes) 13 years since Dec. 17, 2010. The “current” version (from 2015) doesn’t have this annotation anymore, just says

As of this release, Xen PV DomU support is not heavily tested; insta-
bility has been reported during VM migration of PV kernels.

As for PVH support and also kernel params, I used this: FreeBSD PVH - Xen

Interesting, I saw that DomU Support for Xen - Xen linked to [base] Revision 282274 where PV was removed in 2015

It’s very frustrating how out of date the documentation is considering how active Xen is as a project!

It works!


Still no interface though, but at least the passthrough worked.
Custom kernel. Will post instructions later.
Top looks reasonable:

2 Likes

I think in the meantime I have finally figured out how to create direct links between domains. The keywords seem to actually be “driver domain” and “backend” in “vif” specification, cf:

https://xenbits.xen.org/docs/unstable/man/xl.cfg.5.html#Other-Options
https://xenbits.xen.org/docs/unstable/man/xl-network-configuration.5.html

I have not tested that yet, but the setup would require setting up a “driver domain” VM, say “dom1” and then specifying vif=...,backend=dom1 for dom2, which should create a link between dom1 and dom2 with the backend driver in dom1. This is purely theoretical and I have not seen any guide for that yet.


Meanwhile I’m actually seriously considering having all the switching being done either in a completely separate VM (even from opnsense) or in dom0. The reason being, I can’t find reliable info about whether the FreeBSD Chelsio driver can handle switching on hardware level, or will it do all of it in software. The Linux manuals for the drivers are much more complete on that front, including OVS offloading etc.
I also noticed something I didn’t previously, that OPNsense actually doesn’t really like having more than one LAN interfaces and you have to setup the bridge manually. So given I currently have 2 NICs, each with switching offloading, I could probably be better off by configuring the switching on dom0, either bridging the two at dom0 or at the router domain, and passing a single VF from either card (so 2 total) to each VM. Why? Because that way I can have them use the offloading features on the corresponding interface.

P.S. It would be ideal if the driver could do switching by DMA between the cards, but I have no idea if that’s even possible.

I’m about to rebuild the system once again to make sure my instructions are more or less complete and I’m not missing anything important. Like I just realized I forgot to add a peculiar module_blacklist to the ArchISO command line.

1 Like

(My) Arch Xen setup (as of 2024-02-01):

Let me know if I should post some parts of this “guide” edited somewhere else.
Comments and suggestions are welcome.

Start & identification

  1. Run Arch ISO, connect mobo non-IPMI Ethernet
  • I have this weird kernel panic caused by csiostor so I blacklist it with module_blacklist=csiostor in GRUB parameters. This has to be applied on every Live ISO boot (until fixed).
  1. ip addr
ip addr
root@archiso ~ # ip addr
1: lo: <LOOPBACK,UP,LOWER_UP> mtu 65536 qdisc noqueue state UNKNOWN group default qlen 1000
    link/loopback 00:00:00:00:00:00 brd 00:00:00:00:00:00
    inet 127.0.0.1/8 scope host lo
       valid_lft forever preferred_lft forever
    inet6 ::1/128 scope host noprefixroute
       valid_lft forever preferred_lft forever
2: eno1: <BROADCAST,MULTICAST,UP,LOWER_UP> mtu 1500 qdisc fq_codel state UP group default qlen 1000
    altname enp0s31f6
3: enp23s0f4: <BROADCAST,MULTICAST,UP,LOWER_UP> mtu 1500 qdisc mq state UP group default qlen 1000
    inet 192.168.1.15/24 metric 100 brd 192.168.1.255 scope global dynamic enp23s0f4
       valid_lft 86122sec preferred_lft 86122sec
4: enp23s0f4d1: <NO-CARRIER,BROADCAST,MULTICAST,UP> mtu 1500 qdisc mq state DOWN group default qlen 1000
5: enp23s0f4d2: <NO-CARRIER,BROADCAST,MULTICAST,UP> mtu 1500 qdisc mq state DOWN group default qlen 1000
6: enp23s0f4d3: <NO-CARRIER,BROADCAST,MULTICAST,UP> mtu 1500 qdisc mq state DOWN group default qlen 1000
7: enp24s0f4: <NO-CARRIER,BROADCAST,MULTICAST,UP> mtu 1500 qdisc mq state DOWN group default qlen 1000
8: enp24s0f4d1: <NO-CARRIER,BROADCAST,MULTICAST,UP> mtu 1500 qdisc mq state DOWN group default qlen 1000
9: enp24s0f4d2: <NO-CARRIER,BROADCAST,MULTICAST,UP> mtu 1500 qdisc mq state DOWN group default qlen 1000
10: enp24s0f4d3: <NO-CARRIER,BROADCAST,MULTICAST,UP> mtu 1500 qdisc mq state DOWN group default qlen 1000
11: wlan0: <NO-CARRIER,BROADCAST,MULTICAST,UP> mtu 1500 qdisc noqueue state DOWN group default qlen 1000
  1. For SSH setup instead of local, s.t. commands can be easily copied:
    1. passwd; systemctl status sshd
    2. ssh -o StrictHostKeyChecking=no -o UserKnownHostsFile=/dev/null root@[archiso ip addr]
  2. lspci -vvt, identify hardware, check if anything’s missing
lspci -vvt
root@archiso ~ # lspci -vvt
-+-[0000:00]-+-00.0  Intel Corporation Sky Lake-E DMI3 Registers
 |           +-04.0  Intel Corporation Sky Lake-E CBDMA Registers
 |           +-04.1  Intel Corporation Sky Lake-E CBDMA Registers
 |           +-04.2  Intel Corporation Sky Lake-E CBDMA Registers
 |           +-04.3  Intel Corporation Sky Lake-E CBDMA Registers
 |           +-04.4  Intel Corporation Sky Lake-E CBDMA Registers
 |           +-04.5  Intel Corporation Sky Lake-E CBDMA Registers
 |           +-04.6  Intel Corporation Sky Lake-E CBDMA Registers
 |           +-04.7  Intel Corporation Sky Lake-E CBDMA Registers
 |           +-05.0  Intel Corporation Sky Lake-E MM/Vt-d Configuration Registers
 |           +-05.2  Intel Corporation Sky Lake-E RAS
 |           +-05.4  Intel Corporation Sky Lake-E IOAPIC
 |           +-08.0  Intel Corporation Sky Lake-E Ubox Registers
 |           +-08.1  Intel Corporation Sky Lake-E Ubox Registers
 |           +-08.2  Intel Corporation Sky Lake-E Ubox Registers
 |           +-14.0  Intel Corporation 200 Series/Z370 Chipset Family USB 3.0 xHCI Controller
 |           +-14.2  Intel Corporation 200 Series PCH Thermal Subsystem
 |           +-16.0  Intel Corporation 200 Series PCH CSME HECI #1
 |           +-17.0  Intel Corporation 200 Series PCH SATA controller [AHCI mode]
 |           +-1b.0-[01]----00.0  Intel Corporation Optane NVME SSD H10 with Solid State Storage [Teton Glacier]
 |           +-1b.4-[02]--+-00.0  Advanced Micro Devices, Inc. [AMD/ATI] Caicos [Radeon HD 6450/7450/8450 / R5 230 OEM]
 |           |            \-00.1  Advanced Micro Devices, Inc. [AMD/ATI] Caicos HDMI Audio [Radeon HD 6450 / 7450/8450/8490 OEM / R5 230/235/235X OEM]
 |           +-1c.0-[03]----00.0  Realtek Semiconductor Co., Ltd. RTL8822BE 802.11a/b/g/n/ac WiFi adapter
 |           +-1c.1-[04]----00.0  ASMedia Technology Inc. ASM1062 Serial ATA Controller
 |           +-1c.4-[05]----00.0  ASMedia Technology Inc. ASM2142/ASM3142 USB 3.1 Host Controller
 |           +-1c.6-[06]----00.0  ASMedia Technology Inc. ASM2142/ASM3142 USB 3.1 Host Controller
 |           +-1d.0-[07]----00.0  Intel Corporation Optane NVME SSD H10 with Solid State Storage [Teton Glacier]
 |           +-1f.0  Intel Corporation X299 Chipset LPC/eSPI Controller
 |           +-1f.2  Intel Corporation 200 Series/Z370 Chipset Family Power Management Controller
 |           +-1f.3  Intel Corporation 200 Series PCH HD Audio
 |           +-1f.4  Intel Corporation 200 Series/Z370 Chipset Family SMBus Controller
 |           \-1f.6  Intel Corporation Ethernet Connection (2) I219-V
 +-[0000:16]-+-00.0-[17]--+-00.0  Chelsio Communications Inc T540-BT Unified Wire Ethernet Controller
 |           |            +-00.1  Chelsio Communications Inc T540-BT Unified Wire Ethernet Controller
 |           |            +-00.2  Chelsio Communications Inc T540-BT Unified Wire Ethernet Controller
 |           |            +-00.3  Chelsio Communications Inc T540-BT Unified Wire Ethernet Controller
 |           |            +-00.4  Chelsio Communications Inc T540-BT Unified Wire Ethernet Controller
 |           |            +-00.5  Chelsio Communications Inc T540-BT Unified Wire Storage Controller
 |           |            \-00.6  Chelsio Communications Inc T540-BT Unified Wire Storage Controller
 |           +-02.0-[18]--+-00.0  Chelsio Communications Inc T540-BT Unified Wire Ethernet Controller
 |           |            +-00.1  Chelsio Communications Inc T540-BT Unified Wire Ethernet Controller
 |           |            +-00.2  Chelsio Communications Inc T540-BT Unified Wire Ethernet Controller
 |           |            +-00.3  Chelsio Communications Inc T540-BT Unified Wire Ethernet Controller
 |           |            +-00.4  Chelsio Communications Inc T540-BT Unified Wire Ethernet Controller
 |           |            +-00.5  Chelsio Communications Inc T540-BT Unified Wire Storage Controller
 |           |            \-00.6  Chelsio Communications Inc T540-BT Unified Wire Storage Controller
 |           +-05.0  Intel Corporation Sky Lake-E VT-d
 |           +-05.2  Intel Corporation Sky Lake-E RAS Configuration Registers
 |           +-05.4  Intel Corporation Sky Lake-E IOxAPIC Configuration Registers
 |           +-08.0  Intel Corporation Sky Lake-E CHA Registers
 |           +-08.1  Intel Corporation Sky Lake-E CHA Registers
 |           +-08.2  Intel Corporation Sky Lake-E CHA Registers
 |           +-08.3  Intel Corporation Sky Lake-E CHA Registers
 |           +-08.4  Intel Corporation Sky Lake-E CHA Registers
 |           +-08.5  Intel Corporation Sky Lake-E CHA Registers
 |           +-08.6  Intel Corporation Sky Lake-E CHA Registers
 |           +-08.7  Intel Corporation Sky Lake-E CHA Registers
 |           +-09.0  Intel Corporation Sky Lake-E CHA Registers
 |           +-09.1  Intel Corporation Sky Lake-E CHA Registers
 |           +-0e.0  Intel Corporation Sky Lake-E CHA Registers
 |           +-0e.1  Intel Corporation Sky Lake-E CHA Registers
 |           +-0e.2  Intel Corporation Sky Lake-E CHA Registers
 |           +-0e.3  Intel Corporation Sky Lake-E CHA Registers
 |           +-0e.4  Intel Corporation Sky Lake-E CHA Registers
 |           +-0e.5  Intel Corporation Sky Lake-E CHA Registers
 |           +-0e.6  Intel Corporation Sky Lake-E CHA Registers
 |           +-0e.7  Intel Corporation Sky Lake-E CHA Registers
 |           +-0f.0  Intel Corporation Sky Lake-E CHA Registers
 |           +-0f.1  Intel Corporation Sky Lake-E CHA Registers
 |           +-1d.0  Intel Corporation Sky Lake-E CHA Registers
 |           +-1d.1  Intel Corporation Sky Lake-E CHA Registers
 |           +-1d.2  Intel Corporation Sky Lake-E CHA Registers
 |           +-1d.3  Intel Corporation Sky Lake-E CHA Registers
 |           +-1e.0  Intel Corporation Sky Lake-E PCU Registers
 |           +-1e.1  Intel Corporation Sky Lake-E PCU Registers
 |           +-1e.2  Intel Corporation Sky Lake-E PCU Registers
 |           +-1e.3  Intel Corporation Sky Lake-E PCU Registers
 |           +-1e.4  Intel Corporation Sky Lake-E PCU Registers
 |           +-1e.5  Intel Corporation Sky Lake-E PCU Registers
 |           \-1e.6  Intel Corporation Sky Lake-E PCU Registers
 +-[0000:64]-+-01.0-[65]----00.0  Samsung Electronics Co Ltd NVMe SSD Controller SM981/PM981/PM983
 |           +-02.0-[66]----00.0  Samsung Electronics Co Ltd NVMe SSD Controller SM981/PM981/PM983
 |           +-03.0-[67]----00.0  Intel Corporation Optane NVME SSD H10 with Solid State Storage [Teton Glacier]
 |           +-05.0  Intel Corporation Sky Lake-E VT-d
 |           +-05.2  Intel Corporation Sky Lake-E RAS Configuration Registers
 |           +-05.4  Intel Corporation Sky Lake-E IOxAPIC Configuration Registers
 |           +-08.0  Intel Corporation Sky Lake-E Integrated Memory Controller
 |           +-09.0  Intel Corporation Sky Lake-E Integrated Memory Controller
 |           +-0a.0  Intel Corporation Sky Lake-E Integrated Memory Controller
 |           +-0a.1  Intel Corporation Sky Lake-E Integrated Memory Controller
 |           +-0a.2  Intel Corporation Sky Lake-E Integrated Memory Controller
 |           +-0a.3  Intel Corporation Sky Lake-E Integrated Memory Controller
 |           +-0a.4  Intel Corporation Sky Lake-E Integrated Memory Controller
 |           +-0a.5  Intel Corporation Sky Lake-E LM Channel 1
 |           +-0a.6  Intel Corporation Sky Lake-E LMS Channel 1
 |           +-0a.7  Intel Corporation Sky Lake-E LMDP Channel 1
 |           +-0b.0  Intel Corporation Sky Lake-E DECS Channel 2
 |           +-0b.1  Intel Corporation Sky Lake-E LM Channel 2
 |           +-0b.2  Intel Corporation Sky Lake-E LMS Channel 2
 |           +-0b.3  Intel Corporation Sky Lake-E LMDP Channel 2
 |           +-0c.0  Intel Corporation Sky Lake-E Integrated Memory Controller
 |           +-0c.1  Intel Corporation Sky Lake-E Integrated Memory Controller
 |           +-0c.2  Intel Corporation Sky Lake-E Integrated Memory Controller
 |           +-0c.3  Intel Corporation Sky Lake-E Integrated Memory Controller
 |           +-0c.4  Intel Corporation Sky Lake-E Integrated Memory Controller
 |           +-0c.5  Intel Corporation Sky Lake-E LM Channel 1
 |           +-0c.6  Intel Corporation Sky Lake-E LMS Channel 1
 |           +-0c.7  Intel Corporation Sky Lake-E LMDP Channel 1
 |           +-0d.0  Intel Corporation Sky Lake-E DECS Channel 2
 |           +-0d.1  Intel Corporation Sky Lake-E LM Channel 2
 |           +-0d.2  Intel Corporation Sky Lake-E LMS Channel 2
 |           \-0d.3  Intel Corporation Sky Lake-E LMDP Channel 2
 \-[0000:b2]-+-00.0-[b3]----00.0  Samsung Electronics Co Ltd NVMe SSD Controller 980 (DRAM-less)
             +-01.0-[b4]----00.0  Hewlett-Packard Company Smart Array Gen8 Controllers
             +-03.0-[b5]----00.0  Samsung Electronics Co Ltd NVMe SSD Controller SM981/PM981/PM983
             +-05.0  Intel Corporation Sky Lake-E VT-d
             +-05.2  Intel Corporation Sky Lake-E RAS Configuration Registers
             +-05.4  Intel Corporation Sky Lake-E IOxAPIC Configuration Registers
             +-12.0  Intel Corporation Sky Lake-E M3KTI Registers
             +-12.1  Intel Corporation Sky Lake-E M3KTI Registers
             +-12.2  Intel Corporation Sky Lake-E M3KTI Registers
             +-15.0  Intel Corporation Sky Lake-E M2PCI Registers
             +-16.0  Intel Corporation Sky Lake-E M2PCI Registers
             +-16.4  Intel Corporation Sky Lake-E M2PCI Registers
             \-17.0  Intel Corporation Sky Lake-E M2PCI Registers
  1. timedatectl
  2. lsblk -o+FSTYPE

Root on RAID1

Setting up root on a mirror DC S4600 (240GB each).
All default VMs will have their root hosted on a mirrored SATA SSD with good write endurance for logging.
In my setup, all VMs use thick-provisioned LVM volumes as their drives.
This also allows me to boot into them directly if needed.

  1. Identify disks using lsblk or ls -l /dev/disk/by-id:
    root@archiso ~ # ls -l /dev/disk/by-id
    total 0
    lrwxrwxrwx 1 root root  9 Jan  4 17:43 ata-MK000240GWKVK_BTYM73830F0Q240AGN -> ../../sdb
    lrwxrwxrwx 1 root root  9 Jan  4 17:43 ata-MK000240GWKVK_BTYM7384027Z240AGN -> ../../sda
    
    If there is an active md / lvm active on the drives, remove them first:
    • vgremove /dev/vgX (answer yes to all)
    • mdadm --stop /dev/mdX
  2. blkdiscard -f /dev/sdX for both drives
  3. fdisk /dev/sdX for both mirrors
    : g
    : n
      : 1
      : [default 2048]
      : +8G
      : (optional) Y (if asked for previous signature)
    : n
      : 2
      : [default]
      : [default]
      : (optional) Y (if asked for previous signature)
    : t
      : 1
      : 1 [EFI System]
    : t
      : 2
      : 43 [Linux RAID]
    : w
    
  4. mkfs.fat -F32 /dev/sdX1 for both mirrors
  5. mdadm --homehost=any --create /dev/md0 --verbose --level=1 --metadata=1.2 --raid-devices=2 --name=rootraid /dev/sda2 /dev/sdb2
  6. mdadm --detail /dev/md0
    mdadm --detail /dev/md0
    root@archiso ~ # mdadm --detail /dev/md0
    /dev/md0:
               Version : 1.2
         Creation Time : Thu Feb  1 22:01:56 2024
            Raid Level : raid1
            Array Size : 225908736 (215.44 GiB 231.33 GB)
         Used Dev Size : 225908736 (215.44 GiB 231.33 GB)
          Raid Devices : 2
         Total Devices : 2
           Persistence : Superblock is persistent
    
         Intent Bitmap : Internal
    
           Update Time : Thu Feb  1 22:02:21 2024
                 State : clean, resyncing
        Active Devices : 2
       Working Devices : 2
        Failed Devices : 0
         Spare Devices : 0
    
    Consistency Policy : bitmap
    
         Resync Status : 2% complete
    
                  Name : any:rootraid
                  UUID : 6c2409d0:0d12ba02:5705e0cf:2c69beb6
                Events : 5
    
        Number   Major   Minor   RaidDevice State
           0       8        2        0      active sync   /dev/sda2
           1       8       18        1      active sync   /dev/sdb2
    
  7. pvcreate /dev/md0
  8. vgcreate vgroot /dev/md0
  9. lvcreate -n vmserver-root -L 20G vgroot
  10. mkfs.ext4 -vL "vmserver-root" -b 4096 /dev/vgroot/vmserver-root

Arch system install

C.f. Installation guide - ArchWiki, more or less from the “1.11 Mount the file systems” step.

  1. mount /dev/vgroot/vmserver-root /mnt
  2. mount --mkdir /dev/sda1 /mnt/boot - sdb will be mirrored manually; OPTIONAL: installation - Can the EFI system partition be RAIDed? - Ask Ubuntu
  3. pacstrap -K /mnt base linux-hardened linux-firmware
  4. genfstab -U /mnt >> /mnt/etc/fstab
  5. arch-chroot /mnt
  6. pacman -Sy nano vim zsh less sudo wget tmux htop iotop mdadm lvm2 efivar edk2-shell memtest86+-efi openssh bash-completion man-db
    If there are any other “essential” packages for you, add them here.
  7. nano /etc/makepkg.conf change:
    • CFLAGS="-march=native -mtune=native ..."
    • RUSTFLAGS="-C opt-level=2 -C target-cpu=native"
    • MAKEFLAGS="-j16" or w/e the core count
    • PACKAGER="Marcin Slowik <[email protected]>" or whoever you are :wink:
  8. systemctl enable sshd systemd-networkd systemd-resolved
  9. nano /etc/systemd/network/20-wired.network
    [Match]
    Name=en*
    
    [Network]
    DHCP=yes
    
  10. echo "vmserver" > /etc/hostname
  11. rm /etc/resolv.conf; ln -s /run/systemd/resolve/stub-resolv.conf /etc/resolv.conf

Locale & timezone

  1. ln -sf /usr/share/zoneinfo/CET /etc/localtime; hwclock --systohc - change to your timezone if needed, I prefer CET to e.g. Europe/Warsaw
  2. sed -r 's/#(en_US.UTF-8 UTF-8)/\1/' -i /etc/locale.gen
  3. echo "LANG=en_US.UTF-8" > /etc/locale.conf
  4. locale-gen

Admin users

We need a dedicated Admin user for building Xen and Linux kernel from source, because makepkg really doesn’t like when you build something as root.

  1. passwd (in chroot)
  2. EDITOR=nano visudo, uncomment %sudo ALL=(ALL:ALL) ALL, save & exit
  3. groupadd sudo -g 32
  4. useradd -m admin -s /bin/bash -G adm,sudo,wheel,power,users, although I want to learn zsh one day, today’s still not the day :wink: . Set w/e shell and groups you like though.
  5. passwd admin

Install and configure bootloader

I’m using systemd-boot instead of GRUB, steps for GRUB will be slightly different. I consider systemd-boot to be good enough.

  1. Install microcode updates
    • sudo pacman -Sy intel-ucode or amd-ucode or both.
  2. nano /etc/mkinitcpio.conf
    • Add mdadm_udev and lvm2 in HOOKS=(... block mdadm_udev lvm2 filesystems ...)
  3. nano /etc/fstab, in /boot change fmask=0077,dmask=0077
  4. umount /boot; chmod 700 /boot; mount -a
  5. mkdir -p /boot/loader/entries
  6. nano /boot/loader/entries/20-vmserver-direct.conf
    title    VMServer Arch Linux - Direct
    linux    /vmlinuz-linux-hardened
    initrd   /intel-ucode.img
    initrd   /initramfs-linux-hardened.img
    options  root=/dev/vgroot/vmserver-root rw module_blacklist=csiostor add_efi_memmap intel_iommu=on iommu=pt pci=realloc
    
  7. nano /boot/loader/entries/30-memtest86+.conf
    title    Memtest86+ - EFI
    efi      /memtest86+/memtest.efi
    
  8. cp /usr/share/edk2-shell/x64/Shell.efi /boot/shellx64.efi
  9. nano /boot/loader/loader.conf
    default  @saved
    timeout  3
    
  10. bootctl install
  11. mkinitcpio -P
  12. exit; reboot → Try booting into arch
  13. ssh -o StrictHostKeyChecking=no -o UserKnownHostsFile=/dev/null admin@[...] should work, if not check ip addr and then troubleshoot

Build & Install additional software

THIS IS THE MOST PECULIAR ISSUE I HAVE EVER ENCOUNTERED SO FAR!

I tried building everything inside chroot to not pollute the base system with devel packages, so I started with building paru (using makechrootpkg) and then configured it with Chroot and used it to download, build and install xen - NO PROBLEM.

But when I try to build Linux kernel, I encounter the following issue - neither of the interactive configuration tools work properly! And (my guess is) that’s because the terminal properties are not being properly forwarded down the chain into the chroot environment. The closest I could find was this:

How can I export an env var so makechrootpkg uses color when building / Creating & Modifying Packages / Arch Linux Forums.

At first, I thought the issue was the default .bashrc as someone pointed out here. But no. I changed to my .bashrc that I planned to download at a later stage, reset it and nothing!

I finally validated that in a fresh terminal (the broken nconfig/menuconfig can severely cripple the terminal) makepkg -s works after installing base-devel, but in the same terminal makechrootpkg is borked again. The most surprising thing for me is that NOBODY IS COMPLAINING ABOUT THIS as if I was the only one affected by this issue. I believe there has to be a way to remedy this, but for the time being, I’m just going to build the kernel outside a clean chroot, or modify the config file manually.

The last time I simply forgot I could do the whole makechrootpkg and built linux without chroot.

Nevertheless, I need to redo some steps now and will try again tomorrow.

2 Likes

Optional: bashrc config

I use a global /etc/bash.bashrc config to have consistent base config between accounts, you can configure it however you like. Mine is a modified Debian/Ubuntu default from a few years ago.

  1. wget https://gist.githubusercontent.com/Marandil/2054fbc797b4613a19c22b22d769bdc2/raw/etc-bash.bashrc
  2. nano ~/.bashrc
    Comment out conflicting/duplicate entries, e.g.:
    • alias ls='ls --color=auto'
    • alias grep='grep --color=auto'
    • PS1='[\u@\h \W]\$ '
  3. sudo mv etc-bash.bashrc /etc/bash.bashrc
  4. sudo chown root:root /etc/bash.bashrc
  5. Relog or . /etc/bash.bashrc

Build & Install additional software (finally)

  1. Prepare temporary build environment:
    In my experience the current linux build (6.7.3) needs about 32G of storage. vmserver-root only has 20G total. Optane on H10 has under 32GiB but close (27.3GiB). With enough RAM we could build it in RAM-disk, but NVMe storage is also good enough.
    1. mkdir ~/build
    2. If using NVMe backing:
      1. sudo mkfs.ext4 /dev/nvme5n1 where nvme5 is a spare NVMe. Yes, no partitions, raw FS on full namespace is OK.
      2. sudo mount /dev/nvne5n1 ~/build
        If using RAM backing:
      • sudo mount -o size=40G -t tmpfs none ~/build
    3. cd ~/build
    4. mkdir chroot; mkarchroot chroot/root base-devel
  2. Install paru (AUR package manager):
    1. sudo pacman -Sy git devtools
    2. git clone https://aur.archlinux.org/paru.git; cd paru
    3. makechrootpkg -r ../chroot
    4. sudo pacman -U paru-*.pkg.tar.zst
    5. sudo nano /etc/paru.conf uncomment Chroot and LocalRepo
    6. sudo nano /etc/pacman.conf set CacheDir = /var/lib/repo/aur and append:
    [aur]
    SigLevel = PackageOptional DatabaseOptional
    Server = file:///var/lib/repo/aur
    
    1. paru -Sy paru should regenerate repository s.t. pacman does not complain.
      When needed, paru pkg is at /var/lib/repo/aur/paru-*-x86_64.pkg.tar.zst
  3. Build custom Linux kernel:
    Kernel/Arch build system - ArchWiki
    Xen flags based on Xen - Gentoo wiki + pciback built into kernel.
    In this setup, the image is only used with Xen and direct boot should use the default.
    1. cd ~/build; pkgctl repo clone --protocol=https linux; cd linux
    2. nano PKGBUILD:
      • Set pkgbase=linux-custom or something similar, like linux-xen. linux-custom is used below.
      • Comment out make htmldocs in build() and "$pkgbase-docs" in pkgname, packages under htmldocs in makedepends.
    3. Import gpg keys:
    4. Depending on the strategy chosen, we need to build outside of chroot, or can either build in or outside of chroot. Building outside requires pacman -Sy base-devel.
      Changing config using nconfig/menuconfig:
      1. nano PKGBUILD, change make olddefconfig to make nconfig or make menuconfig in prepare().
      2. makepkg -s
        Change config (based on Xen - Gentoo wiki):
      Kernel Config
      Processor type and features  --->
        [*] Linux guest support  --->
            [*]   Enable paravirtualization code
            [*]   Paravirtualization layer for spinlocks
            [*]   Xen guest support
            [*]     Xen PV guest support
            [*]       Limit Xen pv-domain memory to 512GB
            [*]     Xen PVHVM guest support
            [*]     Enable Xen debug and tuning parameters in debugfs
            [*]     Xen PVH guest support
            [*]   Xen Dom0 support
      Device Drivers  --->
        Character devices  --->
            [*] Xen Hypervisor Console support
            [*]   Xen Hypervisor Multiple Consoles support
        [*] Block devices  --->
            <*>   Xen virtual block device support
            <*>   Xen block-device backend driver
        [*] Network device support  --->
            <*>   Xen network device frontend driver
            <*>   Xen block-device backend driver
        [*] PCI support  --->
          <*> Xen PCI Frontend
        Input device support  --->
            [*] Miscellaneous devices  --->
              <*>   Xen virtual keyboard and mouse support
        Graphics support  --->
              Frame buffer Devices  --->
                  <*> Xen virtual frame buffer support
        Network device support --->
            <M> Universal TUN/TAP device driver support
        Xen driver support  --->
              [*] Xen memory balloon driver
              [*]   Memory hotplug support for Xen balloon driver
              [*] Scrub pages before returning them to system by default
              <*> Xen /dev/xen/evtchn device
              [*] Backend driver support
              <*> Xen filesystem
              [*]   Create compatibility mount point /proc/xen
              [*] Create xen entries under /sys/hypervisor
              <*> userspace grant access device driver
              [*]   Add support for dma-buf grant access device driver extension
              <*> User-space grant reference allocator driver
              [*] Allow allocating DMA capable buffers with grant reference module
              <*> Xen PCI-device backend driver
              <*> XEN PV Calls frontend driver
              <*> XEN PV Calls backend driver
              <M> XEN SCSI backend driver
              -*- Xen hypercall passthrough driver
              [*]   Xen Ioeventfd and irqfd support
              <*> Xen ACPI processor
              [*] Xen platform mcelog
              [*] Xen symbols
              [*] Use unpopulated memory ranges for guest mappings
              [*] Xen virtio support
      Power management and ACPI options  --->
        [*] ACPI (Advanced Configuration and Power Interface) Support  --->
      [*] Networking support --->
        Networking options  --->
              <*> 802.1d Ethernet Bridging
          [*] Network packet filtering framework (Netfilter) --->
                    [*] Advanced netfilter configuration
                    [*]   Bridged IP/ARP packets filtering
      
      Alternatively, config diff (for linux-6.7.2/3):
      1. Apply config patch (either manually or with patch -p1):
      config.patch
      --- a/config
      +++ b/config
      @@ -388,7 +388,7 @@
       CONFIG_XEN_PVHVM_SMP=y
       CONFIG_XEN_PVHVM_GUEST=y
       CONFIG_XEN_SAVE_RESTORE=y
      -# CONFIG_XEN_DEBUG_FS is not set
      +CONFIG_XEN_DEBUG_FS=y
       CONFIG_XEN_PVH=y
       CONFIG_XEN_DOM0=y
       CONFIG_XEN_PV_MSR_SAFE=y
      @@ -1351,7 +1351,7 @@
       CONFIG_NETWORK_PHY_TIMESTAMPING=y
       CONFIG_NETFILTER=y
       CONFIG_NETFILTER_ADVANCED=y
      -CONFIG_BRIDGE_NETFILTER=m
      +CONFIG_BRIDGE_NETFILTER=y
      
       #
       # Core Netfilter Configuration
      @@ -1735,10 +1735,10 @@
       CONFIG_L2TP_V3=y
       CONFIG_L2TP_IP=m
       CONFIG_L2TP_ETH=m
      -CONFIG_STP=m
      +CONFIG_STP=y
       CONFIG_GARP=m
       CONFIG_MRP=m
      -CONFIG_BRIDGE=m
      +CONFIG_BRIDGE=y
       CONFIG_BRIDGE_IGMP_SNOOPING=y
       CONFIG_BRIDGE_VLAN_FILTERING=y
       CONFIG_BRIDGE_MRP=y
      @@ -1770,7 +1770,7 @@
       CONFIG_VLAN_8021Q=m
       CONFIG_VLAN_8021Q_GVRP=y
       CONFIG_VLAN_8021Q_MVRP=y
      -CONFIG_LLC=m
      +CONFIG_LLC=y
       CONFIG_LLC2=m
       CONFIG_ATALK=m
       # CONFIG_X25 is not set
      @@ -2047,7 +2047,7 @@
      
       CONFIG_AF_RXRPC=m
       CONFIG_AF_RXRPC_IPV6=y
      -# CONFIG_AF_RXRPC_INJECT_LOSS is not set
      +CONFIG_AF_RXRPC_INJECT_LOSS=y
       # CONFIG_AF_RXRPC_INJECT_RX_DELAY is not set
       CONFIG_AF_RXRPC_DEBUG=y
       CONFIG_RXKAD=y
      @@ -2193,7 +2193,7 @@
       # CONFIG_PCI_REALLOC_ENABLE_AUTO is not set
       CONFIG_PCI_STUB=y
       CONFIG_PCI_PF_STUB=m
      -CONFIG_XEN_PCIDEV_FRONTEND=m
      +CONFIG_XEN_PCIDEV_FRONTEND=y
       CONFIG_PCI_ATS=y
       CONFIG_PCI_DOE=y
       CONFIG_PCI_LOCKLESS_CONFIG=y
      @@ -2607,8 +2607,8 @@
       CONFIG_CDROM_PKTCDVD_BUFFERS=8
       # CONFIG_CDROM_PKTCDVD_WCACHE is not set
       CONFIG_ATA_OVER_ETH=m
      -CONFIG_XEN_BLKDEV_FRONTEND=m
      -CONFIG_XEN_BLKDEV_BACKEND=m
      +CONFIG_XEN_BLKDEV_FRONTEND=y
      +CONFIG_XEN_BLKDEV_BACKEND=y
       CONFIG_VIRTIO_BLK=m
       CONFIG_BLK_DEV_RBD=m
       CONFIG_BLK_DEV_UBLK=m
      @@ -4167,8 +4167,8 @@
       CONFIG_MTK_T7XX=m
       # end of Wireless WAN
      
      -CONFIG_XEN_NETDEV_FRONTEND=m
      -CONFIG_XEN_NETDEV_BACKEND=m
      +CONFIG_XEN_NETDEV_FRONTEND=y
      +CONFIG_XEN_NETDEV_BACKEND=y
       CONFIG_VMXNET3=m
       CONFIG_FUJITSU_ES=m
       CONFIG_USB4_NET=m
      @@ -4496,7 +4496,7 @@
       CONFIG_INPUT_IQS7222=m
       CONFIG_INPUT_CMA3000=m
       CONFIG_INPUT_CMA3000_I2C=m
      -CONFIG_INPUT_XEN_KBDDEV_FRONTEND=m
      +CONFIG_INPUT_XEN_KBDDEV_FRONTEND=y
       CONFIG_INPUT_IDEAPAD_SLIDEBAR=m
       CONFIG_INPUT_SOC_BUTTON_ARRAY=m
       CONFIG_INPUT_DRV260X_HAPTICS=m
      @@ -6939,7 +6939,7 @@
       # CONFIG_FB_UDL is not set
       # CONFIG_FB_IBM_GXT4500 is not set
       # CONFIG_FB_VIRTUAL is not set
      -CONFIG_XEN_FBDEV_FRONTEND=m
      +CONFIG_XEN_FBDEV_FRONTEND=y
       # CONFIG_FB_METRONOME is not set
       # CONFIG_FB_MB862XX is not set
       # CONFIG_FB_HYPERV is not set
      @@ -8952,25 +8952,25 @@
       CONFIG_XEN_BALLOON_MEMORY_HOTPLUG=y
       CONFIG_XEN_MEMORY_HOTPLUG_LIMIT=512
       CONFIG_XEN_SCRUB_PAGES_DEFAULT=y
      -CONFIG_XEN_DEV_EVTCHN=m
      +CONFIG_XEN_DEV_EVTCHN=y
       CONFIG_XEN_BACKEND=y
      -CONFIG_XENFS=m
      +CONFIG_XENFS=y
       CONFIG_XEN_COMPAT_XENFS=y
       CONFIG_XEN_SYS_HYPERVISOR=y
       CONFIG_XEN_XENBUS_FRONTEND=y
      -CONFIG_XEN_GNTDEV=m
      +CONFIG_XEN_GNTDEV=y
       CONFIG_XEN_GNTDEV_DMABUF=y
      -CONFIG_XEN_GRANT_DEV_ALLOC=m
      +CONFIG_XEN_GRANT_DEV_ALLOC=y
       CONFIG_XEN_GRANT_DMA_ALLOC=y
       CONFIG_SWIOTLB_XEN=y
       CONFIG_XEN_PCI_STUB=y
      -CONFIG_XEN_PCIDEV_BACKEND=m
      -CONFIG_XEN_PVCALLS_FRONTEND=m
      +CONFIG_XEN_PCIDEV_BACKEND=y
      +CONFIG_XEN_PVCALLS_FRONTEND=y
       CONFIG_XEN_PVCALLS_BACKEND=y
       CONFIG_XEN_SCSI_BACKEND=m
      -CONFIG_XEN_PRIVCMD=m
      +CONFIG_XEN_PRIVCMD=y
       CONFIG_XEN_PRIVCMD_EVENTFD=y
      -CONFIG_XEN_ACPI_PROCESSOR=m
      +CONFIG_XEN_ACPI_PROCESSOR=y
       CONFIG_XEN_MCE_LOG=y
       CONFIG_XEN_HAVE_PVMMU=y
       CONFIG_XEN_EFI=y
      
      1. makepkg -g >> PKGBUILD ← update config hash
      2. makechrootpkg -r ../chroot
    5. sudo cp linux-custom-*.tar.zst /var/lib/repo/aur/
    6. sudo pacman -U linux-custom-*.tar.zst
  4. Install xen:
    1. paru -Sy seabios edk2-ovmf
    2. paru -S xen xen-qemu xen-pvhgrub xen-docs
      • If it fails with gpg: keyserver receive failed: Server indicated a failure add nameserver 9.9.9.9 to resolv.conf temporarily or check if /etc/resolv.conf points to the systemd-resolved stub.
      • If the process fails in general, try installing packages one-by-one
  5. Configure xen:
    1. sudo nano /boot/xen.cfg:
    [global]
    default=xen
    
    [xen]
    options=console=vga dom0_mem=32768M,max:32768M dom0_max_vcpus=16 loglvl=all noreboot ucode=scan spec-ctrl=gds-mit=no iommu=force,verbose,qinval=yes
    kernel=vmlinuz-linux-custom root=/dev/vgroot/vmserver-root rw module_blacklist=csiostor add_efi_memmap intel_iommu=on iommu=pt pci=realloc
    ramdisk=initramfs-linux-custom.img
    
    dom0 mem and dom0 vcpus should be adjusted to available and modified as VMs are added.
    Finally something small like 4G RAM and 2vcpus should suffice.
    spec-ctrl=gds-mit=no is required to have AVX if host doesn’t have hw mitigation
    2. sudo nano /boot/loader/entries/10-xen.conf
    title   Xen Hypervisor
    efi     /xen.efi
    
    sudo systemctl enable xenstored
    sudo systemctl enable xenconsoled
    sudo systemctl enable xendomains
    sudo systemctl enable xen-init-dom0
    
    1. sudo reboot, make sure to select Xen Hypervisor in bootloader
    2. sudo xl list
    3. Test PCIe passthrough with a dummy HVM domain and random PCIe appliance:
      Using 0:b3:00.0 for the random appliance. As root run:
      1. mkdir -p /opt/xen/isos; cd /opt/xen/isos
      2. wget https://dl-cdn.alpinelinux.org/alpine/v3.19/releases/x86_64/alpine-virt-3.19.1-x86_64.iso
      3. nano /opt/xen/test.cfg
      name = "Test"
      type = "hvm"
      
      memory = 2048
      maxmem = 2048
      vcpus = 2
      
      disk = [ 
        "file:/opt/xen/isos/alpine-virt-3.19.1-x86_64.iso,hdc:cdrom,r",
      ]
      pci = [
        "0:b3:00.0"
      ]
      
      1. xl pci-assignable-add 0:b3:00.0; xl pci-assignable-list
      2. xl create /opt/xen/test.cfg
      3. xl top; xl dmesg; dmesg, check for errors/crashes, wait a minte, recheck again
      4. xl shutdown Test, check for errors/crashes, wait a minte, recheck again
      5. rm /opt/xen/test.cfg

PCIe passthrough should now work as expected.

@avicks512 What distro are you using? I can try and see if it works with my kernel (or kernel config diff).

I’m dumb. I just spent 2 hours trying to debug why I suddenly can’t passthrough SR-IOV VFs, suspecting IOMMU issues. I managed to break my UEFI configuration (can’t boot into BIOS but can into system - fun, huh? Need to clear CMOS and redo some of the configuration because I likely didn’t save all of it. Why did I think disabling CSM was such a good idea?)

Nevertheless, I learned that Xen doesn’t have the concept of iommu groups…

xen grep iommu
root@vmserver:/home/admin # dmesg | grep -i iommu
[ 1.922035] Kernel command line: root=/dev/vgroot/vmserver-root rw module_blacklist=csiostor add_efi_memmap intel_iommu=on iommu=pt pci=realloc
[ 1.922083] DMAR: IOMMU enabled
[ 2.472496] iommu: Default domain type: Passthrough (set via kernel command line)
root@vmserver:/home/admin # xl dmesg | grep -i iommu
(XEN) Command line: console=vga dom0_mem=32768M,max:32768M dom0_max_vcpus=16 loglvl=all noreboot ucode=scan spec-ctrl=gds-mit=no iommu=force,verbose,qinval=yes
(XEN) [VT-D]drhd->address = b5ffc000 iommu->reg = ffff82c000966000
(XEN) [VT-D]drhd->address = d8ffc000 iommu->reg = ffff82c000968000
(XEN) [VT-D]drhd->address = fbffc000 iommu->reg = ffff82c00096a000
(XEN) [VT-D]drhd->address = 92ffc000 iommu->reg = ffff82c00096c000
(XEN) Intel VT-d iommu 2 supported page sizes: 4kB, 2MB, 1GB
(XEN) Intel VT-d iommu 1 supported page sizes: 4kB, 2MB, 1GB
(XEN) Intel VT-d iommu 0 supported page sizes: 4kB, 2MB, 1GB
(XEN) Intel VT-d iommu 3 supported page sizes: 4kB, 2MB, 1GB
(XEN) [VT-D]iommu_enable_translation: iommu->reg = ffff82c00096a000
(XEN) [VT-D]iommu_enable_translation: iommu->reg = ffff82c000968000
(XEN) [VT-D]iommu_enable_translation: iommu->reg = ffff82c000966000
(XEN) [VT-D]iommu_enable_translation: iommu->reg = ffff82c00096c000

… compared to direct Linux boot…

linux grep iommu
[    0.000000] Command line: initrd=\intel-ucode.img initrd=\initramfs-linux-hardened.img root=/dev/vgroot/vmserver-root rw module_blacklist=csiostor add_efi_memmap intel_iommu=on iommu=pt pci=realloc
[    0.382432] Kernel command line: pti=on page_alloc.shuffle=1 initrd=\intel-ucode.img initrd=\initramfs-linux-hardened.img root=/dev/vgroot/vmserver-root rw module_blacklist=csiostor add_efi_memmap intel_iommu=on iommu=pt pci=realloc
[    0.382516] DMAR: IOMMU enabled
[   12.240348] DMAR-IR: IOAPIC id 12 under DRHD base  0xfbffc000 IOMMU 2
[   12.240349] DMAR-IR: IOAPIC id 11 under DRHD base  0xd8ffc000 IOMMU 1
[   12.240350] DMAR-IR: IOAPIC id 10 under DRHD base  0xb5ffc000 IOMMU 0
[   12.240351] DMAR-IR: IOAPIC id 8 under DRHD base  0x92ffc000 IOMMU 3
[   12.240352] DMAR-IR: IOAPIC id 9 under DRHD base  0x92ffc000 IOMMU 3
[   12.477052] iommu: Default domain type: Passthrough (set via kernel command line)
[   12.499875] pci 0000:b2:00.0: Adding to iommu group 0
[   12.499904] pci 0000:b2:01.0: Adding to iommu group 1
[   12.499930] pci 0000:b2:03.0: Adding to iommu group 2
[   12.499960] pci 0000:b3:00.0: Adding to iommu group 3
[   12.499988] pci 0000:b4:00.0: Adding to iommu group 4
[   12.500015] pci 0000:b5:00.0: Adding to iommu group 5
[   12.500092] pci 0000:64:01.0: Adding to iommu group 6
[   12.500119] pci 0000:64:02.0: Adding to iommu group 7
[   12.500145] pci 0000:64:03.0: Adding to iommu group 8
[   12.500177] pci 0000:65:00.0: Adding to iommu group 9
[   12.500206] pci 0000:66:00.0: Adding to iommu group 10
[   12.500233] pci 0000:67:00.0: Adding to iommu group 11
[   12.500292] pci 0000:16:00.0: Adding to iommu group 12
[   12.500319] pci 0000:16:02.0: Adding to iommu group 13
[   12.500492] pci 0000:17:00.0: Adding to iommu group 14
[   12.500529] pci 0000:17:00.1: Adding to iommu group 14
[   12.500565] pci 0000:17:00.2: Adding to iommu group 14
[   12.500601] pci 0000:17:00.3: Adding to iommu group 14
[   12.500636] pci 0000:17:00.4: Adding to iommu group 14
[   12.500673] pci 0000:17:00.5: Adding to iommu group 14
[   12.500709] pci 0000:17:00.6: Adding to iommu group 14
[   12.500873] pci 0000:18:00.0: Adding to iommu group 15
[   12.500964] pci 0000:18:00.1: Adding to iommu group 15
[   12.501001] pci 0000:18:00.2: Adding to iommu group 15
[   12.501037] pci 0000:18:00.3: Adding to iommu group 15
[   12.501073] pci 0000:18:00.4: Adding to iommu group 15
[   12.501109] pci 0000:18:00.5: Adding to iommu group 15
[   12.501146] pci 0000:18:00.6: Adding to iommu group 15
[   12.501209] pci 0000:00:00.0: Adding to iommu group 16
[   12.501237] pci 0000:00:04.0: Adding to iommu group 17
[   12.501264] pci 0000:00:04.1: Adding to iommu group 18
[   12.501292] pci 0000:00:04.2: Adding to iommu group 19
[   12.501318] pci 0000:00:04.3: Adding to iommu group 20
[   12.501344] pci 0000:00:04.4: Adding to iommu group 21
[   12.501372] pci 0000:00:04.5: Adding to iommu group 22
[   12.501399] pci 0000:00:04.6: Adding to iommu group 23
[   12.501425] pci 0000:00:04.7: Adding to iommu group 24
[   12.501452] pci 0000:00:05.0: Adding to iommu group 25
[   12.501479] pci 0000:00:05.2: Adding to iommu group 26
[   12.501506] pci 0000:00:05.4: Adding to iommu group 27
[   12.501534] pci 0000:00:08.0: Adding to iommu group 28
[   12.501584] pci 0000:00:08.1: Adding to iommu group 29
[   12.501610] pci 0000:00:08.2: Adding to iommu group 30
[   12.501677] pci 0000:00:14.0: Adding to iommu group 31
[   12.501704] pci 0000:00:14.2: Adding to iommu group 31
[   12.501755] pci 0000:00:16.0: Adding to iommu group 32
[   12.501782] pci 0000:00:17.0: Adding to iommu group 33
[   12.501809] pci 0000:00:1b.0: Adding to iommu group 34
[   12.501837] pci 0000:00:1b.4: Adding to iommu group 35
[   12.501865] pci 0000:00:1c.0: Adding to iommu group 36
[   12.501893] pci 0000:00:1c.1: Adding to iommu group 37
[   12.501920] pci 0000:00:1c.4: Adding to iommu group 38
[   12.501948] pci 0000:00:1c.6: Adding to iommu group 39
[   12.501976] pci 0000:00:1d.0: Adding to iommu group 40
[   12.502082] pci 0000:00:1f.0: Adding to iommu group 41
[   12.502110] pci 0000:00:1f.2: Adding to iommu group 41
[   12.502138] pci 0000:00:1f.3: Adding to iommu group 41
[   12.502166] pci 0000:00:1f.4: Adding to iommu group 41
[   12.502194] pci 0000:00:1f.6: Adding to iommu group 42
[   12.502222] pci 0000:01:00.0: Adding to iommu group 43
[   12.502289] pci 0000:02:00.0: Adding to iommu group 44
[   12.502319] pci 0000:02:00.1: Adding to iommu group 44
[   12.502347] pci 0000:03:00.0: Adding to iommu group 45
[   12.502374] pci 0000:04:00.0: Adding to iommu group 46
[   12.502404] pci 0000:05:00.0: Adding to iommu group 47
[   12.502430] pci 0000:06:00.0: Adding to iommu group 48
[   12.502458] pci 0000:07:00.0: Adding to iommu group 49
[   12.502485] pci 0000:16:05.0: Adding to iommu group 50
[   12.502512] pci 0000:16:05.2: Adding to iommu group 51
[   12.502539] pci 0000:16:05.4: Adding to iommu group 52
[   12.502727] pci 0000:16:08.0: Adding to iommu group 53
[   12.502758] pci 0000:16:08.1: Adding to iommu group 53
[   12.502789] pci 0000:16:08.2: Adding to iommu group 53
[   12.502820] pci 0000:16:08.3: Adding to iommu group 53
[   12.502851] pci 0000:16:08.4: Adding to iommu group 53
[   12.502882] pci 0000:16:08.5: Adding to iommu group 53
[   12.502913] pci 0000:16:08.6: Adding to iommu group 53
[   12.502946] pci 0000:16:08.7: Adding to iommu group 53
[   12.503013] pci 0000:16:09.0: Adding to iommu group 54
[   12.503045] pci 0000:16:09.1: Adding to iommu group 54
[   12.503232] pci 0000:16:0e.0: Adding to iommu group 55
[   12.503265] pci 0000:16:0e.1: Adding to iommu group 55
[   12.503298] pci 0000:16:0e.2: Adding to iommu group 55
[   12.503331] pci 0000:16:0e.3: Adding to iommu group 55
[   12.503363] pci 0000:16:0e.4: Adding to iommu group 55
[   12.503395] pci 0000:16:0e.5: Adding to iommu group 55
[   12.503427] pci 0000:16:0e.6: Adding to iommu group 55
[   12.503459] pci 0000:16:0e.7: Adding to iommu group 55
[   12.503525] pci 0000:16:0f.0: Adding to iommu group 56
[   12.503561] pci 0000:16:0f.1: Adding to iommu group 56
[   12.503666] pci 0000:16:1d.0: Adding to iommu group 57
[   12.503701] pci 0000:16:1d.1: Adding to iommu group 57
[   12.503735] pci 0000:16:1d.2: Adding to iommu group 57
[   12.503768] pci 0000:16:1d.3: Adding to iommu group 57
[   12.503935] pci 0000:16:1e.0: Adding to iommu group 58
[   12.503969] pci 0000:16:1e.1: Adding to iommu group 58
[   12.504003] pci 0000:16:1e.2: Adding to iommu group 58
[   12.504037] pci 0000:16:1e.3: Adding to iommu group 58
[   12.504071] pci 0000:16:1e.4: Adding to iommu group 58
[   12.504106] pci 0000:16:1e.5: Adding to iommu group 58
[   12.504141] pci 0000:16:1e.6: Adding to iommu group 58
[   12.504169] pci 0000:64:05.0: Adding to iommu group 59
[   12.504196] pci 0000:64:05.2: Adding to iommu group 60
[   12.504226] pci 0000:64:05.4: Adding to iommu group 61
[   12.504252] pci 0000:64:08.0: Adding to iommu group 62
[   12.504281] pci 0000:64:09.0: Adding to iommu group 63
[   12.504310] pci 0000:64:0a.0: Adding to iommu group 64
[   12.504337] pci 0000:64:0a.1: Adding to iommu group 65
[   12.504363] pci 0000:64:0a.2: Adding to iommu group 66
[   12.504391] pci 0000:64:0a.3: Adding to iommu group 67
[   12.504417] pci 0000:64:0a.4: Adding to iommu group 68
[   12.504444] pci 0000:64:0a.5: Adding to iommu group 69
[   12.504472] pci 0000:64:0a.6: Adding to iommu group 70
[   12.504499] pci 0000:64:0a.7: Adding to iommu group 71
[   12.504525] pci 0000:64:0b.0: Adding to iommu group 72
[   12.504551] pci 0000:64:0b.1: Adding to iommu group 73
[   12.504580] pci 0000:64:0b.2: Adding to iommu group 74
[   12.504607] pci 0000:64:0b.3: Adding to iommu group 75
[   12.504633] pci 0000:64:0c.0: Adding to iommu group 76
[   12.504660] pci 0000:64:0c.1: Adding to iommu group 77
[   12.504687] pci 0000:64:0c.2: Adding to iommu group 78
[   12.504714] pci 0000:64:0c.3: Adding to iommu group 79
[   12.504740] pci 0000:64:0c.4: Adding to iommu group 80
[   12.504768] pci 0000:64:0c.5: Adding to iommu group 81
[   12.504795] pci 0000:64:0c.6: Adding to iommu group 82
[   12.504822] pci 0000:64:0c.7: Adding to iommu group 83
[   12.504848] pci 0000:64:0d.0: Adding to iommu group 84
[   12.504883] pci 0000:64:0d.1: Adding to iommu group 85
[   12.504912] pci 0000:64:0d.2: Adding to iommu group 86
[   12.504939] pci 0000:64:0d.3: Adding to iommu group 87
[   12.504965] pci 0000:b2:05.0: Adding to iommu group 88
[   12.504992] pci 0000:b2:05.2: Adding to iommu group 89
[   12.505019] pci 0000:b2:05.4: Adding to iommu group 90
[   12.505045] pci 0000:b2:12.0: Adding to iommu group 91
[   12.505110] pci 0000:b2:12.1: Adding to iommu group 92
[   12.505155] pci 0000:b2:12.2: Adding to iommu group 92
[   12.505203] pci 0000:b2:15.0: Adding to iommu group 93
[   12.505269] pci 0000:b2:16.0: Adding to iommu group 94
[   12.505312] pci 0000:b2:16.4: Adding to iommu group 94
[   12.505358] pci 0000:b2:17.0: Adding to iommu group 95
[   24.171527] pci 0000:18:01.3: Adding to iommu group 96
[   24.171790] pci 0000:17:01.3: Adding to iommu group 97
[   24.172850] pci 0000:18:01.7: Adding to iommu group 98
[   24.172963] pci 0000:17:01.7: Adding to iommu group 99
[   24.173405] pci 0000:17:02.3: Adding to iommu group 100
[   24.173526] pci 0000:18:02.3: Adding to iommu group 101
[   24.174105] pci 0000:17:02.7: Adding to iommu group 102
[   24.176354] pci 0000:18:02.7: Adding to iommu group 103
[   24.176468] pci 0000:17:01.0: Adding to iommu group 104

(and that’s without any override patch)
… meanwhile I can’t remember to replace all placeholder PCIe addresses in all the places :rofl:

root@vmserver:/home/admin # lspci | grep '\[VF]'
17:01.0 Ethernet controller: Chelsio Communications Inc T540-BT Unified Wire Ethernet Controller [VF]
17:01.3 Ethernet controller: Chelsio Communications Inc T540-BT Unified Wire Ethernet Controller [VF]
17:01.7 Ethernet controller: Chelsio Communications Inc T540-BT Unified Wire Ethernet Controller [VF]
17:02.3 Ethernet controller: Chelsio Communications Inc T540-BT Unified Wire Ethernet Controller [VF]
17:02.7 Ethernet controller: Chelsio Communications Inc T540-BT Unified Wire Ethernet Controller [VF]
18:01.3 Ethernet controller: Chelsio Communications Inc T540-BT Unified Wire Ethernet Controller [VF]
18:01.7 Ethernet controller: Chelsio Communications Inc T540-BT Unified Wire Ethernet Controller [VF]
18:02.3 Ethernet controller: Chelsio Communications Inc T540-BT Unified Wire Ethernet Controller [VF]
18:02.7 Ethernet controller: Chelsio Communications Inc T540-BT Unified Wire Ethernet Controller [VF]
root@vmserver:/home/admin # xl create /opt/xen/opnsense.cfg
Parsing config from /opt/xen/opnsense.cfg
libxl: error: libxl_pci.c:1658:libxl__device_pci_add: Domain 1:PCI device 0000:17:02.0 already assigned to a different guest?
libxl: error: libxl_pci.c:1809:device_pci_add_done: Domain 1:libxl__device_pci_add failed for PCI device 0:17:2.0 (rc -1)
libxl: error: libxl_pci.c:1658:libxl__device_pci_add: Domain 1:PCI device 0000:18:02.0 already assigned to a different guest?
libxl: error: libxl_pci.c:1809:device_pci_add_done: Domain 1:libxl__device_pci_add failed for PCI device 0:18:2.0 (rc -1)
libxl: error: libxl_create.c:1939:domcreate_attach_devices: Domain 1:unable to add pci devices
libxl: warning: libxl_pci.c:2156:pci_remove_timeout: Domain 1:timed out waiting for DM to remove pci-pt-17_01.0
libxl: error: libxl_xshelp.c:201:libxl__xs_read_mandatory: xenstore read failed: `/libxl/1/type': No such file or directory
libxl: warning: libxl_dom.c:49:libxl__domain_type: unable to get domain type for domid=1, assuming HVM
libxl: error: libxl_domain.c:1612:domain_destroy_domid_cb: Domain 1:xc_domain_destroy failed: No such process
libxl: error: libxl_domain.c:1133:domain_destroy_callback: Domain 1:Unable to destroy guest
libxl: error: libxl_domain.c:1060:domain_destroy_cb: Domain 1:Destruction of domain failed

TBF I did change them after checking, just not in the config file…

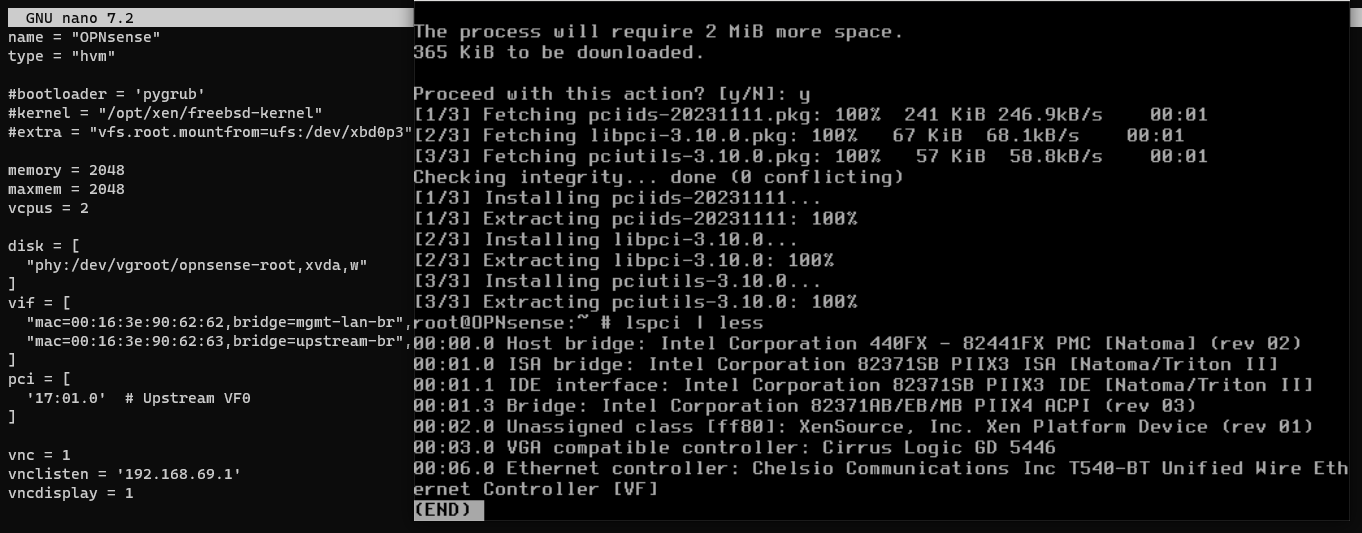
Another oddity. I can passthrough the Chelsio NICs (function 4) to HVMs no problem:

root@archiso ~ # ip addr
1: lo: <LOOPBACK,UP,LOWER_UP> mtu 65536 qdisc noqueue state UNKNOWN group default qlen 1000
    link/loopback 00:00:00:00:00:00 brd 00:00:00:00:00:00
    inet 127.0.0.1/8 scope host lo
       valid_lft forever preferred_lft forever
    inet6 ::1/128 scope host noprefixroute
       valid_lft forever preferred_lft forever
2: enX0: <BROADCAST,MULTICAST,UP,LOWER_UP> mtu 1500 qdisc mq state UP group default qlen 1000
    link/ether 00:16:3e:22:85:36 brd ff:ff:ff:ff:ff:ff
    inet 192.168.69.17/24 metric 100 brd 192.168.69.255 scope global dynamic enX0
       valid_lft 3385sec preferred_lft 3385sec
    inet6 fe80::216:3eff:fe22:8536/64 scope link proto kernel_ll
       valid_lft forever preferred_lft forever
3: ens5f0: <BROADCAST,MULTICAST,UP,LOWER_UP> mtu 1500 qdisc mq state UP group default qlen 1000
    link/ether 00:07:43:4b:f7:e0 brd ff:ff:ff:ff:ff:ff
    altname enp0s5f0
    inet 192.168.1.15/24 metric 100 brd 192.168.1.255 scope global dynamic ens5f0
       valid_lft 86191sec preferred_lft 86191sec
    inet6 fe80::207:43ff:fe4b:f7e0/64 scope link proto kernel_ll
       valid_lft forever preferred_lft forever
4: ens5f0d1: <NO-CARRIER,BROADCAST,MULTICAST,UP> mtu 1500 qdisc mq state DOWN group default qlen 1000
    link/ether 00:07:43:4b:f7:e8 brd ff:ff:ff:ff:ff:ff
    altname enp0s5f0d1
5: ens5f0d2: <NO-CARRIER,BROADCAST,MULTICAST,UP> mtu 1500 qdisc mq state DOWN group default qlen 1000
    link/ether 00:07:43:4b:f7:f0 brd ff:ff:ff:ff:ff:ff
    altname enp0s5f0d2
6: ens5f0d3: <NO-CARRIER,BROADCAST,MULTICAST,UP> mtu 1500 qdisc mq state DOWN group default qlen 1000
    link/ether 00:07:43:4b:f7:f8 brd ff:ff:ff:ff:ff:ff
    altname enp0s5f0d3

Note that two interfaces got assigned IP addreses - enX0 is a virtualized management LAN, ens5f0 is the physical NIC connection to my router.

root@archiso ~ # dmesg | grep cxgb4
[    4.899632] cxgb4 0000:00:05.0: Coming up as MASTER: Initializing adapter
[    5.596729] cxgb4 0000:00:05.0: Direct firmware load for cxgb4/t5-config.txt failed with error -2
[    6.533372] cxgb4 0000:00:05.0: Successfully configured using Firmware Configuration File "Firmware Default", version 0x0, computed checksum 0x0
[    6.766686] cxgb4 0000:00:05.0: Hash filter supported only on T6
[    6.816682] cxgb4 0000:00:05.0: max_ordird_qp 21 max_ird_adapter 387072
[    6.856683] cxgb4 0000:00:05.0: Current filter mode/mask 0x632b:0x21
[    7.010427] cxgb4 0000:00:05.0: 130 MSI-X vectors allocated, nic 32 eoqsets 32 per uld 8 mirrorqsets 32
[    7.010647] cxgb4 0000:00:05.0: 63.008 Gb/s available PCIe bandwidth (8.0 GT/s PCIe x8 link)
[    7.061697] cxgb4 0000:00:05.0 eth1: Chelsio T540-BT 100M/1G/10GBASE-BT_XFI
[    7.061938] cxgb4 0000:00:05.0 eth2: Chelsio T540-BT 100M/1G/10GBASE-BT_XFI
[    7.062141] cxgb4 0000:00:05.0 eth3: Chelsio T540-BT 100M/1G/10GBASE-BT_XFI
[    7.062330] cxgb4 0000:00:05.0 eth4: Chelsio T540-BT 100M/1G/10GBASE-BT_XFI
[    7.099978] cxgb4 0000:00:05.0: Chelsio T540-BT rev 1
[    7.099981] cxgb4 0000:00:05.0: S/N: PT40180192, P/N: 110124450A0
[    7.099983] cxgb4 0000:00:05.0: Firmware version: 1.27.5.0
[    7.099984] cxgb4 0000:00:05.0: Bootstrap version: 1.1.0.0
[    7.099985] cxgb4 0000:00:05.0: TP Microcode version: 0.1.4.9
[    7.099986] cxgb4 0000:00:05.0: No Expansion ROM loaded
[    7.099987] cxgb4 0000:00:05.0: Serial Configuration version: 0x1009000
[    7.099988] cxgb4 0000:00:05.0: VPD version: 0x2
[    7.099989] cxgb4 0000:00:05.0: Configuration: RNIC MSI-X, Offload capable
[   11.817237] cxgb4 0000:00:05.0 ens5f0: renamed from eth1
[   11.854079] cxgb4 0000:00:05.0 ens5f0d2: renamed from eth3
[   11.922367] cxgb4 0000:00:05.0 ens5f0d1: renamed from eth2
[   11.977684] cxgb4 0000:00:05.0 ens5f0d3: renamed from eth4
[   15.401824] cxgb4 0000:00:05.0 ens5f0: link up, 1Gbps, full-duplex, Tx/Rx PAUSE

Now for comparison I’ll start the same Xen configuration, but as PV instead of HVM (I’d prefer PVH but the PCI passthrough not implemented thingy…)

root@archiso ~ # ip addr
1: lo: <LOOPBACK,UP,LOWER_UP> mtu 65536 qdisc noqueue state UNKNOWN group default qlen 1000
    link/loopback 00:00:00:00:00:00 brd 00:00:00:00:00:00
    inet 127.0.0.1/8 scope host lo
       valid_lft forever preferred_lft forever
    inet6 ::1/128 scope host noprefixroute
       valid_lft forever preferred_lft forever
2: enX0: <BROADCAST,MULTICAST,UP,LOWER_UP> mtu 1500 qdisc mq state UP group default qlen 1000
    link/ether 00:16:3e:22:85:36 brd ff:ff:ff:ff:ff:ff
    inet6 fe80::216:3eff:fe22:8536/64 scope link proto kernel_ll
       valid_lft forever preferred_lft forever
3: enp0s0f4: <BROADCAST,MULTICAST,UP,LOWER_UP> mtu 1500 qdisc mq state UP group default qlen 1000
    link/ether 00:07:43:4b:f7:e0 brd ff:ff:ff:ff:ff:ff
    inet 192.168.1.15/24 metric 100 brd 192.168.1.255 scope global dynamic enp0s0f4
       valid_lft 86386sec preferred_lft 86386sec
    inet6 fe80::207:43ff:fe4b:f7e0/64 scope link proto kernel_ll
       valid_lft forever preferred_lft forever
4: enp0s0f4d1: <NO-CARRIER,BROADCAST,MULTICAST,UP> mtu 1500 qdisc mq state DOWN group default qlen 1000
    link/ether 00:07:43:4b:f7:e8 brd ff:ff:ff:ff:ff:ff
5: enp0s0f4d2: <NO-CARRIER,BROADCAST,MULTICAST,UP> mtu 1500 qdisc mq state DOWN group default qlen 1000
    link/ether 00:07:43:4b:f7:f0 brd ff:ff:ff:ff:ff:ff
6: enp0s0f4d3: <NO-CARRIER,BROADCAST,MULTICAST,UP> mtu 1500 qdisc mq state DOWN group default qlen 1000
    link/ether 00:07:43:4b:f7:f8 brd ff:ff:ff:ff:ff:ff

Notice no address on the management interface. Any attempt to configure it with DHCP will fail, static assignment also doesn’t help, i.e. pings don’t work in any way.

root@archiso ~ # dmesg | grep cxgb4
[   14.720529] cxgb4 0000:00:00.4: Xen PCI mapped GSI32 to IRQ77
[   14.766826] cxgb4 0000:00:00.4: Coming up as MASTER: Initializing adapter
[   16.445938] cxgb4 0000:00:00.4: Successfully configured using Firmware Configuration File "/lib/firmware/cxgb4/t5-config.txt", version 0x1425001c, computed checksum 0xd8c8fbd6
[   16.622529] cxgb4 0000:00:00.4: Hash filter supported only on T6
[   16.672608] cxgb4 0000:00:00.4: max_ordird_qp 21 max_ird_adapter 387072
[   16.712537] cxgb4 0000:00:00.4: Current filter mode/mask 0x632b:0x21
[   16.813999] cxgb4 0000:00:00.4: too many vectors (0x82) for PCI frontend: Increase SH_INFO_MAX_VEC
[   16.814034] cxgb4 0000:00:00.4: Xen PCI frontend error: -22!
[   16.815542] cxgb4 0000:00:00.4: enable msix get err ffffffe4
[   16.815560] cxgb4 0000:00:00.4: Xen PCI frontend error: -28!
[   16.815684] cxgb4 0000:00:00.4: Disabling MSI-X due to insufficient MSI-X vectors
[   16.815924] cxgb4 0000:00:00.4: 63.008 Gb/s available PCIe bandwidth (8.0 GT/s PCIe x8 link)
[   16.880617] cxgb4 0000:00:00.4 eth0: Chelsio T540-BT 100M/1G/10GBASE-BT_XFI
[   16.880877] cxgb4 0000:00:00.4 eth1: Chelsio T540-BT 100M/1G/10GBASE-BT_XFI
[   16.881117] cxgb4 0000:00:00.4 eth2: Chelsio T540-BT 100M/1G/10GBASE-BT_XFI
[   16.881354] cxgb4 0000:00:00.4 eth3: Chelsio T540-BT 100M/1G/10GBASE-BT_XFI
[   16.919202] cxgb4 0000:00:00.4: Chelsio T540-BT rev 1
[   16.919205] cxgb4 0000:00:00.4: S/N: PT40180192, P/N: 110124450A0
[   16.919212] cxgb4 0000:00:00.4: Firmware version: 1.27.5.0
[   16.919214] cxgb4 0000:00:00.4: Bootstrap version: 1.1.0.0
[   16.919215] cxgb4 0000:00:00.4: TP Microcode version: 0.1.4.9
[   16.919216] cxgb4 0000:00:00.4: No Expansion ROM loaded
[   16.919217] cxgb4 0000:00:00.4: Serial Configuration version: 0x1009000
[   16.919219] cxgb4 0000:00:00.4: VPD version: 0x2
[   16.919220] cxgb4 0000:00:00.4: Configuration: RNIC MSI, Offload capable
[   16.939658] cxgb4 0000:00:00.4 enp0s0f4: renamed from eth0
[   16.979387] cxgb4 0000:00:00.4 enp0s0f4d3: renamed from eth3
[   16.999341] cxgb4 0000:00:00.4 enp0s0f4d2: renamed from eth2
[   17.029394] cxgb4 0000:00:00.4 enp0s0f4d1: renamed from eth1
[   19.800967] cxgb4 0000:00:00.4 enp0s0f4: link up, 1Gbps, full-duplex, Tx/Rx PAUSE

Notice the bit about insufficient MSI-X vectors and SH_INFO_MAX_VEC. So I checked and… well…

In the HVM passthrough you can see the card gets 130 vectors. On the host it gets even more:

root@vmserver:/opt/xen # dmesg | grep -i msi-x
[    6.713113] cxgb4 0000:17:00.4: 162 MSI-X vectors allocated, nic 32 eoqsets 32 per uld 16 mirrorqsets 32
[    6.800866] cxgb4 0000:17:00.4: Configuration: RNIC MSI-X, Offload capable
[    8.854739] cxgb4 0000:18:00.4: 162 MSI-X vectors allocated, nic 32 eoqsets 32 per uld 16 mirrorqsets 32
[    8.944282] cxgb4 0000:18:00.4: Configuration: RNIC MSI-X, Offload capable
[   17.364304] cxgb4vf 0000:17:01.0: eth0: Chelsio VF NIC PCIe MSI-X
[   17.564546] cxgb4vf 0000:17:01.4: eth1: Chelsio VF NIC PCIe MSI-X
[ 1532.330417] pciback 0000:17:00.4: xen_pciback: error enabling MSI-X for guest 3: err -28!

The last pciback error is consistent, as the SH_INFO_MAX_VEC limit is checked on both front and back.

Now for more oddities, if I shut down the PV and recreate it without the passthrough:

root@archiso ~ # ip addr
1: lo: <LOOPBACK,UP,LOWER_UP> mtu 65536 qdisc noqueue state UNKNOWN group default qlen 1000
    link/loopback 00:00:00:00:00:00 brd 00:00:00:00:00:00
    inet 127.0.0.1/8 scope host lo
       valid_lft forever preferred_lft forever
    inet6 ::1/128 scope host noprefixroute
       valid_lft forever preferred_lft forever
2: enX0: <BROADCAST,MULTICAST,UP,LOWER_UP> mtu 1500 qdisc mq state UP group default qlen 1000
    link/ether 00:16:3e:22:85:36 brd ff:ff:ff:ff:ff:ff
    inet6 fe80::216:3eff:fe22:8536/64 scope link proto kernel_ll
       valid_lft forever preferred_lft forever

And as HVM:

root@archiso ~ # ip addr
1: lo: <LOOPBACK,UP,LOWER_UP> mtu 65536 qdisc noqueue state UNKNOWN group default qlen 1000
    link/loopback 00:00:00:00:00:00 brd 00:00:00:00:00:00
    inet 127.0.0.1/8 scope host lo
       valid_lft forever preferred_lft forever
    inet6 ::1/128 scope host noprefixroute
       valid_lft forever preferred_lft forever
2: enX0: <BROADCAST,MULTICAST,UP,LOWER_UP> mtu 1500 qdisc mq state UP group default qlen 1000
    link/ether 00:16:3e:22:85:36 brd ff:ff:ff:ff:ff:ff
    inet6 fe80::216:3eff:fe22:8536/64 scope link proto kernel_ll
       valid_lft forever preferred_lft forever

However if I reboot the whole server and try again as PV:

root@archiso ~ # ip addr
1: lo: <LOOPBACK,UP,LOWER_UP> mtu 65536 qdisc noqueue state UNKNOWN group default qlen 1000
    link/loopback 00:00:00:00:00:00 brd 00:00:00:00:00:00
    inet 127.0.0.1/8 scope host lo
       valid_lft forever preferred_lft forever
    inet6 ::1/128 scope host noprefixroute
       valid_lft forever preferred_lft forever
2: enX0: <BROADCAST,MULTICAST,UP,LOWER_UP> mtu 1500 qdisc mq state UP group default qlen 1000
    link/ether 00:16:3e:22:85:36 brd ff:ff:ff:ff:ff:ff
    inet 192.168.69.17/24 metric 100 brd 192.168.69.255 scope global dynamic enX0
       valid_lft 3568sec preferred_lft 3568sec
    inet6 fe80::216:3eff:fe22:8536/64 scope link proto kernel_ll
       valid_lft forever preferred_lft forever

Which tells me something gets really broken in the host network stack along the way.

Now I could rebuild the kernel again, this time with higher SH_INFO_MAX_VEC (note the source says it should not exceed 128 for some reason) but I’m not entirely sure if I should. I would also need to use the same kernel for both dom0 and domU (not a big problem, but still) , or at least have consistent patches between them.

The config
name = "OVSwitch"
type = "pv"  # or hvm
driver_domain=1

memory = 4096
maxmem = 4096
vcpus = 8

kernel = "/mnt/arch/boot/x86_64/vmlinuz-linux"
ramdisk = "/mnt/arch/boot/x86_64/initramfs-linux.img"
extra = "archisobasedir=arch archisodevice=UUID=2024-01-01-16-44-54-00"

disk = [
    "file:/opt/xen/isos/archlinux-2024.01.01-x86_64.iso,hdc:cdrom,r",
    "phy:/dev/vgroot/ovswitch-root,xvda,w",
]
vif = [
    "mac=00:16:3e:22:85:36,bridge=mgmt-lan-br",
]
pci = [
#    "0:17:00.4",
#    "0:18:00.4",
]

vnc = 1
vnclisten = '192.168.69.1'
vncdisplay = 1

The VM-to-VM link with driver domain confirmed working:

SR-IOV still beats it though.
I’m also suspecting PV PCI passthrough might be borked:

[  349.614026] pciback 0000:17:01.0: xen-pciback: Driver tried to write to a read-only configuration space field at offset 0x110, size 4. This may be harmless, but if you have problems with your device:
               1) see permissive attribute in sysfs
               2) report problems to the xen-devel mailing list along with details of your device obtained from lspci.
[  349.742430] pciback 0000:17:01.4: xen_pciback: vpci: assign to virtual slot 0
[  349.742535] pciback 0000:17:01.4: registering for 3
[  350.318006] pciback 0000:17:01.0: enabling device (0100 -> 0102)
[  356.414446] xen-blkback: backend/vbd/3/5632: using 2 queues, protocol 1 (x86_64-abi) persistent grants
[  361.991788] pciback 0000:17:01.4: xen-pciback: Driver tried to write to a read-only configuration space field at offset 0x110, size 4. This may be harmless, but if you have problems with your device:
               1) see permissive attribute in sysfs
               2) report problems to the xen-devel mailing list along with details of your device obtained from lspci.
[  362.458767] pciback 0000:17:01.4: enabling device (0100 -> 0102)

This is for VFs. And I did notice some issues with the passed-through devices, like broken connections between VMs, failed pacman pulls and the like.

PVs confirmed borked:

root@zfserver:~# dmesg | grep nvme
[    7.659083] nvme nvme0: pci function 0000:00:01.0
[    7.659169] nvme 0000:00:01.0: Xen PCI mapped GSI48 to IRQ102
[    7.661199] nvme nvme1: pci function 0000:00:02.0
[    7.661259] nvme 0000:00:02.0: Xen PCI mapped GSI51 to IRQ104
[    7.662436] nvme nvme2: pci function 0000:00:03.0
[    7.662503] nvme 0000:00:03.0: Xen PCI mapped GSI16 to IRQ106
[    7.669263] nvme nvme1: missing or invalid SUBNQN field.
[    7.669388] nvme nvme1: Shutdown timeout set to 8 seconds
[    7.671543] nvme 0000:00:03.0: enable msix get err ffffff8e
[    7.671570] nvme 0000:00:03.0: Xen PCI frontend error: -114!
[    7.672108] nvme nvme2: 1/0/0 default/read/poll queues
[    7.674372] nvme nvme0: Shutdown timeout set to 8 seconds
[    7.676220] nvme 0000:00:02.0: enable msix get err ffffff8e
[    7.676244] nvme 0000:00:02.0: Xen PCI frontend error: -114!
[    7.678147] nvme nvme1: 1/0/0 default/read/poll queues
[    7.679630] nvme nvme3: pci function 0000:00:04.0
[    7.679696] nvme 0000:00:04.0: Xen PCI mapped GSI16 to IRQ106
[    7.680756] nvme nvme4: pci function 0000:00:05.0
[    7.680808] nvme 0000:00:05.0: Xen PCI mapped GSI41 to IRQ111
[    7.682573] nvme nvme6: pci function 0000:00:07.0
[    7.682638] nvme 0000:00:07.0: Xen PCI mapped GSI43 to IRQ113
[    7.683611] nvme nvme5: pci function 0000:00:06.0
[    7.683663] nvme 0000:00:06.0: Xen PCI mapped GSI42 to IRQ115
[    7.685639] nvme nvme4: missing or invalid SUBNQN field.
[    7.685769] nvme nvme4: Shutdown timeout set to 8 seconds
[    7.689618] nvme nvme5: missing or invalid SUBNQN field.
[    7.689824] nvme nvme5: Shutdown timeout set to 8 seconds
[    7.690389] nvme 0000:00:04.0: enable msix get err ffffff8e
[    7.690415] nvme 0000:00:04.0: Xen PCI frontend error: -114!
[    7.690973] nvme nvme3: 1/0/0 default/read/poll queues
[    7.693747] nvme 0000:00:05.0: enable msix get err ffffff8e
[    7.693769] nvme 0000:00:05.0: Xen PCI frontend error: -114!
[    7.695787] nvme 0000:00:06.0: enable msix get err ffffff8e
[    7.695806] nvme 0000:00:06.0: Xen PCI frontend error: -114!
[    7.699224] nvme nvme4: 1/0/0 default/read/poll queues
[    7.702368] nvme 0000:00:07.0: enable msix get err ffffff8e
[    7.702395] nvme 0000:00:07.0: Xen PCI frontend error: -114!
[    7.709247] nvme nvme5: 1/0/0 default/read/poll queues
[    7.710849] nvme nvme0: allocated 64 MiB host memory buffer.
[    7.719624] nvme 0000:00:01.0: enable msix get err ffffff8e
[    7.719650] nvme 0000:00:01.0: Xen PCI frontend error: -114!
[    7.725121] nvme nvme0: 1/0/0 default/read/poll queues
[   69.035994] nvme nvme6: I/O 3 QID 0 timeout, completion polled
[  130.475904] nvme nvme6: I/O 0 QID 0 timeout, completion polled
[  130.475945] nvme nvme6: 1/0/0 default/read/poll queues
[  191.915957] nvme nvme6: I/O 1 QID 0 timeout, completion polled
[  253.355938] nvme nvme6: I/O 12 QID 0 timeout, completion polled
[  314.795973] nvme nvme6: I/O 2 QID 0 timeout, completion polled

This is with pci_permissive=1 in config; without t’was much worse.
I can’t even destroy a PV with pt nvme:

admin@vmserver:~ $ sudo xl destroy ZFServer
[sudo] password for admin:
libxl: error: libxl_device.c:1453:libxl__wait_for_backend: Backend /local/domain/0/backend/pci/2/0 not ready
libxl: error: libxl_pci.c:2250:pci_remove_detached: Domain 2:xc_physdev_unmap_pirq irq=252: Invalid argument
libxl: error: libxl_pci.c:2254:pci_remove_detached: Domain 2:xc_domain_irq_permission irq=252: Operation not permitted
libxl: error: libxl_device.c:1453:libxl__wait_for_backend: Backend /local/domain/0/backend/pci/2/0 not ready
libxl: error: libxl_pci.c:2250:pci_remove_detached: Domain 2:xc_physdev_unmap_pirq irq=251: Invalid argument
libxl: error: libxl_pci.c:2254:pci_remove_detached: Domain 2:xc_domain_irq_permission irq=251: Operation not permitted
libxl: error: libxl_device.c:1453:libxl__wait_for_backend: Backend /local/domain/0/backend/pci/2/0 not ready
libxl: error: libxl_pci.c:2250:pci_remove_detached: Domain 2:xc_physdev_unmap_pirq irq=250: Invalid argument
libxl: error: libxl_pci.c:2254:pci_remove_detached: Domain 2:xc_domain_irq_permission irq=250: Operation not permitted
libxl: error: libxl_device.c:1453:libxl__wait_for_backend: Backend /local/domain/0/backend/pci/2/0 not ready
libxl: error: libxl_pci.c:2250:pci_remove_detached: Domain 2:xc_physdev_unmap_pirq irq=249: Invalid argument
libxl: error: libxl_pci.c:2254:pci_remove_detached: Domain 2:xc_domain_irq_permission irq=249: Operation not permitted
libxl: error: libxl_device.c:1453:libxl__wait_for_backend: Backend /local/domain/0/backend/pci/2/0 not ready
libxl: error: libxl_pci.c:2250:pci_remove_detached: Domain 2:xc_physdev_unmap_pirq irq=256: Invalid argument
libxl: error: libxl_pci.c:2254:pci_remove_detached: Domain 2:xc_domain_irq_permission irq=256: Operation not permitted
libxl: error: libxl_device.c:1453:libxl__wait_for_backend: Backend /local/domain/0/backend/pci/2/0 not ready
libxl: error: libxl_pci.c:2250:pci_remove_detached: Domain 2:xc_physdev_unmap_pirq irq=257: Invalid argument
libxl: error: libxl_pci.c:2254:pci_remove_detached: Domain 2:xc_domain_irq_permission irq=257: Operation not permitted
libxl: error: libxl_device.c:1453:libxl__wait_for_backend: Backend /local/domain/0/backend/pci/2/0 not ready
libxl: error: libxl_pci.c:2250:pci_remove_detached: Domain 2:xc_physdev_unmap_pirq irq=248: Invalid argument
libxl: error: libxl_pci.c:2254:pci_remove_detached: Domain 2:xc_domain_irq_permission irq=248: Operation not permitted
libxl: error: libxl_device.c:1453:libxl__wait_for_backend: Backend /local/domain/0/backend/pci/2/0 not ready

It can even block host shutdown sometimes… Time to change back to HVMs only.

OK, that’s it. I’m done with Xen, at least until they get their shit together, or I have another machine to experiment with. I’ve already wasted enough time, but now I encountered an issue I see no workaround for:

HVM uses full BIOS emulation. Full BIOS means e.g. running Option ROM. And I don’t want to run Option ROM for the HBA. Mostly because it Just. Doesn’t. Work. And I’ve tested UEFI already and it’s not working as intended as well.

There have been too many roadblocks, I’m redoing the setup with KVM. On a plus side, I don’t see a reason why KVM would require rebuilding the kernel, so the setup times will be noticeably faster.

3 Likes

First world problems:
image
My kernel is too recent :joy: will have to build zfs from git instead…

On a plus side, I have migrated the setup procedure to KVM pretty easily. There are some things I liked better with Xen, but at least the system feels much more stable and mature now.

admin@zfserver:~ $ lspci -vvt
-[0000:00]-+-00.0  Intel Corporation 82G33/G31/P35/P31 Express DRAM Controller
           +-01.0-[01-02]----00.0-[02]----01.0  Device 1234:1111
           +-01.1-[03]----00.0  Red Hat, Inc. Virtio file system
           +-01.2-[04]----00.0  Red Hat, Inc. Virtio 1.0 network device
           +-01.3-[05]----00.0  Red Hat, Inc. Virtio 1.0 network device
           +-01.4-[06]----00.0  Red Hat, Inc. QEMU XHCI Host Controller
           +-01.5-[07]----00.0  Red Hat, Inc. Virtio 1.0 block device
           +-01.6-[08]----00.0  Red Hat, Inc. Virtio 1.0 block device
           +-01.7-[09]----00.0  Hewlett-Packard Company Smart Array Gen8 Controllers
           +-02.0-[0a]----00.0  Red Hat, Inc. Virtio file system
           +-02.1-[0b]----00.0  Intel Corporation Optane NVME SSD H10 with Solid State Storage [Teton Glacier]
           +-02.2-[0c]----00.0  Intel Corporation Optane NVME SSD H10 with Solid State Storage [Teton Glacier]
           +-02.3-[0d]----00.0  Samsung Electronics Co Ltd NVMe SSD Controller 980 (DRAM-less)
           +-02.4-[0e]----00.0  Samsung Electronics Co Ltd NVMe SSD Controller SM981/PM981/PM983
           +-02.5-[0f]----00.0  Samsung Electronics Co Ltd NVMe SSD Controller SM981/PM981/PM983
           +-02.6-[10]----00.0  Samsung Electronics Co Ltd NVMe SSD Controller SM981/PM981/PM983
           +-02.7-[11]----00.0  Intel Corporation Optane NVME SSD H10 with Solid State Storage [Teton Glacier]
           +-03.0-[12]----00.0  Red Hat, Inc. Virtio 1.0 memory balloon
           +-1f.0  Intel Corporation 82801IB (ICH9) LPC Interface Controller
           +-1f.2  Intel Corporation 82801IR/IO/IH (ICH9R/DO/DH) 6 port SATA Controller [AHCI mode]
           \-1f.3  Intel Corporation 82801I (ICH9 Family) SMBus Controller
1 Like

How many zfs_member signatures can there be?

On a side note, building zfs-dkms-git is mildly broken due to zfs-utils-git dependency, so here’s how I solved it:


If for some reason zfs-dkms is not up-to-date enough with the linux package we can install zfs-dkms-git.
BUT, zfs-dkms-git and zfs-utils-git have weird dependency issue, so they need to be built separately (AUR (en) - zfs-dkms-git):

  • paru -G zfs-dkms-git
  • paru -G zfs-utils-git
  • paru -B zfs-utils-git
  • nano zfs-dkms-git/PKGBUILD
    • remove zfs-utils-* from depends
  • paru -B zfs-dkms-git
  • paru -U /var/lib/repo/aur/zfs-dkms-git-*.pkg.tar.zst /var/lib/repo/aur/zfs-utils-git-*.pkg.tar.zst

This seems to work, or at least doesn’t scream at me anymore :smiley:

Since I started experimenting with ZFS geometry and the like today, I think it’s finally time to do the rust storage inventory as well:

Rust storage inventory (2024-02-12)

I think I’ve re-tested and validated all the remaining HDDs in my possession. There should still be at least one 4TB drive in my old-old machine that I will recover one day, but for now I’ll count it as a spare.

I initially ordered more 3TB and 4TB drives because they had very good $/TB ratio. Unfortunately half of the order turned out to be DOA and I had to document and return them. Given the time I spent on that, if I had a choice I’d just go with refurb 12TB X12s/X14s, but I digress.

Here’s what’s available:

1x ST5000LM000 (5TB Barracuda Compute, 2.5") - I currently use it as primary data backup and don’t plan to use it in the pool (but likely modernize filesystem and data layout to work better with new ZFS datasets)
2x ST33000650SS (3TB Constellation ES.2, SAS) - 2 out of 4 arrived DOA so I’m not holding my breath here. I’ll likely use them as secondary, low-use backup. The 2 that arrived working seem fine for now, but are quite old nevertheless.
4x HGST HDN724040ALE640 (4TB Deskstar NAS) - good track record with these so far.
1x WDC WD4000F9YZ (4TB WD Se) - 1 out of 2 arrived DOA. The sample size was small but I wouldn’t trust it too much.
2x ST1000DM010 (1TB Barracuda Compute) - OK. Not good, not terrible. Above average transfer rates.
2x WDC WD10S21X (1TB WD Black SSHD, 2.5") - The drives are quite funny. They have 8G SSD R/W buffer that makes some workloads super fast. Not sure how they’ll fit here, but included nevertheless.
1x HGST HTS541010A7E630 (1TB Travelstar, 2.5") - I don’t even know where I have this one from.
1x WDC WD10JPCX (1TB WD Blue, 2.5") - Likewise

The last 3 positions (4 disks) are the most egregious, but they can work pretty well in tandem. Since they are all 1TB drives I have tested grouping them in md raid0 and they readily beat any other drive on the list not only in speed, but also in power usage - as primarily mobile parts they are exceptionally good at it.

I wouldn’t trust them too much, however, and will only use them as either a spare, or as a +1 in a RAID5 (RAIDZ1).

Summing by size we’ve got:
1x5TB likely off-limits
5x4TB
2x3TB
6x1TB (4x LP SFF, 2x LFF)

ZFS tank proposal

Excluding special devices (log, cache and special) I currently envision the pool to be either 5x4TB RAIDZ1 + 1x4TB spare or 6x4TB RAIDZ2. The 6th 4TB to be constructed as md raid0 from the SFF 1TB drives. This leaves:

1x5TB
2x3TB
2x1TB

For hot backups or “extra-spares”. Why extra spares? Because if needed I can temporarily convert 1x3TB + 1x1TB into “4TB” using LVM. I even researched using LVM for a more permanent solution, but I couldn’t find a way to get asymmetric stripes between the drives (i.e. have 3 stripes on the 3TB drive for each stripe on the 1TB drive) and forewent that route.

A 4x1TB matrix can be easily created with:

sudo mdadm --create /dev/md0 --verbose --homehost=any --level=0 --raid-devices=4 --name=md4x1Ta /dev/sd[cdjl]

I’m having a weird problem with automatic pool import, where one of the vdevs tries to get imported using an invalid partuuid.
I have created a test pool using /dev/sdX and /dev/nvmeXn1 names, exported and reimported with sudo zpool import -d /dev/disk/by-partuuid tank. So far, so good. I couldn’t initially get the pool to load on boot so I restarted the system a couple of times, always just importing manually if needed.

After I fixed the auto-mount issue (module zfs was loading too late) I check zpool status and see this:

admin@zfserver:~ $ zpool status
  pool: tank
 state: DEGRADED
status: One or more devices could not be used because the label is missing or
        invalid.  Sufficient replicas exist for the pool to continue
        functioning in a degraded state.
action: Replace the device using 'zpool replace'.
   see: https://openzfs.github.io/openzfs-docs/msg/ZFS-8000-4J
config:

        NAME                                      STATE     READ WRITE CKSUM
        tank                                      DEGRADED     0     0     0
          raidz1-0                                ONLINE       0     0     0
            75e33064-2aac-4aa1-8a85-f53c82b1c06f  ONLINE       0     0     0
            e2222802-2357-4cde-b7c8-1e721cc9ac45  ONLINE       0     0     0
            d146aa02-5070-49cd-a35c-26b7e795ed75  ONLINE       0     0     0
            0fd0e066-b381-4aba-8351-3a13b0e5455f  ONLINE       0     0     0
            7c93f1e5-e14a-4a02-9db2-417b97775aa2  ONLINE       0     0     0
        special
          mirror-3                                DEGRADED     0     0     0
            9950470425596223100                   UNAVAIL      0     0     0  was /dev/disk/by-partuuid/55b4b54a-efe1-497f-8dc6-c231bfe2aaa8
            d4170767-111f-42b0-8b20-18234155c5a2  ONLINE       0     0     0
          mirror-4                                ONLINE       0     0     0
            d50fec14-5695-4298-a255-0c9d8d7e4186  ONLINE       0     0     0
            6db80842-7850-4c01-a6fb-8fcff4debd42  ONLINE       0     0     0
          mirror-5                                ONLINE       0     0     0
            6261e7ff-492e-4d65-8562-f51e55453998  ONLINE       0     0     0
            6c596476-411d-4018-87a8-2be37bd8734f  ONLINE       0     0     0
        logs
          mirror-1                                ONLINE       0     0     0
            ff332ddf-32de-40c0-af5b-2d9bab1f3497  ONLINE       0     0     0
            aad644c8-cb4a-43bf-9e7c-fd4bc7e71c6e  ONLINE       0     0     0
          mirror-2                                ONLINE       0     0     0
            2c09b7f0-d253-420f-8da0-cdba6b3304e5  ONLINE       0     0     0
            8d642099-e69d-45c5-900b-bde2d059beee  ONLINE       0     0     0
        cache
          9e0a6838-69ba-4895-b0d8-b7bde9e18e86    UNAVAIL      0     0     0
          9738e2e6-9d18-49df-b56b-b866db5ab32e    ONLINE       0     0     0
          80683a16-c9f1-434e-98b0-fa10f0f1c2c3    ONLINE       0     0     0
          a2fad9b0-4743-4f2a-ad66-e95f9ba456ad    ONLINE       0     0     0
          de6216e6-9071-4476-b4b2-f7b2ddd1888d    ONLINE       0     0     0
        spares
          d61401c2-48e6-4deb-b742-9e000db578e8    AVAIL

errors: No known data errors

Which is weird, because neither 55b4b54a-* nor 9e0a6838-* are partitions on the system and all devices are there:

admin@zfserver:~ $ ls -la /dev/disk/by-partuuid/
total 0
drwxr-xr-x 2 root root 520 Feb 12 01:13 .
drwxr-xr-x 9 root root 180 Feb 12 01:12 ..
lrwxrwxrwx 1 root root  10 Feb 12 01:13 0fd0e066-b381-4aba-8351-3a13b0e5455f -> ../../sdj1
lrwxrwxrwx 1 root root  15 Feb 12 01:13 27832ab6-e85f-4ba6-b415-4d59493e9ed9 -> ../../nvme0n1p2
lrwxrwxrwx 1 root root  15 Feb 12 01:13 2c09b7f0-d253-420f-8da0-cdba6b3304e5 -> ../../nvme1n1p3
lrwxrwxrwx 1 root root  15 Feb 12 01:13 6261e7ff-492e-4d65-8562-f51e55453998 -> ../../nvme3n1p1
lrwxrwxrwx 1 root root  15 Feb 12 01:13 62cdfe6f-f488-4932-876c-1cc851c423fd -> ../../nvme0n1p1
lrwxrwxrwx 1 root root  15 Feb 12 01:13 6c596476-411d-4018-87a8-2be37bd8734f -> ../../nvme2n1p3
lrwxrwxrwx 1 root root  15 Feb 12 01:13 6db80842-7850-4c01-a6fb-8fcff4debd42 -> ../../nvme2n1p2
lrwxrwxrwx 1 root root  13 Feb 12 01:13 75e33064-2aac-4aa1-8a85-f53c82b1c06f -> ../../md127p1
lrwxrwxrwx 1 root root  10 Feb 12 01:13 7c93f1e5-e14a-4a02-9db2-417b97775aa2 -> ../../sdl1
lrwxrwxrwx 1 root root  15 Feb 12 01:13 80683a16-c9f1-434e-98b0-fa10f0f1c2c3 -> ../../nvme2n1p4
lrwxrwxrwx 1 root root  15 Feb 12 01:13 8d642099-e69d-45c5-900b-bde2d059beee -> ../../nvme6n1p1
lrwxrwxrwx 1 root root  10 Feb 12 01:13 956bf7f4-9244-4e62-8703-20b5b47ec858 -> ../../sdn3
lrwxrwxrwx 1 root root  15 Feb 12 01:13 9738e2e6-9d18-49df-b56b-b866db5ab32e -> ../../nvme1n1p2
lrwxrwxrwx 1 root root  10 Feb 12 01:13 a101a2cb-8fbf-42d1-bd9a-6f6ccee4e924 -> ../../sdn1
lrwxrwxrwx 1 root root  15 Feb 12 01:13 a2fad9b0-4743-4f2a-ad66-e95f9ba456ad -> ../../nvme5n1p1
lrwxrwxrwx 1 root root  15 Feb 12 01:13 aad644c8-cb4a-43bf-9e7c-fd4bc7e71c6e -> ../../nvme2n1p5
lrwxrwxrwx 1 root root  10 Feb 12 01:13 c54d9c4b-46b2-414c-b46d-593ab964e7f0 -> ../../vda1
lrwxrwxrwx 1 root root  10 Feb 12 01:13 d146aa02-5070-49cd-a35c-26b7e795ed75 -> ../../sdi1
lrwxrwxrwx 1 root root  15 Feb 12 01:13 d4170767-111f-42b0-8b20-18234155c5a2 -> ../../nvme2n1p1
lrwxrwxrwx 1 root root  15 Feb 12 01:13 d50fec14-5695-4298-a255-0c9d8d7e4186 -> ../../nvme1n1p1
lrwxrwxrwx 1 root root  10 Feb 12 01:13 d61401c2-48e6-4deb-b742-9e000db578e8 -> ../../sdf1
lrwxrwxrwx 1 root root  15 Feb 12 01:13 de6216e6-9071-4476-b4b2-f7b2ddd1888d -> ../../nvme4n1p1
lrwxrwxrwx 1 root root  10 Feb 12 01:13 e2222802-2357-4cde-b7c8-1e721cc9ac45 -> ../../sdh1
lrwxrwxrwx 1 root root  15 Feb 12 01:13 ff332ddf-32de-40c0-af5b-2d9bab1f3497 -> ../../nvme0n1p3

So I do export & import again, same spiel, and again everything seems to be fine:

admin@zfserver:~ $ sudo zpool export tank
admin@zfserver:~ $ sudo zpool import -d /dev/disk/by-partuuid tank
admin@zfserver:~ $ zpool status
  pool: tank
 state: ONLINE
status: One or more devices has experienced an unrecoverable error.  An
        attempt was made to correct the error.  Applications are unaffected.
action: Determine if the device needs to be replaced, and clear the errors
        using 'zpool clear' or replace the device with 'zpool replace'.
   see: https://openzfs.github.io/openzfs-docs/msg/ZFS-8000-9P
config:

        NAME                                      STATE     READ WRITE CKSUM
        tank                                      ONLINE       0     0     0
          raidz1-0                                ONLINE       0     0     0
            75e33064-2aac-4aa1-8a85-f53c82b1c06f  ONLINE       0     0     0
            e2222802-2357-4cde-b7c8-1e721cc9ac45  ONLINE       0     0     0
            d146aa02-5070-49cd-a35c-26b7e795ed75  ONLINE       0     0     0
            0fd0e066-b381-4aba-8351-3a13b0e5455f  ONLINE       0     0     0
            7c93f1e5-e14a-4a02-9db2-417b97775aa2  ONLINE       0     0     0
        special
          mirror-3                                ONLINE       0     0     0
            62cdfe6f-f488-4932-876c-1cc851c423fd  ONLINE       0     0     1
            d4170767-111f-42b0-8b20-18234155c5a2  ONLINE       0     0     0
          mirror-4                                ONLINE       0     0     0
            d50fec14-5695-4298-a255-0c9d8d7e4186  ONLINE       0     0     0
            6db80842-7850-4c01-a6fb-8fcff4debd42  ONLINE       0     0     0
          mirror-5                                ONLINE       0     0     0
            6261e7ff-492e-4d65-8562-f51e55453998  ONLINE       0     0     0
            6c596476-411d-4018-87a8-2be37bd8734f  ONLINE       0     0     0
        logs
          mirror-1                                ONLINE       0     0     0
            ff332ddf-32de-40c0-af5b-2d9bab1f3497  ONLINE       0     0     0
            aad644c8-cb4a-43bf-9e7c-fd4bc7e71c6e  ONLINE       0     0     0
          mirror-2                                ONLINE       0     0     0
            2c09b7f0-d253-420f-8da0-cdba6b3304e5  ONLINE       0     0     0
            8d642099-e69d-45c5-900b-bde2d059beee  ONLINE       0     0     0
        cache
          27832ab6-e85f-4ba6-b415-4d59493e9ed9    ONLINE       0     0     0
          9738e2e6-9d18-49df-b56b-b866db5ab32e    ONLINE       0     0     0
          80683a16-c9f1-434e-98b0-fa10f0f1c2c3    ONLINE       0     0     0
          a2fad9b0-4743-4f2a-ad66-e95f9ba456ad    ONLINE       0     0     0
          de6216e6-9071-4476-b4b2-f7b2ddd1888d    ONLINE       0     0     0
        spares
          d61401c2-48e6-4deb-b742-9e000db578e8    AVAIL

errors: No known data errors

But after another reboot we’re almost where we started:

admin@zfserver:~ $ sudo reboot

Broadcast message from root@zfserver on pts/1 (Mon 2024-02-12 01:17:43 CET):

The system will reboot now!

admin@zfserver:~ $ Connection to zfserver closed by remote host.
Connection to zfserver closed.
admin@vmserver:~ $ ssh admin@zfserver
admin@zfserver's password:
Last login: Mon Feb 12 01:13:58 2024 from fe80::216:3eff:fe47:2444%enp4s0
admin@zfserver:~ $ zpool status
  pool: tank
 state: DEGRADED
status: One or more devices could not be used because the label is missing or
        invalid.  Sufficient replicas exist for the pool to continue
        functioning in a degraded state.
action: Replace the device using 'zpool replace'.
   see: https://openzfs.github.io/openzfs-docs/msg/ZFS-8000-4J
  scan: resilvered 2.06M in 00:00:00 with 0 errors on Mon Feb 12 01:16:45 2024
config:

        NAME                                      STATE     READ WRITE CKSUM
        tank                                      DEGRADED     0     0     0
          raidz1-0                                ONLINE       0     0     0
            75e33064-2aac-4aa1-8a85-f53c82b1c06f  ONLINE       0     0     0
            e2222802-2357-4cde-b7c8-1e721cc9ac45  ONLINE       0     0     0
            d146aa02-5070-49cd-a35c-26b7e795ed75  ONLINE       0     0     0
            0fd0e066-b381-4aba-8351-3a13b0e5455f  ONLINE       0     0     0
            7c93f1e5-e14a-4a02-9db2-417b97775aa2  ONLINE       0     0     0
        special
          mirror-3                                DEGRADED     0     0     0
            9950470425596223100                   UNAVAIL      0     0     0  was /dev/disk/by-partuuid/55b4b54a-efe1-497f-8dc6-c231bfe2aaa8
            d4170767-111f-42b0-8b20-18234155c5a2  ONLINE       0     0     0
          mirror-4                                ONLINE       0     0     0
            d50fec14-5695-4298-a255-0c9d8d7e4186  ONLINE       0     0     0
            6db80842-7850-4c01-a6fb-8fcff4debd42  ONLINE       0     0     0
          mirror-5                                ONLINE       0     0     0
            6261e7ff-492e-4d65-8562-f51e55453998  ONLINE       0     0     0
            6c596476-411d-4018-87a8-2be37bd8734f  ONLINE       0     0     0
        logs
          mirror-1                                ONLINE       0     0     0
            ff332ddf-32de-40c0-af5b-2d9bab1f3497  ONLINE       0     0     0
            aad644c8-cb4a-43bf-9e7c-fd4bc7e71c6e  ONLINE       0     0     0
          mirror-2                                ONLINE       0     0     0
            2c09b7f0-d253-420f-8da0-cdba6b3304e5  ONLINE       0     0     0
            8d642099-e69d-45c5-900b-bde2d059beee  ONLINE       0     0     0
        cache
          27832ab6-e85f-4ba6-b415-4d59493e9ed9    ONLINE       0     0     0
          9738e2e6-9d18-49df-b56b-b866db5ab32e    ONLINE       0     0     0
          80683a16-c9f1-434e-98b0-fa10f0f1c2c3    ONLINE       0     0     0
          a2fad9b0-4743-4f2a-ad66-e95f9ba456ad    ONLINE       0     0     0
          de6216e6-9071-4476-b4b2-f7b2ddd1888d    ONLINE       0     0     0
        spares
          d61401c2-48e6-4deb-b742-9e000db578e8    AVAIL

errors: No known data errors

IDK what’s going on. The cache vdev seems to be fixed, but special mirror-3 is missing once again, once again pointing at 55b4b54a-* PARTUUID. I tried redoing export/import/export/import and the issue persists. I haven’t tried doing a zpool replace yet, that’s the next step.