This guide is now 1 year old! 
If you have an old Samsung Galaxy Tab 10.1 sitting around gathering dust with its old Android 4.4, heres’s how to get a real operating system running on it! Took me a few days to get this working on mine with the thankfully existing but outdated guide so I’m sharing this you don’t have to go through all the pain I did.
Massive props to Github users exception13, X-Stranger, thermatk and mikkeloscar for providing the original how-to’s and source code. You some cool dudes.
What you’ll need:
- A ROOTED Sumsung Galaxy Tab 10.1 (2014) model GT-N8000, GT-N8010, GT-N8013 (Unfortunately, this requires a Windows only application. See here for instructions)
- An SD card. Preferably a good one. This is where Linux will go.
- A computer running Linux
- Some free time
FYI, I’m going to be referring to the Samsung Galaxy Tab as the SGT from now on.
PART ONE: The kernel
Unfortunately, since the kernel the SGT uses is so old, it can’t be compiled using GCC version 5 and above.
If you already run sonething like debian Jessie, you should be fine, otherwise there are 2 options, run a chroot of an old distro or use VirtualBox to run an old distro. I chose to run a virtual machine of 32 bit Ubuntu 14.04.5. You can use 64 bit but we’re working with 32 bit arm and you have to install extra packages on 64 bit to get things working and I don’t want to deal with that.
PART 1.1: Setting up a virtual machine
So, install virtualbox and download the 32 bit iso of ubuntu 14.04.5 from here or from a local mirror.
- Create a new virtual machine giving it as many cores and as much RAM as you can. Remeber to enable PAE. Give it a reasonably sized virtual drive here as well. You’re going to be compiling the Linux kernel after all.
- Create a shared folder with your home folder as the path and set it to auto mount.
- Start up and install ubuntu.
- Insert the virtualbox guest additions iso and install them so that shared folders work.
- Don’t forget to install updates.
- Run the command
sudo usermod -a -G USERNAME vboxsfReplace USERNAME with your username. This is so you can access the shared folder. - Reboot the virtual machine
PART 1.2: Dependencies and source code
- Run the command
sudo apt-get install git build-essential libncurses5-devto install some neccesary programs - Just run these next few commands to make a directory structure and download the source code:
mkdir opensgn
cd opensgn
git clone https://github.com/opensgn/N8000.git -b arch-r4p0
mv N8000 kernel
git clone https://github.com/opensgn/N8000.git -b toolchain
mv N8000 toolchain
sudo mv toolchain /var/local/
git clone https://github.com/thermatk/opensgn-easy.git -b commonfiles
mv opensgn-easy firmware
Part 1.3: The Build
-
Now run these ones to configure the kernel:
cd kernel
make mrproper
export CROSS_COMPILE=/var/local/toolchain/bin/arm-linux-gnueabihf-
export ARCH=arm
export SUBARCH=armv7h
make n8000_linux_mali_defconfig
make menuconfig -
Go to “Boot options” and change the command line to this:
root=/dev/mmcblk1p1 rw rootfstype=ext4 rootwait vmalloc=144M -
Done, Exit, Exit then run some more commands to compile the sucker:
export INSTALL_MOD_PATH=$(pwd)/compiledmodules
make -j2# CPU cores + 1 here
make modules_install
rm compiledmodules/lib/modules/3.0.31+/source
rm compiledmodules/lib/modules/3.0.31+/build -
Once that’s done, copy the useful files to a new folder:
cd ..
mkdir -p results/{boot,opt}
cp kernel/arch/arm/boot/zImage results/boot/
cp kernel/System.map results/boot/
cp kernel/.config results/boot/config-$(ls kernel/compiledmodules/lib/modules/)
cp -r kernel/compiledmodules/lib/ results/
cp -r firmware/firmware/* results/opt -
Copy that “results” folder into the shared folder if you used a virtual machine because your done with it now. Shut it down and delete it if you want.
PART TWO: The root filesystem
For better compatibility, replace all mentions of jessie with wheezy. It’s an older version but still supported for now.
-
Plug that SD into your machine and format it with a single ext4 partition
-
Mount that partition somewhere. I just mounted it to /mnt to make things easy
mount /dev/sdX1 /mnt# X is the SD card -
Install: debootstrap qemu-system-arm qemu-user-static or your distro’s equivalent
sudo apt install debootstrap qemu-system-arm qemu-user-static -
Run the next command to create a Debian Jessie root filesystem on the SD card (Other distros should work, I haven’t tested them). This will take a while.
sudo debootstrap --foreign --arch=armhf jessie /mnt http://ftp.debian.org/debian/ -
Now we’re going to emulate and arm system with the SD card as the root.
sudo cp /usr/bin/qemu-arm-static /mnt/usr/bin
sudo su
echo ':arm:M::\x7fELF\x01\x01\x01\x00\x00\x00\x00\x00\x00\x00\x00\x00\x02\x00\x28\x00:\xff\xff\xff\xff\xff\xff\xff\x00\xff\xff\xff\xff\xff\xff\xff\xff\xfe\xff\xff\xff:/usr/bin/qemu-arm-static:' > /proc/sys/fs/binfmt_misc/register
exit
sudo mount -t proc /proc /mnt/proc
sudo mount -t devpts /dev/pts /mnt/dev/pts
sudo mount -t sysfs /sys /mnt/sys
sudo chroot /mnt /bin/bash -
That long string of hex is to register the qemu-arm-static binary as an ARM interpreter in the kernel.
-
Run:
/debootstrap/debootstrap --second-stagethis will install and configure all the base packages. This will take a while. -
Run the next few commands to add the debian repositories so that you can install and update programs:
echo "deb http://ftp.debian.org/debian/ jessie main contrib non-free" > /etc/apt/sources.list
echo "deb http://ftp.debian.org/debian/ jessie-updates main contrib non-free" >> /etc/apt/sources.list
echo "deb http://security.debian.org/ jessie/updates main contrib non-free" >> /etc/apt/sources.list -
Run
apt-get update && apt-get dist-upgradeto update all packages. -
Run
apt-get install abootimg initramfs-toolsto install the program which will make all the magic happen soon. -
Exit from the chroot with
exit -
Open the terminal in the place you put that “results” folder a while back
-
Copy over those files to the SD card:
sudo cp -r results/boot /mnt/
sudo cp -r results/lib/modules /mnt/lib/
sudo cp -r results/opt /mnt/ -
Get back into the chroot with
sudo chroot /mnt /bin/bash -
Run the next few commands to generate an initramfs and new recovery for your SGT
cd /boot
mkinitramfs -o initrd.img $(ls /lib/modules/)
abootimg --create recovery.img -k zImage -r initrd.img -c "cmdline = root=/dev/mmcblk1p1"
PART 2.1: Install some useful stuff
You probably want more that a terminal login when you start up for the first time; especially since you don’t have a keyboard.
-
Here’s some stuff you should consider installing:
apt-get install locales
dpkg-reconfigure locales
apt-get install $(tasksel --task-packages standard)#Installs some basic packages you might want
apt-get install xorg xinput xvkbd xfce4 network-manager network-manager-gnome pulseaudio lightdm lightdm-gtk-greeter sudo
Xvkbd is a basic on-screen keyboard. -
Run these few commands to get wifi to work:
echo "options dhd op_mode=0 nvram_path=/opt/wifi/nvram_net.txt_murata firmware_path=/opt/wifi/bcmdhd_sta.bin" >> /etc/modprobe.d/dhd.conf
echo "dhd" >> /etc/modules-load.d/dhd.conf -
Add a user:
useradd -m -s /bin/bash -G sudo USERNAME
passwd USERNAME -
To make the on-screen keyboard available on the login screen, run
nano /etc/lightdm/lightdm-gtk-greeter.conf -
Remove the # from the start of the line that says
#keyboard=and change it to look likekeyboard=xvkbd -
Edit the line that says
show-indicators=~language;~session;~powerand change it to look likeshow-indicators=~language;~a11y;~session;~power -
At the login screen press the button with the little person on it and select the “On screen Keyboard”
-
When using the keyboard you have to press the “Focus” button then the window you want to type into, in this case, the login prompt.[/details]
-
Exit from the chroot with
exitand copy that recovery.img file to your home folder
cp /mnt/boot/recovery.img ~/
Or, if you’re don’t feel like doing any of that, you can download these pre-made recovery and SD card images:
Recovery: download
SD card: download
Just unzip and write the SD card image to the microSD card you want to use using dd or equivalent tool and resize the ext4 partition using gparted if the SD card is over 4GB.
Default user username/password: user/user
Default root username/password: root/root
PART THREE: The magic
-
Turn on and plug your SGT into a USB port and wait for it to come up as an MTP device in your file browser.
-
Copy that recovery.img file onto the SGT’s internal storage.
-
Enable developer mode on the SGT by going to Settings -> About Device and tapping “Build Number” a few times.
-
Go to “Developer options” and enable “USB debugging”
-
Install adb on you computer with your package manager
sudo apt install adb -
Run the next few commands to enable you to boot into Linux:
adb shell
su
cd /storage
dd if=/dev/block/mmcblk0p6 of=recovery.old
dd if=recovery.img of=/dev/block/mmcblk0p6
exit
exit -
That just rewrote the recovery partition with our special one and backed up the old one just in case.
-
Unplug the SD card from your computer and insert it into your SGT.
-
Hold the power and the volume up button (furthest from the power button) to reboot into our special recovery.
-
Wait until the “Samsung Galaxy Note 10.1” splash screen appears then release the buttons.
-
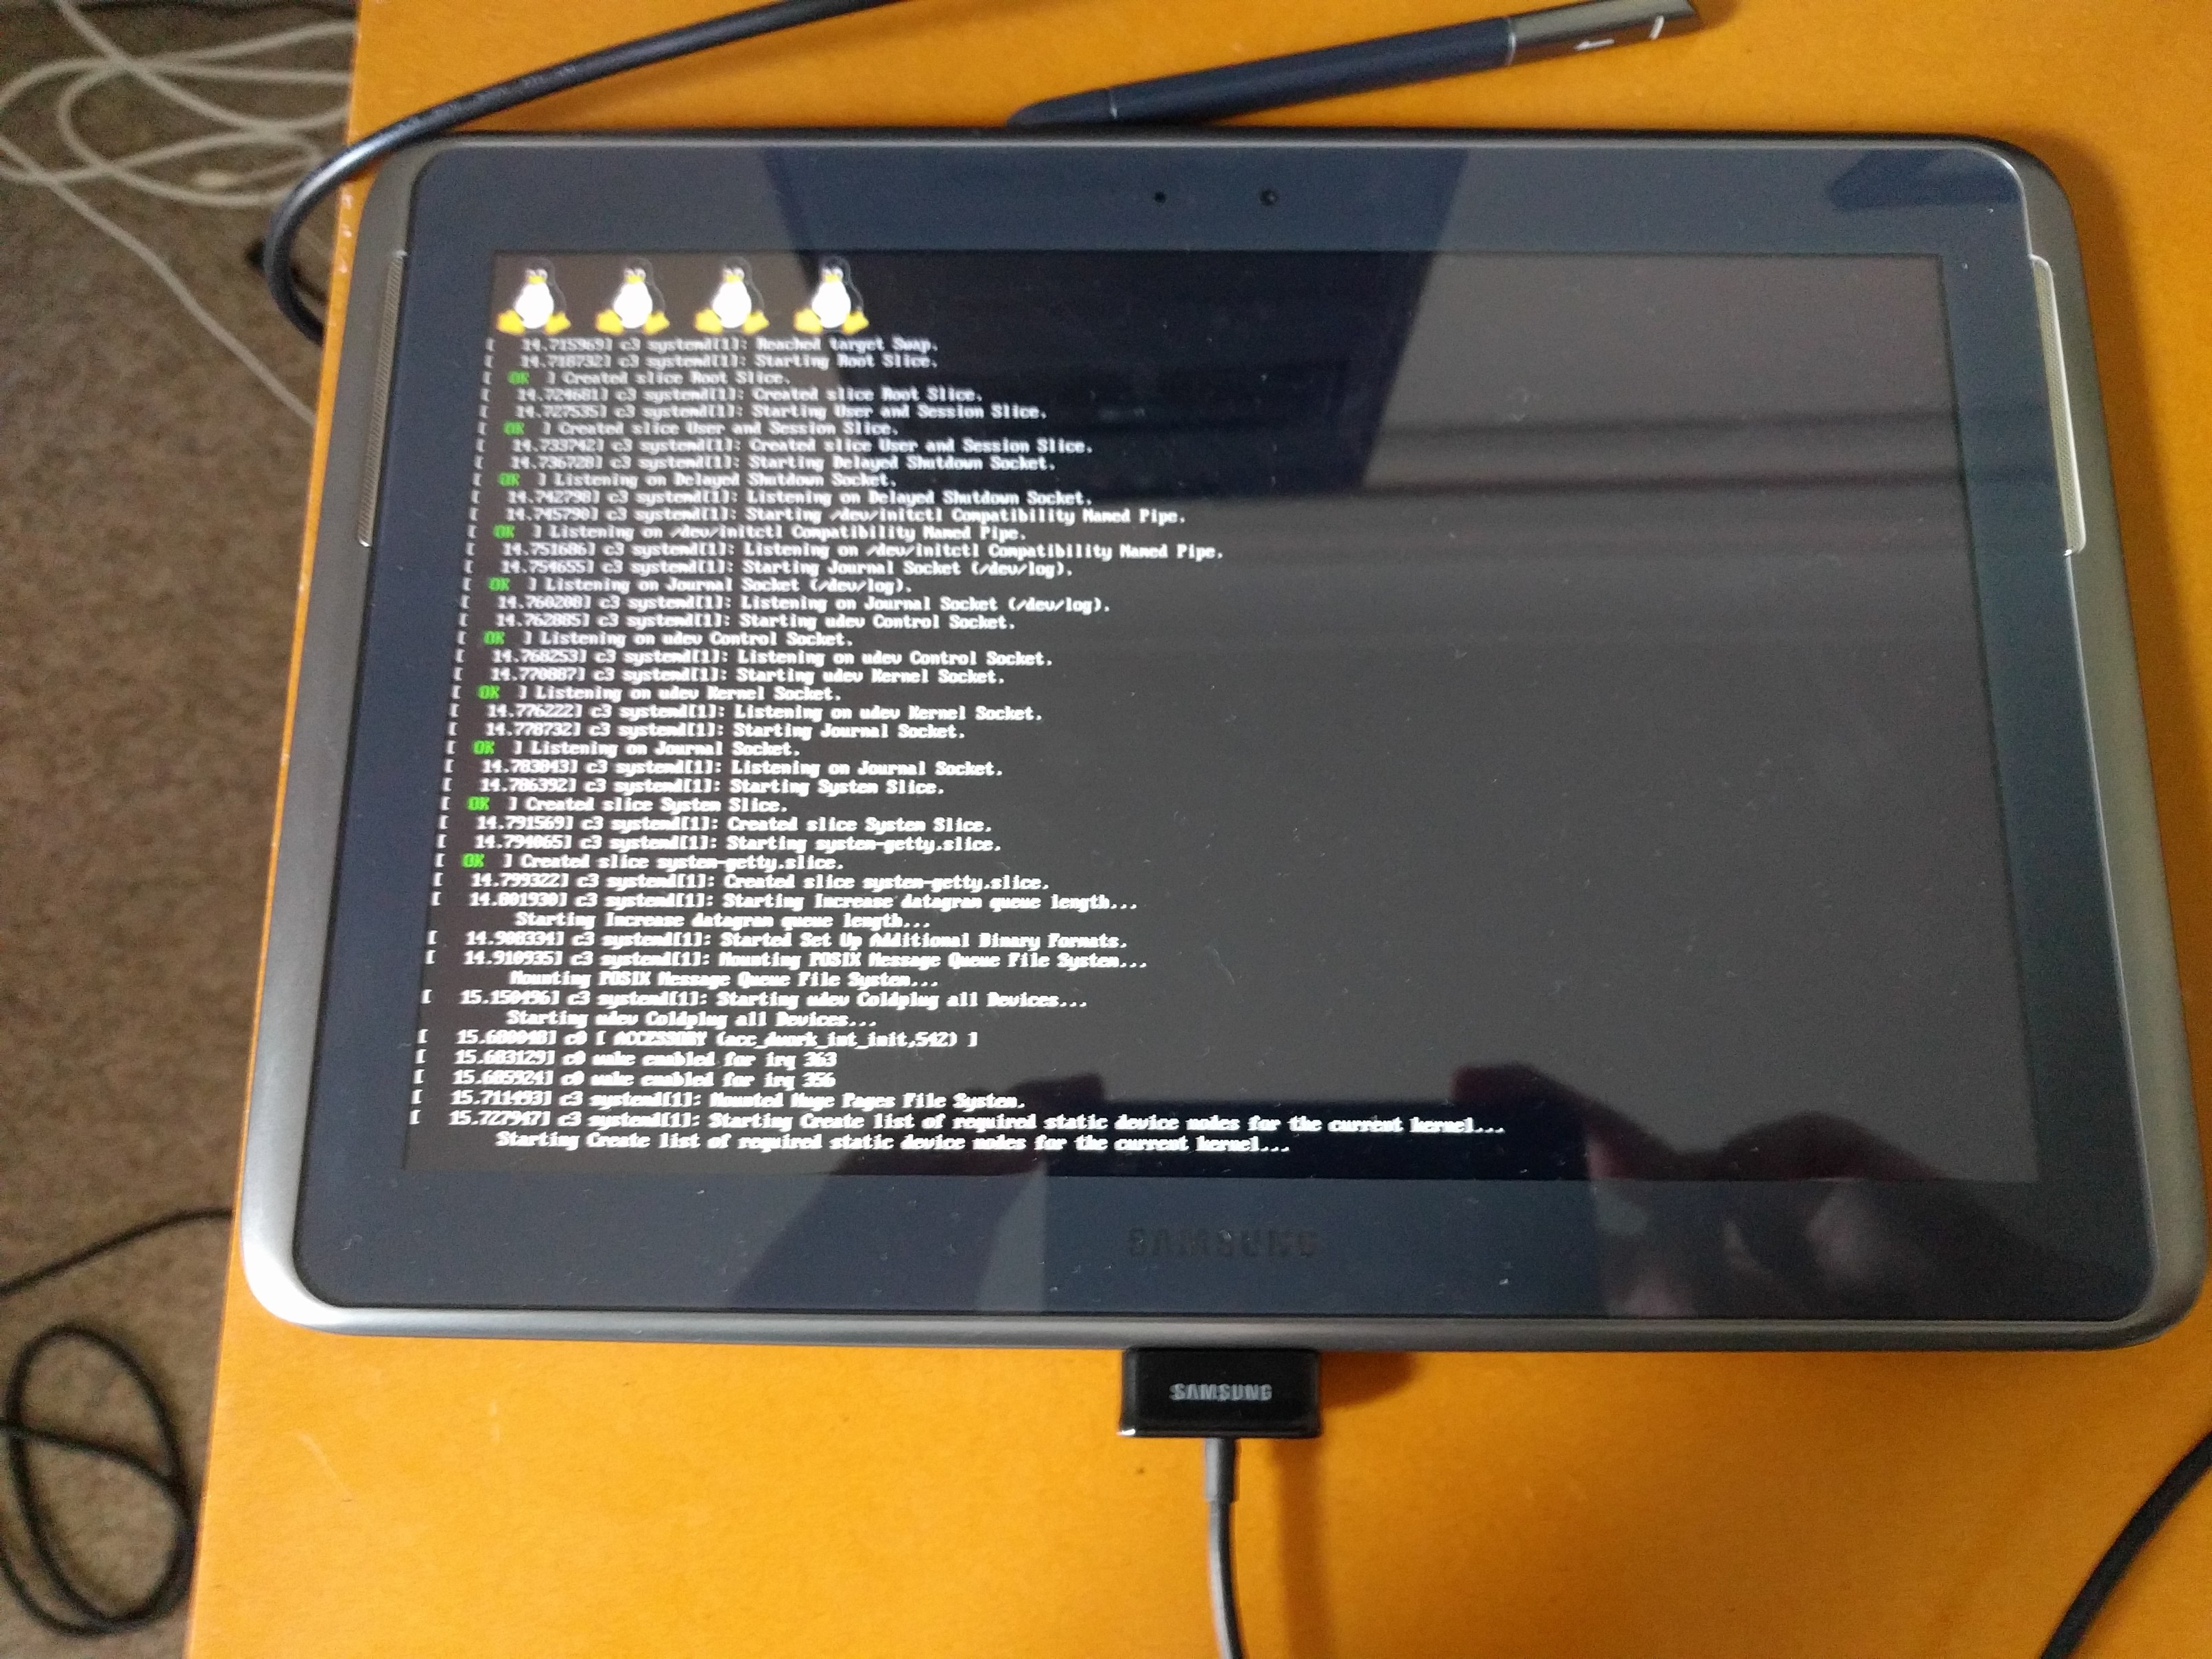
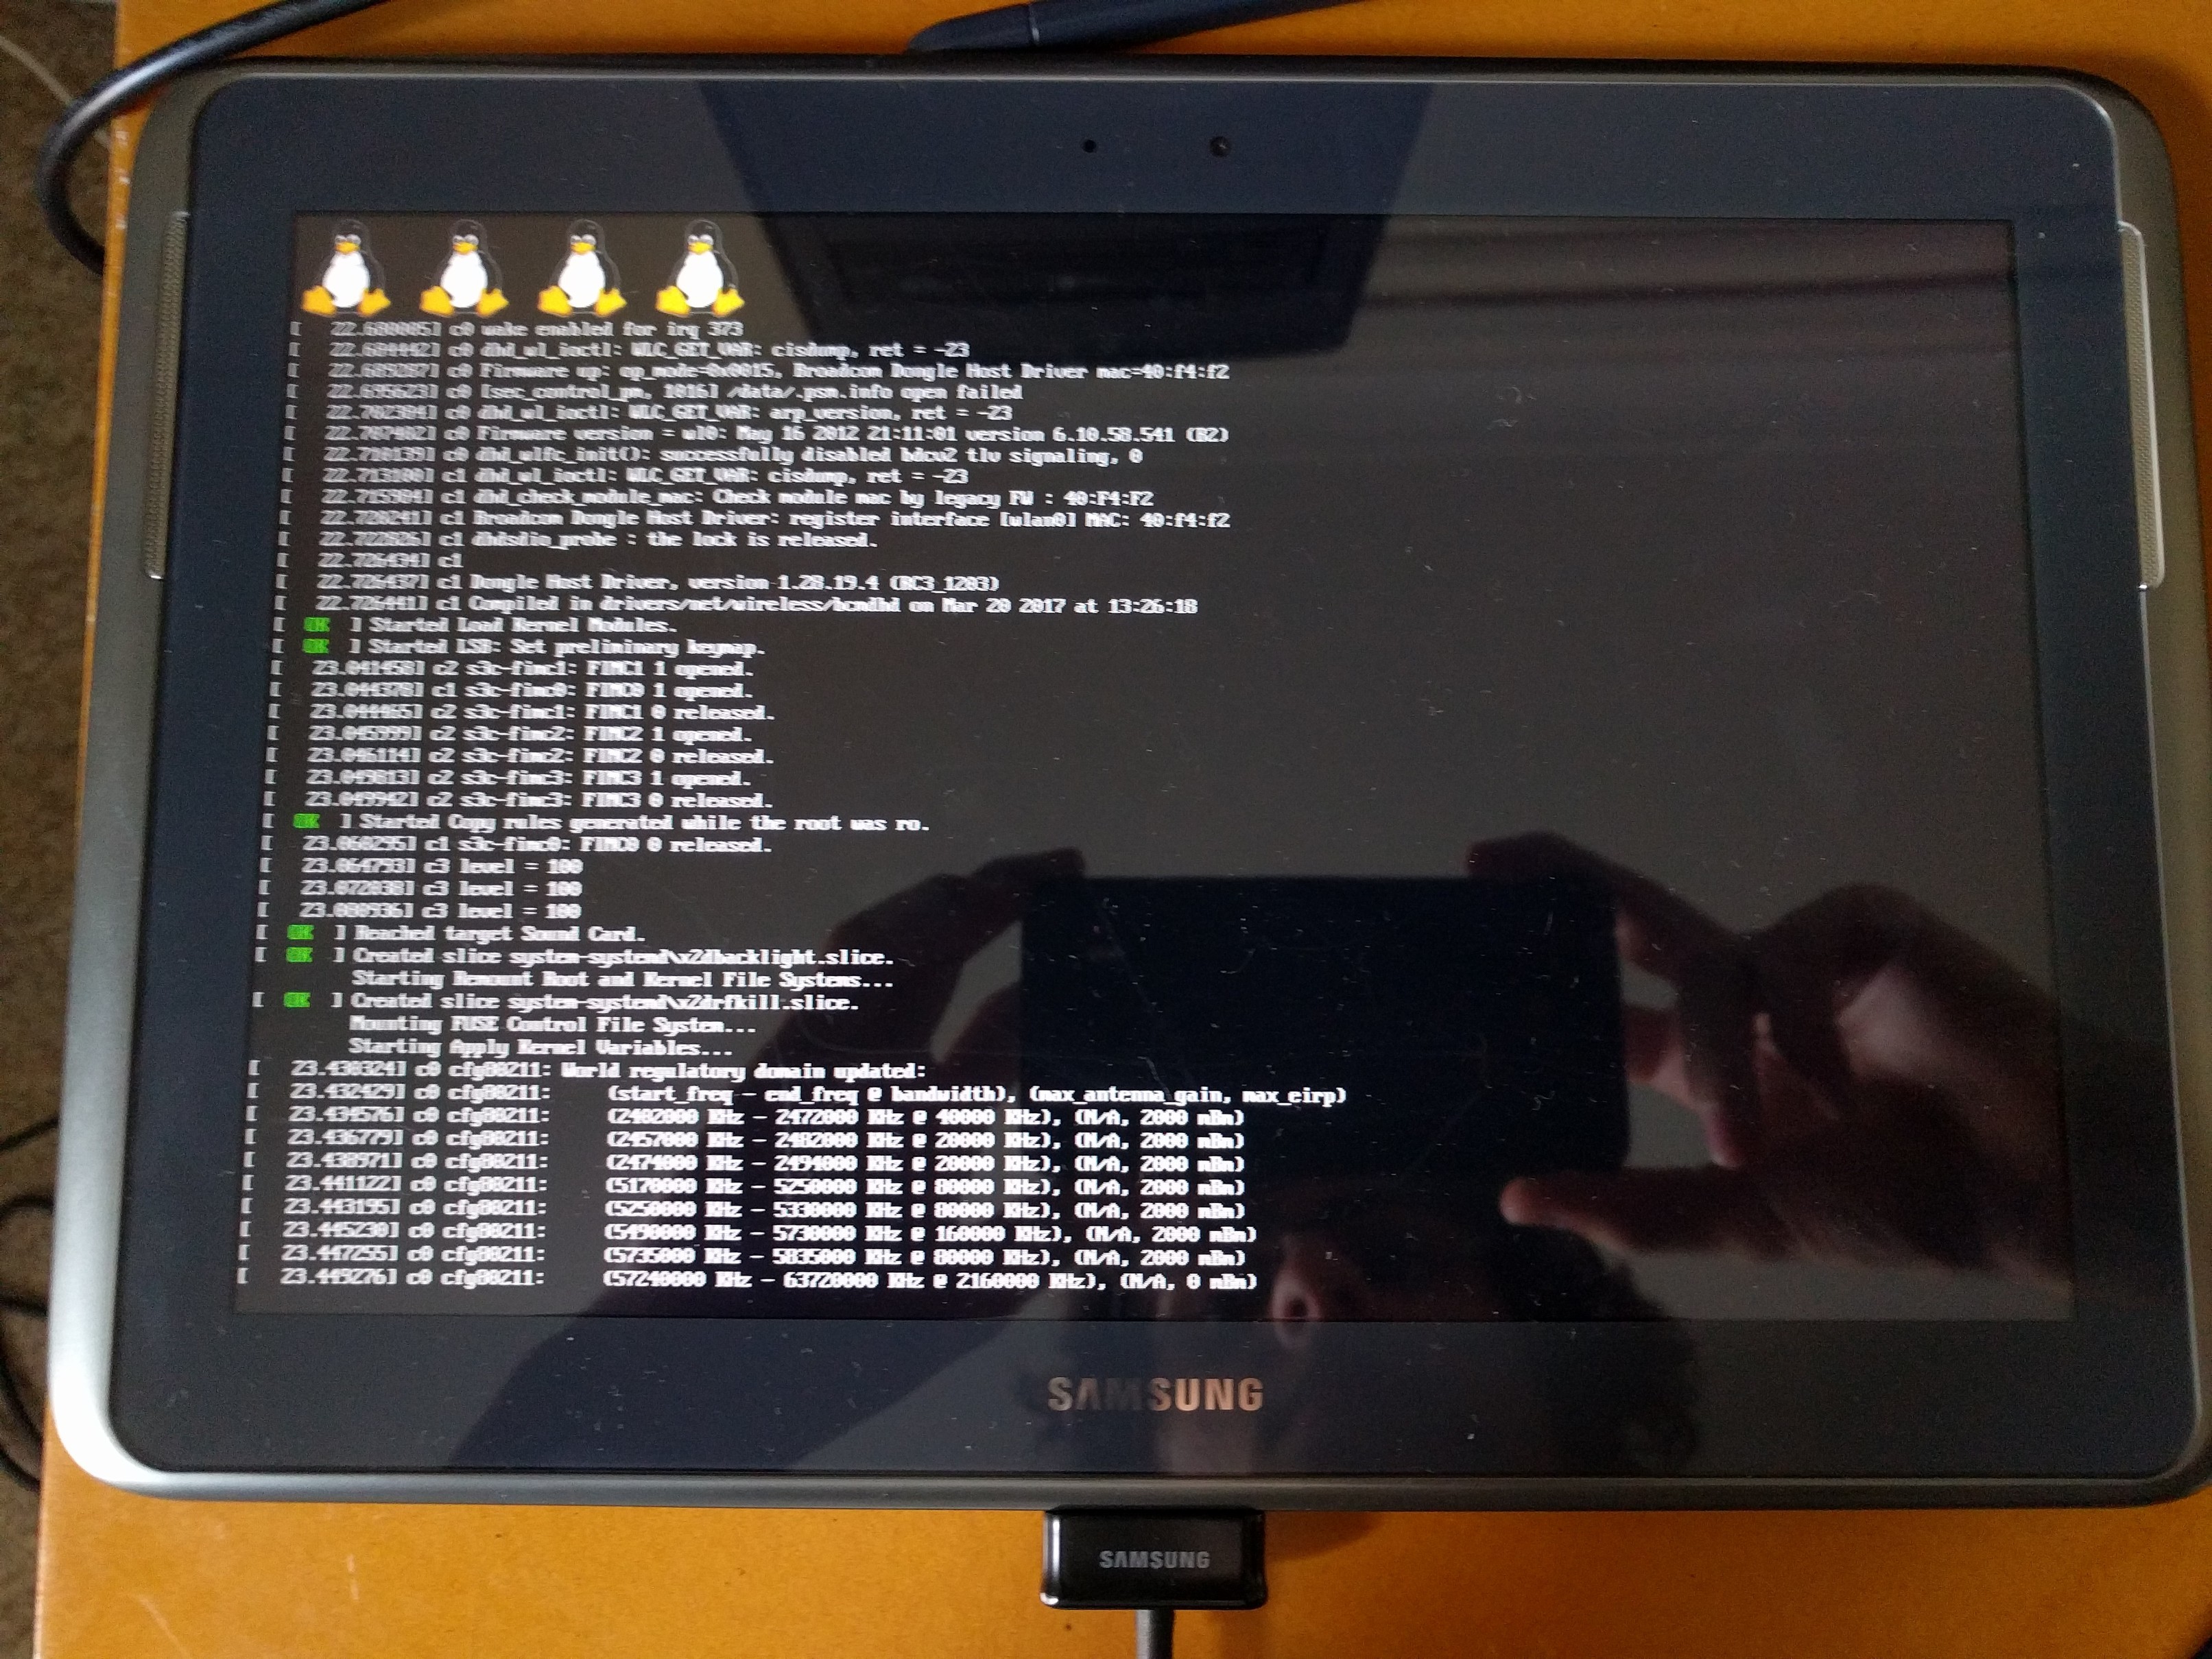
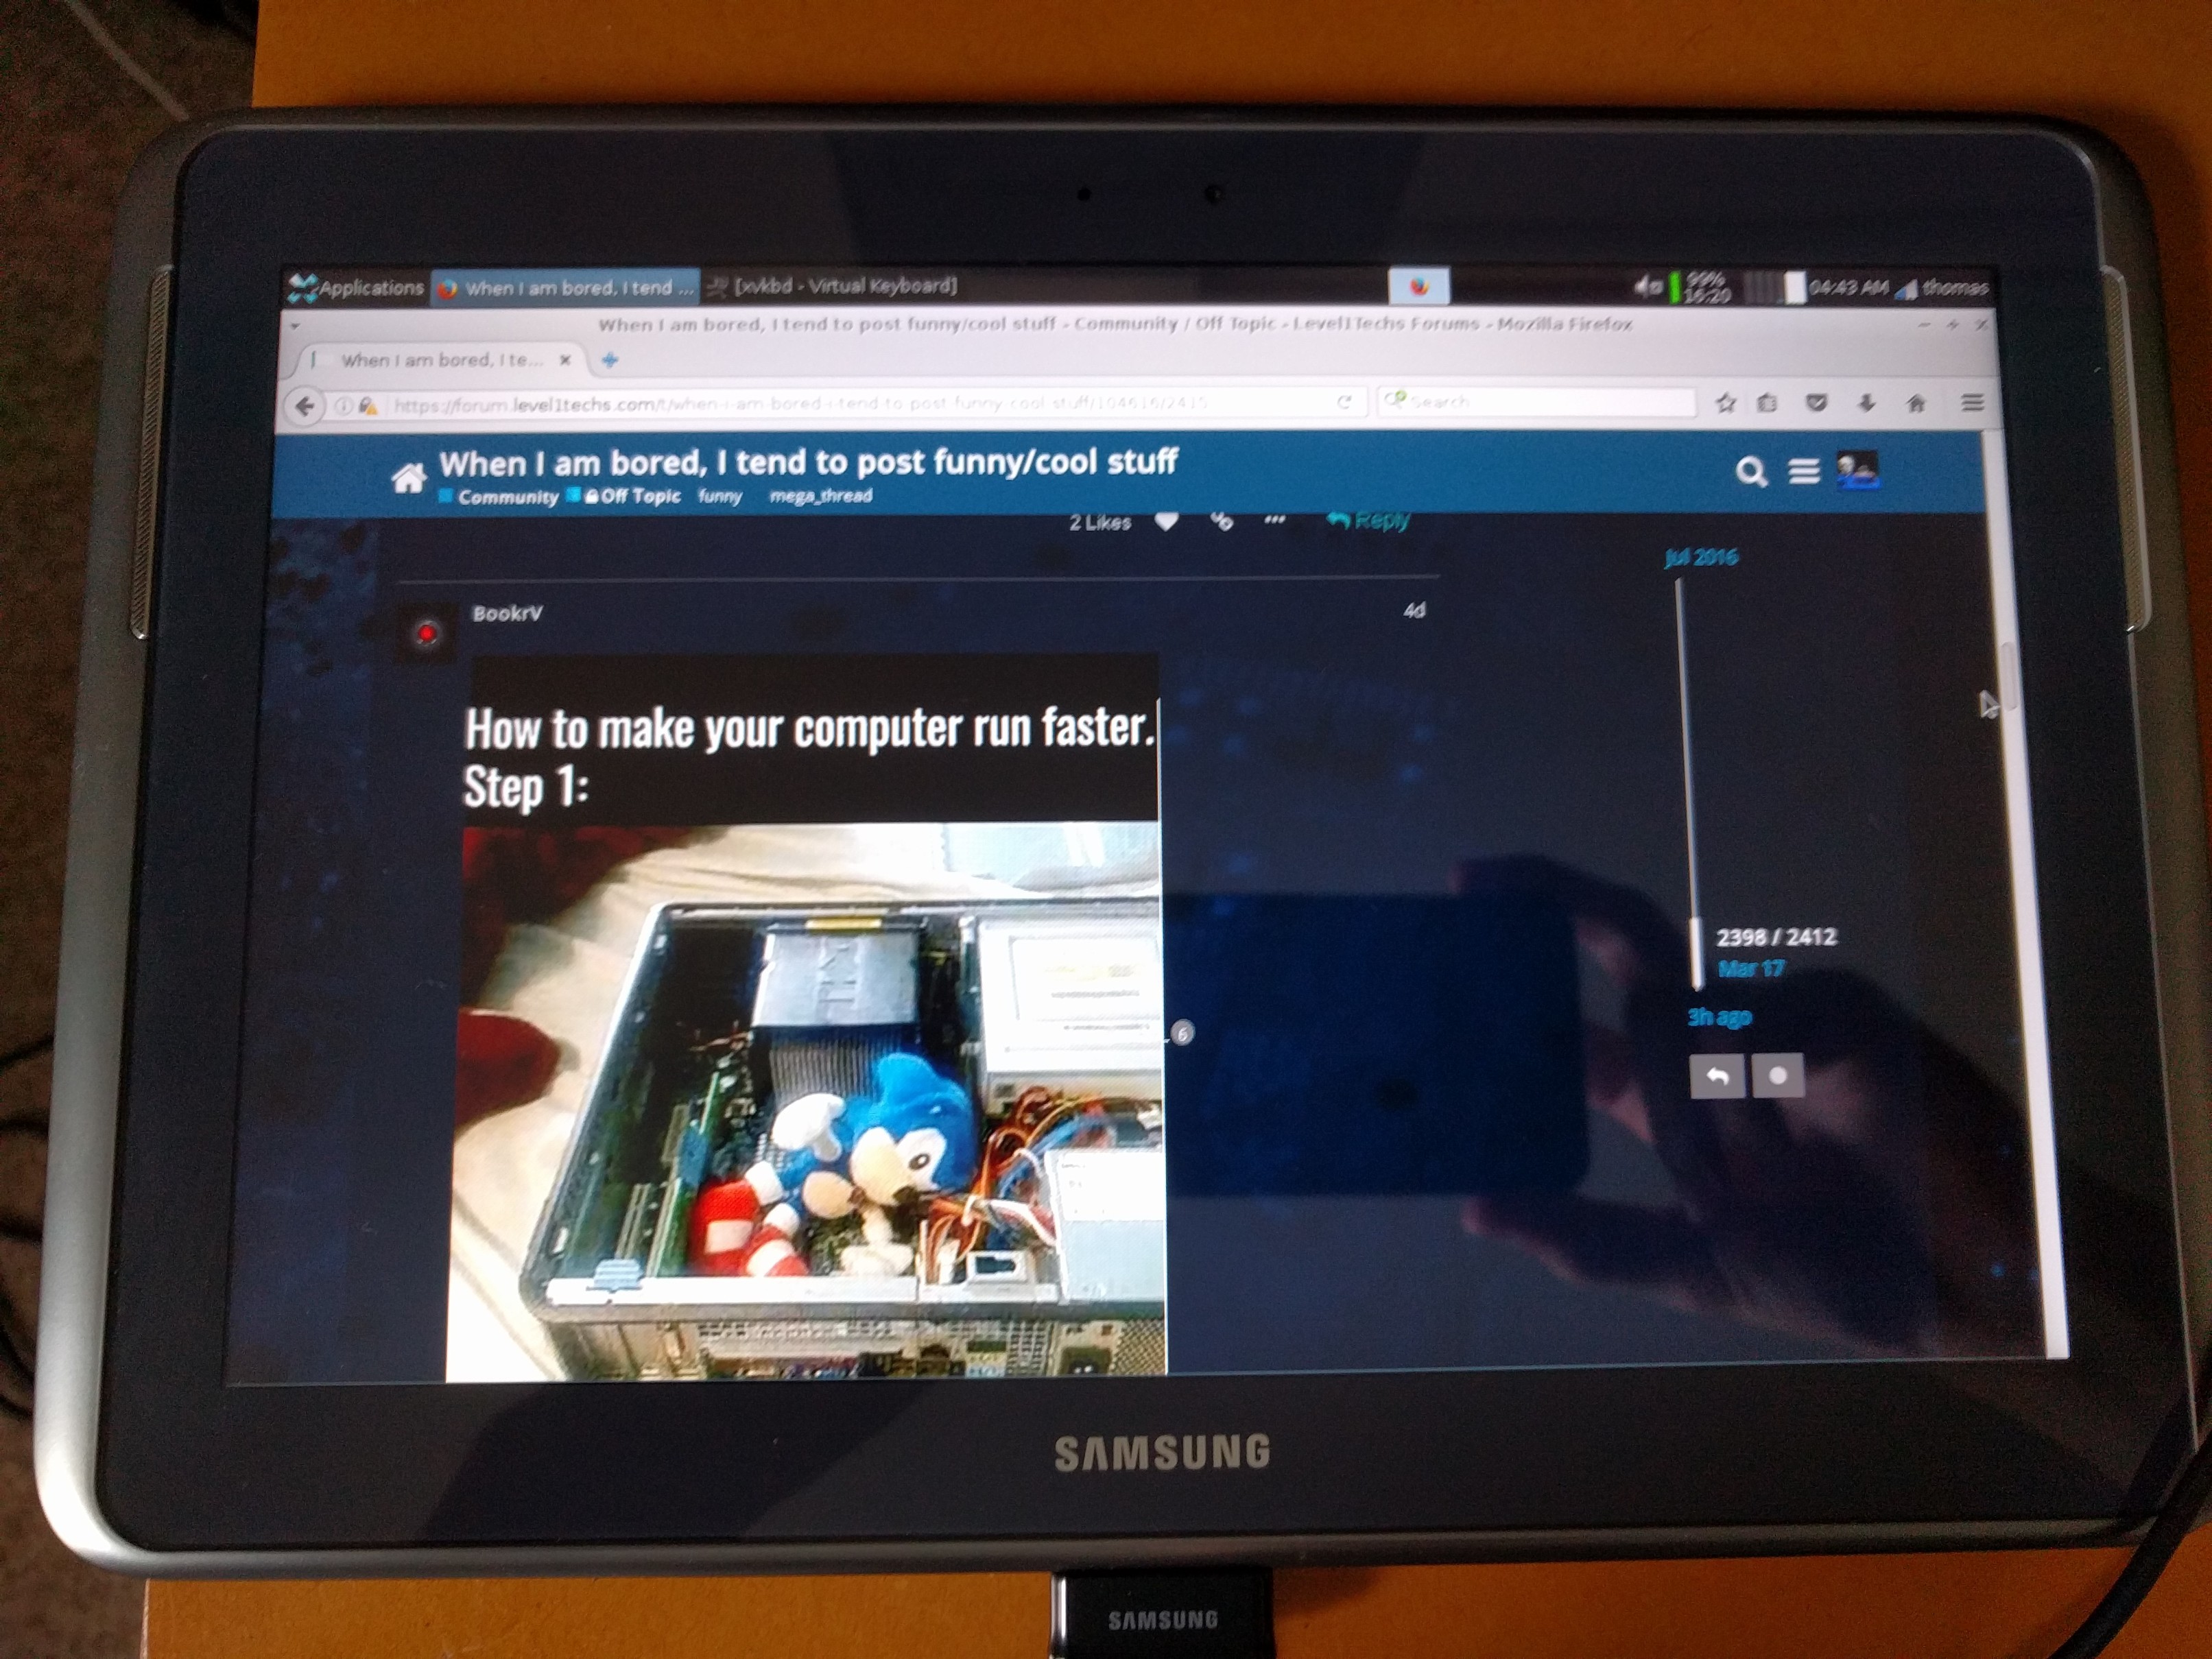
If all went according to plan, you should have Linux booting up on your screen! Again, this may take a while. Try to avoid the temptation to reboot because it’s “frozen”. It’s not.
Pics 4 Proof: