I needed a backup server but I did not want to spend any money, so I gathered the leftover parts from my past systems and built it myself.
This post describes the process in case someone finds it useful.
This server is for the purpose of backing up my main system at home. It does not have redundancy and it is not intended to be running 24/7. I just turn it on every two or three weeks, I run my backup scripts and then turn it off.
This is a long post, so I divided in the following sections:
- Building the PC using leftovers.
- Installing the OS (Ubuntu server in this case).
- Granting access to the server using SSH keys.
- “Joining” all the hard drives into one big logical volume using an LVM (Logical Volume Management).
- Backing up.
.
.
.
1. Building the PC using leftovers.
I am using an AMD Phenom II X4 945, this CPU was a beast, I used it for a long time in my main system and I have no complains. It is cooled by a really nice cooler from Thermaltake. For the RAM I am using two DDR3 sticks of 2GB each. The motherboard is a Gigabyte GA-880GM, it has a set of amazing features for those days: HDMI, 5 SATA 2 ports, digital audio with a TOSLINK output, USB 3 and Gigabit ethernet.
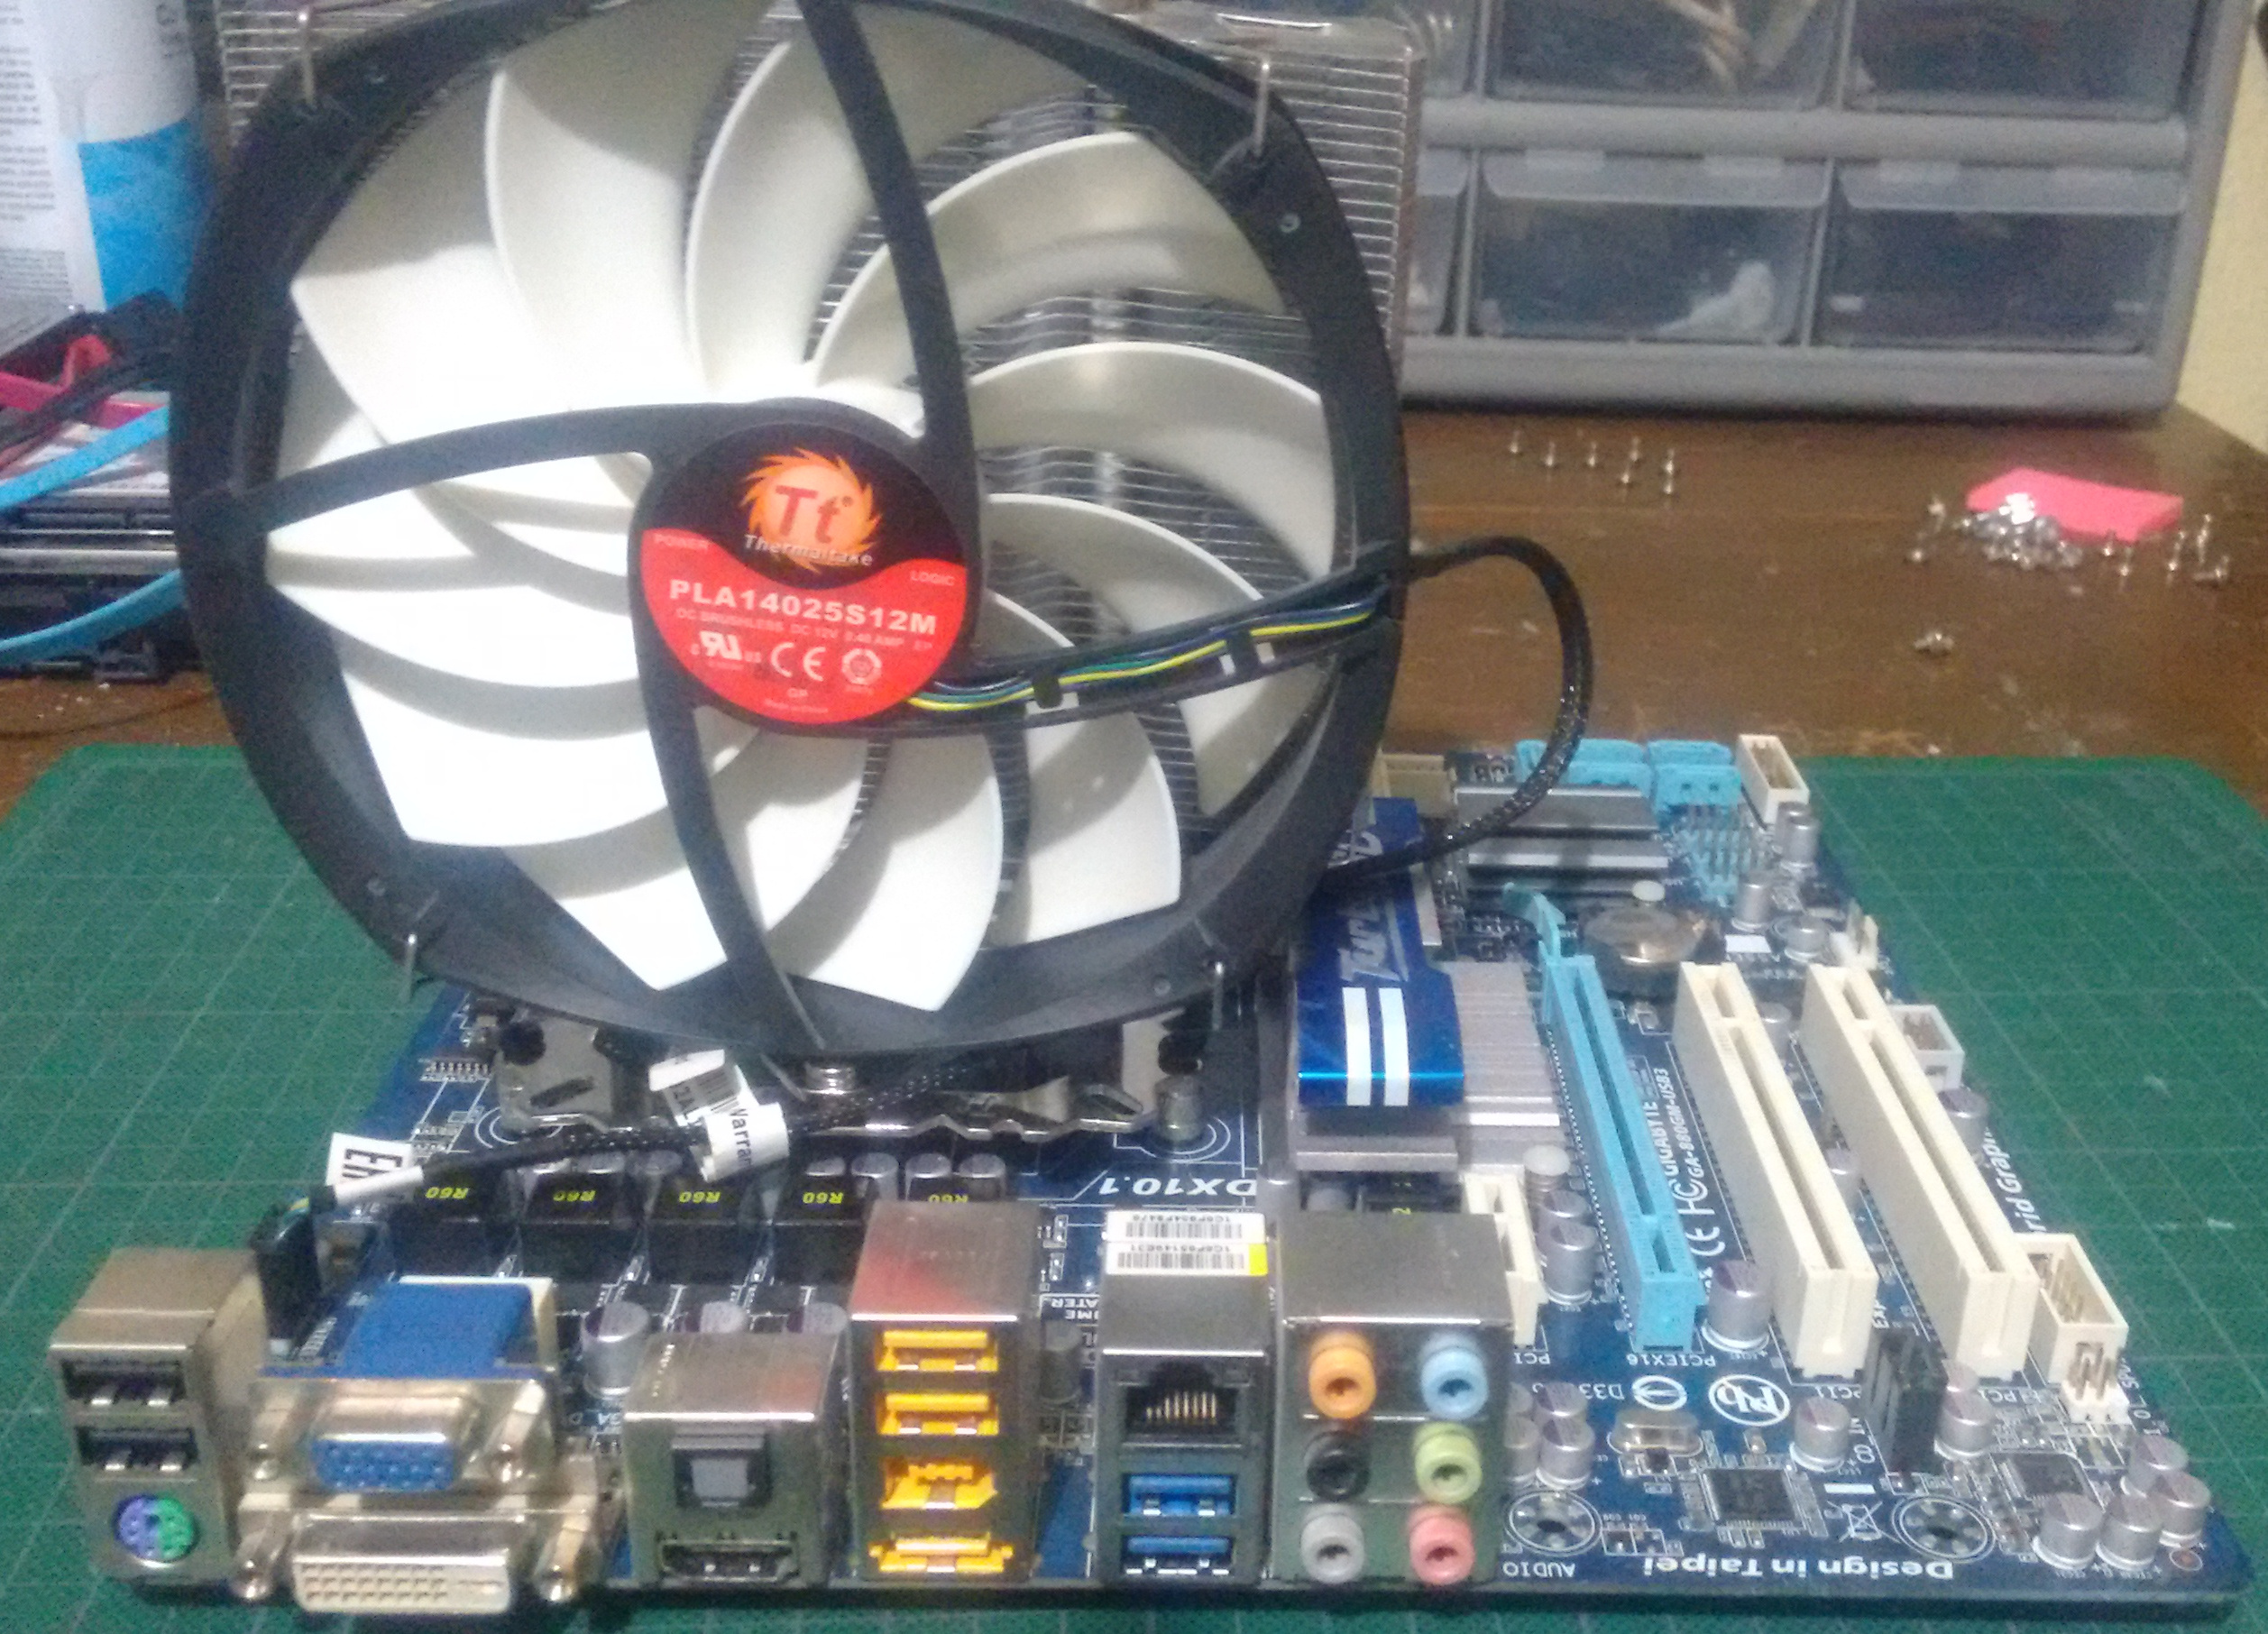
This motherboard still has IDE ports, so I am using an old ATA hard drive for the OS, leaving the 5 SATA ports for actual storage.

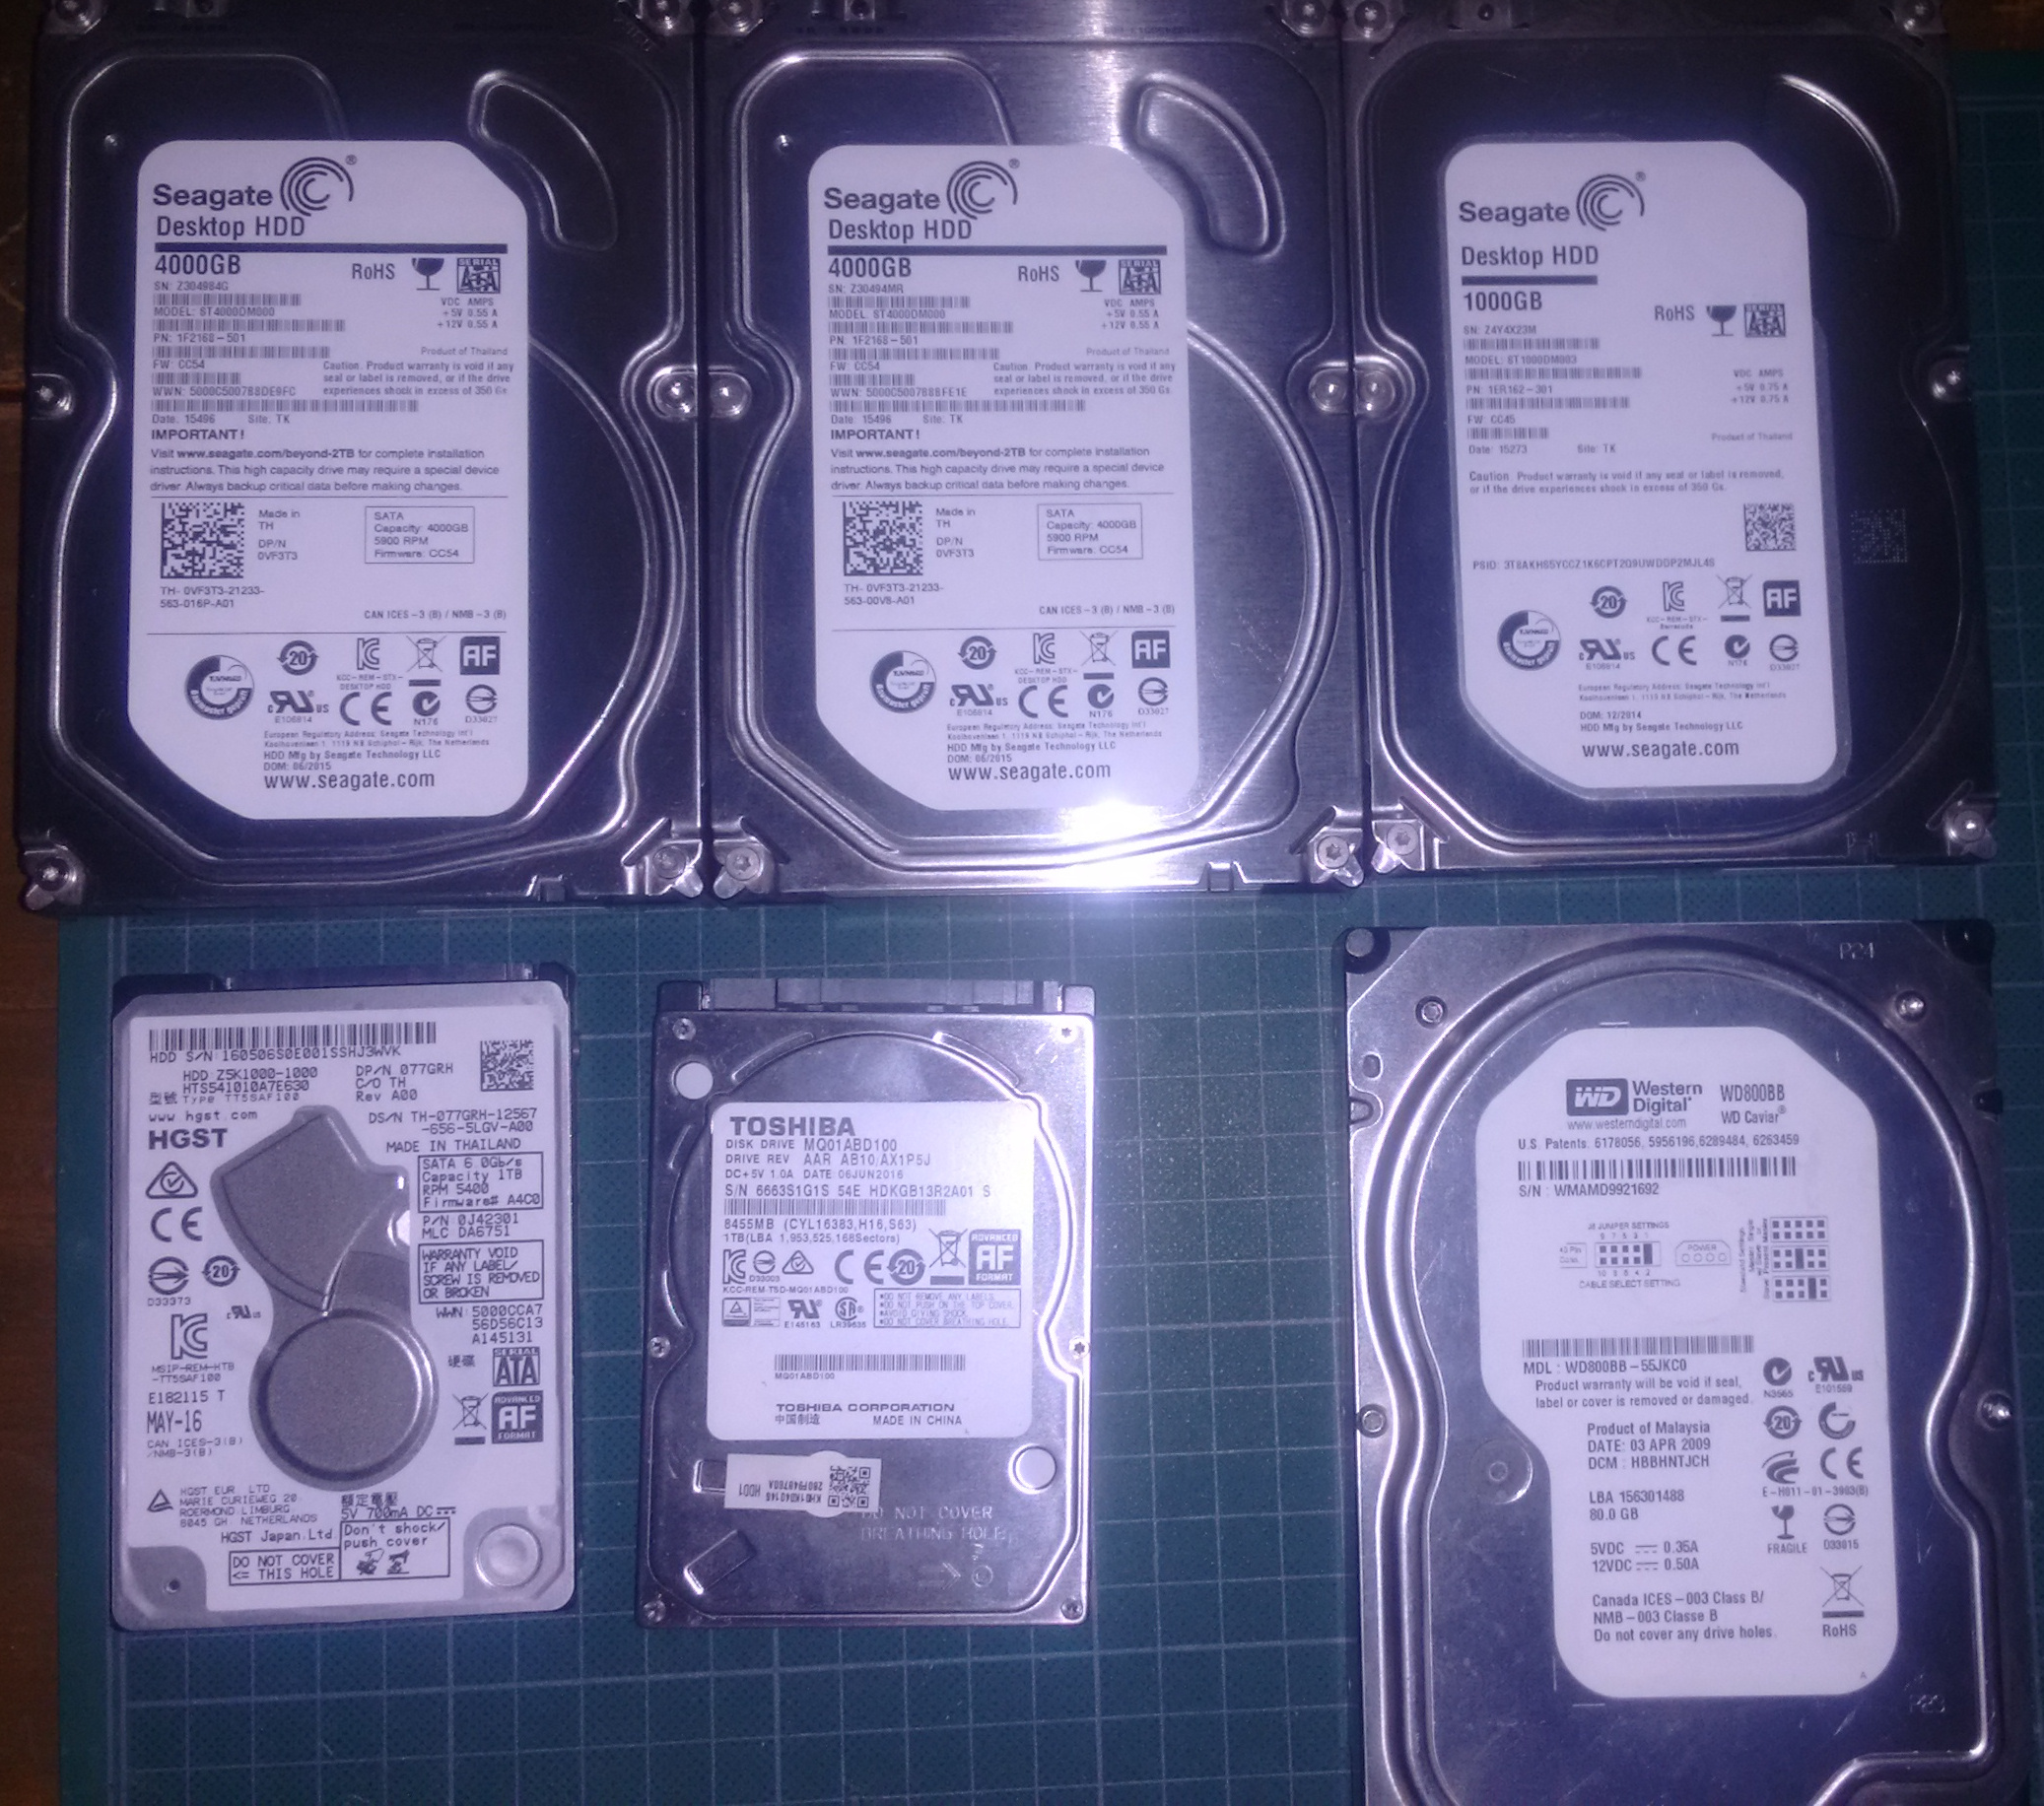
For the hard drives, I chose these six: Two Seagates of 4TB each, another Seagate of 1TB, a 2.5" HGST of 1TB, a 2.5" Toshiba of 1TB and a really old ATA Western Digital of 80 GB for the OS.
With this many hard drives, the power supply needs to be no crap. An under powered hard drive will corrupt the data. I made a table listing the current that each of the active parts of the system requires to measure the power consumption.
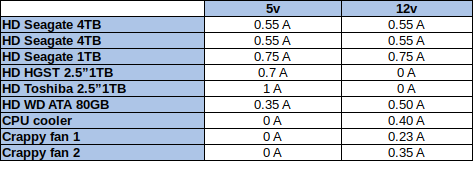
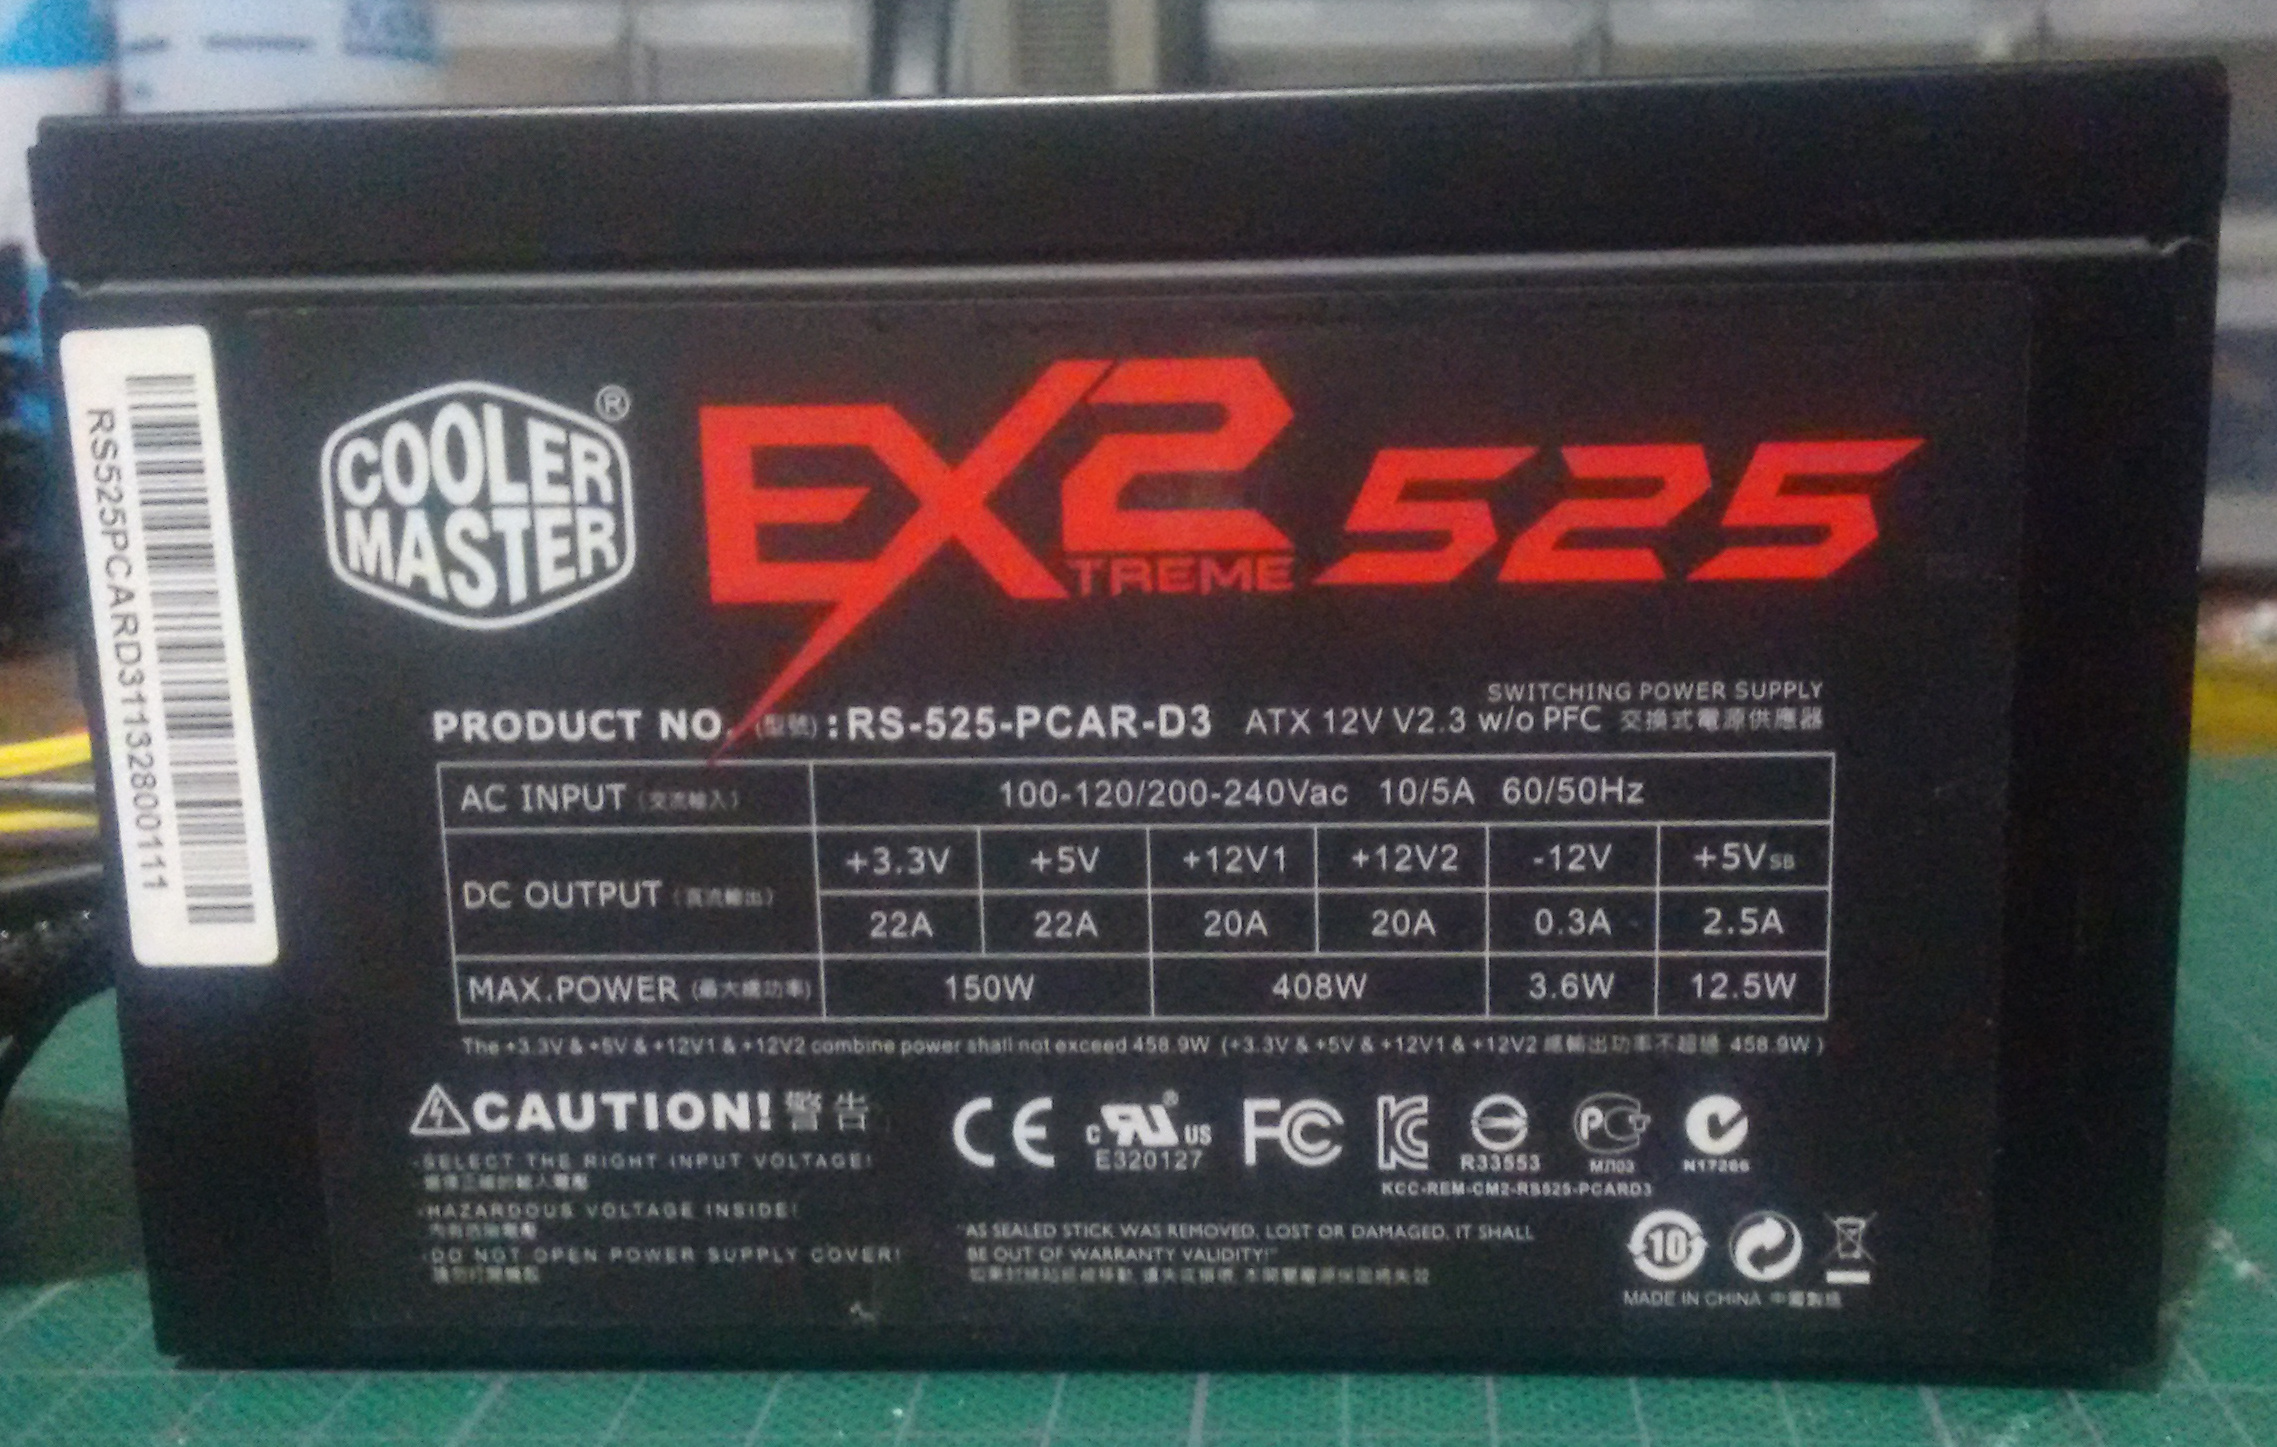
According to this table, 3.9 Amperes will be consumed in the 5 Volt rail (20 Watts) and 3.3 Amperes in the 12 Volt rail (40 Watts). The Phenom II platform will consume around 120 Watts, so the PSU should be able to supply at least 180 Watts. I have a cheap and cheerful Cooler Master Extreme 2 that is capable to supply 525 Watts. This PSU should give the system plenty of headroom.
For the case I am using an unbranded and crappy one that I have for some reason.
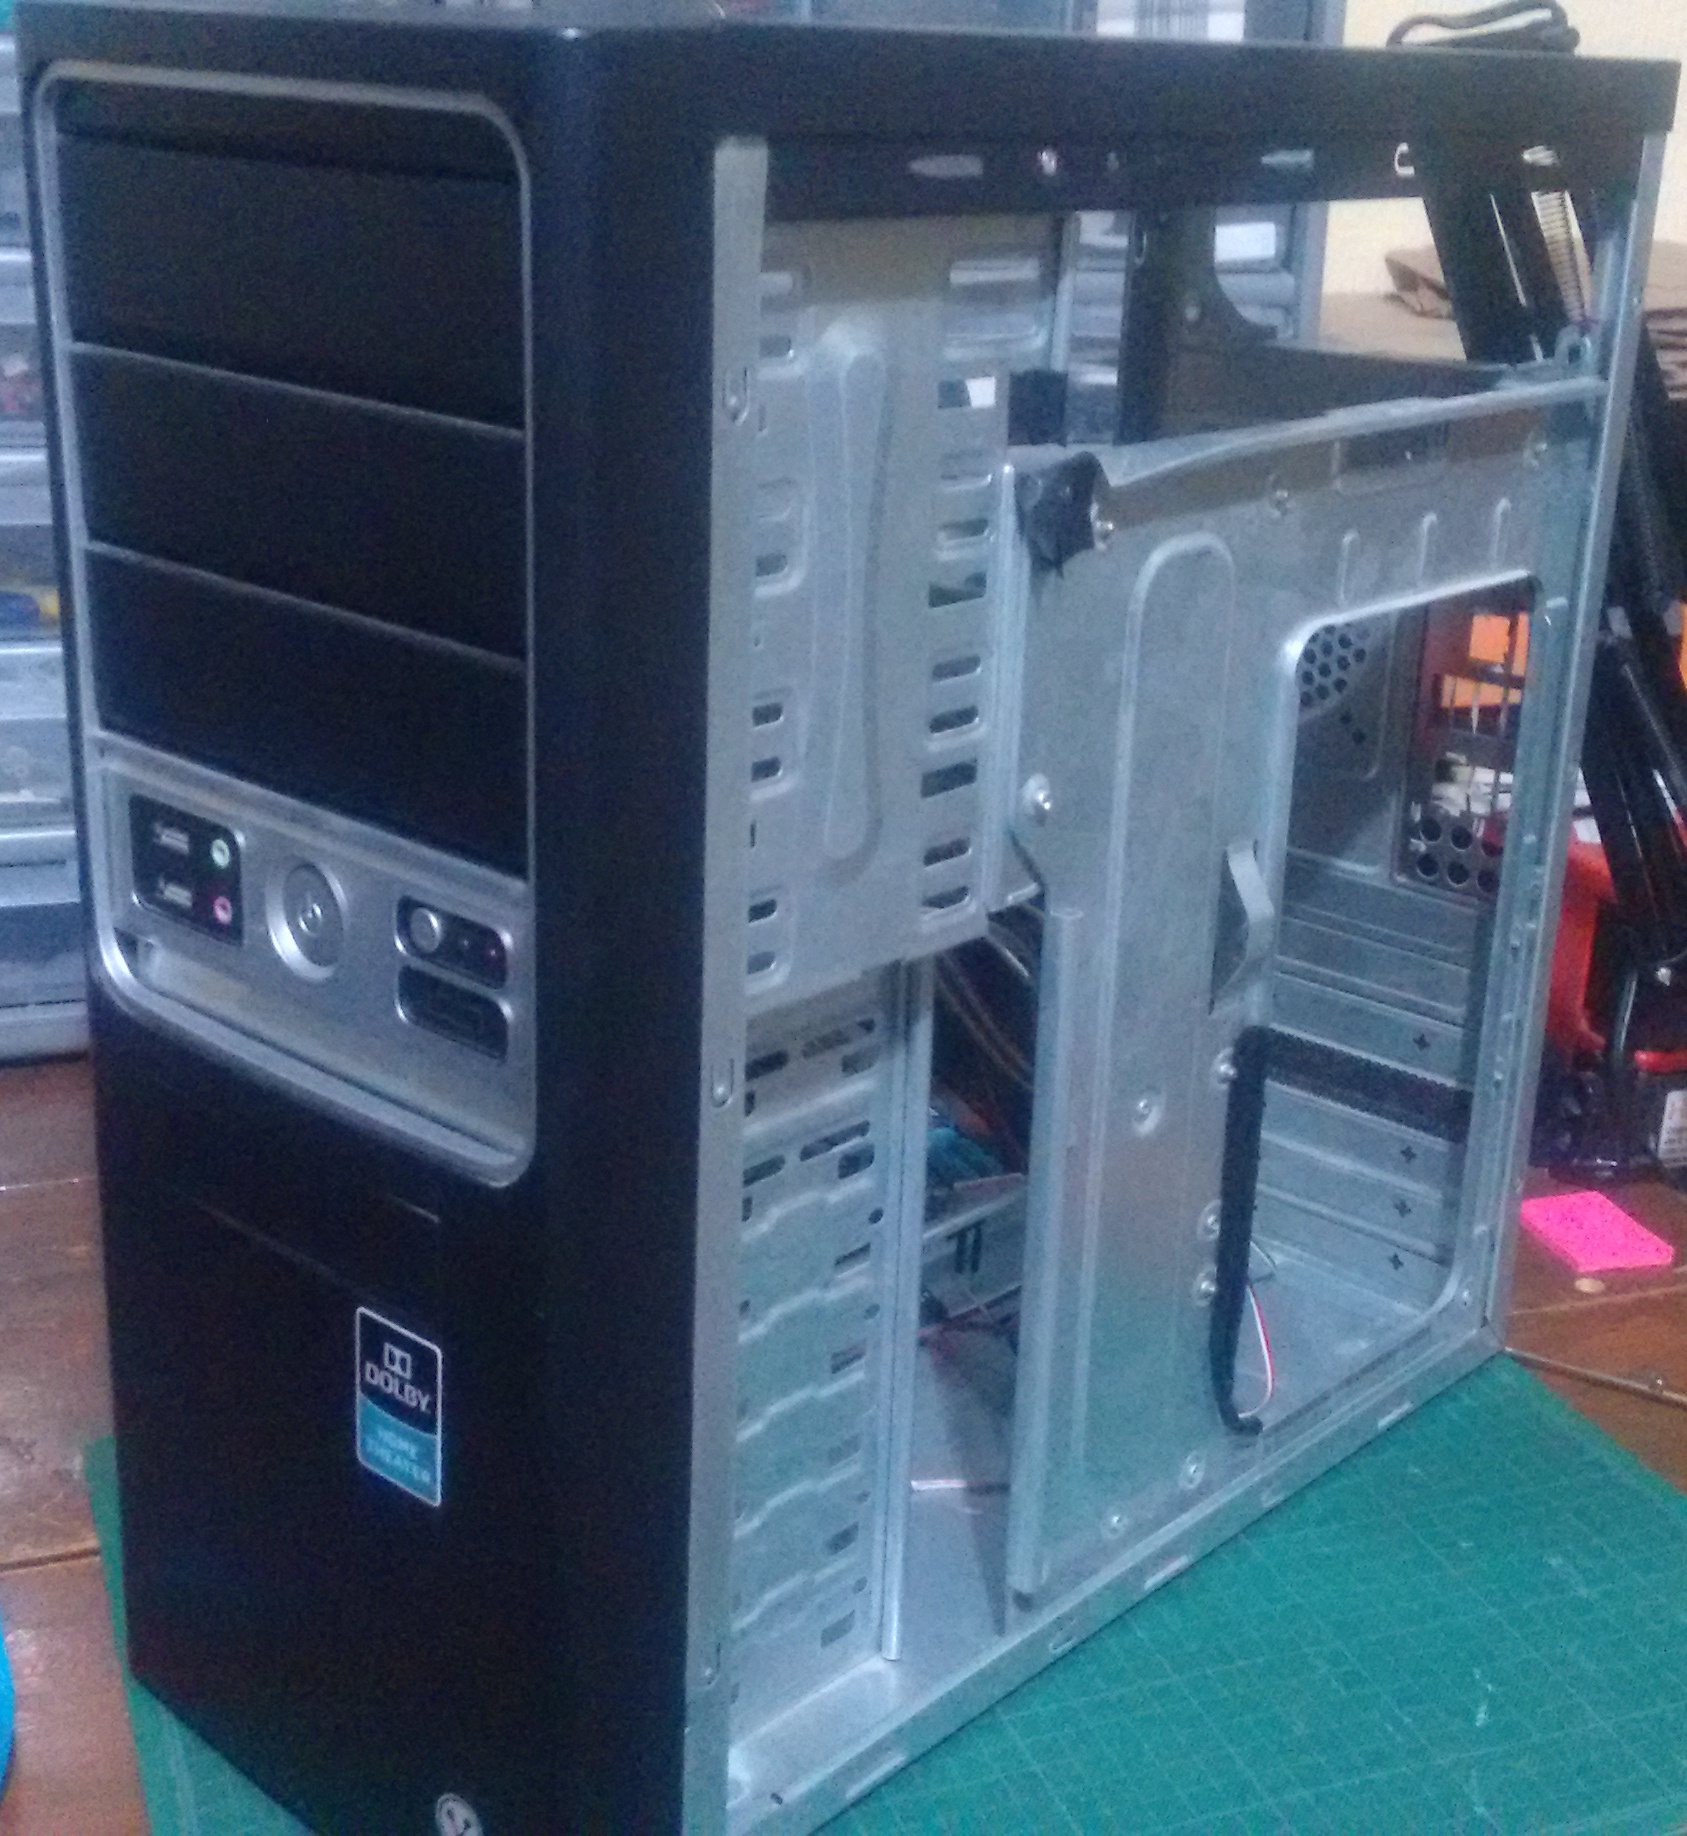
The build went without any hassle and with no cable management at all.
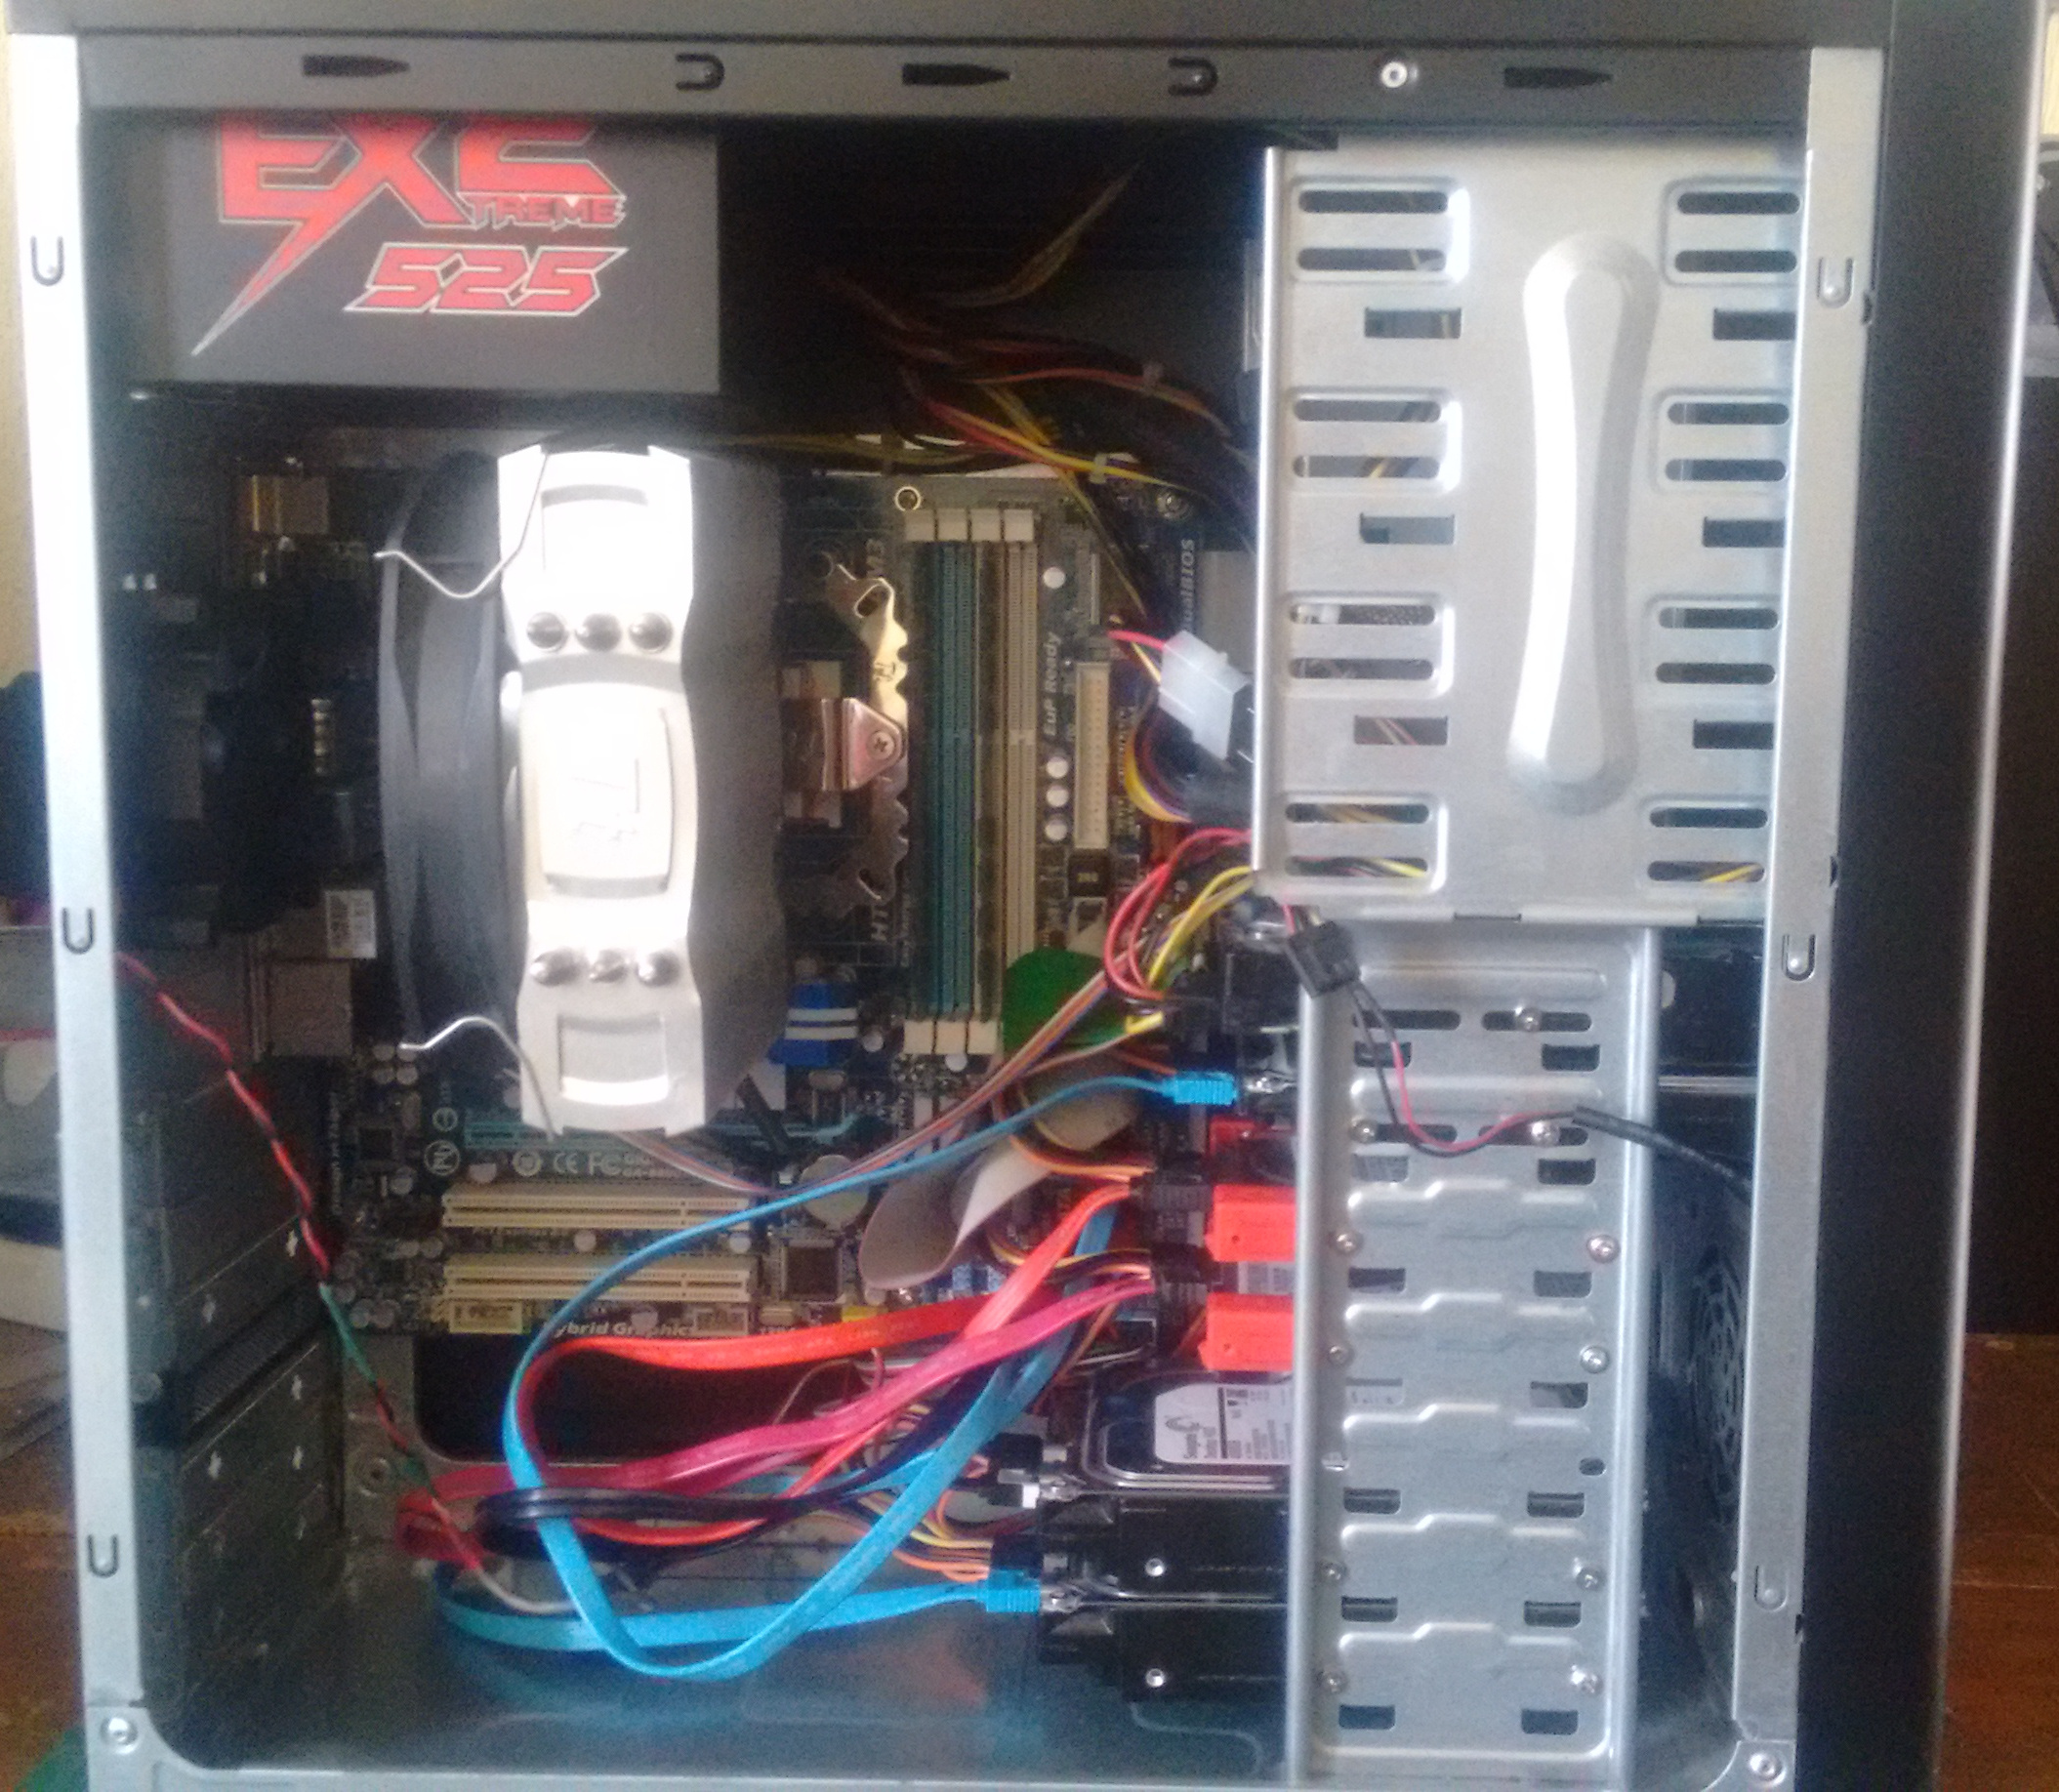
Also the CPU cooler is too tall for the case sidepanel so I had to dremel its way out.

It is no pretty, but it works for me.
.
.
.
2. Installing the OS (Ubuntu server in this case).
For the OS, I selected Ubuntu server 18.04, because it is easy to use and has a lot of support (and also because I already had a bootable USB with this distribution lying around). I connected a monitor and a keyboard and fired up the installation and also I connected it to my network (obviously not through WiFi).
I selected the old ATA 80G Western Digital as the installation drive. I let the installer to automatically create all the required partitions.
During the installation process I assigned an static IP to my server. This static IP should be beyond the address range that the network DHCP server assigns, this is to avoid having duplicated IP addresses in the network.
The installer requires the network subnet in CIDR (Classless Inter-Domain Routing) format. CIDR format is basically xx.xx.xx.xx/yy. The /yy represents the number of bits of the network prefix. For example, my network subnet in CIDR is 10.255.255.0/24 so my network prefix is 10.255.255 (3 bytes = 24 bits). The last byte is used to identify the nodes in the network. This means that my network can have connected devices with addresses from 10.255.255.0 to 10.255.255.255. This is equal to a network mask of 255.255.255.0.
I recommend reading this document from CISCO. I think it explains this concepts really well.
The installer also requires the network gateway address (which usually is the address of the router), and the IP or IPs of the DNS servers, I use Google’s public DNS (8.8.8.8,8.8.4.4).
The installer gives the option to enable OpenSSH server, it should be enabled. This is the way to interact with the server.
As any OS installation, a user should be created. For this post, this user will be user_in_server.
After the installation finished, I rebooted the server and unplugged the monitor and keyboard.
.
.
.
3. Granting access to the server using SSH keys.
SSH is the way I will interact with the server. If you are not familiar with SSH, this is the definition according to https://www.ssh.com/ssh/protocol: “The SSH protocol (also referred to as Secure Shell) is a method for secure remote login from one computer to another”.
To login to the server from my main system. I just opened a terminal and typed:
ssh user_in_server@server_ip
Then I entered the password of user_in_server. If you use OSX, the process is exactly the same, but If you use Windows, you will need something like PuTTY to login to your server.
Typing the user_in_server password everytime I login to the server is not practical, so I use SSH key pairs to authenticate instead (this also allows to automate the login to the server, which will be handy during the backup process).
To create an SSH key pair, In my main system, I opened a terminal and typed:
ssh-keygen
This command generates two files in $HOME/.ssh/: id_rsa (private key) and id_rsa.pub (public key). The private key should never leave your main system and should never be shared. The public key is meant to be shared and it should be put in your server to authenticate your login from your main system. Check this document from SSH.com for a detailed description of SSH key pairs.
Again, if you use OSX, the process to generate the SSH key pair is exactly the same, but if you are using Windows, you will need a program like PuTTYygen to create your keys.
If you open the id_rsa.pub file with a text editor, you should see something like this:
ssh-rsa afddklfheuldfafhrjdlshf2342345w3452== my_key
id_rsa.pub is basically a CSV file separated by whitespaces of just one record. The first column is the type of key, the second column is the key itself and the third column is a label used to easily identify the key.
The id_rsa file should not be readable by any other user in the system. Linux is a paranoid OS and its programs mostly share the same principle, so ssh will not allow the use of the key if its permissions are “too open”. I made sure that the private key is only readable by my user in my main system using chmod:
chmod 400 id_rsa
Next, in the server, I created a directory called .ssh, inside the home directory of user_in_server. Inside this directory, I created a file called authorized_keys. The purpose of this file is to contain the public keys of those users that will be able to login to this server (through user_in_server). I copied the contents of my public key file (id_rsa.pub) into the authorized_keys file.
The file authorized_keys is a CSV separated by whitespaces, in which each record is a public key of an authorized user. In this case, as I am the only one using this server, the authorized_keys file is an exact copy of the id_rsa.pub file.
Once the authorized_keys file is in place, I logged out of the server and logged in again:
ssh user_in_server@server_ip
But this time, with the use of the keys for authentication, the login is without the password.
.
.
.
4. “Joining” all the hard drives into one big logical volume using an LVM (Logical Volume Management).
I joined every hard drive (except for the old ATA 80G Western Digital that hosts the OS) into one big logical volume volume using an LVM. This allows me to use all the hard drives as “one big” hard drive.
First I needed to be sure that the OS detects all the hard drives. So logged in to the server and ran:
sudo fdisk -l
According to the fdisk manpage: “fdisk is a dialog-driven program for creation and manipulation of partition tables”.
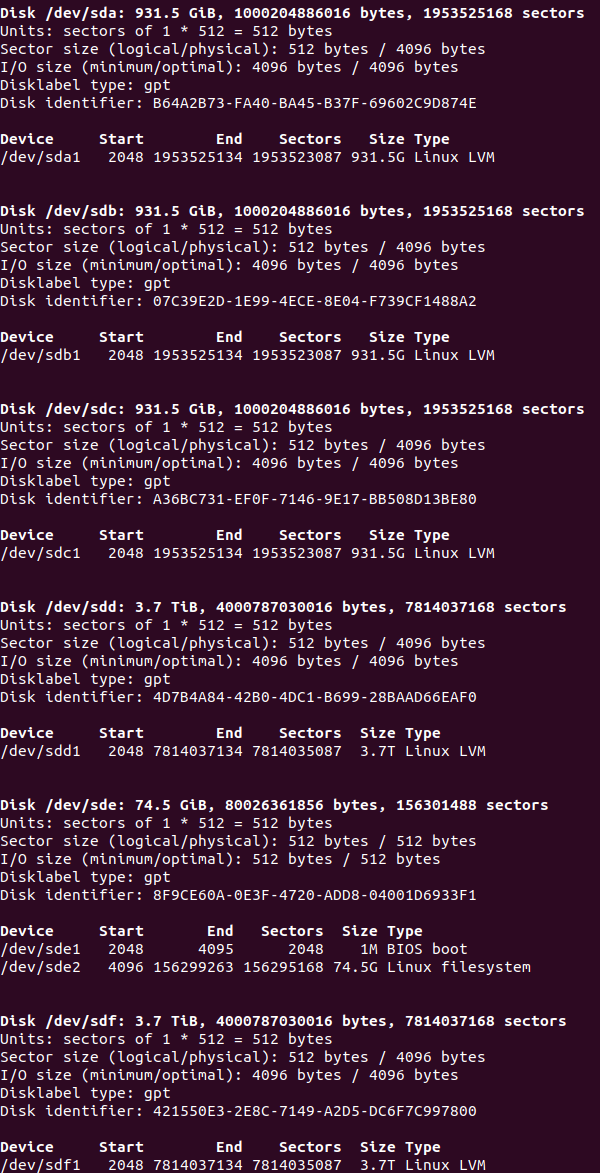
The -l parameter stands for “list”, so fdisk -l lists all the hard drives connected to the system and their partitions. In my server the output was:

/dev/sda, /dev/sdb, /dev/sdc, /dev/sdd, /dev/sde and /dev/sdf are the hard drives.
/dev/sde is the old ATA 80G Western Digital that contains the OS. It has two partitions: /dev/sde1 which is the boot partition and /dev/sde2 which is the OS root file system. So this drive and its partitions are untouchable.
The hard drives are recycled from past systems, so some of them (/dev/sdb and /dev/sdd) had previous partitions, so I removed them. For /dev/sdb I typed:
sudo fdisk /dev/sdb
When the fdisk command line prompted, I typed “d”, this will remove the last partition in the hard drive. /dev/sdb had two partitions, so I did it twice, and then typed “w” to write the changes to the disk. I repeated the same process with the /dev/sdd drive.
Once all the previuos partitions for all the drives are cleared (Except /dev/sde), I had to be sure that all the drives had a GUID Partition Table (GPT). The use of the old MBR partition table is not encouraged because of its limitations compared to GPT, most noticeable is that MBR cannot have partitions bigger than 2TB.
As you can see in the output of sudo fdisk -l, In this case, all the drives already have a GPT, but if not, just type:
sudo fdisk your_disk
Then type “g” and finally “w” to write the table to the disk.
Once I was sure that every drive has its GPT, the next step is to create a Linux LVM partition in every drive. So, for the /dev/sdd drive I did:
sudo fdisk /dev/sdd
Then I typed “n” to create a new partition. fdisk asked the index of the partition and the start and end of the new partition. I left the default values, so once created, this new parttion occupies the all the space of the disk.
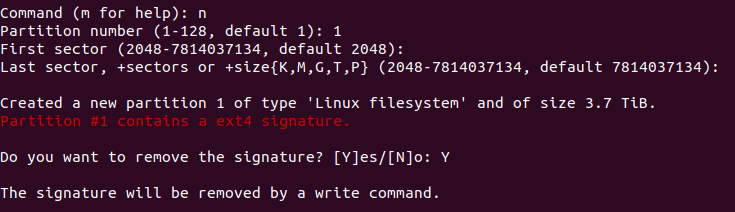
This drive had a previous ext4 partition, so fdisk warned about the ext4 signature. It was just a warning, the signature disappeared once I wrote the changes to the disk.
By default, when created a new partition, its type is Linux filesystem, so I changed it to Linux LVM. I typed “t” and then typed the partition type value. For Linux LVM, the value is 31. In this step, you can type L and fdisk will display a list of all the partition types supported, so you can see where that 31 comes from.

Then I typed “w” to write the changes to the disk.
I repeated the same process with /dev/sda, /dev/sdb, /dev/sdc and /dev/sdf. I double checked by running:
sudo fdisk -l
The output shows that /dev/sda, /dev/sdb, /dev/sdc, /dev/sdd and /dev/sdf have one Linux LVM type partition each.
At this point I had the disks ready for the LVM. I started with /dev/sda, as you can see in the previous picture, its “Linux LVM” partition is /dev/sda1. First I created an LVM using only this partition and then I added the other ones, one by one, expanding the LVM.
An LVM has three components (as I understand it):
- Physical volumes: Are the partitions of the actual disks.
- Volume groups: Are groups of one or more physical volumes.
- Logical volumes: A logical volume is a part of a volume group. So a volume group can have multiple logical volumes. The filesystem is created in a logical volume.
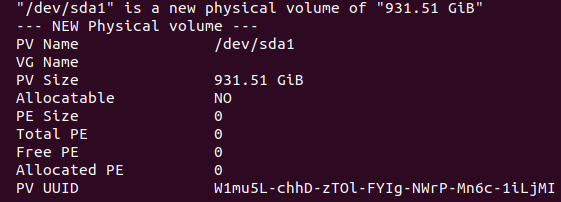
First I created a physical volume using /dev/sda1, I typed:
sudo pvcreate /dev/sda1
I checked the physical volume with:
sudo pvdisplay
The output was:
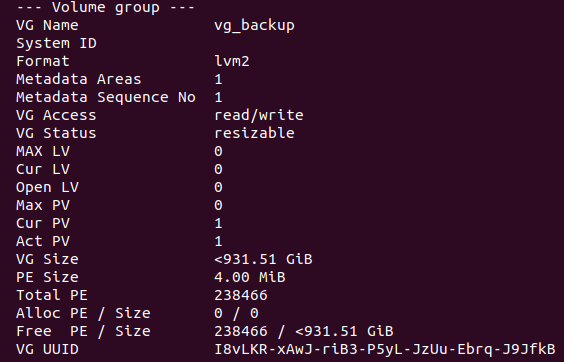
Next, I created the volume group. A name is required for each volume group you create. I named mine “vg_backup”. I also assigned the physical volume created in the previous step to the new volume group:
sudo vgcreate vg_backup /dev/sda1
So, at this point, I had created a volume group named “vg_backup” that contains the physical volume /dev/sda1.
I checked the volume group with:
sudo vgdisplay
The output was:
Then, I created the logical volume of the size of all the available space of the volume group “vg_backup”. A name is also required for the logical volume, I named mine “lv_backup”. I ran:
sudo lvcreate --name lv_backup -l 100%FREE vg_backup
After this, I ran sudo fdisk -l again, and this time there is a new entry:

/dev/mapper/vg_backup-lv_backup is the logical volume “lv_backup”. At this moment a filesystem should be created into the logical volume so I can start writng data. I created an ext4 filesystem:
sudo mkfs.ext4 /dev/mapper/vg_backup-lv_backup
Next, I created a directory in the server in which I mounted the logical volume (as a normal ext4 partition). So I created a directory called /home/user_in_server/backup/ and mounted the logical volume “lv_backup” in it.
sudo mount /dev/mapper/vg_backup-lv_backup /home/user_in_server/backup/
To avoid permissions issues I assigned the ownership of “/home/user_in_server/backup/” to the user “user_in_server”.
sudo chown -R user_in_server:user_in_server /home/user_in_server/backup/
At this point I had a fully functional LVM with an ext4 filesystem, but I was only using one partition (/dev/sda1). So the next step was to add all the other partitions of the other disks to the logical volume “lv_backup”.
The next parttion that I added was /dev/sdb1, so I created the physical volume first:
sudo pvcreate /dev/sdb1
Then I added the newly created physical volume to the volume group “vg_backup” that I created previously.
sudo vgextend vg_backup /dev/sdb1
After the execution of this command, the physical volumes /dev/sda1 and /dev/sdb1 belong to the volume group “vg_backup”. I ran sudo vgdisplay to check the volume group and this was the output:
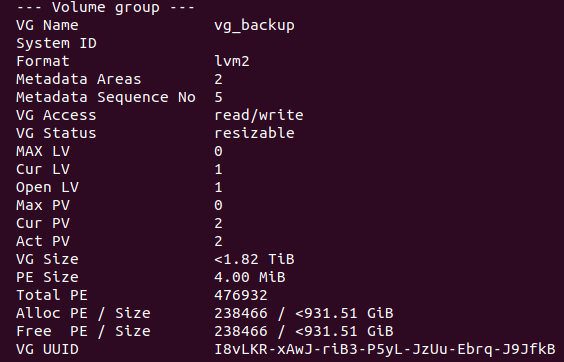
The VG Size was at that moment of 1.82 TB, so the volume group was expanded successfully.
Then I expanded the logical volume “lv_backup” to use the 100% of the space of the volume group “vg_backup”:
sudo lvextend -l +100%FREE /dev/mapper/vg_backup-lv_backup
lvextend extends the logical volume to a size less or equal than the size of the volume group it belongs to. I ran a sudo fdisk -l to check the size of the logical volume “lv_backup”:

As the image shows, the size of “lv_backup” was 1.8 TB at that moment.
It should be noticed that I had resized the logical volume, but its ext4 filesystem did not change, it should be resized in a separate operation. So I did:
sudo resize2fs /dev/mapper/vg_backup-lv_backup
When the resize2fs operation finished, the ext4 filesystem occupied all the available space of “lv_backup”.
I repeated the same steps for /dev/sdc, /dev/sdd and /dev/sdf. And the end result is that the logical volume “lv_backup” is 10 TB. This is its entry from sudo fdisk -l:

The last step is to configure the OS to mount “lv_backup” into “/home/user_in_server/backup/” automatically on boot, I added an entry to the /etc/fstab file. But first I needed to know the UUID of the “lv_backup” volume, so I ran blkid:
sudo blkid
blkid (according to its man page) is a “command-line utility to locate/print block device attributes”. This were the attributes of “lv_backup” from the command output:
I copied the UUID and added this entry to the /etc/fstab file:
UUID=b986aceb-41bc-4bb3-9635-915532f4bfea /home/user_in_server/backup/ ext4 defaults 0 0
The /etc/fstab file contains the “Filesystem table”. The OS uses it to know where to mount a specific partition. It is basically a CSV file separated by whitespaces. These are its columns:
- Filesystem: The identifier of the partition (UUID).
- Mount point: /home/user_in_server/backup/ in this case.
- Filesystem type: ext4 in this case.
- Options: I used “defaults” to avoid weird stuff.
- Dump: This is not used anymore in modern systems, so I disabled it.
- Passing: Tells the OS to perform automatic filesystem checks or not. I leaved it at 0. I prefer doing the checks manually.
I rebooted the server to check that it worked. At this point I was ready to start backing up my data.
.
.
.
5. Backing up.
To backup my data I use rsync. According to its man page, “rsync is a fast, versatile, remote (and local) file-copying tool”.
And indeed, It is quite versatile. One of its features is that It allows to copy files from one computer to another over SSH. This is when the SSH key pairs become useful.
Using rsync is quite straight forward. This is the command I use to backup my main system Documents folder:
rsync -azvhP --delete /home/user_in_main_system/Documents/ user_in_server@server_ip:/home/user_in_server/backup/Documents/
-
a option means “archive mode”, it copies files recursively and follows and preserves symbolic links.
-
z compresses file data during the transfer.
-
v means verbose (obviously).
-
h is “human readable”, so the output is user friendly.
-
P allows to resume the backup in case it stops for some reason and also shows the progress of the transfer.
-
delete By default, rsync does not delete files from the backup system. With this option, files deleted in the main system will also be deleted in the backup.
Your network gear speed should be at least 1 Gigabit, or it will be a really slow process.