Kla3`s guide to custom watercooling!
Hello good people, after posting some pictures of some of my watercooled builds on this forum, I heard that the wish for a guide to custom watercooling was much wanted, so here is my go at it!
This is by no means a 100% accurate factual guidline, this is just me sharing my experience about this subject, and if you think my guide is pointless and full of BS, feel free to carry on closing this tab on your browser, and carry on with your day.
One of the first things I would like to say, is that English is not my first language, its actually my fourth, so sorry in advance if my grammar or spelling is way of.
1:
First step is to figure out what the total TDP of your system will be, this is crucial to selecting the right components in your loop.
They way I find out my TDP is taking the (bullshit) rated TDP from the manufacturer, and add 45% on the GPU side of things, and I like to double it on the CPU, the more headroom you have the better, since this will enable you to run your fans and pump at lower RPM, thus lower noise levels.
Lets create a fictional build with a loop that includes the CPU and GPU in a Fractal Design S2, since this should be a pretty standard build for most first-time watercoolers.
CPU: AMD 3700X - Rated TDP 65w x 2 = 130w (Should be fine for stock/PBO operation)
GPU: GTX 1080ti - Rated TDP 250w + 45% = 362.5w (leaves room for a good OC)
This leaves us with 492.5w total TDP, this should give us plenty of headroom on both the CPU and GPU side for some sweet sweet overclocks, we all want that right?
If you think that I’m aiming a bit high for the TDP targets, I do this because I like my systems to be pretty silent even when overclocked, if you have questions about this step, please feel free to DM me, I’m happy to help!
2:
Step two involves figuring out how many/big rads we need to meet our TDP target, so to figure this out we have to look at specs on radiators with given fans mounted.
Since I tend to use EK radiators and EK Vardar fans for my loops, I will use their chart for this, this can be found on their site, and I will post a pic for this in the bottom of this step!
So, how many rads can we fit in our case, and how big?
We chose the Fractal Design S2, so lets look up the specs for this case on their website:
Top radiator support 420mm
Front radiator support: 360mm
Base radiator support: 280mm
I would like to make some corrections to this since this is a bit misleading, I know from experience, that fitting a 420 up top, and then fitting a 360 in the front will be pretty difficult, if not impossible since the top 420mm will crash into the top of the 360mm in the front!
So my advice here, is to put a thin 420mm radiator in the top, and a thin 240mm in the front, since this will enable us to have some space for the pump/res combo in front of the 240mm that we are mounting in the front.
When I say thin radiator, I mean the EK CoolStream SE, this radiator is only 28mm thick, so there is plenty of room behind it, even after we mount fans to it!
So, EK CoolStream SE 420mm up top and a EK CoolStream SE 240mm in the front, this gives us good surface area for dissipating all that heat, now lets look at some charts to figure out if we have enough heat dissipation to run our fans at a low enough RPM.
This can easily be done with the nice chart that EK provides on they website
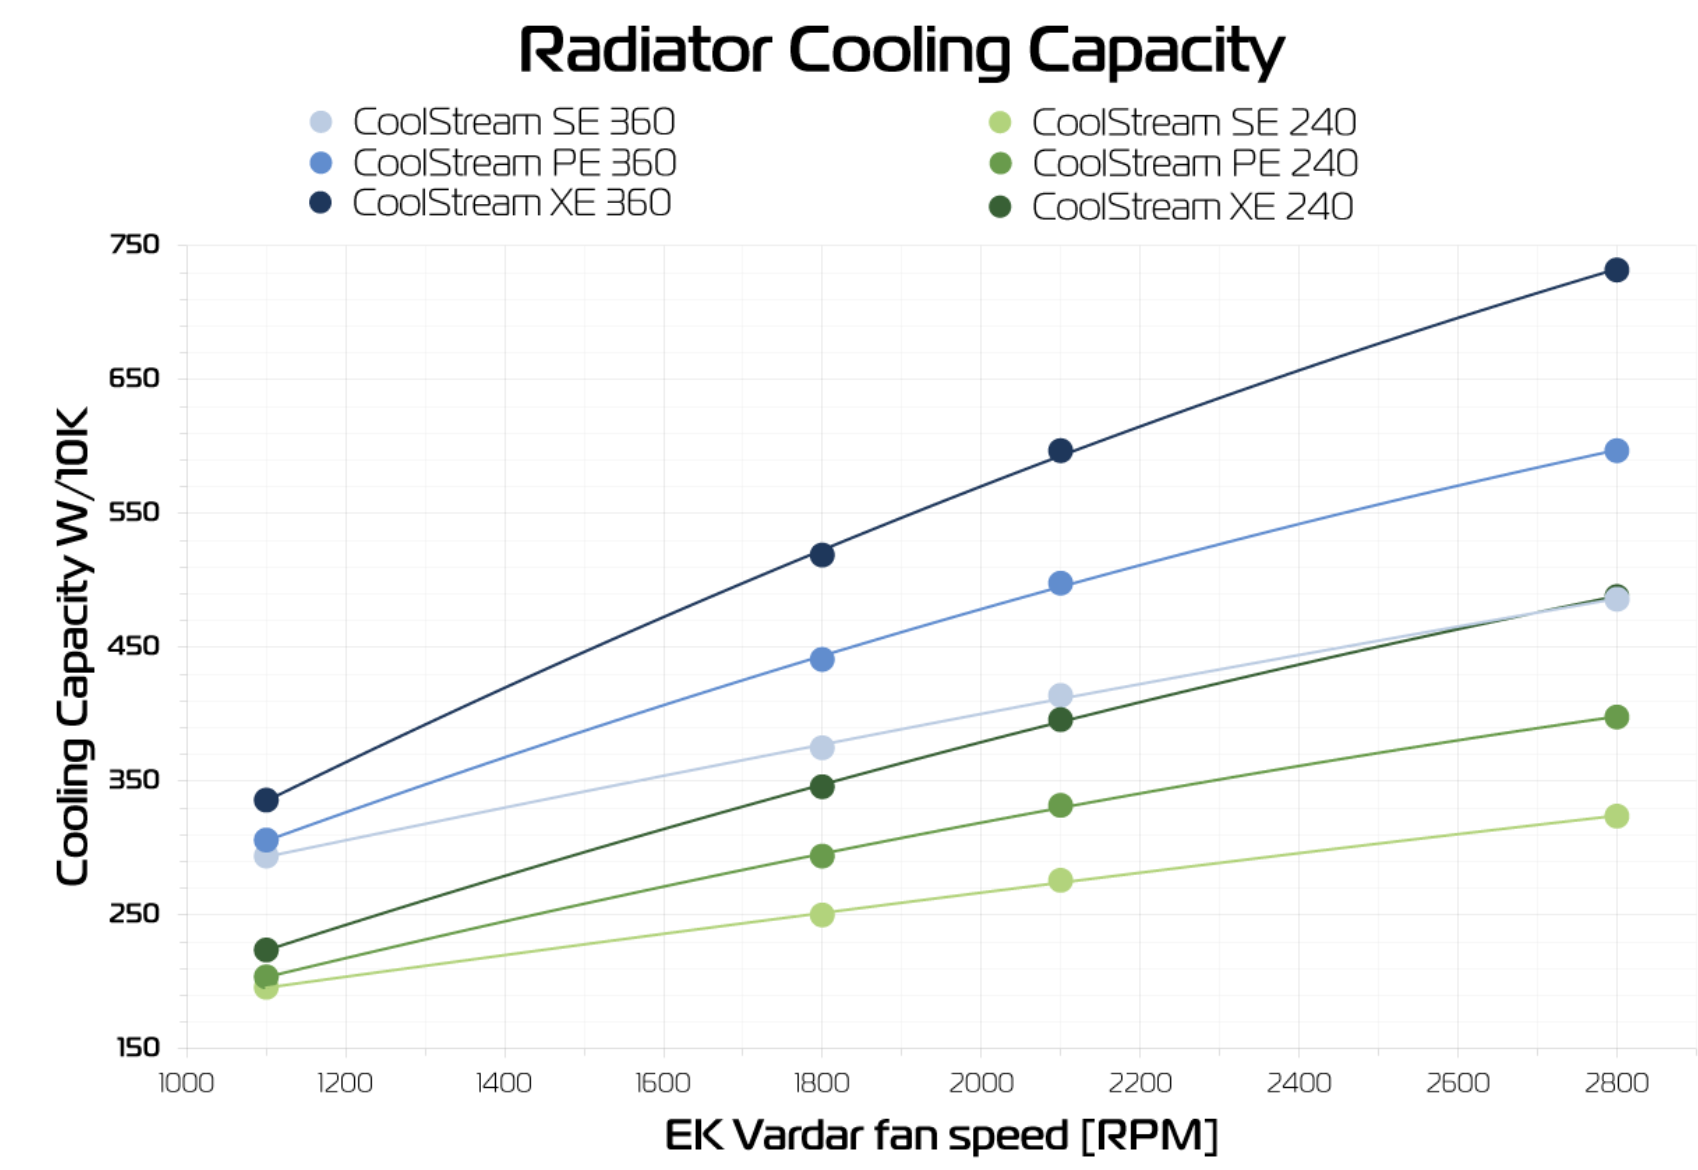
Looking at this chart, we can identify the rads we picked out, and go from there, but I see there Is no SE 420mm listed in this chart, but we can just use the SE360mm as a guide and do the maths on it;
SE 360mm with EK Vardar fans at 1800 RPM = 450w
SE 240mm with EK Vardar fans at 1800RPM = 250w
This should give us 700w of heat dissipation at a pretty low noise level even when the system is at max load and heavily overclocked, so I think we are golden, especially when we consider that we went for the 420mm rad, not the 360mm.
This chart can also be converted into other brands if you want to save some money and not buy EK stuff, just double check the specifications of the parts you buy, and cross-reference them with the EK parts, if the specs are pretty much similar, you /should/ be fine
Questions? Feel free to ask me!
3:
Step three is all about waterblocks, this is one of those steps where you have to triple check everything, if you dont, you might end up buying a block that doesn’t fit your hardware!
Again, lets use the fictional build as a reference;
AMD 3700x - This means we need a AM4 compatible block, preferably a good block, since these chips tends to run pretty hot, and they need good flow thru the block to get that heat away from the CPU, but the block also need a good fin layout to get that heat into the water.
There is a lot of places in a loop you can save money, but the one place I would advice you to not save money, is on the blocks, so my personal choice here is either a EK Supremacy block, or something from Alphacool!
Make sure you get a block that fits your hardware, this can be done at the EK configurator, they have a pretty complete list regarding CPUs and GPUs, if you can’t find a block for your GPU here, there is a good chance Alphacool has got one, whatever blocks you chose from these two manufacturers, I’m 100% positive they will meet your expectations.
Again; unsure of which block to pick, feel free to ask!
4:
Step four is a pretty short step, but just as important as the other steps, pump and reservoir!
If this is your first loop, I would advice you to choose a pump/res combo, this means that the pump has a built in reservoir(or the other way around, whatever makes you happy)
For this step I have only one advice; buy something that isn’t to big, and the most important part, make sure it has a D5 pump in it, you CAN also use a DDC pump, but I find the D5 pumps to be much more silent, and easier to adjust the RPM on!
Short story: find the one you think looks good, and has a D5 pump in it.
5:
Step five, its time to make a decision, now you have to chose whether to go hardline or soft tubing!
I am under the impression that softlink is for the people that just want their loop to work, and not show it off, and hardline is for the people that want something pretty to look at, and likes to post pictures of their rig(bragging rights is important eh?)
For our fictional build, we will go with hardline, but these steps should also relate to soft tubing, since fittings are basically the same!
To chose the writings fittings, first you have to decide what kinda lines you want to use, again, I’m using EK as a reference.
EK has two types of hardline tubing, 10/12mm and 12/16mm, the first measurement is the inner diameter of the tube, and the second measurement is the outer diameter of the tube, if this is your first hardline loop, I would advice you to go for the 12/16mm tube, since this has a bit thicker walls, and is harder to fuck up while bending them.
These tubes come in 50cm/500mm lengths(Yes I use metric, since Imperial isn’t a real thing), so to calculate how many tubes you need, I would strongly advice you to draw out your loop on a piece of paper, preferably on the back of a unpaid bill.
But a general rule of thumb that I tend to use when doing loops, is to buy one length of tubing for each run, this enables us to fuck up a couple of times while bending, and still get there. (its cheaper to buy more tubes now, than have to order in two extra tubes later)
So, lets think about how many runs we need;
420mm rad -> 360mm rad -> pump/res combo -> GPU block -> CPU Block -> 420mm rad = 6 tubes, yes I know this sounds like a lot, but trust me, you will fuck up at least 2 of them while trying you first bends!
6:
Step six is the part that can make you crazy, also the same step can make you pull out a lot of hair; choosing fittings!
This is where drawing up you system on a pieces of paper comes into handy, this will show you pretty easily where you need 90degree/45degree fittings.
This is also highly dependent on personal preference, do you want the least amount of fittings and the most amount of bends ins your tubes, if yes, you want to buy the least amount of angled fittings!
Do you want to make it easier for yourself and use fittings for the hardest bends, if yes, draw your loop out as detailed as you can, and buy the fittings you think you need!
If you are in doubt on where you need such and such fitting, feel free to post some artistic drawings of your rig, and I will try to help the best I can!
Since we went with 12/16mm hardline tubing, we need some 12/16mm compression fittings for where the tubes meet our parts/blocks!
Since I didn’t draw out my system, I have to count in my head(im pretty good at counting)
General rule, we need two fittings pr block/rad/pump;
Two rads = 4 fittings
Two blocks = 4 fittings
One pump/res combo = 2 fittings
So we need 10 Compression fittings for 12/16mm hardline tubing, but I like to throw in some extra fittings, generally for one rad, and for the GPU block, since it tends to be easier to make the loop look pretty when these parts are fitted with a 90degree fitting.
So our total is 10 12/16 mm compression fittings for hardline tubing, and 4 x 90degree fittings!
But wait, we also need a drain, right? correct!
For this part, I would advice you to take the easy route, buy a Y-Splitter and connect it to the lowest part of your loop, this will make it ALOT easier to drain the loop when that day comes (trust me, that day comes sooner than you think) - Remember to buy a blind plug for this Y-Splitter, as they tend to not come with one!
For what brand to buy on the fittings, I would just suggest that you buy from a known brand-name, but most importantly is to buy the fittings that you like the looks of, after all, this is your build, not the internet-warrior`s build!
7:
Step seven revolves around which liquid to choose, and to this I don’t have much to say, other than: DONT BUY LIQUID WITH SPARKLY STUFF IN IT!
Other than that but the liquid that you think looks good, but make sure it has anticorrosives in it!
Final words:
First of all, thank you for reading my guide!
This is guide is not meant as a encyclopedia on how to do watercooling, its meant more as a guide made from experience, so please, make your own decisions regarding parts and all that!
The next part of this guide will be a very detailed guide on how to bend tubes, lay out your loop to make it loop pretty, and how to configure your fans/pump speed for the optimal noise and performance setup!
I hope you enjoyed this, and that it helped you to some extent , and if you want to give me some CONSTRUCTIVE advice, please do, but please, don’t shit-talk, and act like a normal polite person!
Part two of this guide, where we go into loop layout etc etc is in the press, I just don’t have THAT much spare time anymore!
 . I do agree that it can look beautiful.