Help with WRX80E-Sage SE Render server

I have a threadripper pro cpu and Pro WRX80E- Sage SE and am building a Render Server.
6x RTX 3090’s
Risers are all 4.0. Each gpu works on its own.

Having issues with getting it to boot in PCIE 4.0 with 6 3090’s. Have sometimes been able to boot with 2 attached but that is it. And once or twice had all running. Have been changing multiple settings on the BIOS and nothing works consistently.

Currently running W10 to see if we can crack the code but Ubuntu will be the OS.

1 Like

What’s in the system? How many and what type of PSU? Which model of 3090? Have you tried setting power limits for each GPU?

3, 3090 fe
1 3090 Msi
1 3090 gigabit
1 3090 rog strix

1300 seasonic
750 gamemax
1000 Corsair
850 Corsair
750 evga

All daisy chained together and connections are good between daisy chain

Bandwidth has been set manually
Above 4g enabled

They all work fine.
Everything was running on a previous motherboard.
And everything will run on pcie 3.0

1 Like

If you haven’t already, make sure the onboard VGA switch on the motherboard is set to off.

It could also have something to do with your riser cables. I have a PCIe 4.0 cable that worked fine on my x299 Asus SAGE board with my 3090 TUF, but it doesn’t work on my WRX80 Asus SAGE.

The same cable also works on my x570 Asrock Creator, so I know it supports PCIe 4. That being said, I didn’t manually set the slots to PCI 3.0 as you did.

When I was using two 3090s, I also ran into issues determining which GPU was outputting to the monitor. As it turned out, after rebooting, the output would often revert to HDMI even though I didn’t have a cable connected to it… only DP was connected. weird.

Welcome to the clubs, Minnie ! And by that I mean Level1Techs and owners of Asus boards demanding to use ALL of the PCIe :grin:

I’m having a problem very similar to yours. If you don’t mind my angry ranting, you can check out my build on this thread :

YATPRO : Yet Another Threadripper Pro Build!

My problem comes from trying to use an RTX 3090 in the last slot using a PCIe 4.0 riser. The riser and the 3090 both worked fine in the same configuration when using an Asrock ROMED8-2T EPYC motherboard. So of course I am pretty disappointed at this plot twist.

Here’s what my setup looks like. The idea is to get the 3090 clear off the motherboard so that it doesn’t heat it up and doesn’t block any PCIe slot :

I got the same kind of symptoms you got, when I first started it. Sometimes it would boot, but the graphics would stutter a lot. Sometimes it wouldn’t boot. Clearly a signal integrity issue. I forced this slot to PCIe 3.0 in the BIOS and, just like you, this “solved” the problem, assuming I were willing to settle for that. Not my style, though; I like to get what I pay for.

I’m an electrical engineer by trade, I actually design boards. So I decided to see what can be done about this. Since this is looking like it’s going to be “A Project ™” I figured I’d share. Maybe you can try things on your side and we can compare how our respective machines respond.

So here’s the start of my investigation.

The first thing to know is that the Asus (by which I mean the “Pro WS WRX80E-SAGE SE WIFI”) uses PCIe redrivers on several slots as well as the U.2 connectors. I’m talking about those little things packed between the DIMM’s and the chipset heatsink :

Those are interesting chips, and I don’t mean from a technical standpoint. The packages read PI3EQX16000. You can find them on Digikey, Mouser, etc… but the one place you can’t find them is on their manufacturer’s website. For some reason that exact reference isn’t listed. But there’s a functionally identical one, PI3EQX16904.

Here’s what they look like inside :

This is for one half (TX or RX pair) of one PCIe lane. The IC contains four such channels, which means you need 8 of those chips to equip a single x16 slot (16 lines x 2 pairs = 32 pairs = 8 chips).

PCIe is tough as you probably know. The equalizer / amplifer / buffer combo isn’t a luxury, it’s a necessity. It’s part of the PCIe specification, as a matter of fact. For your viewing pleasure, here’s how equalization is supposed to work when we boot our machines :

This is only to go from 8 GT/s (PCIe 3.0) to 16 GT/s (PCIe 4.0)

If you’re into DSP, the coefficients that are mentioned in this figure are FIR filter coefficients. Exactly how those coefficients are calculated takes about a hundred page of headache-inducing PCIe spec to explain. It’s all part of a process called link training whereby both devices at the ends of a PCIe link learn to talk to each other with as few errors as possible.

And the reason I bring that up is because those redrivers, right smack in the middle of the link between our Threadripper Pro and our GPU’s, are actually dumb devices : they do not learn how to work with the PCIe devices on both sides of them. All you can do is set their coefficients for your own specific hardware and that’s it.

I’m not a betting man, but I’m willing to bet that Asus set those redrivers to average values because they thought that should work in most cases. As if Threadripper Pro users fall in the “most cases” category ! Bottom line : our crazy contraptions won’t work.

This is a long post, so I’m going to stop there, post it and leave you in suspense as to what we can try in order to fix this.

3 Likes

And I’m back.

Now, if we go into the Asus BIOS, under “Advanced Settings”, there’s an “AMD PBS” entry. And in there, you’ll find a single PCIe redriver setting that is set by default to “auto”.

It’s quite misleading. You’d think this means that the BIOS is somewhat capable of adapting redriver settings to the hardware you plug in. I have seen no evidence of that, and furthermore I cannot conceive of how the BIOS would even be able to do that. The PCIe negotiation protocols are internal to the PCIe subsystem hardware, as far as I know it’s not something you can look into from software running in the CPU cores.

Let’s switch to “manual”. As my interest is in slot 7, let’s look at what we can configure now :

Bingo ! We have access to the FIR filter coefficients, the amplifier gain and the output voltage amplitude settings. We can even disable the redrivers, and we have separate settings for the TX and RX paths.

As a test, I booted my machine with those fixed settings (and GPU set to PCIe 3.0 and 4.0). It behaved exactly the same : rock stable at 3.0, very crappy at 4.0, which to me is confirmation that indeed there is no magic happening when you use the default “auto” setting. In fact, if you look at the settings in manual mode you’ll find that they are “middle of the road”, as I suspected earlier :


And if you’re wondering, those settings aren’t coming from nowhere, these are the redrivers’ presets. Here’s an excerpt from the datasheet :

What can we conclude ? That Asus’ “auto” settings for the redrivers should actually be called “default” settings. They just couldn’t make any assumption as to what we’d put in those PCIe slots, so they went for something beige. Although the user manual does make it a point to tell you how many GPU you could use and which slots to put them in, so they could have made some assumptions there.

At least, they did write a BIOS that gives us full control, so we may have some room to tailor our PCIe lanes’ performance to what we’re trying to accomplish.

Fair warning, though : it’s not going to be easy nor trivial. This isn’t just a matter of cranking everything up to eleven. And to be honest and dispel any illusion I might have given, I’m not a PCIe expert, I’m just a PCIe tourist. I know what I’m doing, but I don’t know if what I want to do is doable. FFS the PCIe base spec alone is 1300 pages ! :hot_face:

For now I’m gonna eat dinner and then start studying the redrivers in depth. And maybe give a chance to any PCIe experts around here to come upon this thread and save us all from my madness :grin:

5 Likes

Maybe time for collaborating with the team maintaining this BIOS?

Given the permutations “Level1” users are throwing at this board, ASUS might appreciate such high-level feedback.

Worth a note to ASUS Support, pointing them to this thread?

1 Like

I’d like that, and I’m used to doing that sort of thing at work. It’s unusual when a year goes by that I don’t open a few service tickets with software vendors regarding bugs I found in their code. But then I’m working for the kind of large corporation they can’t say “no” to.

In this case it probably won’t happen. We’re just a few happy geeks with deep pockets using their products past the edge of what they are designed for.

But I will try. Once I’m done investigating what can be achieved with the redrivers, I’ll gladly pass on the information to Asus. Not sure it’s going to lead to a new BIOS version, though. We’re in edge-case territory. It would be a different matter if that problem also happened to people who don’t use PCIe risers.

3 Likes

Good evening, guys. The adventure continues. I already apologize, because this is gonna get technical and possibly boring. Plus, this is “stream of thought”, so it’s not Shakespeare :sweat_smile:

I’ve come up with a dodgy method for testing PCIe 4.0 stability on our motherboards. It involves :

  • Forcing PCIe 4.0 on the slot that is vexing us
  • For multiple-GPU users, using only one GPU at a time
  • Booting your OS of choice (Win10 in my case)
  • Running a graphics-intensive test (Outer Worlds in 4K, for me)

I’ve run that test using the Asus “vanilla” redriver settings. The machine takes longer to boot, and under Outer Worlds I get 10 to 15 FPS instead of 60 (my monitor is a 60 Hz, I’m not a gamer).

The FPS number doesn’t tell the whole story, however. In a typical scenario of using an underpowered GPU to run a game, those 10-15 FPS would be “smooth”, meaning a somewhat constant interval between frame where it feels like the world is slowing down. In this case however, imagine a very jerky frame rate, where you get a smooth 60 FPS for half a second, then 5 frames here and there, then nothing for half a second, in a completely random jittery way.

My intuition is that I’m looking at a link that’s borderline. It works at some PCIe speeds, not so well at others.

As you may or may not know, PCIe links don’t usually operate in a single mode from power on to power off. A tool like GPU-Z will show you that your GPU’s interface switches through all flavors of PCIe depending on workload, down to 1.0 when you’re on the Windows desktop doing nothing. That is the reason why a dodgy GPU connection might still let you boot : you don’t need PCIe 4.0 graphics to display the Windows logging screen.

The process by which PCIe links dynamically change speed is called “recovery”. Here’s the state machine :

Yeah, I know, it’s Klingon to most people. This diagram basically tells you that recovery (a speed change) can occur for any number of reasons, one of which being an “electrical idle” state on the link. This shall trigger a speed change (in this case to a lower speed) with a new equalization phase. In cases of abject failure, recovery can lead to a link being disabled, or to a reset. “L0” is the “perfect ending” : it’s the state where your PCIe link just works.

My guess is that by forcing PCIe 4.0 and then starting a video game, I cause the system to attempt to reach PCIe 4.0 (even though 3.0 would be more than enough). At 4.0 I get terrible signal quality, which appears as an electrical idle state to the GPU and/or CPU, at least long enough (128 µs, per spec) to trigger the recovery automaton.

My system ends-up in a stuttering loop of :

  • Equalizing to 8 GHz
  • Working for a few video frames
  • Recovering to 4 GHz
  • Recovering to 8 GHz again, immediately

The answer is clear, I need to fix signal integrity at 8 GHz, and 8 GHz only.

That’s why our redrivers have multiple filtering coefficients. Each one applies to one PCIe speed, from 1.0 to 4.0 : 1.25 GHZ, 2.5 GHz, 4 GHz, 8 GHz. A redriver allows us to apply a different level of amplification to each frequency band. That is because slower signals are much more tolerant of line loss and you don’t want to saturate those signals. The reason you don’t want that is because PCIe signals are analog, they aren’t exactly “ones and zeroes”. They look like this :

Figure-3b

That’s for PCIe 3.0 and 4.0, whereas PCIe 5.0 uses PAM4 signaling (4 levels per “bit”) which looks like that on the old eye-diagram scope :

PAM4

That is why, earlier, I said the solution to our problem wasn’t going to be as easy as cranking-up everything to the maxxx. If we overshoot, then we might actually degrade signal integrity at the lower speeds and that would suck, because we actually need PCIe 1.0 : it’s the starting point, like you can’t start your car in fourth speed. If we mess up PCIe 1.0 we’ll be in a worse place than we already are.

BUT WAIT, there’s another wrinkle. PCIe is a full-duplex interface. There’s every chance that our signal integrity issues are asymmetrical, meaning they are worse on the outgoing lanes than on the incoming lanes (or vice versa). So we can’t use the same settings on the TX and RX redrivers. We might, once again, saturate the signal at the lower frequencies and shoot ourselves in the feet.

So here’s my plan for the next step :

  • Find out as much as I can on the topology of the motherboard’s PCIe lanes. Unfortunately, Asus does not provide CAD files for their products, for some reason (cough capitalism cough)
  • Based on that, determine which direction(s) requires which amount signal boost.
  • Increase the gain in that direction, little by little. That is another complicated aspect.
  • Test each settings with a round of Outer Worlds. Parvati is the cute engineer girlfriend I’ve never had.

Long post again. Time to eat and get to work. I’ll see you on the other side.

3 Likes

Back again. This time with a request for your participation if you’re able and willing.

In my last post I mentioned that our PCIe links are most likely asymmetrical, meaning the electrical characteristics of the traces between the CPU and redrivers are not the same as those of the traces between the redrivers and the GPU(s). This, in turn, means that we’ll probably need to apply different corrections to the TX and RX paths. Also, even though I didn’t mention it, you’re right in guessing that our corrections will probably be different depending on :

  • Which slot we’re using (slots 5, 6 and 7 are redriven).
  • Which GPU’s we’re using.

Unfortunately I couldn’t locate any naked photo of our motherboard. Must be a ban on pornography or something. Between the heatsinks on top and the stiffening plate on the bottom, it’s impossible to tell how our PCIe lanes are routed. This is the best photo I could find of the area near the DIMM and chipset :

This reveals 12 redrivers. Keep in mind, each one is for 4 lanes, 1 direction, so you need 8 chips for one x16 ports. Besides that, there are redrivers for M.2 slots and, interestingly, near the I/O shield for the X550 NIC and WiFi, I presume.

So we don’t know the location of the redrivers that feed the PCIe x16 slots. And here comes the cry for help : if any motherboard owner feels courageous, I could really use photos of the entire motherboard, top and bottom, without back plate and ideally without heatsink. Or maybe you have found such photos because your Google-fu is stronger than mine.

For now, I will assume that our PCIe links are symmetrical. My reasoning is that the SP3 socket area, with the DIMMs, is a lot noisier an environment than the rest of the board. It’s also more densely packed, which could mean more vias on the PCIe traces. So the traces may be shorter but their impedance might still suck worse than running all the way to the PCIe slots. Still, it would be nice to know for sure.

Now I’m off to try raising the TX gain just a little bit. I’ll let you know how that goes…

3 Likes

It appears the voices in my head that have been forcing me to read arcane specifications and datasheets for the better part of 40 years know what they are on a about. I’m happy to report some success :

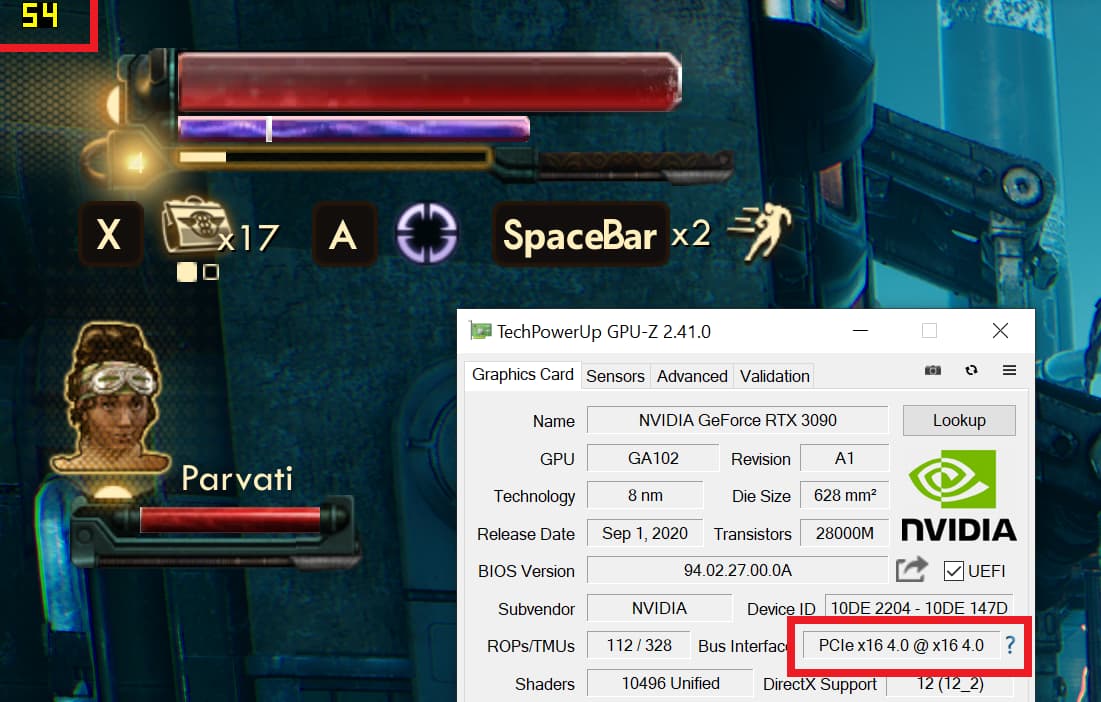
This is my “benchmarking tool” Outer Worlds, running in 4K with every setting maxed out, and with the GPU interfaced in PCIe 4.0, and the frame rate is almost where it should be.

Most importantly, the way to that result was exactly what I anticipated it should be.

First I raised the gains for slot 7’s TX redrivers from 2.1 / 3.3 / 4.8 / 8.5 to 3.0 / 4.2 / 5.8 / 9.4 (one step). The machine booted normally, but the game still stuttered. However, instead of running at around 10-15 FPS, it was now running at 15-30 FPS and with less jitter on those figures. Clearly this was a step in the right direction.

So I went back to the BIOS and raised those gains to 3.2 4.6 6.5 10.4 dB (yet another single step). This led to the result I posted above : 54-60 FPS.

In case you’re wondering, raising those gains cannot damage your hardware : the actual line voltages are constrained by the output buffer swing settings, which I have left to their default 1000 mV peak-to-peak. Let me be clear on this : changing those voltages would be the absolute last thing you do when all else has failed.

Increasing voltages will lead to increased power consumption (each redriver IC burns up to 1.35 W nominal, however if you go that far without heatsink I don’t know what the result would be, long term) . It may also affect signal integrity negatively as higher voltages impact rise/fall time.

Going back to my earlier call for naked photos of motherboards : I’m still on the market for those, but this experiment already provides some hints that signal quality is in fact worse on the CPU-redriver segment than the redriver-GPU segment : I did not have to boost signals on the RX pathway. The way I see it, we’ve got horrible insertion loss around the CPU socket area, so that the CPU can’t talk “loud enough” to reach the end of the motherboard. However, whatever comes out of the redrivers is “loud enough” for the CPU to read clearly.

We’re not done with this just yet. This is definitely a path to solving our PCIe issues but I don’t know how good my solution is. I suspect that increasing the gain reduces the BER but I don’t know by how much. For all I know, my GPU is still wasting a lot of time going through PCIe recovery many times a second. It might not be very important while playing a game, but for applications like networking and machine learning, that’s a different story.

My intuition is that if I keep boosting the gains, eventually I’ll get back to crappy frame rates, signifying that I’m now saturating the receivers on the GPU. Then, in theory, picking gains in the middle of the “it seems to work” band should give the best result in terms of BER and overall link stability.

I also don’t know for sure how good the signals really look on the RX path, so I would be tempted to apply the same treatment. But since it appears to work so far, I may have to reduce gains first just to see with how little amplification I can get away with.

By the way, if you’re interested, that process is called “characterization”. It’s in the same field as calibration, certification and metrology, and normally you’re supposed to do it with instruments that cost more than a sports car. Much more. I have some at work… sadly I have been told in no uncertain terms that I would not be allowed to borrow the 33 GHz oscilloscope for my week-end projects. Bummer. If you have one lying around, though, I’d appreciate a loan :wink:

2 Likes

A few more results before I call it a night :

I turned the filter settings up three notches to 4.3 / 5.8 / 7.8 / 11.7 dB and I finally got 60 FPS on lock throughout the Emerald Vale outpost of Outer Worlds. However I felt that those gains were a little high for an equalization stage, and I did see some weird behavior at PCIe 1.0 and 2.0 on the Windows desktop. That may have been signs of saturation.

so I dialed back one step and instead rose the DC gain by 1.5 dB (from -0.5 to +1).

Lo and behold, I got my best result so far. In fact I turned off V-sync in Outer Worlds and got 90 to 100 FPS, no dip lower than 80 FPS. As I was saying, just cranking the gains all the way up isn’t a viable approach.

I still haven’t messed with RX gains.

@Minnie : I think we know how we’re going to make your rig work (or at least work better). It’s clear that you’ll need to experiment with redriver settings on a slot-by-slot basis. There’s also the fact that not all your 3090’s are the same.

If I were you, I’d characterize my 3090’s first : get one working on slot 5, 6 or 7, then try them all and see how they behave. Chances are, 3090’s from different vendors (with different PCB’s) will perform differently on the PCIe bus.

Since you have 6 GPU’s, only 3 can go into “redriven” slots. Your GPU’s with the best signal integrity should go on slots 1, 2, 3 : no redrivers but closest to the CPU socket. The worst three GPU’s should go on 5, 6, 7 where you can amplify the signals.

I will likely do some endurance testing this week-end. Any excuse to play video games for a change :grin: (seriously though, I just don’t see myself starting serious work on a machine that I’m not yet confident is stable). I’ll keep posting if I come across anything more, good or bad.

7 Likes

This topic was automatically closed 273 days after the last reply. New replies are no longer allowed.