HA04 - How-To setup Home Automation Smart Plugs -- Flashing the S31 on Linux from Sonoff

Assumptions

This guide assumes that you already have a functional linux environment. For this guide, I am using vanilla Ubuntu 20.04.

Pre-reqs:

apt install python3 python3-pip

pip install pyserial

next we need the ESPTool for flashing:

git clone https://github.com/espressif/esptool.git esp


cd esp

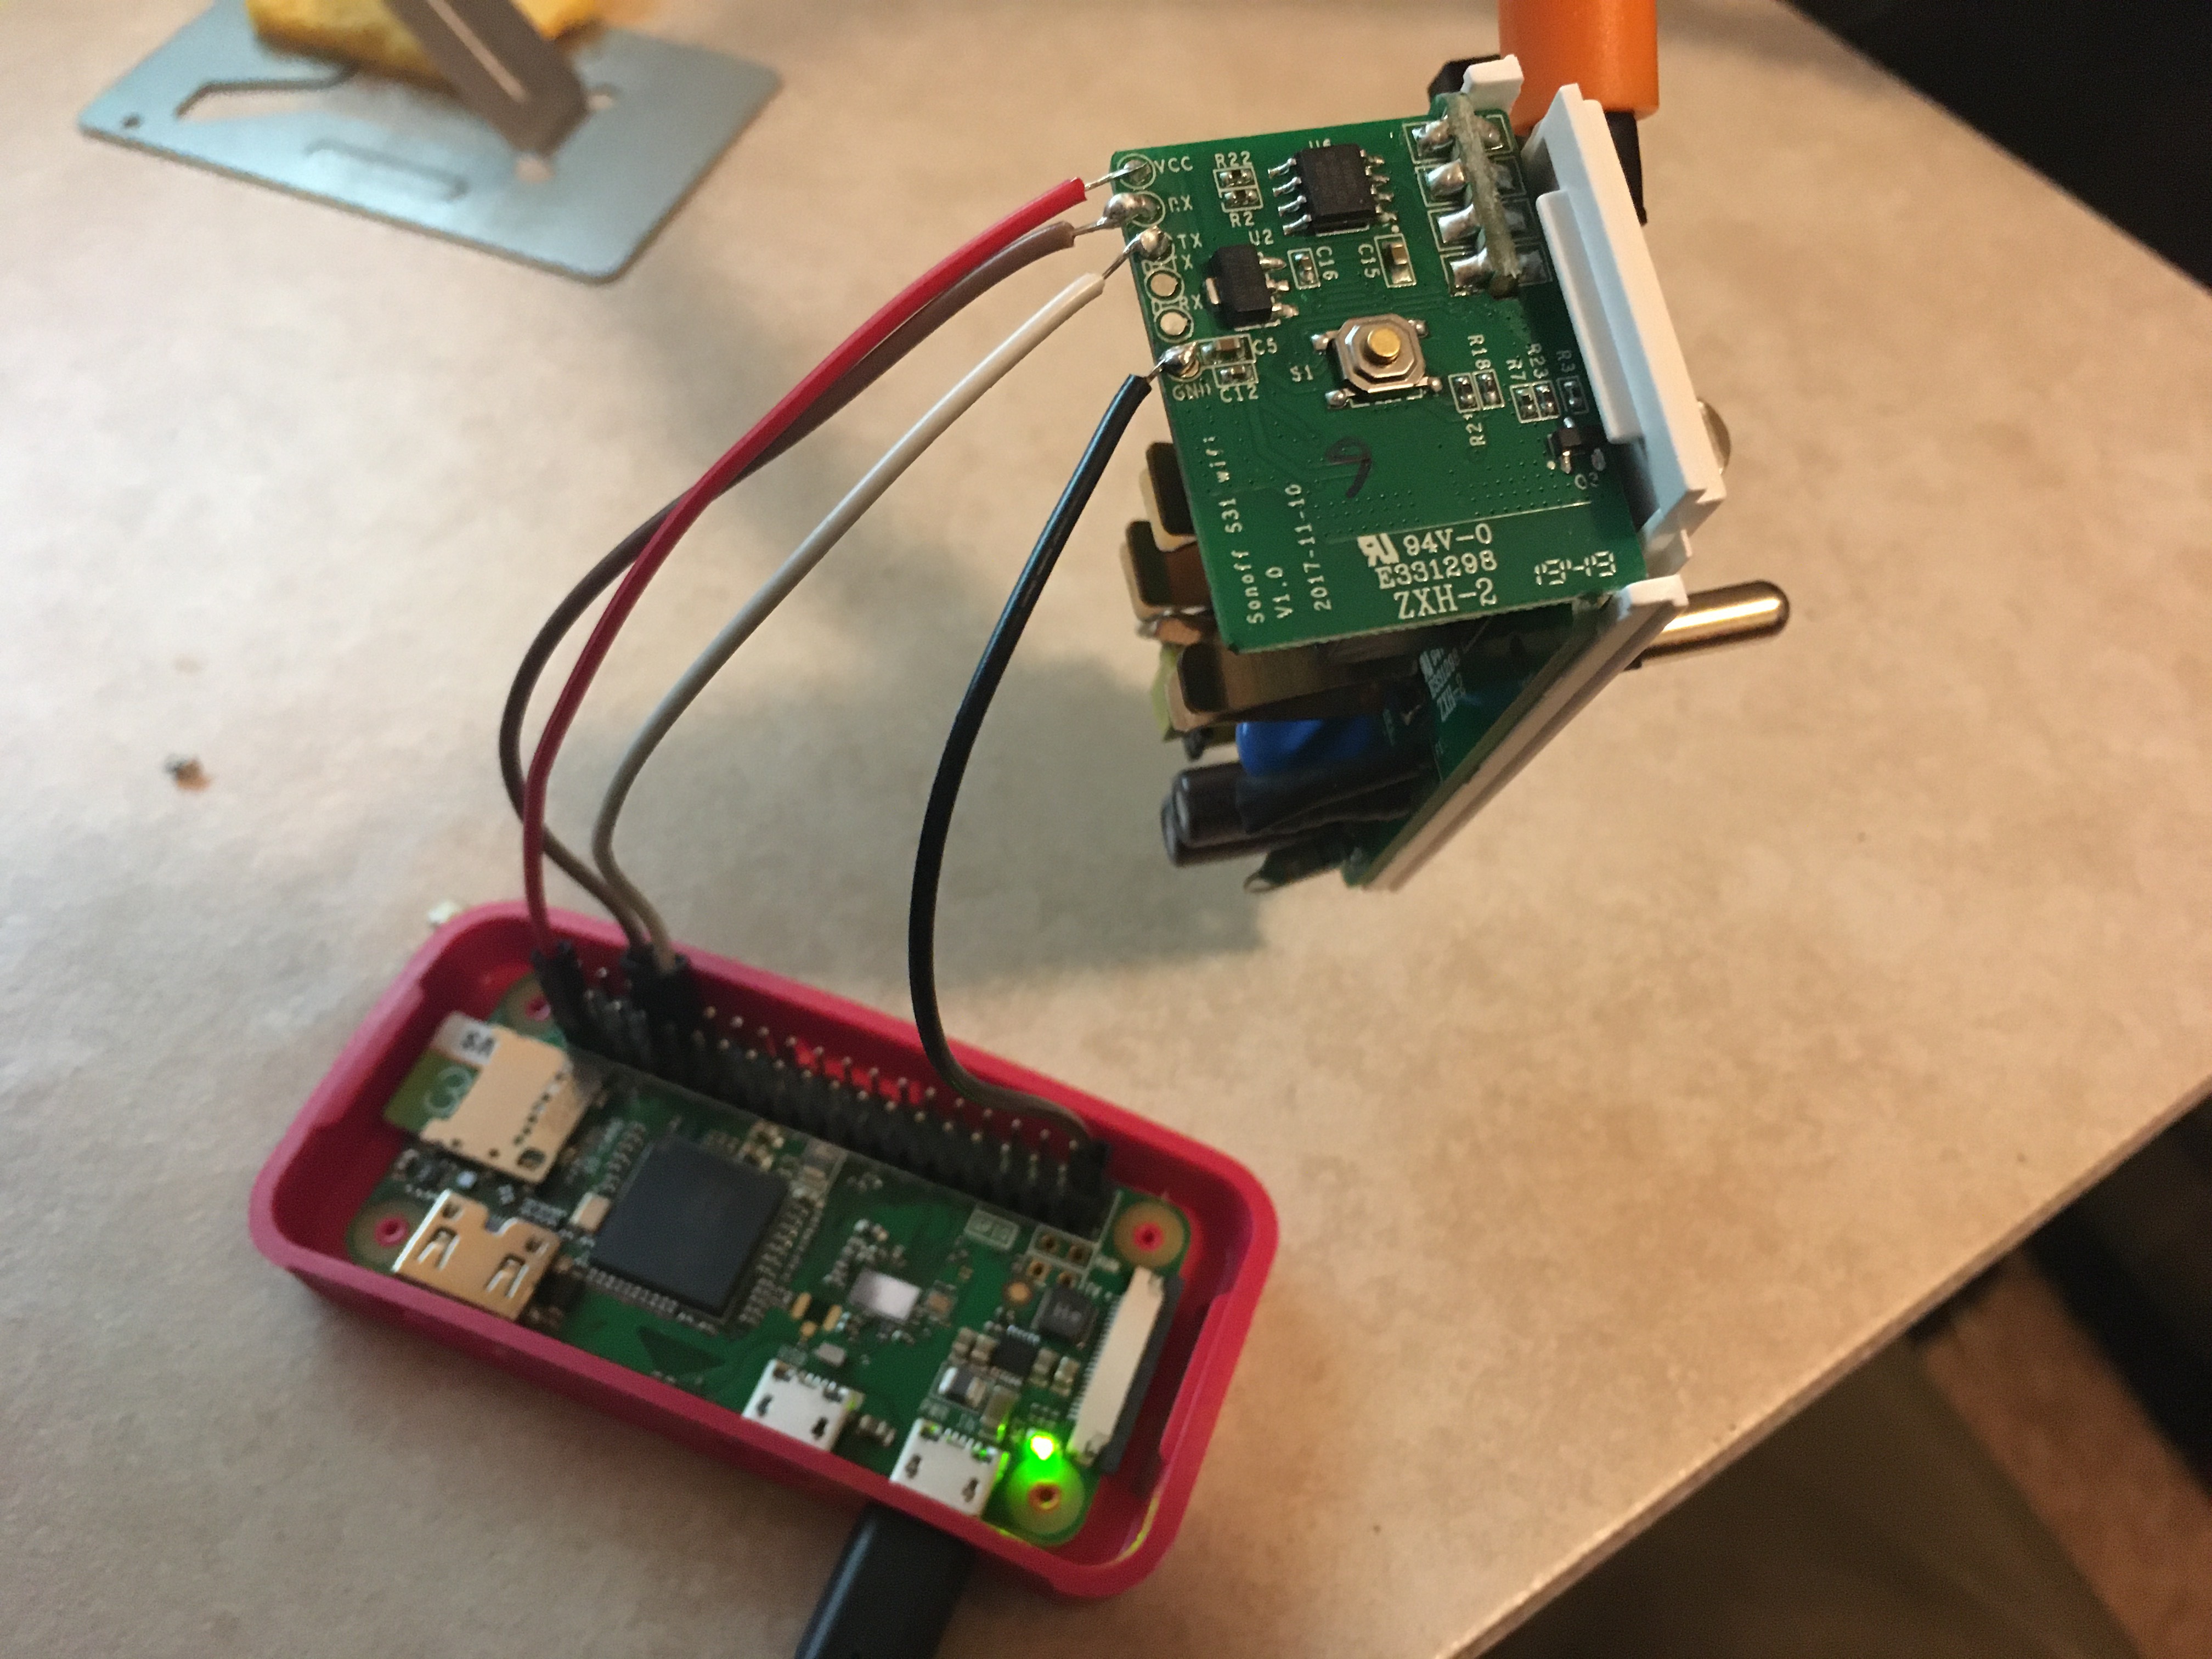
Now, wire up the FTDP usb uart plug. Some of these intentionally mis-label TX and RX, so don’t be afraid to swap. TX on the USB goes to RX on the S31, and RX on the USB goes to goes to TX on the S31 as in the video/pictured.

If you don’t want to solder, that’s fine. I have these handy HP micro-grabber things, and they work fine to avoid soldering if you’d rather not. It can be hard to find a place to order the hp micrograbbers, though.

The Tasmota firmware is the one I like to use because it can be OTA upgraded (meaning, hopefully, no more FTDI usb flashing) and because it can be configured wirelessly. Other solutions have you modify source code and flash device-specific S31 firmwares to each smart plug.

I used the appropriate Sonoff S31 firmware from here:

http://ota.tasmota.com/tasmota/release/

Verify you’ve got a good connection before doing anything:

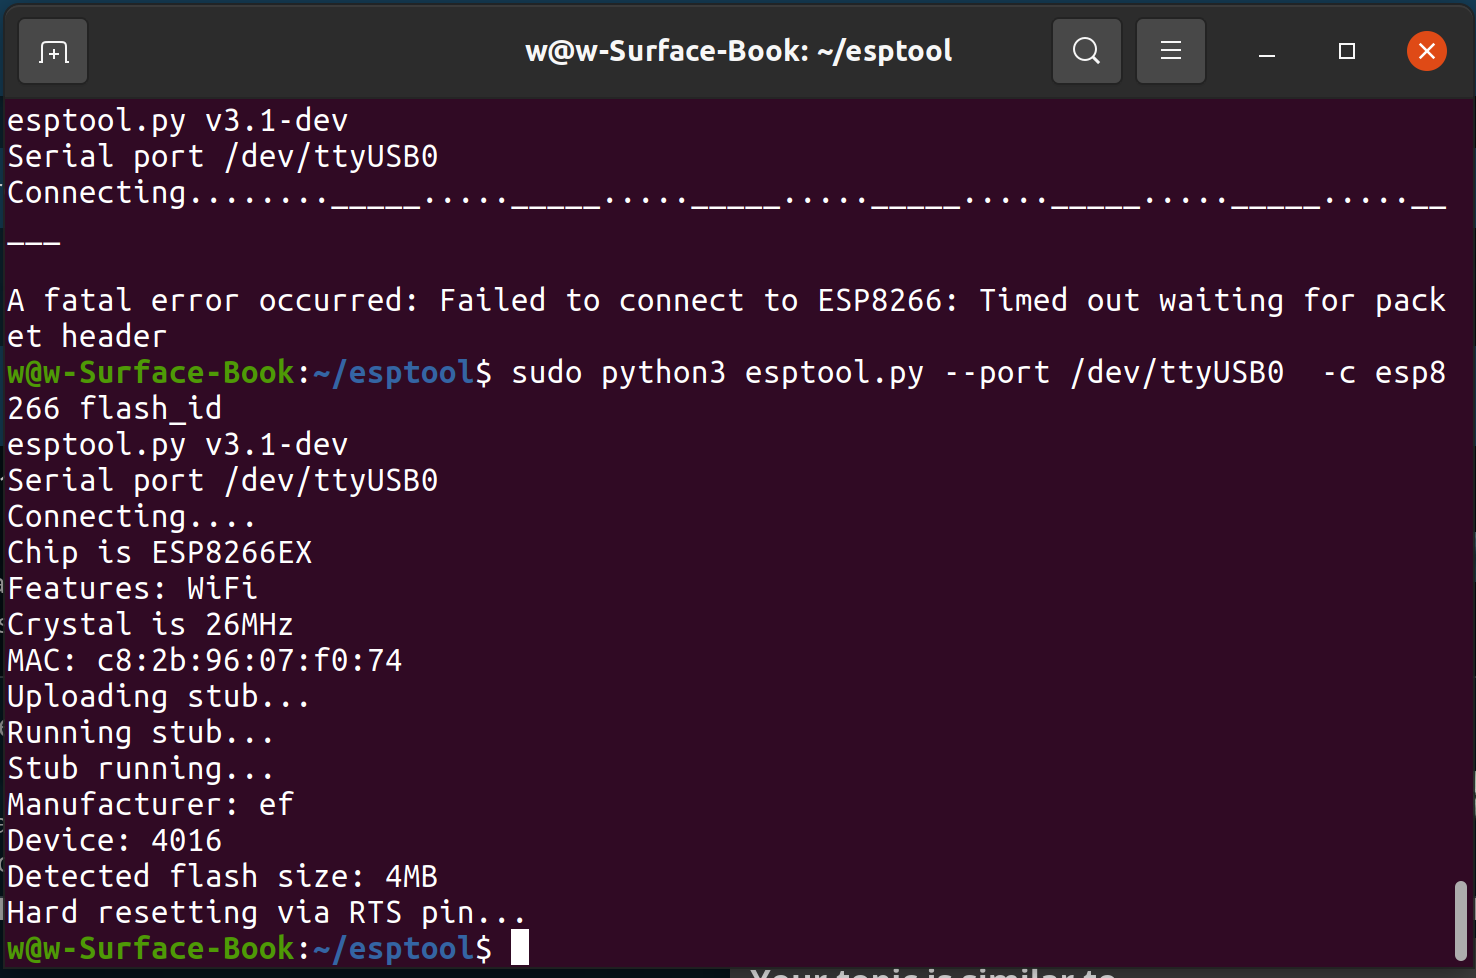
That’s how I ran the command, and esptool was able to “shake hands” with the ESP8266.

Now, flash Tasmota.
0. Ensure FTDI is configured for 3.3v, not 5v, power.

  1. PRess and hold the button on the S31 as you plug in the USB dongle (USB dongle supplies VCC power of 3.3v)
  2. run dmesg to confirm /dev/ttyUSB??? (/dev/ttyUSB0 in my case).
  3. run the handshake command above which is non destructive. IF all is good
    *** DESTRUCTIVE ***
    About to overwrite the factory flash!
  4. run the command to flash the tasmota bin file:

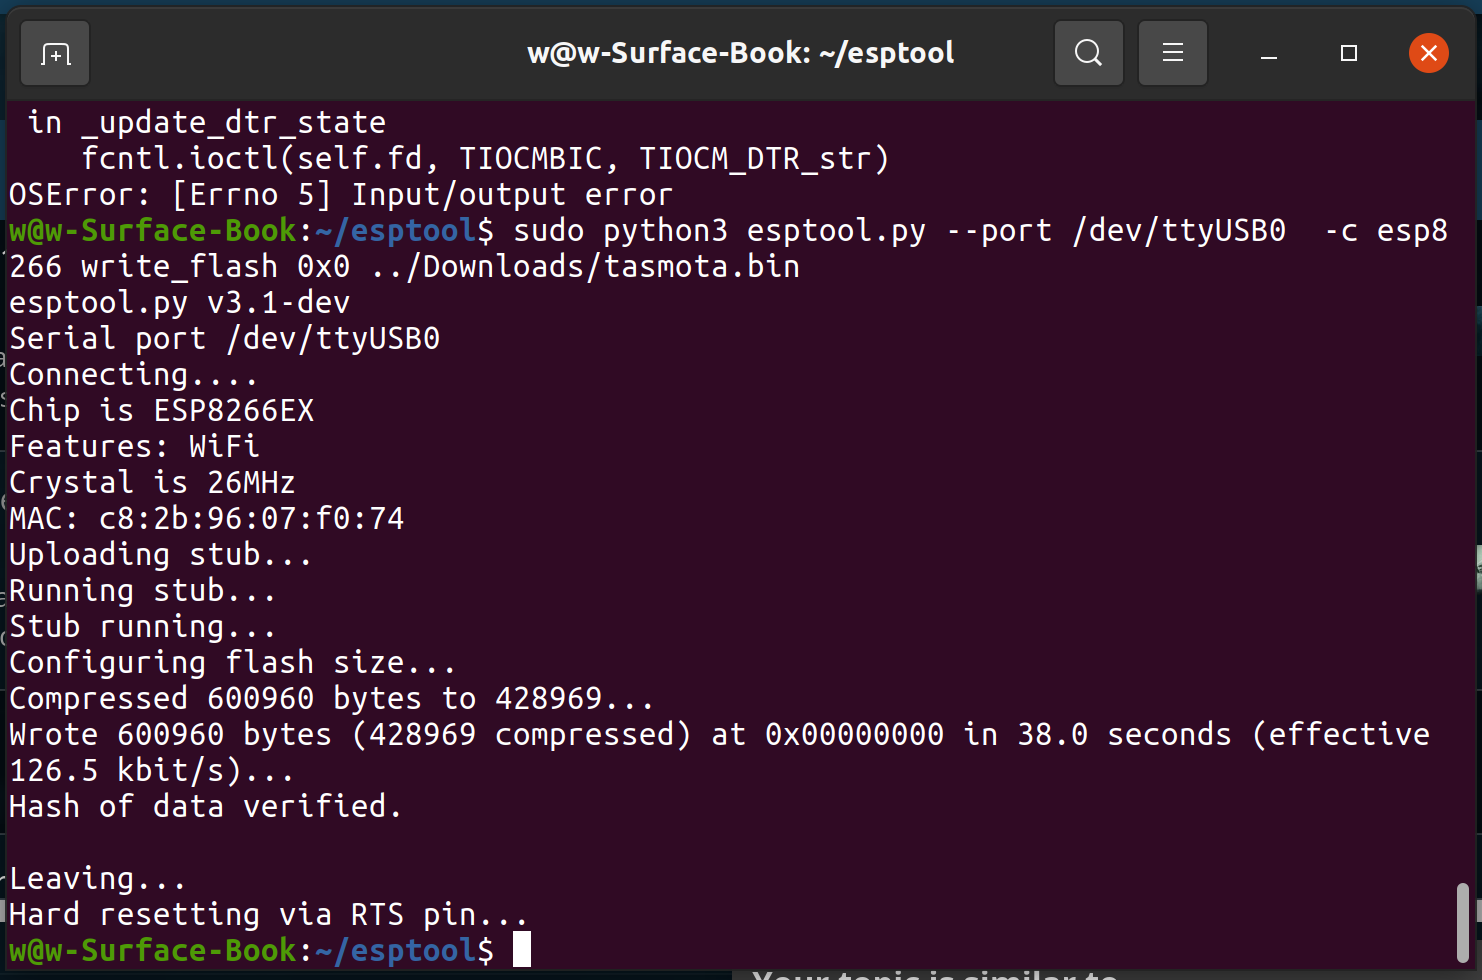
Once you do that, reboot the S31 device (power cycle) and you should see a new wifi network tasmota_SOMETHING

join that, and you can configure from there.

Re-assemble the smartplug fully BEFORE plugging back in to 110v AC mains. Be sure to remove/desolder the wires.

BE CAREFUL to restore it to its original state. It is not 100% safe to leave a plug or pig tail on this programming header when it is plugged into AC mains.

Level1 is not responsible for any thing you might do; etc etc.

From here, we will continue with the HomeAsssistant Guide and our other videos on smart home automation.

9 Likes

Great write up!

I didn’t have a usb uart on hand, but turns out you can also use a raspberry pi to flash if you have one, just have to enable serial and choose the correct tty device.

2 Likes

Have you tried Tuya Convert 2.3 ( GitHub - digiblur/Tuya-Convert-Donor: ESP8266 donor device for the Tuya Convert Process ). I haven’t yet but will be trying on my smart plugs. Seems to be a good OTA option.

yes, but it doesnt always work due to hardware/software variance. once it “worked” but then bricked the plug. so after having done a dozen of these I think the way I showed is the only way to make it work reliably.

1 Like

Thanks for the reply. As I enjoy soldering I’ll just do as the video shows. Keep up the automation video’s. Enjoying them tremendously. Been messing around with getting Home Assistant up and working.

I can happily confirm that it all flawlessly works also on the european Sonoff Basic R2 version.
It’s really easy to flash and because this model has holes instead of pads. I just used dupont cables without any soldering required and it works like a charm, just had to invert RX and TX from the ftdi adapter to the board.

Can’t wait for the next videos in this DIY IoT series!

2 Likes

As an alternative to Tasmota, I highly recommend ESPHome. It integrates directly with Home Assistant and doesn’t require another central server of any sort (i.e. MQTT). You configure each ESP with YAML the same way you do Home Assistant, and the devices you configure appear in Home Assistant as the correct type and entity with no extra work!

So if you define a switch, it shows up as a switch. If you define a shade/window cover, it shows up as a cover entity. You can do all of this with MQTT, but there is more setup involved and less “it just works.” And if you don’t want or like the YAML, you can embed your own C++ code in the YAML and it works great (I do this to manipulate strings to appear on an LCD display).

The most useful part of ESPHome for me is that a lot of the scripting can be offloaded from Home Assistant onto the ESP while still integrating very well. So for example if you have a pool pump being controlled by an ESP, you still want it to turn on when it freezes outside even if it can’t connect to Home Assistant for some reason. Or you want your garage door to squawk at your if you leave it open for too long even if it can’t connect to WiFi. Or you want your DIY lightswitch to work just fine right after a black or brown out and simply report and receive states from Home Assistant rather than using it for 100% of the logic.

The ESP Home firmware also is quite robust in my experience and is able to detect its own failures. It also supports OTA from an interface in Home Assistant if you use the VM or dedicated hardware version that includes their Docker supervisor. I’ll be honest I only tried Tasmota briefly so I don’t have much experience with it. ESPHome does have an MQTT integration if you want to use it with not Home Assistant, but I am unsure how it compares to Tasmota in that regard.

I know there hasn’t been a video on Home Assistant in particular yet, but I have a feeling one is coming soon :smiley:

1 Like

Thank you for a very useful article indeed.

I am curious, in terms of soldering, what wattage iron and what gauge wires were used to solder onto the S31 as depicted in some of the photographs shown or in the video on Youtube?

Thank you!

35w iron and tiny wires are fine as they are only temporary for programming. Solder program resolder. Or use clips

Wendell,

Ok, my iron is 25W so that is good. So wires that are smaller in gauge than say the copper wire on CAT6 network cable? I wanted to get some small wire and wanted to know exactly what gauge to purchase.

By the way, I got some clips and it was hard to get them all to stay on at once, plus I need to improve my soldering skills anway.

Thanks again for a brisk reply.

Cat 6 network wires probably are fine to use to hook up the programmer

Wendell,

Awesome, I have that handy then.