I recently picked up a 4 Port power monitor hat for the Wemos ESP32-S2 based boards from MattramLabs - MLP201191 - ESP32 S2 4-Channel Mains Power Sensor - Mottramlabs-Products
I will likely use this thread as a bit of a running log on trying to get this dam thing working as there seems to be bugger all documentation and its a bit of the deepest I have gone through in getting something that is essentially just a hat with minimal documentation working.
Beaware of DOA Wemos ESP32-S2 Boards. My first 2 boards were DOA and I had spent days trying to get them to connect to my PC. If when you hold the ‘0’ button and plug in the USB cable, if no USB ding happens on the PC, the board is dead and get another one.
ESP Home Flashing of Files
ESPHome on Home Assistant never wants to flash. I could say the same for the web ESPHome tool as well. I had to use the Adafruit online tool and use an exported file from my HA device. I stumbled across a video which helped.
Below are the notes I made as I went for getting that to flash for the first time. I have repeated that a few times until OTA from Home Assistant ESPhome tool would work reliably using the ‘flashing wirelessly’ function.
Video on how to do it

Adafruit Web Serial ESPTool
https://adafruit.github.io/Adafruit_WebSerial_ESPTool/
How to get the .bin file
Will likely need to copy the factory-fimware.bin file from within Home Assistant - Access ESPHOME file system to retrieve .elf build file - #5 by nickrout - ESPHome - Home Assistant Community
Make sure the terminal promiscuous mode is turned off
Can use this command to get to the folder area for the addon
docker exec -it $(docker ps|sed -rne 's/(.+)(addon_.{8}_esphome)/\2/p') bash
You will then need to use the location where the bin file was generated in the Home assistant ESPhome dashboard. In the past it has gone to here
cd /data/build/wemoss2-4-port/.pioenvs/wemoss2-4-port/
You will have to copy the file to somewhere you can access via samba/ssh/etc
cp /firmware-factory.bin /config/
the file will then be on the /config directory to copy to pc for flashing.
Developing a YAML
With the limited docs i went searching and within the issues section I had located on the github this bit of code
substitutions:
  update_time: never
  disp_name: "house-power-sensor"

esphome:
  name: house-power-sensor
  friendly_name: house-power-sensor

esp32:
  board: esp32dev
  framework:
    type: arduino

# Enable logging
logger:
  level: debug

# Enable Home Assistant API
api:
  encryption:
    key: "USE YOUR ENCRYPTION KEY HERE"

ota:

wifi:
  ssid: !secret wifi_ssid
  password: !secret wifi_password
  ap:
    ssid: "house-power-sensor"
    password: "PROVIDE AP PASSWORD"

time:
  - platform: homeassistant
    id: homeassistant_time

interval:
  - interval: 5s
    then:
      - script.execute: readCTs
script:
  - id: readCTs
    then:
      - component.update: ct1Amps
      - delay: 500ms
      - component.update: ct1Watts
      - delay: 500ms
      - component.update: ct2Amps
      - delay: 500ms
      - component.update: ct2Watts
      - delay: 500ms
      - component.update: ct3Amps
      - delay: 500ms
      - component.update: ct3Watts
      - delay: 500ms
      - component.update: ct4Amps
      - delay: 500ms

switch:
   - platform: restart
     name: "Restart"

sensor:
  - platform: ct_clamp
    sensor: adc_sensor_1
    name: ct1Amps
    id: ct1Amps
    update_interval: never
    sample_duration: 200ms
    filters:
      - calibrate_linear:
          - 0 -> 0
          - 0.07972 -> 7.72

  - platform: adc
    pin: GPIO34
    id: adc_sensor_1
    attenuation: 11db
    internal: true

  - platform: ct_clamp
    sensor: adc_sensor_2
    name: ct2Amps
    id: ct2Amps
    update_interval: never
    sample_duration: 200ms
    filters:
      - calibrate_linear:
          - 0 -> 0
          - 0.08278 -> 7.71

  - platform: adc
    pin: GPIO35
    id: adc_sensor_2
    attenuation: 11db
    internal: true

  - platform: ct_clamp
    sensor: adc_sensor_3
    name: ct3Amps
    id: ct3Amps
    update_interval: never
    sample_duration: 200ms
    filters:
      - calibrate_linear:
          - 0 -> 0
          - 0.08317 -> 7.84

  - platform: adc
    pin: GPIO36
    id: adc_sensor_3
    attenuation: 11db
    internal: true

  - platform: ct_clamp
    sensor: adc_sensor_4
    name: ct4Amps
    id: ct4Amps
    update_interval: never
    sample_duration: 200ms
    #filters:
      #- calibrate_linear:
          #- 0 -> 0
          #- 0.08277 -> 7.80

  - platform: adc
    pin: GPIO39
    id: adc_sensor_4
    attenuation: 11db
    internal: true

  - platform: wifi_signal
    name: "wifi_signal"
    update_interval: 1min
  - platform: uptime
    name: "uptime"
    id: Uptime
    update_interval: 1min

#Watts per channel
  - platform: template
    name: CT1 Watts
    id: ct1Watts
    lambda: return id(ct1Amps).state * id(ic1Volts).state;
    accuracy_decimals: 0
    unit_of_measurement: W
    icon: "mdi:flash-circle"
    update_interval: never

  - platform: template
    name: CT2 Watts
    id: ct2Watts
    lambda: return id(ct2Amps).state * id(ic1Volts).state;
    accuracy_decimals: 0
    unit_of_measurement: W
    icon: "mdi:flash-circle"
    update_interval: never

  - platform: template
    name: CT3 Watts
    id: ct3Watts
    lambda: return id(ct3Amps).state * id(ic1Volts).state;
    accuracy_decimals: 0
    unit_of_measurement: W
    icon: "mdi:flash-circle"
    update_interval: never

  - platform: total_daily_energy
    name: CT1 Total kWh
    power_id: ct1Watts
    filters:
      - multiply: 0.001
    unit_of_measurement: kWh
    icon: "mdi:flash"

  - platform: total_daily_energy
    name: CT2 Total kWh
    power_id: ct2Watts
    filters:
      - multiply: 0.001
    unit_of_measurement: kWh
    icon: "mdi:flash"

  - platform: total_daily_energy
    name: CT3 Total kWh
    power_id: ct3Watts
    filters:
      - multiply: 0.001
    unit_of_measurement: kWh
    icon: "mdi:flash"

  - platform: template
    name: Total Amps
    id: totalAmps
    lambda: return id(ct1Amps).state + id(ct2Amps).state + id(ct3Amps).state ;
    accuracy_decimals: 2
    unit_of_measurement: A
    icon: "mdi:flash"
    update_interval: 15s

  - platform: template
    name: Total Watts
    id: totalWatts
    lambda: return id(totalAmps).state * id(ic1Volts).state;
    accuracy_decimals: 1
    unit_of_measurement: W
    icon: "mdi:flash"
    update_interval: 15s

  - platform: total_daily_energy
    name: Total kWh
    power_id: totalWatts
    filters:
      - multiply: 0.001
    unit_of_measurement: kWh
    icon: "mdi:flash"

  - platform: homeassistant
    name: "Voltage"
    id: ic1Volts
    entity_id: sensor.house_voltage
    internal: true

  - platform: template
    name: Voltage
    id: voltageupdate
    lambda: return id(ic1Volts).state;
    accuracy_decimals: 1
    unit_of_measurement: V
    update_interval: 60s
After obtaining the code provided in the other issue - ESP Home Code · Issue #1 · Mottramlabs/ESP32-4-Channel-Mains-Current-Sensor · GitHub
I noticed that the ADC provided would list an error where it says
ESP32S2 doesn't support ADC on this pin.
Knocking over a fair bit of googling, etc I couldn’t get a grasp on it until i found that the ADC pins are slightly different.
Using this site here - ESP32-S2 - Pinout -
GPIO1  ADC1_CH0
GPIO2 ADC1_CH1
GPIO3 ADC1_CH2
GPIO4 ADC1_CH3
Don’t use the ADC2 pins listed as these are disabled for wifi
Digging through some more within the schematics of the 4 port board ESP32-4-Channel-Mains-Current-Sensor/SCH201191.pdf at main · Mottramlabs/ESP32-4-Channel-Mains-Current-Sensor · GitHub
It listed that the barrel jacks appear to go to 1, 2, 3 & 4.
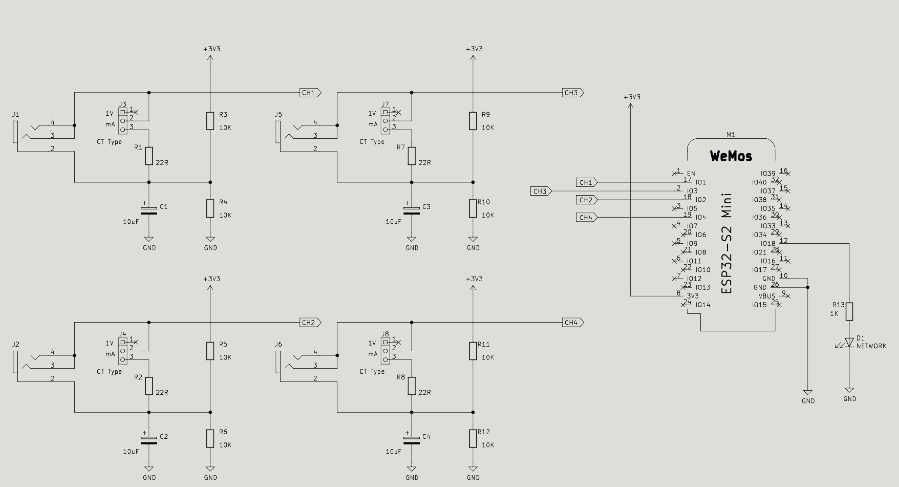
I updated that code to change the GPIO to 1,2,3 & 4 and it validated and got it installed no issues.
Next issue it appeared is that it seemed like the device would randomly disconnect…
Originally i thought it was a power issue but digging through some more docs on ESPHome (WiFi Component — ESPHome) it appears that there is a ‘light’ power save feature with these so that it must turn off/on wifi. This may be okay later down the line but when your trying to set the device up it makes it super frustrating it just disconnecting. Under the wifi listed the power saving as none.
wifi:
  # ...
  power_save_mode: none
This has stopped it disconnecting after about 90 seconds or so… This may also assist in getting the dam thing to flash as this disconnect would be a pain in trying to flash it OTA wirelessly during my updates/changes to the yaml.
I have been typing this out for a fair while now and the device is yet to disconnect =]
I found it easier to set a static IP so i have done this in both my DHCP settings within the router but have also backed this up within the device yaml with this from WiFi Component — ESPHome
wifi:
  # ...
  manual_ip:
    # Set this to the IP of the ESP
    static_ip: 10.0.0.42
    # Set this to the IP address of the router. Often ends with .1
    gateway: 10.0.0.1
    # The subnet of the network. 255.255.255.0 works for most home networks.
    subnet: 255.255.255.0
When you watch the device connect however it does not have any DNS listed so the addition of a DNS1 & DNS2 parameter into the wifi section above below subnet will get you sorted (if necessary)
In essence your WiFi section within the yaml would end up looking something like this
wifi:
  ssid: !secret wifi_ssid
  password: !secret wifi_password

  # Optional manual IP
  manual_ip:
    static_ip: 10.0.0.42
    gateway: 10.0.0.1
    subnet: 255.255.255.0
    dns1: 10.0.0.1

  #powersaving WiFi
  power_save_mode: none
I am yet to get this fully working or deployed but am using this a notes for getting through the issues as well as helping others who purchase it and have a bit of a WTF moment in trying to get it going.