Hi all! I’m EposVox - a tech educator/”YouTuber” who specializes in guides focused around content creation and live streaming. You may have seen me in recent videos about DaVinci Resolve with Wendell such as this and this.
As promised, I have put together a couple guides on setting up a Remote Render Server for BlackMagic Design’s DaVinci Resolve video production software for Linux and Windows. My primary audience focuses on those two OSes, but I could put together a guide for Mac OS if desired, as well - assuming I can get it running on my 2013 Macbook Pro (my only modern Mac).
On the off-chance you wish to purchase a DaVinci Resolve license through Amazon, please consider using my affiliate link: http://geni.us/9hFKcm - this gives me a small kickback for your purchase at no additional cost to you.
I have complete video guides, but am also providing text/screenshot guides here to aid in following along/for those who prefer this format. Since it’s probably more appropriate for this community, we’ll start with Linux.
Table of Contents
Linux Guide:
- Intro/Context
- Requirements
- Installing Resolve
- Configure Networking
- Project Database/Server Setup
- Resolve Settings
- Sending a Remote Render
Windows Guide:
- Requirements
- Installing Resolve
- Configure Networking
- Project Database/Server Setup
- Resolve Settings
- Sending a Remote Render
Linux Guide
Full video guide:
Intro/Context
BlackMagic’s DaVinci Resolve software made a name for itself as THE premium Hollywood color grading tool, but has been getting constant updates and improvements to the extent that it has become a VERY powerful timeline video editor, with a decode and encode engine that far surpasses what Adobe Premiere uses. One of the amazing features of the paid “Studio” version of Resolve is the ability to set up a dedicated Render Server that you send your projects to for final rendering and export, that way your primary machine is free to keep editing or do something else. This is also really great for editing teams.
Requirements
You’ll need a few things:
- Linux OS - I’ve had the best results getting this to work on Vanilla Ubuntu, 18.04+ preferred. It should be possible on other flavors, but I keep running into serious stability issues (or it not running at all) on anything else.
Resolve is natively built for CentOS, so that’s an option, too. It’s easier to install there. - Dedicated GPU - Nvidia preferred, Proprietary Drivers for Nvidia required if so.
AMD is technically usable, but OpenCL rendering is not currently supported on Linux
You can use multiple (non SLI, can be mixed generations) Nvidia GPUs in one system, but Resolve will not use both Nvidia AND AMD in the same system. - BlackMagic DaVinci Resolve Studio (paid version) license key or USB dongle (from older versions)
Installing Resolve
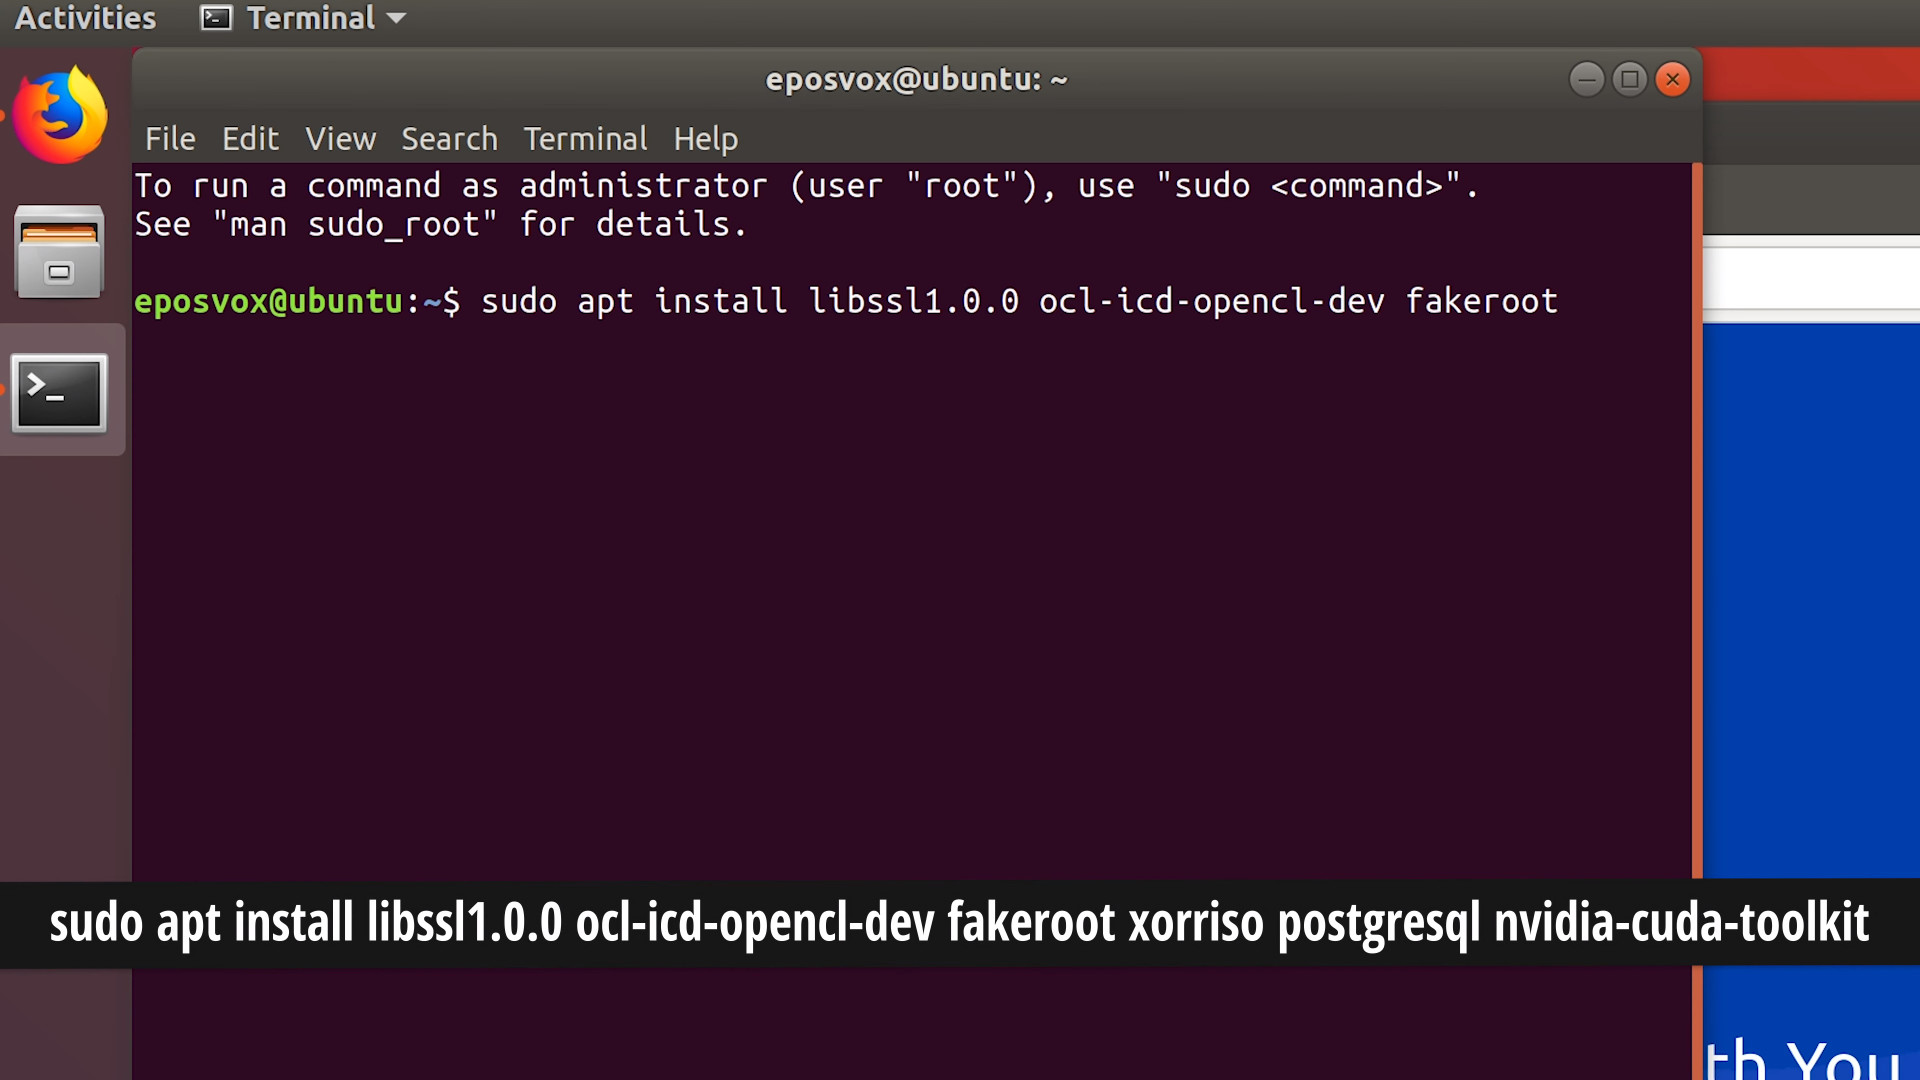
First, you need to install some dependencies. Open a terminal and type:
sudo apt install libssl1.0.0 ocl-icd-opencl-dev fakeroot xorriso postgresql nvidia-cuda-toolkit
Once installed, download the latest DaVinci Resolve Studio for Linux installer from their site.
Extract the zip to a folder of your choosing. I just left it in Downloads.
Next, download the “MakeResolveDeb” script from here.
This should match your Resolve version number. So at the time of recording we have Resolve 15.2 and MakeResolveDeb 15.2. Extract the contents of this archive to the exact same folder as you extracted the Resolve zip to.
Open a terminal and navigate to the location you extracted these so. We’re going to run the MakeResolveDeb script. Type:
./makeresolvedeb_15.*.sh studio
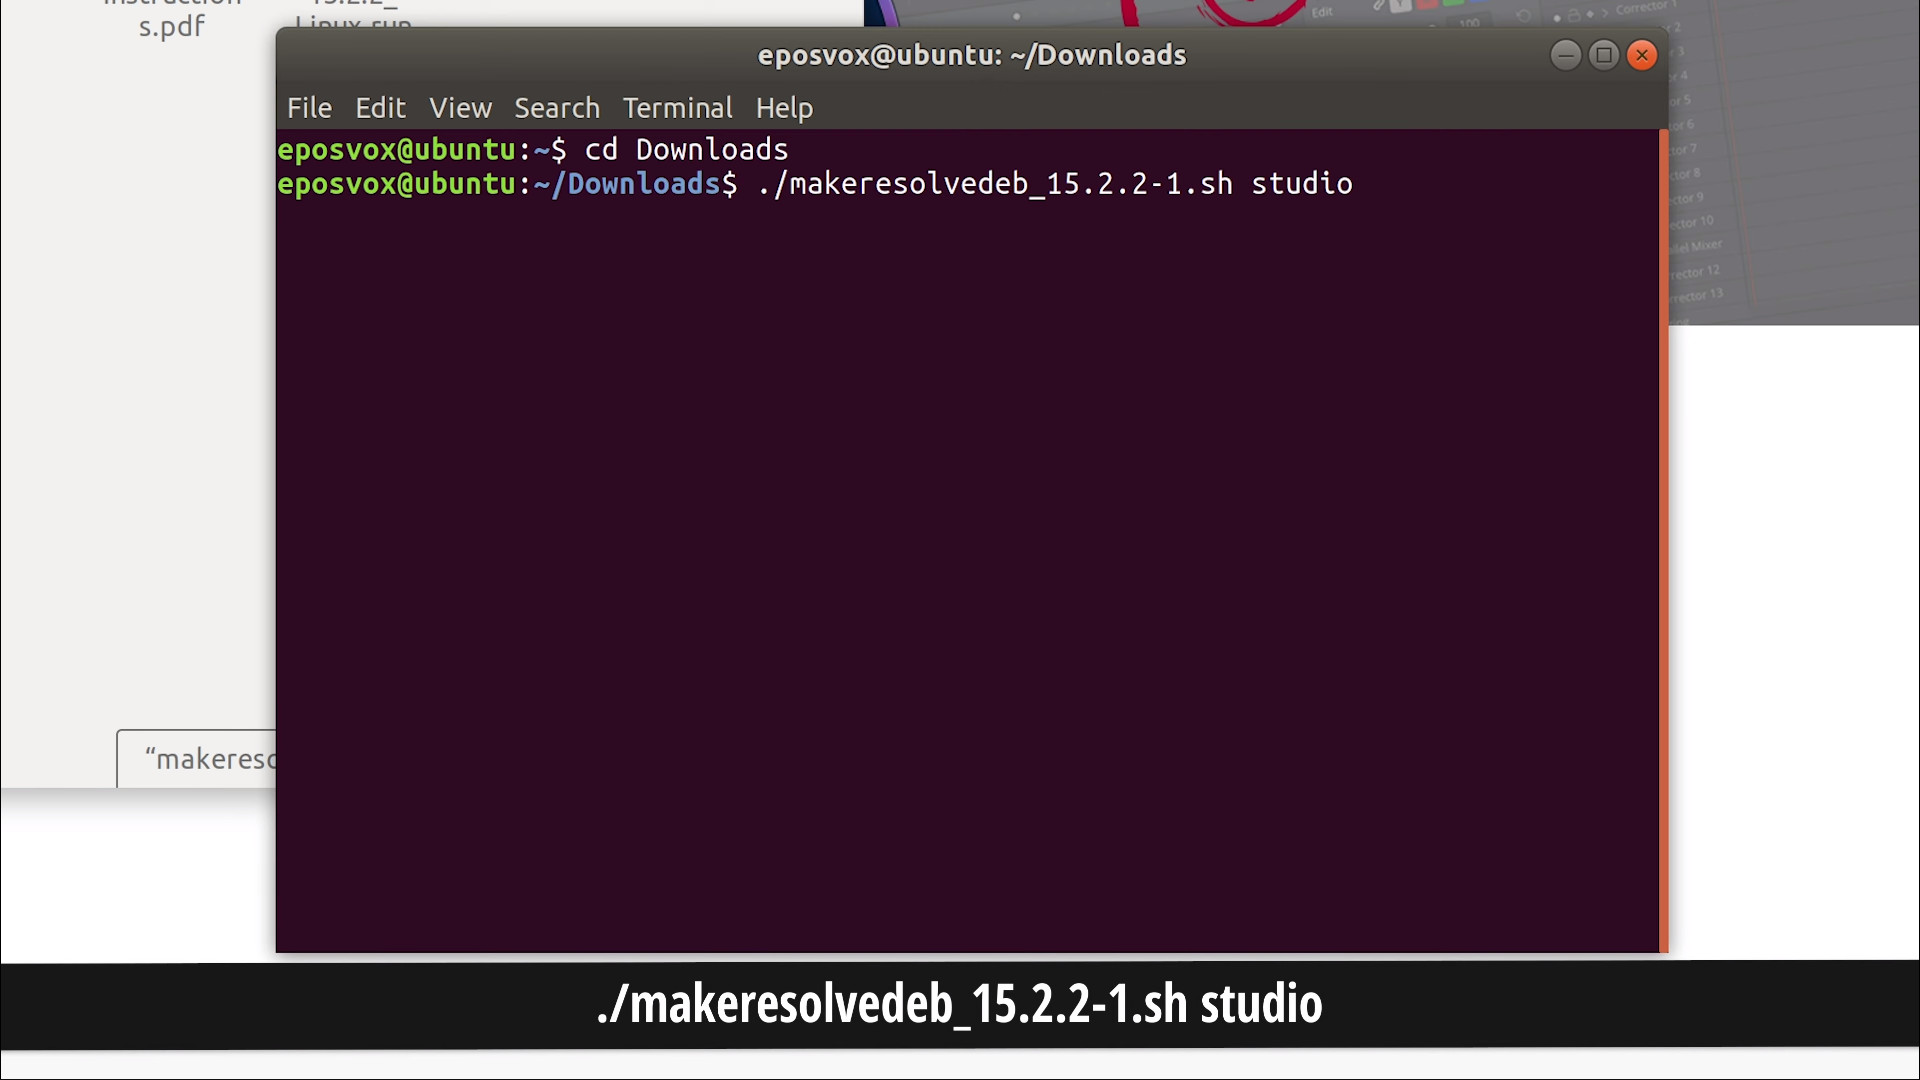
I just type “makeresolvedeb” and hit TAB and it finishes the rest for me.
(This script can be used to install the free version of Resolve by typing “Lite” instead of “Studio” when paired with the free installer instead of the paid one - but the Lite version of Resolve does NOT let you use the render server features.)
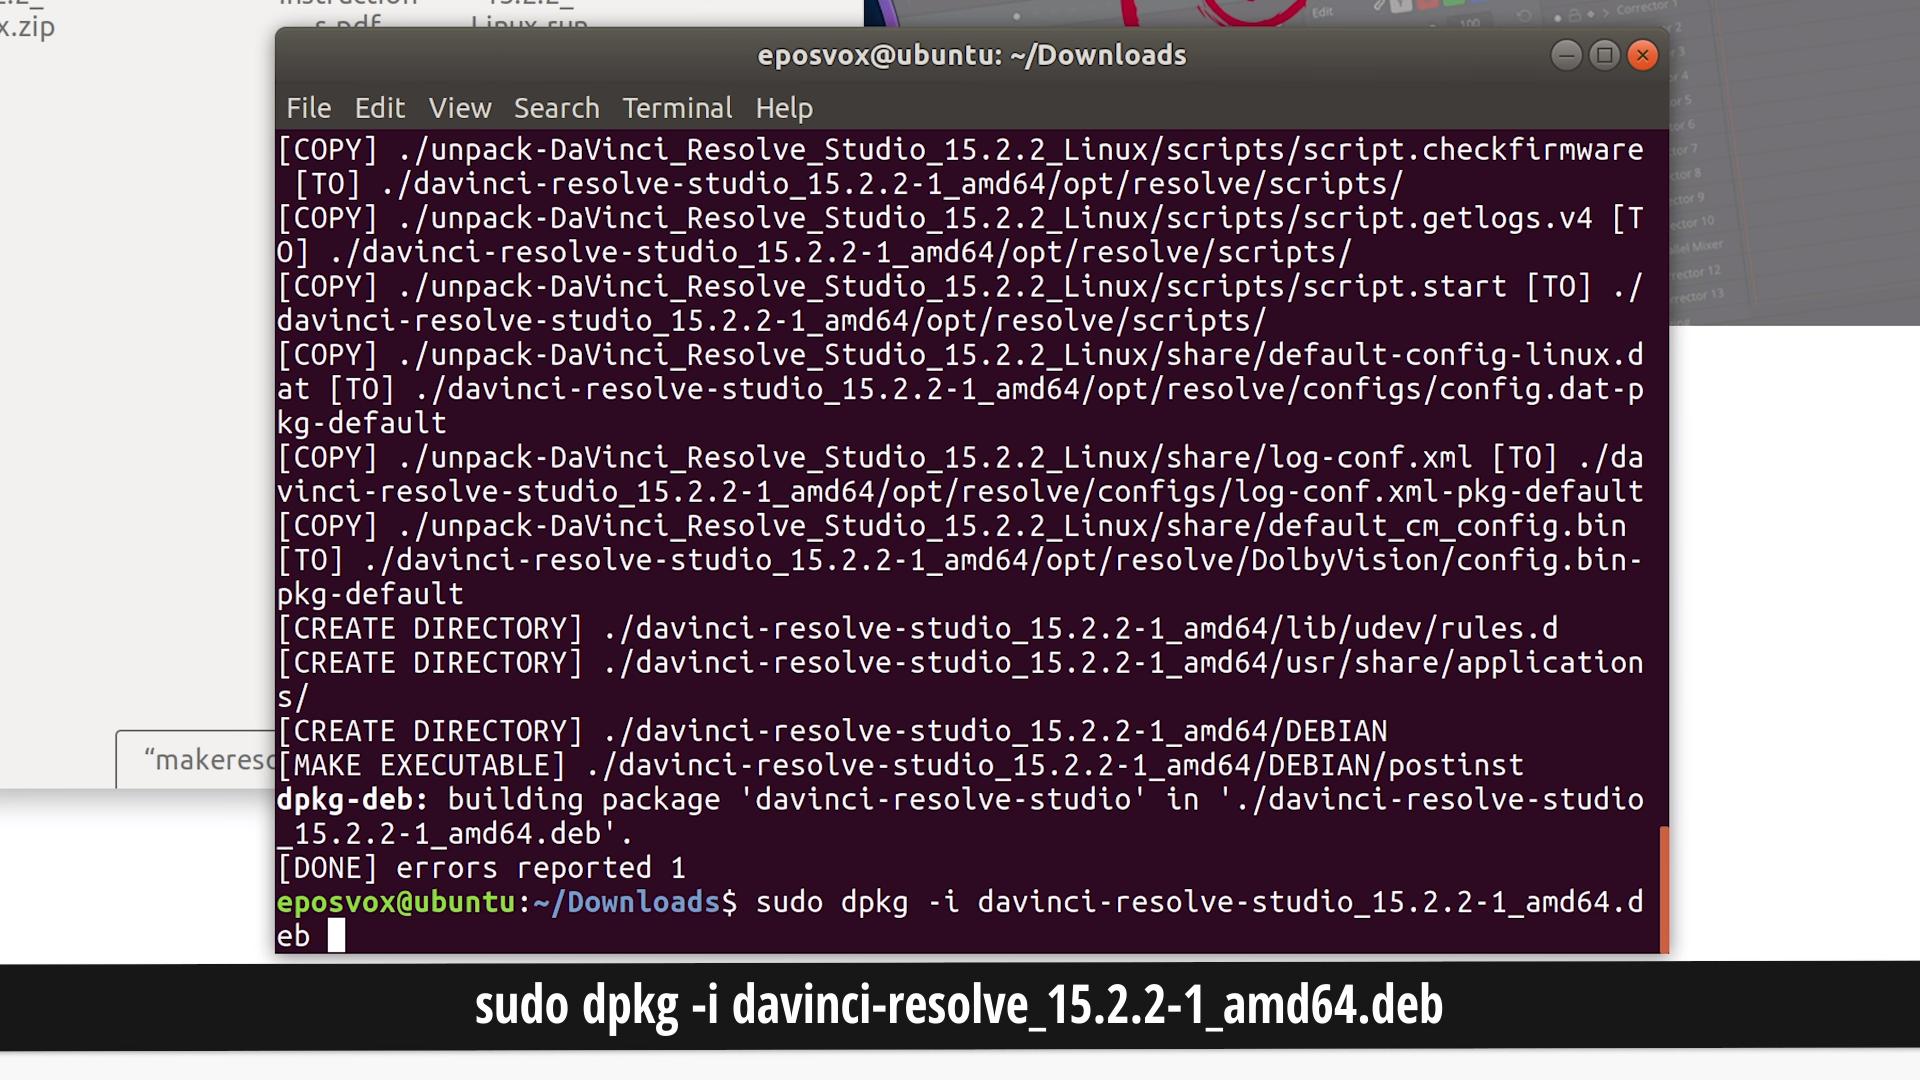
This step takes a minute, let it sit there and do its thing. It might say there was one error at the end, this SHOULD be fine. Once, done it’s time to install the Debian package file. Type:
sudo dpkg -i davinci-resolve_15.*_amd64.deb
Again, TAB is your friend here. Let it install.
Configure Networking
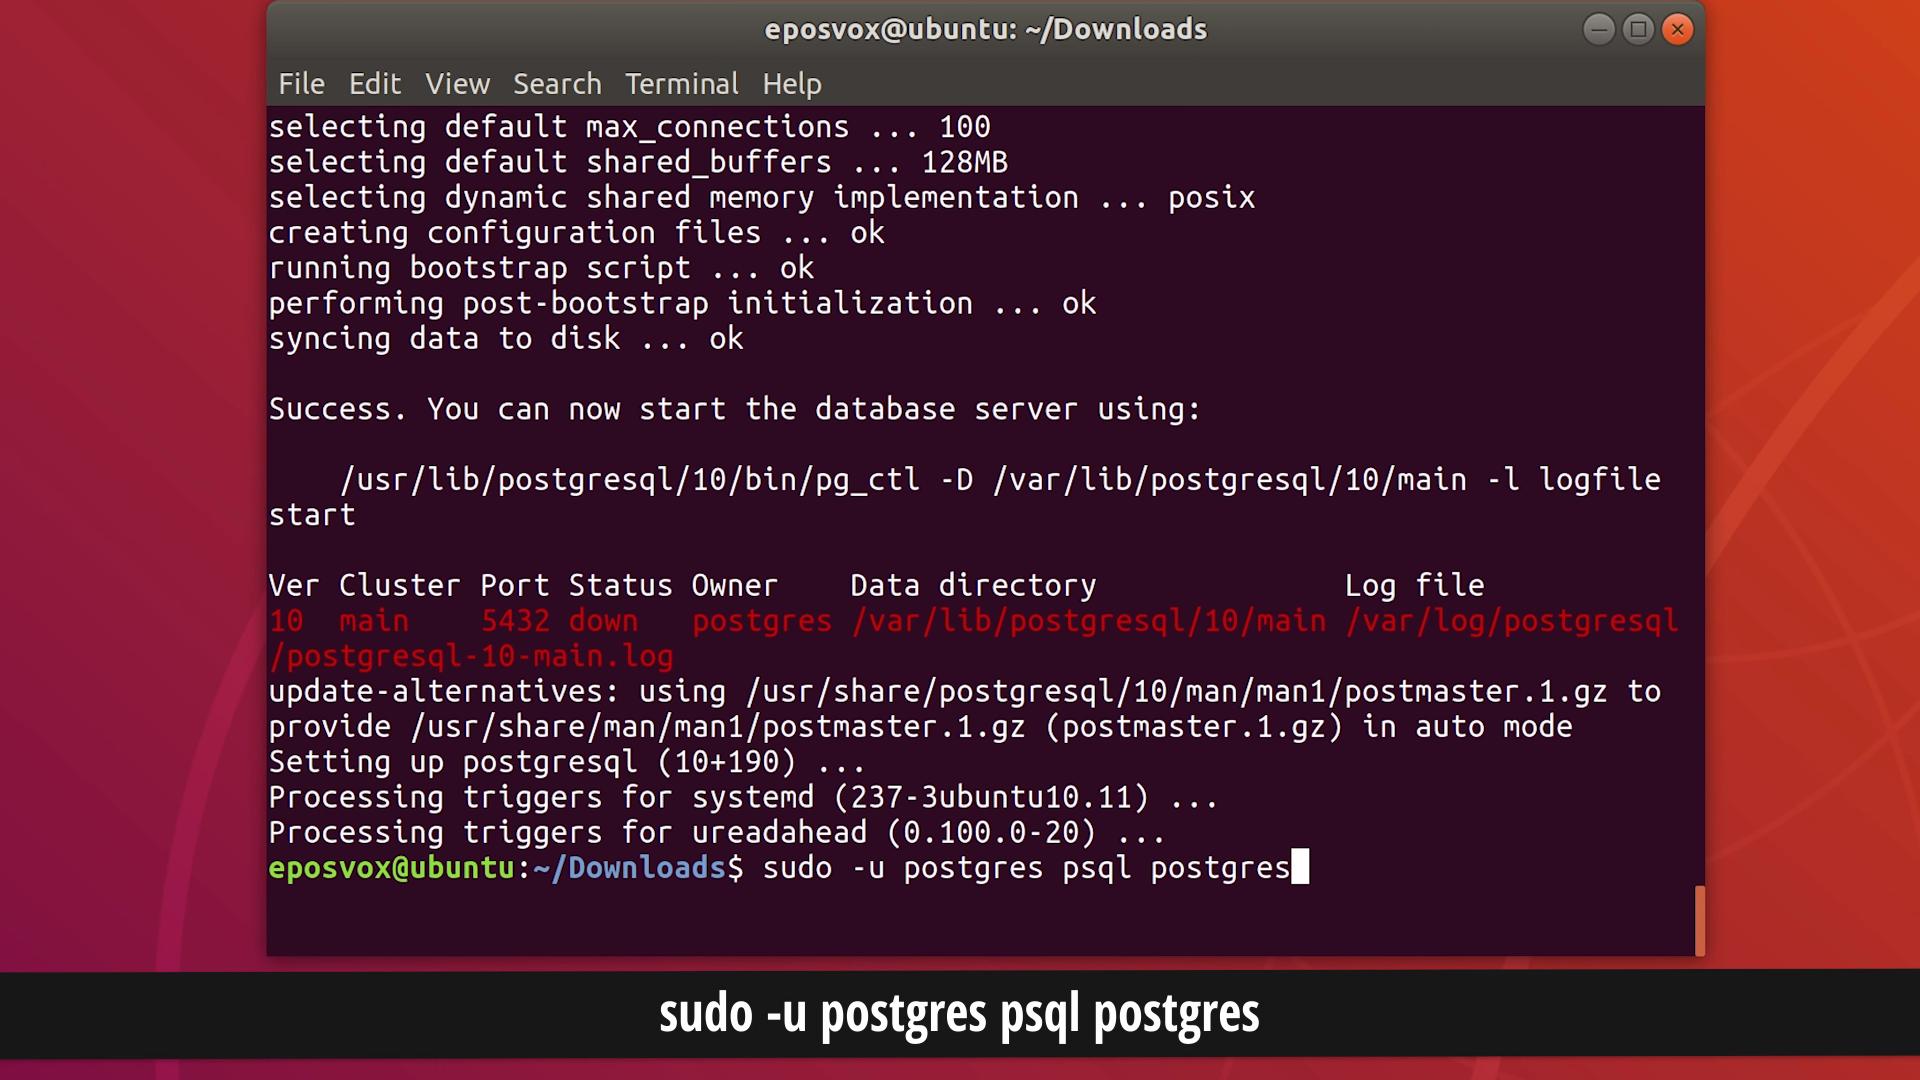
It’s time to configure PostgreSQL.
In a terminal, type:
sudo -u postgres psql postgres
Then once you get the postgres prompt:
\password postgres
And set a password.
Then type:
\q
to quit.
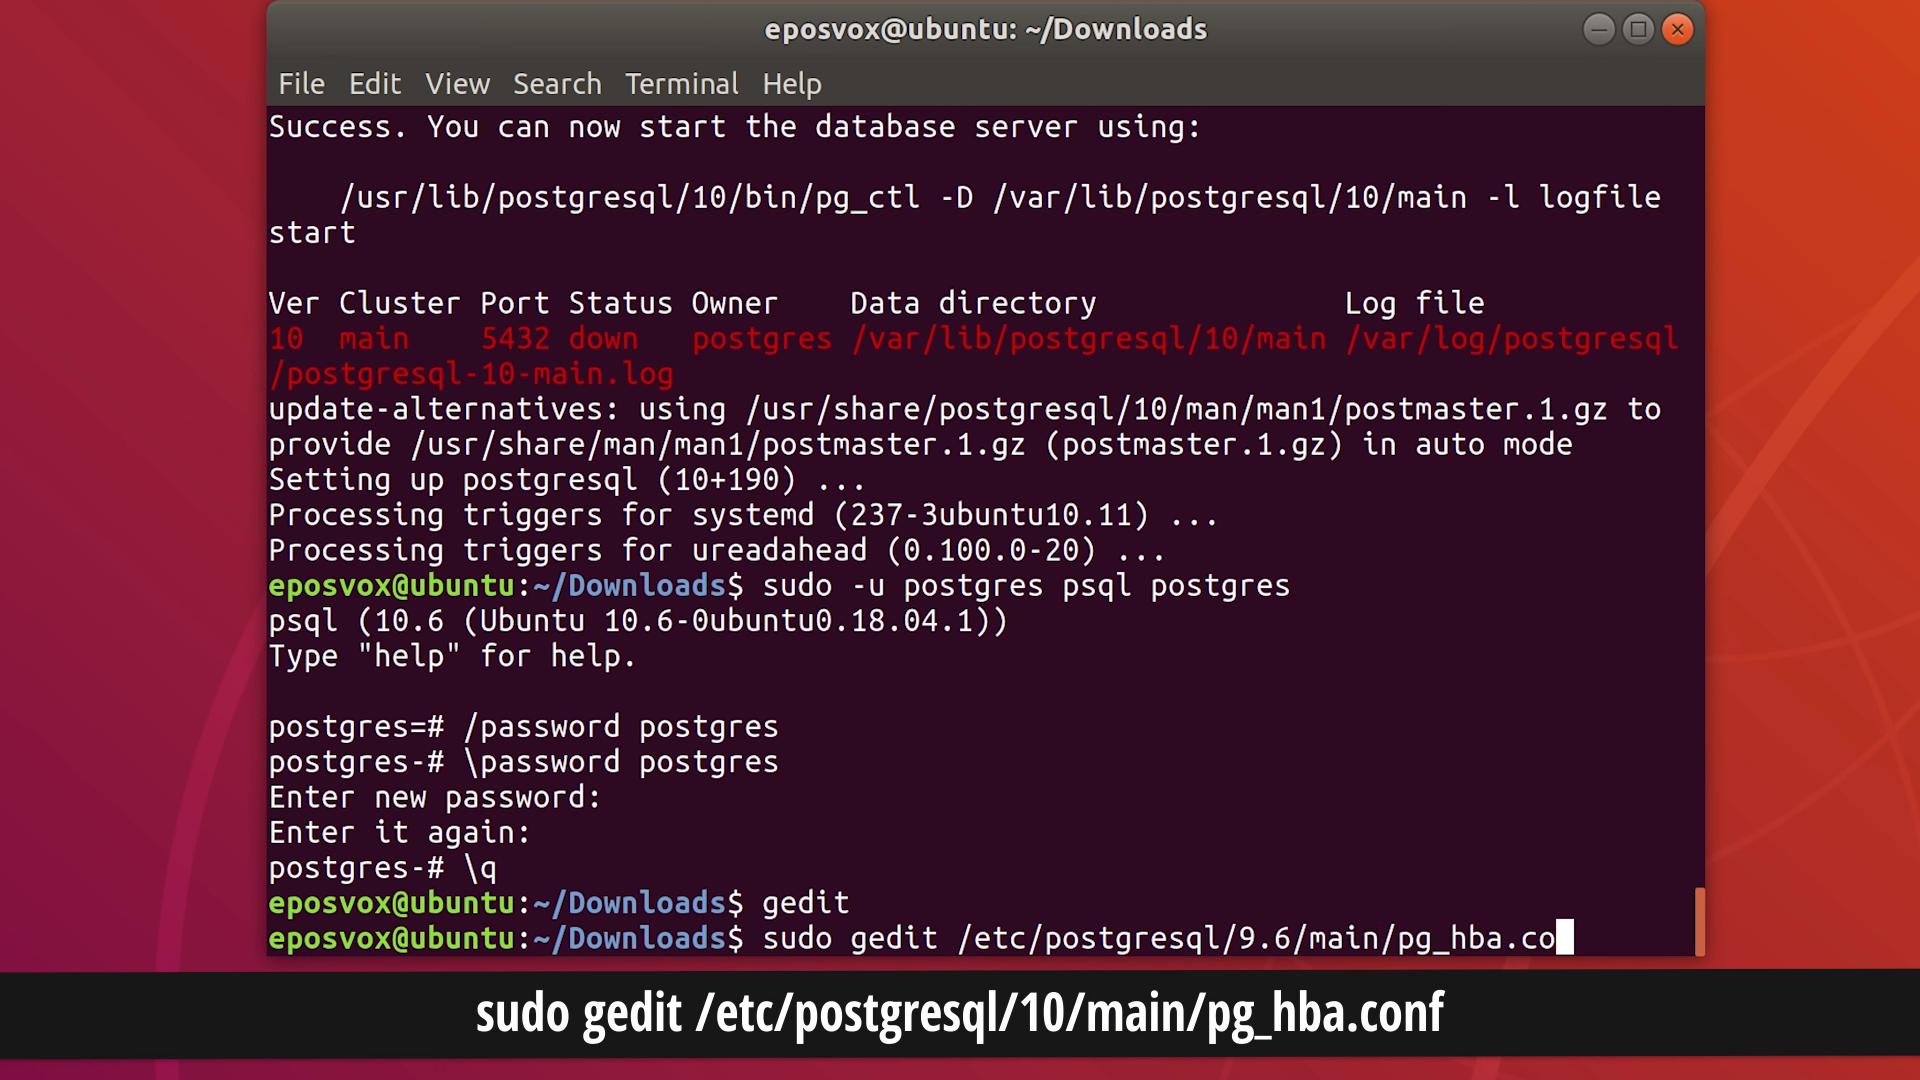
Next, you need to make a change to the PostgreSQL configuration.
In a terminal, type:
sudo gedit /etc/postgresql/10/main/pg_hba.conf
If your postgresql version is different than 10, replace 10 with your version number.
Scroll down to the bottom with lines that describe local socket connections. There should be a line that says “Local All All Peer”. In that line, change “peer” to “md5”.

Save and close the file.
In the terminal, type:
sudo service postgresql restart
And honestly I recommend just rebooting your system at this point.
Next, you’ll want to set up file sharing between your two PCs. Take note of the mount locations on each, as we will pair these up later. Ideally, set up your file shares in fstab so they mount on startup.
Project Database/Server Setup
It’s time to actually launch DaVinci Resolve. Activate with your license key, or make sure your USB dongle is inserted before launching.
Go through setup. We’re going to set up a Project server that manages and sees the project files. Both the editing client and the render server need to be connected to the same Project database - and the projects imported or created on that database, but the database server does NOT need to be running on the render server itself.
(Some editing studios use a Mac Mini with its fast storage as the project database server. I’m not really sure why you’d want that as a separate node in your configuration, but it is possible.)
Let’s make a shared database.
Once you’ve reached the Project Manager, click the “Show/Hide Databases” button next to where it says “Projects” and then click “New Database” at the bottom.
In the window that appears, change from “Connect” to “Create.”

Click the “PostgreSQL” radio button. Name your server. Typically, I’ll make this the same name as the PC name itself to keep things easy. For “location” type in the local IP of your machine in place of 127.0.0.1. To find this, open a terminal and type:
ifconfig -a
And hit enter
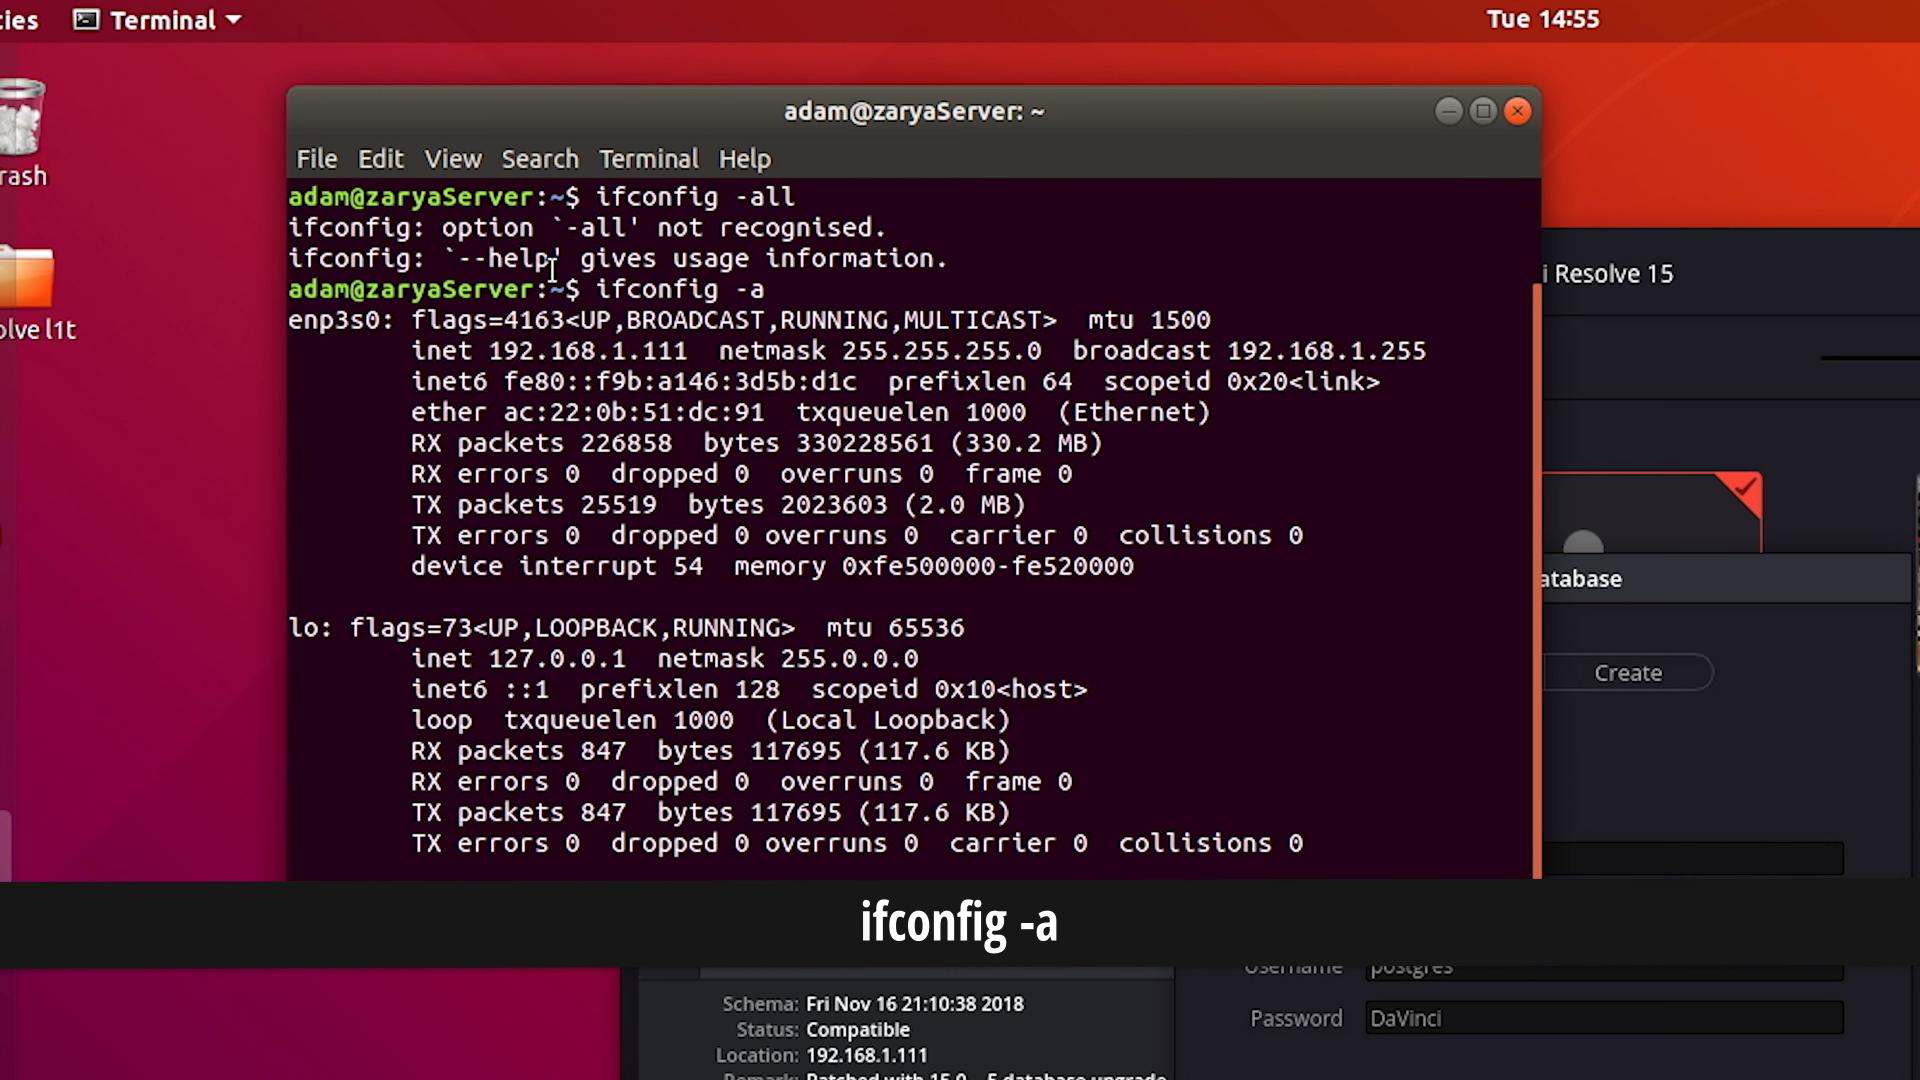
Typically the network device you want starts with 192.168 - but this may differ depending on your networking.
Give your Database a username and password. Unless you have specific reasoning, the defaults work fine. Hit Create.
Once your new Database is made and selected, you’ll have an empty project list, or an auto-generated “Untitled Project.” (Leave that one there.)
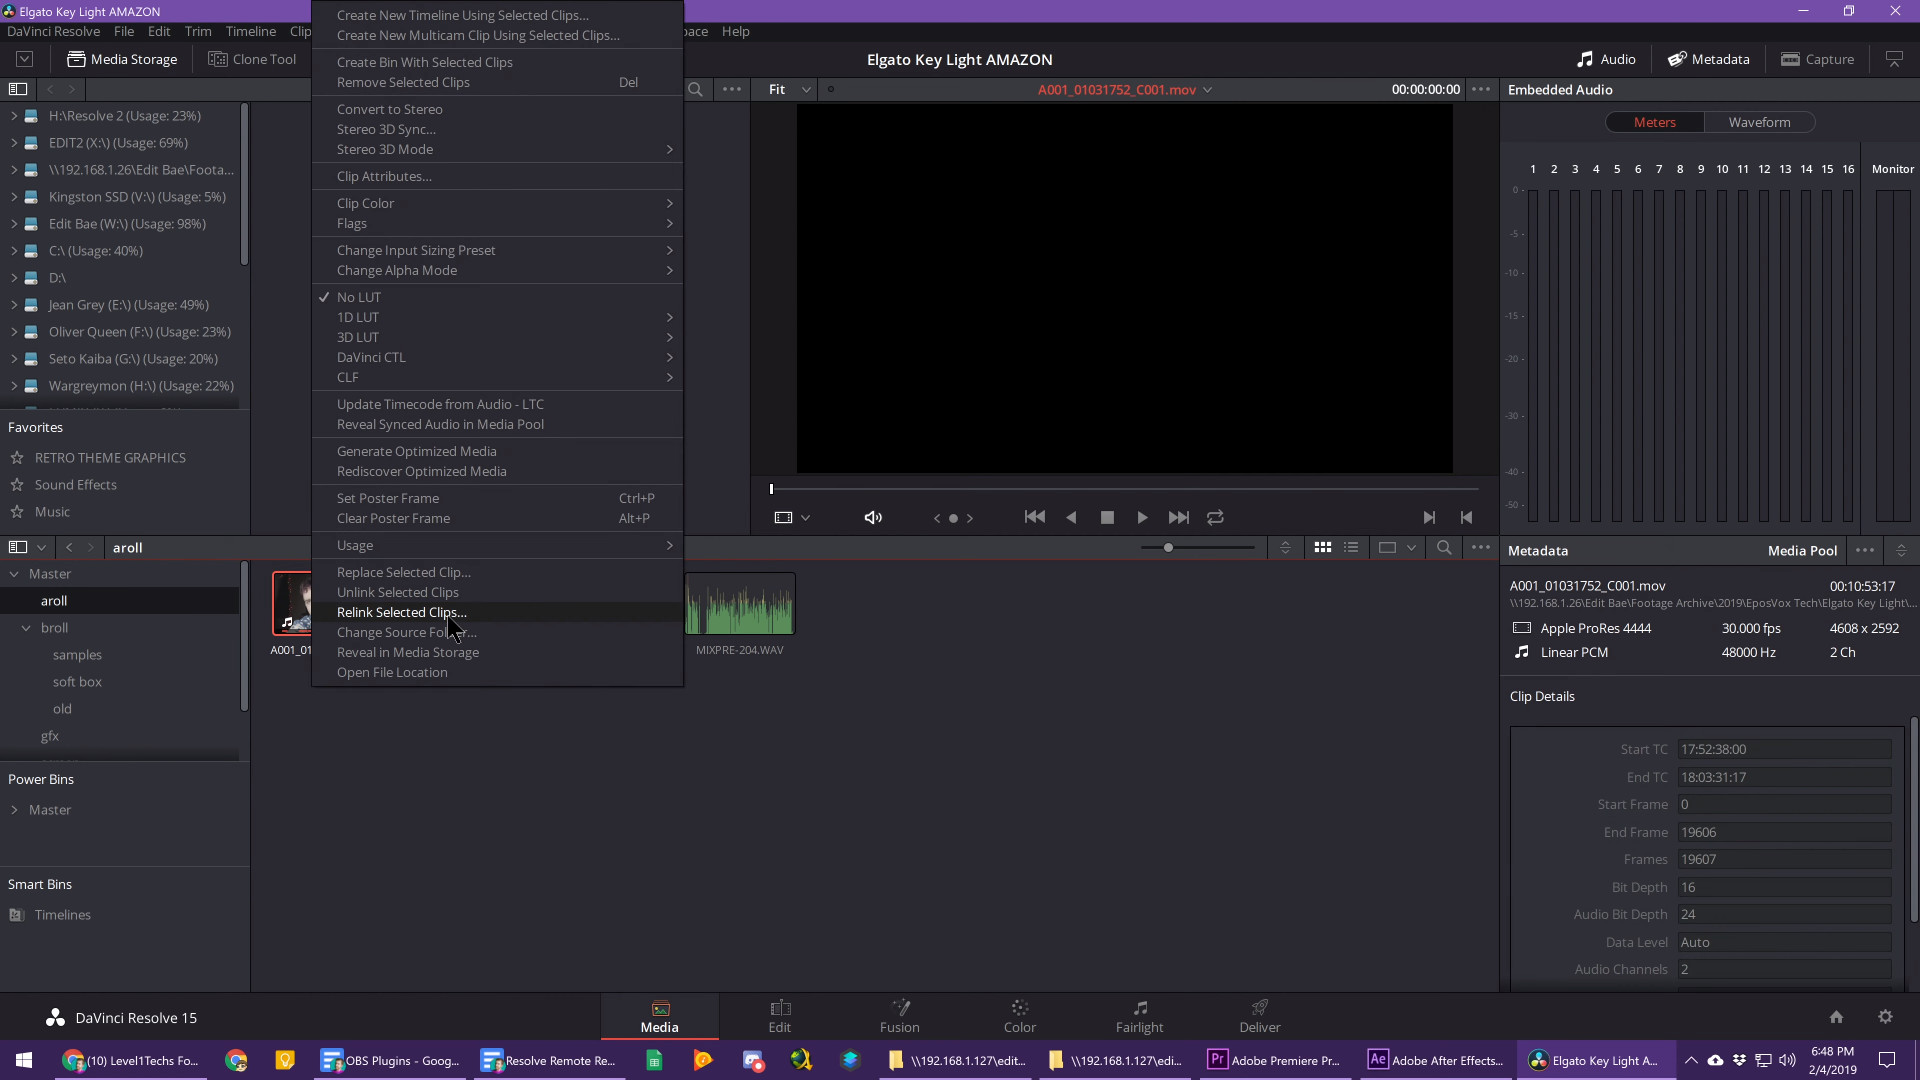
If you need to move projects from a local database or another PC’s database, select the project in its appropriate database project manager, right click and hit “Export”. Save the file. This can take a good amount of time for bigger projects, and it doesn’t really indicate that anything is happening. If the program becomes unresponsive, leave it for a bit until it’s done.
Once finished, navigate to your new shared Database, right click in the empty space and hit “Import.” Select that file. Again, this may take time and become unresponsive.
You may have to re-link your footage the first time you open it after moving it between databases. Simple select your footage in the Media workspace, right click and choose “Relink media” and navigate to the folder its stored in.
Next, you want to connect to your shared Database on your editing client computer on the same network. Open Resolve’s Project Manager, click “New Database” and leave it on “Connect” this time.
Choose the PostgreSQL radio button. Type the name, IP address, username, and password that you just set on the render server (or project server) and hit Add. If PostgreSQL is set up properly on both machines and your networking is cooperating, it should add the server and you be good to go. If not, check on your PostgreSQL configuration. On Windows you will have to add PostgreSQL allowed access through your Windows Firewall.
Now, whenever you make new projects, you should create them in the shared database from the start and be good to go.
Resolve Settings
Now go ahead and open that “Untitled Project” - as we need to change some settings in Resolve.
Click the DaVinci Resolve menu and click “Preferences.”
(I recommend watching some guides or reading the manual to fully optimize these for your machines, but I’ll cover relevant ones here.)
Under “Memory and GPU”, set how much memory you want Resolve to have access to - you’ll know if you need specific settings for this.
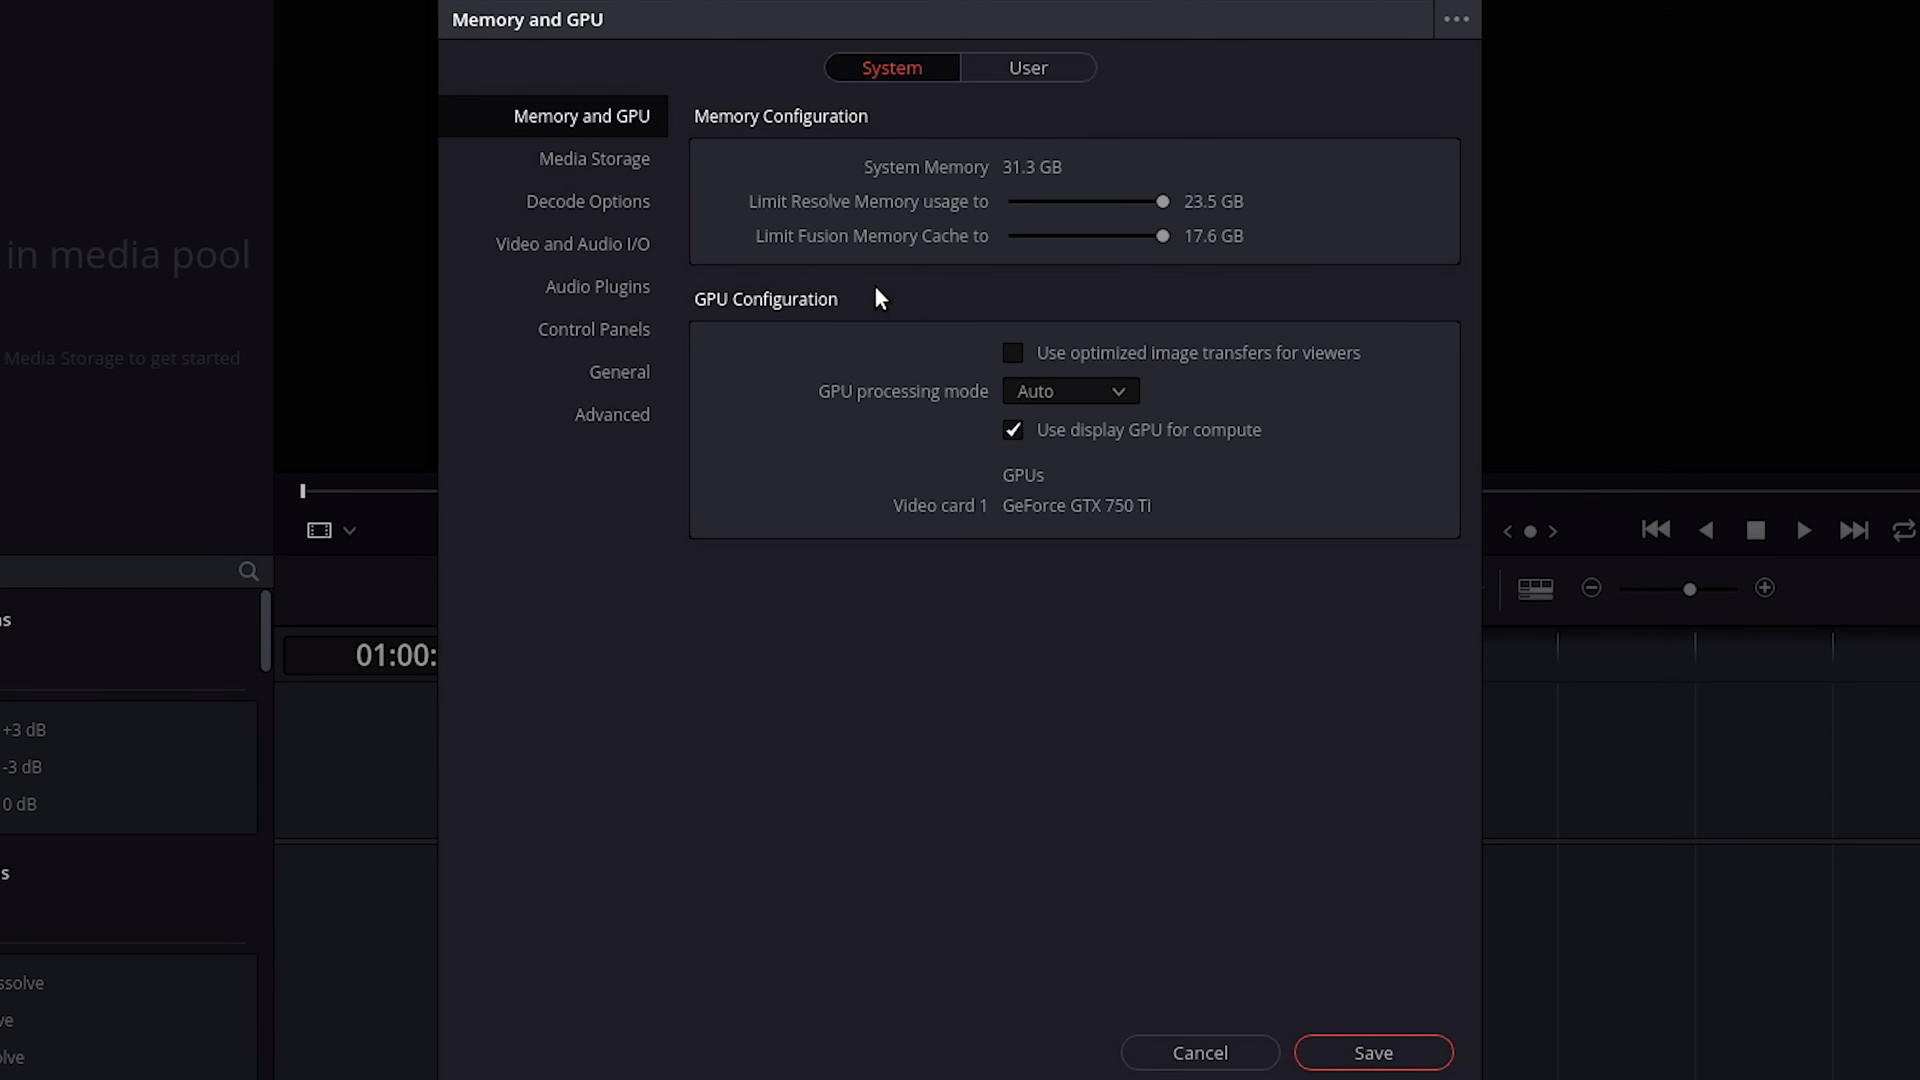
Leave “GPU Processing Mode” on Auto, but check “Use display GPU for compute” unless you have a reason to do otherwise. If you don’t do this, on single-GPU systems, you’ll just end up doing all your rendering in software CPU mode only. Here you can also make sure your GPUs are detected properly. You can use multiple GPUs - no need for SLI or anything, you can mix and match within the Nvidia platform, but Resolve only utilizes CUDA, and thus Nvidia GPUs for the time being.
(It can work with AMD GPUs, but may not leverage OpenCL just yet (they’re working on it) and you may have to install specific drivers or OpenCL toolkits to get it to work.)
Go to “Decode Options” and uncheck “Use GPU for Blackmagic RAW decode.” This is fine on Windows, but causes glitching and crashing on Linux at the moment. Of course, if you are never going to utilize Blackmagic’s RAW codec from their cameras this isn’t an issue, but worth checking anyway. Make sure the other 3 boxes are checked.

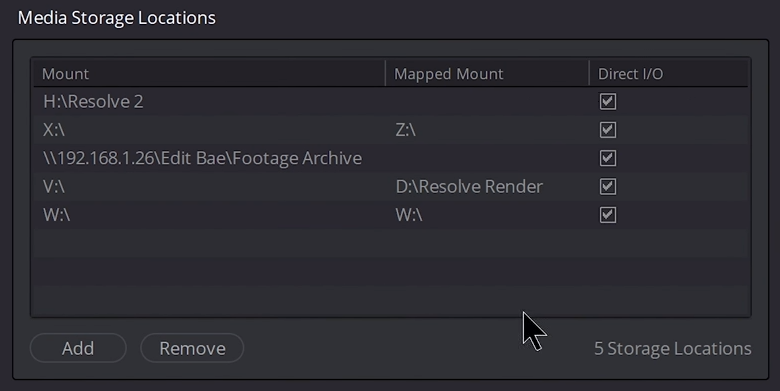
Next, go to “Media Storage.” Here, add your local network share and your footage locations.
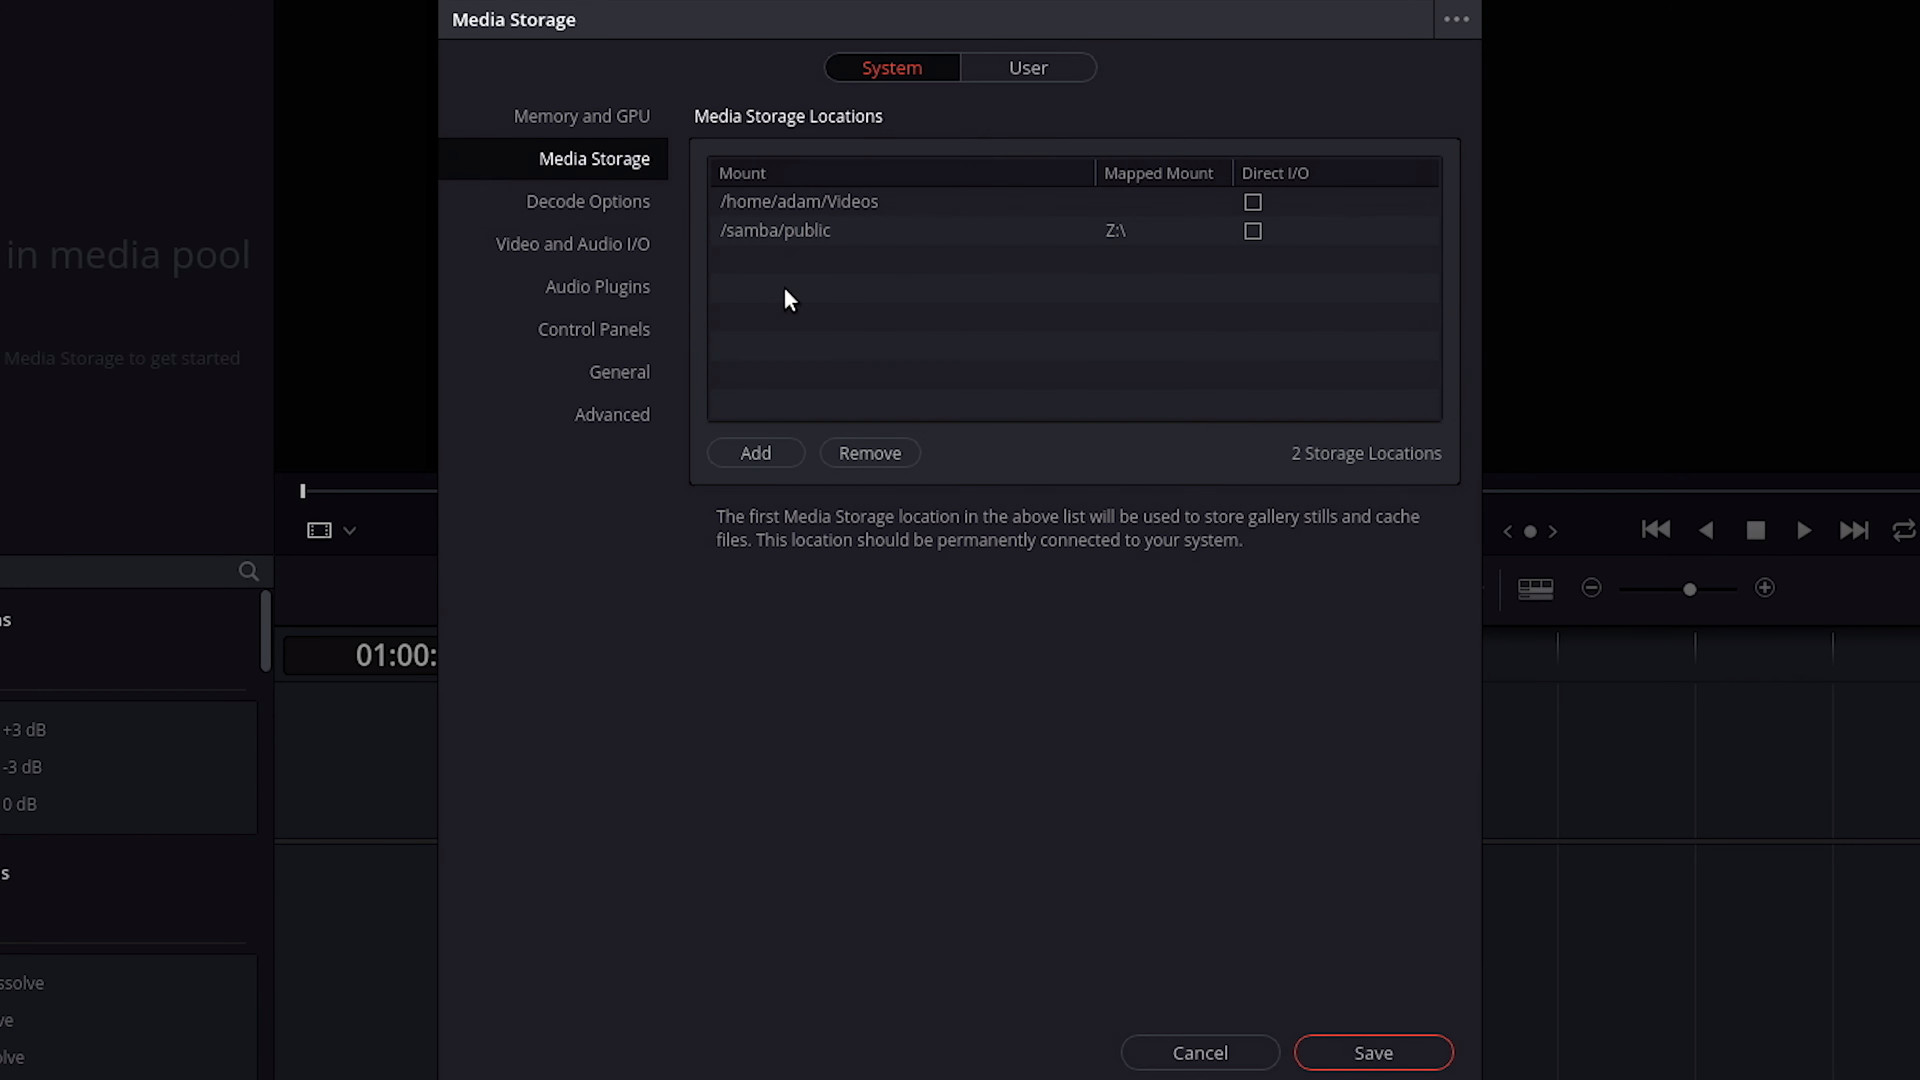
The “Mount” column is where the storage mounts are located according to the render machine itself. “Mapped Mount” lets you input a secondary mount location, which will be where it is mounted on your editing machine. Since I use Windows to edit and Linux to render, on my render machine the “Mount” is the local share and my Synology NAS mount on Linux and then “Mapped Mount” locations are the drive letters they are mounted to on Windows. That way Resolve knows where your footage is supposed to be across both machines.
While you can render to a network storage location or even your editing PC from your render machine - you’ll get the best performance out of writing to a drive local to the rendering machine. I recommend setting up a shared “Renders” folder on the render machine, mounting that on your editing PC, adding those to the Media Storage locations in Resolve and setting your projects to render there during export for the best performance and fastest renders. I’ll cover this more in the next section.
Sending a Remote Render
Now that we have the Database set up, you’re able to create and edit projects.
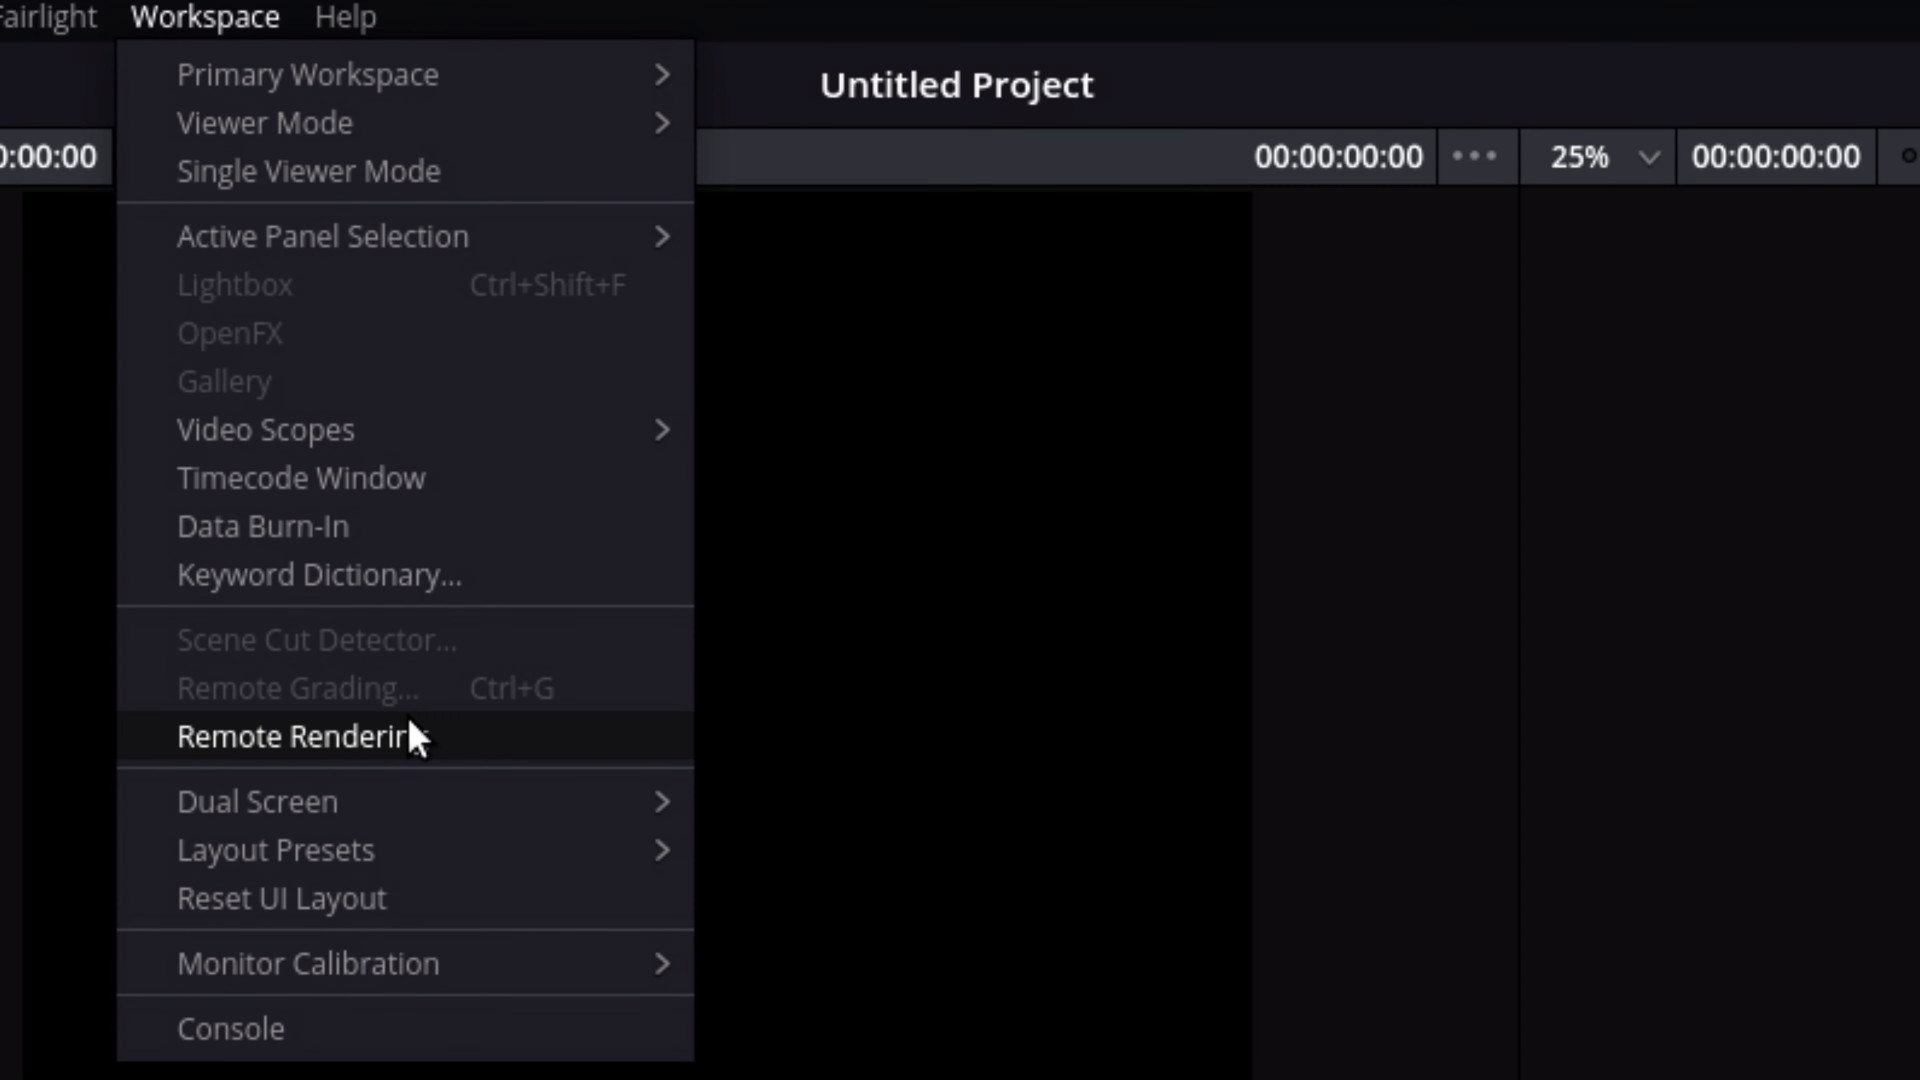
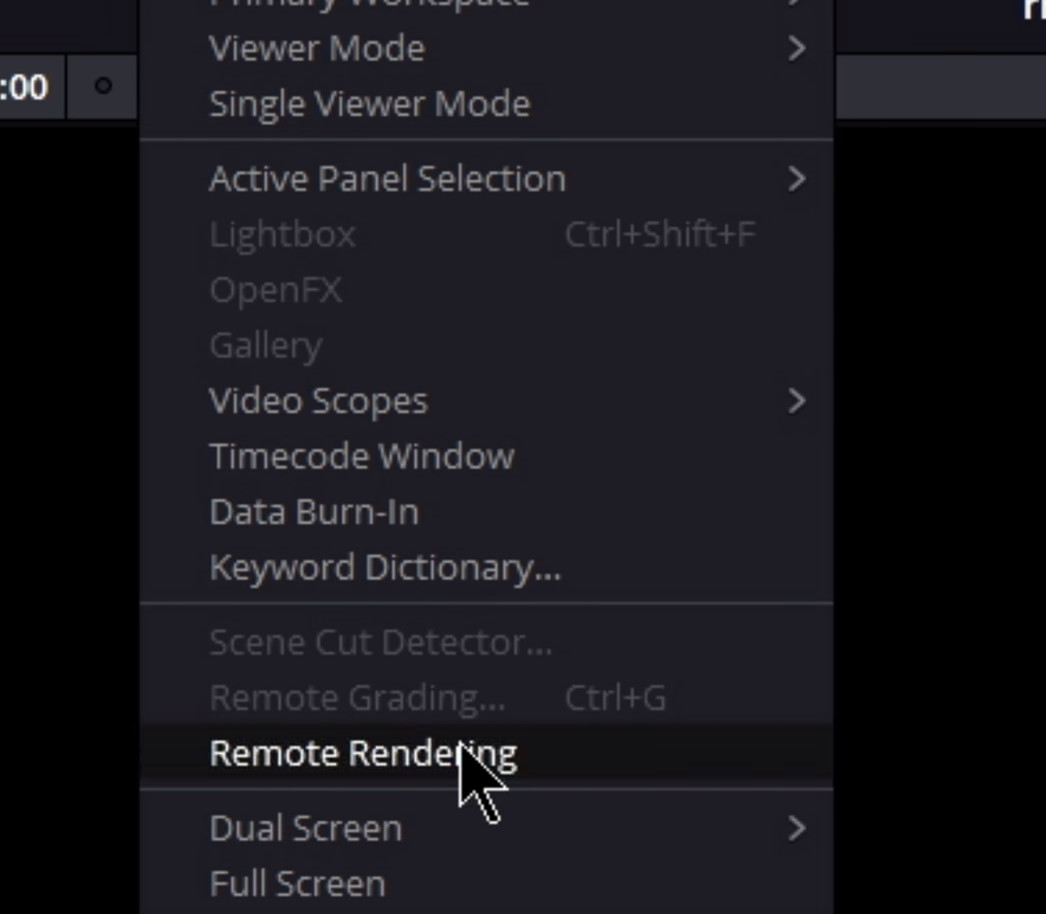
To prepare your render server for remote rendering, open that “Untitled Project” in your shared Database, then go to the “Workspace” menu and choose “Remote Rendering.” This will let you monitor queued render jobs, the progress of the ongoing render, etc. - but does not let you interact with the software.
(At the time of creating this guide, the DaVinci Resolve manual still references a special Remote Rendering workspace accessible by right-clicking the empty space in the Project Manager that acts more as a smaller que - BUT this is outdated. This workspace is no longer available, and you must open an empty project and use the Workspace menu to access it. BlackMagic staff are aware of the issue and will update the manual in time.)
You can also launch a headless remote render server by sending the launch command via a terminal with “-rr” at the end. So:
/opt/resolve/bin/resolve -rr
But this is 100% headless, you don’t even get terminal-based feedback as to how renders are progressing or anything, so I don’t like this approach.
Once you’re ready to render something, it’s time to head to the “Deliver” tab in Resolve (on your editing computer).
Give your render a file name. For “Location” you want to browse to a directory mapped and listed in Resolve on both machines. Again, I recommend telling it to render on a local drive inside the render machine for best performance. Make sure you have write access to that folder in your folder sharing settings.
Choose your format settings and hit “Add to Render Queue.”
BEFORE you hit “Start Render”, click the little signal or wireless-looking icon next to the queue entry and choose the name of your render server. The project has to be open from within the PostgreSQL database for this to show up.

It’s also worth noting here that in a big multi-editor and multi-server workflow, you can actually just tell it to render on “any available machine” which might have some workflow benefits for you.
There are a couple VERY important considerations with your video format, however. On Windows, Resolve can utilize its own “Native” H264 encoder, but this is not available on Linux. If you try to send a render job to a Linux render server with the “Native” encoder option selected for H264, it will error out because that encoder is unavailable on the server.
Instead, Linux just leverages GPU encoding for H264 and H265 encoding - and at this point only on Nvidia as far as I can determine. This means that your editing and render machine should match having the same GPU family - Nvidia or AMD, preferably Nvidia at the moment - that way you can assign the correct encoder for H264 specific tasks.
Also, I’ve had serious issues getting Resolve to cooperate with rendering GoPro Cineform codec files on Ubuntu. This could be due to a missing dependency or something, but I’ve not figured it out thus far. I use this mezzanine codec heavily in my Premiere Pro workflow, so this was disappointing. Also, if you’re editing on Mac, ProRes export in Resolve is unavailable on Windows and Linux. But DNxHR is a fantastic multiplatform mezzanine codec that works on them all and renders quite fast in Resolve.
Also, you CAN install OFX plugins by putting the files in /usr/OFX/Plugins - though this directory might not exist yet and you’ll have to create it.
This location doesn’t follow Linux directory etiquette, but you can symbolic link it to somewhere in your Home folder. That being said, most of the plugin suites I have found are still Windows and Mac only, and just copying the OFX files doesn’t allow them to work in your renders on Linux, so your mileage may vary.
Windows Guide
Full video guide:
Requirements:
- Operating System - Windows 10 most compatible with latest features
- GPU - Nvidia Preferred, AMD can work. Make sure drivers are up to date
- BlackMagic DaVinci Resolve Studio (paid version) license key or USB dongle (from older versions)
Installing Resolve
Download the DaVinci Resolve Studio installer from BlackMagic’s website.
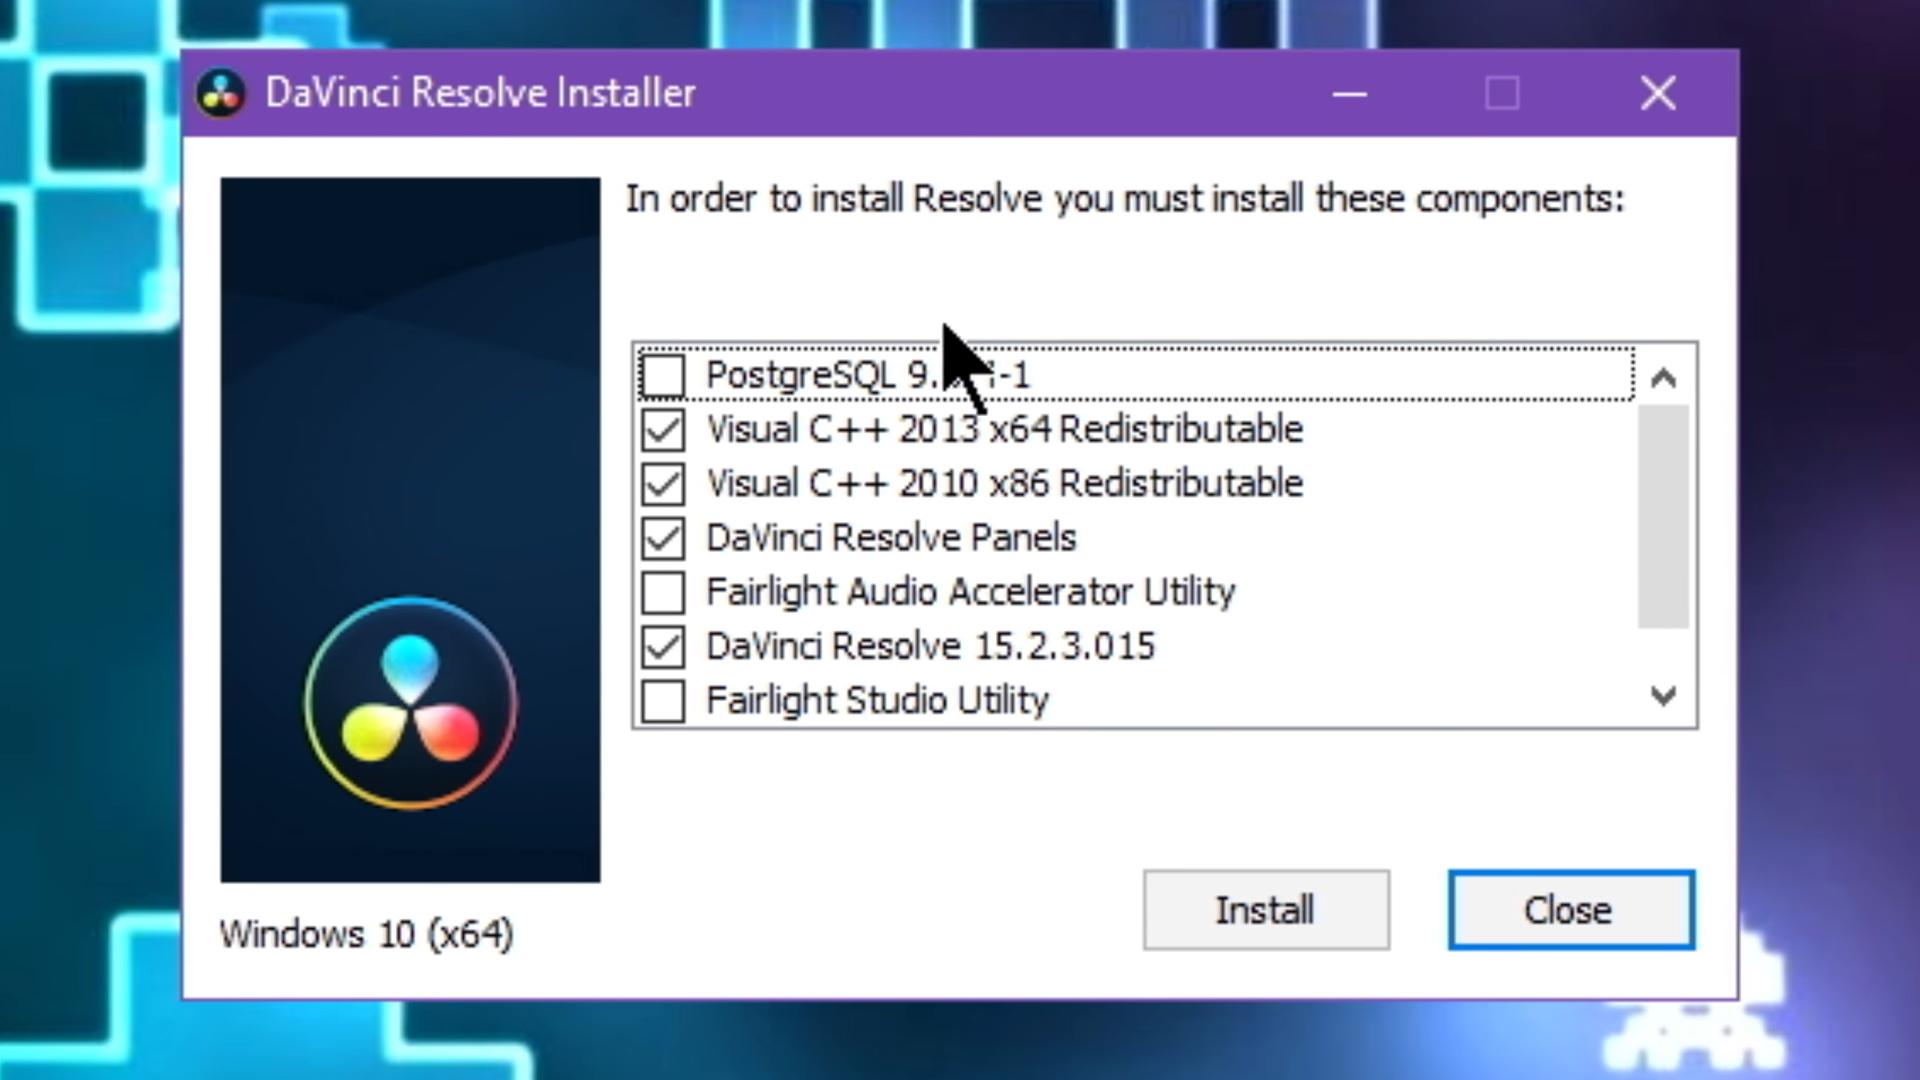
Run the installer. When prompted, make sure you check ALL of the boxes for which features to install. Especially important is PostgreSQL, as that is what we will need to make the Remote Rendering workflow work.
Configure Networking
Once done, you need to let PostgreSQL through Windows Firewall. If you have third-party firewall software set up, you’ll have separate steps for that software.
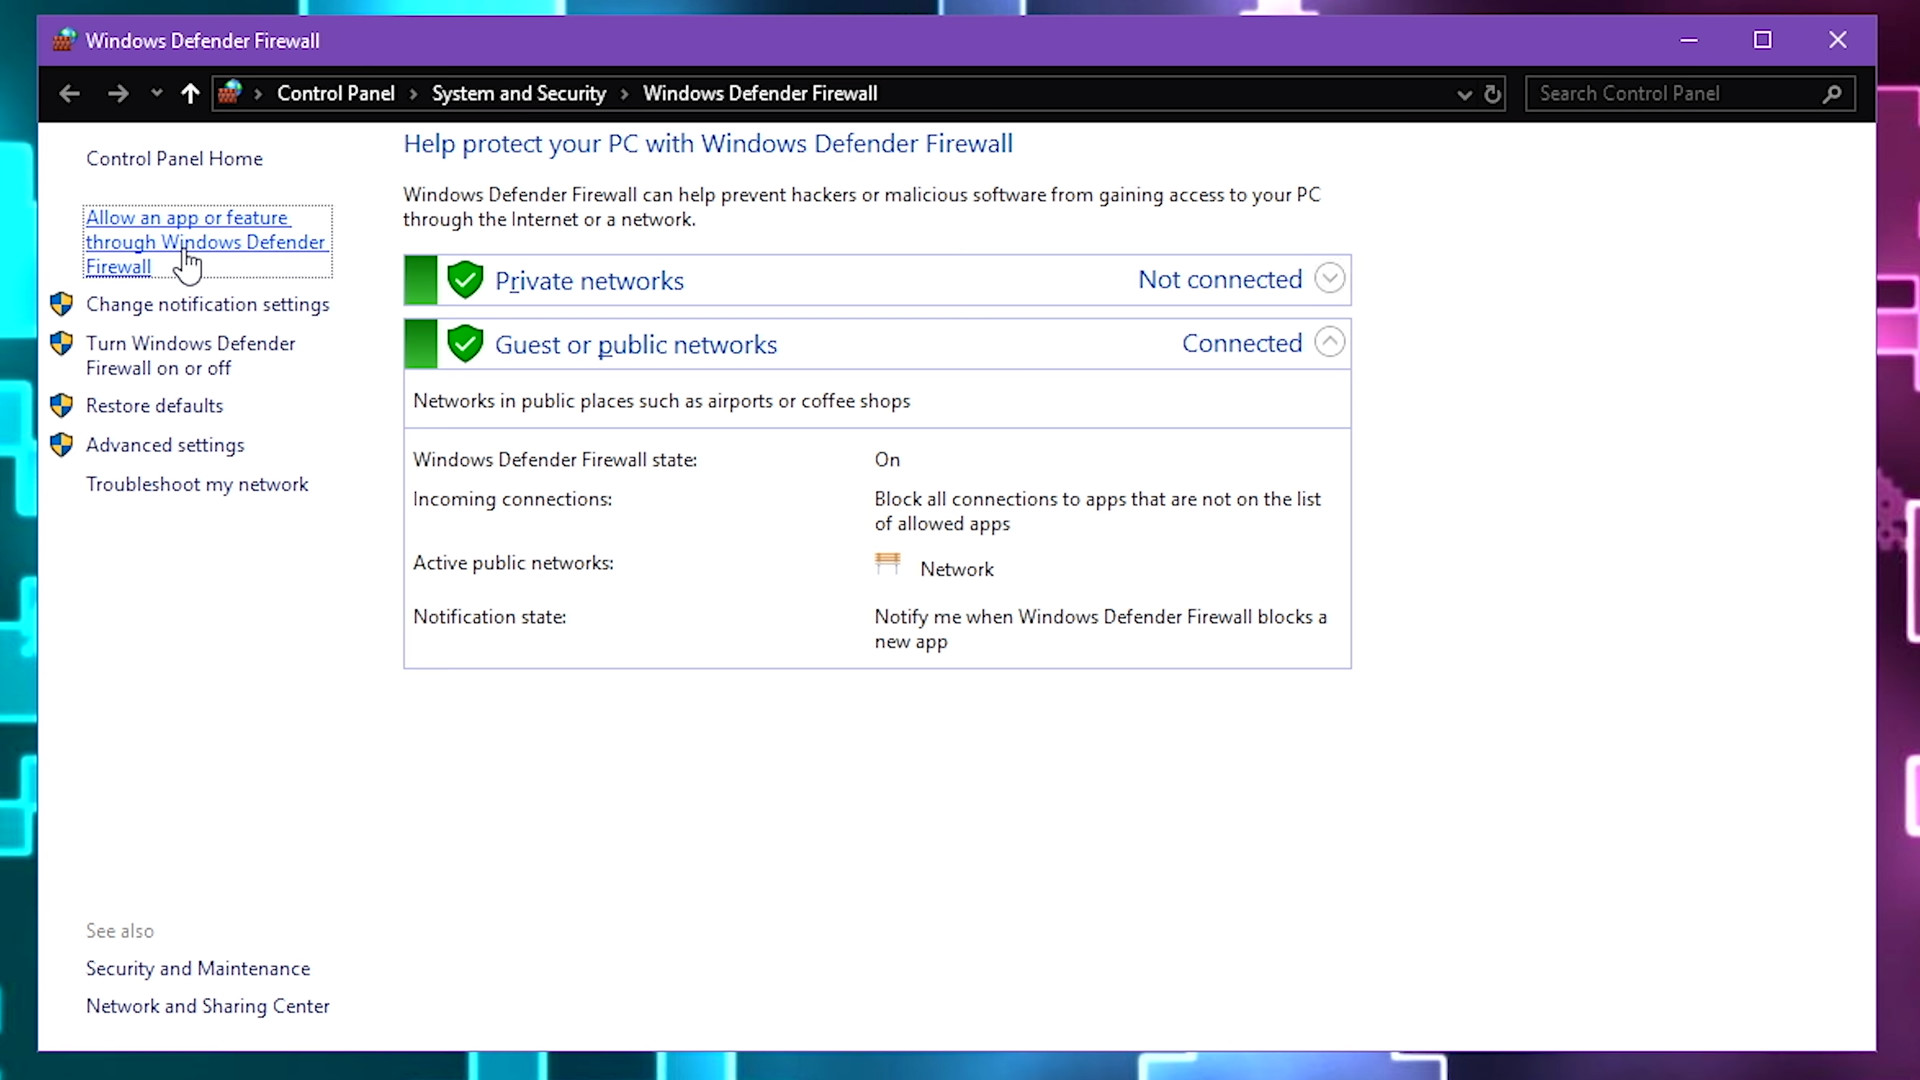
For allowing access through the Windows Firewall, hit the Start button and type “Firewall.” Click on “Windows Defender Firewall”. Click “Allow an app or feature through Windows Defender Firewall” on the left.
Click where it says “Change Settings” and approve the UAC security prompt. Click “Allow another app…”
Click “Browse” next to path and find the “psql.exe” file located in:
C:\Program Files\PostgreSQL\9.5\bin
(Replace “9.5” with whatever version number happened to install for you.)
Click “Add” and check the box for Private or Public - or both, depending on your network setup.
Click “OK” and save and close the Firewall window. This needs done on all machines you wish to interact with DaVinci Resolve’s shared database and remote rendering.
Next, you’ll want to set up file sharing between your two PCs. Take note of the mount locations on each, as we will pair these up later. Resolve works best with Mapped Drive Letters instead of Added Network Locations, and make sure they’re set to mount on startup with password remembered, etc.
Map Network Drive
When you’re at “This PC”, open the options ribbon and select “Map Network Drive.” Browse to your file share, give it a drive letter and a name, and you’re good to go! If your mapped drive letters are different across machines, Resolve lets you assign an alias to the mount on the render machine so it can know that X: on your editing machine is really Y: on your render machine.
If you can’t connect to shares between the PCs, your Firewall rules and networking isn’t set up correctly. Disabling the Firewall entirely can usually fix this, but isn’t a solution for everyone obviously. You’ll have to dig into matching your Workgroups, Private or Public network rules, etc. and make sure the two PCs can chat before Resolve can connect.
Project Database/Server Setup
It’s time to actually launch DaVinci Resolve. Activate with your license key, or make sure your USB dongle is inserted before launching.
Go through setup. We’re going to set up a Project server that manages and sees the project files. Both the editing client and the render server need to be connected to the same Project database - and the projects imported or created on that database, but the database server does NOT need to be running on the render server itself.
(Some editing studios use a Mac Mini with its fast storage as the project database server. I’m not really sure why you’d want that as a separate node in your configuration, but it is possible.)
Let’s make a shared database.
Once you’ve installed Resolve, on Windows you have an actual “Resolve Project Server” shortcut. Run that. You may need to go ahead and run Resolve itself and get it activated before this. Be sure to approve any Firewall Exception prompts that may appear along the way.
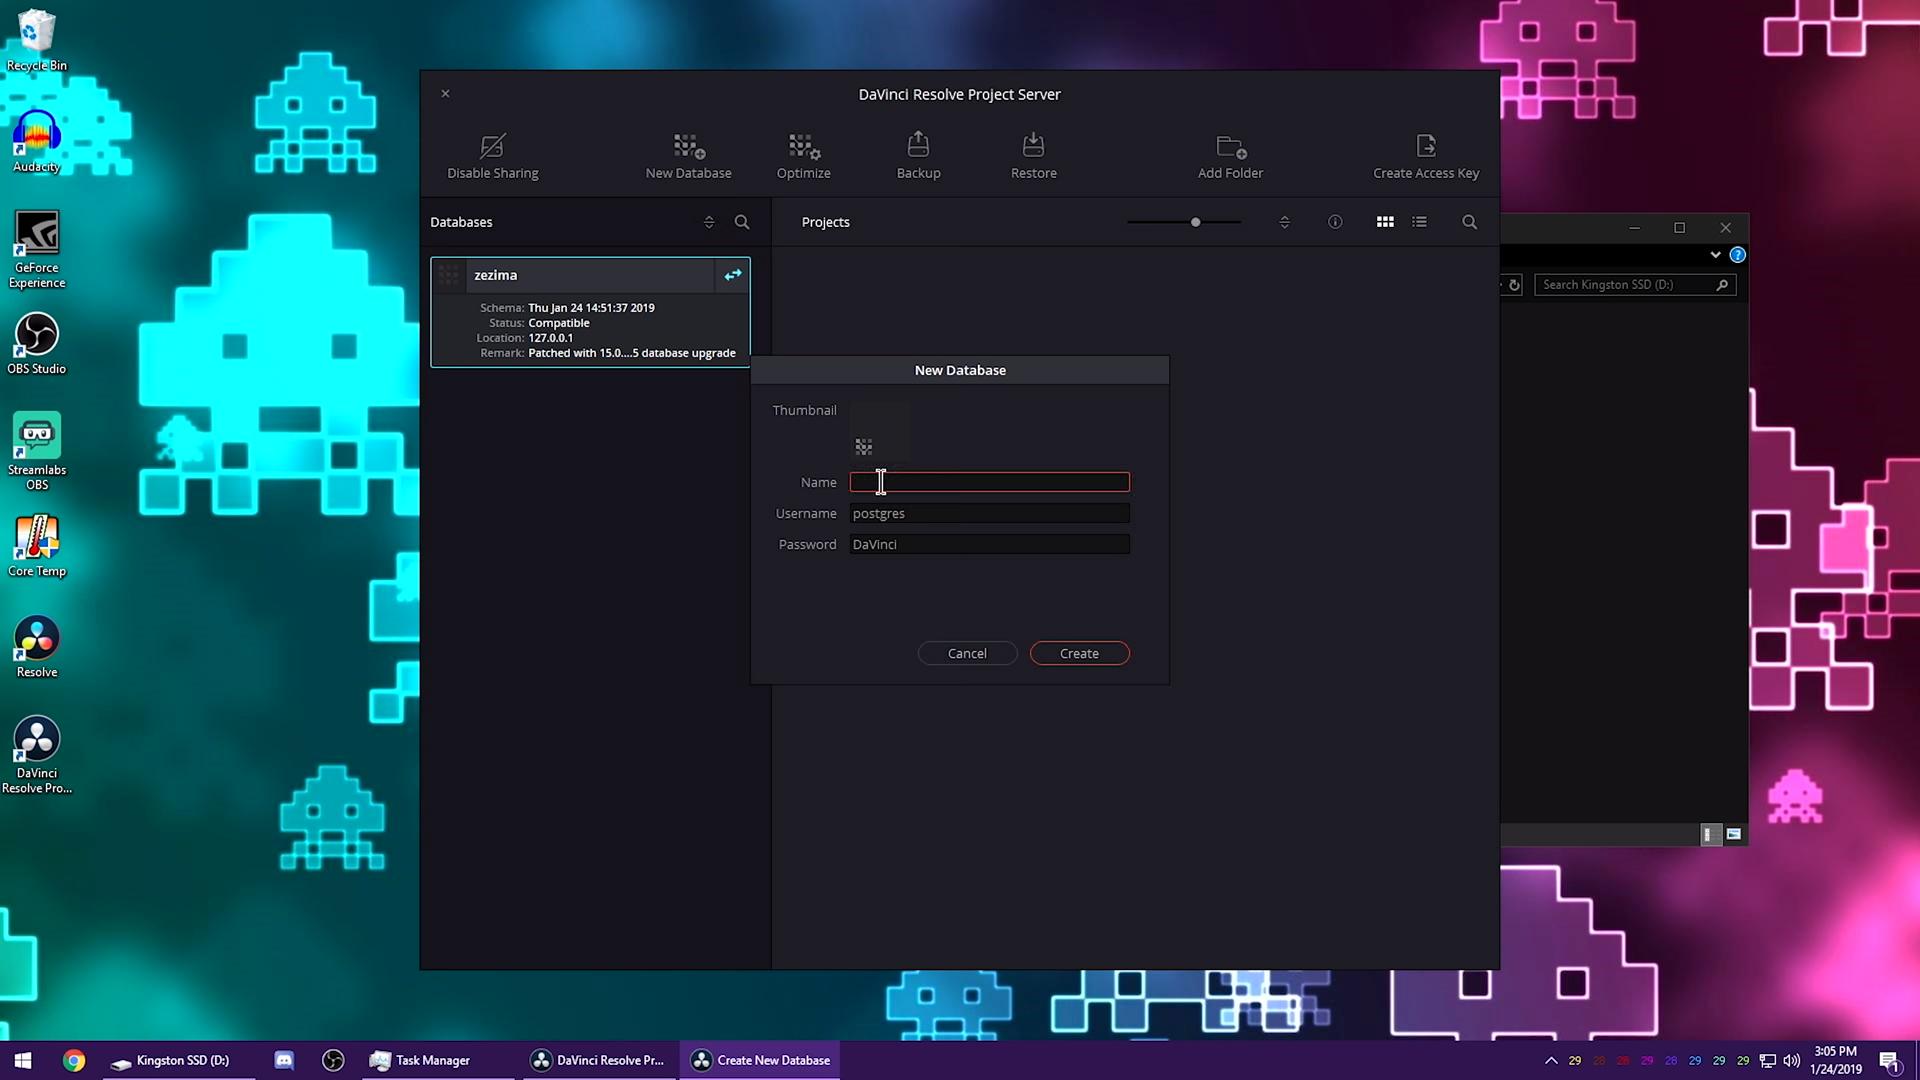
In the Project Server window, click “New Database” at the top. Give it a name.
Once created, click on it in the database list and click “Enable Sharing” at the top.
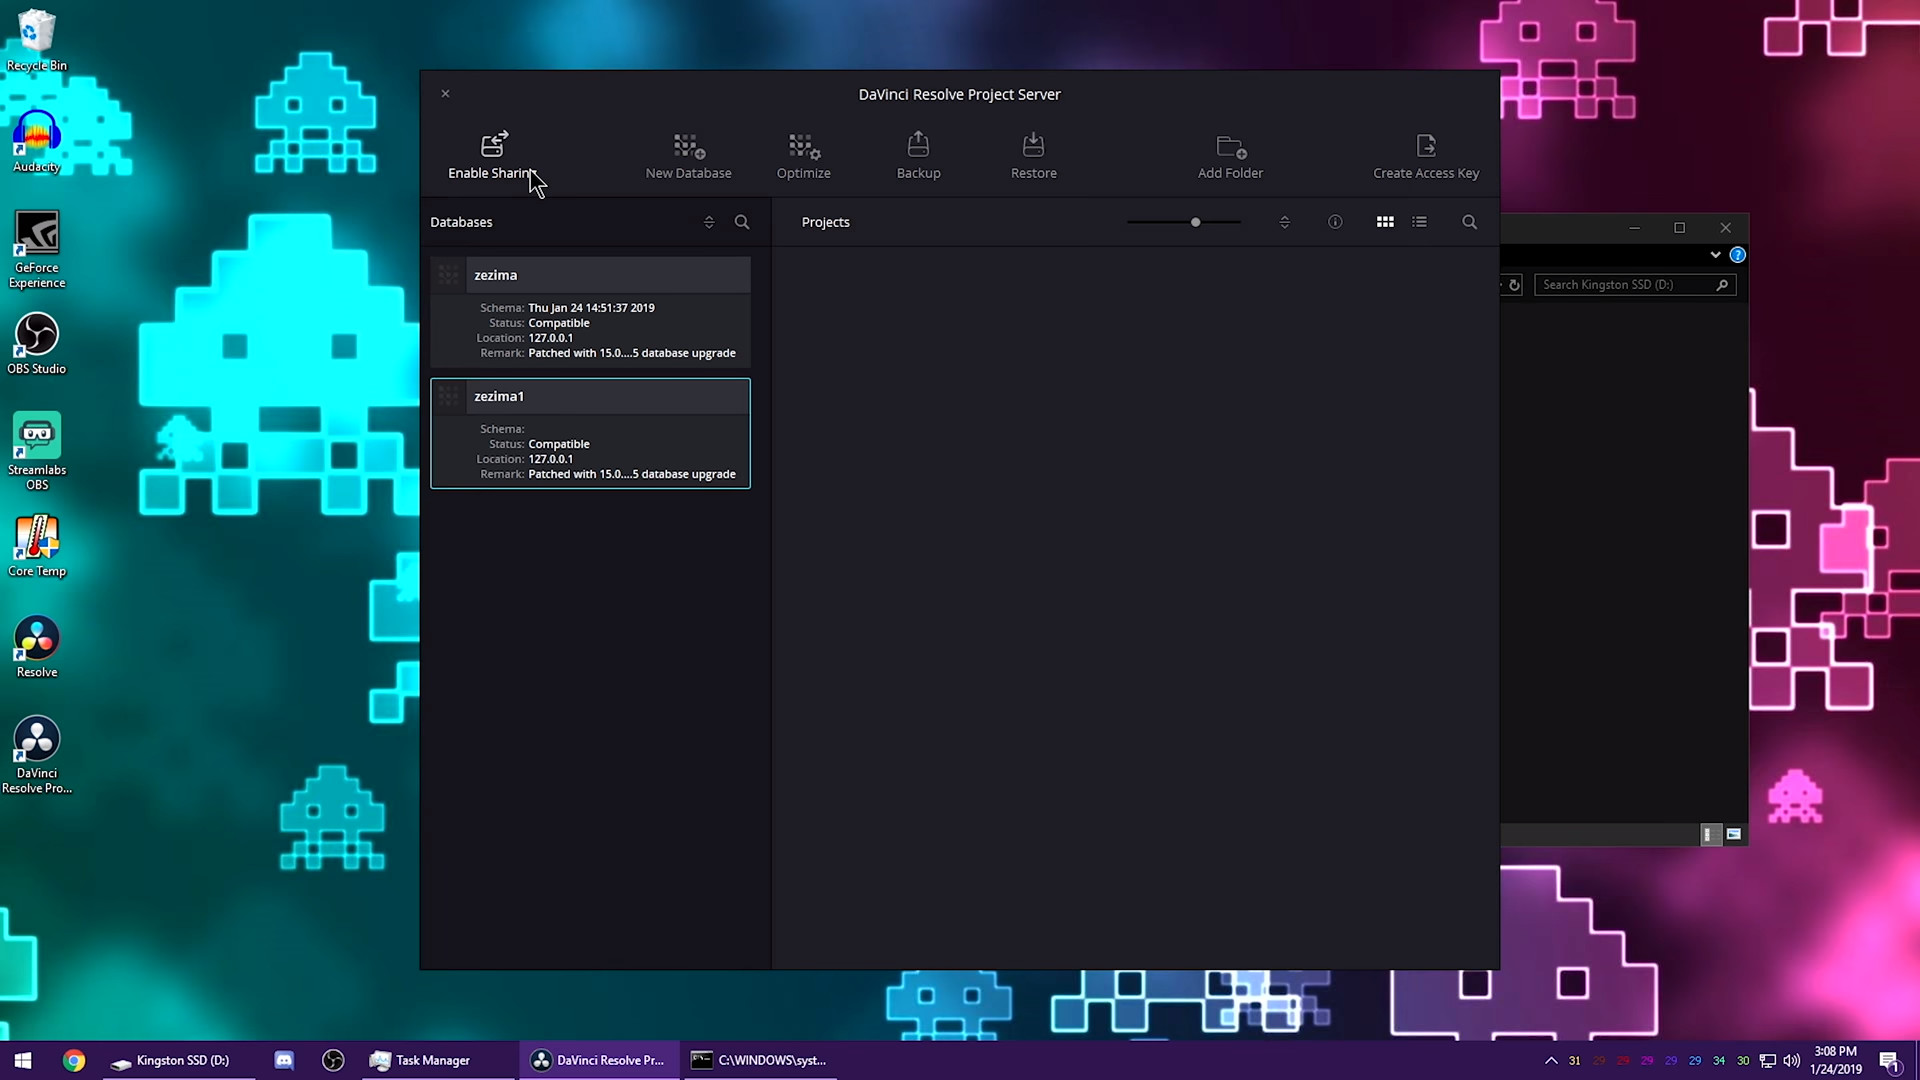
Approve the UAC prompt for editing the config file, and you’re good to go.
Open Resolve itself, and expand the “Databases” side panel. Click on “New Database.”
In the window that appears, click the “PostgreSQL” radio button. Choose the name of your server and hit “Connect.”

Once your new Database is made and selected, you’ll have an empty project list, or an auto-generated “Untitled Project.” (Leave that one there.)
If you need to move projects from a local database or another PC’s database, select the project in its appropriate database project manager, right click and hit “Export”.
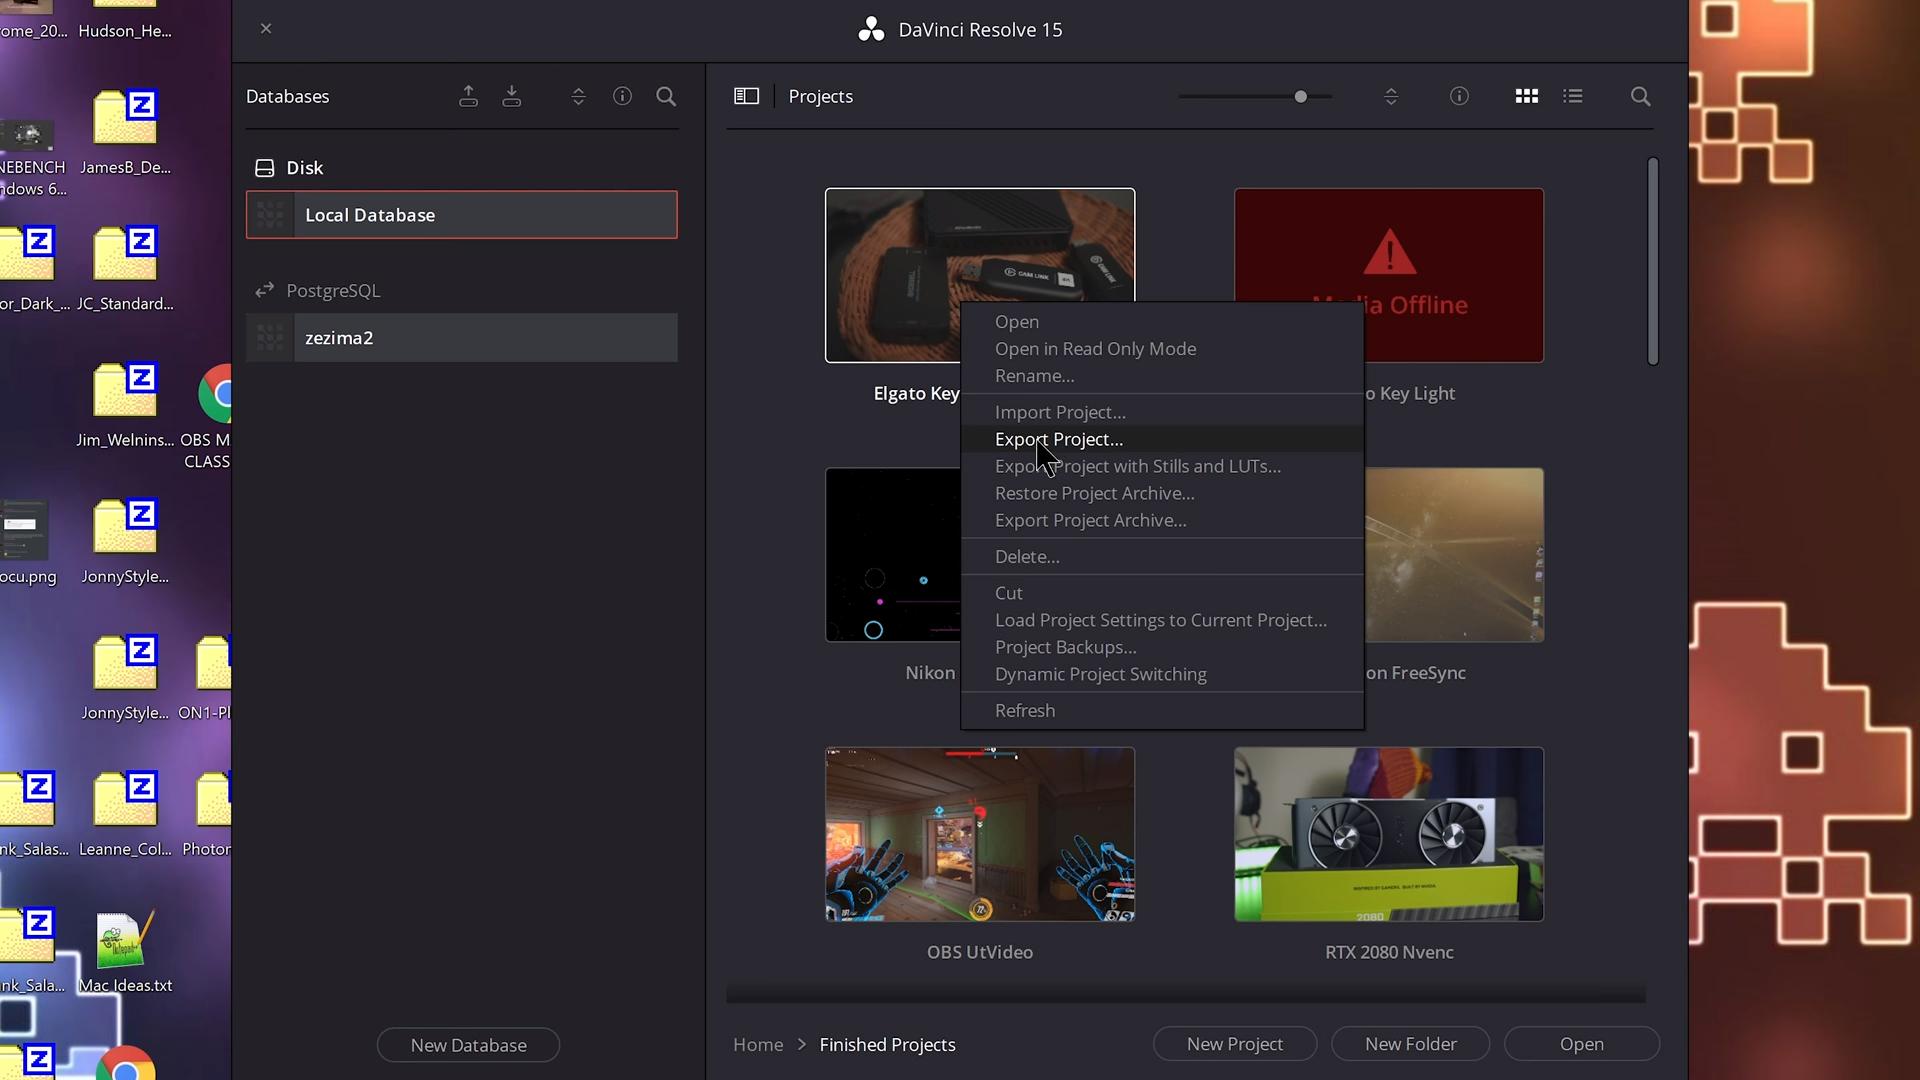
Save the file. This can take a good amount of time for bigger projects, and it doesn’t really indicate that anything is happening. If the program becomes unresponsive, leave it for a bit until it’s done.
Once finished, navigate to your new shared Database, right click in the empty space and hit “Import.” Select that file. Again, this may take time and become unresponsive.
You may have to re-link your footage the first time you open it after moving it between databases. Simple select your footage in the Media workspace, right click and choose “Relink media” and navigate to the folder its stored in.

Next, you want to connect to your shared Database on your editing client computer on the same network. Open Resolve’s Project Manager, click “New Database” and leave it on “Connect” this time.
Choose the PostgreSQL radio button. Type the name, IP address, username, and password that you just set on the render server (or project server) and hit Add.

You will need the local IP address of the render machine. To get this, open a command prompt window and type:
Ipconfig
And hit enter
Typically the network device you want starts with 192.168 - but this may differ depending on your networking.
If PostgreSQL is set up properly on both machines and your networking is cooperating, it should add the server and you be good to go. If not, check on your PostgreSQL configuration. On Windows you will have to add PostgreSQL allowed access through your Windows Firewall on both machines.
Now, whenever you make new projects, you should create them in the shared database from the start and be good to go.
Resolve Settings
Now go ahead and open that “Untitled Project” - as we need to change some settings in Resolve.
Click the DaVinci Resolve menu and click “Preferences.”
(I recommend watching some guides or reading the manual to fully optimize these for your machines, but I’ll cover relevant ones here.)
Under “Memory and GPU”, set how much memory you want Resolve to have access to - you’ll know if you need specific settings for this.
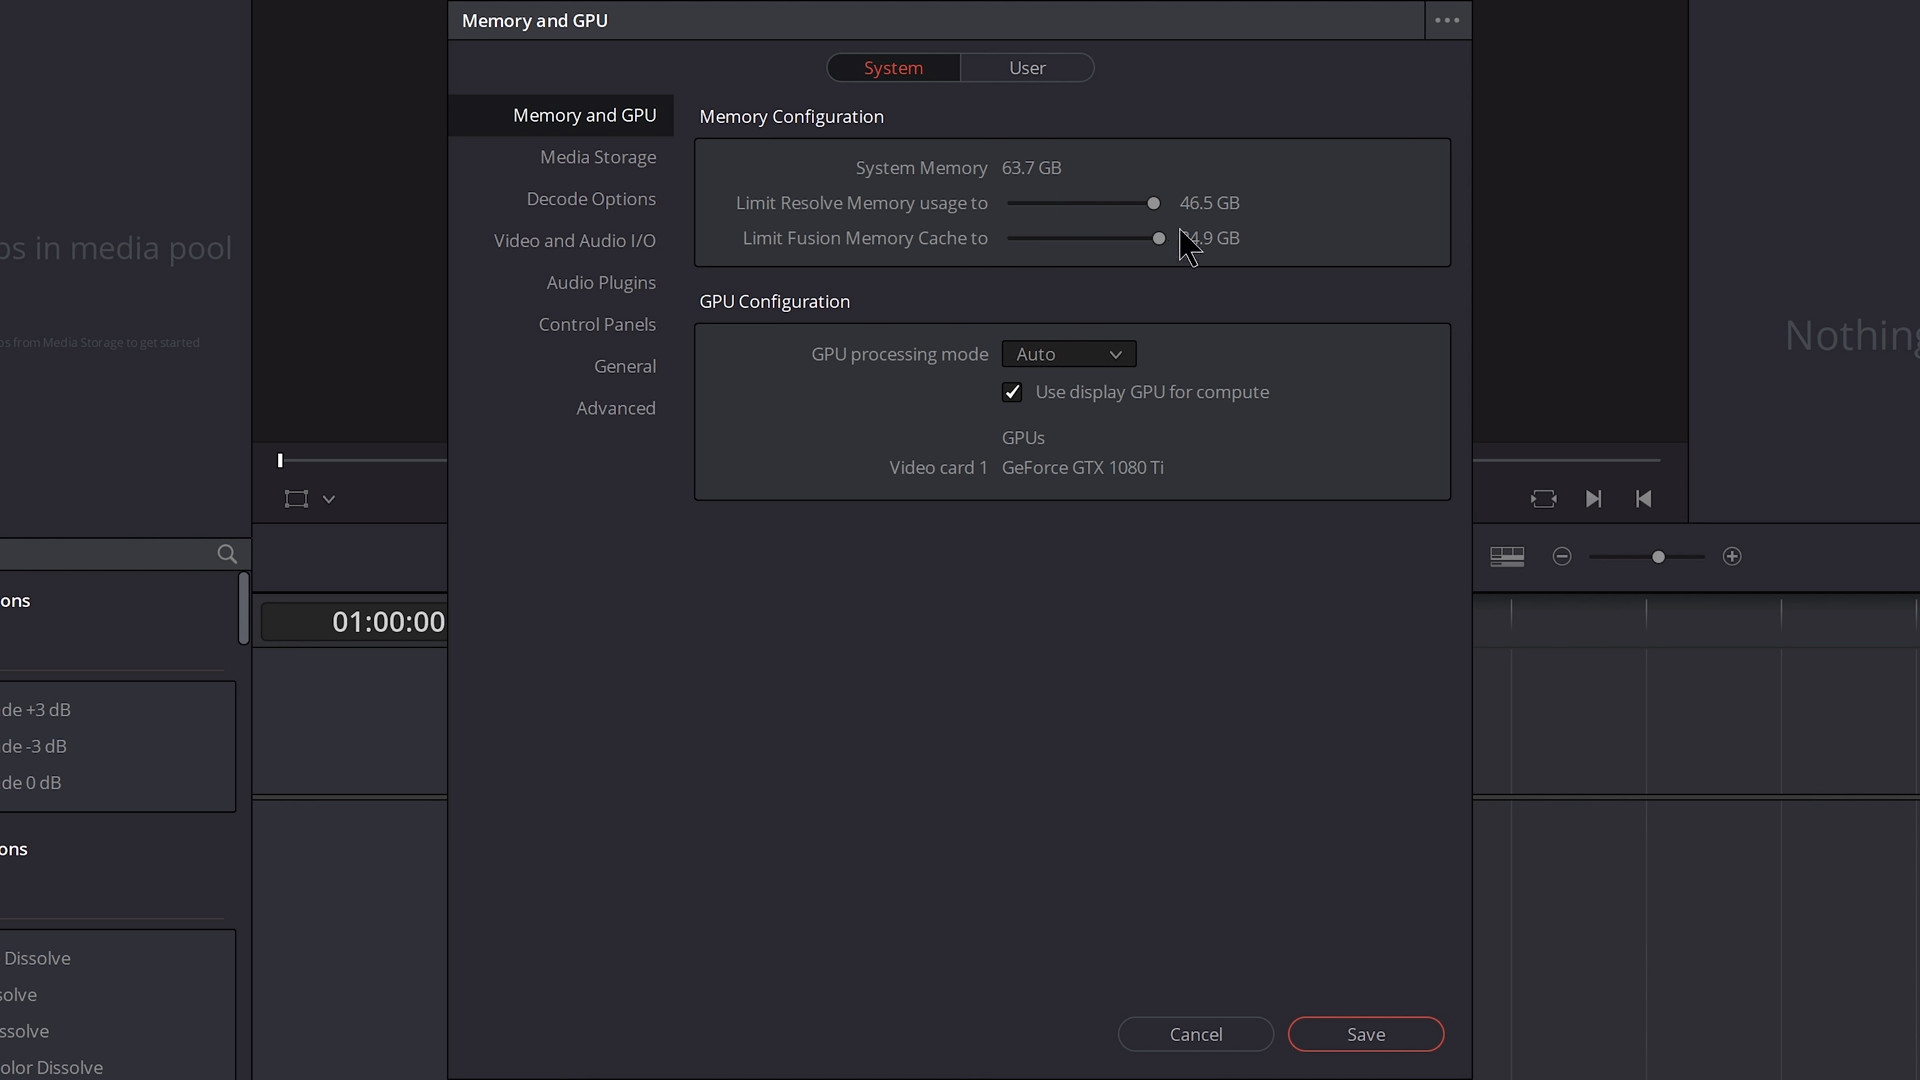
Leave “GPU Processing Mode” on Auto, but check “Use display GPU for compute” unless you have a reason to do otherwise. If you don’t do this, on single-GPU systems, you’ll just end up doing all your rendering in software CPU mode only. Here you can also make sure your GPUs are detected properly. You can use multiple GPUs - no need for SLI or anything, you can mix and match within the Nvidia platform, but Resolve only utilizes CUDA, and thus Nvidia GPUs for the time being. It can work with AMD GPUs, but may not leverage OpenCL just yet (they’re working on it) and you may have to install specific drivers or OpenCL toolkits to get it to work.
Go to “Decode Options” and make sure all the boxes are checked. This is fine on Windows, but “Use GPU for BlackMagic RAW decode” causes glitching and crashing on Linux at the moment. Of course, if you are never going to utilize Blackmagic’s RAW codec from their cameras this isn’t an issue, but worth checking anyway. Make sure the other 3 boxes are checked.
Next, go to “Media Storage.” Here, add your local network share and your footage locations. The “Mount” column is where the storage mounts are located according to the render machine itself.
“Mapped Mount” lets you input a secondary mount location, which will be where it is mounted on your editing machine. Since I use Windows to edit and Linux to render, on my render machine the “Mount” is the local share and my Synology NAS mount on Linux and then “Mapped Mount” locations are the drive letters they are mounted to on Windows. That way Resolve knows where your footage is supposed to be across both machines.
If you’re using Windows on both machines, just make sure your drive letters are set up properly.
While you can render to a network storage location or even your editing PC from your render machine - you’ll get the best performance out of writing to a drive local to the rendering machine. I recommend setting up a shared “Renders” folder on the render machine, mounting that on your editing PC, adding those to the Media Storage locations in Resolve and setting your projects to render there during export for the best performance and fastest renders. I’ll cover this more in the next section.
Sending a Remote Render
Now that we have the Database set up, you’re able to create and edit projects.
To prepare your render server for remote rendering, open that “Untitled Project” in your shared Database, then go to the “Workspace” menu and choose “Remote Rendering.” This will let you monitor queued render jobs, the progress of the ongoing render, etc. - but does not let you interact with the software.
(At the time of creating this guide, the DaVinci Resolve manual still references a special Remote Rendering workspace accessible by right-clicking the empty space in the Project Manager that acts more as a smaller que - BUT this is outdated. This workspace is no longer available, and you must open an empty project and use the Workspace menu to access it. BlackMagic staff are aware of the issue and will update the manual in time.)
You can also launch a headless remote render server by sending the launch command via a command prompt with “-rr” at the end. So navigate to the “DaVinci Resolve” folder in program files and sending “Resolve -rr”
(But this is 100% headless, you don’t even get terminal-based feedback as to how renders are progressing or anything, so I don’t like this approach.)
Once you’re ready to render something, it’s time to head to the “Deliver” tab in Resolve (on your editing computer).
Give your render a file name. For “Location” you want to browse to a directory mapped and listed in Resolve on both machines. Again, I recommend telling it to render on a local drive inside the render machine for best performance. Make sure you have write access to that folder in your folder sharing settings.
Choose your format settings and hit “Add to Render Queue.”
BEFORE you hit “Start Render”, click the little signal or wireless-looking icon next to the queue entry and choose the name of your render server. The project has to be open from within the PostgreSQL database for this to show up.
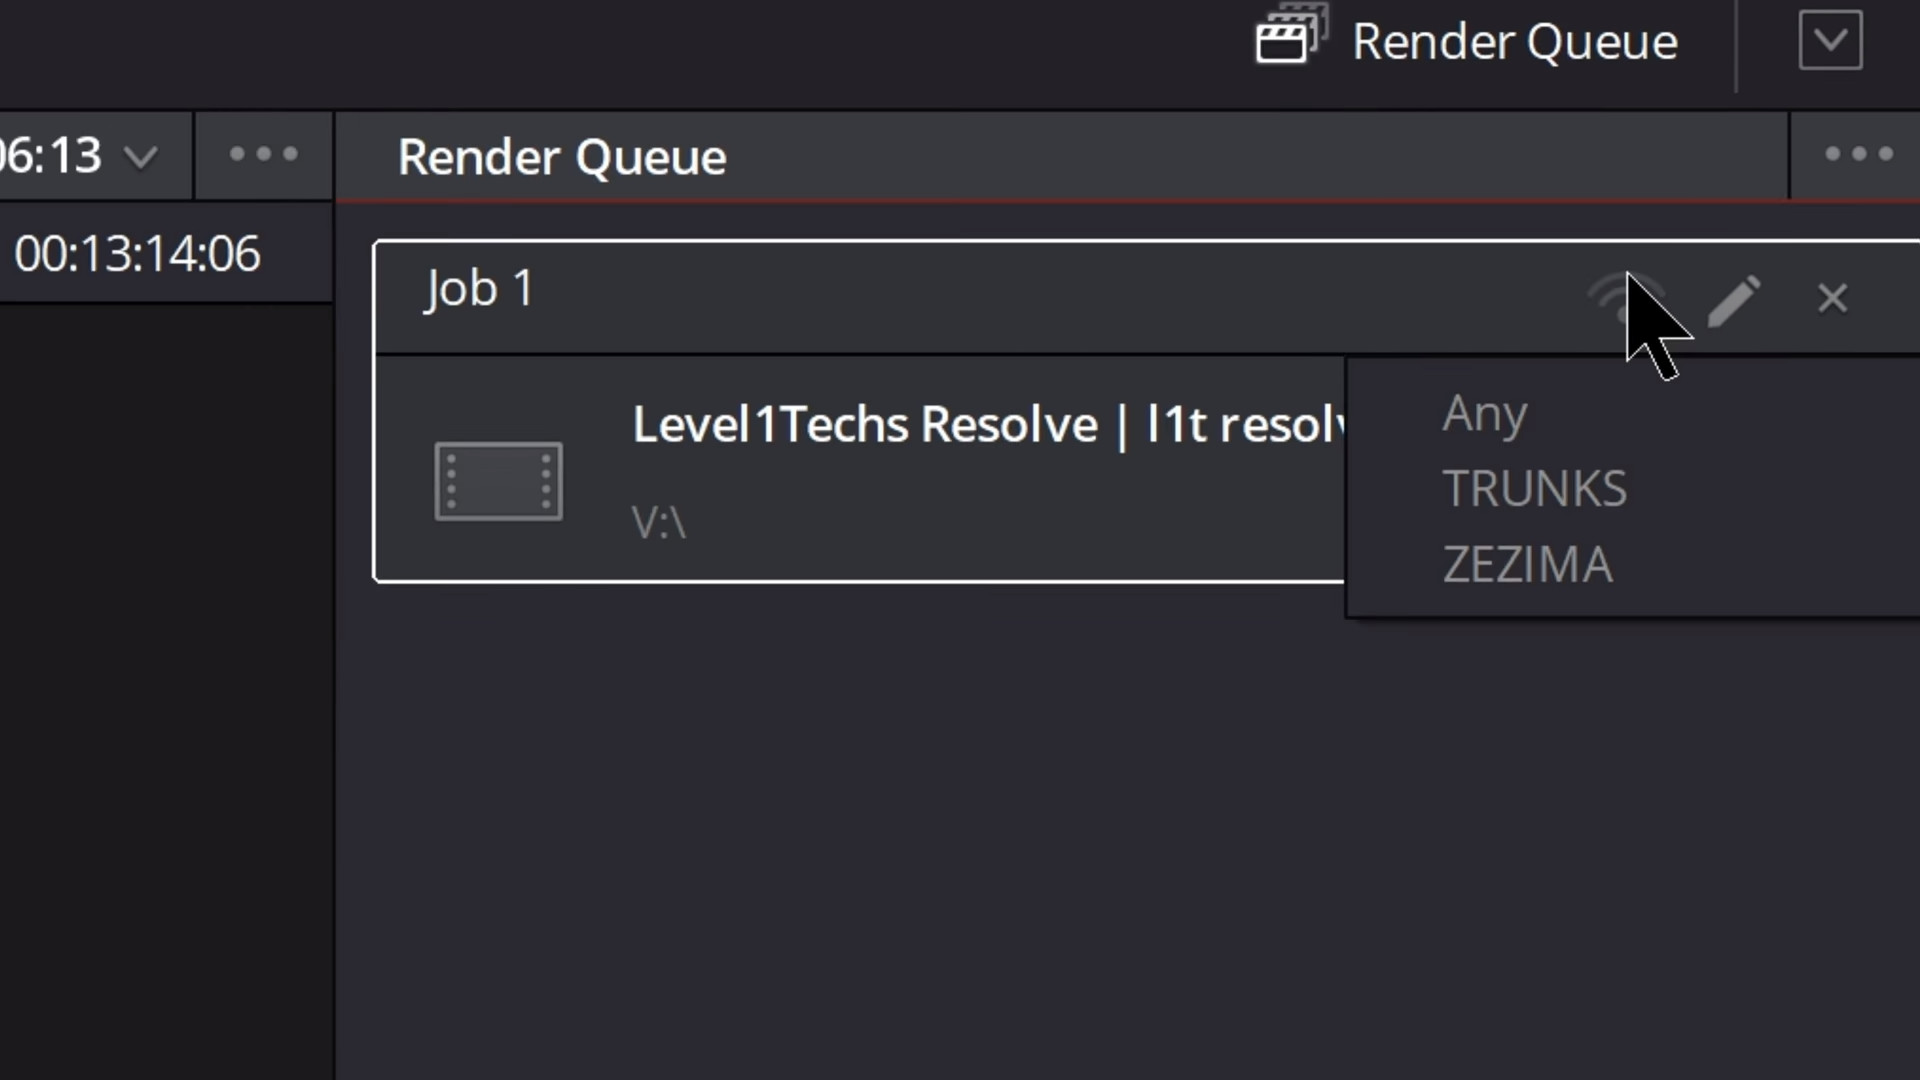
It’s also worth noting here that in a big multi-editor and multi-server workflow, you can actually just tell it to render on “any available machine” which might have some workflow benefits for you.
There are a couple VERY important considerations with your video format, however. On Windows, Resolve can utilize its own “Native” H264 encoder, but this is not available on Linux. If you try to send a render job to a Linux render server with the “Native” encoder option selected for H264, it will error out because that encoder is unavailable on the server. The same thing applies if you send a Nvidia encoder job to a machine without a Nvidia GPU.
Also, if you’re editing on Mac, ProRes export in Resolve is unavailable on Windows and Linux. But DNxHR is a fantastic multiplatform mezzanine codec that works on them all and renders quite fast in Resolve.
If you’re using third-party OFX Plugins, you need to make sure they’re installed across all involved machines.
Conclusion
Hopefully with this guide, updates notwithstanding, you are able to set up and run your own DaVinci Resolve render server and start offloading your render tasks, or allowing for more efficient team work. If something is not working right - typically it has to do with PostgreSQL or Windows Firewall configuration, so I’d start there. BlackMagic’s forums are always there for help from other users, as well as here, of course!