Data recovery after nuking first 2GB of the NVMe drive with FIO

So staying true to my name I nuked one of my NVMe drives. I wanted to test the speed with FIO tool and didn’t payed enough attention to being sure it wont overwrite the drive. It did. The drive had LUKS crypt on it with one ext4 partition.

So far I’ve made a drive image with dd to not destroy the drive further and tried to recover any encryption or sector metadata. I still have passphrase for the drive, but the encryption keys are most likely gone forever. I just want to ask here if there are any other techniques that are worth a try.

If you’ve wiped the first 2TB then you’ve definitely lost the header, I doubt you’ll be able to recover anything. It’s worth backing up the headers for encrypted disks.

1 Like

Yeah… That’s what I was afraid of. Thanks for the tip about backuping the headers tho.

Your bacon may be saved by using ext4 (or any modern FS for that matter) as it stores important info in multiple sectors on the drive. Try this:

sudo su #if you use sudo, otherwise omit this with just su instead
fsck </full/path/to/drive/image>

The fsck tool will attempt to repair lost data blocks but may not be successful due to encryption and/or missing essential data. You may be able to rescue data with the photorec tool

1 Like

Thanks for the suggestion! I tried to run fsck several times. Both as a dry run and repair mode. Unfortunately it returned the same error every time:

sudo fsck -p ~/disk_image
fsck from util-linux 2.38.1
fsck.ext2: Bad magic number in super-block while trying to open ~/disk_image
~/recovery/recovery: 
The superblock could not be read or does not describe a valid ext2/ext3/ext4
filesystem.  If the device is valid and it really contains an ext2/ext3/ext4
filesystem (and not swap or ufs or something else), then the superblock
is corrupt, and you might try running e2fsck with an alternate superblock:
    e2fsck -b 8193 <device>
 or
    e2fsck -b 32768 <device>

I also tried to run from the blocks as suggested, and from the blocks that are after those 2GB so that would be e2fsck -b 2147483648 ~/disk_image. But to no avail.

I got a suggestion from ChatGPT that some LUKS crypts store the header in different places on the drive but I got no response how to extract them. All the tools ChatGPT was able to suggest involve using cryptsetup but that wont work as the image is not recognized as a valid LUKS device.

On the fun note running photorec did returned some files but it looks like garbage. Cannot open any file and the filetypes are all wrong - 100 files are .swf and I never used that format for anything or a gpg file that is ~9GB in size. Didn’t removed them just yet.

I made my peace with the fact that I probably never will see that data. I have some old backups, so I’m mostly covered.

1 Like

So this is where it’s tough. If you imaged /dev/nvmeXnY, that includes all the partitions.

You did well with your first action being a copy image. At this point, you’re going to be using a lot of disk space. What I do is I take a copy of that image on an external and unplug that disk, so I always have an offline copy.

This is where testdisk comes in. You can use testdisk to see if it can find the partitions and recover the partition table. However, you’ll need to loopmount the filesystem.

First, make a copy that you won’t write to:

cp ~/disk_image ~/disk_image_NOWRITE

As root:

losetup -f
losetup /dev/loop1 ~/disk_image # Replace /dev/loop1 with the output of "losetup -f"
losetup /dev/loop1 # Replace /dev/loop1 with the output of "losetup -f"

This will create a loop device at /dev/loop1 which pretends to be a block device. You’ll be using the initial image, and this file will be modified, which is why it’s important to have another backup.

Next, you can use testdisk: sudo testdisk

In there, the first thing it’ll ask for is if you want a log. That’s not necessary here.

Next screen will be the disk selection. Make sure you choose the loop disk you just created. After you select your loop disk, choose proceed.

It will then ask the partition table type. Yours is most likely EFI GPT.

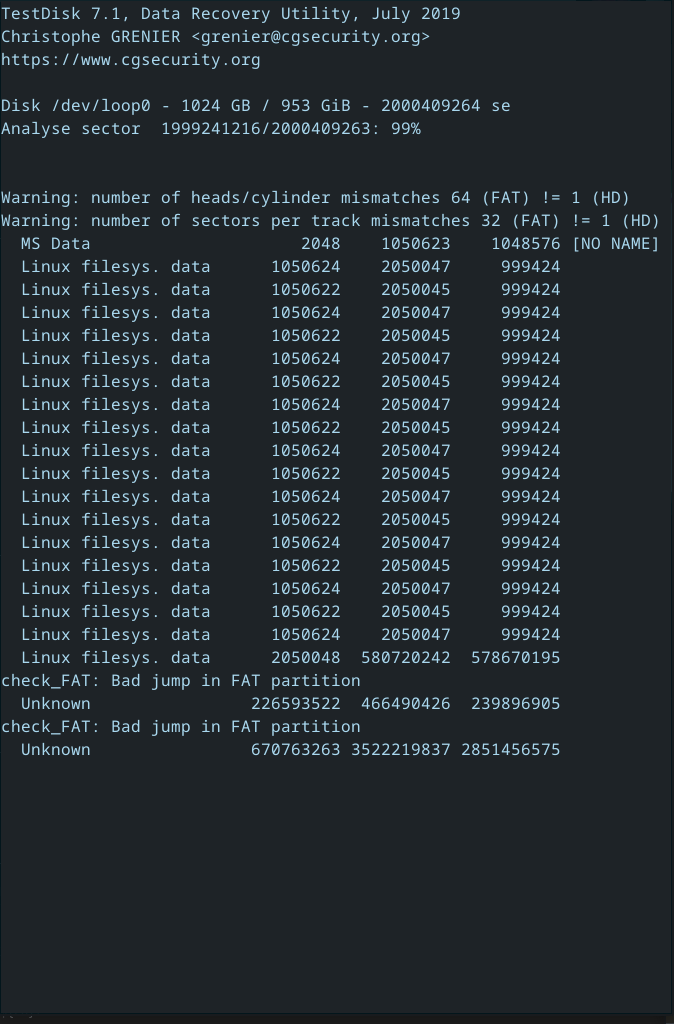
Once you select the partition table type, testdisk is configured. It’ll ask you what you want to do. The first step is “Analyze”, then “Quick Search”. testdisk will then do what it can to find all the partitions on the disk.

If you had an EFI boot partition, it’s gone. If you had a /boot before your /, it’s gone. The important thing is that hopefully it can recover a lot from your main data partition.

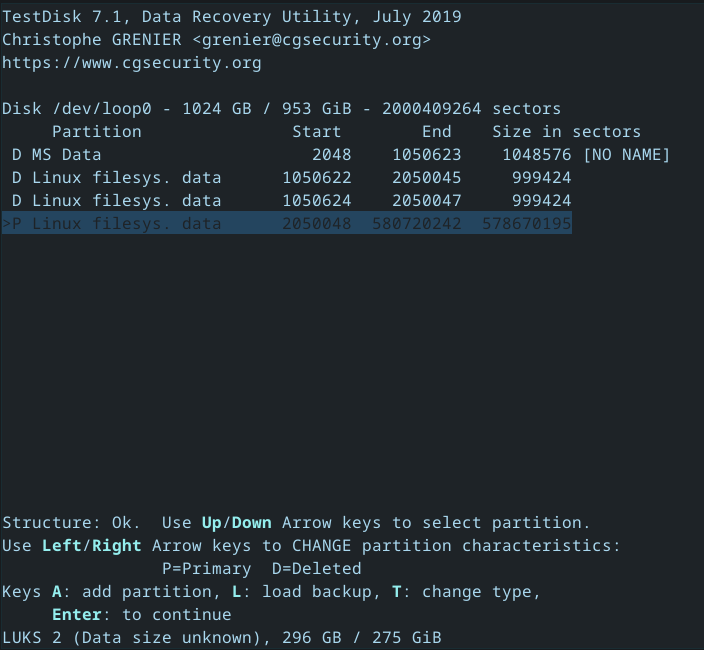
Once the analysis is done, you have the option to reconfigure the partition boundaries. I wouldn’t, unless you know what you want. Testdisk is pretty smart here.

If it all looks good, you can write the new partition table to the image with “write”. If not, run a deeper search. This will take a lot of time, go get lunch or watch a movie, kind of long.

Once you’ve finished writing the partition table, you can quit out and that’s where FSCK comes in.

If FSCK still can’t help you, take yet another backup, and we’re going to do a hail mary.

Since this is sort of black magic and can be pretty sketch, let me know if FSCK doesn’t help you here, and I’ll write about the hail-mary then.

If FSCK does recover the partition, you’re probably going to see a lot of stuff in Lost+Found

1 Like

Running photorec on an encrypted volume is only going to yield nonsense. Unless you can somehow recover the header and decrypt the disk there’s really nothing you can do to recover any data.

1 Like

Thanks for the detailed response. First thing after making the image was to backup it on an external drive so that is covered.

I followed your instructions and here is what I have got so far. During testdisk I got this:

And after I have one partition with ~300GB. I’m not sure this is exactly right, that partition should be around 800. I don’t remember how much it was used by the data.

I have written that changes to the image as instructed and everything seems to be without any problem.
But I compared the raw disk image and the supposedly re-written by the testdisk and they are identical.
So either the write did not work or testdisk didn’t fix anything.
To be sure I’ve run both quick and deep scan, and the results are the same - no difference in the drive image.

Running the fsck against rewritten images with sudo fsck.ext4 -n disk_image got me the same response as before.

1 Like

Your ext4 partition is inside an encrypted volume, without unlocking it you can’t access anything to do with the file system or partition tables. If you’ve wiped the LUKS header there’s no way to recover any data from inside the encrypted volume without a backup of the header.

1 Like

I’ve scanned the entire image with binwalk and was able to recover something that looks like a LUKS header: 1049624576 0x3E900000 LUKS_MAGIC sha256

I checked and the LUKS version used by the distro was LUKS2 which stores backup header near the end of the drive. This looks about right as the offset is 1049624576 which is ~977GB. The header size appartently is 16MB.

So I extracted it from the image with dd if=disk_image of=recovered_header bs=1 skip=1049624576 count=16777216

After this I verified the dump with sudo cryptsetup luksDump recovered_header and I got something that looks like a LUKS header output. Redaction is mine.

sudo cryptsetup luksDump recovered_header
LUKS header information
Version:       	2
Epoch:         	3
Metadata area: 	16384 [bytes]
Keyslots area: 	16744448 [bytes]
UUID:          	[[[REDACTED]]]
Label:         	(no label)
Subsystem:     	(no subsystem)
Flags:       	(no flags)

Data segments:
  0: crypt
	offset: 16777216 [bytes]
	length: (whole device)
	cipher: aes-xts-plain64
	sector: 512 [bytes]

Keyslots:
  0: luks2
	Key:        512 bits
	Priority:   normal
	Cipher:     aes-xts-plain64
	Cipher key: 512 bits
	PBKDF:      argon2i
	Time cost:  4
	Memory:     775460
	Threads:    4
	Salt:       [[[REDACTED]]]
	AF stripes: 4000
	AF hash:    sha256
	Area offset:32768 [bytes]
	Area length:258048 [bytes]
	Digest ID:  0
Tokens:
Digests:
  0: pbkdf2
	Hash:       sha256
	Iterations: 190511
	Salt:       [[[REDACTED]]]
	Digest:     [[[REDACTED]]]

At this point I don’t know if there is any damage done to this header or the keys. I’m also not sure how I should overwrite the header on the disk image and what should be the offset for this write. Should I write the new header right at the beginning of the drive or it should be exactly where it was before?

1 Like

That’s good news. If you can fix the partition table then it may be as simple as using cryptsetup luksHeaderRestore to repair the LUKS volume. Otherwise yeah you’ll need to figure out how to repair the LUKS volume manually. But with a working header you should be able to decrypt it and then you can work on the ext4 volume.

1 Like

I’ve tried to use luksHeaderRestore but unfortunately I cannot get it to work.

Instead I did write the restored header at the beginning of the drive. The crypt is recognized and I can open it. Since the partition tables and LVM are destroyed there is no way to mount any file system, so I used testdisk and photorec to try to either repair the file system or at least recover the data. Unfortunately without any effect.

To check what is going on I used hexdump and dumped same sector from the middle of the drive from the unopened drive image and from the opened LUKS crypt mounted at /dev/loop0 - the data was the same. So to me it looks that it wasn’t decrypted at all and writing of the header should be in different place.

One other thing - FIO seems to write random data, so maybe the crypt could not be decrypted because right after the header there is only garbage data. I will try to cut first 2GiB of the image and prepend the header to the remaining image.

========================================

Edit:

So I’ve cut away the first 2GiB of the image that was damaged and prepended the header. This time I could open the crypt also, but same as before I cannot recover any data nor any partition metadata.

However after doing hexdums of decrypted and mounted image and enmcrypted one there is a difference, so it looks that the decryption works.

The only thing that I can think of to try next is to write LUKS header couple bytes before or after the 2GiB mark. Or maybe finding a spot in the hexdumps where one file ends and next starts… At this point I’m running out of ideas.

Hmmm, that doesn’t look right at all. TestDisk might not be able to fix this one.

OHHHHHH, was this encrypted? I must have missed that.

Yeah, testdisk won’t be able to do much with an encrypted volume. That’s probably going to be what’s causing the strangeness.


What distro was this?

Do you remember the approximate partition layout?

Ideally, I’m looking for partition order, use and count. If we can get that data, we might be able to manually recreate the partition table. And if we can do that, we might be able to get LUKS to open the LVM member, then if we can do that, we might be able to get LVM to initialize.

Lots of ifs in there, but I’ve not recovered this partition scheme before, unfortunately.


When you say you can’t recover data, I’m assuming you’re talking about testdisk/photorec? I’m thinking there might be something going on with the LVM2 metadata here that’s throwing everything out of sync. I’ll do a bit of research and get back to you.

1 Like

Debian bookworm.

It was autogenerated by Debian installer. I have lsblk output saved in the old backup fortunately:

nvme1n1                     259:0    0 953.9G  0 disk   
├─nvme1n1p1                 259:1    0   512M  0 part   /boot/efi
├─nvme1n1p2                 259:2    0   488M  0 part   /boot
└─nvme1n1p3                 259:3    0 952.9G  0 part   
  └─nvme1n1p3_crypt         253:0    0 952.9G  0 crypt  
    ├─user--vg-root         253:1    0  23.3G  0 lvm    /
    ├─user--vg-var          253:2    0   9.3G  0 lvm    /var
    ├─user--vg-swap_1       253:3    0   976M  0 lvm    [SWAP]
    ├─user--vg-tmp          253:4    0   1.9G  0 lvm    /tmp
    └─user--vg-home         253:5    0 895.9G  0 lvm    /home

That’s correct, I used testdisk & photorec. Thank you very much!