Build your own quality microphone

I am a music tech student who cant afford to buy expensive microphones. So i decided to make my own and in my opinion the quality is rather good. I will list all the parts that i used here so that you may make your own if you wish.

TOTAL COST: £12.10 + £1.50 for delivery = £13.60 (approx $21(usd), component pricing may vary in US etc)


AUDIO SAMPLES:

    • https://drive.google.com/file/d/0B_aAjtGMg0sqS2lGakJpTFBNRDA/view?usp=sharing

This was recorded using an Asus Xonar DX (Pls no hate, something like an objective 2 would not work with my setup since i use 5.1 speakers as well as headphones, the mic in sounds pretty nice too)

Please note that i did amplify the Audio in audacity, i was also speaking very quietly in the mic tests because its very late at the moment. I tried creating a YouTube tutorial using this microphone and i was speaking louder then: /watch?v=l5khVi_-0bY&list=UU8cgZJUFQvEo9KBtR0DUTRw

This was recorded in the same room as my computer as well. So you may be able to hear some fan noise.


COMPONENT LIST:

  • Primo EM172 microphone capsule [£10]
  • Neutrik 3.5 mm stereo line jack socket (Neutrik NYS240BG) [Can also use connector of own choice] [£2.10]

I purchased all my components from Fel Communications. If you are outside the UK you may want to find a more local dealer. If you use Ebay then you can get the capsule for £10 including delivery and you can buy connectors on many many websites.


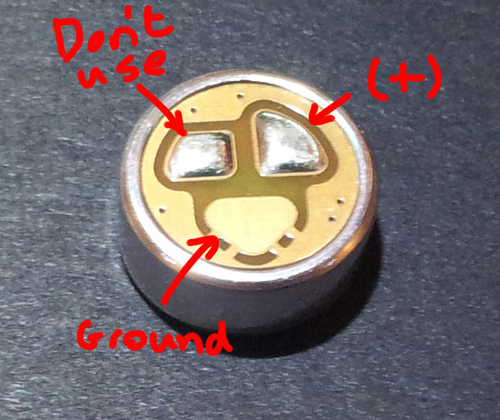
Labeled Microphone capsule

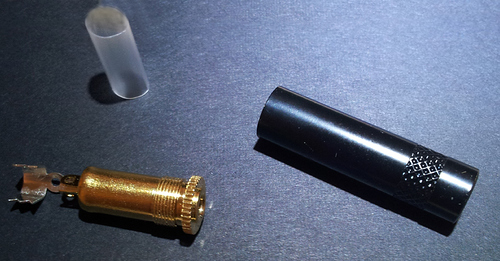
3.5mm Female connector

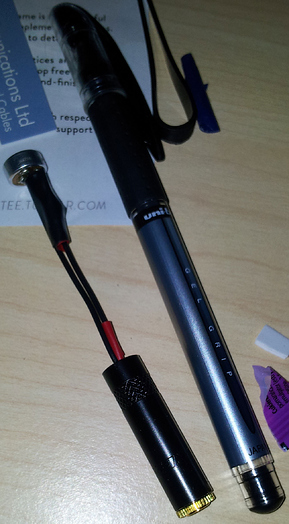
The microphone currently as it is when i recorded that sample

I have a piece of copper pipe that i will be putting this inside whenever i next get some packaging materials (to hold everything inside the case correctly)


MY PERSONAL CONCLUSION:

I really like how the microphone sounds, the quality is fairly excellent especially considering the price. Compared to samples of the mod mic v3 that i have listened to i think its fair to say that the sound is comparable, personally i prefer how this seems to have more sparkle in its sound signature which really helps to make your voice sound very clear. Since with this you are putting it together yourself you can do what you like with it in terms of placement. If you put a paperclip along the wire and heatshrink around it you could use this as a boom arm that you can attach to your headphones or you can use it as a desk microphone as i am. Coming in at under half the price of a mod mic v3 i think it is a very tempting prospect proving that you are willing to bit of solder work (connecting things onto the ends of 2 cables). The microphone capsule was a bit difficult to solder but i can happily say it can cope with being heated to 90 quadrillion *c as mine had to deal with that in my many attempts to solder it. The 3.5mm female connector was very easy to solder though, you can find to tutorial on how to solder them on YouTube.

I would recommend building one of these to anyone interested in quality microphone who likes to do a bit of DIY work.


Hope some people have found this useful.

I may upload some more musical recordings in the future but i am not really able to create any right now ;)
 

Forgot to add.

The microphone is a condenser electret microphone and is non directional.

It is powered by your audio interface's 3.5mm (or 1/4 inch with adapter) input without the need for phantom power like some other condenser microphones.

Holy shit that sounds good for the price. Did you follow a tutorial or just wing it?

Well, I spent a couple weeks doing some research and arrived at these microphone capsules. But that's not to say that i had nothing to work from. Here are a few of the websites i used:

  • http://diycamera.com/audio/audioindex.htm
  • http://www.jg1983.co.uk/Blog/diy-miniature-omnis
  • http://www.caperteebirder.com/index.php?p=1_35_Telinga-SSM-vs-DIY-SASS

On that last website they have many mic comparison articles (this one in perticular: http://www.caperteebirder.com/index.php?p=1_30 ), they actually compared these microphones to ones such as Sennhieser mkh 8020 microphones which cost a lot more, quick google shows ~£800 mark each ($1300). Which they do say sound better than the ones i used but personally i would not be able to justify the more expensive microphones on a price to performance basis. They sound so similar that i doubt many people who aren't into audio gear would be able to tell. Through my speakers (z5500) i was struggling to hear any difference at all since unless you have really bad hiss you just cant hear it through speakers, through my IEM's (Yamaha EPH-100) i could tell but it was super close.

But maybe its just my me not being able to discern between two sets of bird noises... :p

Damn that sounds better than any microphone I have.

Now I wanna source parts and make one.

Found another source for the Primo EM172.  I assume you've used shielded cabling as well?

http://www.frogloggers.com/bt-em172/

FEL Communications link for future reference:

http://www.felmicamps.co.uk/products/diystereomicroph.html

I actually just asked one of the DT Technicians in school for 20cm of cable. Since its from school i can assure you it is probably the cheapest you can get. The 3.5mm cable is a standard 3.5mm cable. Noting special about it.

The two bits of cable used in the mic are not solid core since they will be looped once when inserted into the copper tube so that the cables have some slack meaning they needed to be flexible. So its just generic cheap multithread cable with plastic coating to prevent shorts. Its about 1mm in diameter.

I see.  Probably going to order parts over the weekend and try it out!

I've got another question.  Since the 3.5mm jack has a left and a right channel, how is your wiring done(as you only have one microphone)?

Could I do something similar with this mic right here? LINK

If possible could it be wired to have one mic as a dedicated left channel and one as a right channel?

Yes, you totally can with that mic.

If you look at the picture of the 3.5mm female jack that i used you will notice it has 3 prongs. You will connect both of the microphones to the long one and then each microphone to the other two connectors. So the end product is no more complex than before, you just have to attach another mic.

But please be aware that you will find that most (if not all) communication software will only use a single microphone. But DAW software such as Audacity, FL studio and protools etc will be just fine and wont hve any issues with stereo.

Its also worth noting that to get a good recording you will need a proper 3.5mm audio input on your computer or an adapter (as opposed to the phone style one on some new laptops) unless you want more connectors to solder. If you are not using a dedicated audio interface (eg a sound card or a proper external audio interface) you may notice that there will be quite a bit of hiss and/or the microphone may be very quiet. This is because some motherboards have a pretty crappy microphone solution built in to them and often have no microphone amplification abilities.

However, if you're only using one microphone, then do you solder the microphone to the left or right channel (with the black wire going to ground, of course)?

Currently planning to get:

Primo EM172: http://www.frogloggers.com/bt-em172/

Neutrik Rean NYS240(the not as fancy verson): http://www.ebay.com/itm/330855359401

Shielded wire: http://www.ebay.com/itm/271199635209

Extension cable: http://www.ebay.com/itm/360364991642

Then planning to model up some exterior casing and send it to my 3D printer to print.

Holy crap thats nice for the price. I think im going to do the same as Noob, 3D printer, god I love you.

I soldered the microphone to both the left and right channel. You could use a mono jack if you want to as well. But the Neutrik/Rean connector that i used is surprisingly well made. The case is black metal and feels fairly very solid and has a nice bit of weight to it so i can definitely recommend it.

That should be pretty awesome, especially with the 3d printed case. One thing that you will have to take into account is because of the way that you have to assemble the mic jack you cant rally have the microphone mounted too close (you slide housing and plastic insulator onto the cable then solder the cable to the actual jack and slide the insulator and housing back over and screw the jack in). So you may want to include space for slack cable if you want to make it smaller in length.

Decided to take a better photo under natural light. Also made a phone holder out of wire so this one is nice and clear. Galaxy s2 ftw :p

The body is about 7cm long and the microphone is about 9cm long.

The mess of electrical tape you see is because i soldered both cables then used some red tape to prevent the two cables shorting where they connect to the capsule. I then wrapped both cables in black electrical tape to prevent any other possibilities of shorting out and to help reinforce the solder joints a bit. The red electrical tape near the mic jack is just there so that if i need to do anything to it in the future i can easily see which wire is positive.

I have now started preparing the microphone to put inside its housing.

First i found some foam and wrapped it around the microphone to make sure it was about correct. Then i cut it down to size. The foam i used is very light and easy to compact, it was 11mm thick. I then got the flat bit of foam and put some tape along the end where the mic capsule will be. I then wrapped it around the mic tightly using the tape to help get a tight fit and secure it. I then proceeded to wrap the rest of the foam in tape. This is top make it easier to get inside the copper tube and help make the microphone much more solid once it is in the copper tube.

I now need to find a material that i want to put over the end of the microphone to make it look smart inside the tube, i will do some testing with things like socks to see whether anything effects the quality of the recording. I also need to find something to put around the mic jack at the rear end of the copper tube.

EDIT:

Socks were not acoustically transparent enough, gonna have to try and see if i can get some tights from some family that i can test with and then cut up if needed. Failing that i may have to have the raw microphone at the end of the tube which wouldn't look very nice but im not about to substitute sound quality for looks. I guess all else failing i could use a black marker pen to colour in the top :p

I remember using some pantyhose for a physics project...

Perhaps I can find that stuff and use it again.

Shipping for the mic was $7.50 :(.  $0.05 more than if I imported in from FEL.

Total would be $24.95.  I'm going to go and continue to look for a cheaper seller of the Primo mic capsule.

It might be worth mentioning that Panasonic also sell comparable microphone capsules. So it might be easier to get one of theirs in the US.

I shall look into them.  Primos are quite hard to source here in the US.

So the Panasonic WM-61A seems to be a great option, although it's apparently discontinued.  Further research says that all of panasonic's mic elements are being discontinued :(.

JLI-61A is apparently a replica of the WM-61A.  I found a seller on ebay - it's ~$13 shipped.

//edit: you can select standard shipping!  Total become ~$8 shipped.

http://www.ebay.com/itm/Panasonic-WM-61A-Replacement-Microphones-/350779217336

Going to keep looking around, as apparently the WM-61A used to go for $2 each(plus shipping).  China eBay seller seems to have 2 of them shipped for $8, but the internets are warning people of fakes.

Also available on JLI's site, but shipping is $11 for me.

http://www.jlielectronics.com/products/JLI%252d61A.html