[Build log] うずめ X コンパ | A Dreamcast & a Gamecube PC

Paint day today. It’s so wild 15C in November. The climate is becoming more and more fuck up. The paint job is really nice I’m happy of it. Will let it dry and harden for two days before playing with it.

The handle will stay black, and the cover io will be painted way down the line when all the modif would have be done to it, probably next spring?

7 Likes

Updates: Some good and some bad

Worked on it yesterday. Ya I didn’t listen to my 2 days before touching it. Assembled the Gamecube looked really nice.

Tested all the components and everything works fine. And Windows 10 installation was quick.

I noticed there is a port on the motherboard labelled USB4 which appears in the bios, and now I’m wondering if I could use for the power sync instead of doing some modif to the laptop fan cable.

Disassembled furthermore the PN50 to salvage the wifi antennas. They’re kind of strange as one is pretty much only a sheet metal. Was expecting to have two little antenna bearing PCBs like in the ASUS shark fin.

Assembled everything in the Gamecube using hot glue for the moment (maybe will stay there if it does the job). Cut a small section inside to gain a mm or 2 of clearance for the ATX pins. It is now solidly in place as it’s kind of slotted in.

The so tiny SSD is just flopping in there with some cushion pads thinghy that was on the rear io. Did longer cables and cable managed for the included microphones and microsd port (even if I’m not gonna use them) and soldered a temporary power button.

Also, I looked at that and I will just remove the Gamecube stock controllers port and simply put a Gamecube adapter there. The one used by Madmorda in her Gamecube Switch Dock as the same spacing than on the Gamecube and it’s just compact in one board (but would not solve the GPU power connector issue), instead of trying to fiddle with the Gamecube stock ports.

I discovered also that pretty much all the picopsu, aside the hdplex, only accept 12V input only, so I need a 12V power adapter for the GPU. Was already looking to acquire a second power adapter as pretty much all power adapters over 90W are 19.5V and not the 19V, and would probably fry my PN50. Just that the mismatch of voltage kinda suck, wanted to have the same looking Asus power adapter in the 90W variant for the GPU. Think will be buying all the last components tonight, except for the GPU because I still have to find a dirt cheap one.

It is insane how costs in this project just skyrocket :disappointed_relieved: The usb c to a adapter, pico psu, 12V power adapter and Gamcube adapter will be shy of 80$ alone.

For the bad news, noticed I use the past tense right at the beginning. Well it’s because I was moving the upper section and I dropped it and now it’s scuffed :sob: There is no real way to really fix it without removing the paint and painting it all over again. So I think I will find some stickers to cover the scuffs in the meantime. Will probably paint it next spring, and maybe a different colour as Sunrise is kind of a little in your face when all over the Gamecube. Maybe I could consider getting a spray gun :thinking:

11 Likes

I really like the color
have you thought about wiring up USB ports to the Memory card slots

No, and I don’t think I would need it really and it would be lot of hassle for nothing. With my monitor being already use as a usb hub, I just 3 usb ports, and the fourth and fifth will be free ones.

Well I did some change to my plan.

I finally accepted that I would not be able to use my dear GTX 1660 ti, or at least not without some serious expenses and challenges. Still have to find a 1650 or 1050ti though.

Received the Gamcube adapter, but need to return it because it doesn’t work. It’s detected by the pc, but no input received whatsoever. But still disassembled it to see if it would fit the bill and yes. The fact that it would allow for some clearance below the ports mean that the PCB of a 1050 or 1650 would fit underneath up to the circular heatsink and would give the precious millimeters I need so the card doesn’t interfere with the back panel.

Second I did some modifications to the inside of the Gamecube by cutting a hole. That way the cpu cooler can ft so I can flip the board, have the exhaust align with the original Gamecube exhaust, and simplify a lot the process of removing parts with everything easily accessible. Also, it simplifies so much the run of the pcie adpater and gives me some clearance needed to fit the GPU.


Easy access to all the cables means also that I was now able to secure the ssd instead of having it flip flop inside.

4 Likes

Received stuff. That 12V power brick sounds hollow never had that before.

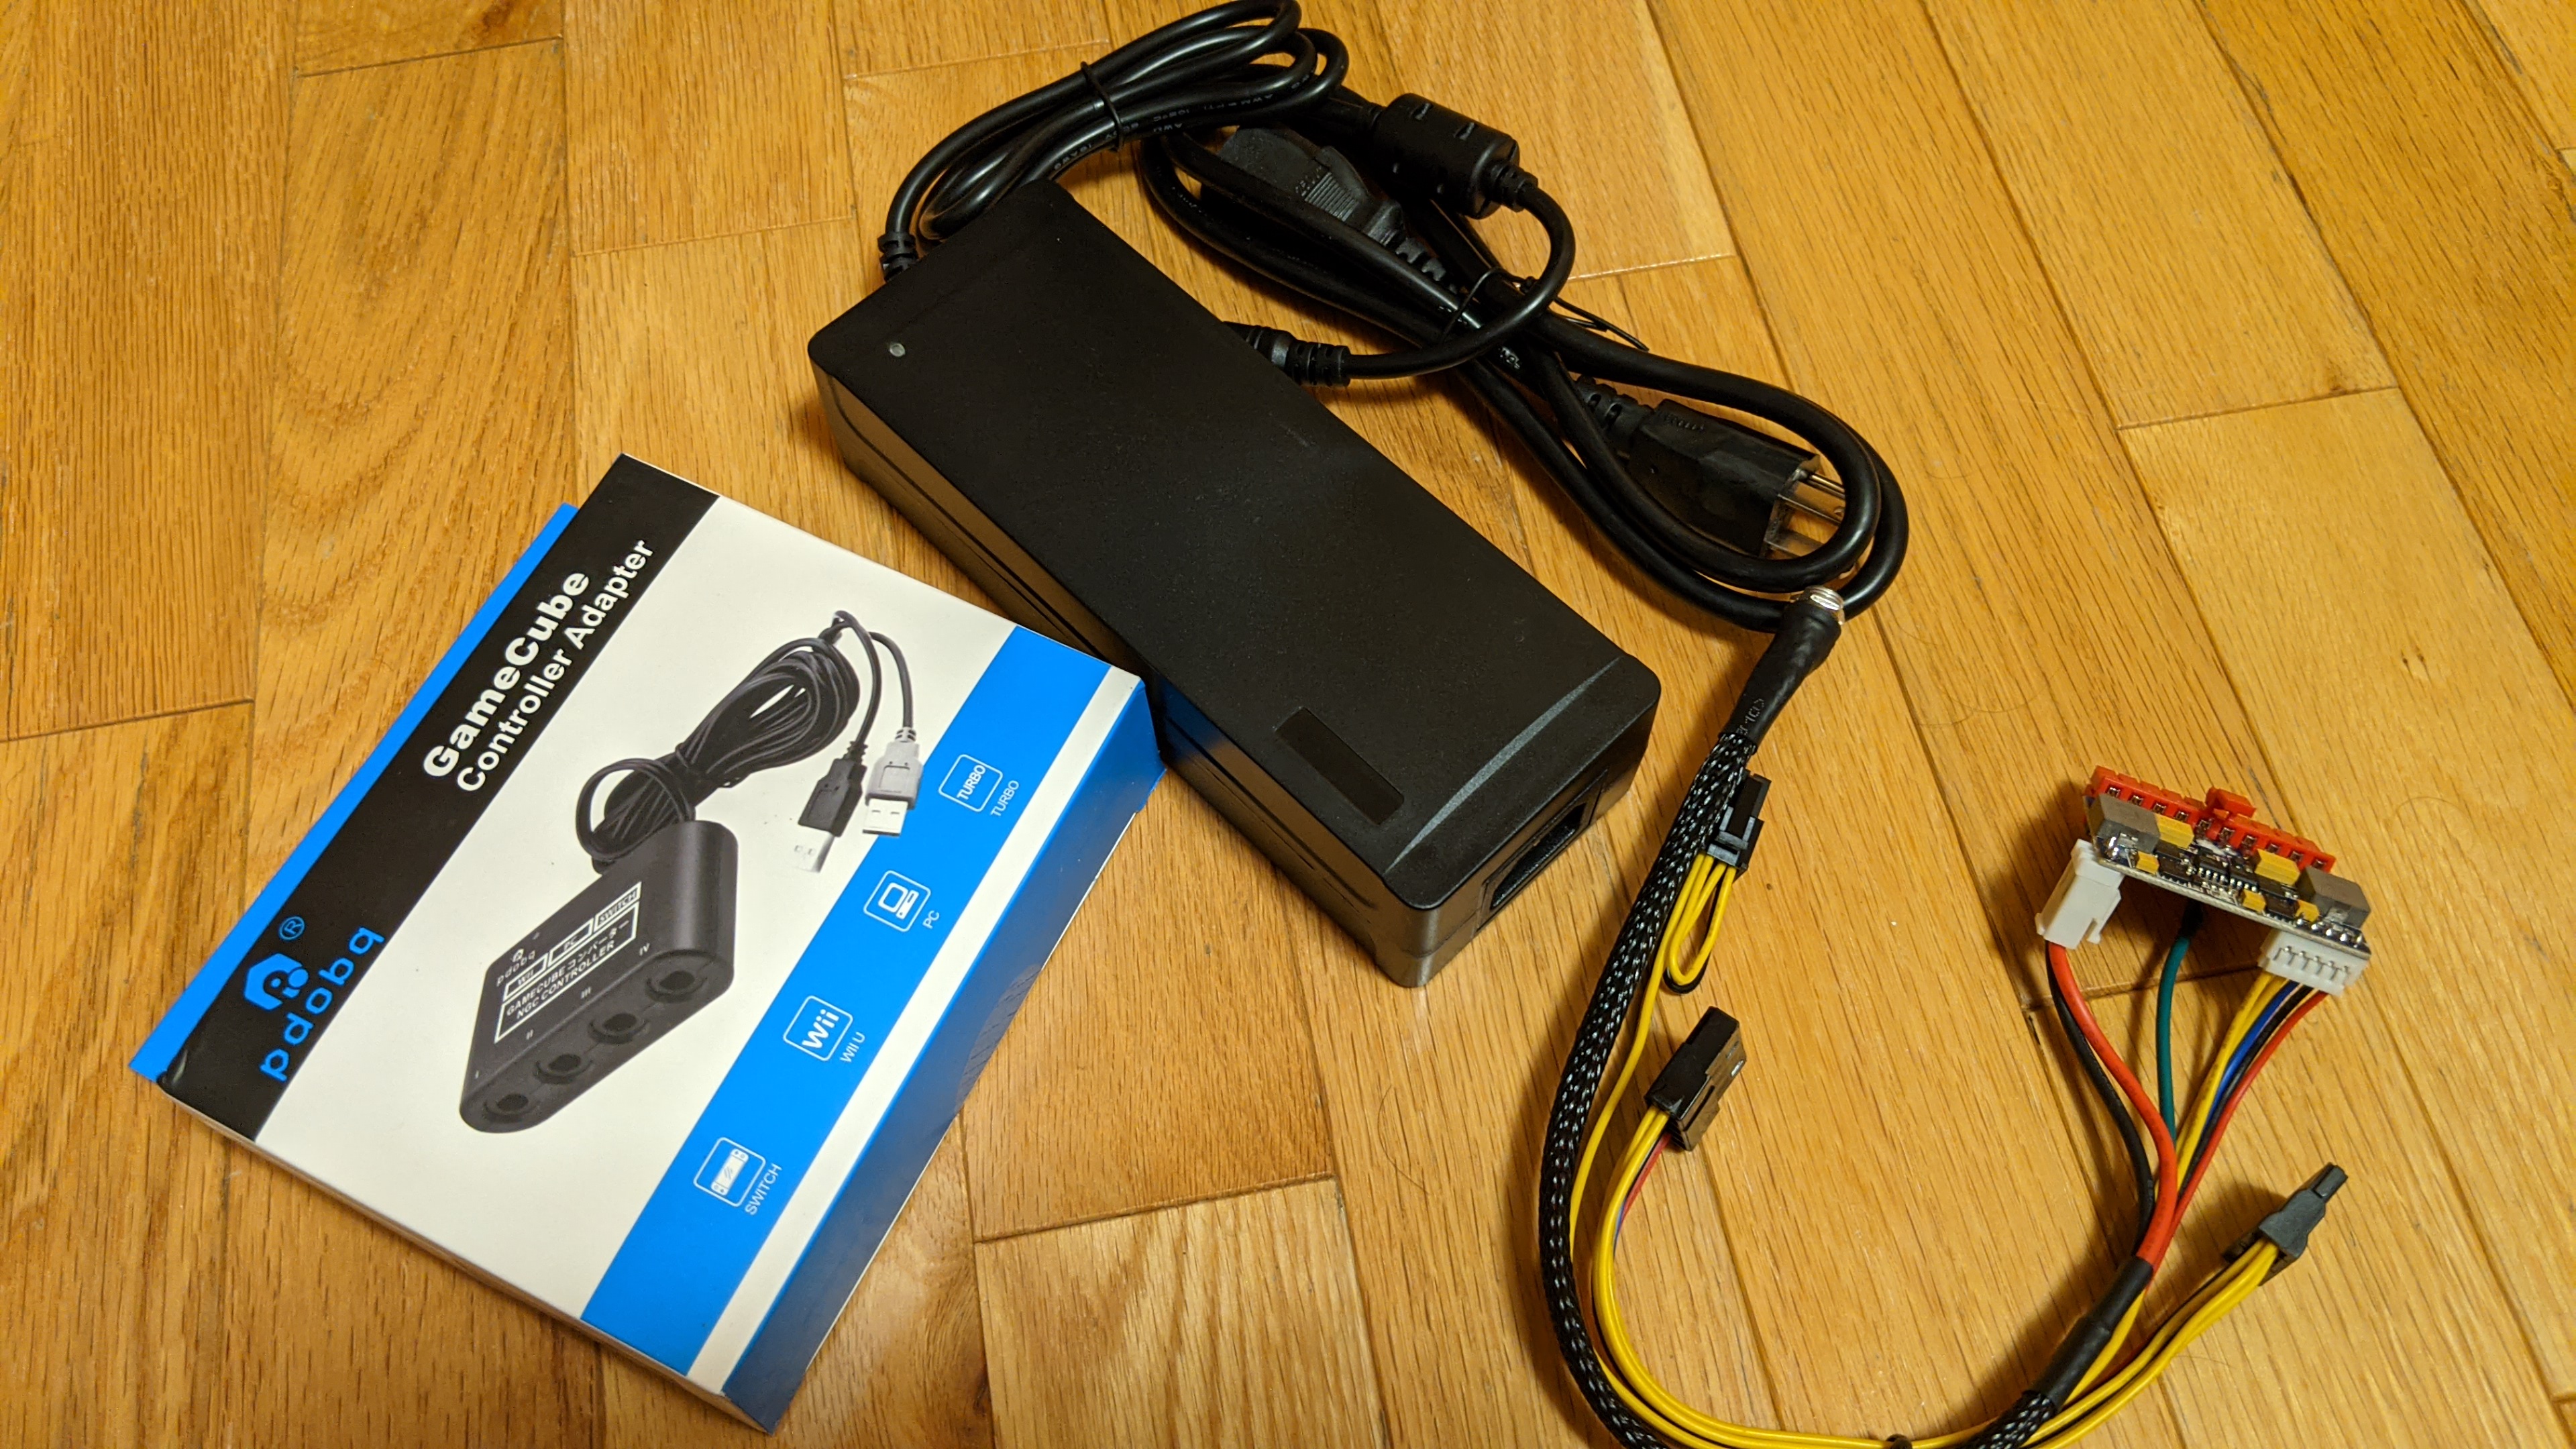
In short right now I’m fucked, because to my understanding, the Add2PSU syncs with the 12V signals. I assumed that the fan connector on the PN50 had a 12V lead, but I just discovered it doesn’t have one. The highest voltage on any connector on the PN50 is 5V. And I tried to sync with 5V maybe but to no avail.

So now I have to do more thinking what I can do (that project has been thinking) and I posted a question on sff network in case somebody has a solution for me over there. At least the Gamecube adapter works this time.

3 Likes

Didn’t received any answer on sff network, but I have a solution that I thought at the beginning that I will probably use at the end.

But first I wanted to know if the GPU on the NVME would work first. So used the PSU jumper included with my mom’s pc psu and it worked right away. Just had to install nvidia drivers to remove some initial sloppiness.


Testing right now to see the limits. Run Dirt on High and everything run well except a massive frame drop at the beginning and later during the run. Unigine benchmark however no issue to be seen. Running Time Spy.

So I think it will only be a matter to provide adequate airflow to the cpu fan in order to don’t choke it and be cpu bottleneck.

And to solve the issue of syncing power, I would just use two power buttons. One for the PN50 and one for the picoPSU. And the Gamecube OG powrr button stay depressed, which means the gate is close up to the point when the button is pressed again, allowing to trick the picopsu by shorting the 2 pins. And I would use the reset button to power on the PN50.

Simplest solution I found :upside_down_face: just gonna be strange to have to press two buttons to power the pc… and not forgetting to press one when I shut it down…

6 Likes

Only 900 points less on Time spy than when I did the test with the 3600. Not too shabby.

4 Likes

Small update. Decided I didn’t want to go with dual power adapter because it would be too unwieldy. So first I was looking for HDPLEX160 DC-ATX v2, a rare version of the HDPLEX160 that would have fitted in the basement of my build without any major modifications.
HDPLEX-160W-DC-ATX-v2

The use of the HDPLEX200 would have required more modification to the case that I didn’t wanted to do and putting it in a location that was not optimal.

But when asking on smallformfactor network for the v2, another alternative showed up.

So I will be getting a GxR-DIY made by Revoccases. In short it is a board that deals with 12V power and allows me to sync with anything over +3V, so no need anymore of the two power buttons solution. And it’s small so it can fit easily in the build.

I’m going all 12V as I tested and the PN50 can work on 12V. Played Dirt 3 for 10 minutes and ran Time Spy on the PN50 (no external GPU) without any issue on 12V. Will source a Dell DA-2 which is a 12V 230W power adapter that will power the PN50 and the GPU.

Otherwise, modded the Gamecube adapter and sleeved/cable managed so it looks better and less cluster.

Finally I’m planning to get pogo connectors for the fans, led and power button that will be attached to the upper section of the Gamecube. So when I close or open the case, I don’t have to deal with any cables and it will be so satisfactory , like what Intel NUC Ghost Canyon’s case do.

5 Likes

0e15b030194bfc7ed52bff1830eb7322

Went around working on the project. Did a temporary connection job to test, and after checking voltages for 10 times, connected everyhting and it just works. Everything powered up without any issue. Yeah!

Gonna play Minecraft to test the stability. Will do a more detailled log later. In the meantime some junkass setup pictures.


7 Likes

A little update to keep you up-to-date with everything. Compa first. So ya played Minecraft and ran Time Spy and no problem. However, my Time Spy results were lower on the CPU side, and I think it was because the CPU was heat soak, as I ran it after 2 hours of Minecraft.

So that brings the subject of cooling. Installed two 50mm fans inside the case, one as an intake, and one as an exhaust. Those will be connected to the fan header on the GPU. So still haven’t tested how the cooling performs, but it should be able to exhaust the heat generated by the GPU and provide fresh air to the CPU to improve its cooling.


Speaking of GPU, still haven’t acquired a GTX 1650, because out of stock and too high used price for the card. So waiting for the RTX 3050. The rumored 90W TDP should be still fine with the case. Plus that would make the build the first ray tracing Gamecube :wink: Hoping there is a PALIT one akin to their 1650 which has a super short PCB that would make the whole fit the GPU inside the Gamecube way easier.

Speaking of GPU, I will probably buy a new riser to reduce the cable clutter. More precisely, the ADT R43NL as it goes directly to a right angle, with an angled PCIE slot, and with hopefully a 3cm cable, and would allow me to avoid doing several questionable bends to the riser that will be squeezed between the GPU and the PN50 and would block airflow to the ram and wifi card.

Also, all the power and reset buttons (even if the latter is unused) are done on the Gamecube, and they have a satisfying sound.


Lastly, I will surely need to redo the cable on the GxR-DIY to reduce cable length and make everything much cleaner.

Also, a word on Uzume, the Dreamcast build. I’m considering getting a Ryzen 3 Pro 4350GE, as it is ZEN 2 and a 35W CPU, which would allow me to use the cute 65W power adapter that was included with the PN50. Might go with a Deskmini X300 also, as it would fit better in the Dreamcast, if I can sell my current MOBO and get the Deskmini without any loss.

6 Likes

looking good! you could probably even go 60mm slim in place of the 50mm ones for more air flow

Ya could have gone with 60mm fans, but went with 50mm to be sure I didn’t had clearance issue around them, and it kind of keeps the spirit of Gamecube by using 50mm fans. Maybe will go with 60mm fans if necessary.

1 Like

Quick update:

In the same weekend I sold stuff that I was trying to sell since a month. So logically my mind went just to “Can I sell more stuff?”. And my attention went toward my 3400G. Was already planning to just return it to Amazon as I could return till February 1st, as I pretty much want a 35W Ryzen instead for Uzume (HTPC Dreamcast).

So today I put it on ebay with a pricing allowing me, after the ebay fees, to get a small 15$ profit on the price I paid originally for it, you know to try maybe. And it fucking sold the same day. Was kind of baffled. So kind of forced me to use Compa (Gamecube) :sweat_smile:. Just without the GPU for the moment.

And I encountered a strange issue with the PN50. Wanted to boot on my NVME in the meantime, but the bios didn’t recognized it as a boot option, but the drive is there when going in the NVME section of the bios and on Windows. So ya I don’t know what is going on. At least that means I will be able to clone it with Clonezilla, probably tomorrow.

5 Likes

Dammit I will need to do a clean install. The PN50 does not have a CSM option and is running UEFI only. And my NVME is in MBR… Too lazy tonight to any installs, just reinstalled Windows so I can browse. (well maybe I gonna look to convert an MBT to GPT so I can do that with the QVO…)

3 Likes

Lights on!
So this week I received, after 2 months of shipping, my pogo pins connector. They are smaller than what I expected and the holes are not big enough for M3 screws, so I have to rely exclusively on hot glue to install these. (This project can be named Hot Glue: The Project)

Solder the led and power button cable and cable managed to have clean runs.


And after some adjustments, everything works. I can power my PC with power button of the Gamecube. And the OG Gamecube power led is alive ^^

Will do the fans tommorow, I first want to check if there is a way I could power the fans with the PN50, instead of the future GPU, despite the lack of 12V. Still looking for a GTX 1650 or 1050 not too expensive in the meantime to be a placeholder for the RTX 3050 that might come after February.

8 Likes

Did also the wiring for the fans, so now all the upper section is cable managed. The pogo pins for the fans will only be completed when I will get a GPU one day…

7 Likes

Was looking for Deskmini on ebay to see the prices (still thinking about how I will go with the Dreamcast) and I just found that! Lol. He was way less destructive than me :sweat_smile: Looks clean (also do any of you know how I could have a Google TV OS like? My parents have begun Netflix and I would like to do a more powerful option with still an easy use)

5 Likes

Decided today to finally solder the XT60 connector to the poer birck so I don’t have nay more the jank cables. Took longer than expected because I didn’t work in a proper manner, and I discovered at the end my soldering pen was not hot enough, explaining all the issues I had.


The GTX 1650 I bought, an OEM one of the super short variant, should arrive next week, and hoping that the riser arrives at the same time (wandering in the country since the 12th) so I can finally have a functional PC with a discrete GPU.

3 Likes

GTX 1650 received! The super short variant. A Dell OEM

Did a quick test and everything worked fine. Finally I went for a R42NL for the riser as the physical 4x slot meant easier to fit with less chance of interference.

So installed it in a temporary-ish manner. Plastic part removed from the Gamecube during the initial modding was used to secured the GPU. Only screwed at the front has the PCI-E riser, being bent to fit, prop the back of the card up. Right now there is no issue, but might one to have also an attach point at the back so the card stay put whenever the PC will be moved.

Had to move the exhaust fan to the corner so it doesn’t interfere with with the PCI-E riser.

The wires fit inside, but at one point I will shorten them. Might do it if I get a RTX 3050, will depend how the card is made and if there would super short variants.

Everything closes and fits.

However the fans cases are still not connected, will maybe do that during the week because need to solder wires for that.

7 Likes