[Build log] うずめ X コンパ | A Dreamcast & a Gamecube PC

7 Likes

Didn’t post update for some time. That is because I fucked up. My first white paint was perfect, sat undisturbed for one week. But was impatient and a little bit worried about the diminishing number of days warm enough to paint.

So I applied a clear coat on a humid day, which caused the paint to react on the edge where it was more porous. Had to scrape the paint (except for the disk cover).

Redo last weekend, and it’s fair enough, except the bottom part where I was lazy and only sanded instead.


Still have to wait to buy hdplex 200W and PN50 before progressing further with anything. And I’m thinking of returning the 3400G I got for instead trying to get a 4650GE or 4600GE

7 Likes

get a load of this

2 Likes

Probably will do that for the yellowed grey parts

HDPlex and PN50 4500u were supposed to be in stock in late october, last Friday of the month and still nothing.
grrrrr

tumblr_mxw2q4e5Rl1rbnx7io1_500

Did a little progress on the Gamecube case working on it a little bit intermittently. With spot putty, now the outside is smooth, and will finish smoothing out and level the flooring inside. The inside base will be painted to have it clean, just need to find how I can paint now that it is cold outside.

6 Likes

Bought and received surprisingly fast my Asus PN50 4500u. Yeah! Still have no SSD and ram to test it. So I said I would wait before disassembling it. So I let you imagine what happened. Ya I already tear it down. :grin:

Tearing it down was kind of tedious and a little bit challenging. Had to go slowly. In short, it required opening the case, removing the plastic io cover, disconnecting all the cables, removing the lightly glued microphone boards, removing the power button and led assembly by trying to shove the motherboard to the rear io side, then slowly propping up the board from the front io side with the plastic hook in the ifixit (using the mounting holes) while trying to clear the front io off the case.

But I done it at last. And now I realize I will have some work to do in order to figure out which among the 4 cables of the power button and assembly are for the power signal (I do thing it’s the red and black though). Also do somebody know what is the specific name of those small connectors? Will need to buy some.

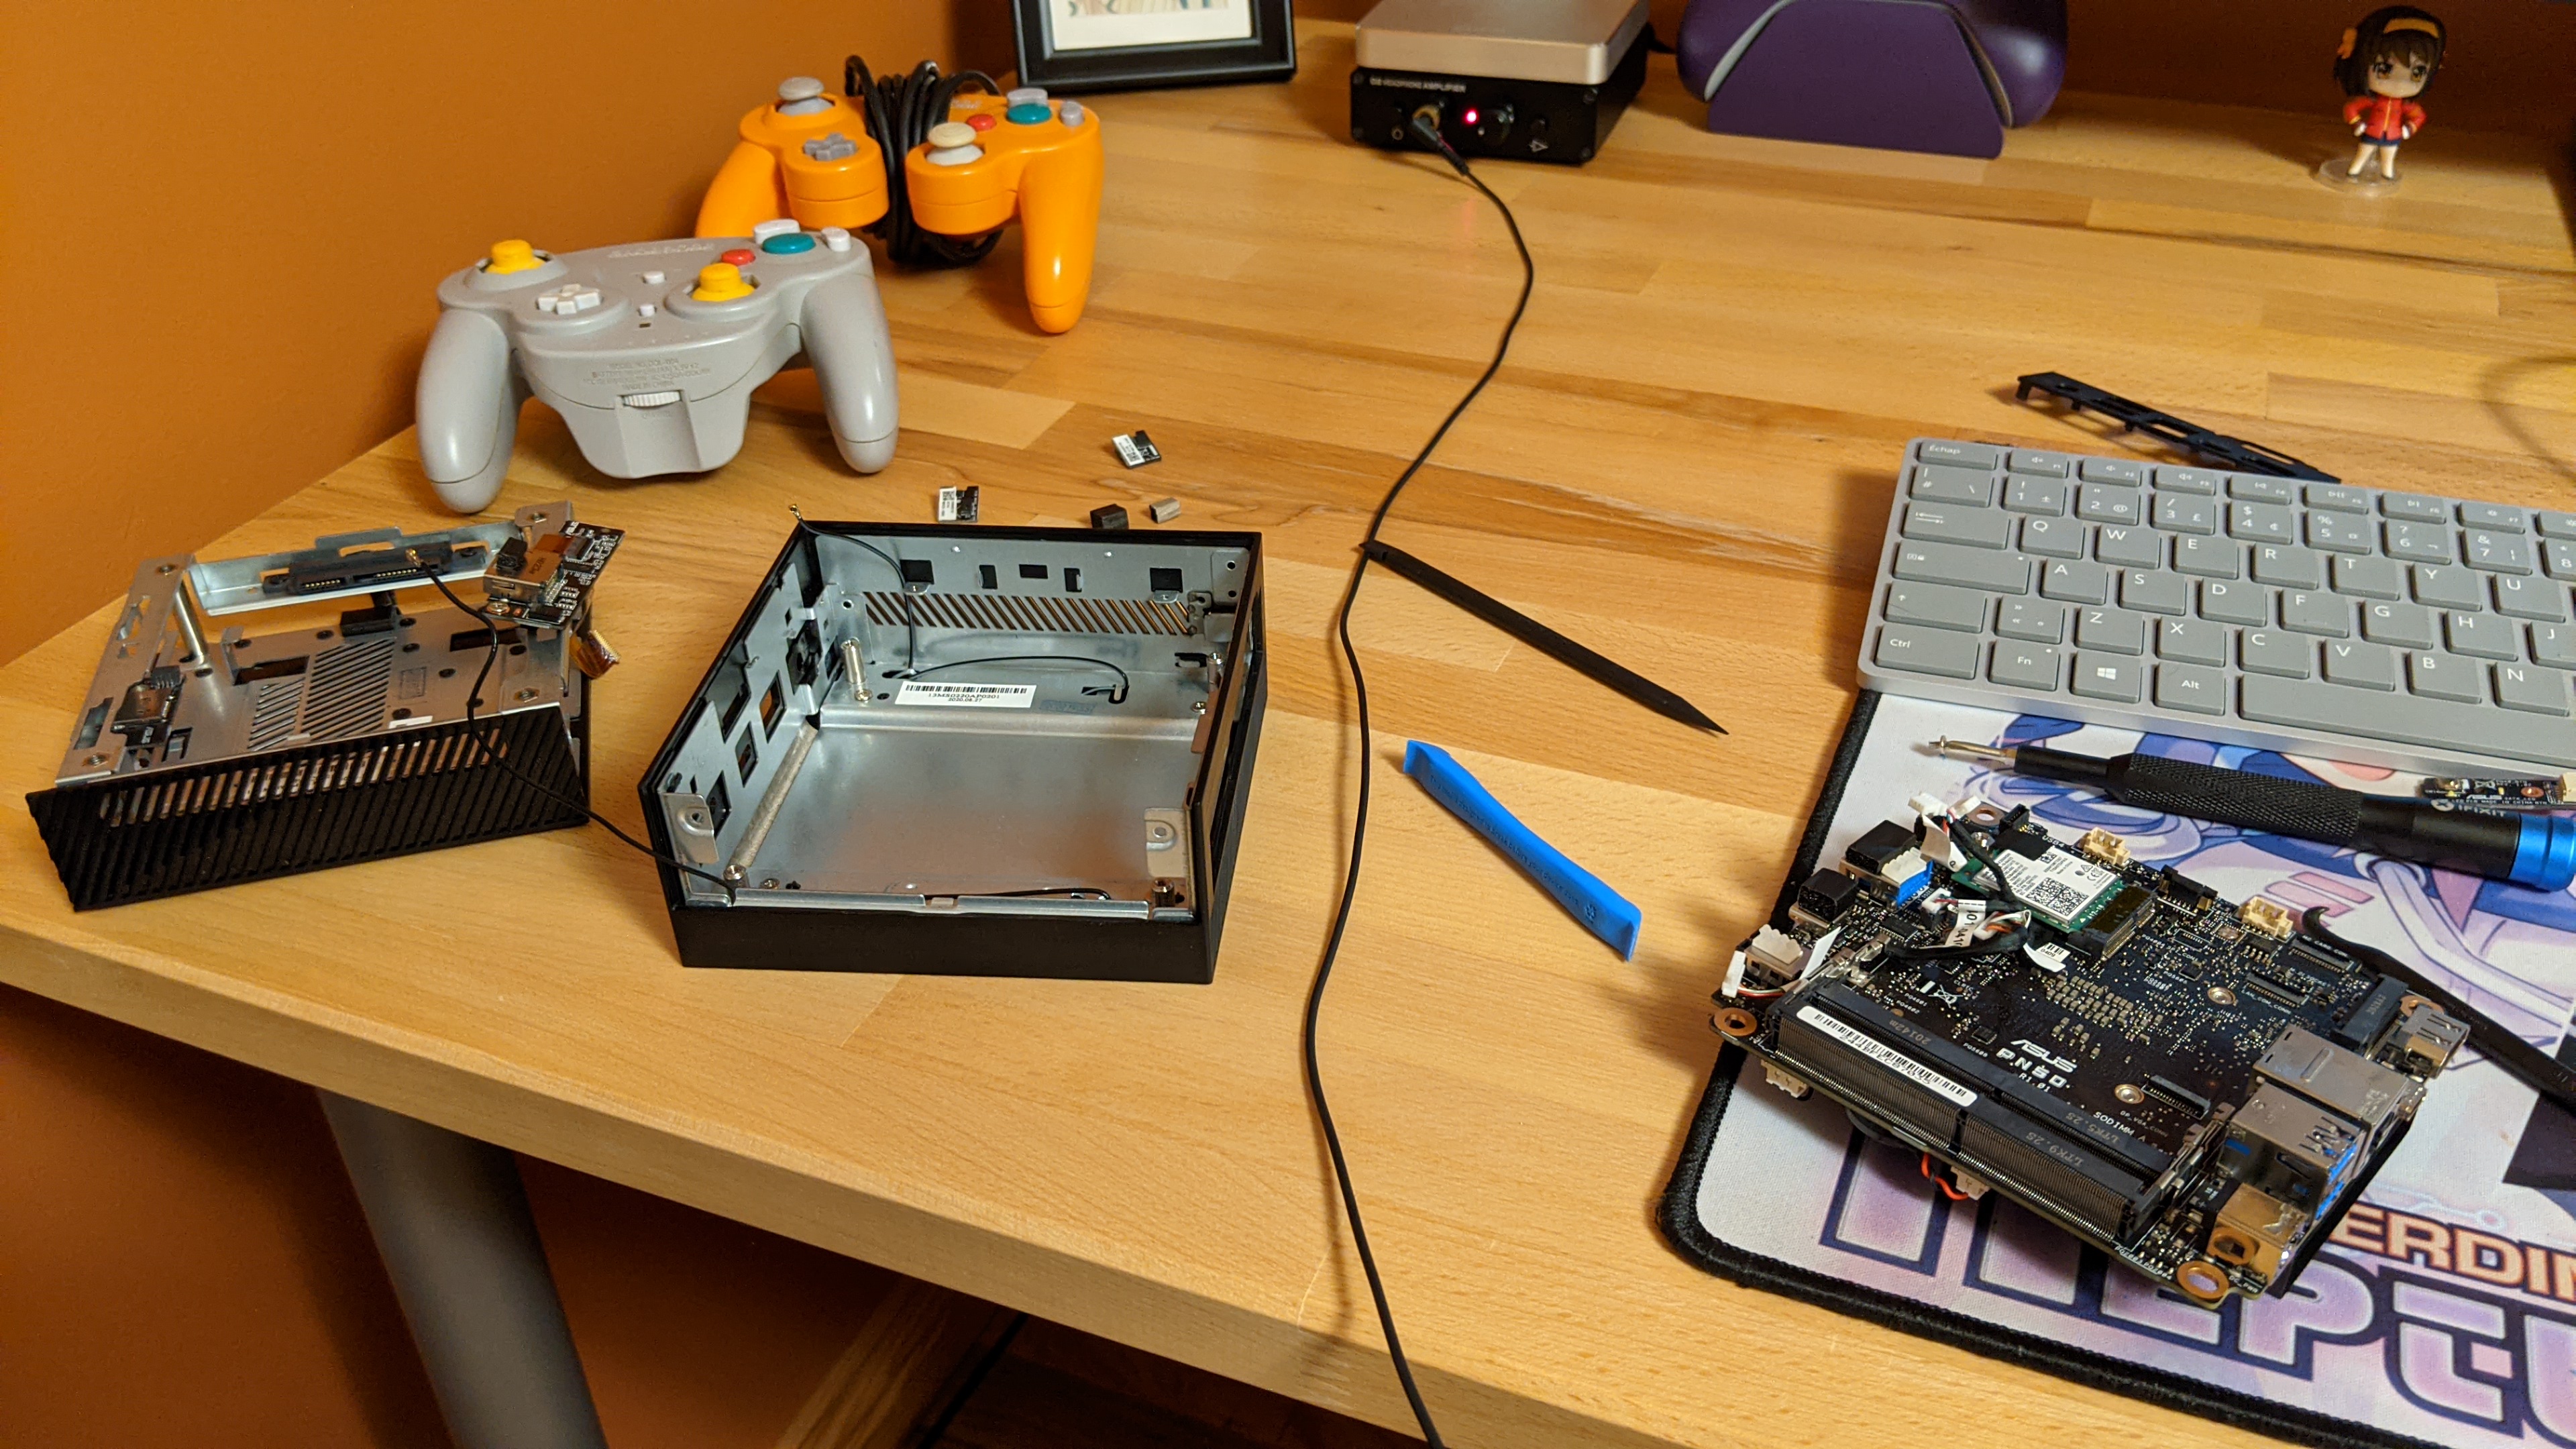
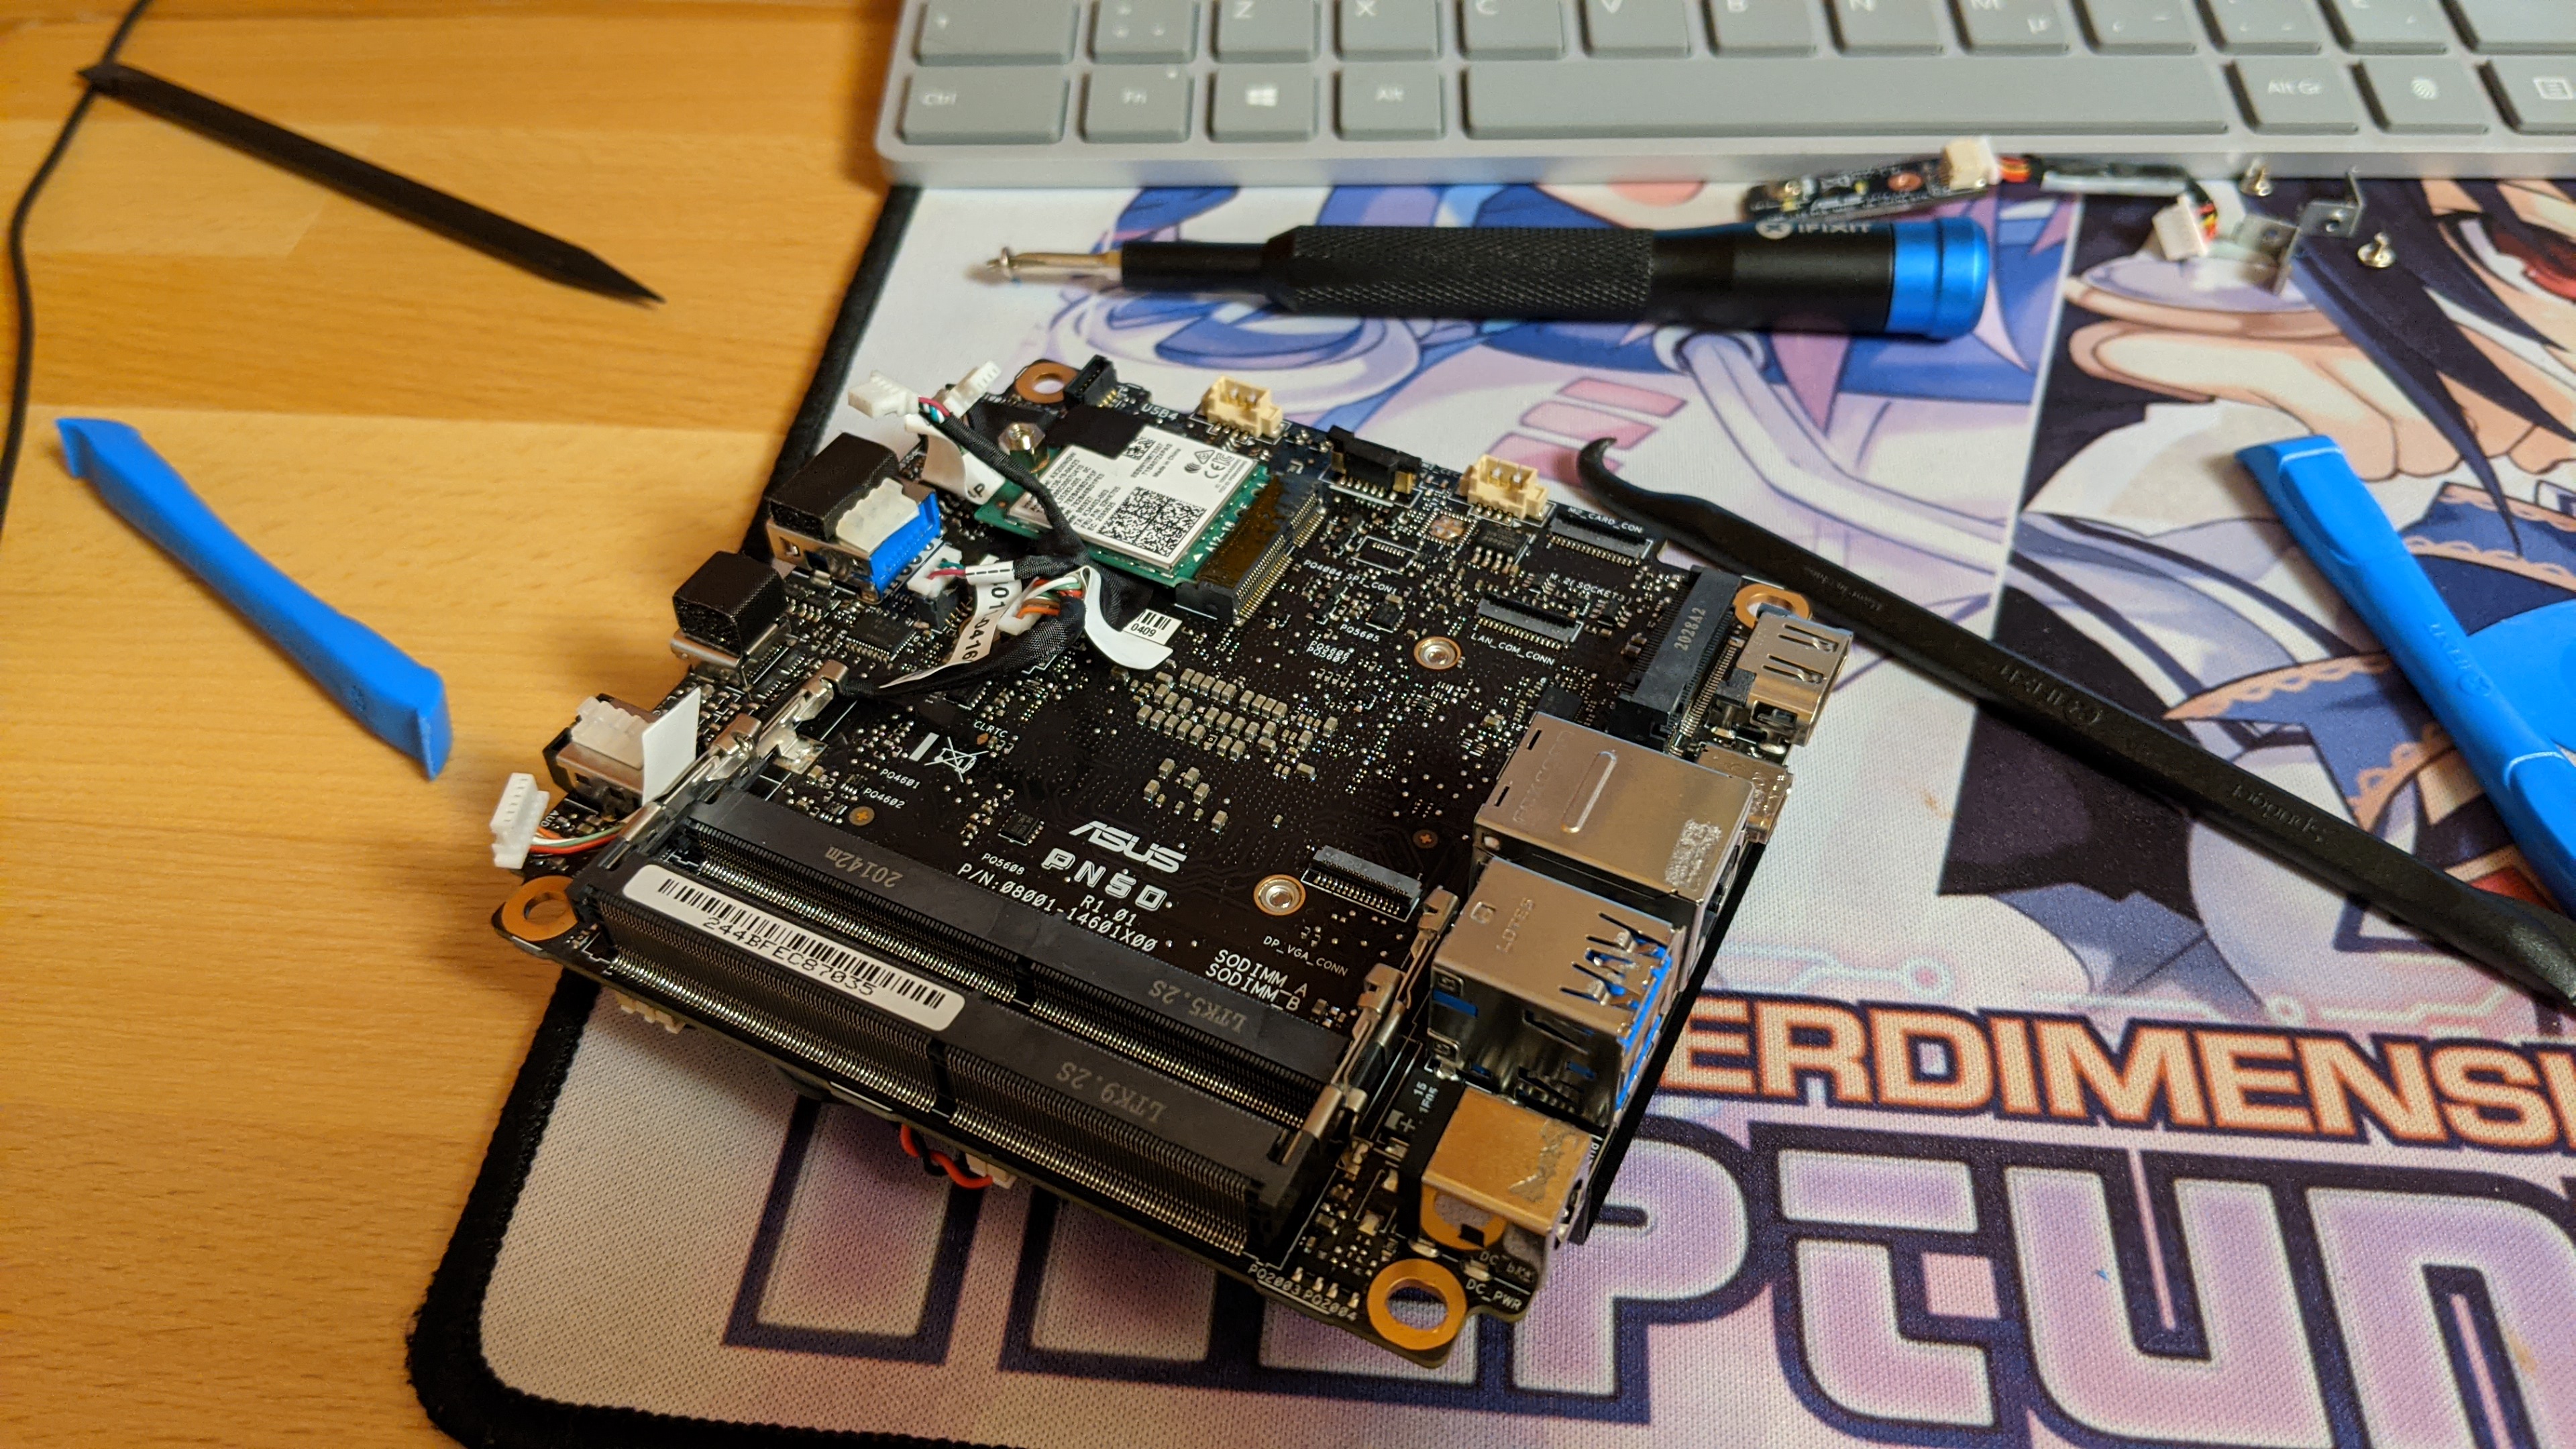
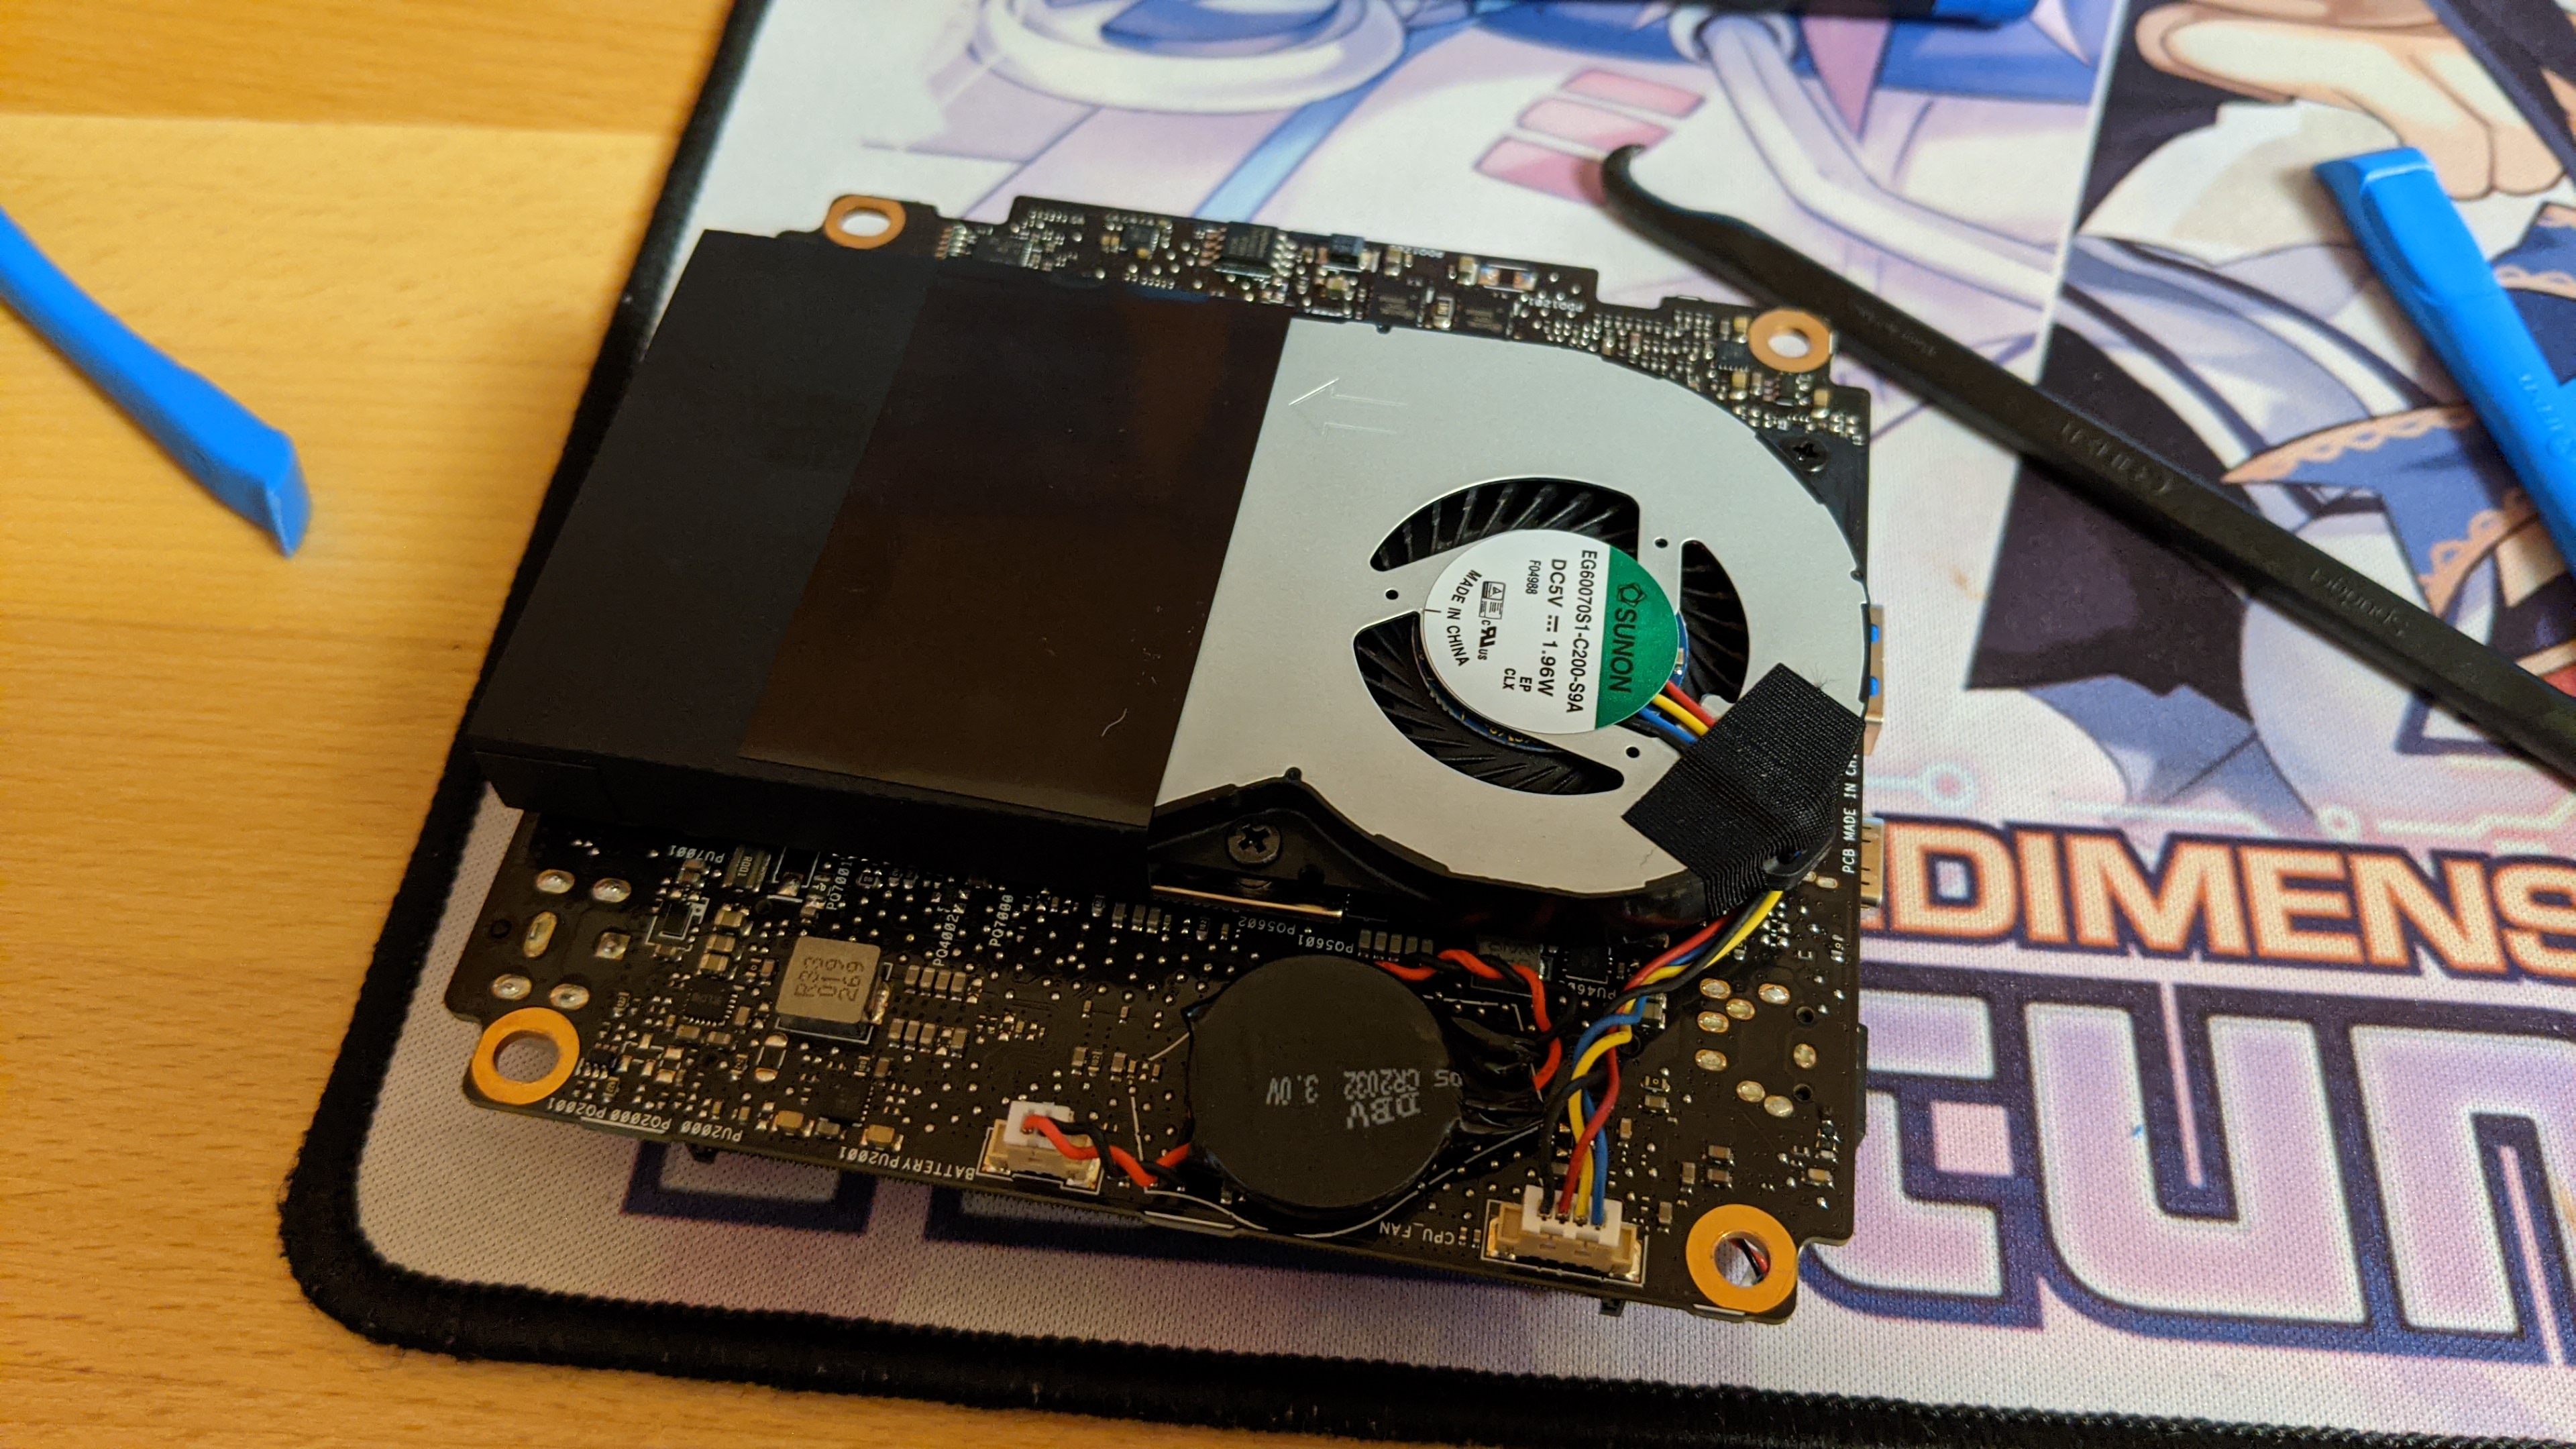
To my knowledge those pictures are the first and only pictures of a disassembled PN40, PN50 or PN60 on the internets.

7 Likes

Well…

So first I finished some days ago leveling the inside floor.

And today I painted as right now we have like a small indian summer in November, a first, it was 16C today.

And then I played around test fitting the build, during which I noticed several obstacles. First, there is no way that an HDPLEX would fit inside here, too thick. So thought of maybe getting a custom G-UNIQUE instead.

But then problem #2, there is no way I can power the GPU, as the only orientation I can put it has the power connector directly next to the Gamecube connectors. I can not even go connectorless with the cables directly into the connector as I thought I would do because there no space at all.

I could always resolder the connector on the back, but not really warm to the idea. So I think I would just acquire a dirt cheap 1650 and wait for the 3050 that would probably have performance around the 2060. Also going that route, I will have only the cable riser to power, which will greatly simplify the delivery system and require only a cheap picopsu.

10 Likes

I’m loving this project.

4 Likes

Paint day today. It’s so wild 15C in November. The climate is becoming more and more fuck up. The paint job is really nice I’m happy of it. Will let it dry and harden for two days before playing with it.

The handle will stay black, and the cover io will be painted way down the line when all the modif would have be done to it, probably next spring?

7 Likes

Updates: Some good and some bad

Worked on it yesterday. Ya I didn’t listen to my 2 days before touching it. Assembled the Gamecube looked really nice.

Tested all the components and everything works fine. And Windows 10 installation was quick.

I noticed there is a port on the motherboard labelled USB4 which appears in the bios, and now I’m wondering if I could use for the power sync instead of doing some modif to the laptop fan cable.

Disassembled furthermore the PN50 to salvage the wifi antennas. They’re kind of strange as one is pretty much only a sheet metal. Was expecting to have two little antenna bearing PCBs like in the ASUS shark fin.

Assembled everything in the Gamecube using hot glue for the moment (maybe will stay there if it does the job). Cut a small section inside to gain a mm or 2 of clearance for the ATX pins. It is now solidly in place as it’s kind of slotted in.

The so tiny SSD is just flopping in there with some cushion pads thinghy that was on the rear io. Did longer cables and cable managed for the included microphones and microsd port (even if I’m not gonna use them) and soldered a temporary power button.

Also, I looked at that and I will just remove the Gamecube stock controllers port and simply put a Gamecube adapter there. The one used by Madmorda in her Gamecube Switch Dock as the same spacing than on the Gamecube and it’s just compact in one board (but would not solve the GPU power connector issue), instead of trying to fiddle with the Gamecube stock ports.

I discovered also that pretty much all the picopsu, aside the hdplex, only accept 12V input only, so I need a 12V power adapter for the GPU. Was already looking to acquire a second power adapter as pretty much all power adapters over 90W are 19.5V and not the 19V, and would probably fry my PN50. Just that the mismatch of voltage kinda suck, wanted to have the same looking Asus power adapter in the 90W variant for the GPU. Think will be buying all the last components tonight, except for the GPU because I still have to find a dirt cheap one.

It is insane how costs in this project just skyrocket :disappointed_relieved: The usb c to a adapter, pico psu, 12V power adapter and Gamcube adapter will be shy of 80$ alone.

For the bad news, noticed I use the past tense right at the beginning. Well it’s because I was moving the upper section and I dropped it and now it’s scuffed :sob: There is no real way to really fix it without removing the paint and painting it all over again. So I think I will find some stickers to cover the scuffs in the meantime. Will probably paint it next spring, and maybe a different colour as Sunrise is kind of a little in your face when all over the Gamecube. Maybe I could consider getting a spray gun :thinking:

11 Likes

I really like the color
have you thought about wiring up USB ports to the Memory card slots

No, and I don’t think I would need it really and it would be lot of hassle for nothing. With my monitor being already use as a usb hub, I just 3 usb ports, and the fourth and fifth will be free ones.

Well I did some change to my plan.

I finally accepted that I would not be able to use my dear GTX 1660 ti, or at least not without some serious expenses and challenges. Still have to find a 1650 or 1050ti though.

Received the Gamcube adapter, but need to return it because it doesn’t work. It’s detected by the pc, but no input received whatsoever. But still disassembled it to see if it would fit the bill and yes. The fact that it would allow for some clearance below the ports mean that the PCB of a 1050 or 1650 would fit underneath up to the circular heatsink and would give the precious millimeters I need so the card doesn’t interfere with the back panel.

Second I did some modifications to the inside of the Gamecube by cutting a hole. That way the cpu cooler can ft so I can flip the board, have the exhaust align with the original Gamecube exhaust, and simplify a lot the process of removing parts with everything easily accessible. Also, it simplifies so much the run of the pcie adpater and gives me some clearance needed to fit the GPU.


Easy access to all the cables means also that I was now able to secure the ssd instead of having it flip flop inside.

4 Likes

Received stuff. That 12V power brick sounds hollow never had that before.

In short right now I’m fucked, because to my understanding, the Add2PSU syncs with the 12V signals. I assumed that the fan connector on the PN50 had a 12V lead, but I just discovered it doesn’t have one. The highest voltage on any connector on the PN50 is 5V. And I tried to sync with 5V maybe but to no avail.

So now I have to do more thinking what I can do (that project has been thinking) and I posted a question on sff network in case somebody has a solution for me over there. At least the Gamecube adapter works this time.

3 Likes

Didn’t received any answer on sff network, but I have a solution that I thought at the beginning that I will probably use at the end.

But first I wanted to know if the GPU on the NVME would work first. So used the PSU jumper included with my mom’s pc psu and it worked right away. Just had to install nvidia drivers to remove some initial sloppiness.


Testing right now to see the limits. Run Dirt on High and everything run well except a massive frame drop at the beginning and later during the run. Unigine benchmark however no issue to be seen. Running Time Spy.

So I think it will only be a matter to provide adequate airflow to the cpu fan in order to don’t choke it and be cpu bottleneck.

And to solve the issue of syncing power, I would just use two power buttons. One for the PN50 and one for the picoPSU. And the Gamecube OG powrr button stay depressed, which means the gate is close up to the point when the button is pressed again, allowing to trick the picopsu by shorting the 2 pins. And I would use the reset button to power on the PN50.

Simplest solution I found :upside_down_face: just gonna be strange to have to press two buttons to power the pc… and not forgetting to press one when I shut it down…

6 Likes

Only 900 points less on Time spy than when I did the test with the 3600. Not too shabby.

4 Likes

Small update. Decided I didn’t want to go with dual power adapter because it would be too unwieldy. So first I was looking for HDPLEX160 DC-ATX v2, a rare version of the HDPLEX160 that would have fitted in the basement of my build without any major modifications.
HDPLEX-160W-DC-ATX-v2

The use of the HDPLEX200 would have required more modification to the case that I didn’t wanted to do and putting it in a location that was not optimal.

But when asking on smallformfactor network for the v2, another alternative showed up.

So I will be getting a GxR-DIY made by Revoccases. In short it is a board that deals with 12V power and allows me to sync with anything over +3V, so no need anymore of the two power buttons solution. And it’s small so it can fit easily in the build.

I’m going all 12V as I tested and the PN50 can work on 12V. Played Dirt 3 for 10 minutes and ran Time Spy on the PN50 (no external GPU) without any issue on 12V. Will source a Dell DA-2 which is a 12V 230W power adapter that will power the PN50 and the GPU.

Otherwise, modded the Gamecube adapter and sleeved/cable managed so it looks better and less cluster.

Finally I’m planning to get pogo connectors for the fans, led and power button that will be attached to the upper section of the Gamecube. So when I close or open the case, I don’t have to deal with any cables and it will be so satisfactory , like what Intel NUC Ghost Canyon’s case do.

5 Likes

0e15b030194bfc7ed52bff1830eb7322

Went around working on the project. Did a temporary connection job to test, and after checking voltages for 10 times, connected everyhting and it just works. Everything powered up without any issue. Yeah!

Gonna play Minecraft to test the stability. Will do a more detailled log later. In the meantime some junkass setup pictures.


7 Likes

A little update to keep you up-to-date with everything. Compa first. So ya played Minecraft and ran Time Spy and no problem. However, my Time Spy results were lower on the CPU side, and I think it was because the CPU was heat soak, as I ran it after 2 hours of Minecraft.

So that brings the subject of cooling. Installed two 50mm fans inside the case, one as an intake, and one as an exhaust. Those will be connected to the fan header on the GPU. So still haven’t tested how the cooling performs, but it should be able to exhaust the heat generated by the GPU and provide fresh air to the CPU to improve its cooling.


Speaking of GPU, still haven’t acquired a GTX 1650, because out of stock and too high used price for the card. So waiting for the RTX 3050. The rumored 90W TDP should be still fine with the case. Plus that would make the build the first ray tracing Gamecube :wink: Hoping there is a PALIT one akin to their 1650 which has a super short PCB that would make the whole fit the GPU inside the Gamecube way easier.

Speaking of GPU, I will probably buy a new riser to reduce the cable clutter. More precisely, the ADT R43NL as it goes directly to a right angle, with an angled PCIE slot, and with hopefully a 3cm cable, and would allow me to avoid doing several questionable bends to the riser that will be squeezed between the GPU and the PN50 and would block airflow to the ram and wifi card.

Also, all the power and reset buttons (even if the latter is unused) are done on the Gamecube, and they have a satisfying sound.


Lastly, I will surely need to redo the cable on the GxR-DIY to reduce cable length and make everything much cleaner.

Also, a word on Uzume, the Dreamcast build. I’m considering getting a Ryzen 3 Pro 4350GE, as it is ZEN 2 and a 35W CPU, which would allow me to use the cute 65W power adapter that was included with the PN50. Might go with a Deskmini X300 also, as it would fit better in the Dreamcast, if I can sell my current MOBO and get the Deskmini without any loss.

6 Likes

looking good! you could probably even go 60mm slim in place of the 50mm ones for more air flow