Problem: Installing VMs for testing, lab environments, or projects is tedious and boring.
Solution: Automate the installation process with KVM and Kickstart.
Hello L1T!
This is my attempt at writing a wiki to assist in exposing you to automation, automation, beautiful automation. Rather than jump right into OpenStack, Docker, Kubernetes, and making your very own Stark Industries… I figured we would start with something a little bit simpler.
For this wiki, I am going to be using Debian Stretch “””server edition”””, with Kernel 4.9.0-6. The same concepts apply for CentOS 7.4 1708 with Kernel 4.15.13-1, but there are subtle differences. If you want to follow along exactly, I recommend using Debian. Otherwise, if you’re not afraid of some trial and error or doing your own research and tweaks, feel free to use any system you want! 
The first thing we’re going to do is setup our environment.
sudo apt install qemu-kvm libvirt-clients libvirt-daemon-system virt-viewer virt-manager -y
Add your user to the appropriate groups:
sudo adduser admindev libvirt
sudo adduser admindev libvirt-qemu
Obviously, replace admindev with your username.
Reboot!
Welcome back. I have built a few aliases to assist me with this process. In .bashrc (or, even better, make a .bash_aliases file that .bashrc references):
alias show=’virsh –connect qemu:///system list –all’
alias get-vm=’virsh –connect qemu:///system’
What do these do? show allows me to view the VMs in their current state. get-vm VMNAME start/shutdown/destroy/undefine allows me to easily control the state of a specific VM.
These aliases are not necessary, and definitely not worth it if you just need a VM or two.
Next, we’re going to install Apache for our image server.
sudo apt install apache2 -y
sudo systemctl start apache2 && sudo systemctl enable apache2
Verify that it works by visiting the IP of the server in your browser. You should get the message that Apache has passed the test. If you don’t receive that message, try disabling ufw or your firewall of choice. If the test works after that, you’ll have to create a rule to allow http and https traffic. That information is not within the scope of this guide (yet).
This is where things might get a little… controversial. I had an existing Kickstart configuration from another server. You can do this one of two ways: Copy the generic Kickstart file from github or various other sources and tweak to your specifications. Or, fire off a CentOS server and copy the anaconda-ks.cfg from the root directory and tweak that. Option 2 is a lot better, because the admin and user passwords will be hashed in that file and used in the new VM. Either way, I leave the decision up to you.
So, with your Kickstart file, hang tight, we’re not using that yet! We have to get our networking working and then pass the iso through to the image file.
We’re halfway there, though! (Woooaaahhhh! Livin on a – ahem).
For your VMs to communicate to the host and the Internet, we’re going to need to adjust our /etc/networking/interfaces file. I used vim,
you can use your editor of choice. I highly recommend vim, though, because it comes on EVERY server. One day you’re going to have to cowboy edit a line of code in production and you’re going to thank Wendell (PBUH) that you knew how to do a rapid-fire search using vim 
Bridged Networking
The Debian docs do it a little something like this:
auto lo
iface lo inet loopback

# The primary network interface
auto eth0

#make sure we don't get addresses on our raw device
iface eth0 inet manual
iface eth0 inet6 manual

#set up bridge and give it a static ip
auto br0
iface br0 inet static
        address 192.168.1.2
        netmask 255.255.255.0
        network 192.168.1.0
        broadcast 192.168.1.255
        gateway 192.168.1.1
        bridge_ports eth0
        bridge_stp off
        bridge_fd 0
        bridge_maxwait 0
        dns-nameservers 8.8.8.8

#allow autoconf for ipv6
iface br0 inet6 auto
        accept_ra 1
If this makes you a little uncomfortable, fret not! I will let you know what I deleted in the original file:
NOTHING.
I commented out the file, and saved it, then I added the appropriate contents above. This way, if the bridge didn’t work, or if something catastrophic happened, I wasn’t scrambling on the internet for the default config or, worse, completely reinstalling Debian.
Now, for address, netmask, network, broadcast, gateway, and dns-nameservers, you want to edit that to your environment. For the address, since this badboy was the central hub for all of my work, I made it the “first”: 10.0.0.100. If you’re on a 192.168.1.1, you can do 192.168.1.100 or 192.168.1.50, anything that you can easily remember AND something that’s not within the lease pool of addresses.
Subnet mask is /24, so I left 255.255.255.0 as the netmask.
Network (base subnet) for my network is 10.0.0.0
Broadcast for my network: 10.0.0.255
Gateway and DNS-Nameserver is 10.0.0.1 for me. I don’t need Google to do my routing.
Save the file and reboot. You should be able to ping out or ssh into your box if everything is correct. If not, definitely triple check the configuration and make sure you have the appropriate packages:
https://wiki.debian.org/KVM
Copy the image to the image server
Create a temp folder
sudo mkdir /temp
Download CentOS iso. I used wget since I had no GUI
wget http://mirrors.gigenet.com/centos/7/isos/x86_64/CentOS-7-x86_64-Minimal-1708.iso
Extract iso contents to the temp folder you created.
sudo mount -o loop CentOS-7-x86_64-Minimal-1708.iso /temp
Create an install path in the Apache directory:
sudo mkdir /var/www/html/install
Copy iso contents over to the install path
sudo cp -a /temp/. /var/www/html/install
Now, you can visit the IP of your server in the browser followed my /install to view the contents of the iso. So, in my case:
http://10.0.0.100/install
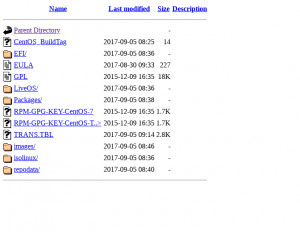
Neat.
Remember that Kickstart file? It’s pretty good on its own. I added some tweaks so it would reboot afterward. Here’s mine:
#version=DEVEL
# System authorization information
auth --enableshadow --passalgo=sha512
firstboot --enable
ignoredisk --only-use=sda
# Keyboard layouts
keyboard --vckeymap=us --xlayouts='us'
# System language
lang en_US.UTF-8

# Network information
network --bootproto=static --device=ens3 --gateway=10.0.0.1 --ip=10.0.0.111 --nameserver=10.0.0.1 --netmask=255.255.255.0 --ipv6=auto --activate
network --hostname=testbench

# Root password
rootpw --iscrypted $PWHASH
# System services
services --disabled="chronyd"
# System timezone
timezone America/Chicago --isUtc --nontp
# Add user
user --groups=wheel --name=sysadmin --password=$PWHASH --iscrypted --gecos="sysadmin"

# Restart when install is complete
reboot

# System bootloader configuration
bootloader --append=" crashkernel=auto" --location=mbr --boot-drive=sda
# Partition clearing information
clearpart --all --initlabel --drives=sda
zerombr
part swap --asprimary --fstype="swap" --size=4096
part /boot --fstype xfs --size=200
part pv.01 --size=1 --grow
volgroup rootvg01 pv.01
logvol / --fstype xfs --name=lv01 --vgname=rootvg01 --size=1 --grow
# Disk partitioning information
#part /boot/efi --fstype="efi" --ondisk=sda --size=512 --fsoptions="umask=0077,shortname=winnt"
#part swap --fstype="swap" --ondisk=sda --size=4096
#part /home --fstype="xfs" --ondisk=sda --size=1717247
#part / --fstype="xfs" --ondisk=sda --size=2092543

url --url http://10.0.0.100/install

%packages
@^minimal
@core
kexec-tools

%end

%addon com_redhat_kdump --enable --reserve-mb='auto'
The network information is crucial, you do not want to keep creating VMs that have the same IP information. Always edit that before you create a new VM.
The Partition Clearing information is not necessary. I added this for customization.
Otherwise, the default drive that is created will work. Here is an easier file:
#version=DEVEL
# System authorization information
auth --enableshadow --passalgo=sha512
firstboot --enable
ignoredisk --only-use=sda
# Keyboard layouts
keyboard --vckeymap=us --xlayouts=''
# System language
lang en_US.UTF-8

# Network information
network  --bootproto=static --device=ens2 --gateway=10.0.0.1 --ip=10.0.0.103 --nameserver=10.0.0.1 --netmask=255.255.255 network  --hostname=mongo02
# Root password
rootpw --iscrypted $PWHASH
# System services
services --enabled="chronyd"
# Do not configure the X Window System
skipx
# System timezone
timezone America/Chicago --isUtc
user --groups=wheel --name=chris --password=$PWHASH

# Reboot when install is complete
reboot
# System bootloader configuration
bootloader --append=" crashkernel=auto" --location=mbr --boot-drive=sda
autopart --type=lvm
# Partition clearing information
clearpart --all --initlabel --drives=sda

%packages
@core
chrony
kexec-tools

%end

%addon com_redhat_kdump --enable --reserve-mb='auto'

%end

%anaconda
pwpolicy root --minlen=6 --minquality=1 --notstrict --nochanges --notempty
pwpolicy user --minlen=6 --minquality=1 --notstrict --nochanges --emptyok
pwpolicy luks --minlen=6 --minquality=1 --notstrict --nochanges --notempty
%end
I hope you get the idea! It is fun to go through each line and see what it does. We’re almost there!
Copy Kickstart over to the install path.
sudo cp ks.cfg /var/www/html/install
Allow read permissions
sudo chmod +r /var/www/html/install/ks.cfg
Time to build the VMs
I have two scripts that I use for this. You are more than welcome to create the scripts or use the command line.
Script 1 is to create and allocate data for the VM. Be sure to put however much data you want and to change the name.img and name.qcow2 to what you want your VM name to be:
fallocate -l 40G name.img
qemu-img create -f qcow2 ./name.qcow2 40G
You can also create directories for various VMs. Either way, be sure to create the HDD where you want the VMs to live. I do that anyway. You can also put them where QEMU recommends, which is /var/somewhere/qemu – But a lot of /var partitions aren’t that big. I prefer using my /home partition.
From here, you build out your VM using virt-install. Rather than using \ to new line everything, I just threw it all into a .sh file.
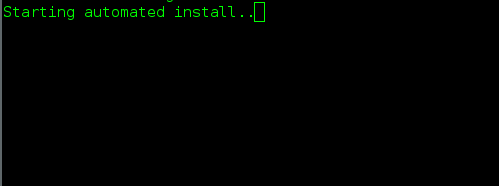
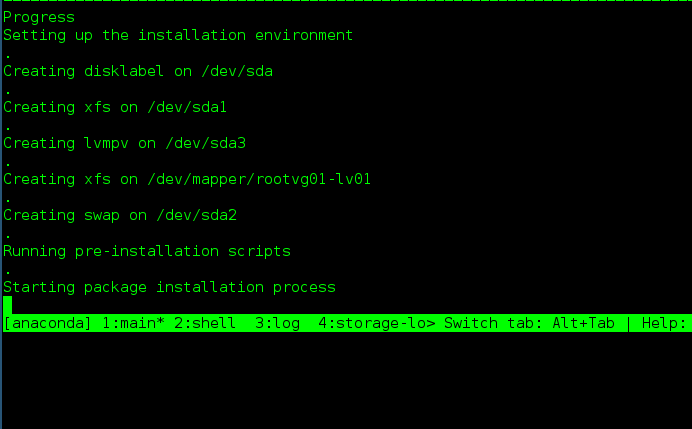
sudo virt-install --name testbench --ram 4096 --disk path=./testbench.qcow2,size=60 --vcpus 4 --os-type linux --os-variant generic --network bridge=br0 --graphics none --console pty,target_type=serial --location 'http://10.0.0.100/install/' --extra-args 'console=ttyS0,115200n8 serial' -x ks=http://10.0.0.100/install/ks.cfgChange all of the above to fit the specs of your VM preferences; Name, RAM, CPUs. The –extra-args=’console…’ aren’t necessary if you don’t want to watch the process. The VM will reboot. On my system, depending on the VM specs, it takes 2 to 5 minutes to complete the installation of a CentOS minimal.
That’s it! Shortly you will see the indication that it is working:
Feel free to make contributions for different operating systems or, if you can make something more efficient in the scripts or Kickstart file, please do! This setup has worked for me when doing development work and school work. Is nice to be able to make some brief edits and shoot off some scripts to have a new VM up and running in minutes.
–
Meta discussion of this article can be found here