Hi All,
I thought I would post a quick “how-to” for those interested in getting better performance out of TrueNAS Scale for iSCSI workloads.
TL;DR
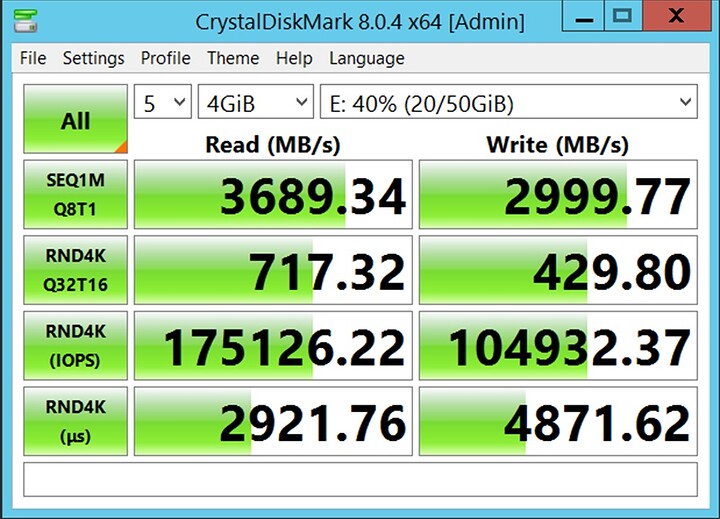
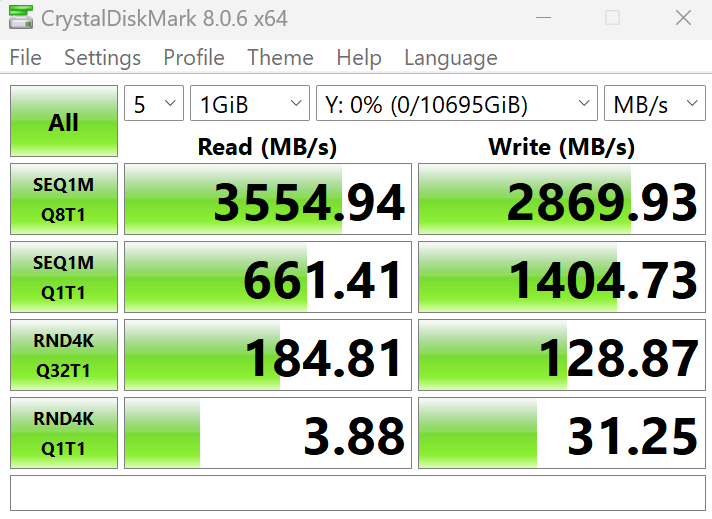
I was able to get almost 4GB/s throughput to a single VMware VM using Mellanox ConnectX-5 cards and TrueNAS Scale 23.10. That’s more than double what I was getting previously with 2x10Gbe connections previously. This is quick and dirty tuning on TrueNAS and VMWare to get this performance. If there’s interest, I can go into some of the deeper “how” in extracting more performance if those are curious.
Requisite FIO information (12 Thread): fio --bs=128k --direct=1 --directory=pwd --gtod_reduce=1 --ioengine=posixaio --iodepth=32 --group_reporting --name=randrw --numjobs=12 --ramp_time=10 --runtime=60 --rw=randrw --size=256M --time_based
randrw: (g=0): rw=randrw, bs=(R) 128KiB-128KiB, (W) 128KiB-128KiB, (T) 128KiB-128KiB, ioengine=posixaio, iodepth=32
…
fio-3.33
Starting 12 processes
Jobs: 12 (f=12): [m(12)][100.0%][r=5929MiB/s,w=5978MiB/s][r=47.4k,w=47.8k IOPS][eta 00m:00s]
randrw: (groupid=0, jobs=12): err= 0: pid=384493: Tue Jan 30 16:20:53 2024
read: IOPS=49.1k, BW=6144MiB/s (6443MB/s)(360GiB/60010msec)
bw ( MiB/s): min= 3214, max= 9988, per=100.00%, avg=6155.88, stdev=106.94, samples=1416
iops : min=25714, max=79906, avg=49245.40, stdev=855.47, samples=1416
write: IOPS=49.2k, BW=6153MiB/s (6452MB/s)(361GiB/60010msec); 0 zone resets
bw ( MiB/s): min= 3277, max= 9977, per=100.00%, avg=6165.42, stdev=106.67, samples=1416
iops : min=26214, max=79816, avg=49320.25, stdev=853.40, samples=1416
cpu : usr=3.40%, sys=0.72%, ctx=1975083, majf=0, minf=439
IO depths : 1=0.1%, 2=0.3%, 4=0.8%, 8=15.3%, 16=61.1%, 32=22.3%, >=64=0.0%
submit : 0=0.0%, 4=100.0%, 8=0.0%, 16=0.0%, 32=0.0%, 64=0.0%, >=64=0.0%
complete : 0=0.0%, 4=96.3%, 8=0.7%, 16=0.9%, 32=2.1%, 64=0.0%, >=64=0.0%
issued rwts: total=2949494,2953888,0,0 short=0,0,0,0 dropped=0,0,0,0
latency : target=0, window=0, percentile=100.00%, depth=32Run status group 0 (all jobs):
READ: bw=6144MiB/s (6443MB/s), 6144MiB/s-6144MiB/s (6443MB/s-6443MB/s), io=360GiB (387GB), run=60010-60010msec
WRITE: bw=6153MiB/s (6452MB/s), 6153MiB/s-6153MiB/s (6452MB/s-6452MB/s), io=361GiB (387GB), run=60010-60010msec
System Specs
TrueNAS Host:
- 128GB RAM
- Ryzen Threadripper Pro 3955WX (12C/24T)
- 2xASUS PCIe 4.0 Quad Hyper Cards
- 8xWD850X 2TB (512b mode) in 2 VDEVxRAIDZ1
- Mellanox ConnectX-5 MCX515A-CCAT Single Port 100GBe
- TrueNAS 23.10.0.1
- Extra Kernel Params: nvme_core.default_ps_max_latency_us=0 pcie_aspm=off
VMWare Host:
- 256GB RAM
- Ryzen Threadripper Pro 3955WX (12C/24T)
- Mellanox ConnectX-5 MCX515A-CCAT Single Port 100GBe
- ESXi 8.0 U2
INTRODUCTION
I’ve been on this quest for “performance.” Much like muscle cars and trying to get into the 9’s at the track, I’m the type that just wants it to work “fast” . Being a tinkerer, I’ve spent many hours (and too much budget!) in pursuit of performance perfection. I’ve long tried Fiber Channel, many types of storage arrays, rolling my own kernels, spending time tuning code in SCST. All because I’ve wanted fast performance.
My latest endeavour has been building the fast-as-possible, cheap as reasonable possible lap setup. One that gives performance, but also balances power and general affordability. I know fast and cheap typically = poor quality. This has been the quest to avoid tha.t
HOW-TO
NETWORKING CARD SUPPORT
For the performance to work, you will need to be specific on the type of 100GBe (50, 40, 25 or even 10) cards you want. In my case, I had loads of ConnectX-3 cards, but, VMware being VMware, ESXi does not support them. ESXi 7 and below should work ok with ConnectX-3.
I ended up going with ConnectX-5 as I did not want to be saddled with another forced upgrade due to VMWare changes.
I know many in the community avoid ConnectX cards and combining them with TrueNAS. They work just fine typically, except, you have to know what to do with them. I normally configure my ConnectX cards on a Windows host to get the latest firmware, and settings applied. I then place the cards into the TrueNAS system which generally preserves their settings. On TrueNAS Scale you will not have the ability to use mst or any of the other tools to modify the card, so, it’s important to do any configuration of the cards, aka setting Ethernet mode, before installing in TrueNAS Scale systems. You can avoid this by looking for Ethernet only cards.
You can find out more about what card to order here, nVidia ConnectX-5 Specs.
If you want to use another 100GBe card by another manufacturer, go ahead, but, the important part to understand is the card MUST support RDMA, and preferably ROCE v2. 1/2 of the sauce to getting performance is making sure to have RDMA support that works on both ends. In the case of the MCX515A-CCAT, it does. RDMA allows the systems to talk directly over the wire to memory on either side of the connection. This avoids protocol overhead and other traditional limitations in performance. Your choice of OS must also support RDMA on both ends. VMWare and TrueNAS Scale do. If you want to use Linux KVM, you need to enable Linux RDMA initiator support on the host side, and RDMA target support on the other. That’s outside the scope of this quick “how-to.”
I also chose this card based on cost. It was $90ea for a single port 100GBe card, whereas 50GBe cards where double that price. While I know that I really cannot stress 100GBe completely, it made no sense to go with 50GBe cards for more money.
SYSTEM CONSIDERATION
You will need to ensure that the machines you use have plenty of PCIe lanes. The MCX515A-CCAT is a PCIe 3.0x16 card. It needs that to be able to support a single link at 100GBe without any loses due to bandwidth restrictions. You also need to ensure that whatever storage backend you are using has enough bandwidth to support your activities. A basic LSI 9300 controller with 8 SSDs tops out around 3GB/s, not matter. This will of course, not max out 100GBe. The point here is that getting good 10GBe performance (aka 2 GB/s w 2x10Gbe) needs to follow these principles as well.
For this, I chose the Lenovo P620. I found some very good deals on them where I managed to pick up working machines for less than $800. Deals come up, you need to look for them. These are upgradable to 5000WX series, which makes them a great investment. CPU lock is the downside for resale, but, Lenovo-Only Threadripper CPU’s are fairly cheap.
It’s also worthwhile to mention that the more memory you have the better. 100GBe is 10GB/s, which under load can exhaust small memory systems quickly. In my case, I chose 128GB to avoid these issues. Smaller amounts of RAM will limit the performance you can achieve. The system has to be able to move memory quickly, and low memory systems may not be able to keep up, hence hurting your performance.
THE RECIPE
Once you have the network cards connected at 100GBe (50, 40, 25, etc.) on each end, the magic can begin. The rest of this configuration focuses on two things, getting RDMA to work (without hacking TrueNAS Scale or VMWare) and a few custom ZFS and network tuning activities to run.
On the TrueNAS Scale side, configure the iSCSI target like you would always do. There’s nothing special to do there. I suggest following ixsystems guides on how to configure it here,
Once you have it working, go to the Linux Bash Root prompt in TrueNAS Scale and check to see if “iSER” is loaded. iSER is required to make this work. Fortunately TrueNAS Scale includes iSER with the appropriate RDMA support out of the box. No need to install any OFED or other tools (if you follow my advice above).
Run this command at root to check on iSER on your TrueNAS Scale host,
dmesg | grep -i scst | grep -i iser
And you should get something similar to,
[ 54.789249] [5677]: iscsi-scst: Registered iSCSI transport: iSER
[ 54.806430] [6157]: iscsi-scst: iser portal with cm_id 000000006e105ebf listens on 0.0.0.0:3260
[ 54.806584] [6157]: iscsi-scst: Created iser portal cm_id:000000006e105ebf
[ 54.806762] [6157]: iscsi-scst: iser portal with cm_id 00000000aeeea253 listens on [::]:3260
[ 54.806926] [6157]: iscsi-scst: Created iser portal cm_id:00000000aeeea253
If you see this, you are in great shape!
On the VMWare side, you need to enable RDMA, and enable RDMA over iSCSI. Many are familiar with regular iSCSI support, however, RDMA is “hidden” and needs to be enabled from the command line.
You should follow the steps located here,
This will enable RDMA on your system, if your network card supports it. The MCX515-CCAT does out of the box.
You then need to configure the RDMA adapter like you would any other VMWare iSCSI target.
Once you’ve enabled the target, regardless of the client OS, you can run the command on TrueNAS Scale,
dmesg | grep -i “iser accepted”
and get something similar to,
[47005.736315] [275975]: iscsi-scst: iser accepted connection cm_id:00000000e9f837d8 10.100.200.11:42694->10.100.200.225:3260
This means that the connection has been made to the target in RDMA mode.
That’s it, it works! … Kinda
TUNING TRUENAS SCALE
There’s been many guides posted over the years on tuning FreeNAS/TrueNAS. Some are helpful, others are not. I’ve found other the years that a few tweaks are needed to get better performance out of the TrueNAS Scale system. Also, some tuning is needed for stability with NVMe devices. By default I’ve found TrueNAS Scale to be VERY unstable without tuning for NVMe.
I also would mention, that its VERY easy to overrun a TrueNAS storage server with multi-GB/s performance. If you have spinning drives, and limited caching, you may see performance tank, as the machine has to cope with a massive inrush of I/O that must be cleared. I’ve seen this make the machine perform so poorly it starts to fail to respond and lock up.
TRUENAS SCALE LINUX KERNEL TUNING
I suggest adding,
nvme_core.default_ps_max_latency_us=0 pcie_aspm=off
to the kernel boot options. This particular command line disables deep power save on PCIe devices. Without these lines, I’ve found it only takes a couple days for my TrueNAS scale machine to lock hard with PCIe hardware errors. The downside is higher idle power draw, but, for 2W in my case, and system stability, it was the best option for me.
Via sysctl and TrueNAS Scales Kernel parameter section, I suggest adding the following kernel values,
net.core.netdev_max_backlog = 8192
net.ipv4.tcp_max_syn_backlog = 8192
net.core.rmem_max = 16777216
net.core.wmem_max = 16777216
net.ipv4.tcp_congestion_control = dctcp
net.ipv4.tcp_ecn_fallback = 0
These changes enable more memory to be allocated to the networking stack. In particular, we enable Data Center TCP which is better for low-latency links which is what we want our storage server to provide.
ZFS TUNING
Improving ZFS performance is the next step. These settings have worked for me, with my workloads to improve performance. They may not for you. My settings are generally tuned towards a big storage server with plenty of CPU and memory. Smaller systems may not run as well.
echo 128 > /sys/module/zfs/parameters/zfs_vdev_def_queue_depth
echo 0 > /sys/module/zfs/parameters/zfs_dmu_offset_next_sync
echo 12 > /sys/module/zfs/parameters/zfs_vdev_async_read_max_active
echo 4096 > /sys/module/zfs/parameters/zfs_vdev_max_active
These commands increase some defaults that ZFS ships with, which are rather conservative. As I’m working with NVMe drive, that can sustain more IOPS, I increase values like queue depth and active commands.
I also set 75% of memory for the ZFS ARC cache. By default TrueNAS Scale uses only 50% of available RAM. This is apparently being fixed in TrueNAS Scale 24.04 to match the TrueNAS Core behaviour.
LINUX IO TUNING
Finally, I do some tuning to the Linux IO subsystem. Again, these changes work for me, and not everyone. These are designed to unlock the bigger queue depths that NVMe drives can sustain.
I set 2 parameters. I set the scheduler to deadline for each drive, and increase the read-ahead-kb to 512. I do this as I want consistent performance per drive. Linux defaults to noop, but I’ve found that for storage workloads, in my case, deadline scheduling works best.
TRUENAS TUNING SCRIPT
If you’ve read this far, bonus. Here’s a script you can call from TrueNAS to run on boot which will make these settings work automatically!
#!/bin/sh
PATH=“/bin:/sbin:/usr/bin:/usr/sbin:${PATH}”
export PATHARC_PCT=“75”
ARC_BYTES=$(grep ‘^MemTotal’ /proc/meminfo | awk -v pct=${ARC_PCT} ‘{printf “%d”, $2 * 1024 * (pct / 100.0)}’)
echo ${ARC_BYTES} > /sys/module/zfs/parameters/zfs_arc_maxSYS_FREE_BYTES=$((810241024*1024))
echo ${SYS_FREE_BYTES} > /sys/module/zfs/parameters/zfs_arc_sys_free
echo ${SYS_FREE_BYTES} > /sys/module/zfs/parameters/zfs_arc_min
echo 128 > /sys/module/zfs/parameters/zfs_vdev_def_queue_depth
echo 0 > /sys/module/zfs/parameters/zfs_dmu_offset_next_sync
echo 12 > /sys/module/zfs/parameters/zfs_vdev_async_read_max_active
echo 4096 > /sys/module/zfs/parameters/zfs_vdev_max_activefor i in
ls /sys/block | grep -i nvme
do
echo 512 > /sys/block/$i/queue/read_ahead_kb
echo mq-deadline > /sys/block/$i/queue/scheduler
done/usr/sbin/modprobe tcp_dctcp
/usr/sbin/sysctl -w net.ipv4.tcp_congestion_control=dctcp
/usr/sbin/sysctl -w net.ipv4.tcp_ecn_fallback=0
/usr/sbin/sysctl -w net.core.netdev_max_backlog=8192
/usr/sbin/sysctl -w net.ipv4.tcp_max_syn_backlog=8192
/usr/sbin/sysctl -w net.core.rmem_max=16777216
/usr/sbin/sysctl -w net.core.wmem_max=16777216
SUMMARY
With this simple configuration, multi GB/s is possible with TrueNAS Scale. Not additional drivers or configuration is needed. This quick how-to did not apply any tuning on the VMWare side as you can increase performance further by using Paravirtualized controllers, and increasing VM, ESXi and TrueNAS Scale queue depths.
I am hoping that future versions of TrueNAS Scale will enable support for NFS and SMB RDMA support. RDMA support via iSER offers significant performance advantages over regular iSCSI. I’m also eagerly waiting for TrueNAS Scale to support NVMe over TCP/RDMA. Those improvements will also increase the performance here.
I hope some found this article helpful. I’ll post more results over time as I tune this configuration.
