As far as I can recall with my limited Linux knowledge: Does one not need to explicitly “mount” a USB drive to a directory so that you can access the directories and files on it? So that it actually does show up under /mnt ???
The installer USB is read-only, so… little luck accomplishing that.
Yes you have to mount a filesystem before it can be accessed. In the installer shell try:
mount -t zfs -o noatime freenas-boot/ROOT/default /tmp/data
And then you should be able to find /tmp/data/boot/boot0
Sorry for the confusion, I thought you get an option after the install to use a shell with the disk still mounted but I guess not.
FreeNAS is really not targeted towards old hardware, so I can understand why it does not support MBR-only legacy BIOS very well. But it is still surprising that you cannot boot with the PMBR written.
Reviewing your initial post a bit, and the manual for this motherboard, USB init seems like an odd place for there to be a problem related to GPT.
You say the installer USB is still bootable if you write it with DD mode in Rufus? If that is the case, I’m even more suspicious. The FreeNAS ISO is a hybrid GPT/MBR image, so wouldn’t that have the same problem when the USB is being initialized?
After a restart I tried:
mount -t zfs -o noatime freenas-boot/ROOT/default /tmp/data
but to no avail. Do I need to replace “freenas-boot” with my own given device name?
Anyways, I also did a fresh install of 11.2-RC1 and didn’t restart, so that it would still be mounted… and indeed there was something in /tmp/data this time. Here is another screenshot with sub-directories:
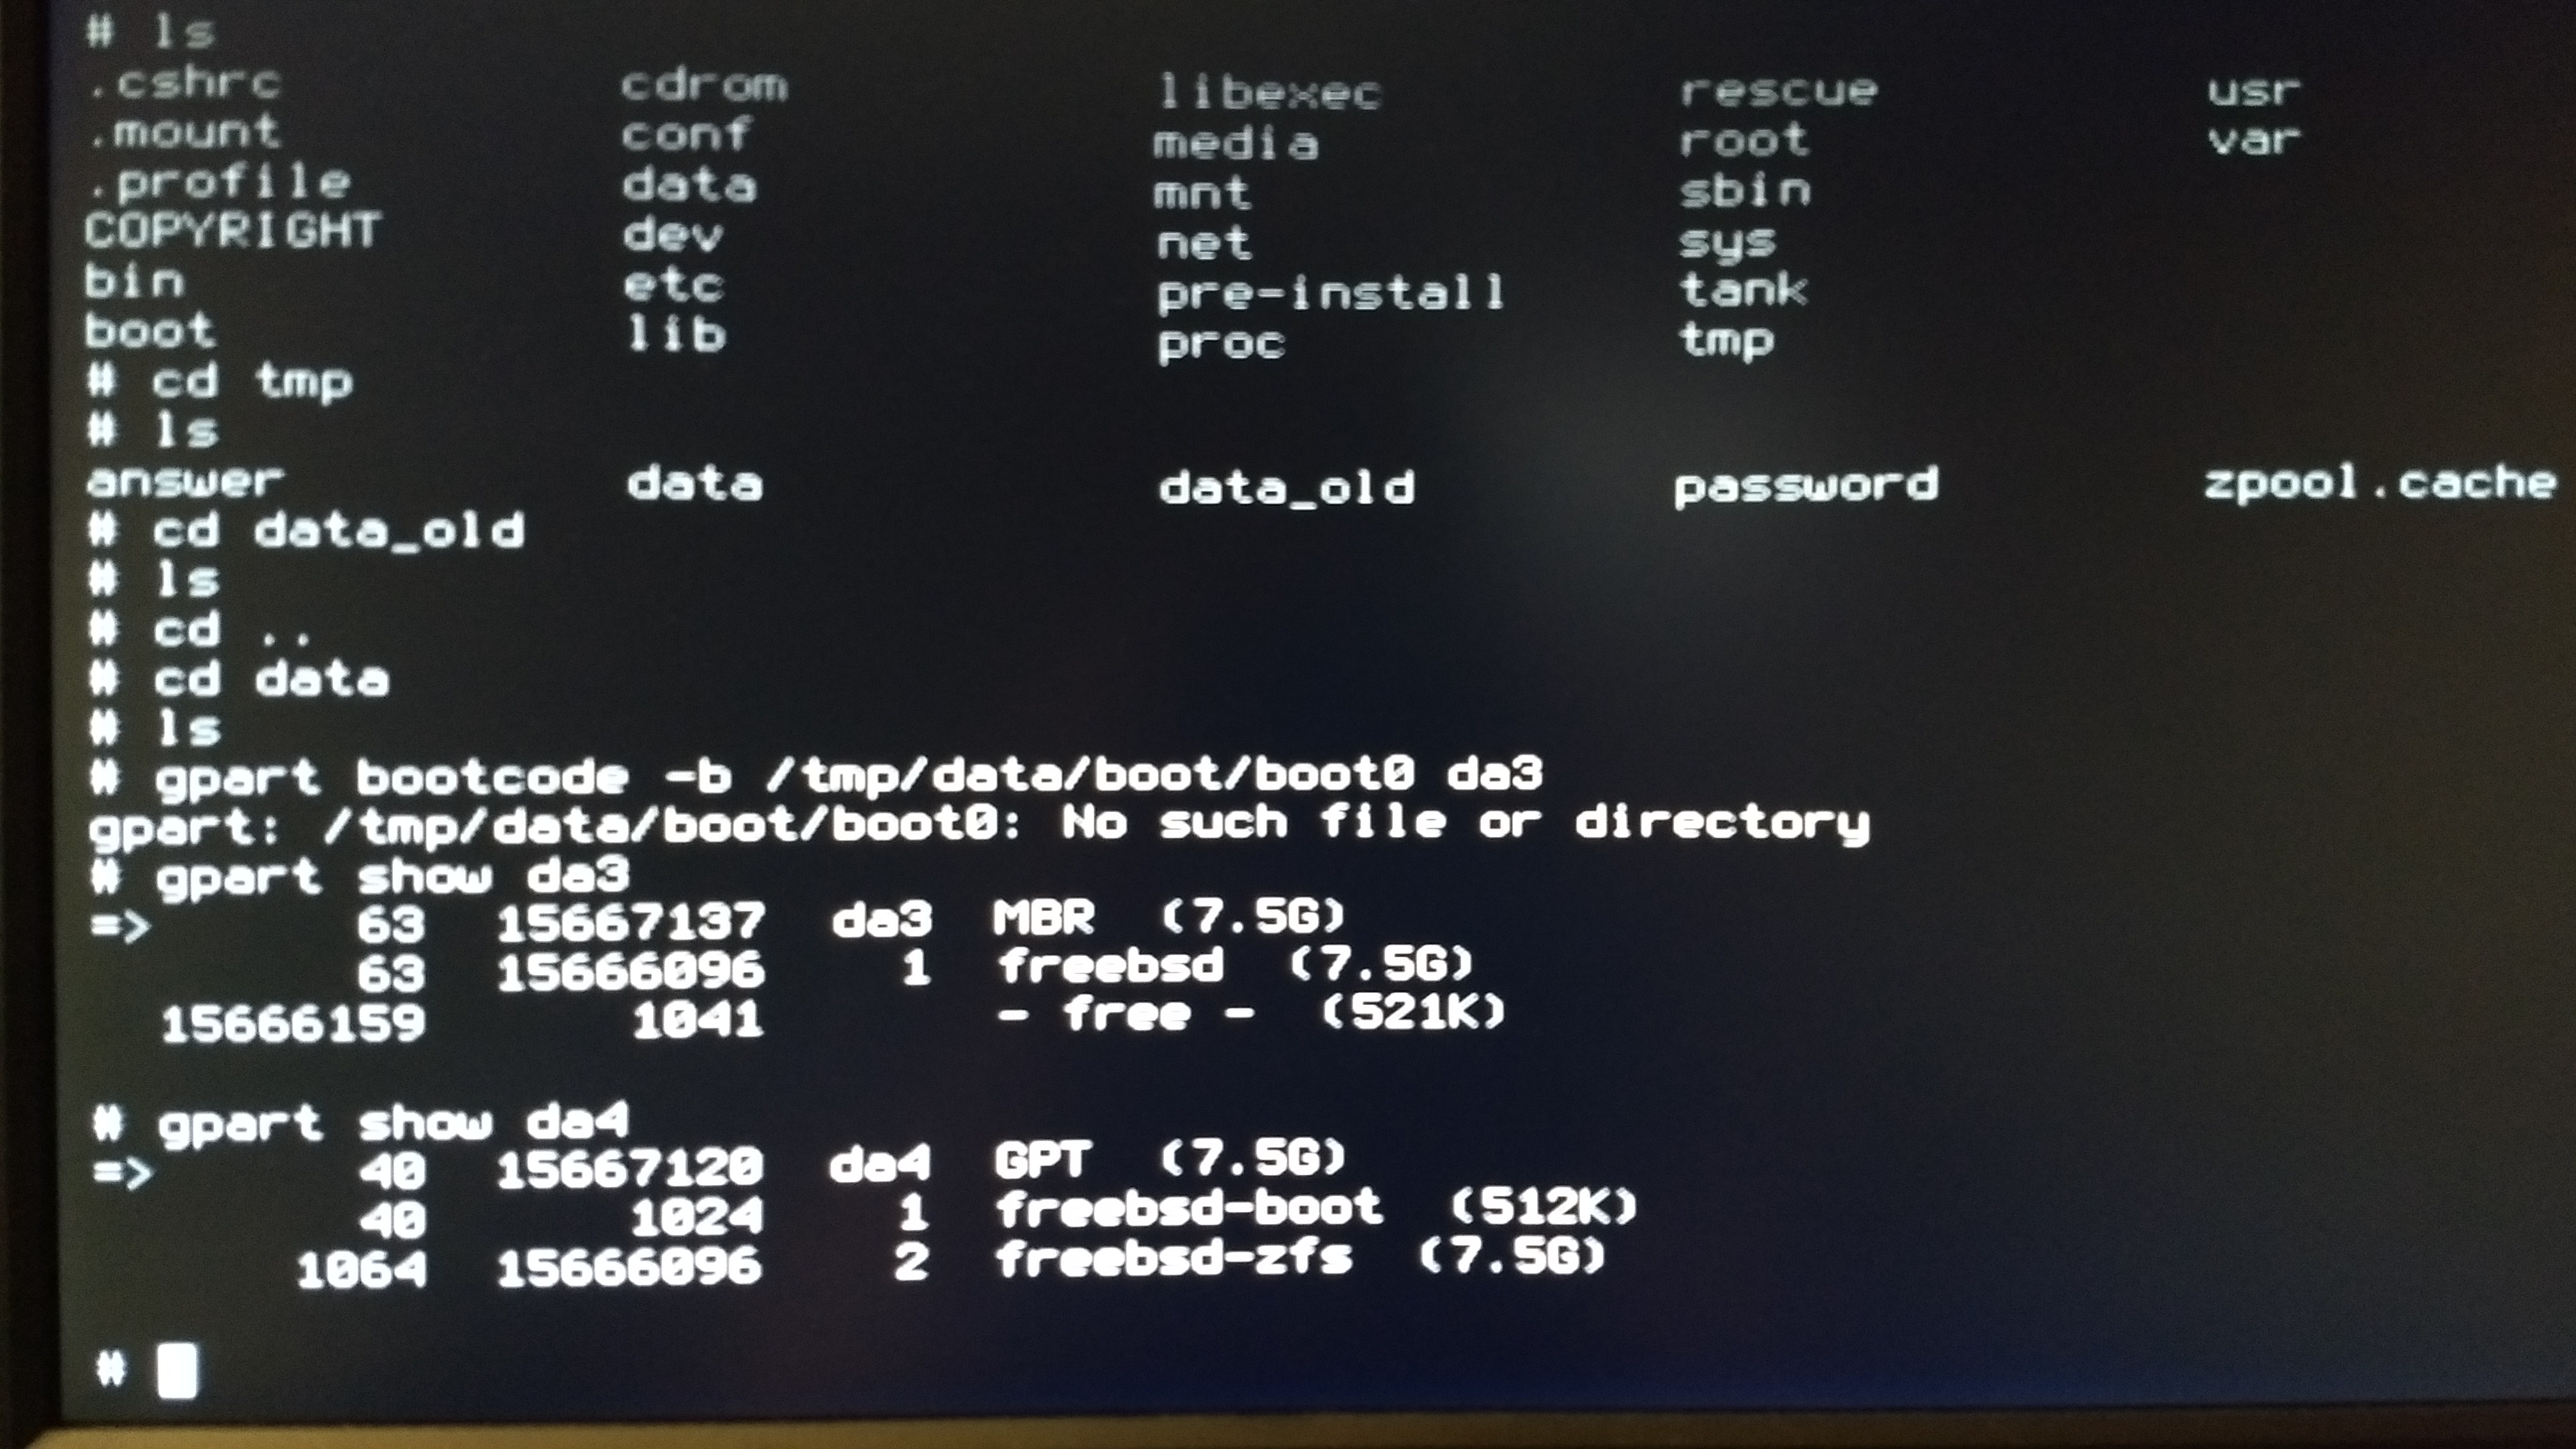
However I still got the same error message: “No such file or directory.” for /boot/boot0 inside /tmp/data . /mnt is empty.
Right the /tmp/data directory exists but the pool is not mounted. I forgot to mention you need to import the pool temporarily too, because that’s how ZFS works.
# load the pool configuration and mount the root filesystem
zpool import -N -f freenas-boot
mount -t zfs freenas-boot/ROOT/default /tmp/data

# ... do your things ...

# unmount the filesystem and unload the pool config
umount /tmp/data
zpool export freenas-boot
freenas-boot is the correct name.
I am currently resilvering for the second time and just after it started I got this message:
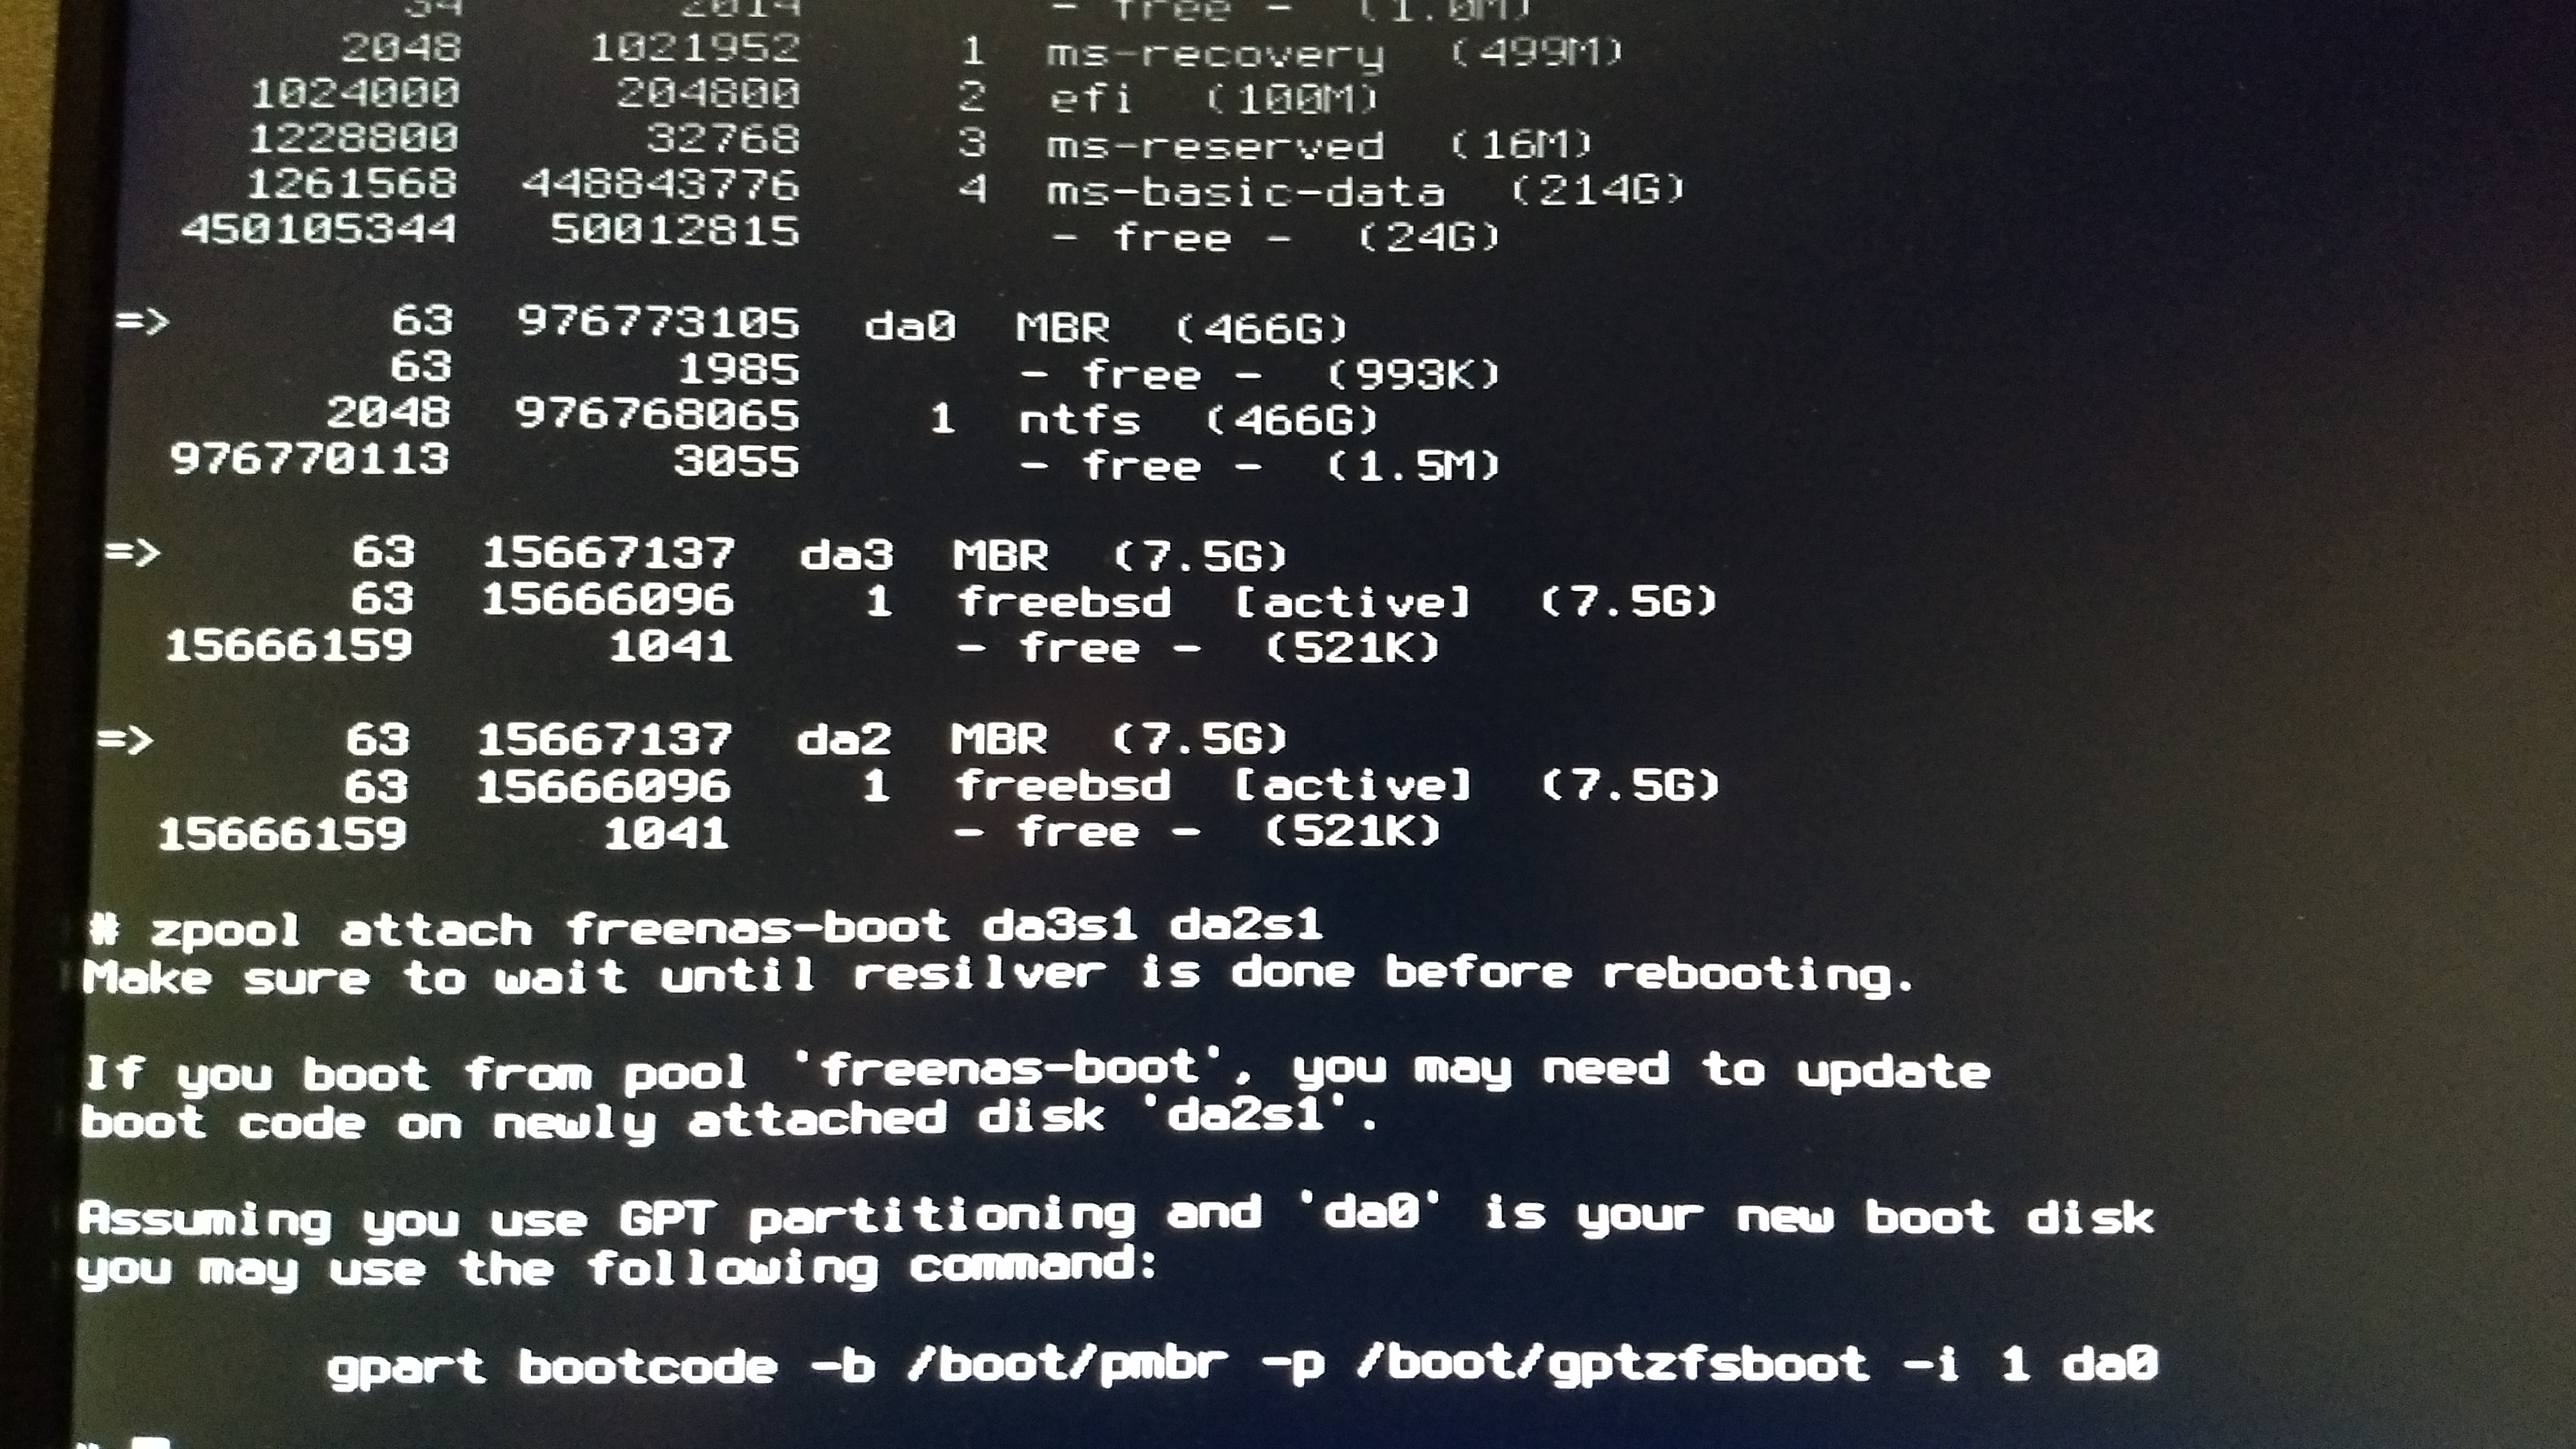
Before I attach the two USBs to my storage server system, I wanted to ask if I should heed what it said about updating the bootcode on what is my ‘da2s1’ or ignore it? (Before I can’t get the freenas install mounted in the shell except after a fresh install  each resilvering seems to take a whopping 55 minutes!!)
If you just freshly wrote the bootcode, it is up to date 
Booting works now so far as to say I get past the POST-screen, which is excellent. But during the FreeNAS boot process it gets stuck at
Trying to mount root from zfs:freenas-boot/ROOT/default []…
Should the partitions that I created have been of the type “freebsd-zfs” instead of “freebsd” as you wrote?
I’ll have to do some research about why that isn’t working, but it might have something to do with the corners we cut by not properly subdividing the freebsd partition (BSD has a notion of subdividing MBR partitions to get around the 4 partition limit).
It is very promising that you get this far at least. The bootloader works, it reads the kernel and modules from the ZFS pool, loads, etc. The kernel just doesn’t seem to be looking in the right place for the pool, for some reason.
I’ll have to get back to you in a few hours.
I managed to get it to boot to the FreeNAS install after all, although the boot process did take 20 minutes because it was stuck at the "trying to mount root from zfs: … " stage.
Everything was working smoothly (so stoked about the sustained 112MB/s transfer speeds!!) but then the boot pool changed to a “degraded” state and the errors just kept on piling up until one of the mirrored USB drives had 5.8K errors while the other had around 38.
Currently doing a full fresh install with the tested method.
How do you think we could subdivide the freebsd parition?
and how would you recommend I change this command you gave me a few days ago. You mentioned subtracting 9 from 24? So where there isa 24 it should be 15?
Now I suddenly get a “GEOM da0: the primary GPT table is corrupt or invalid. using the secondary instead – recovery stronly advised” at the beginning of the installation process !!!
That’s correct, 15 instead of 24
Noted. I don’t think it matters though, you’re wiping the partition table anyway.
To reiterate a few things:
This is only an attempt at a workaround, it might not even work. It is certainly not a supported configuration.
It seems unlikely that the issue is actually related to GPT since:
- the installer also uses GPT, though
- it is also a hybrid ISO
- it’s not clear what your installer ended up with on disk as a result of using Rufus
- the windows disk in your screenshot (the one with the efi partition) appears to be GPT as well
- there is an MBR boot sector written by the installer to make the GPT disk compatible with MBR BIOS
This is all to say it seems like you have a particularly picky BIOS quirk. Anyway it does seem that the MBR partitioning helped, whatever the reason for it is.
I am about to test out the partitioning scheme now to see why the root dataset isn’t being mounted…
My test install didn’t have a problem following this procedure. You may simply have to wait longer. It was blazing fast on FreeBSD 12-BETA4 but I think there is an outstanding bug in FreeNAS about the long wait for mounting root. Don’t quote me on that 
Should I install a live bootable version of a linux distro to a USB and rather use “dd” to create the freenas installer usb? What else should I do to prepare the USB before using “dd”?
I always had a sneaking suspicion that rufus might be the root of all my woes. The newer version (3.3 I think).
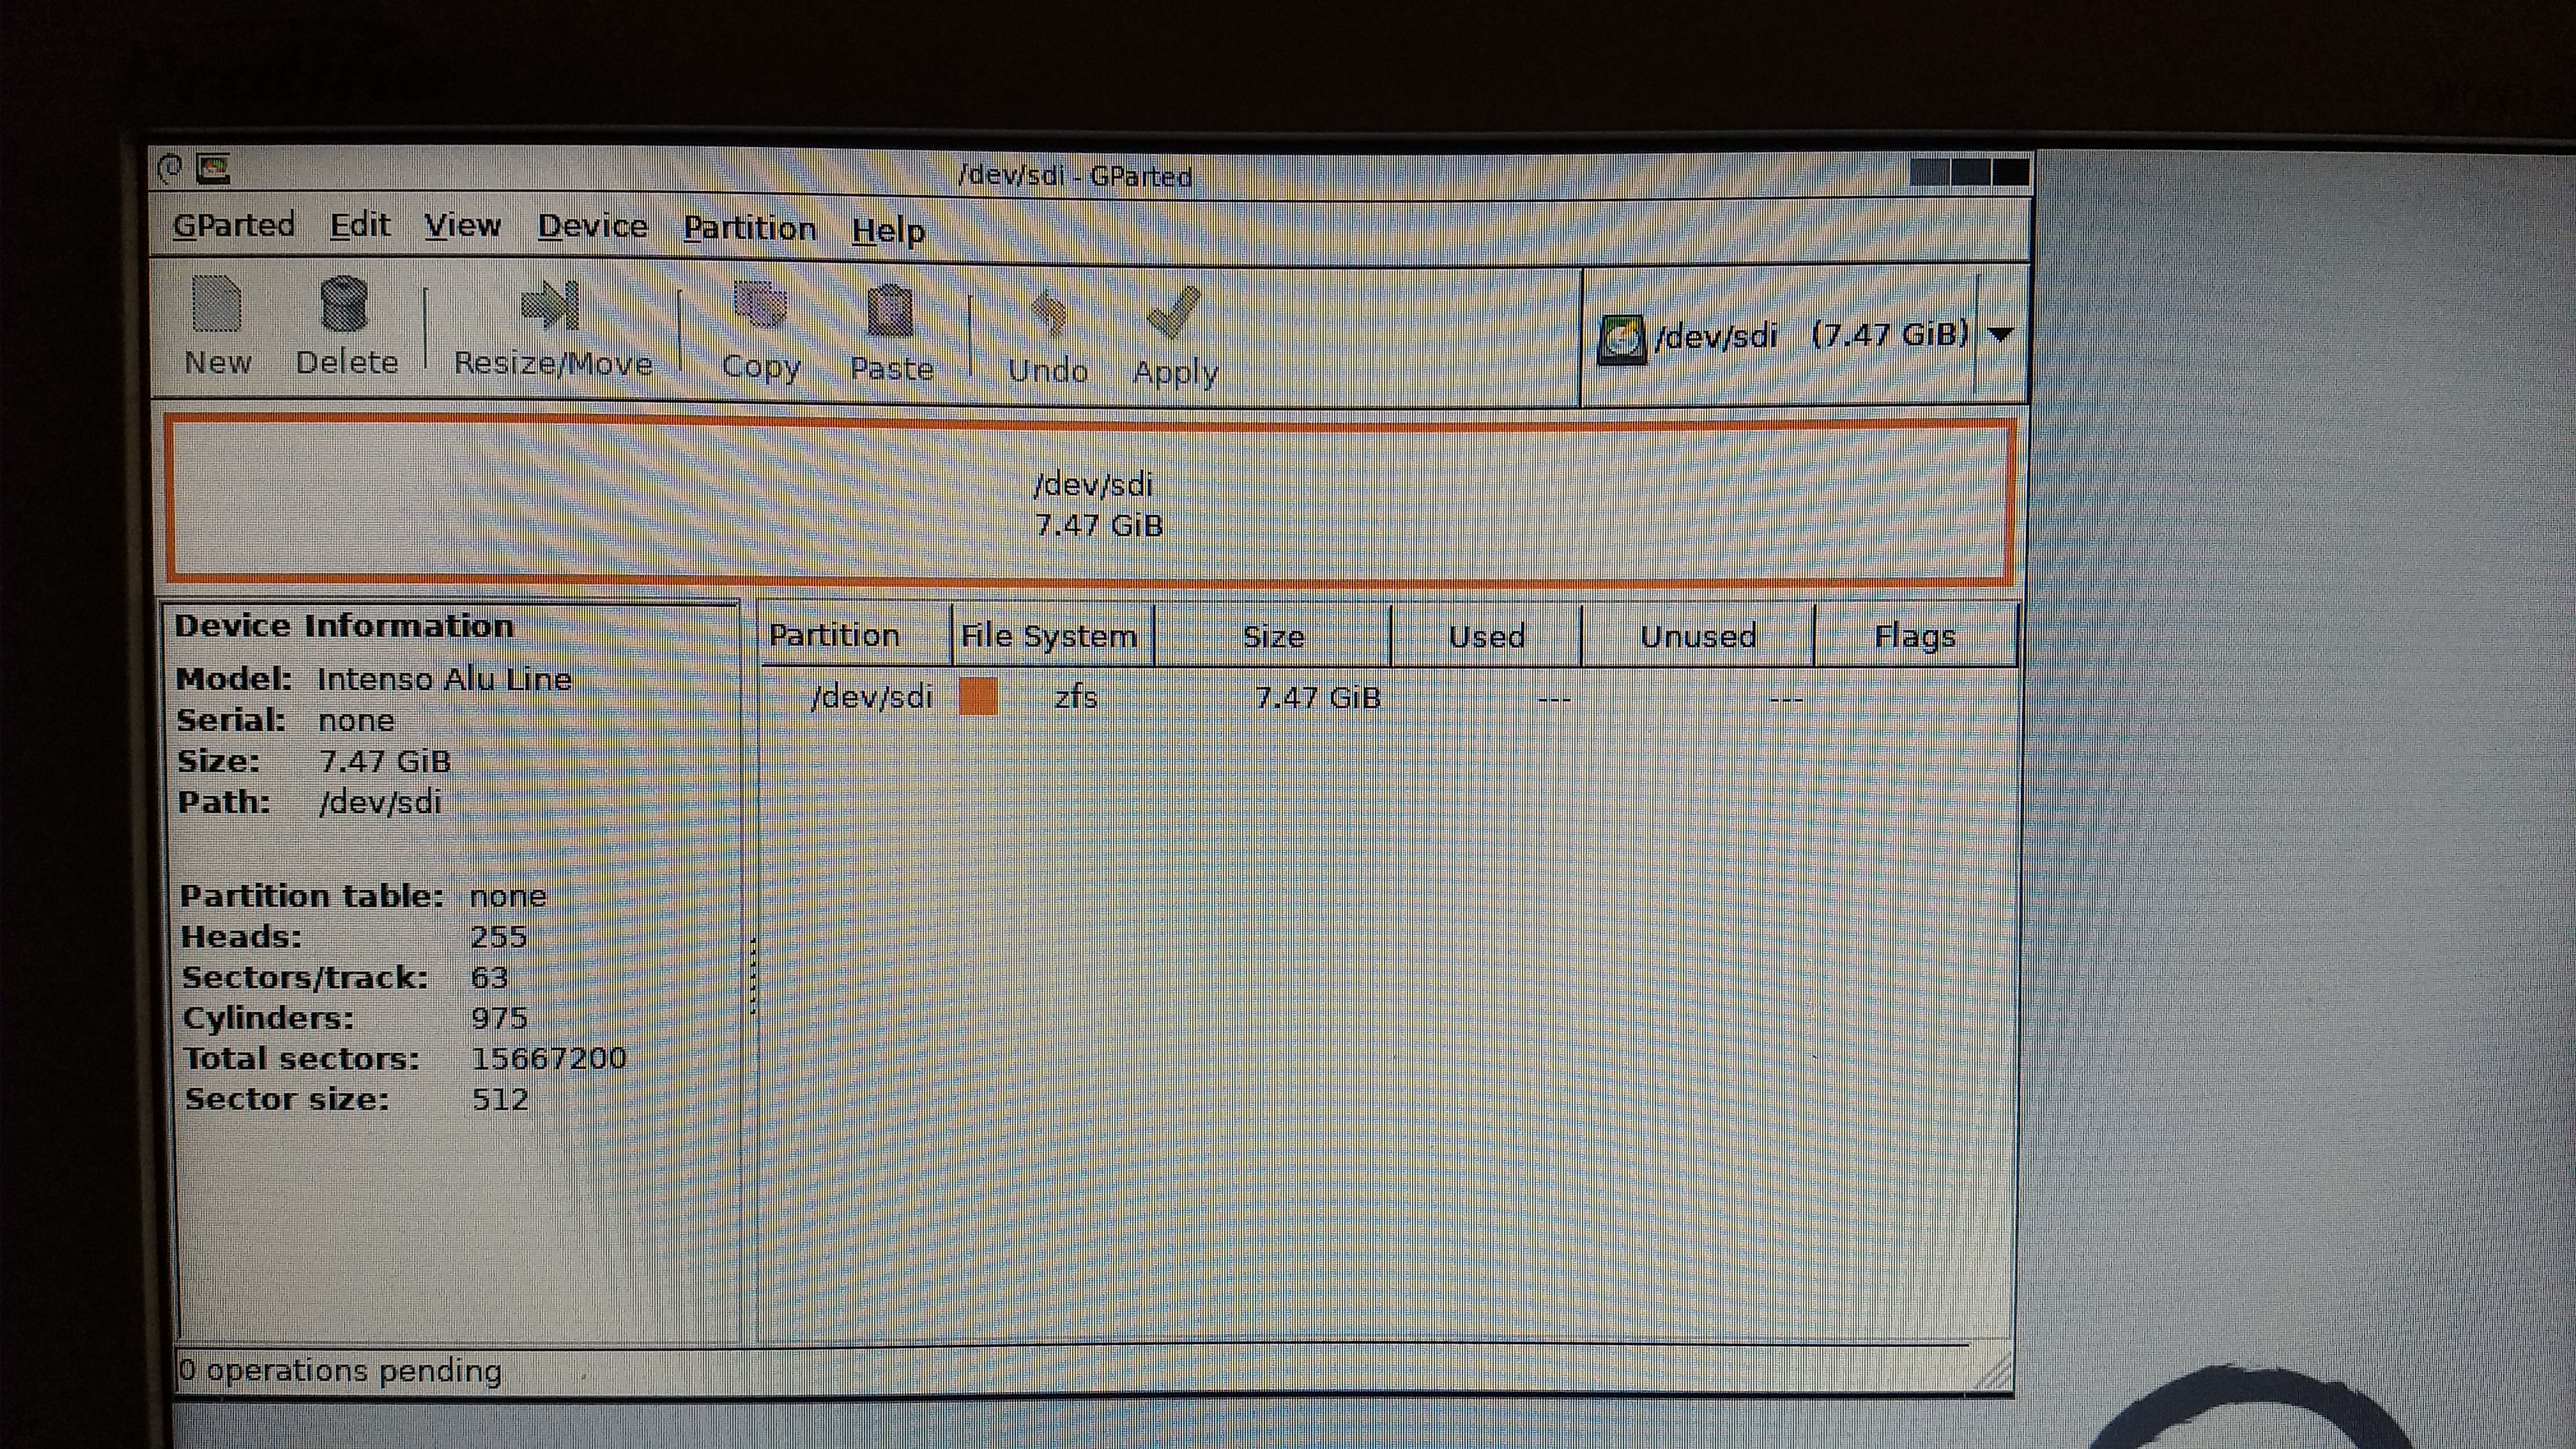
I found an older version of Rufus I had lying around and used the “ISO” mode to create a bootable FreeNAS installer, installed to a different USB and this is the screenshot of the USB in Gparted after a fresh install. Hope it can shed some more light on what the hell is going on
I am a regular dd user myself, but I wouldn’t say that’s strictly necessary. I just couldn’t tell which way you wrote the image based on your prior posts.
In Rufus, DD mode is what you should use. I don’t know what ISO mode is, I just know that Rufus has DD mode which directly writes the image, and it has other modes which try to do their own partitioning and bootloader and stuff, which tends to just screw up modern images.
https://www.balena.io/etcher/ is an alternative to Rufus if you are looking for something else to try.
When creating an installer with the latest version of Rufus, I get an option for “ISO” or “DD” mode for 11.1-U6, not 11.2-RC1. Something must have changed from one version to the next.