Threadripper X399 water cooled build - Indigo Violence

Just kidding, I will NOT name this rig ThreadPimper!

Greetings, fine folks at Level 1 Techs!! After many many years of lacking PCIE lanes, I decided to correct that mistake. Thus I will be doing a build log for my very first Threadripper build. I’ve been on AMD rigs since Ryzen first launched, and haven’t touched an Intel system since X79 (still have that old dog, Rampage IV Extreme Gene). But when Intel decided to bend the enthusiast over starting with X99, I decided to forgoe the PCIE lanes and buy AMD, just to spit in Intels face the only way I could, with my wallet. I’ve had a Ryzen 1700 (sold) / 2700x (soon to be sold) / 3700x (backup PC), and my current 12 core 3900X, which I am very happy with.

However, the lack of PCIE lanes was bugging me. Yeah yeah ya don’t NEED to run two GPUs at 16x / 16x, there’s no performance hit, bla bla bla. But it’s the bloody principle of the thing! Plus I have long dreamed of tons of storage with no spinning disk.

Things you will see in this log:

  1. extreme wastes of Canadian money!
  2. potentially gaudy, flashy components!
  3. Very bad economic decisions!
  4. not one single black friday deal!
  5. Argie Bargie galore! (RGB) Well maybe not galore, we’ll see. :smiley:

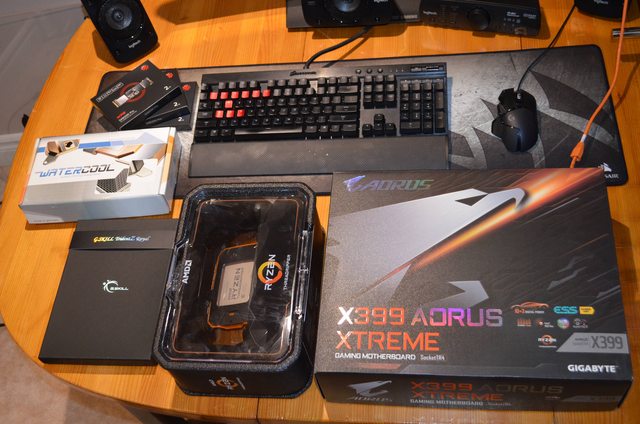
This will also be a log done over time. I’ll be posting as I’m building, so you can share my pain when shit goes sideways and nothing works! Let us begin with a rather large pile of components. If I had a kid with a college fund, it would look like this:

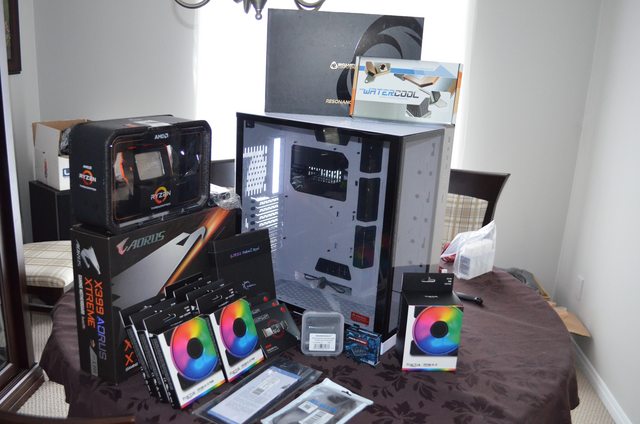
For the specification minded, this is the parts list:

AMD Ryzen Threadripper 2950X 16-core
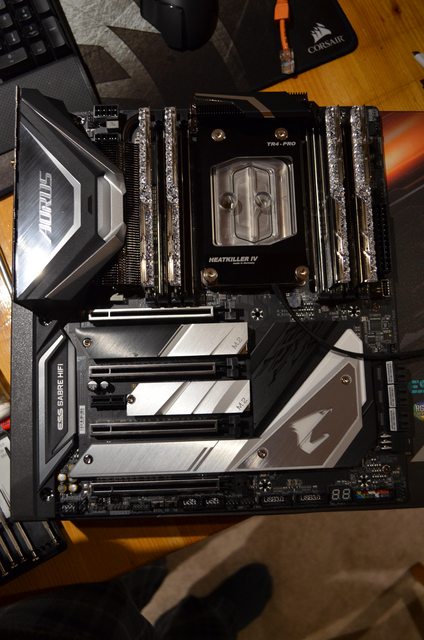
Gigabyte X399 Aorus Xtreme motherboard (wanted that 10gbe)
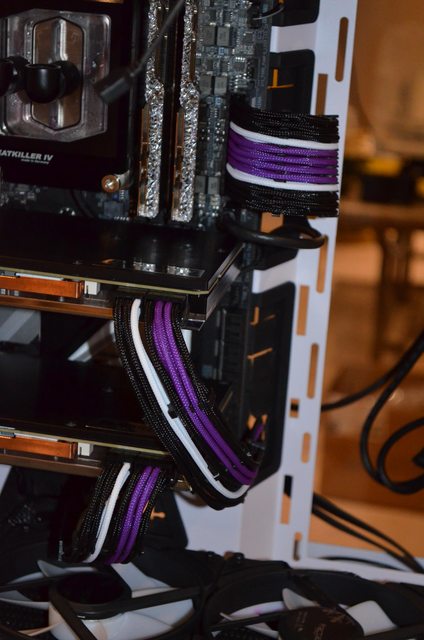
64GB (16GB x 4) G.Skill TridentZ Royal_Bling_Gaudy_Pimpage 3600mhz CL16-16-16-36
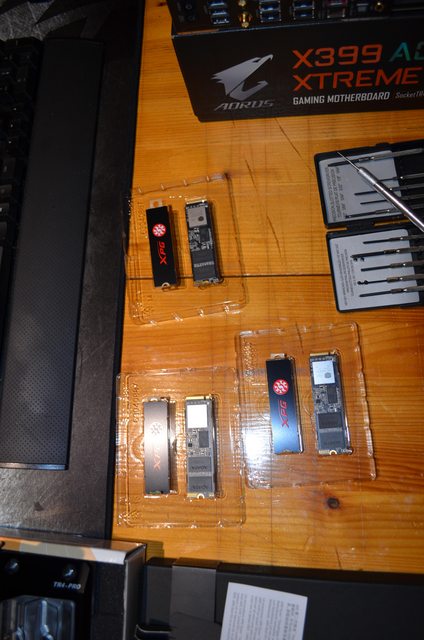
NVME storage: ADATA SX9200 Pro 2TB x 3 (all invisible with no cables, giggity giggity)
PSU: undetermined, but most likely re-using an EVGA G2 1000W from my current rig
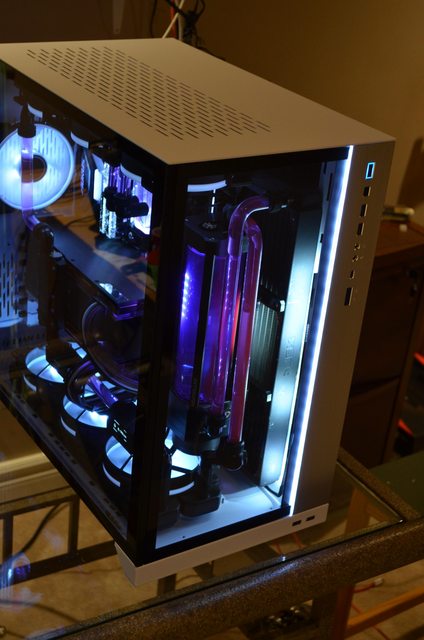
CASE: Lian-Li PCO11 Dynamic XL in white
GPUs: I will be re-using a pair of 1080TI’s

Now for the good stuff, the cooling:
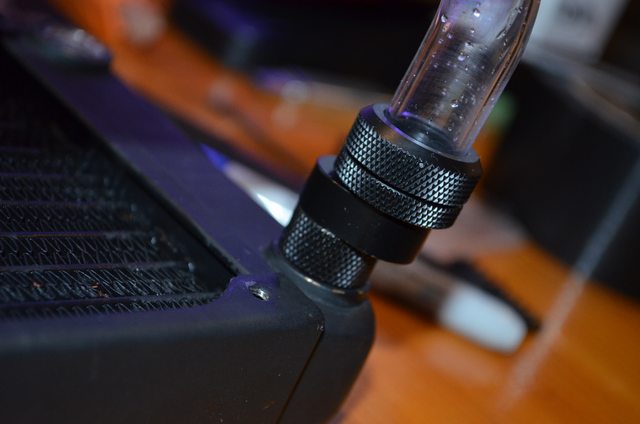
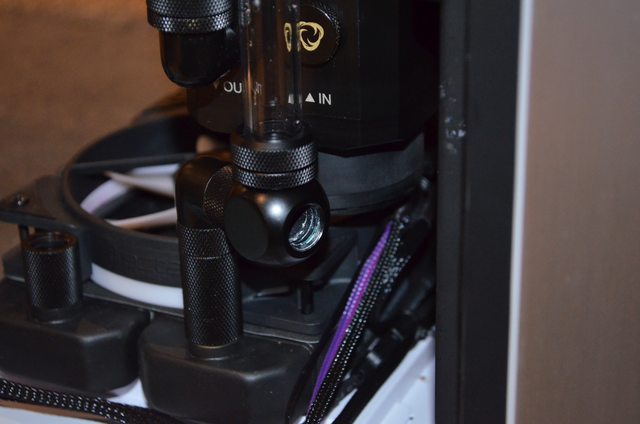
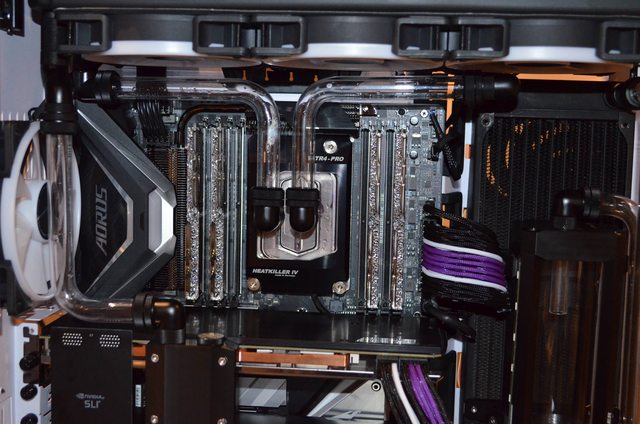
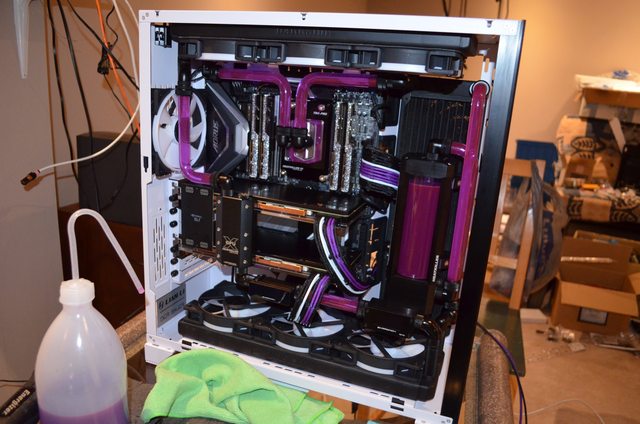
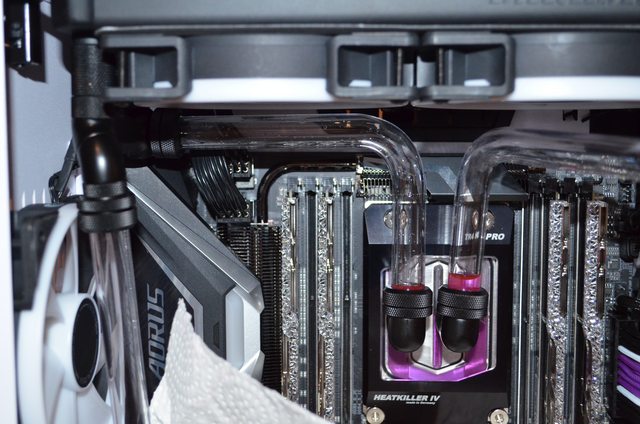
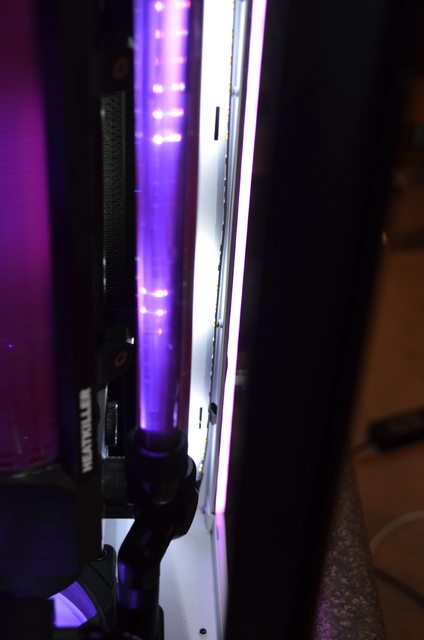
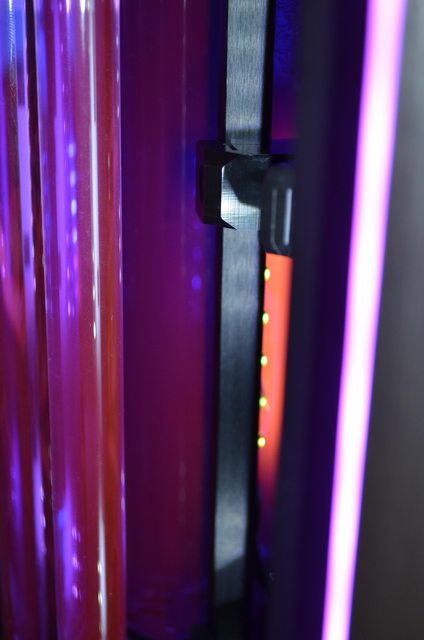
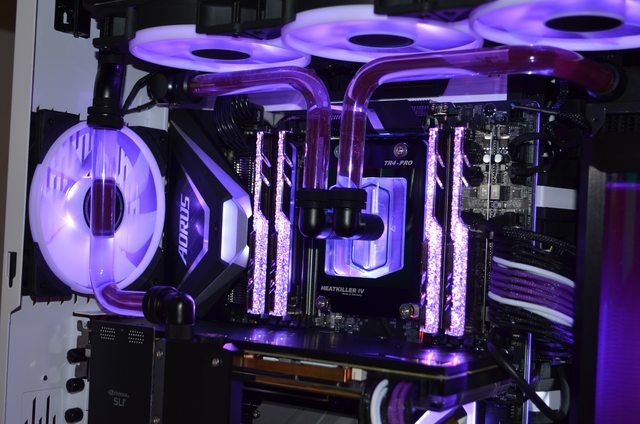
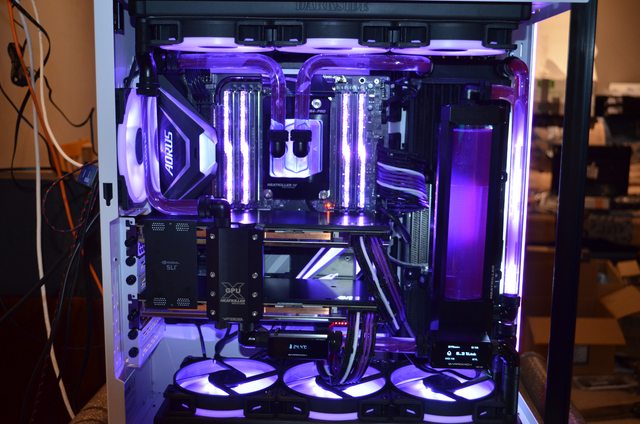
CPU block: Watercool Heatkiller IV Pro RGB block (sex and performance all in one!)
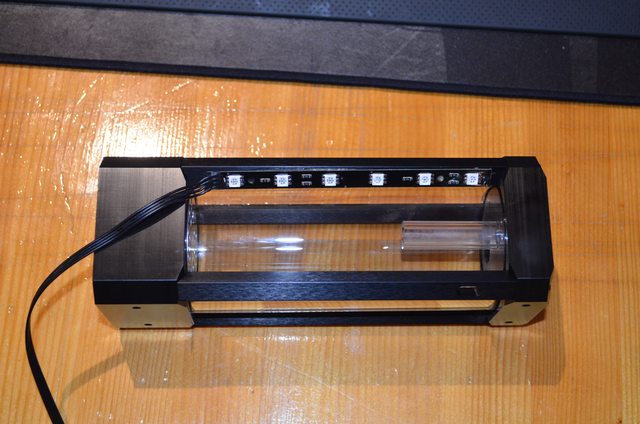
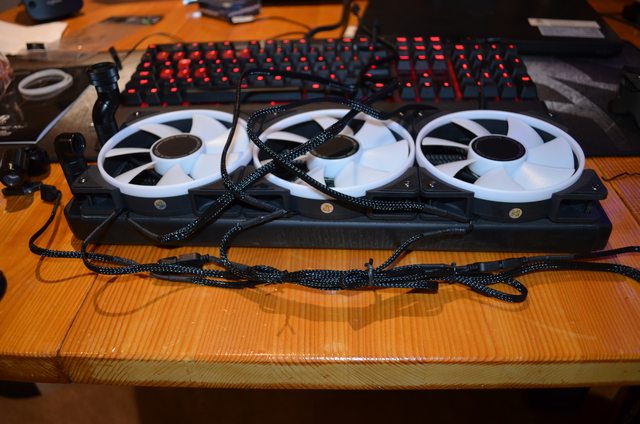
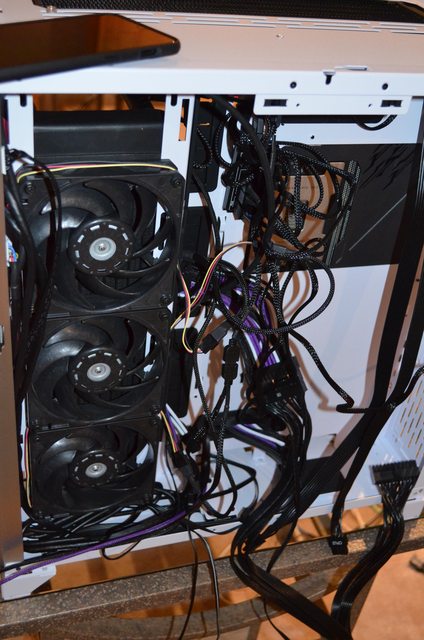
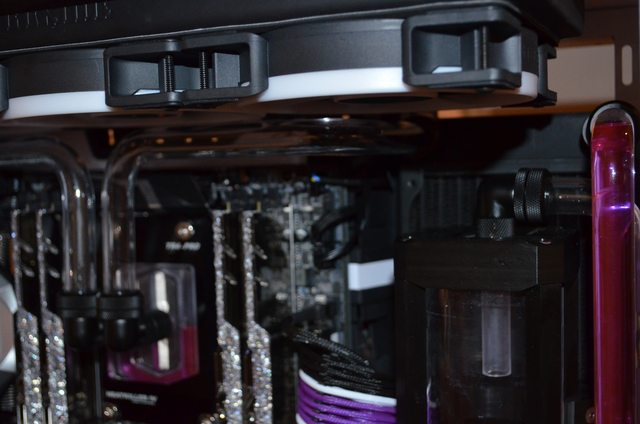
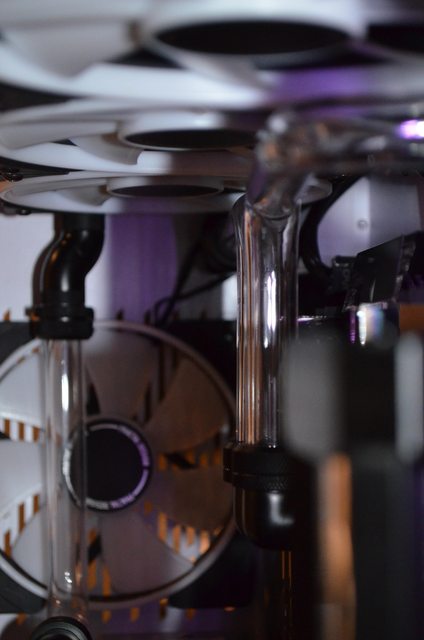
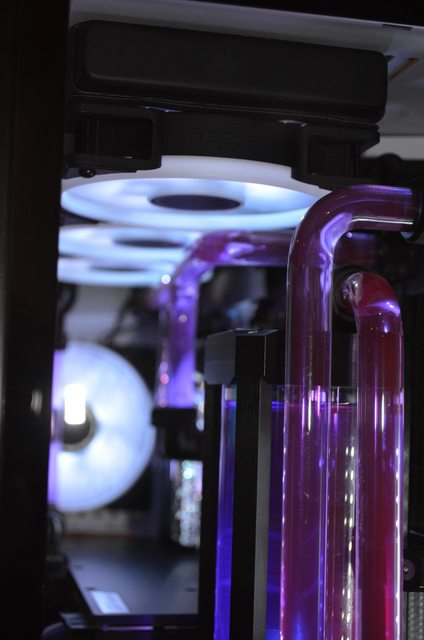
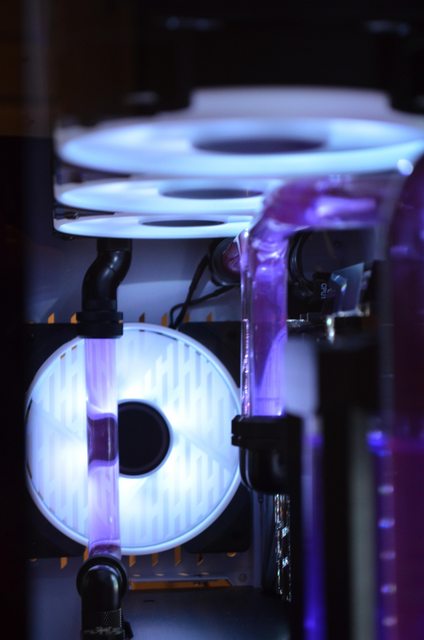
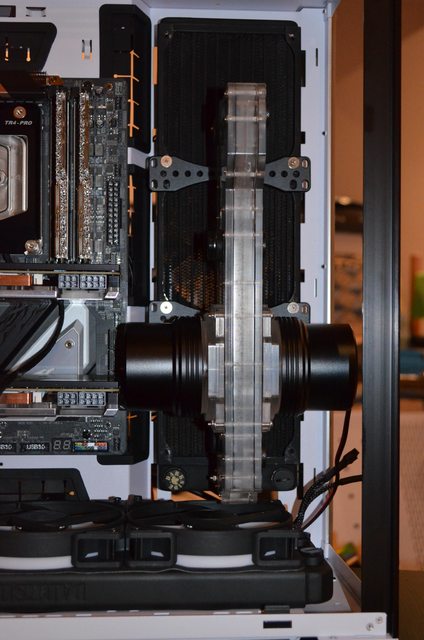
Radiators: Darkside LP360 slim x 3
FANS: Fractal Design Prisma AL12 120mm RGB fans x 7 (because 2.87mm/H20, & RGB with no ecosystem, looking at you Corsair crap)
Also might use some Gentle Typhoons for air flow in the rear, not sure yet, but 10 fans total, controller by two different controllers. The visible fans will all be RGB Fractals.
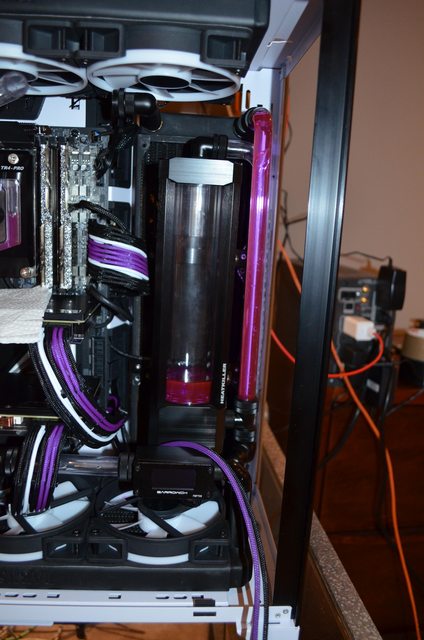
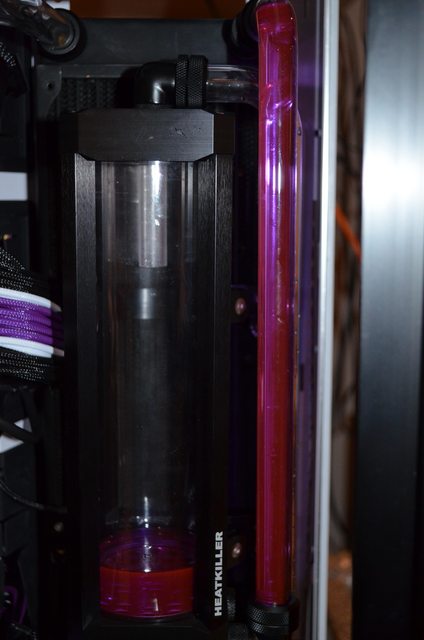
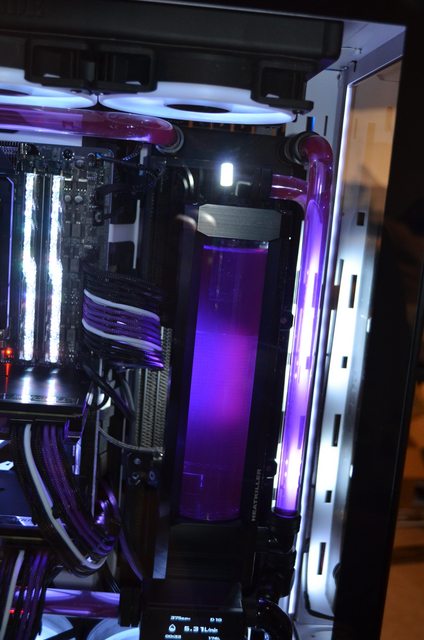
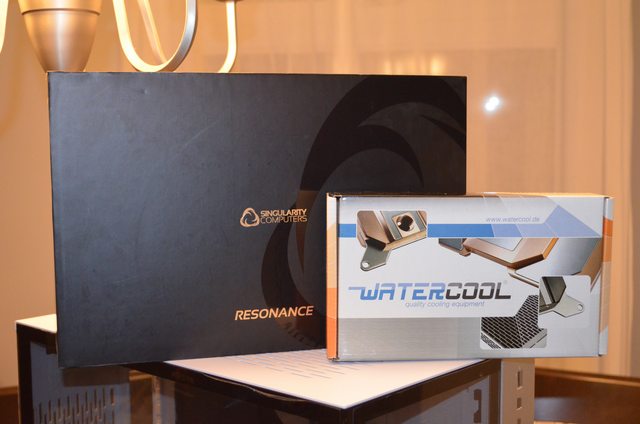
Pumps / reservoir: dual D5 variable pumps on a Singularity Computers Resonance dual loop distro plate, configured in a single loop. More on this later, it’s a piece of work!
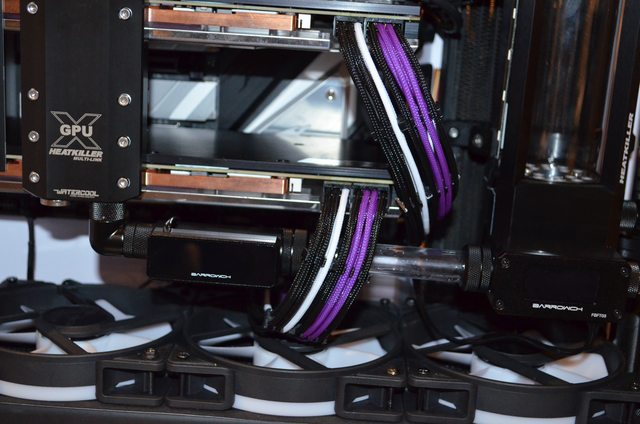
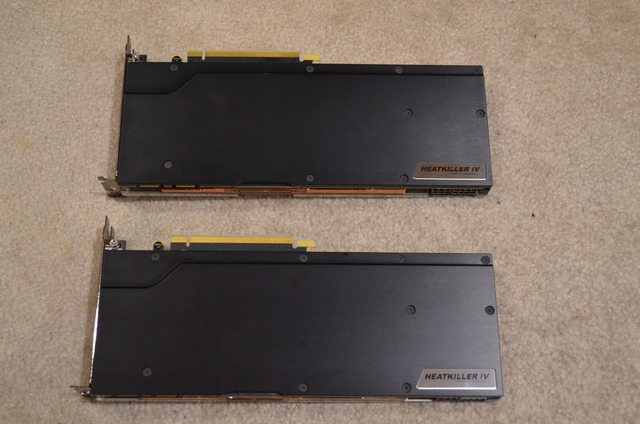
GPU blocks: HeatKiller IV, with EBC back plates (black).

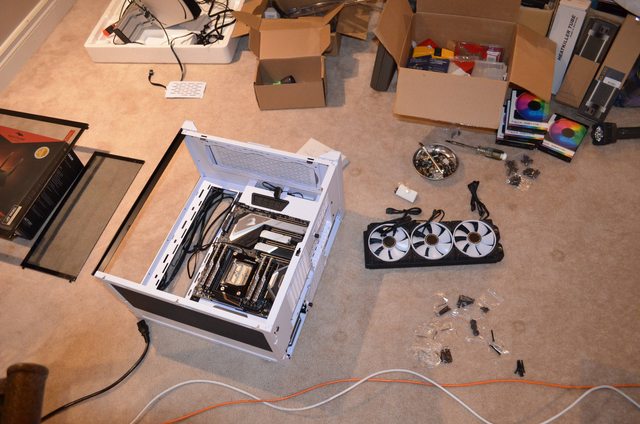
So I started the build earlier this evening. I’m stilling missing one part, lands tomorrow, but there was some stuff I could do today, like motherboard stuff. So I layed out the parts:

So we start with the NVME drives, 2TB x 3:

Strip the board nekkid:

Et voila, 6TB of speedy storage disappears without a trace (or a cable). Joy! Then I got into the weirdest packaging ever:

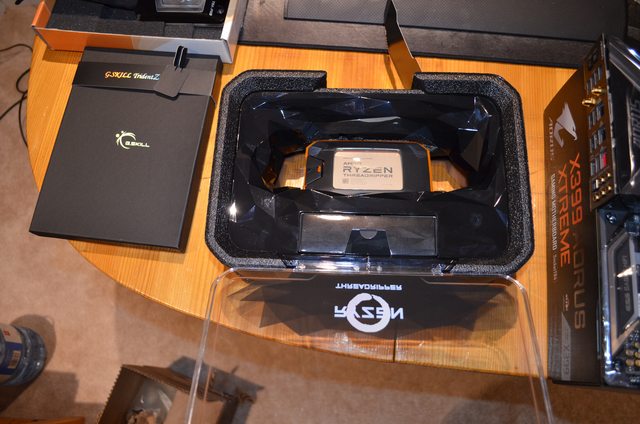
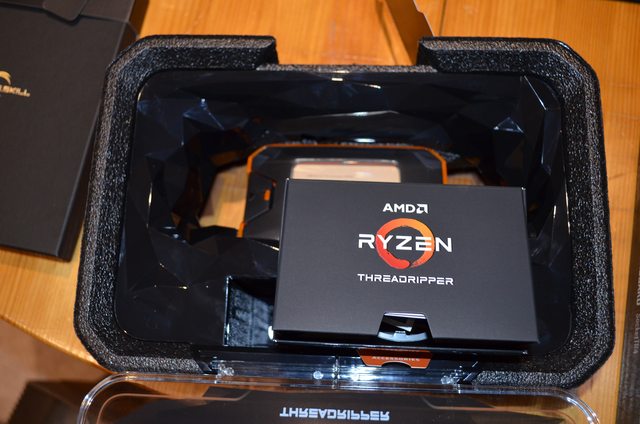
Everything about this CPU is “beefy”, even the little box that comes inside the big one:

You know you’re in for a CPU installation experience when the CPU comes with a torque wrench:

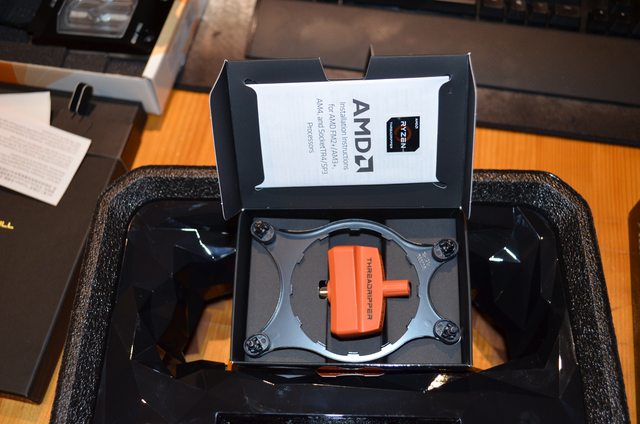
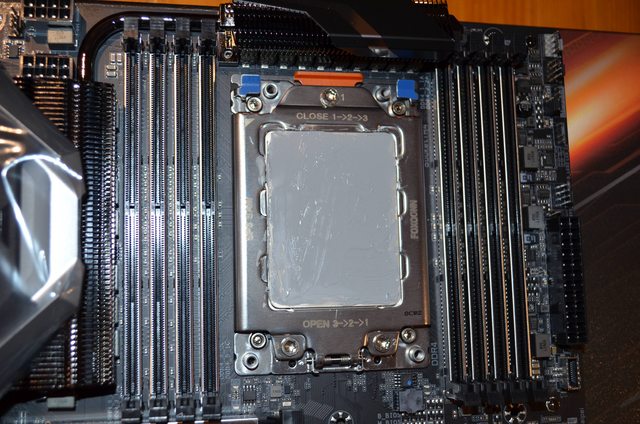
After nearly shitting my pants several times (fuck YOU Foxconn socket):

This was NOT a fun experience, and considering I can’t test boot this thing until tomorrow, I am in for a sleepless night! But surely the HeatKiller install would be easier right? So I pasted this king kong up with Arctic Cooling MX-4 (yes I am a spreader):

Then came another pants shitter installing the CPU block. You have to REALLY push down on the screws to get them started. Watercool provides high quality STIFF springs for this thing, which is great, but you need to compress the spring to get the screws started into the threads. So the block slides all over the place while you try to find the hole (giggity). Got er done though!

Now for the part that people will most likely ridicule and hate (flame suit on). Le sexy box:

Bling aside, this is fairly serious RAM. 3600 @ CL16-16-16-36.

It’s very subtle:

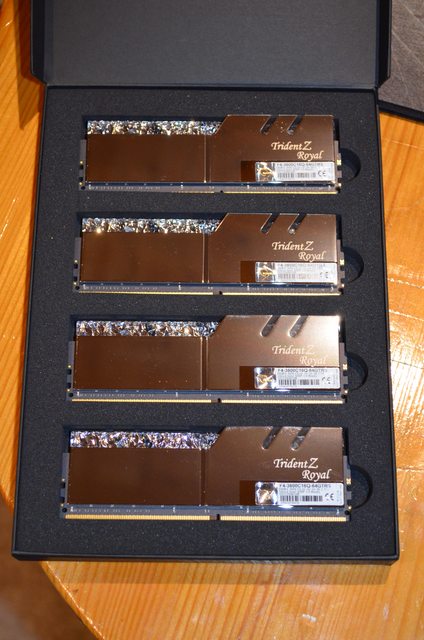
I had to run out to the ‘butler shoppe’ and purchase some proper posh white gloves for handling these things. But I got them installed without fingerprints!

Add it all up, and you have an ungodly amount of money in one picture:

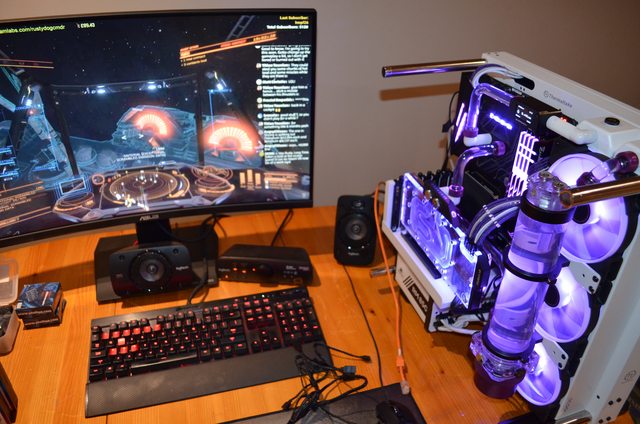
More to come in the very near future!

9 Likes

Nice build! I’m literally replacing this system now with a 3900X build to play with. Haha would have sold you mine.

One hint before it’s all built, get yourself a $20 Intel AX200NGW wifi card off Amazon, and upgrade the card now before it’s all put together. The backplate needs to come off to get to two screws. Might as well go wifi 6 now if you plan to use it for a while.

Thanks! I’m going 10gig wired, so wireless isn’t a factor, but thanks for the heads up on the WiFi! Sounds like we could have traded systems, LOL!

Even down to a heat killer block :slight_smile:

And I run 10Gb at home too, but still updated since it was only $20.

Very nice, mine has the following specs:

2950x
Asus X399 Gaming -E
64GB of Corsair Vengeance, 3200
Radeon VII
Samung 1TB Nvme for my boot/os drive.

But since I use Windows 10 Pro and VM whatever I need to run it does me just fine.

Amazing how much faster my VM’s are not just by allocating more CPU cores and RAM.

Good lord that’s gorgeous, I’m a massive fan of clean grey/black/silver rigs, and slapping that in a white case is going to make it nice and bright without being gaudy :ok_hand:. What kind of lighting/coolant are you planning to go with?

Also not gonna hate on the Royal DIMMs lol, I think they’re gorgeous. Look even better on the board than I thought, now I get to contemplate possibly saving up for some for my eventual (and hopefully final) rebuild of my big rig (X99 Classy based lad with a j-bin 5960X).

1 Like

Thanks for the compliments folks, and apologies for lack of response. Friday night I went down with severe stomach cramps, feeling like I ate a bucket of razor blades. So I didn’t do much other than groan in agony. But today I’m feeling much better, and got some stuff done.

@ZandoBob: not totally sure on the lighting yet, but there will be 3 RGB fans above and below the motherboard, and one on the rear exhaust. I have a bajillion lighting options with this board, and I have some 5v strips laying around. Loads of options. :slight_smile: As for coolant, I’m going purple. Most likely translucent purple, or EK Cryofuel (Indigo Violet).

Since I’m reusing the GPUs from my daily driver (and a pair of slim 360 rads), step 1 today was to drain that behemoth. Artsy drain shot:

GPU removal surgery complete:

With my big rig, I asked a modder on local forums if he would make me a pair of stick-on acrylic back plates. I’ve been rocking these for quite a while, love em to death, but this new build accidentally developed a black / white theme just based on parts selection. I will miss these things:

So that means I got ‘stock’ HeatKiller back plates, to fit the board / CPU cooler. These things are BEEFY, and I’m betting actually aid in cooling a bit. They’re a lovely anodized black aluminum, with Watercool’s usual high quality, and countersunk screws.

Got the motherboard mounted in the case, on the floor. I really need a proper work area. No small wonder my lower back is screwed up! Also got some fans put onto a rad for test fitting. That rad is brand new and still needs cleaning.

Due to the increase slot spacing of the 16x slots on the X399 Xtreme, I had to get a bigger connector block for the GPUs. I considered doing dual tubes instead of a connector block, and I still might do that later on, but I like the ‘solidity’ of these things. It’s like a built-in anti-sag aid for the GPUs, and the black acetal finish fits right in:

Looking right at home now:

Now I need to eat lunch (for the first time in 2 days), and get the other two slim 360 rads out of the big rig. Also need to start thinking about tube runs. More to come!

2 Likes

Now I present to you: a cable management nightmare! I got the other 2 360s pulled from the old rig, and have one test-fitted with 3 RGB fans. There’s a decent trunk of cables that come off these things:

Tidying up the bottom rad cables. Running in pull with these things isn’t as ugly as usual, since Fractal put nice stickers on these fans:

Listening to some Rusty Dog YouTube while I work:

The top / bottom rads getting ready to go in. So many cables!!!

More to come!

One rather large impulse buy I made was something that just popped up in my local water cooling guys’ inventory. I was mulling over whether I had enough room in this case for dual D5 pumps, and I saw this thing, and it fit the bill perfectly, a Singularity Computers ‘Resonance’ distro plate / pump mount thingy. Let’s start with the box:

The manual, along with a page showing some suggested tube runs:

The internals:

It comes with two D5 pump top covers, an ARGB / UV LED strip, and a universal 120mm / 140mm fan / radiator mount. The black covers are very nice (and sharp enough to strip wire!):

Laying it all out and RTFMing:

The distro plate itself can be configured for dual or single loop (will be single for this build). It’s a sweet looking piece:

This will be a SEVERLY tight fit:

Like SEVERELY!!

But it will fit. Just barely (got about 2mm clearance to the glass panel:

More to come tomorrow!

3 Likes

Eeek, after a weeks worth of stomach problems, work problems, etc, I finally managed to boot this thing up. And I don’t like it. :frowning: 
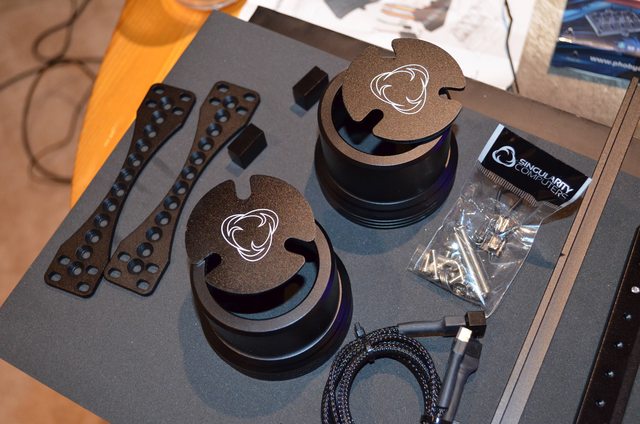
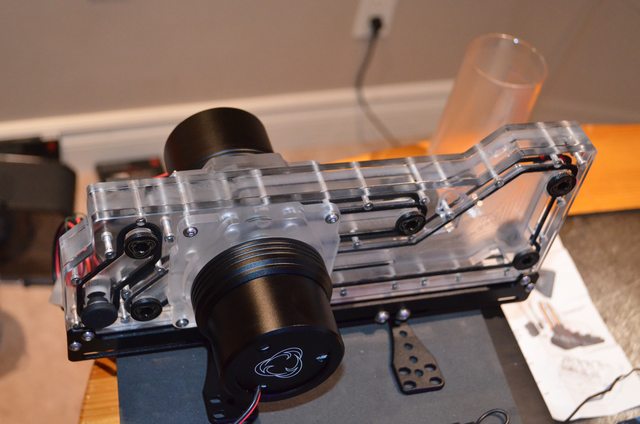
That dual D5 thing was a mistake, and this is the last time I bother with any form of water distro plate. This things just cannot be used with a D5 pump at full steam. You need a vario or PWM pump, running SLOW, otherwise it’s bubble city. So the Singularity Computers thing needs to go.

That problem will be solved this weekend, assuming I don’t die from some form of gastrointestinal explosion. In the meantime, it does live (albeit with a single pump):

The HeatKiller block is sexy sexy, and the RAM isn’t nearly as gaudy as I thought it would be. It’s actually really nice, even seems to twinkle with a single color set.

Things I misunderstood about Singularity Computers “Resonance”:

  • it’s not a dual D5 pump top. It’s two separate D5 pumps + plates fused together. Therefore if you want dual D5’s running in serial (as I did), you would need to treat the pumps separately, as individual devices (and plates) in your loop. So you’d need to tube each side of the plates together. In a case this tight, that’s not easily workable.

  • even though it’s made for a D5 pump, the plate can’t hold enough water to feed a pump at high speed AND let air bubbles out at the same time. Any speed over 2 / 2.5 will just recirculate bubbles. Which is great if you like that soothing bubbly sound, but will ruin your temps.

All in all, it might be usable in a gargantuan Case Labs dual loop build, but you’d still have to throttle the pumps, which seems kinda dumb to me. I’d love to know if anyone has ever used or made a distro plate that could sustain a D5 at full flow without endless cavitation / bubbles.

Also the included RGB strip broke like it was made of Styrofoam, so that’s why the bloody thing isn’t lit up in the pics.

TLDR: Resonance rating 2 / 10, wouldn’t not recommend. Soon to be replaced with a single D5 / HeatKiller tube. :smiley:

2 Likes

Very, Very nice! I feel your pain. I tried a couple of different pump setups on my 2950x, before I settled on a Monsoon bay reservoir with a secondary bleeder reservoir. You are going to Love Threadripper.

I really like how you ran the CPU and GPU directly into separate rad’s even though their on the same loop. Sir you know cooling! And the build looks great too!

Thanks for the kind words! It’s been hard to even LOOK at that thing without being angry lately, LOL. If I had gone with a standard tube reservoir, this build would have been so much easier. But I wanted dual D5s for some dumb reason. I have since slapped myself in the head and will be happy with a single pump!

Oh also got Windows 10 Pro installed, and I put the 3 NVME drives in RAID0 for giggles. 9800+ read / 8800 + write on the “stupid test not indicative of the real world” disk benchmarks. :smiley:

1 Like

Hey folks, I haven’t given up yet. Just waiting for a rather key piece of the puzzle, and it arrived unexpectedly at my door on Sunday. I already had a HeatKiller reservoir, but I didn’t have a D5 pump mount for it. Also, I wanted to run a shorter tube than my current reservoir, so all that leads me to this beauty, which fits in perfectly with the build. HeatKiller reservoir with 150ml tube, and D5 pump mount:

Won’t be any bubbles in this baby, even with twelve D5s at full blast! But it doesn’t have RGB, and this will be a dimly lit part of the case. So I decided to sneak some Argy Bargy’s in behind the new reservoir. I had a Barrow RAM block kit that I wasn’t using, and it has a really nice and bright (and small) RGB strip, so I pilfered it and stuck it in the least visible part of the tube I could find:

Since my stomach has been feeling better, I also felt up to doing some cabling, so I remade my PSU / GPU extensions from my previous red build. I used pre-sleeved / pre-pinned cables (which cost about 50 cents each for a 12" length), then pair them up with cheap black connectors and some cable combs. DIY extensions for uber cheap! I also sleeved a used D5 vario I just bought (that thankfully has no tach cable, never use those things). The color scheme is purple / black, with a touch of white to tie in the case. The coolant will be EK Cryofuel, in Indigo Violet. Results:

PSU extension looks nice enough:

The joys of sleeving. Thank god snooker was on this weekend!

Of course the loop has to change with the new single D5 HeatKiller reservoir, so I flipped the middle rad so the ports are up top this time. Hopefully if I pull this off, the loop will look good. I have something specific in mind, and I’m not a multi-bend tube guy, so I might need more fittings. We shall see. We start with the pump outlet, which will push directly into the top right port of the middle radiator:

Had to use an offset fitting, otherwise the tube was off, and OCD was NOT having THAT! Thank god these fittings were cheap, and I had picked up 4 of them a few months back, since they looked handy:

Had to twist-tie the PSU extension in place to ‘tame’ it:

Making progress:

I am digging this color scheme a LOT:

With the middle rad installed, I had to now find a way to route the bottom rad to the top inlet of the reservoir. I thought this was going to be tricky (and potentially ugly), but I found a way to pull it off so that my OCD was not displeased:

From the side, I can make the tubes align. OCD is pleased:

This bottom connection piece has to be cocked out like this so that the tubes align from both the front and side view. At first this bugged me, but then I realized this is a perfect place to put a drain. Bazinga!

More to come soon! Bonus pic of crazy RAID0 benchmarks: :smiley:

3 Likes

So I actually took the day off work so I could get some work done on this thing. It’s become an obsession! Plus I’m not the quickest guy when it comes to cable management, and this build has LOADS of cables, so I had lots to do.

I began by removing the top radiator, for cleanup and to make room for other stuff.

Then the RGB cable cleanup. I tried to keep as much of the RGB cable mess tied to the radiator, hidden away and more importantly, not clogging up the rear of the case. Did this for the bottom radiator too.

Once I tided up that mess, I moved onto finishing the loop. Thankfully the ports on the TR4 block are reasonably far apart. Since I’m using 16mm fittings, and those things are fat, it’s hard to do things like this:

Since I’m not good with tube bending, and prefer single bend 90 degree angles, I used a pile of extensions, particularly on the top left rad port, which will run to the CPU:

Like a lot of other areas of this build, it’s a tight fit:

A few moments later:

They aren’t perfectly aligned, but it’s not driving me insane…yet. :smiley:

Changed the position of the flow and temperature meters:

I either have a fetish for the letter L or the letter J, not quite sure:

Alignment isn’t perfect like I said, but it’ll do donkey, it’ll do:

And the Bart said “let there be coolant”, and there was coolant:

That coolant is EK CryoFuel, in Indigo Violet, but it also picked up some red from my previous build. That happens when you don’t properly flush your radiators between builds, DOH! So I added 10 drops of blue dye. The color is hard to capture on camera, especially when you suck at cameras:

I swapped out the 3 Fractal Design RGB fans in the rear for 3 Darkside Gentle Typhoons. The 3-pin Fractal variants don’t have good static pressure like their PWM brothers, so the Typhoons are better for the middle radiator. Not to mention less cable headaches. The 3-pin Typhoons are connected to a 3-1 splitter, and will run off one of the combo fan / pump headers on the motherboard:

Now I will give my back a break, eat some supper, then finish off the ‘ugly side’ of the cable management / PSU. More to come soon!

3 Likes

That’s a beautiful piece of work. Oh and nice touch with the Gentle Typhoons on the back :wink:

1 Like

Thank you sir. I love those Typhoons, got all kinds of those floating around. My old ringing ears appreciate their noise profile. With those things, there’s never any electrical whining or humming, no matter how you low you run em.

She is now ‘done’, for about the 4th time. I also named it 'Indigo Violence", because the color is a slightly tweaked version of EK’s ‘Indigo Violet’ Cryofuel coolant, and also for how many times I wanted to kill this thing while building it! :smiley:

Last changes were the following:

  1. I swapped out the 150ml tube for a 200ml one, much better fit now.
  2. I also added some white LED strips in an attempt to back light the reservoir a bit.
  3. Bent a new tube for the side radiator-to-CPU-inlet connection, instead of using a pile of extension fittings.

Bigger tube fills the space much better now.

Only had to re-bend one tube for the reservoir, but it was a biggie. I am now just about out of 16mm tube!

I re-bent the CPU outlet tube, since that was off. The new tube is still off, in a different dimension, LOL! But it now runs closer to the top fans than before, making it more properly in-line with the tube next to it.

New tube. Lord how I hate 3-dimensional bends. This one is about 1-2mm off, but it fits.

Much cleaner look now, instead of 4 inches of extensions.

OCD is relatively pleased!

This might be the longest serving LED strip in the history of LED strips. It’s been used countless times in countless builds over the years, and it’s broken in multiple places. Ironically, I didn’t want this area too bright anyway. :smiley:

There is also a tiny little 4-inch (severely cut down) rigid LED strip in behind one of the reservoir pillars, barely visible from almost any angle.

Let there be white light, to balance this purple a bit!

Close enough!

They almost align in all dimensions.

And we’re back to purple!

Testing with white color everywhere. It’s ‘meh’, I prefer purple.

Done! Again! Until the next time my OCD gets itchy!

4 Likes

Hey man, excellent craftsmanship on display there! A lot of attention detail. Runs are on the money.

I also have the reservoir, I think it looks much better than the EKs. However I decided to switch my design plan from an R6 to O11 Air. It will look alot like yours in the end, but instead I’m going to put a 240 on the front for a 4 rad set up. I’ll have to find some place to stick the reservoir in the back.

I really love the custom PSU cables, they always elevate a build, top notch.

Just curious, do you actually use SLI? I’ve sort of given up on the thing. I’m plan to have two GPUs in my next build, but I’m going to set up Proxmox and run Linux and Windows with GPU passthrough.

I had to scroll up but I didn’t realize those were fractal design fans.

This is a link to my guy in case you’re interested: https://pcpartpicker.com/b/phNQzy

I’ve since disassembled it. I sort of got tired of looking at this case, and it puts a limit on how low my standing desk will go down. Also the fans were making too much noise.

1 Like

Thanks man! You’re in for a tough one, adding a 4th rad. Well if you’re a handy modder, that won’t be a problem. Heck, if that’s the case add another 360, LOL! Not much room in there, and there’s even less in back, but you could easily snug a small reservoir back there. You’ll have to think carefully about where you put the PSU, but it can be done.

As for SLI, some things use it, most things don’t. Having a single GPU is just weird to me though, I’ve been running ‘pairs’ for so long now. The latest thing that supports it via MGPU is Red Dead Redemption 2, not sure how much of a difference that makes though. I haven’t installed it on this rig yet. Haven’t done much of ANYTHING with this rig yet!

1 Like

This topic was automatically closed 273 days after the last reply. New replies are no longer allowed.