Back when netdata was on FreeNAS, I had a startup script that rsync’d the config because it would be overwritten.
1 Like
That’s always an option, I guess. Might be time to start messing with Ansible…as if trying to get k3s setup properly wasn’t enough of a pain already 
On another note: moved the entire network to the PoE switch I got a little while ago. After measuring it turned out to use slightly less power than the HP I was using so far, so I just swapped them over. Having the patch panel between the two switches made this real easy. Just made sure to set up the correct VLANs on the new switch in advance so there was virtually no downtime (would be nice if everyone could just agree on terminology though…)
Before:

After:

Only drawback is that the activity lights are above the ports. Since this is near the top of a 42U rack that kind of impairs visibility. The Mellanox switch has the same problem, though for that one swapping the switch and the cable management rail around would probably sort it out.
On a sidenote, I’m aware of the fan fail light. I…might’ve messed up while replacing the fans (one of them sounded pretty bad). Instead of taking off the cover by unplugging everything I just balanced it on the housing. It must’ve touched the PSU so I shorted out one of the fan connectors while measuring the current by leaning against the cover… Whoopsie…
So for now it runs on one fan, might add a splitter and a second fan once I start putting PoE load on it.
On an entirely unrelated rant: I absolutely loathe the camera in my Nokia 7.2, I cannot for the life of me take a straight picture with it. It’s driving me absolutely up the wall.
3 Likes
Finally got k3s and Rancher installed the “proper” way:
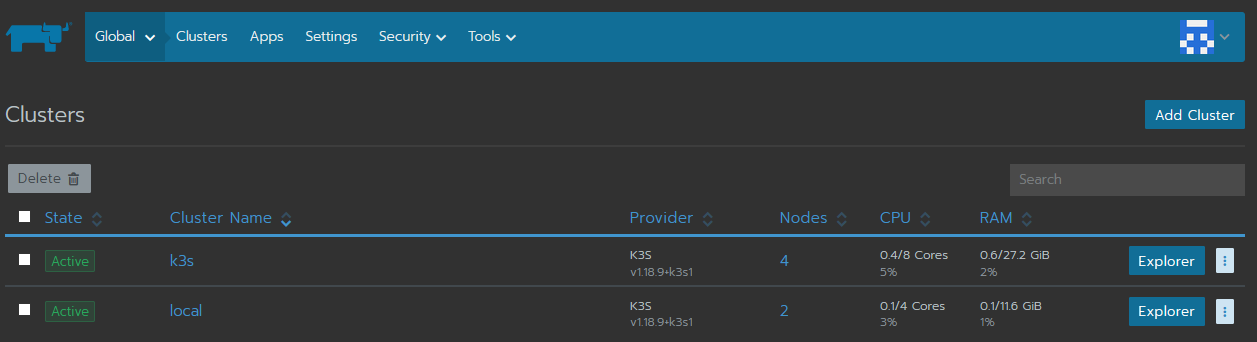
Two cluster setup, running k3os on a bunch of VMs:
- k3s is the “work” cluster
- local is Rancher’s management cluster
Certainly has an impact on the “idle” system load…
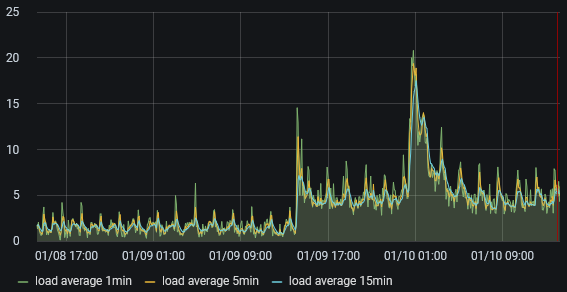
This is with nothing actually running on the clusters, you can pretty clearly see when everything was brought up.
The main challenges were:
- figuring out the k3os cloud setup stuff
- load balancer/reverse proxy was a major pain since I wanted to use a single nginx container for both clusters.
In the end I was forced to used different ports for the k3s and rancher clusters’ management ports as k3s starts misbehaving with ssl passthrough. - nfs provisioner was a bit of a nuisance. Setup was easy enough, but with Helm’s repository going decentralized figuring out which chart was the “main” one was a pain. Felt like this migration was handled rather poorly, a simple link from the old repository to the new chart would have gone a long way for new users.
Might attempt to write up a guide, of sorts, once I actually start using it and discover/fix the any remaining pain points (eg. I ran a test deploy of Wordpress to test the nfs-provisioner, but the deployment of the load balancer service got stuck on that one (but things were still reachable through the expected URL, so…yeah…)
Might need to get some flash storage as well, currently it’s on a RAIDZ mirror that’s shared with Prometheus, and that doesn’t seem ideal… So far no issues with disk pressure, deploys are slow though, and those drives look like they really are getting a workout.
4 Likes
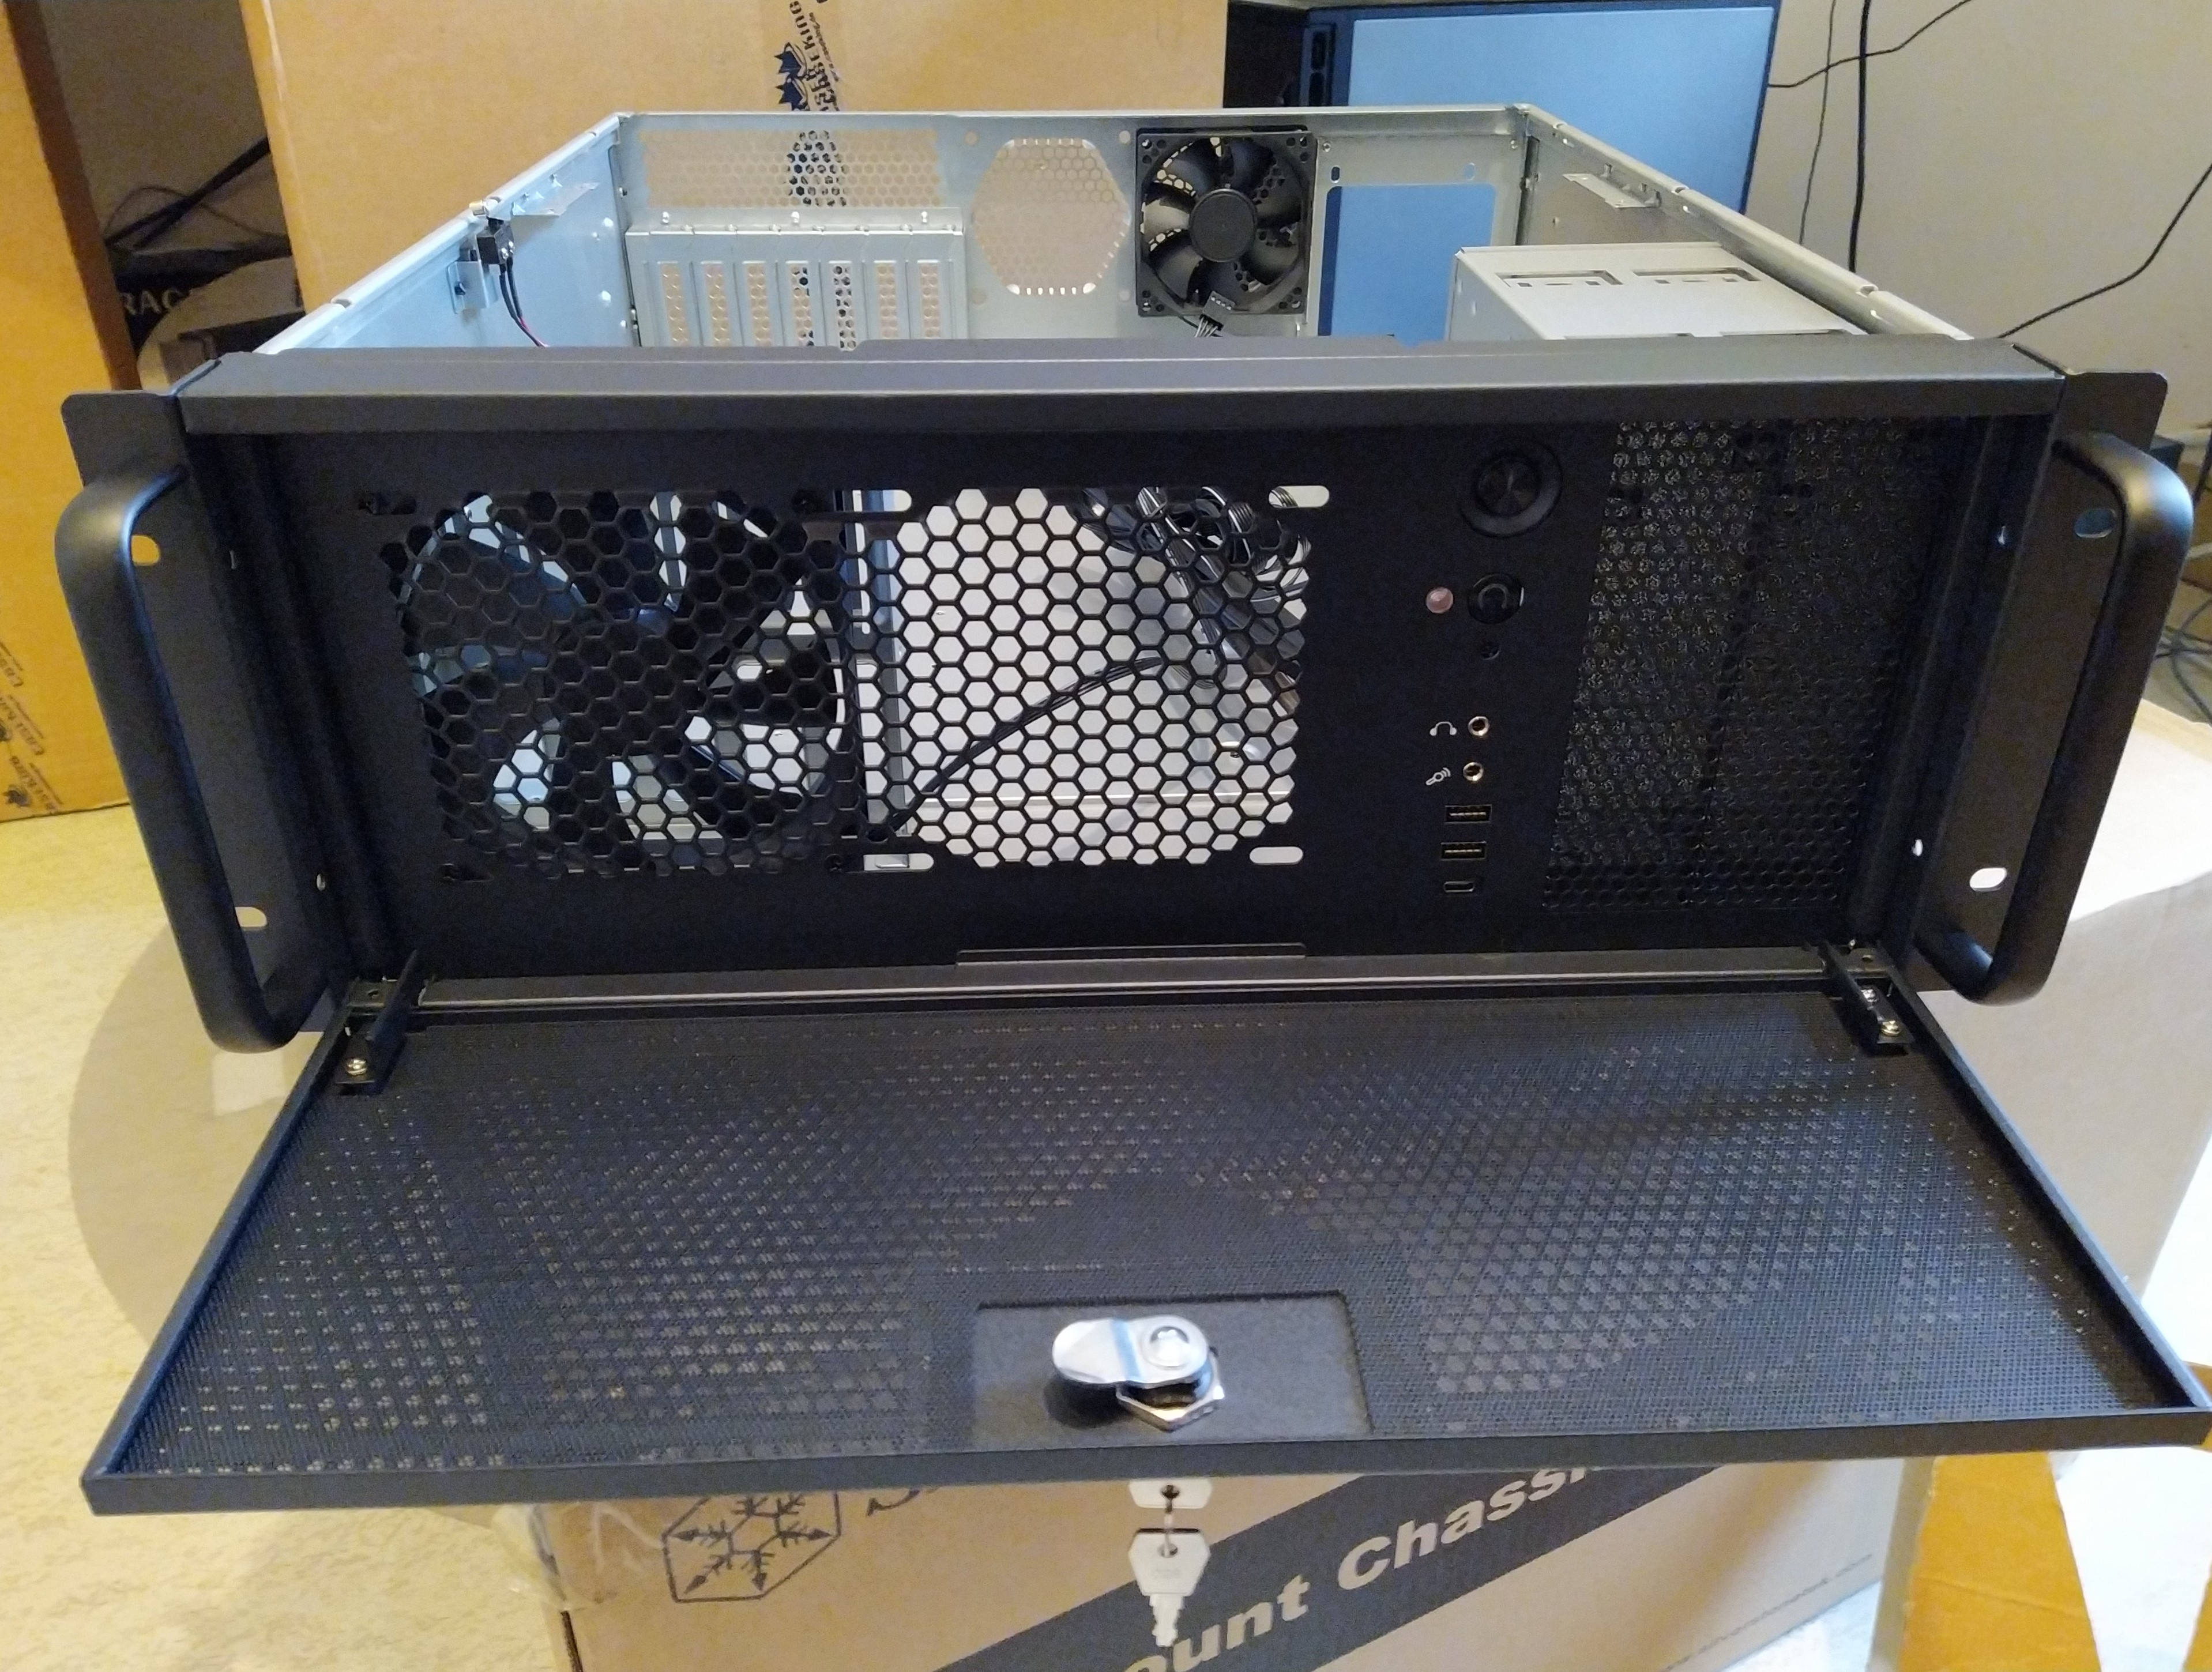
Well, the chassis finally arrived \o/

Since I haven’t really gone over the part selection for my new desktop, let’s quickly do that now:
Motherboard: Gigabyte B550 Aorus Pro V2 (V2 has an internal USB C header, which the original is lacking)
CPU: AMD Ryzen 5900x
Cooling: be quiet! Pure Loop 240mm
Memory: Crucial Ballistix RGB, 3600Mhz CL16 (BL2K16G36C16U4BL)
Storage:
- Samsung 970 EVO Plus 1TB (OS)
- Enmotus FuzeDrive SSD (Fuzed with one of the HDDs)
- 2 x Toshiba X300 5TB HDD
Chassis: Silverstone RM42-502
GPU: MSI GeForce GTX970 (until I can get my hands on a somewhat reasonably priced newer card anyway)
PSU: Enermax Platimax D.F. 750W
Networking: Mellanox ConnectX-2 (for future use)
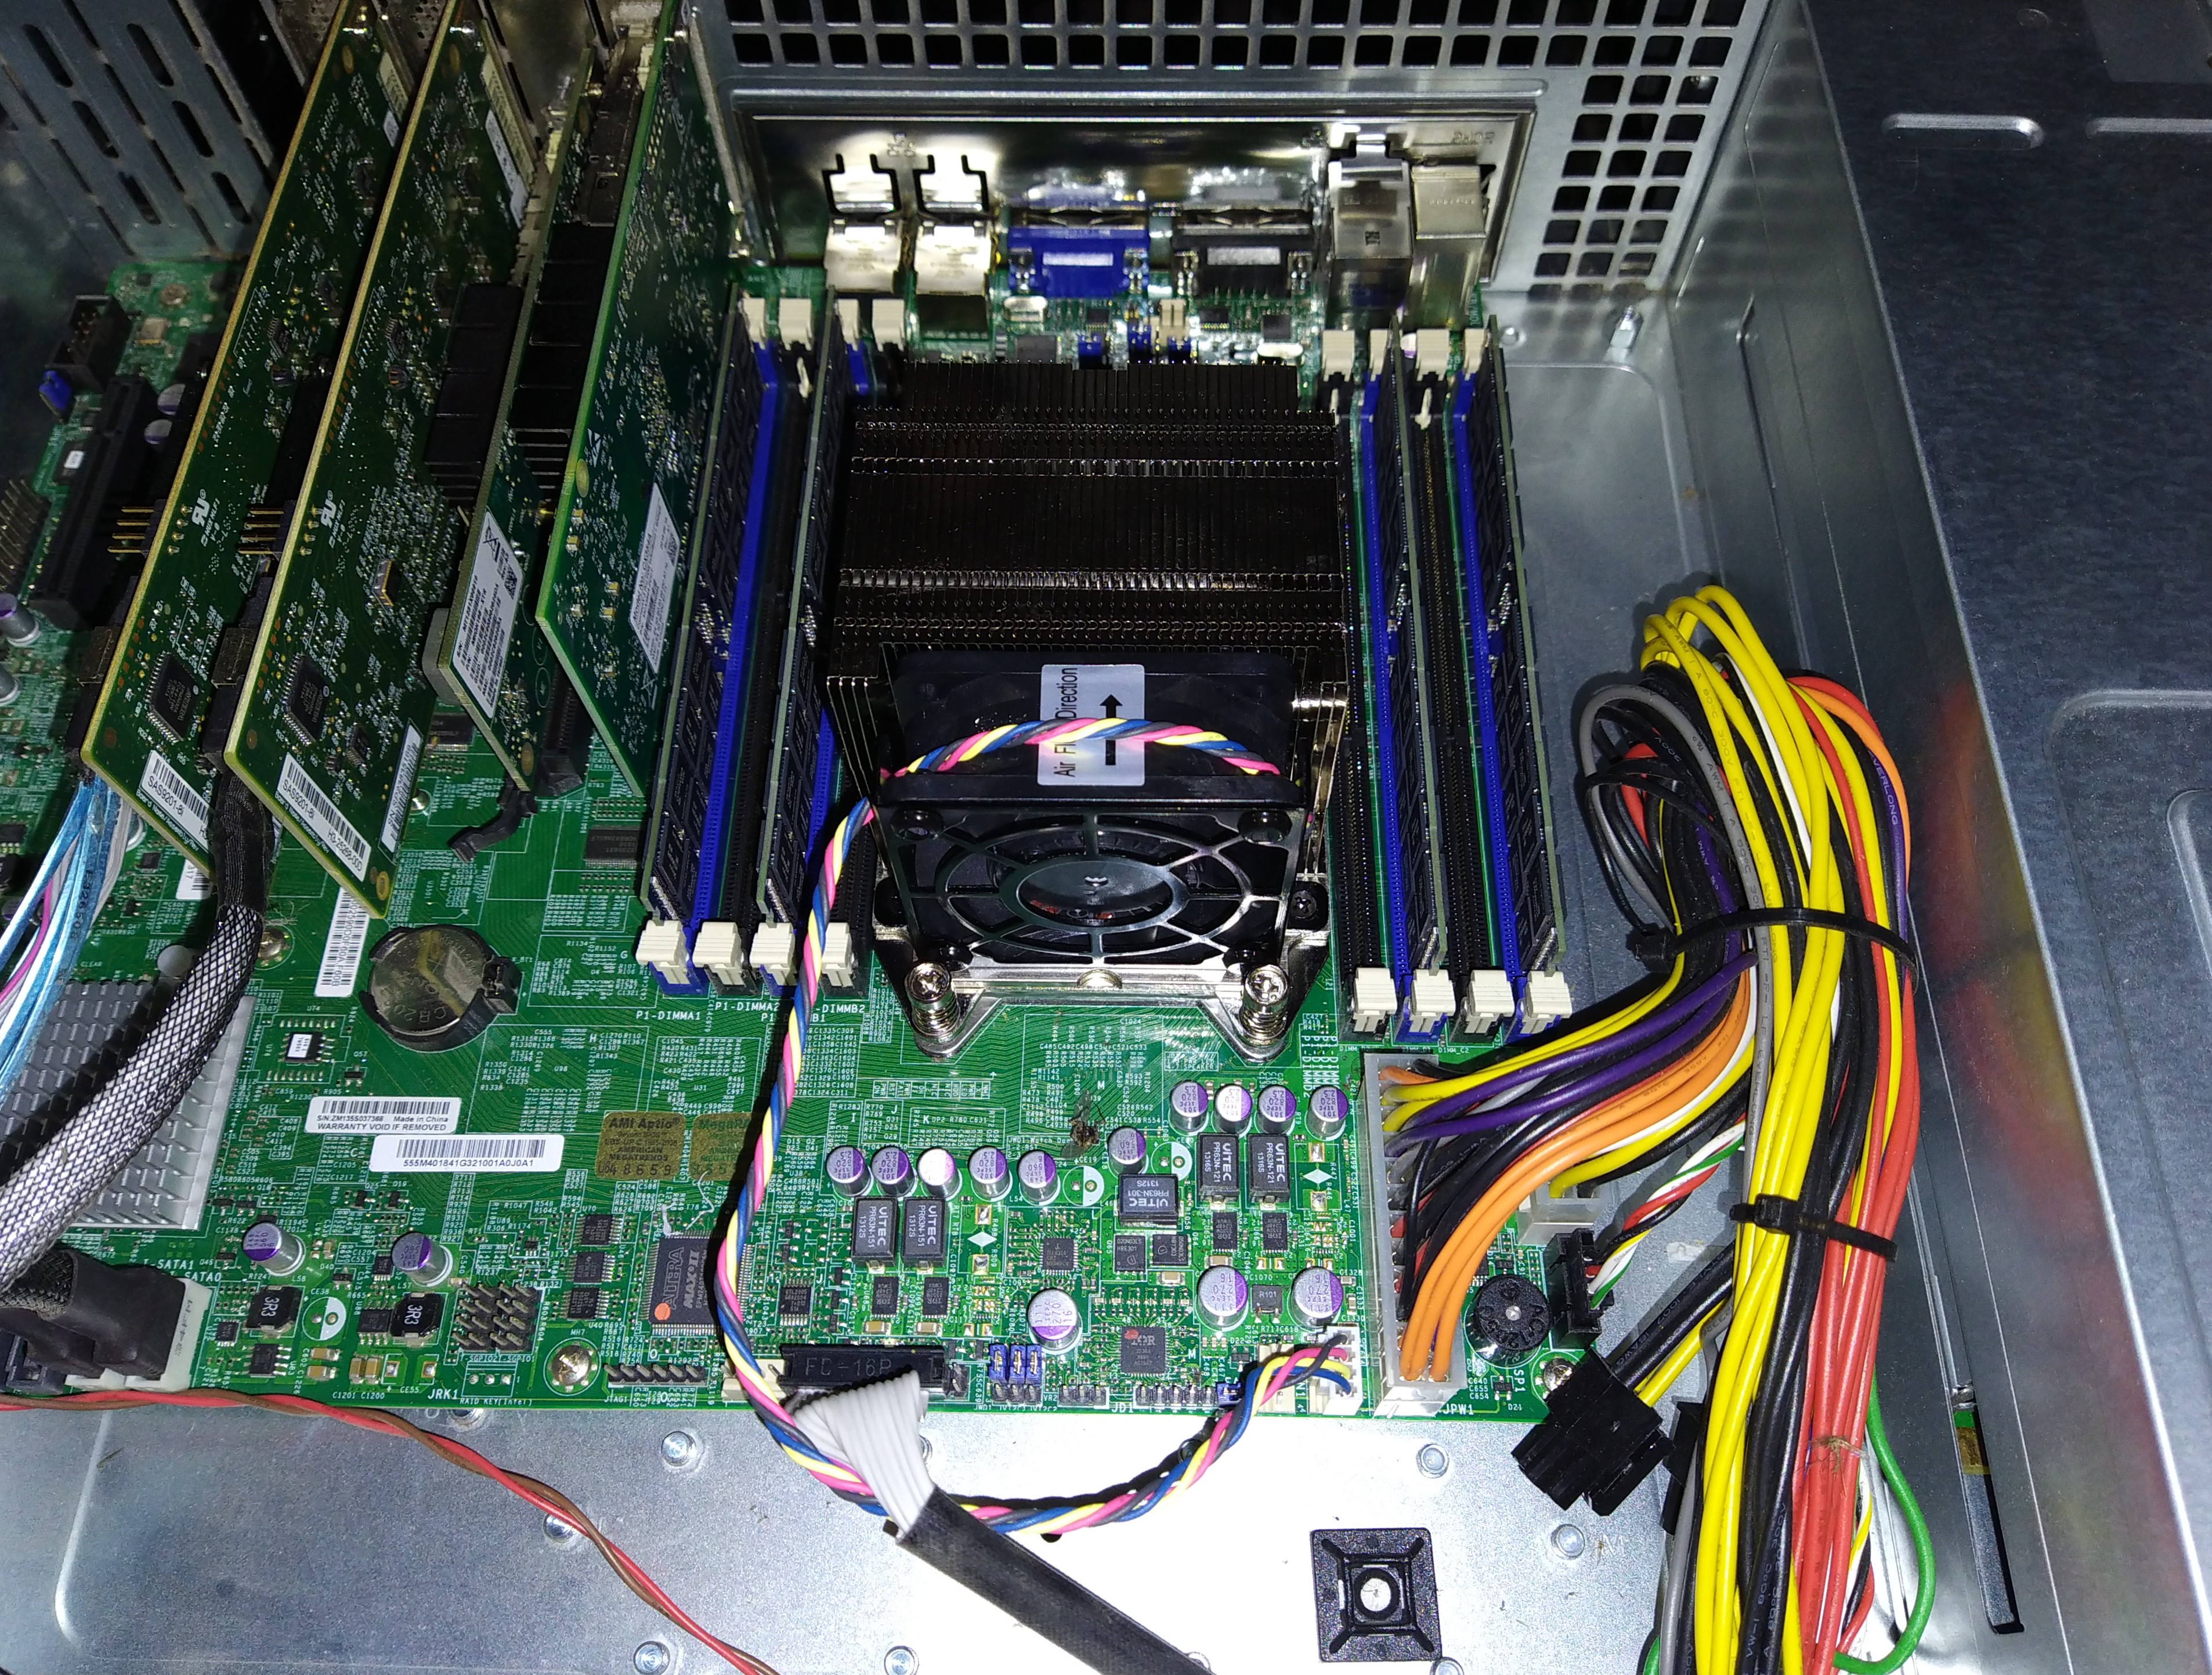
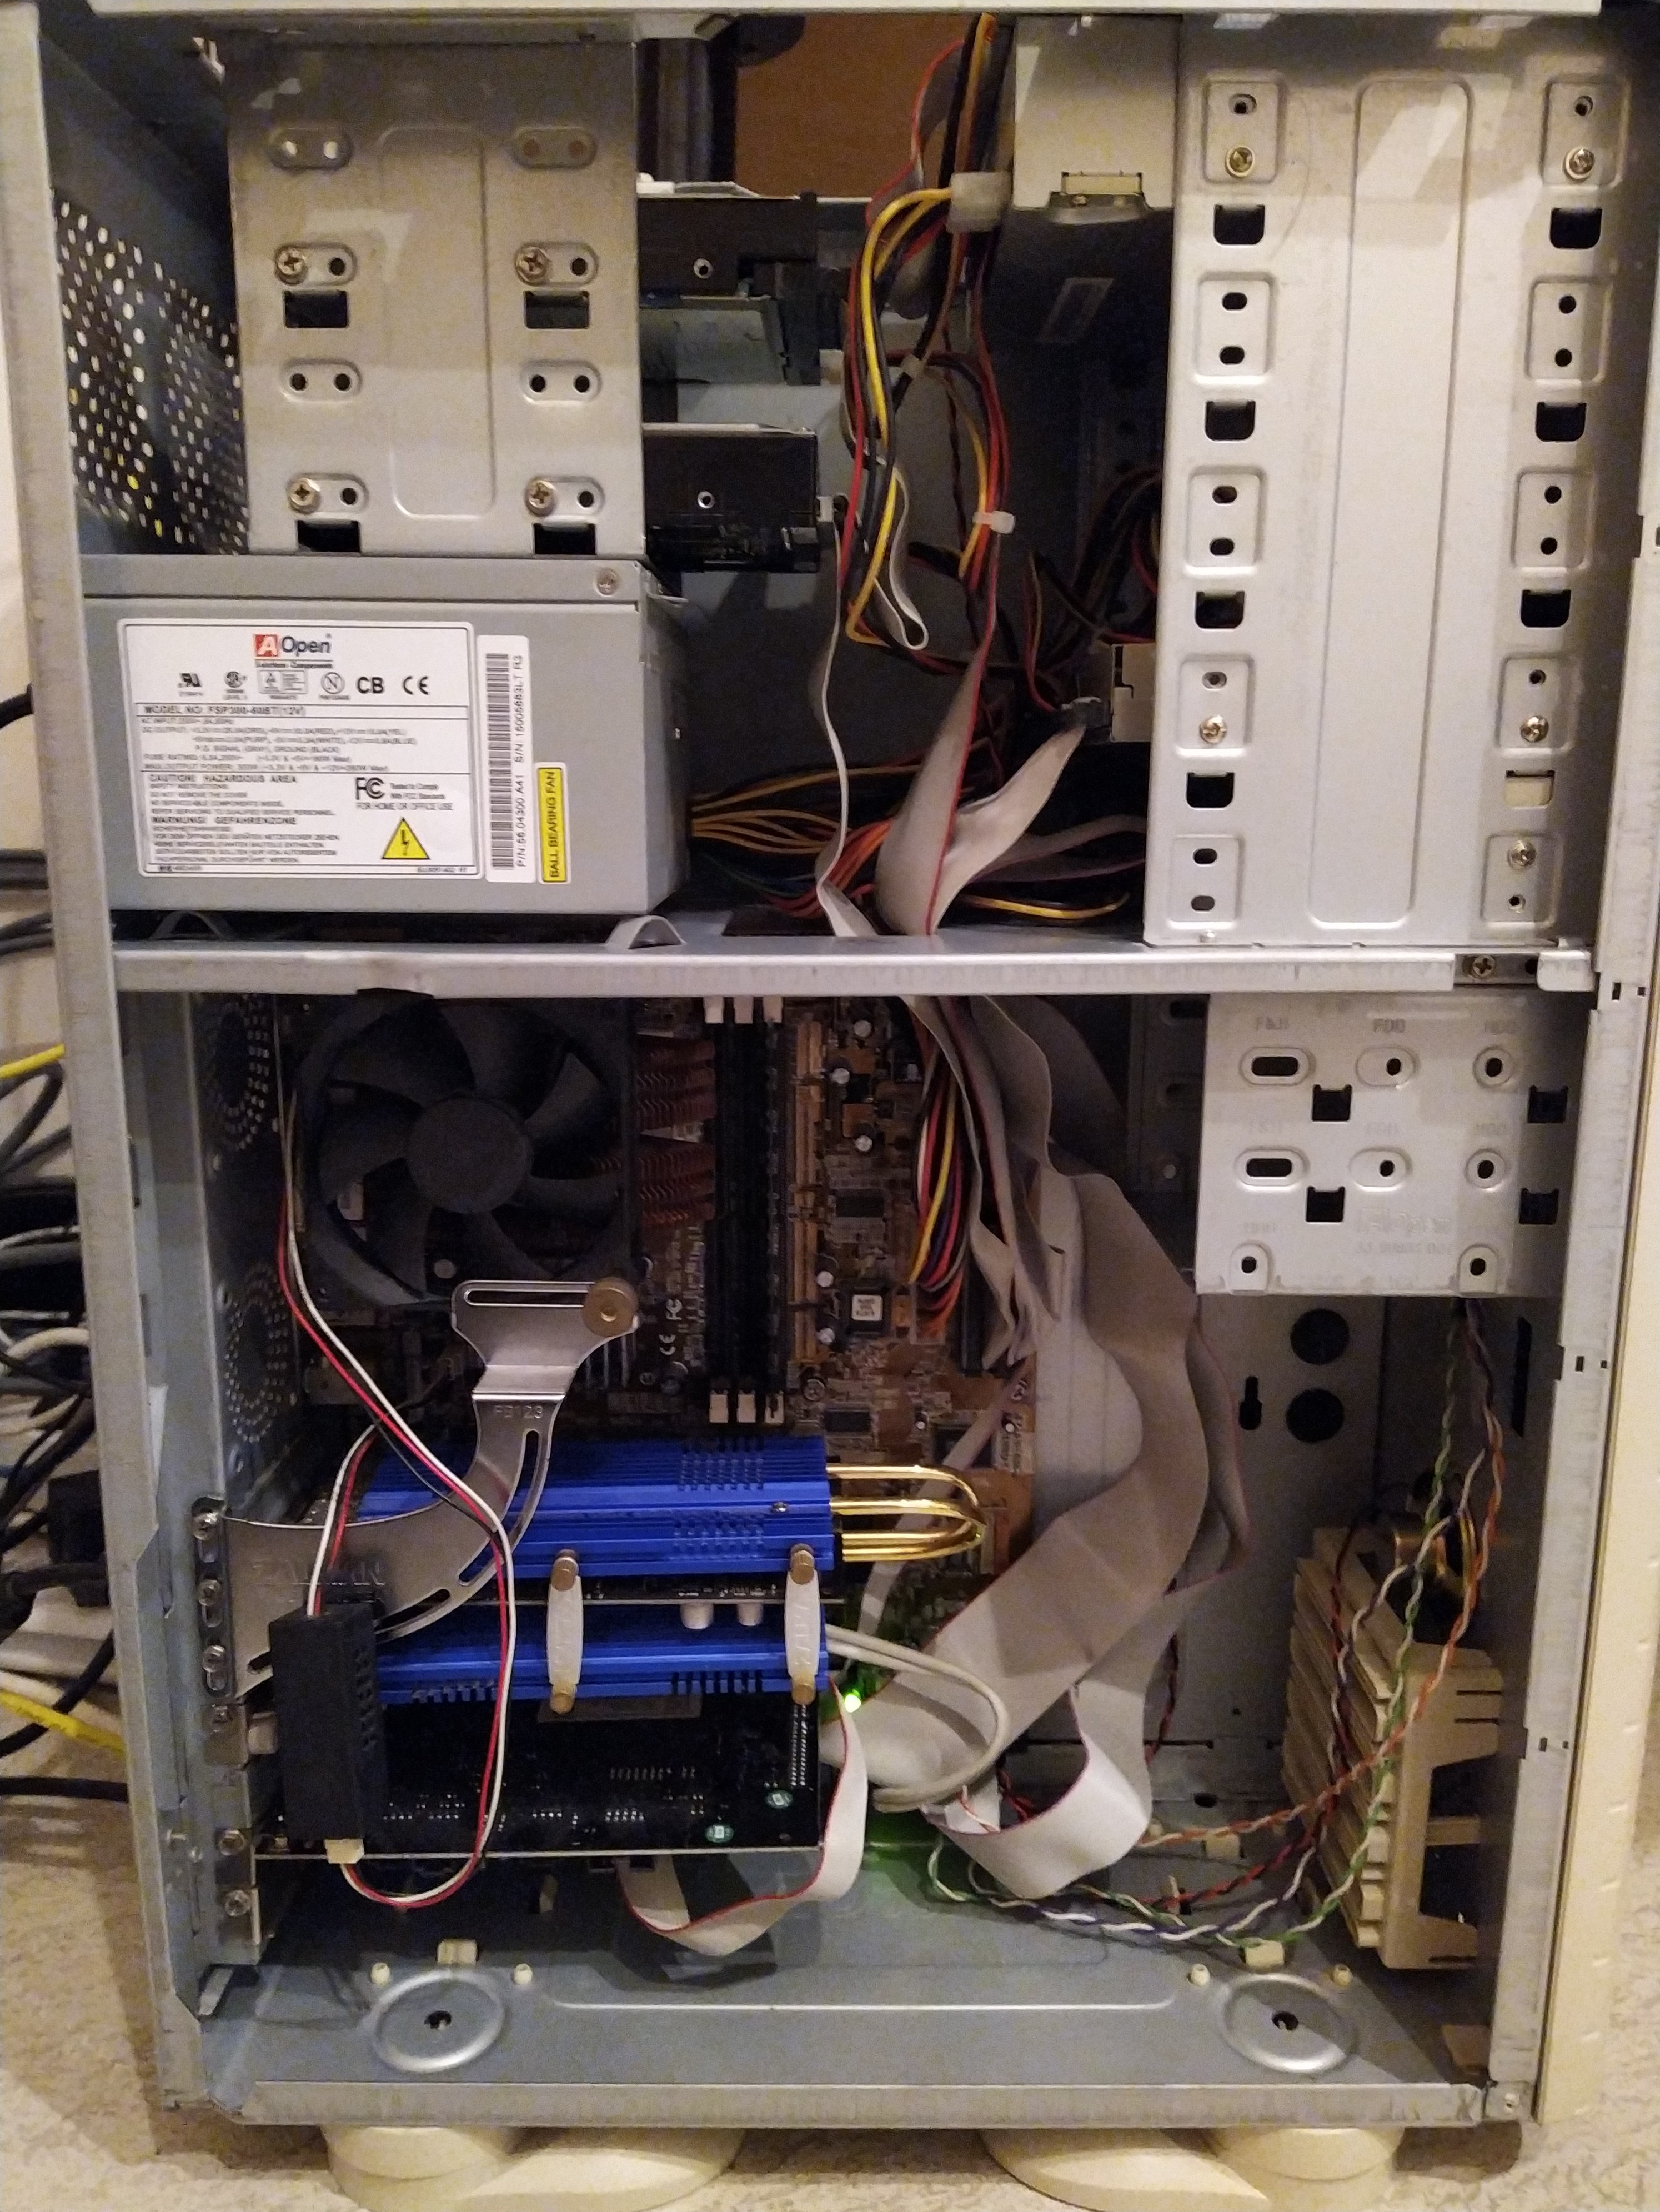
Initially I built the system in an old chassis that was slated for recycling:

Which is where I noticed two issues:
- should have gotten an X570 board, the PCI-E connectivity on B550 boards is…pathetic (not news to anyone, I’m sure, but haven’t dealt with new consumer hardware in ages), so I can’t run the Connect-X 2 at full speed as there’s no x4 slot available when using both NVMe slots.
- the Pure Loop’s pump is supposed to be connected to a SATA power adapter rather than the motherboard, so it always runs at full speed (which is intended). Don’t have any prior experience with water cooling but I guess the lack of feedback from the pump to the motherboard could explain why the default fan curves were absolutely abysmal. Resulting in constant ramping up to 100% (those be quiet! fans really aren’t, at 100% ). Got it pretty quiet eventually, but had to manually tweak the curves.
- Gigabyte’s RGB Fusion application is unable to correctly interface with the Ballistix memory, I was unable to turn off the RGB, or even change it to something other than some form of pulse.
Reason for getting RGB memory despite not caring for RGB was because it was the best bang for the buck, other kits with similar latencies and speeds were way more expensive.
Haven’t really suffered any of the USB related issues, aside from having to re-plug my Sennheiser GSX1000 when I mess with the hardware (only needs to be done once, not on every boot or something). Hard to tell if that’s really the board, certainly not a big deal to me.
Ran the system like this for close to a month, I did end up putting the case fan in the rear back (missing from the above picture) to evacuate the heat from around the CPU when not running the system hard. Under load the PSU fan would take care of that area but most of the time it’s not running.
The chassis came double boxed with paper in-between and the shipping company still managed to damage the inner box. Chassis came out fine though.
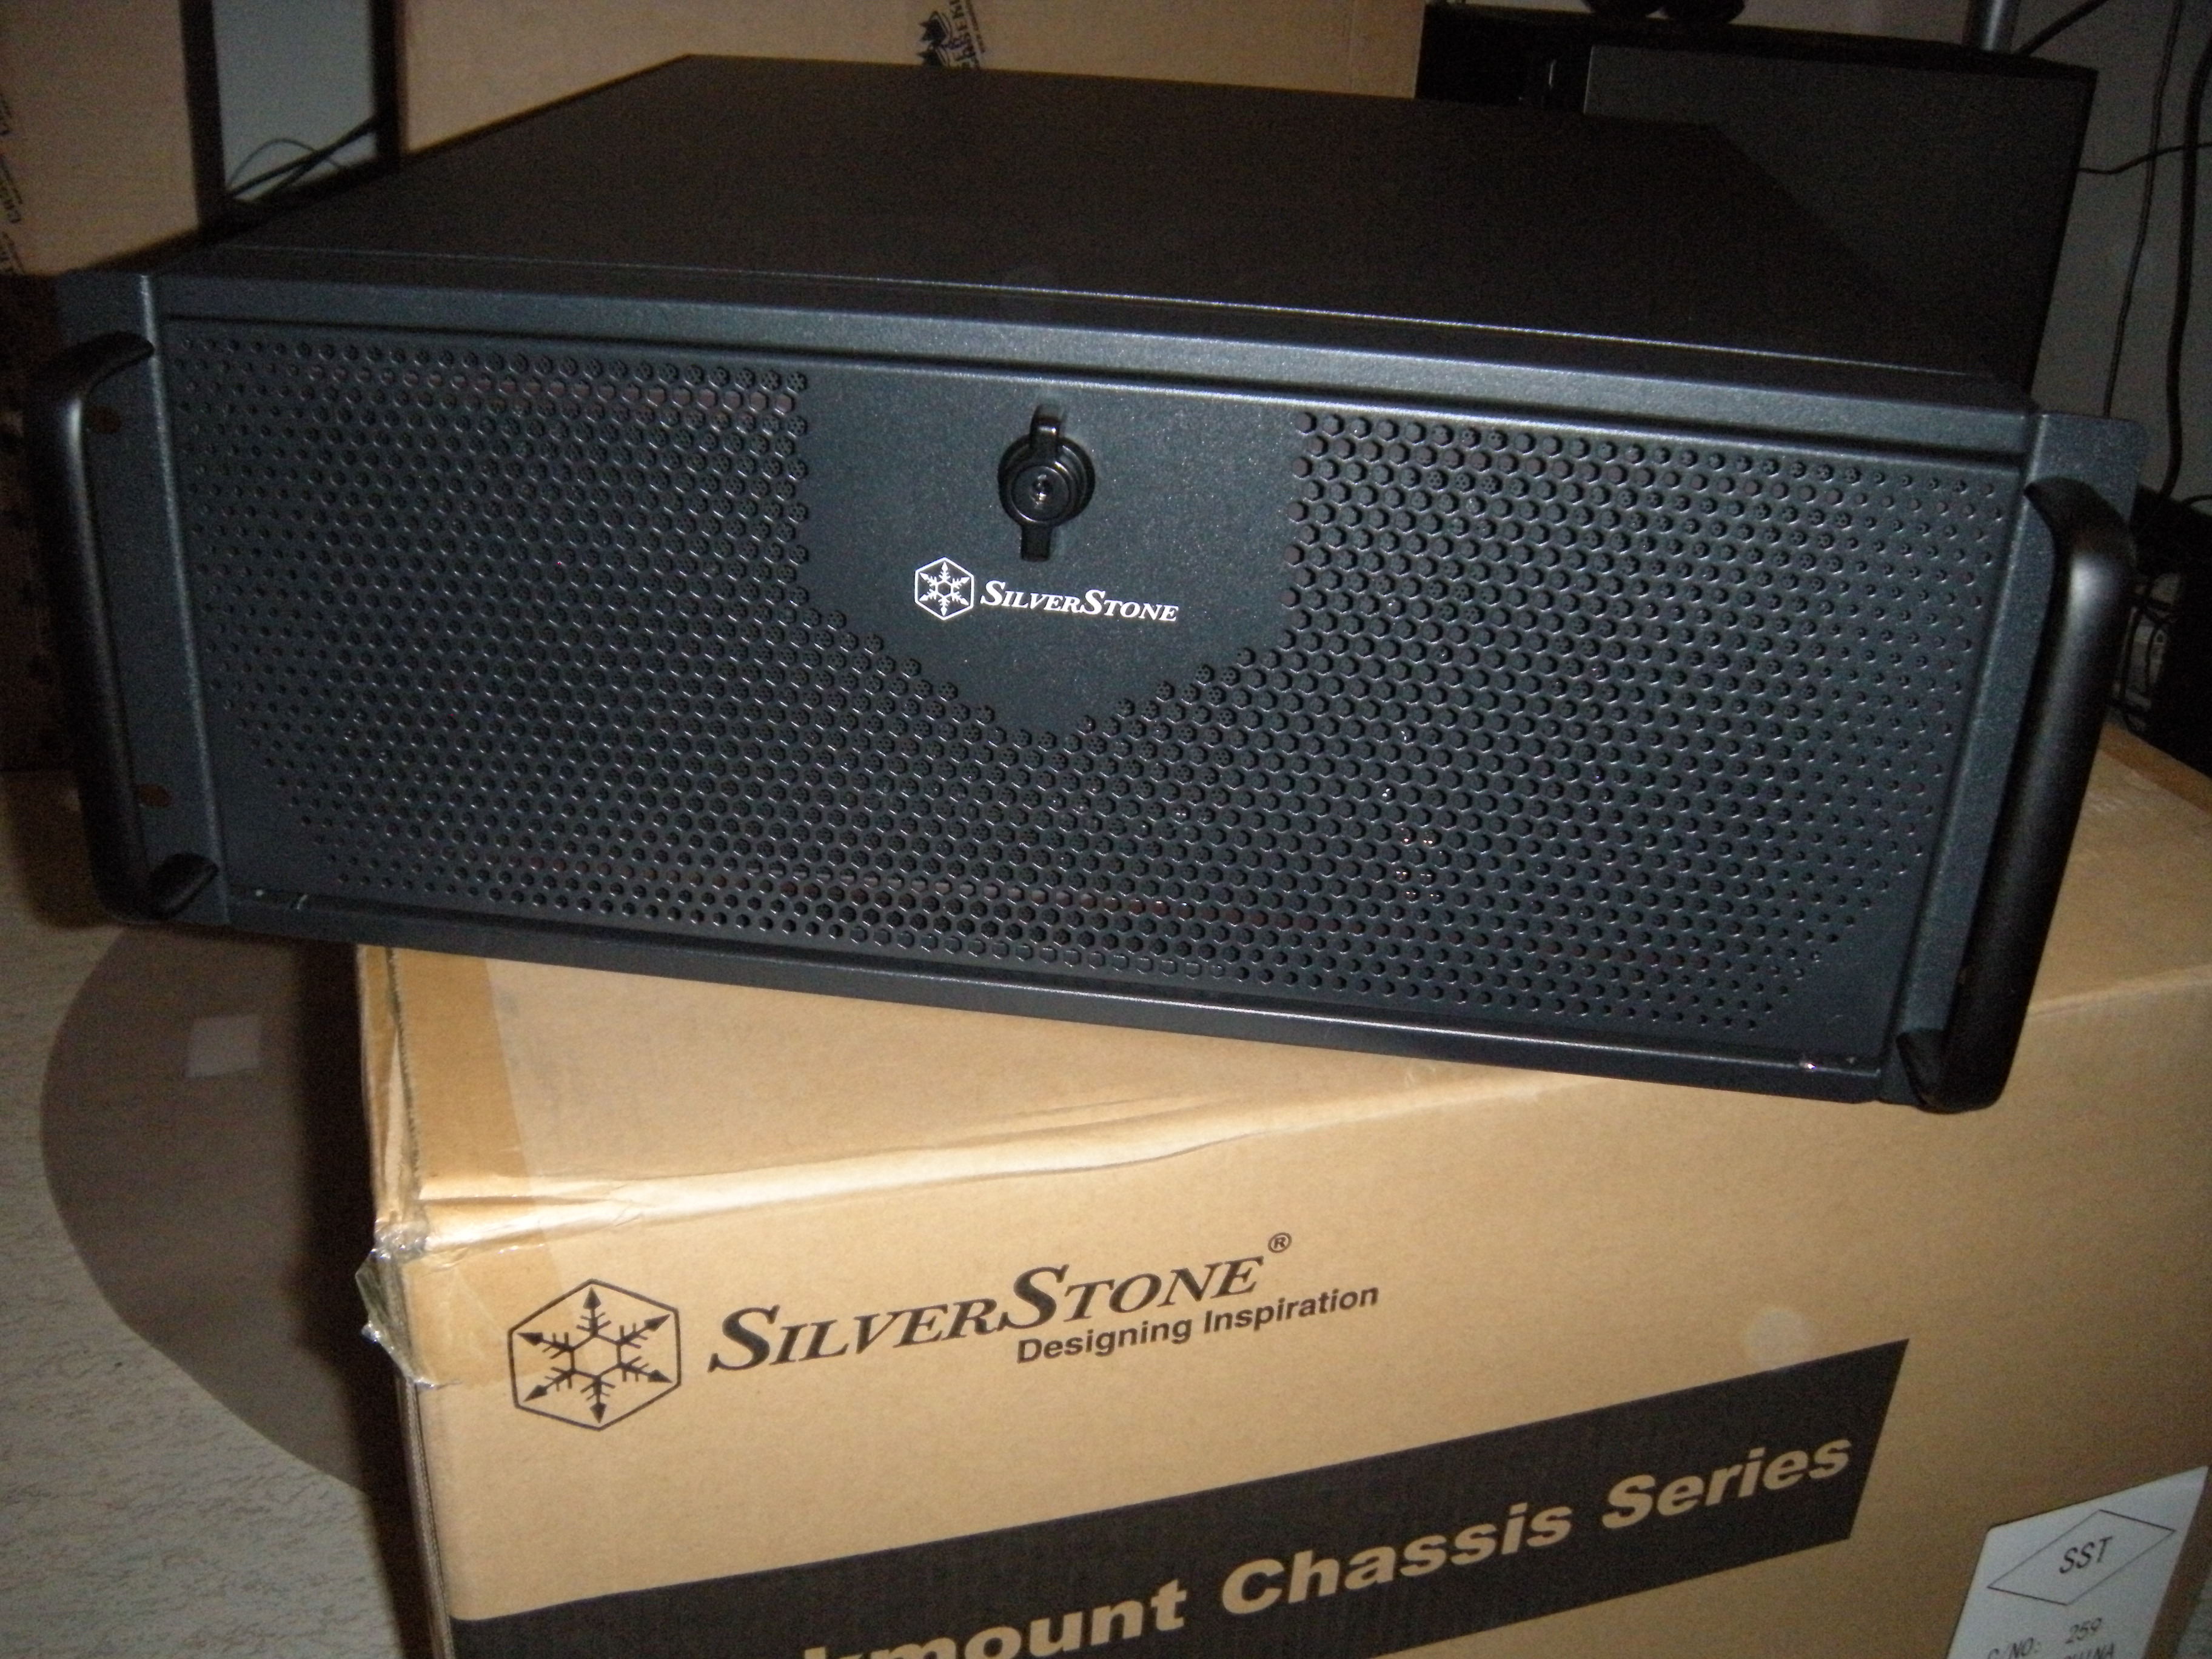
The only blemish I found was a paint issue where the top cover meets the front of the case (only on one side). Not exactly major and easy enough to fix.

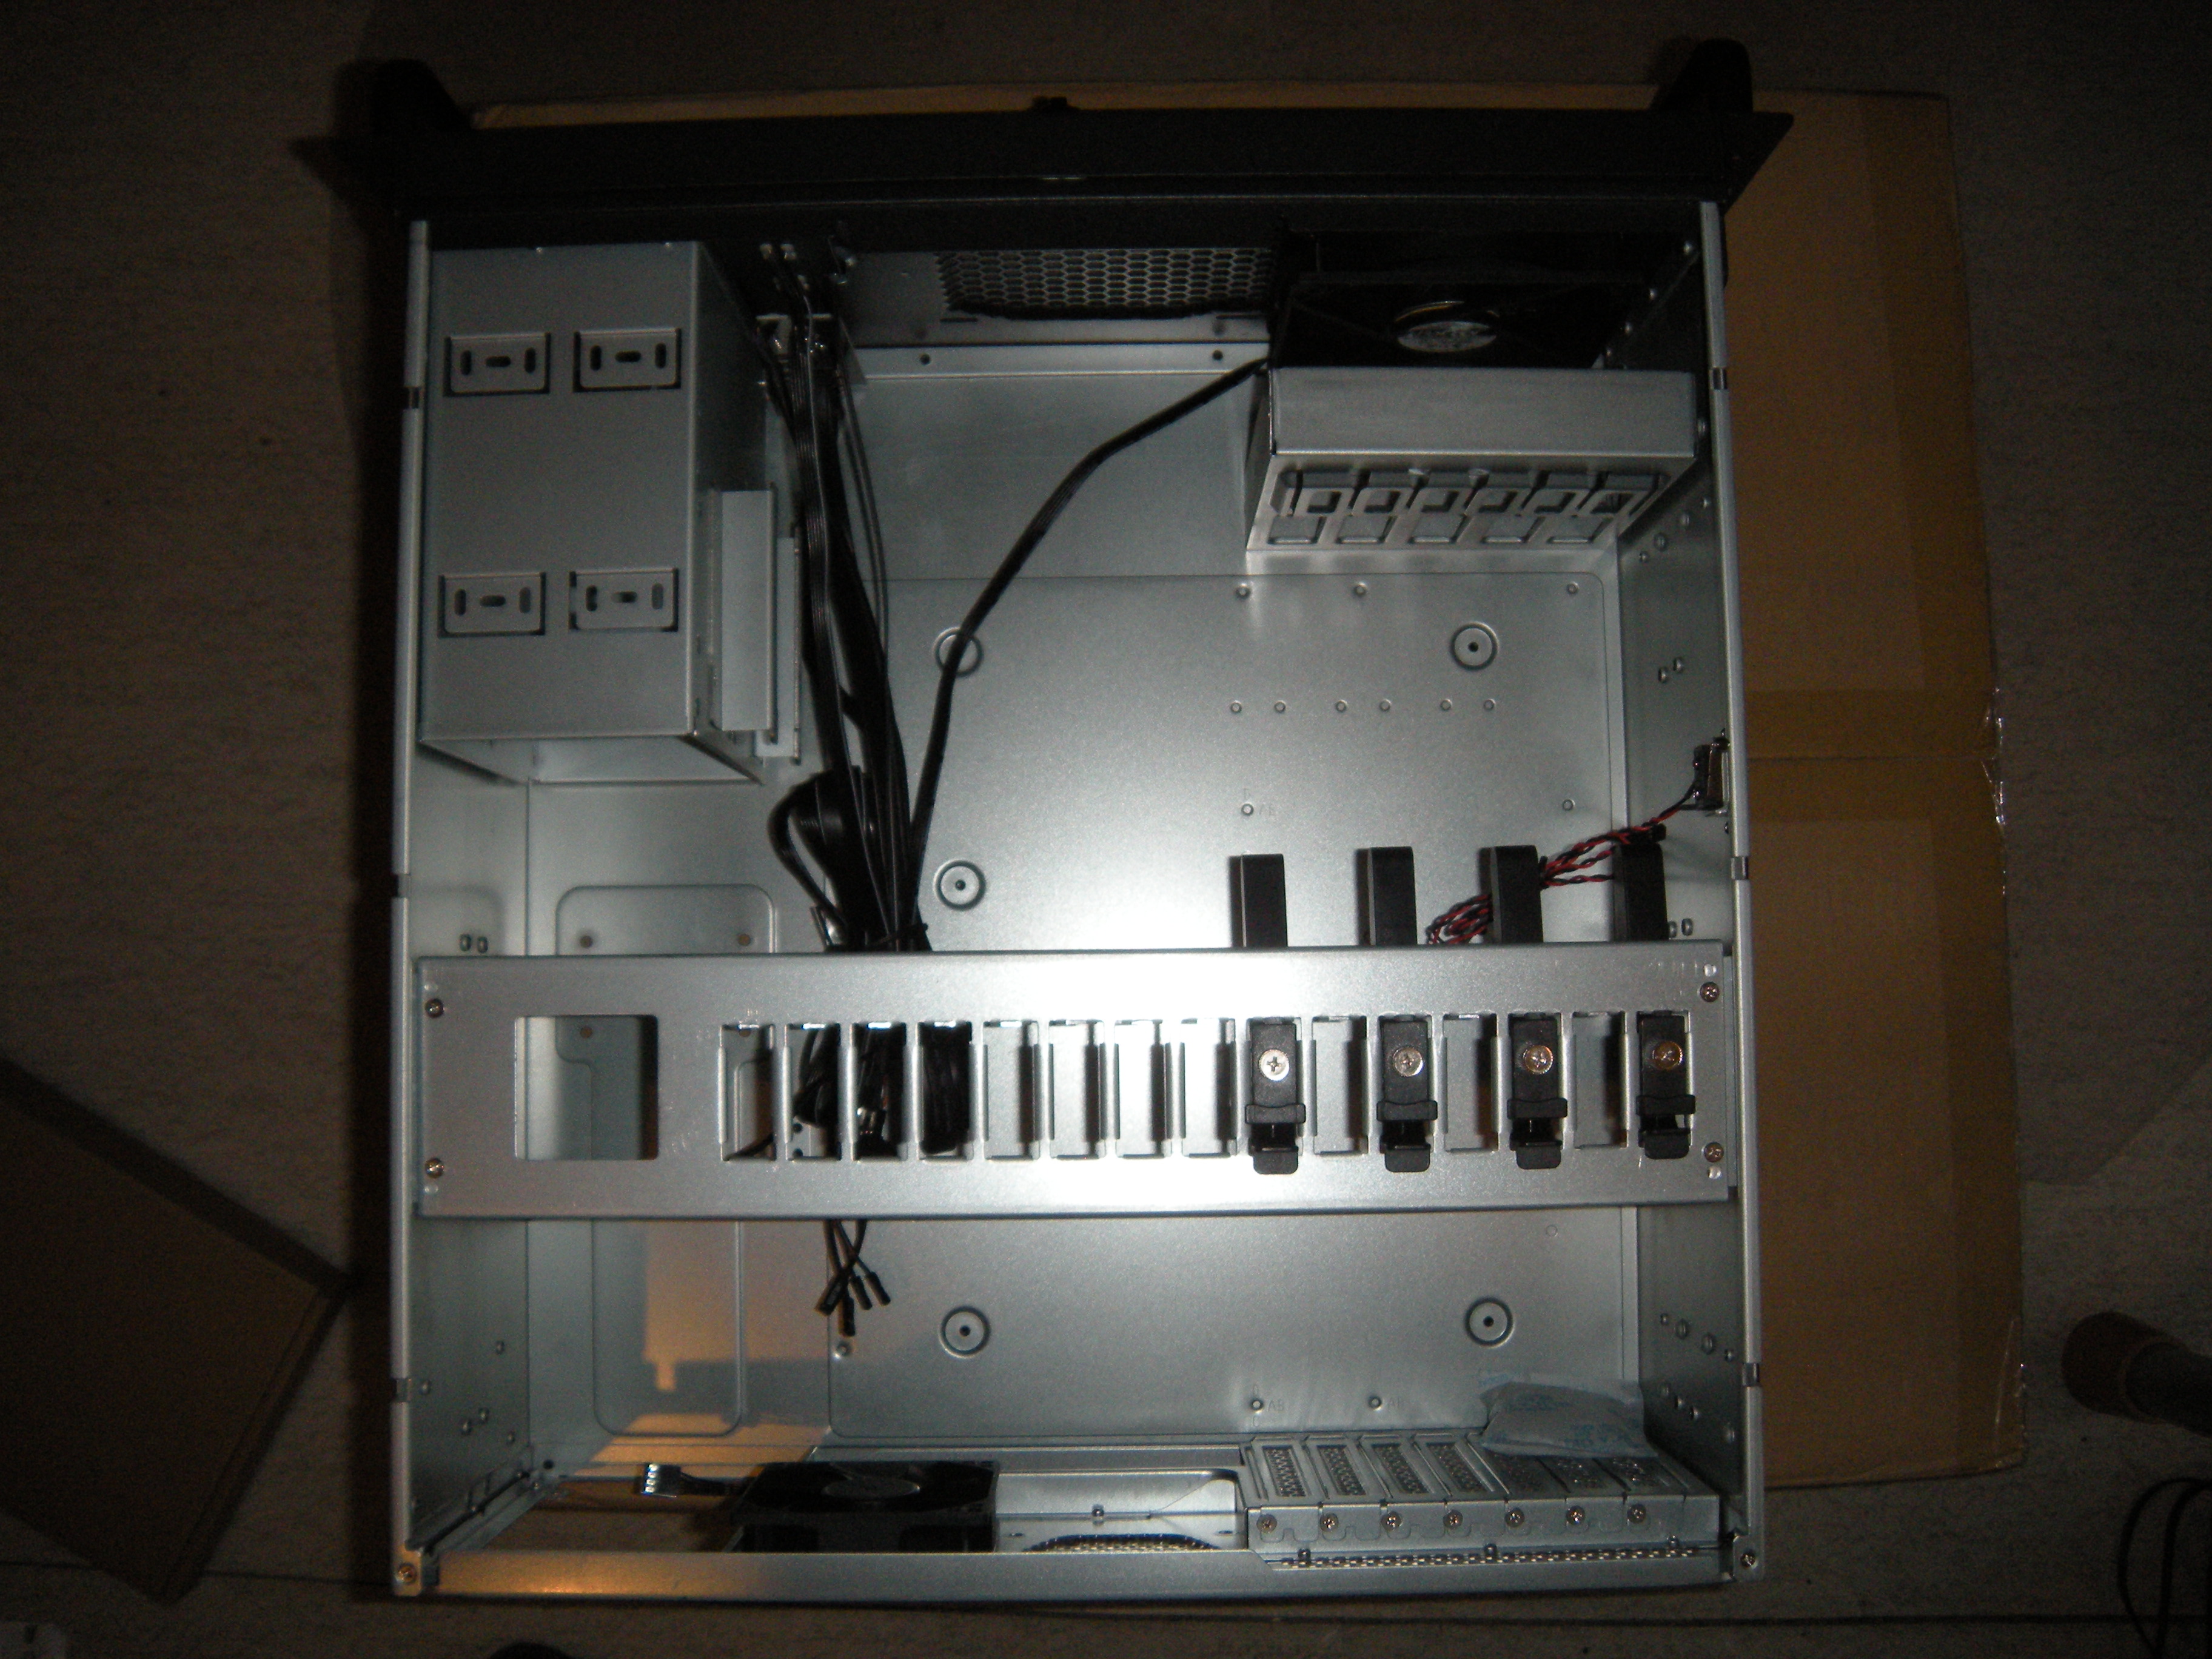
Layout before I started messing with things:

The chassis came with two fans, a 120mm in the back and a 240mm in the front (both PWM). They are branded as “be cool” and are ball bearing. I never ran the front one, since that’s where the AIO went, so don’t really have any comments on it. The back one was mounted improperly though, the screws seemed overtightened, and it sounded like it was hitting something when running. Loosening the screws up a little fixed that.
I ended up adding a SilverStone SST-FM84 (non-PWM) fan in the second 120mm fan mount to help getting rid of hot air. The only reason I picked this fan is because I had it lying around from a previous project. I might at some point replace both with PWM fans.
There is a magnetic dust filter behind the door.
The chassis was easy to work in, and I was able to just transplant the motherboard without removing the AIO.
Things of note:
- it didn’t come with any motherboard stand-offs installed by default, which means no “fixed” ones either, which could be a good thing when using some non-standard motherboard.
- the front-panel audio cable could have been slightly longer so it could have been routed a bit cleaner
- the AIO would rub against the SSD mount, so I added some padding to avoid damage. Note that while the inside of the chassis is well finished, so the risk of ripping up your hands is pretty small, it’s still a metal edge rubbing against those hoses, which will vibrate due to how the pump is mounted.
https://bdp.uni.cx/~dragon/shots/acedia/2/IMG_20210128_164735.jpg - had to remove the PCI retention bracket as it was hitting the AIO screws, a few more millimetres there would have made it fit.
- removed the anti-sag protection bracket as it was hitting the GPU. Didn’t really try to make this work either, maybe it would have been possible.
While installing the PSU I also bumped into a little problem:

The “DF” (Dust Free, a tech where they run the fan in reverse occasionally to minimize dust build up on the fan blades) switch hits the PSU bracket.
Most consumer cases have more open space between those top two mounting holes. Most, but not all. So it would be nice if Enermax could move that button a couple of mm as it also already caused problems in the temporary chassis I was using earlier.
I considered cutting out space for the button, but ended up just adding some washers to make things clear as I didn’t really want to start modifying the chassis, nor the PSU.
Since I haven’t figured out quite how I want to mount the chassis to my desk I’ve set it up vertically for now:


I would really not recommend this chassis if the plan is to use it in this fashion as it’s really inconvenient to work on like this:
- one of the top cover screws is hidden behind one of the feet. Meaning you need to remove the foot to get at the screw. I’ve “solved” that for now by just not adding that screw (the other 3 can be reached fine)
- the screws for the 5.25" drive cage end up behind the plate that has the chassis handle. Leaving those off isn’t really an option as that plate is used for mounting the door to the chassis. (of course, could leave the door off, sidestepping that issue)
- when using two hard drives one of them end up being upside down in this position. While modern drives should work just fine upside down, they clearly aren’t all super-happy doing so: one of my X300’s started making a rather annoying whining noise like this.
EDIT: forum seems to have problems getting at the images. Not sure what’s going on there as I can reach the server just fine.
EDIT2: well, waiting a night fixed that issue 
5 Likes
pfSense 2.5.0 got released. Upgrade went without a hitch.
Tried setting up Prometheus node-exporter, the feature I had been looking forward to in 1.5, but it doesn’t want to start, so I’m going to have to do some digging into that, later…
1 Like
Will you be trying out wire guard?
Eventually, given that we can’t go anywhere with the … situation it’s not at the top of the priority list right now…
I did consider maybe getting a VPS and routing traffic through there. If I actually give that a go then Wireguard sounds like it’d be a good fit.
2 Likes
Got a case of the crazies trying to sort this out:
* Last emerge --sync was 3y 229d 3h 53m 22s ago.
Trying to revive the first system I specced, paid for, and built. Reinstalling is probably easier, but well, let’s see if I can rescue this ancient Gentoo install, just because I’m a masochist.
# head -n 1 /var/log/emerge.log
1141928285: Started emerge on: Mar 09, 2006 18:18:05
Specifications:
| Motherboard | Asus A7v333 |
| CPU | Athlon XP2000+ |
| Memory | 512MB |
| GPU | GeForce 4 Ti 4200 (no idea what brand) |
| Sound | Creative Labs SoundBlaster Audigy rev03) |
| NIC | Realtek RTL8169 based |
Not sure what the harddrives are exactly, though I know one is a Seagate Barracuda and the other is some kind of Maxtor.
Suffering from an annoying hardware issue, namely a PS/2 port that is freaking out (plastic pin in an old keyboard’s PS/2 connector broke off, which I think caused some issues), making it impossible to get into the BIOS (and if I do manage to get in things lock up shortly). Not really sure what to do about that one. Once I get past the BIOS USB keyboards works fine, but PS/2 keyboards just have all the lights lit and don’t do anything.
I did look if I couldn’t find a “new” motherboard, but jeez, those prices. Not to mention that they’re all “inferior” models (this one has the raid controller, so it has 2 additional EIDE ports)
Well, managed to boot into a livecd, so let’s get this party started. Wish me luck
2 Likes
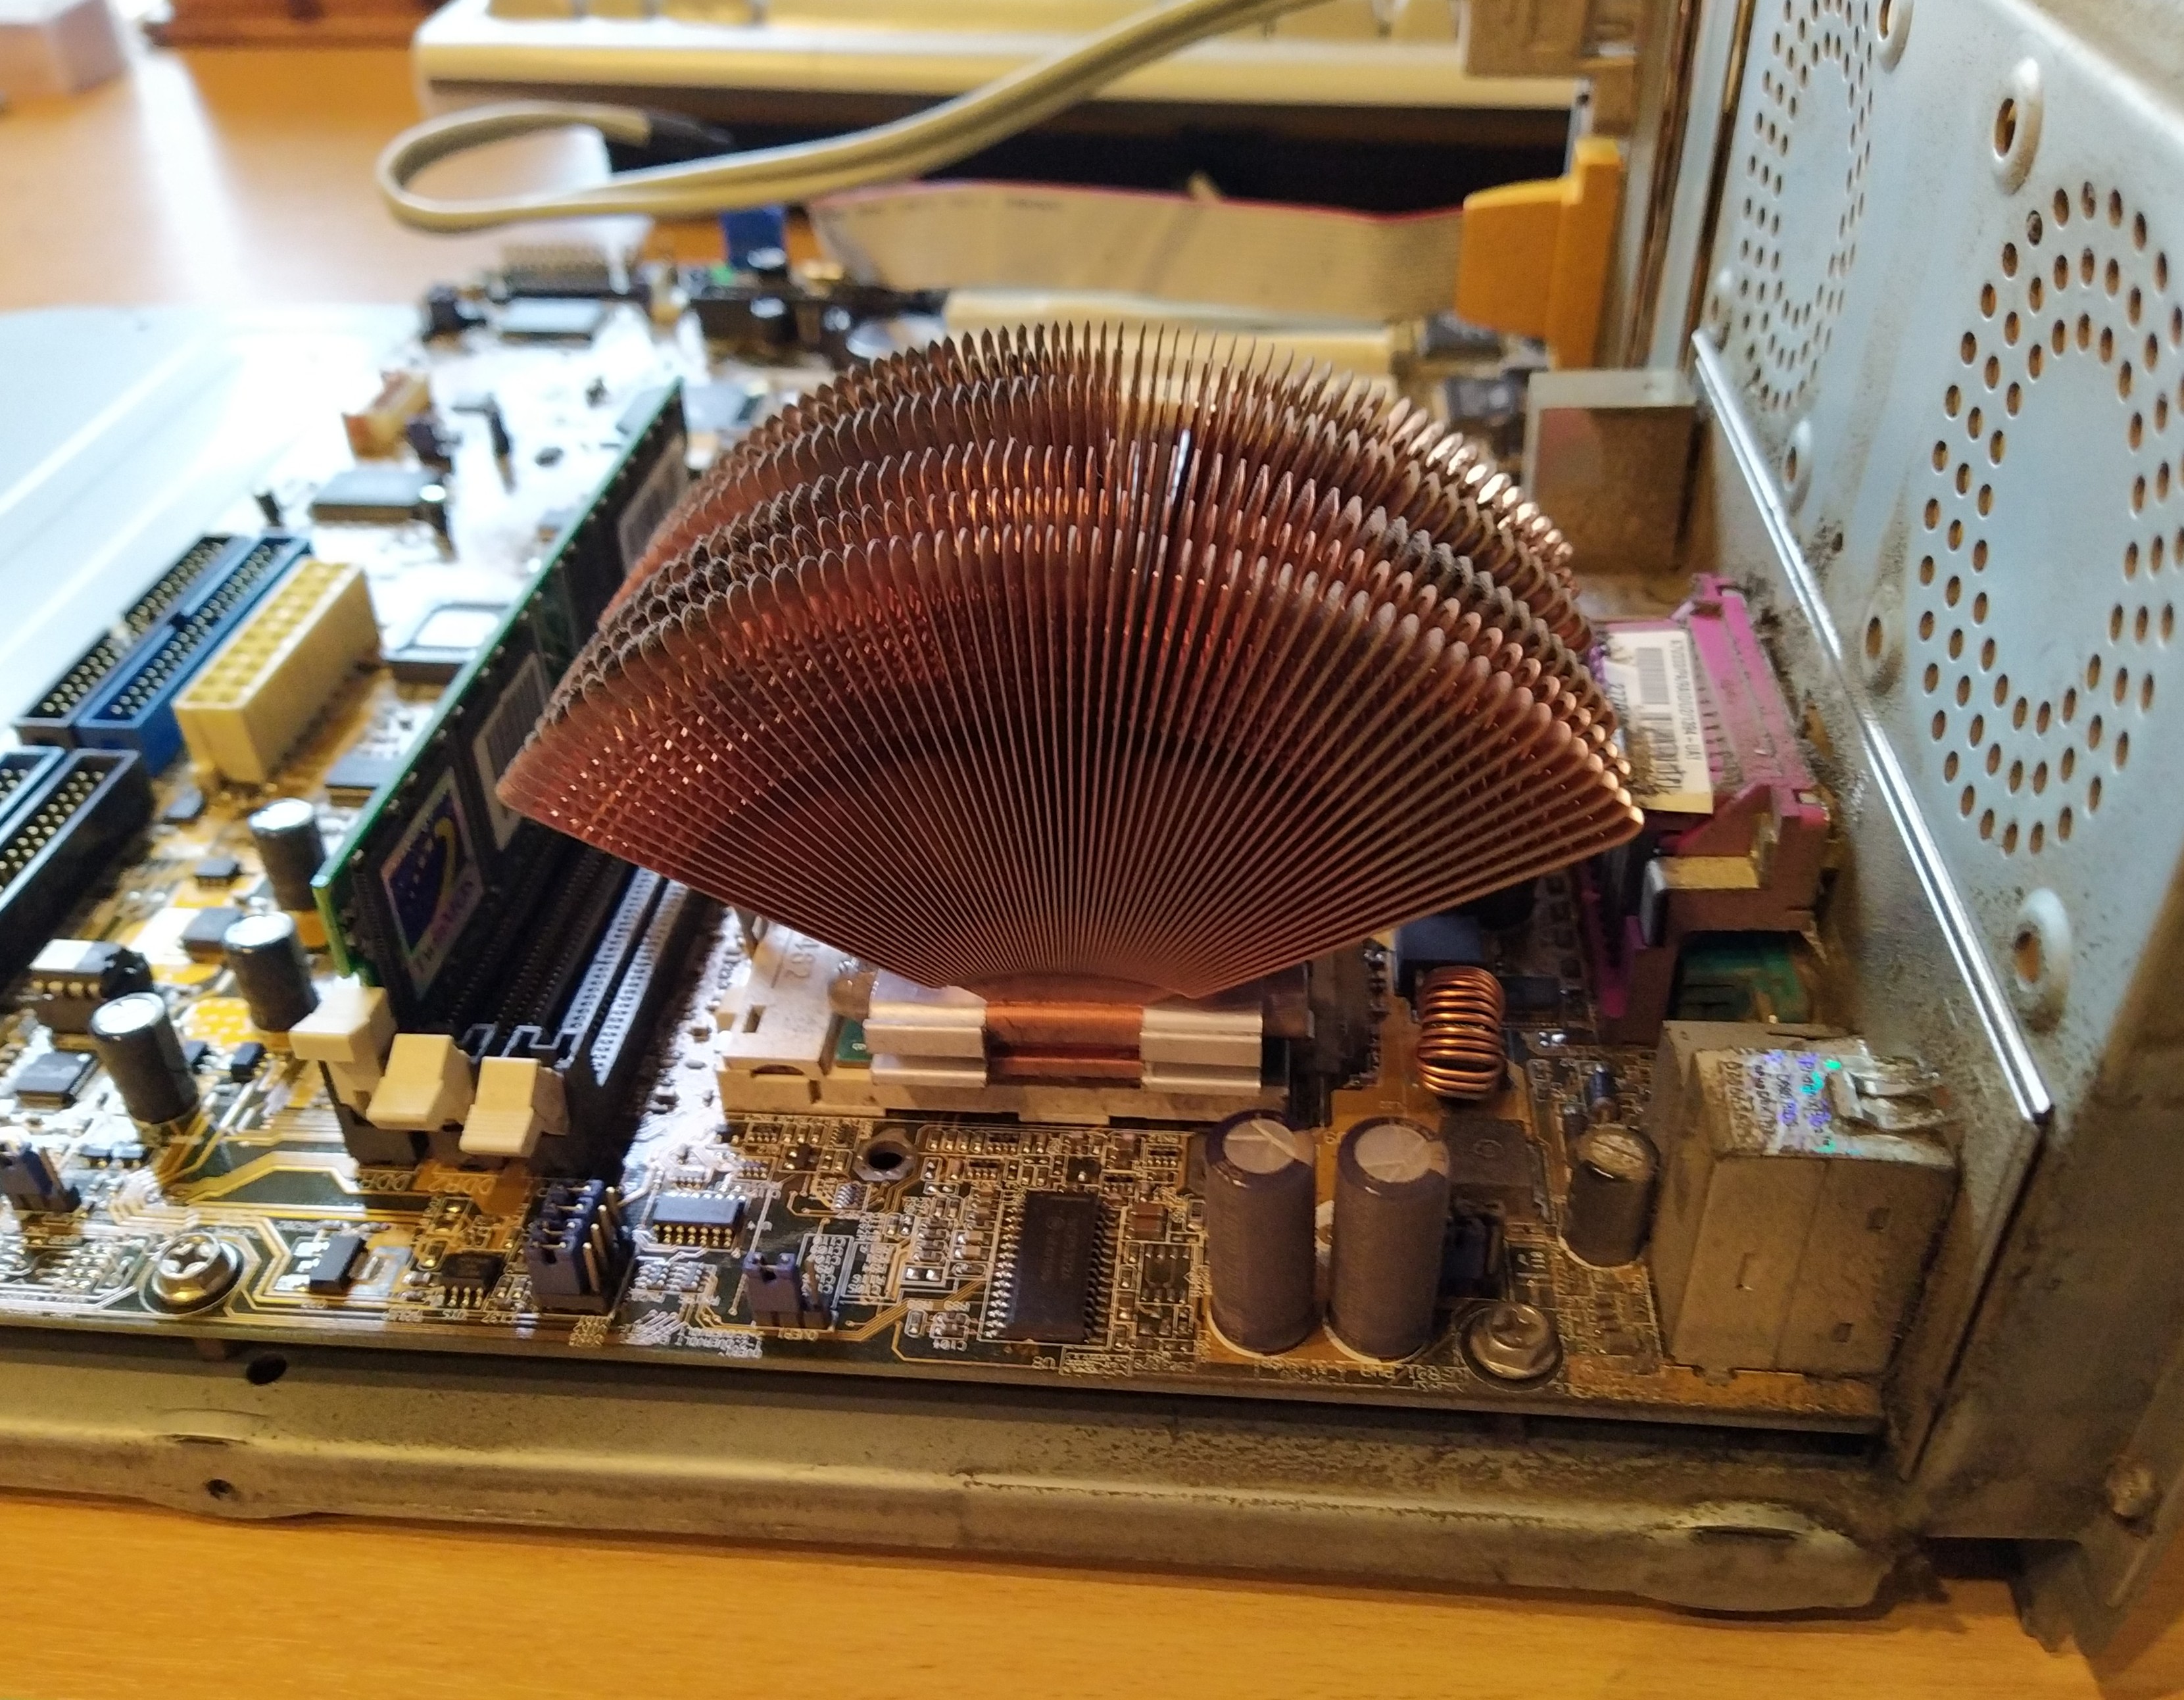
Replacing the passive cooler on the Xeon E5-2680 v2 on a Supermicro X9SRL-F

with the active version:
While I was at it I moved the system fans from the Fan 2 to the Fan A header, resulting in them running slower and spinning up separate from the CPU, which in itself already would have fixed one of the big annoyances, namely that any CPU load would spin up all the fans (after which they have the annoying tendency to not spin down again…)
Result:
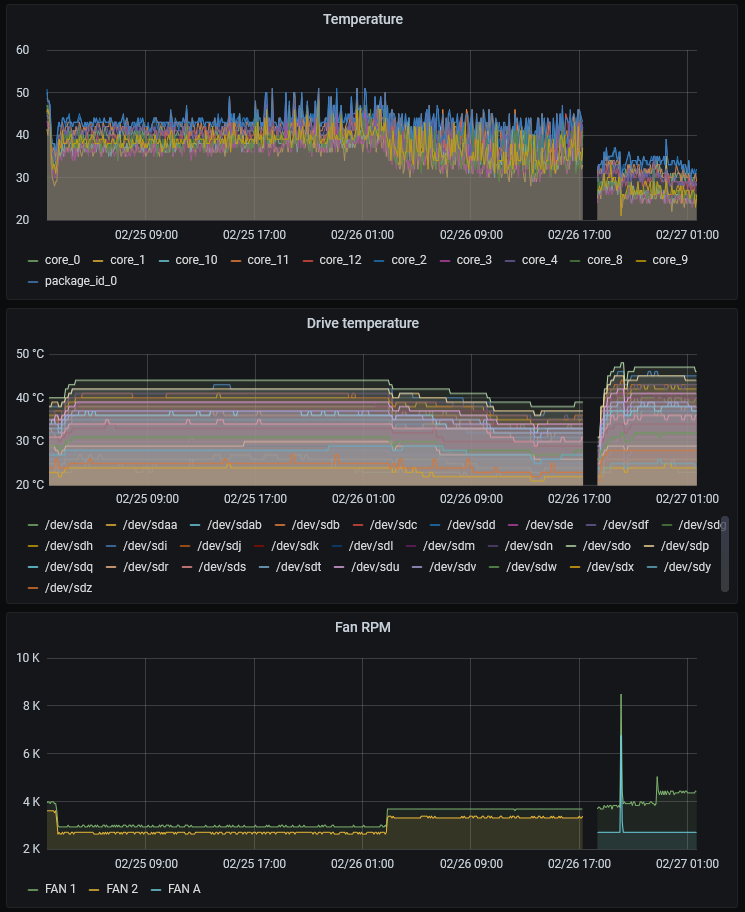
CPU temperatures are way down with the CPU fan sitting at around 4000rpm.
Drives got quite a bit hotter but are still well within spec with the chassis fans spinning at a fixed 2700rpm.
1 Like
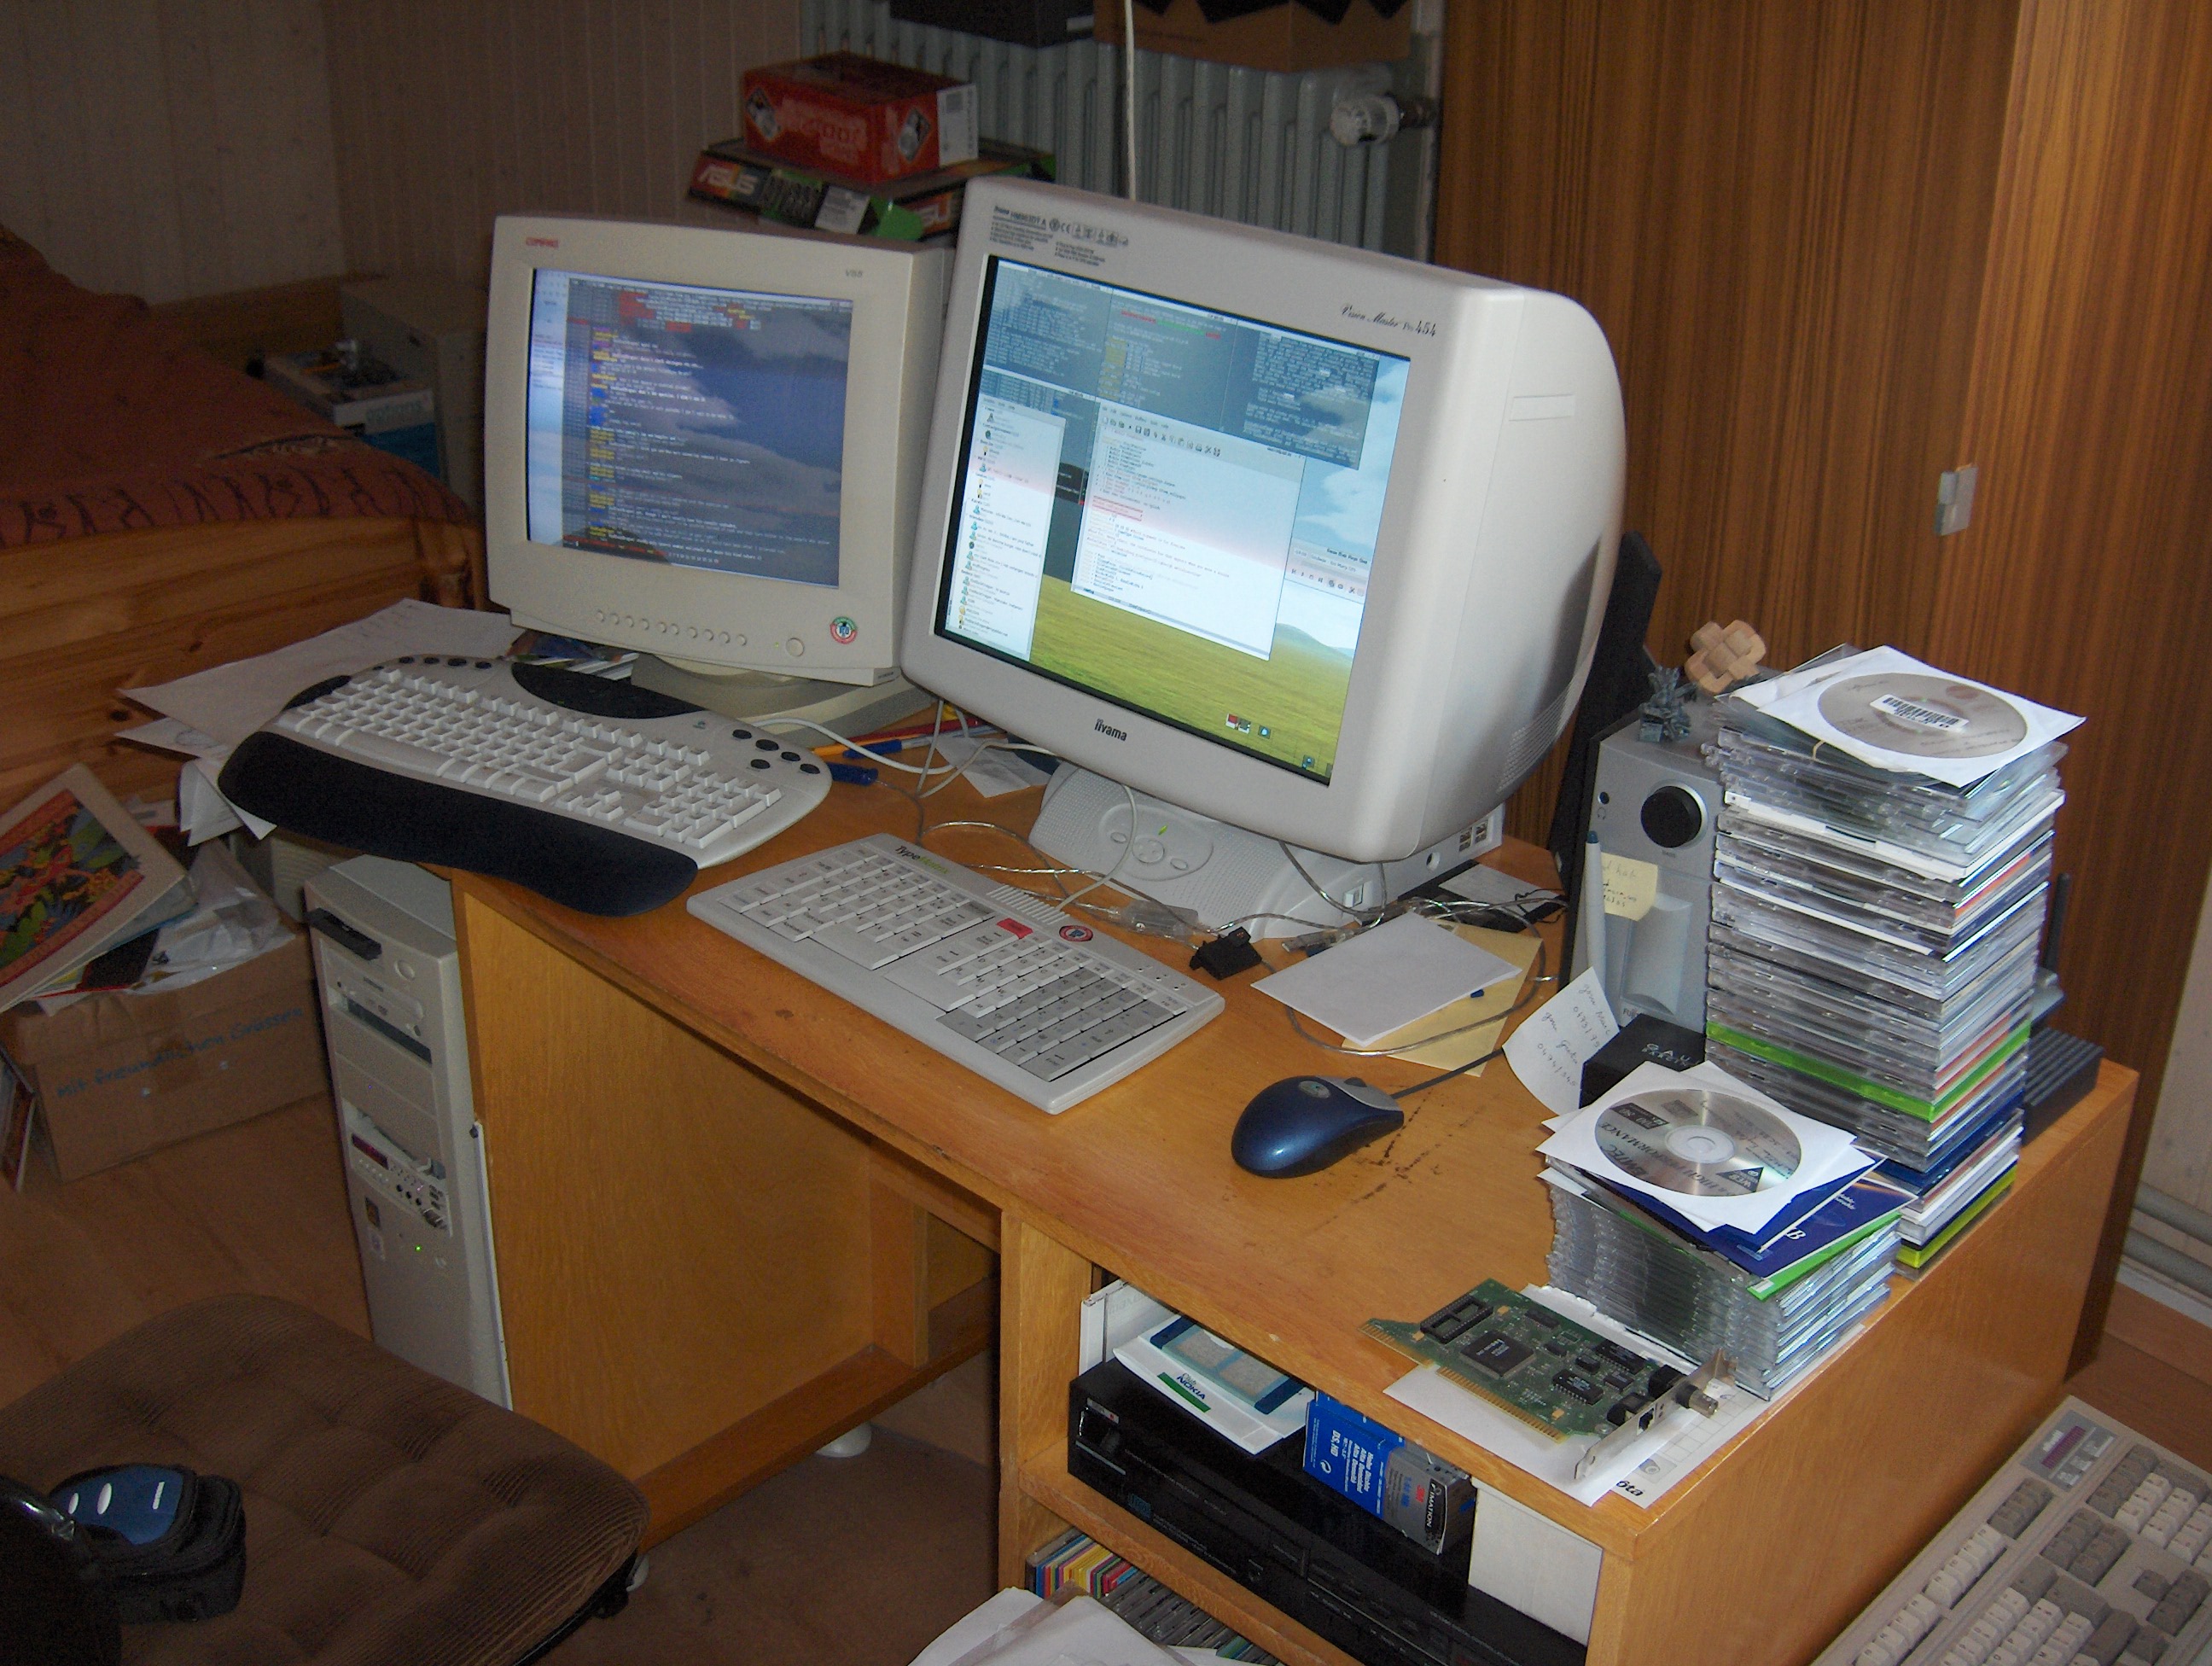
Since I just happened on these pictures, here we go. I rather like this system as it’s got some relatively odd stuff in there (by today’s standards anyway)
The CPU heatsink is a pretty sweet Zalman (of course, I dusted it off…after I took the picture…  )
)
The GeForce 4 cooling solution has a bit of a story attached. The GPU just shut off while I was gaming and I initially couldn’t figure out why, until I opened the case and touched it, and promptly burned my fingers. Turned out the fan had died. I don’t think GeForce 4’s had thermal shutdowns, or sensors (at least not exposed to the user), so I just lost video output.
Replaced the cooler with a passive Zalman one. Thankfully the card turned out to be fine. Shame it’s AGP, makes it rather unusable in any modern system…

Bonus, the system in it’s natural habitat, some 16 years ago…
1 Like
What’s that middle keyboard?
That was a TypeMatrix EZ-Reach 2020, the Dvorak version. Was starting to suffer some RSI related problems at the time.
Unfortunately the C-key broke at some point after I moved out and they stopped making these particular ones (they still have a smaller one). I rather did like having many of the keys that are usually used with the pinky, like return, on the thumbs.
Well, ended up configuring it today.
Basic split tunnel was a piece of cake and is pretty well documented in the pfSense documentation. Main thing that tripped me up was using the correct netmasks in the correct places.
Did initial setup on my phone, with the official Wireguard app I grabbed from F-Droid, but it probably would have been easier to use something a bit more convenient for debugging stuff.
Now considering whether I want to just automate Wireguard activation when I leave the local LAN, or whether I want to configure things so that I can just leave the tunnel open always…
On a sidenote, I also noticed AES-NI isn’t enabled on my router, unfortunately it’s one of the X9-series Supermicro motherboards that suffers from Y2k21 issues. Now, Supermicro was nice enough to actually provide a BIOS update, well past the EOL point of the boards, so that’s pretty damn awesome.
But still…BIOS updates on these boards still require messing with bootables and DOS utilities…blergh 
2 Likes
Depending on the model, you may be able to update the bios via IPMI web interface. But yes, I hate doing those upgrades. FreeDOS is no fun.
Also note that Wireguard does not rely on AES-NI as AES-NI itself would be a performance bottleneck compared to Wireguard’s crypto.
Unfortunately none of the affected X9-series boards support that feature (nor updating of IPMI through the web interface, for that matter), but if Wireguard doesn’t benefit I can at least ignore those BIOS updates for a while longer
Although now that I’ve gone through the pain of setting up a FreeDOS stick with large memory support for HBA flashing I should probably just take care of it…
On that note, flashing a PERC H310 to IT-mode was a bit more of a pain than I anticipated… I tried to follow this guide, except just using the DOS tools instead of the UEFI ones as I figured I might as well use my old desktop (it is “no UEFI support”-old )
That didn’t quite work out: after wiping the card it wasn’t seen by the sas2flsh utility (not a typo btw, the DOS tool is named that). So I went looking for a system with EFI support that I didn’t mind bringing down and settled on the IBM/Lenovo x3650 M4, since I haven’t really set that up yet (but it takes forever and a week to POST). So had to figure out how to make an UEFI shell boot USB and get the server to boot from it (F12 for boot menu → “boot from file” and pick the EFI image)… and had no success with sas2flash that way either: no adapters found.
Soooo, back to DOS to see if I hadn’t bricked the card. And lo and behold, on this machine the sas2flsh DOS program found the card and was able to flash it too. Weird, but I am not going to question it…
As to why I even bothered, since these cards support JBOD mode even with the Dell firmware: there are two versions of the PERC H310: a workstation and a server version. I got two of the workstation cards, and those appear to have some limits in the firmware as they loudly refuse to work with an expander card I have.
Here’s to hoping flashing them back to “stock” firmware gets rid of that limitation.
1 Like
Yeah, raid card jbod mode not to be trusted.
1 Like
Because they tend to mess with the disks, making them unreadable on another adapter, I already verified that’s not the case for these ones
I do have a 3Ware raid card that does mangle the disks you feed it though, even in “JBOD”-mode.
1 Like
They also tend to report writes as successful when they’re still ephemeral in the onboard cache.
1 Like
Absolutely abysmal pictures, but they’ll have to do…
This was the error the workstation Dell PERC H310 with stock firmware threw with an expander card connected:
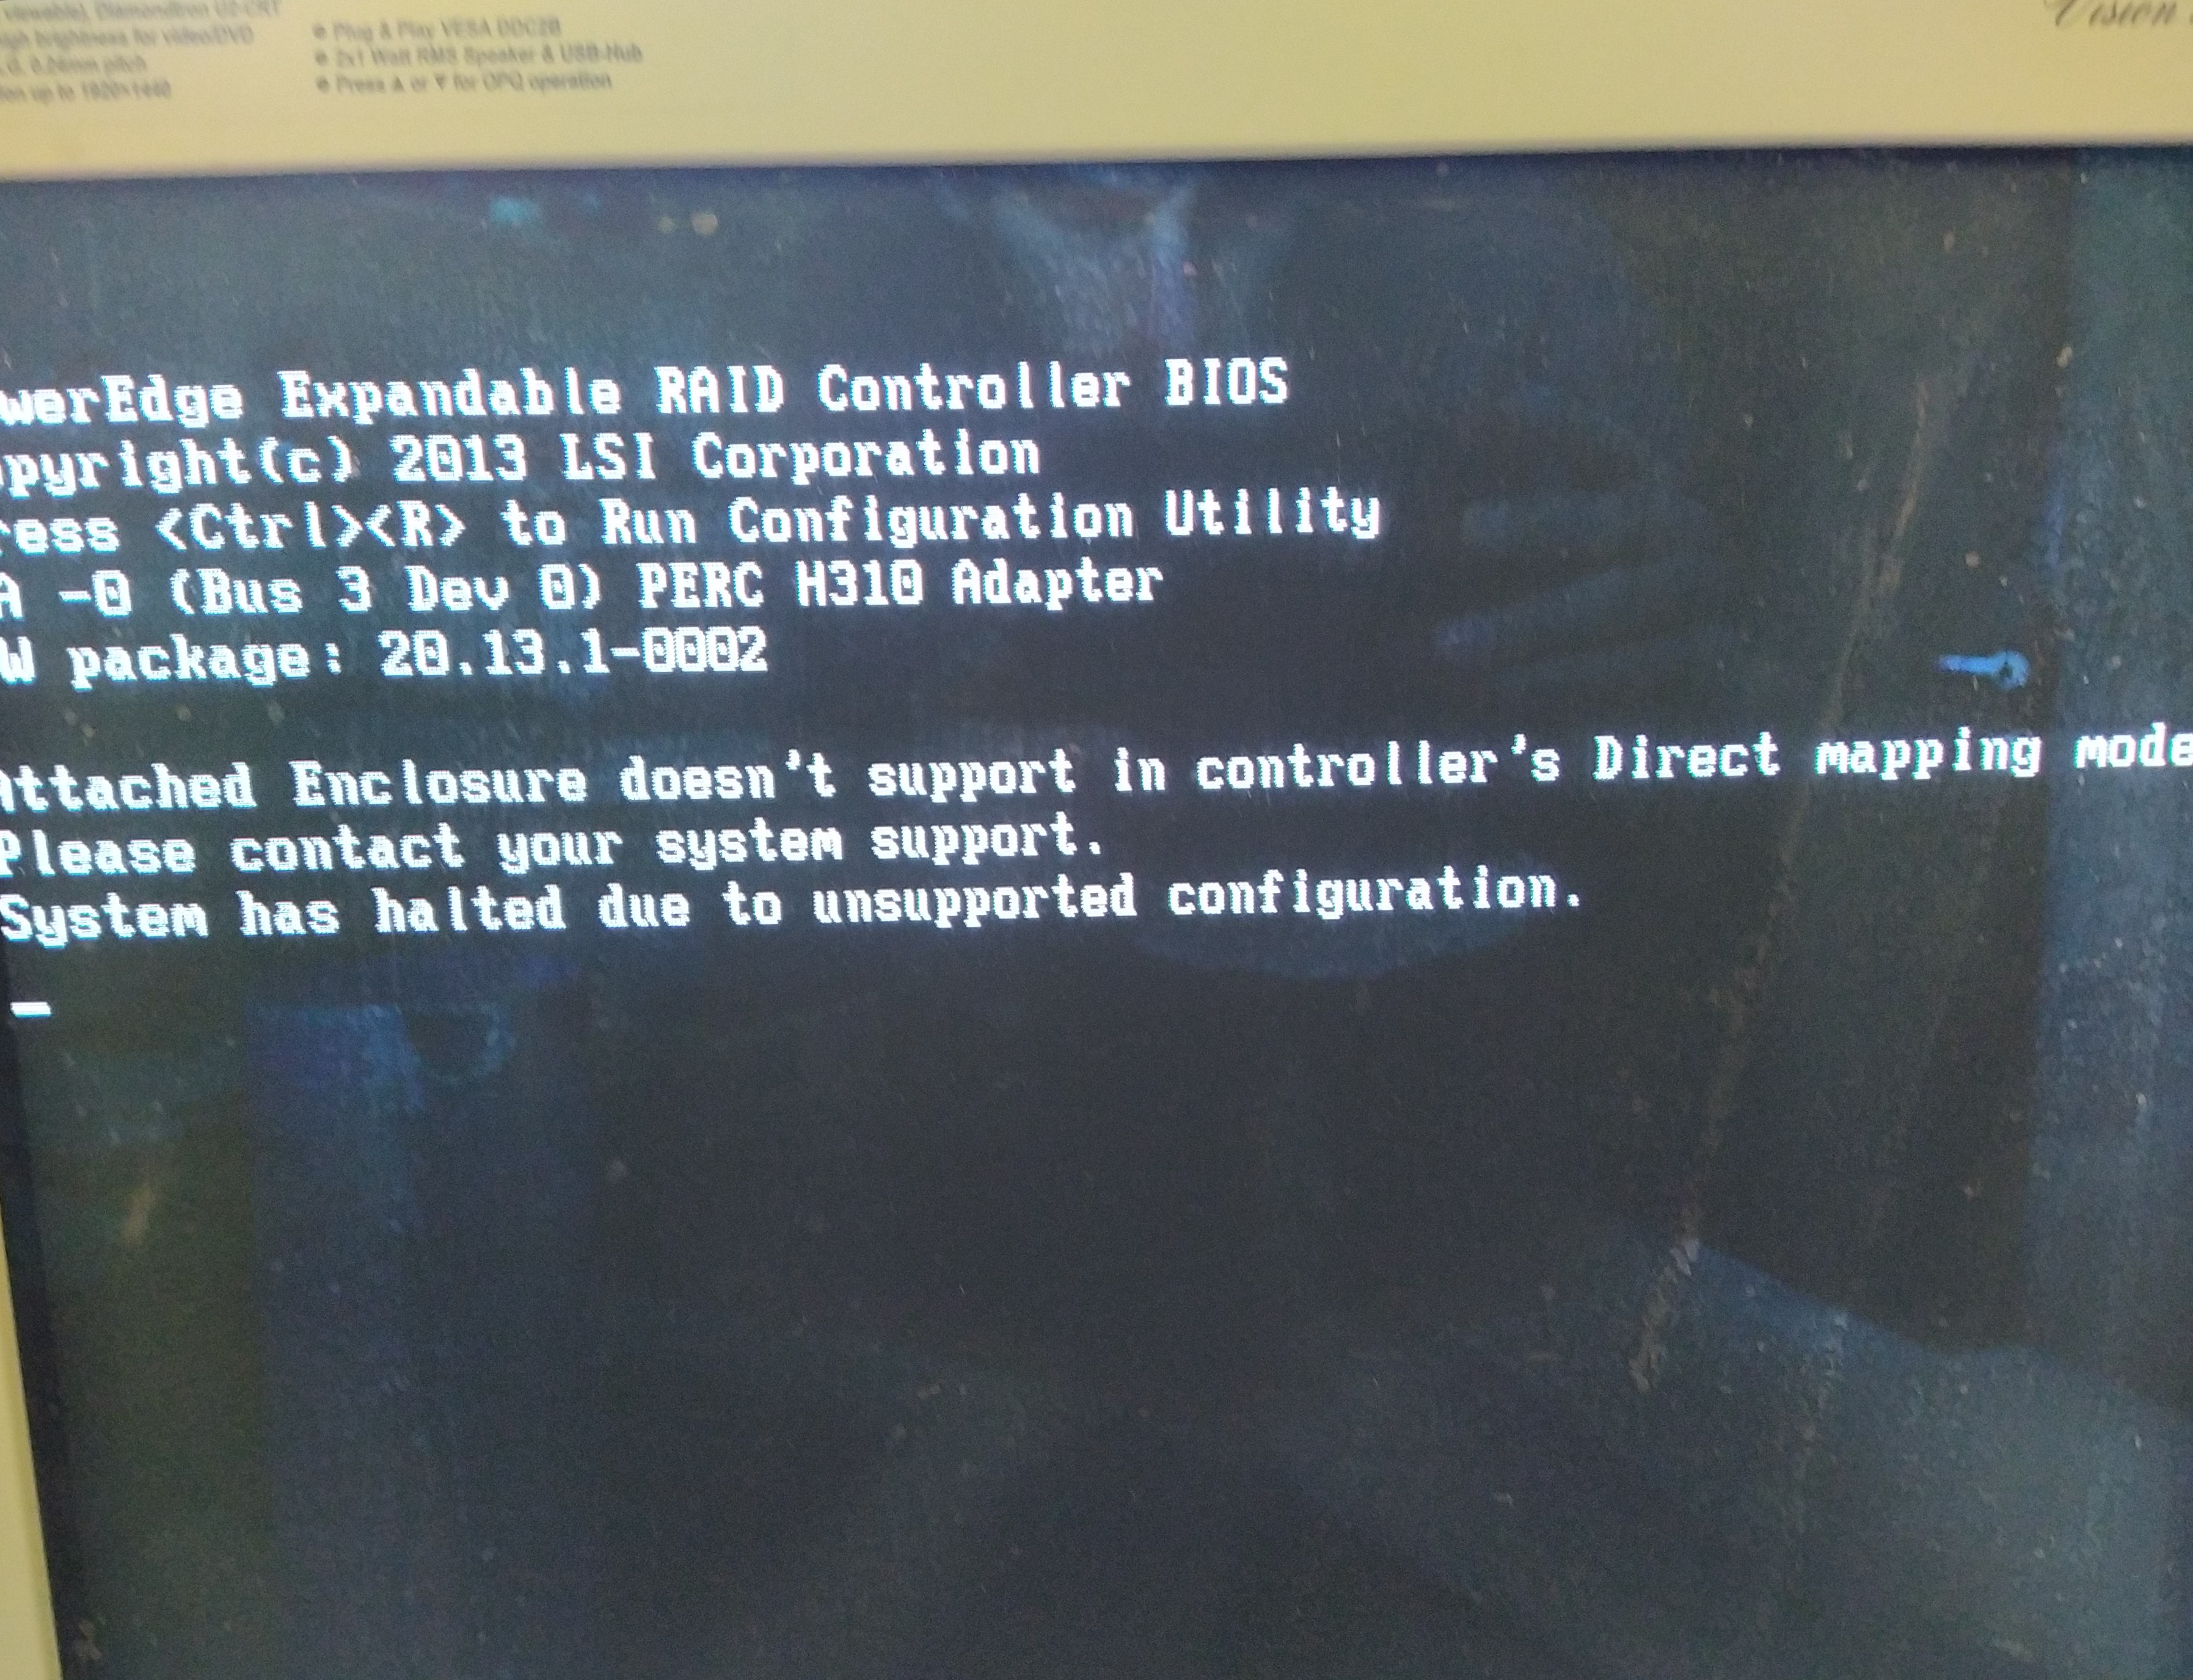
This is after flashing it to LSI firmware:

To save everyone’s eyes, the yellow text says RES2SV240 (spec here), which is an Intel SAS expander card.
Looks like some major drama around the FreeBSD WireGuard implementation.
This Reddit post kinda summarizes, and links, to what went down.
And here are some more details on the FreeBSD side of things, of note being the merge commit message for the “fix sprint” FreeBSD devs did on the WG implementation.
Have to say that the Netgate response isn’t exactly professional, to put it mildly.
Maybe should give OpnSense another look. I had some major issues with it last time I tried, but that was then, and things might have sorted themselves out in the meantime.
I would have to figure out a replacement for pfBlockerNG though, as afaiu OpnSense doesn’t have a drop-in replacement.
3 Likes