Cool, thanks! I’ve ordered them, so they should be here in a few days.
I’ve thought about getting a pi quite a few times, but just never actually pulled the trigger. If I do start getting into it I’ll have to order another one.
Cool, thanks! I’ve ordered them, so they should be here in a few days.
I’ve thought about getting a pi quite a few times, but just never actually pulled the trigger. If I do start getting into it I’ll have to order another one.
body{
  background-color: black;
  background-image: linear-gradient(to top right, gray, black);
}
Ended up looking around on w3schools for a while, just looking at things I thought I might want to use.
I’m also looking into Flexbox and I think I’m going to give that a try.
Anyway here’s my stopping point for tonight.
HTML
<!DOCTYPE html>
<html lang="en" dir="ltr">
  <head>
    <meta charset="utf-8">
    <title>EVE</title>
    <link rel="stylesheet" type="text/css" href="evecss.css">
  </head>
  <body>
    <div class="flex-container">
      <div>
        <img src="bolt_ev.jpg" alt="Bolt EV" width="300" height="200">

      </div>
      <div></div>
      <div></div>
      <div></div>
      <div></div>
      <div></div>
      <div></div>
      <div></div>
      <div></div>
      <div></div>
      <div></div>
      <div></div>
      <div></div>
      <div></div>
      <div></div>
      <div></div>
      <div></div>
      <div></div>
    </div>
  </body>
</html>
CSS
*{
  color: white;
}

body{
  background-color: black;
}
.flex-container{
  display: flex;
  flex-direction: row;
  flex-wrap: wrap;
}
.flex-container>div{
  background-color: #424242;
  margin: 10px;
  width: 600px;
  height: 200px;
}
.car_info{

}
Site
HTML
<!DOCTYPE html>
<html lang="en" dir="ltr">
  <head>
    <meta charset="utf-8">
    <title>EVE</title>
    <link rel="stylesheet" type="text/css" href="evecss.css">
  </head>
  <body>
    <div class="flex-container">
      <div>
        <img class="car_img" src="bolt_ev.jpg" alt="Bolt EV" width="300" height="200">
        <!--<p class="car_info"> Years: 2017, 2018, 2019 <br> Make: Chevy <br> Model: Bolt <br> Range: 238 <br> HP: 200 <br> Torque: 266 <br> 0-60: 6.5 </p> -->
        <table class="car_info">
          <tr>
            <th>Make:</th>
            <td>Chevy</td>
          </tr>
          <tr>
            <th>Model:</th>
            <td>Bolt</td>
          </tr>
          <tr>
            <th>Range:</th>
            <td>238</td>
          </tr>
          <tr>
            <th>HP:</th>
            <td>200</td>
          </tr>
          <tr>
            <th>Torque:</th>
            <td>266</td>
          </tr>
          <tr>
            <th>0-60:</th>
            <td>6.5</td>
          </tr>
          <tr>
            <th>Years:</th>
            <td>2017,</td>
            <td>2018,</td>
            <td>2019</td>
          </tr>
        </table>
      </div>
      <div></div>
      <div></div>
      <div></div>
      <div></div>
      <div></div>
      <div></div>
      <div></div>
      <div></div>
      <div></div>
      <div></div>
      <div></div>
      <div></div>
      <div></div>
      <div></div>
      <div></div>
      <div></div>
      <div></div>
    </div>
  </body>
</html>
CSS
*{
  color: white;
}

body{
  background-color: black;
}
.flex-container{
  display: flex;
  flex-direction: row;
  flex-wrap: wrap;
}
.flex-container>div{
  background-color: #424242;
  margin: 10px;
  width: 600px;
  height: 200px;
}
.car_info{
/*  float: right;*/
}
.car_img{
  float: left;
}
table{
  padding-left: 10px;
  height: 200px;
}
th{
  text-align: right;
}
Site
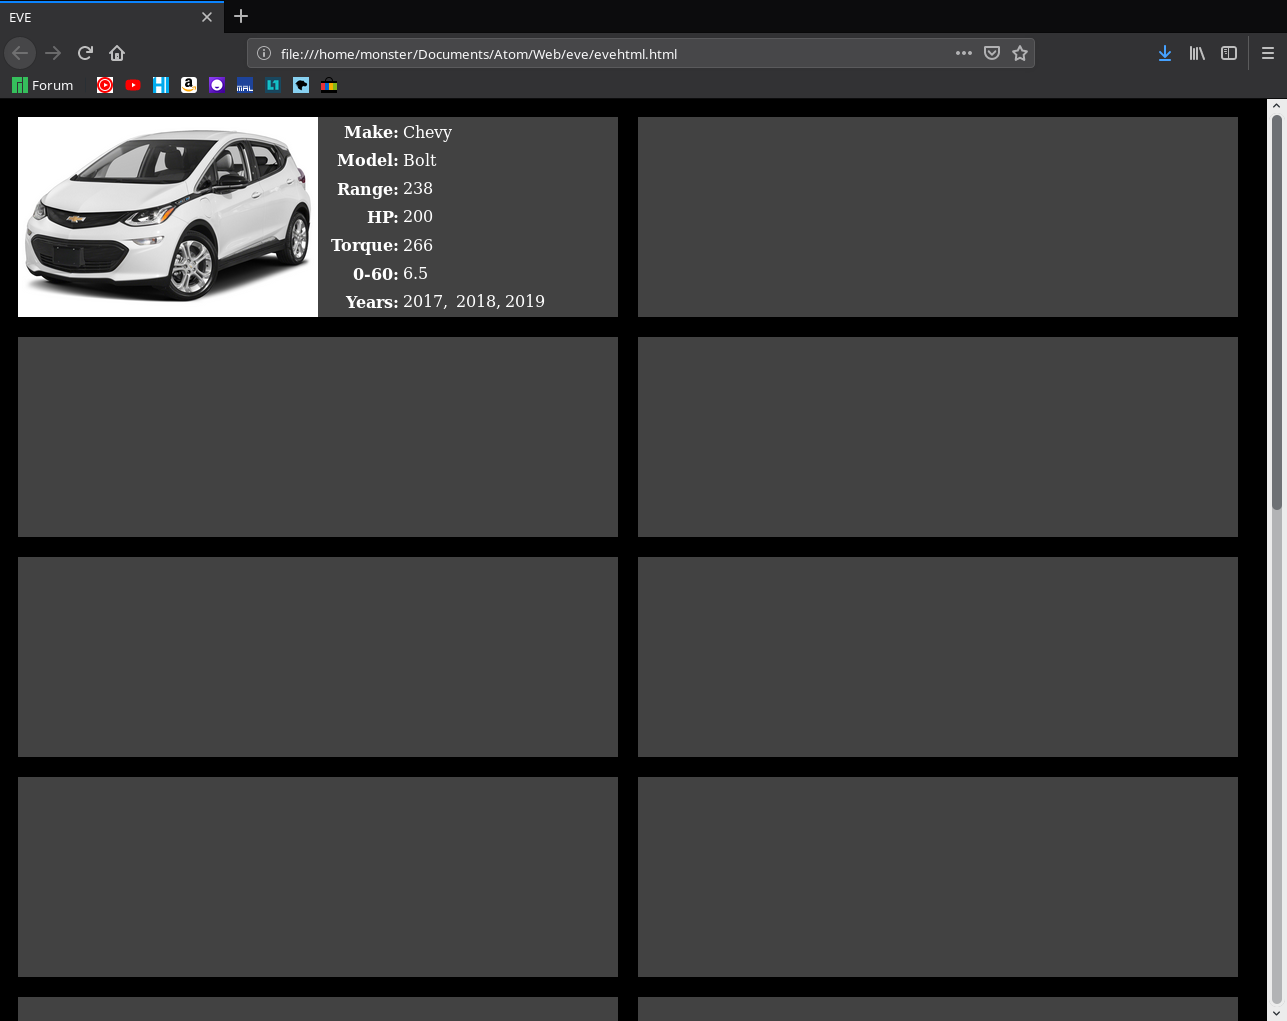
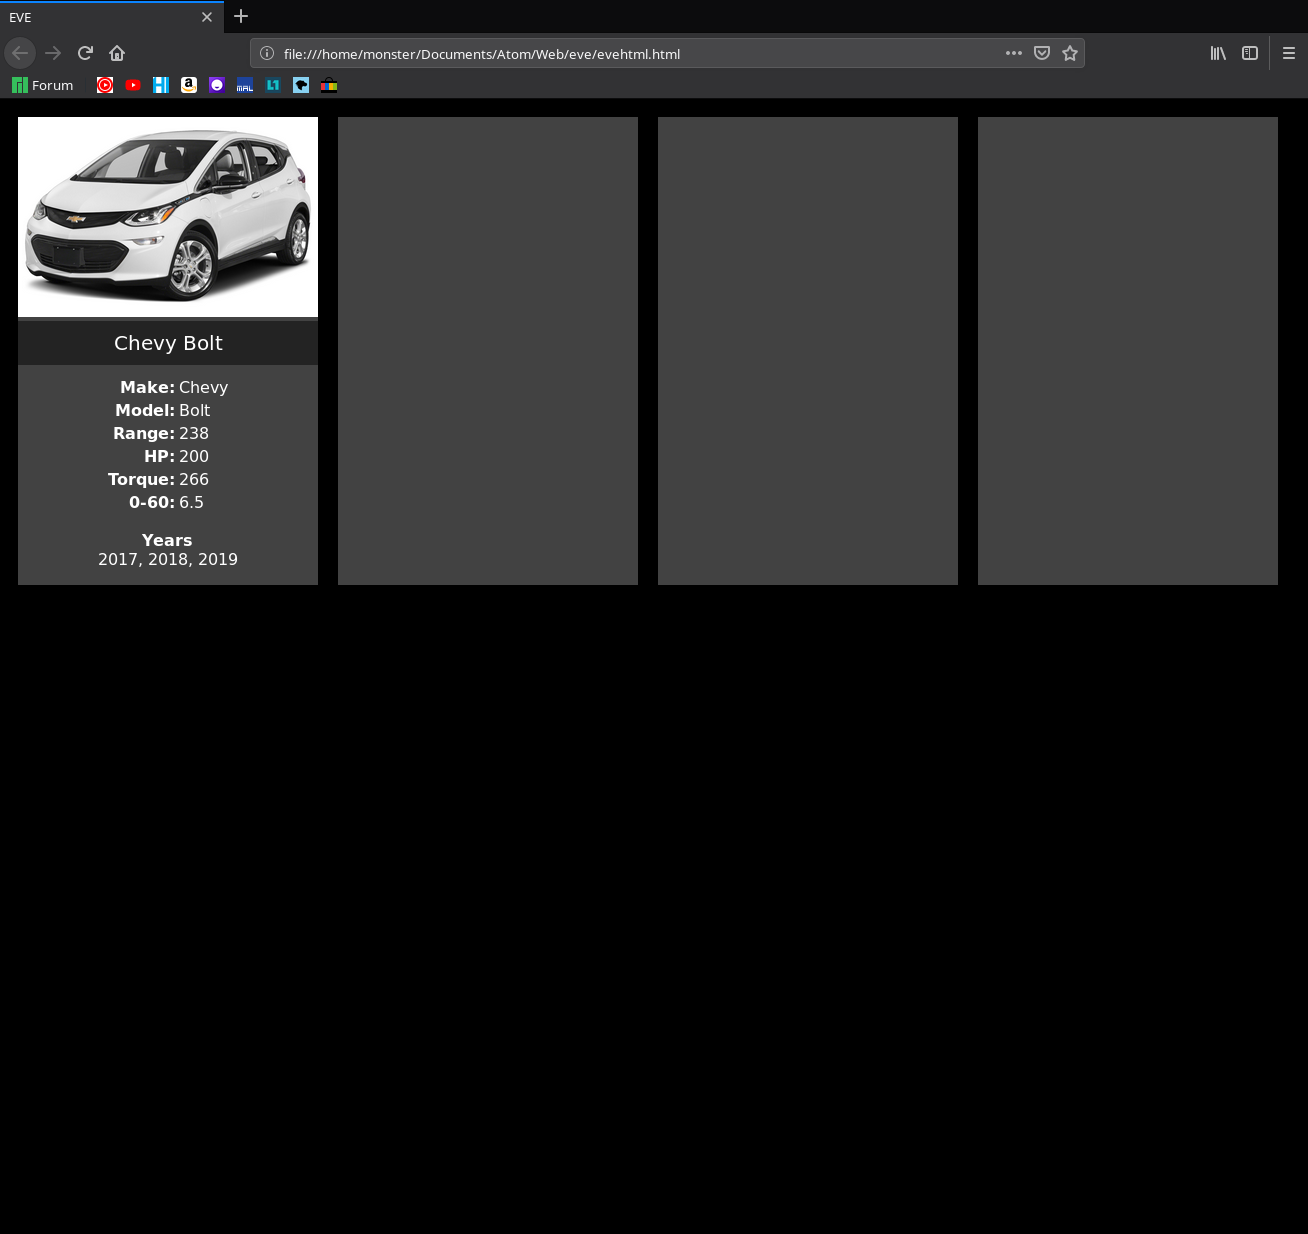
I’m planing on doing something like this, but I want to move the “make” and “model” either on top of the img or in front of the img. I don’t like that it’s kinda barried in with the specs. I want people to be able to easily see the make and model.
I just played around with my lay out for my site’s list. Still not sure but I’m liking this layout most so far, but the years could be a problem for cars that have been made for many years.
HTML
<!DOCTYPE html>
<html lang="en" dir="ltr">
  <head>
    <meta charset="utf-8">
    <title>EVE</title>
    <link rel="stylesheet" type="text/css" href="evecss.css">
  </head>
  <body>
    <div class="flex-container">
      <div>
        <img class="car_img" src="bolt_ev.jpg" alt="Bolt EV" width="300" height="200">
          <p class="make_model">Chevy Bolt</p>
        <table class="car_info">
          <tr>
            <th>Make:</th>
            <td>Chevy</td>
          </tr>
          <tr>
            <th>Model:</th>
            <td>Bolt</td>
          </tr>
          <tr>
            <th>Range:</th>
            <td>238</td>
          </tr>
          <tr>
            <th>HP:</th>
            <td>200</td>
          </tr>
          <tr>
            <th>Torque:</th>
            <td>266</td>
          </tr>
          <tr>
            <th>0-60:</th>
            <td>6.5</td>
          </tr>
        </table>
        <p class="years"> <b>Years</b> <br> 2017, 2018, 2019 </p>
      </div>
      <div></div>
      <div></div>
      <div></div>
      <div></div>
      <div></div>
    </div>
  </body>
</html>
CSS
*{
  font-family: 'Montserrat', sans-serif;
  color: white;
}

body{
  background-color: black;
}
.flex-container{
  display: flex;
  flex-direction: row;
  flex-wrap: wrap;
}
.flex-container>div{
  background-color: #424242;
  margin: 10px;
  width: 300px;
  height: auto;
}
.car_info{
/*  float: right;*/
}
.car_img{
  margin-bottom: 0px;
}
p.make_model{
  padding: 10px;
  margin: 0;
  background-color: #232323;
  font-size: 20px;
  text-align: center;
}
table{
  margin-left: auto;
  margin-right: auto;
  margin-top: 10px;
}
th{
  text-align: right;
}
.years{
 text-align: center;
 float: bottom;
}
Site
Still not using JS, but the gears are turning in my head for the future of this site. I’ll probably use it first to alow visitors to organize the list in various ways.
I got started late, so I figured I’d end it late. I’ll shoot for an hour a day for the full 31 days.
Edit: Haha, I just realized I didn’t take the make and model out of the spec section. I’ll take care of that tomorrow.
Instead of listing individual years maybe use a range like 2017-2019 could even write a loop that counts consecutive years and writes the range(s) to the field.
I was going to do that, but there are some models that have a gap in their years, so if I can I’d love to put every year, but I could try making it a range like that, and make the individual years pop up when you hover over the range.
I’d probably want something like that. That way I could set it up, so visitors can sort by a set year. Like only 2017 for example.
I think I’m going to look into more JS tomorrow. I would like to make building this list easier for me if I can, and I’d really like that pi to get here.
I tried to install https, but I wasn’t sure what I was doing, so I spent an hour looking into httpb to understand what it is, but I’m not sure it’s sticking right now, I’ll look into it again tomorrow and try to install it on the pi again.
Good reason to have day off, and this is coming from a PlayStation guy. 
Tried to install and set up apache2 on the pi, but when I finished it wasn’t working, so I did it again… But my mistake was not changing the name of the html file to index.html. Lol
I set up port forwarding on my router, and looked into getting a domain, but I don’t think I’m ready to get one.
I set up a network folder for the pi to make moving files around easier.
Site loaded from the pi.
I’m going to have to get another pi. When I was looking into all this I ended up learning about other things they can do. Very cool stuff.
Haha. Yeah, I’m more of a PlayStation guy as well, but all my buddies have Xboxes, and I do really enjoy Halo, but I’ve been on PS since the late 90s up until the PS4. PC became my 1st choice when I had a PS3, so I don’t currently have an interest in the PS4.

I don’t have a PS4 yet, so far I’ve been more than happy being a PC gamer.
I did the exact same mistake when I was playing around with apache. 
While you’re at it, check you have all security stuff sorted out in apache2, if you are going to make your pi visible outside of your home network. There where some things that were not enabled by default when I played around with my pi, but I’m not sure if things have changed after that. I don’t even remember what things I had to fiddle with, but I did google some basic guides of how to make sure apache2 web server is safe and secure.
teckmonster.moe is a viable option…
I’ve spent a lot of time working on this today, but I don’t have anything to show for it. I was just trying to secure my web sever, but the tutorial sucks IMO, and now I think I need to start over with the pi again.
The tutorial that sucks IMO (edit: I shouldn’t be so hard on whoever made this tutorial, it looks like they put a lot of time into it, and it’s probably great for someone with a bit of experience):
https://pestmeester.nl/index.html#1.1
He’s going through the motions, but not explaining why we are doing what we’re doing, so I’m not really learning anything. It’s like I’m copying someone’s homework.
I also ran into a few problems that were nearly impossible for me to figure out because I don’t know what I’m doing, or what most this stuff is called/used for yet.
Anyway, I’m going to see about finding another tutorial tomorrow.
Edit: Oh I did buy the teckmonster.moe domain for testing purposes. Thanks for the suggestion @Even747
Thanks for the tip. I gave it a whirl today, but I’m going to have to look into it more later.
I want to make the site live for my last day of “Devember”. It’s very incomplete, but I think it would be a great milestone to end the Devember challenge with.
Don’t know how it is in US, but in here I couldn’t find any solid pricing data for dedicated IP addresses. Some ISPs here do offer them, but they are mostly intended for enterprise customers, so my guess is the pricing is enterprise level too. IDK, it feels all Finnish ISPs are reluctant to sell dedicated IP addresses to regular consumers.
Some mentions about the prices where ranging between 3€ to 15€ per month, and if the price range is similar in US the same money could be invested to some hosting service, maybe even some entry level server hosting or something? I have not checked the prices for those so don’t really know.
Of course when hosting from your own Pi you have all access to the hardware and so on, so it’s not bad option to do it that way. Pretty much just giving some suggestions here. 
After learning about the whole dedicated IP nonsense, I decided I should just keep working on the site until it’s to a point where I think it has enough info to really be helpful.
I’ve got a long way to go with this site, and I still don’t really know what I’m doing but I’ve been wanting to make this site for quite some time, so I’ll get it done one way or another.
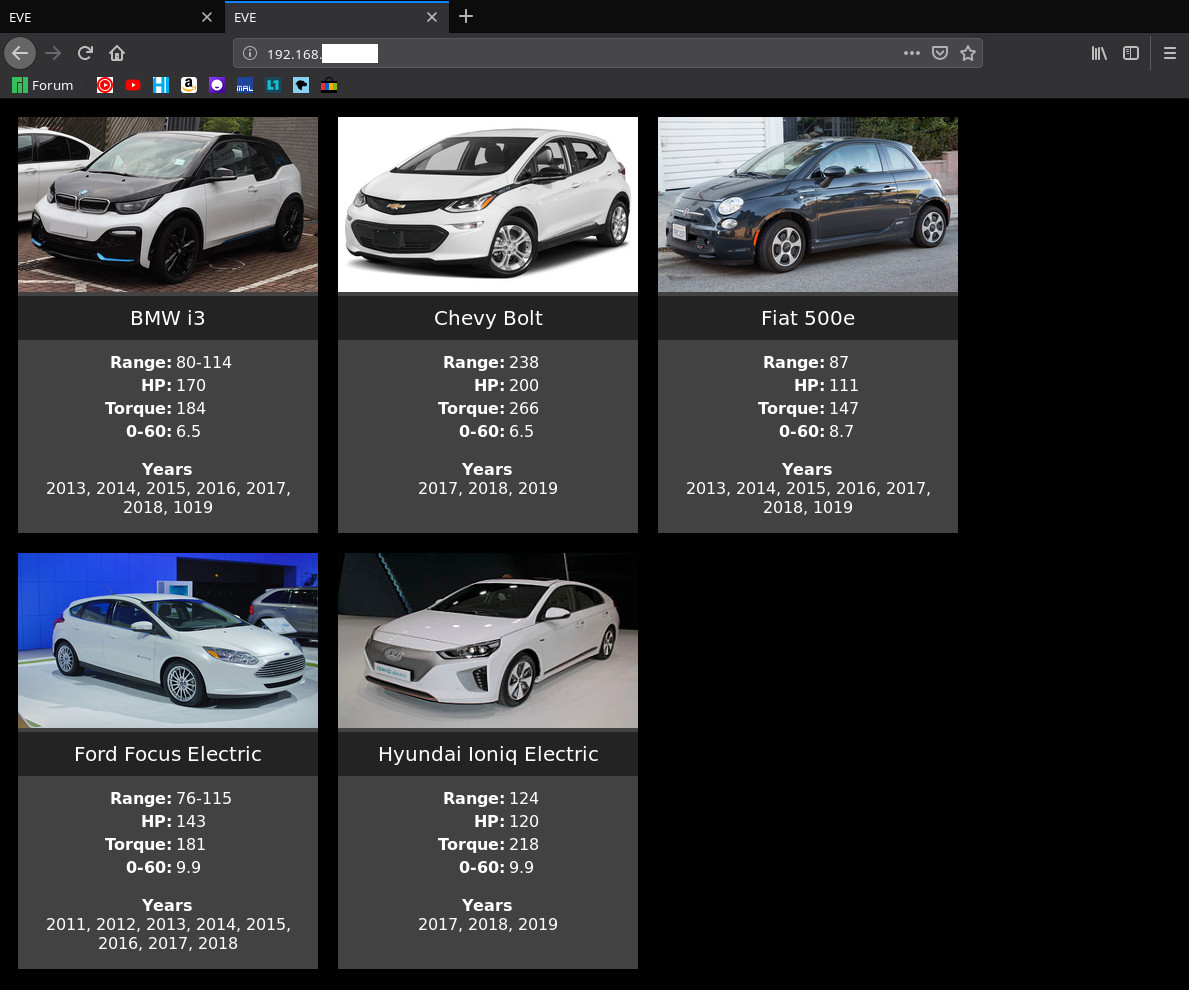
Here’s what the site looks like right now (I still need to fix the pictures).
Taking this challenge did wonders for me. Though my site is still very simple I did learn HTML, CSS, and a fair bit of JS, which would have taken me much longer to do without the Devember challenge and eyes from other L1 forum users watching. Seriously, thanks for the support guys!
I’ll keep updating this blog when I have something worth sharing about my progress.
Well done!