Prelude
Obligatory shill of blog stream post: Phaselockedloopable- PLL’s continued exploration of networking, self-hosting and decoupling from big tech
As always check for updates in the second post ![]()
NGINX Overview
So we’re all familiar with what a reverse proxy is I’m not really going to get too much into that however, most people just set one up and forget it and configure their comps and don’t really care about the security of their reverse proxy save enabling HTTPS and a HTTP redirect.
We can do so much more and in fact with engine x we can do a lot more than just a reverse proxy. nginx can be a load balancer it can do a lot more than just serve a web page and that’s why I use it as my primary set of software to fulfill most web tasks. I’ve been making a lot of infrastructure series wikis lately and you can go and observe the one that creates DNS over TLS server. That’s an example where we can use the stream block in nginx to provide a nice secure DNS lookup. Do keep in mind I view DNS over HTTPS and DNS over TLS to be temporary solutions until DNS over QUIC comes out and is officially ratified. Lots of web changes coming soon. It’s going to be exhausting but I cant wait to implement them! I like the AGILE mindset. If you are looking for the STABLE mindset @Novasty would have more input and experience with that. In my opinion his mindset is probably far better for prod environments and he is a good person to occasionally ask “Am I being Alex Jones”. If you have to ask the answer is probably yes but hey its okay I’m worse than Alex Jones. Anyways jokes aside more details here on QUIC+HTTP/3:
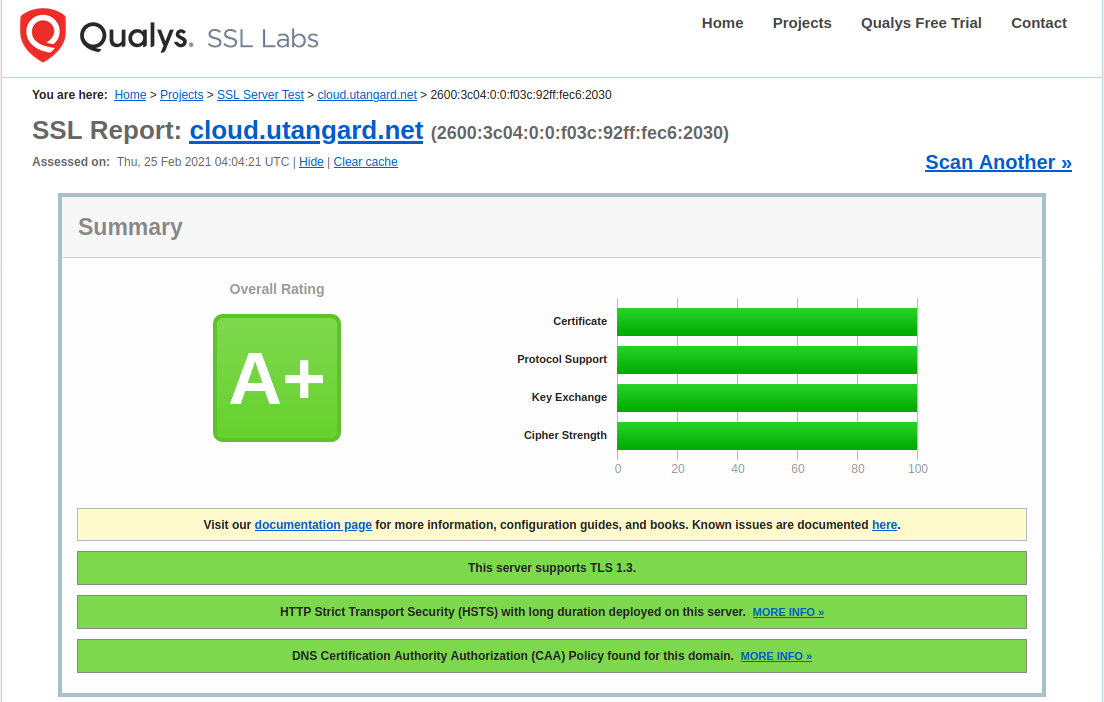
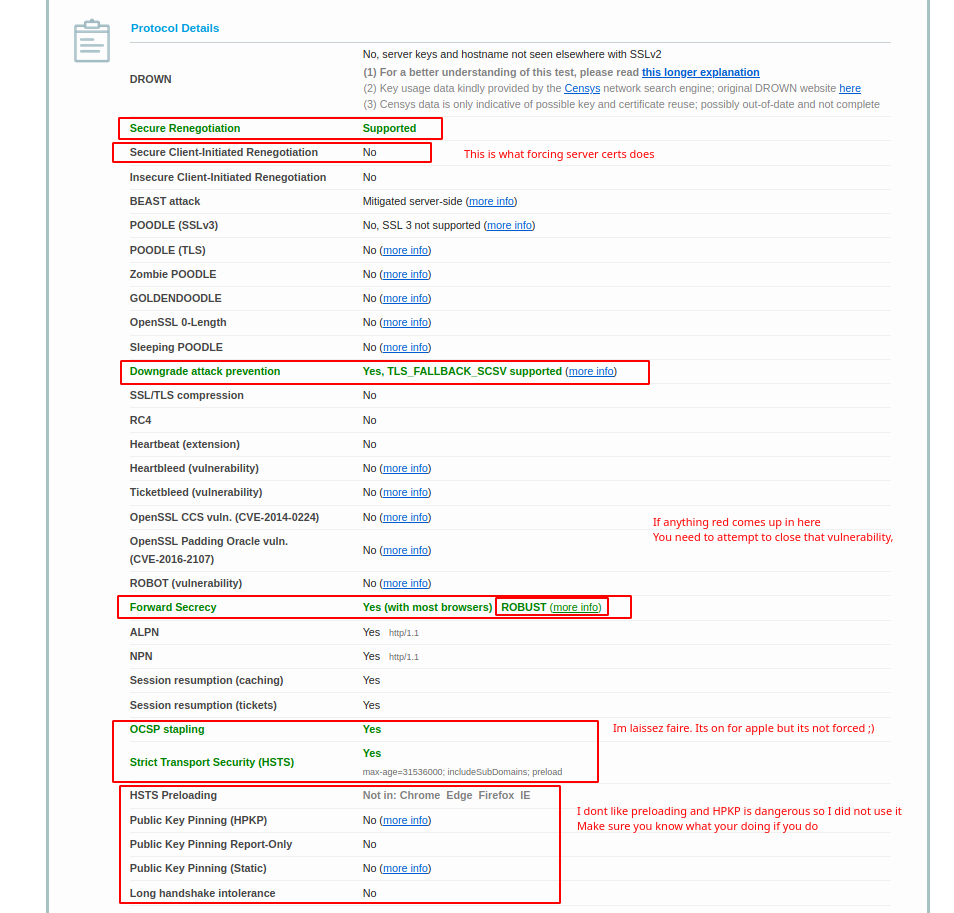
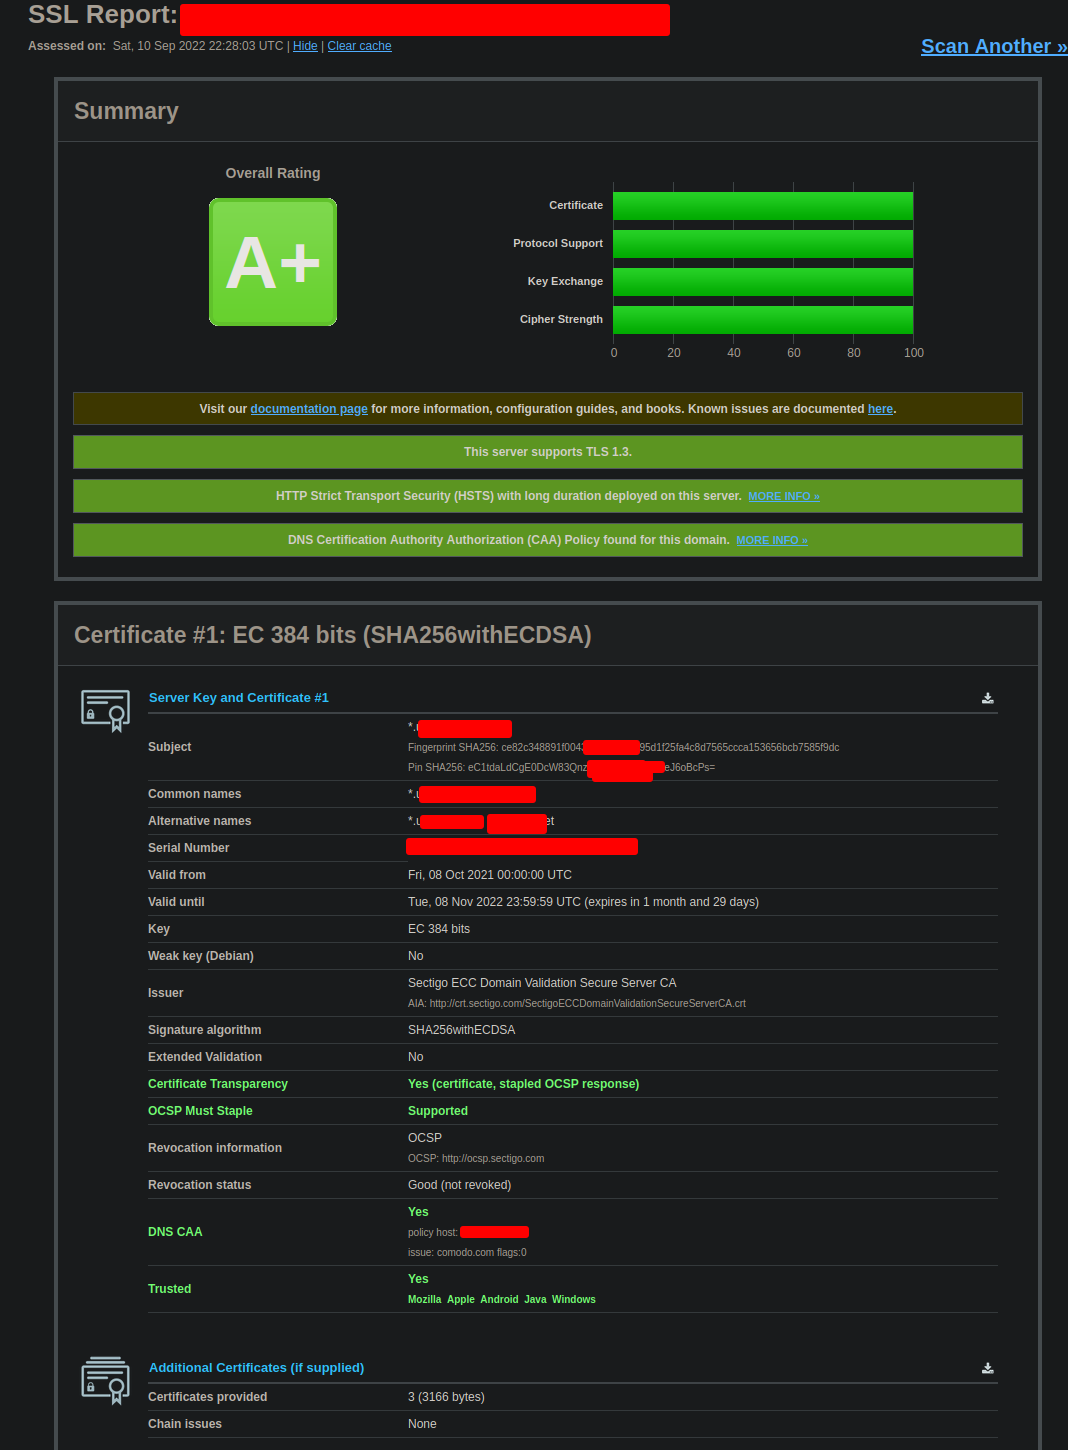
Let’s go ahead and dig into the security of open SSL and our reverse proxy. This guide is going to be rough and wordy and always evolving. So you can observe from here below that I have hardened my server and respect to the engine x configuration: SSL Labs Test:
https://www.ssllabs.com/ssltest/analyze.html?d=cloud.< MY-TLD >.net&latest


Procedure and full configuration
Part of the hardening of SSL is important because most configurations will be a B- and not even an A. as we progress into TLS 1.3 and further we have to understand that the nature of encryption is changing. The use of AEAD ciphers and particularly the use of elliptic curve to make the secure exchange more efficient and have perfect forward secrecy (ECDSA and ECDHPARAM-ephemeral aka ECDHE) … on devices that have no AES new instruction set which this means your phone and other arm devices typically… we can have our server not just harden but also prefer the more efficient encryption methods as much as possible. There are a lot of attacks that can be done against an HTTPS server. most of them can be mitigated and of course I’m not going to go into the absolutely most secure setup because one that’s a fallacy and two doing things like HTTP public key pinning is a very difficult process and very risky. So there’s only going to be a certain amount of hardening in my guide.
NGINX SSL Parameters
There’s a lot of values here so let’s step through them. Mainly let’s talk about the SSL parameters that I’ve placed in here. I will get to the caching later.
Version 1 -- I moved Away from letsencrypt -- The guide was written for this initially
# Setting the certs, keys and diffie-hellman parameters
ssl_certificate /etc/letsencrypt/live/`< MY-TLD >`.net-0001/fullchain.pem;
ssl_certificate_key /etc/letsencrypt/live/`< MY-TLD >`.net-0001/privkey.pem;
ssl_dhparam /etc/letsencrypt/dhparam.pem;
# Specify Protocols
ssl_protocols TLSv1.2 TLSv1.3;
# Specify Ciphers
ssl_ciphers !AES128:ECDHE-ECDSA-CHACHA20-POLY1305:ECDHE-RSA-CHACHA20-POLY1305:ECDHE-ECDSA-AES256-GCM-SHA384:ECDHE-RSA-AES256-GCM-SHA384;
# Mandate Server ciphers
ssl_prefer_server_ciphers on;
# Other Settings
ssl_session_cache shared:SSL:10m;
ssl_session_timeout 10m;
# Specify Safe Elliptic Curves
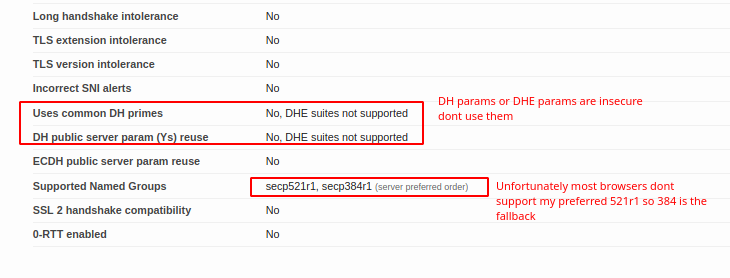
ssl_ecdh_curve secp521r1:secp384r1;
# OCSP Stapling
ssl_stapling on;
ssl_stapling_verify on;
ssl_trusted_certificate /etc/letsencrypt/live/`< MY-TLD >`.net-0001/fullchain.pem;
# Strict Transport Security
#add_header Content-Security-Policy "default-src 'none'; img-src 'self'; script-src 'self'; style-src 'self'; frame-ancestors 'none'";
add_header X-Content-Type-Options "nosniff";
add_header X-Frame-Options "sameorigin";
add_header X-XSS-Protection "1; mode=block";
add_header Strict-Transport-Security "max-age=31536000; includeSubDomains; preload" always;
Sectigo SSL Configuration: (Version 2) (HTTP Block)
ssl_certificate         /etc/nginx/ssl/`< MY-TLD >`/cert.crt;
ssl_certificate_key     /etc/nginx/ssl/`< MY-TLD >`/privkey.key;
ssl_dhparam             /etc/nginx/ssl/`< MY-TLD >`/dhparam.pem;
ssl_trusted_certificate /etc/nginx/ssl/`< MY-TLD >`/cert.crt;
ssl_protocols TLSv1.2 TLSv1.3;
ssl_ciphers         !AES128:ECDHE-ECDSA-CHACHA20-POLY1305:ECDHE-RSA-CHACHA20-POLY1305:ECDHE-ECDSA-AES256-GCM-SHA384:ECDHE-RSA-AES256-GCM-SHA384;
ssl_prefer_server_ciphers on;
ssl_session_cache       shared:SSL:10m;
ssl_session_timeout 10m;
ssl_ecdh_curve secp521r1:secp384r1;
ssl_stapling on;
ssl_stapling_verify on;
add_header Strict-Transport-Security "max-age=94608000; includeSubDomains; preload";
add_header X-Powered-By "Black Jack and Hookers" always;
add_header X-Provided-By "Sweet Sweeeeet Walls" always;
Sectigo SSL Configuration: (Version 2) (Stream/Socket Blocks)
ssl_certificate         /etc/nginx/ssl/`< MY-TLD >`/cert.crt;
ssl_certificate_key     /etc/nginx/ssl/`< MY-TLD >`/privkey.key;
ssl_dhparam             /etc/nginx/ssl/`< MY-TLD >`/dhparam.pem;
ssl_trusted_certificate /etc/nginx/ssl/`< MY-TLD >`/cert.crt;
ssl_protocols TLSv1.2 TLSv1.3;
ssl_ciphers         !AES128:ECDHE-ECDSA-CHACHA20-POLY1305:ECDHE-RSA-CHACHA20-POLY1305:ECDHE-ECDSA-AES256-GCM-SHA384:ECDHE-RSA-AES256-GCM-SHA384;
ssl_prefer_server_ciphers on;
ssl_ecdh_curve secp521r1:secp384r1;
Generic SSL Parameter Overview:
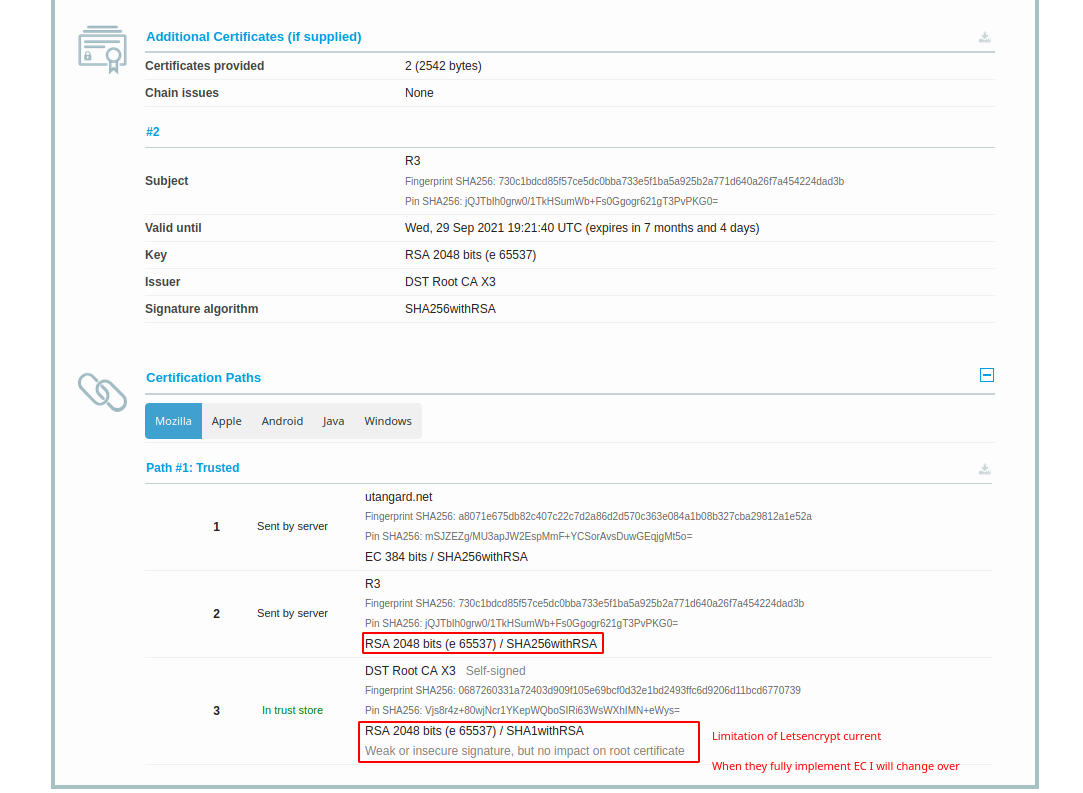
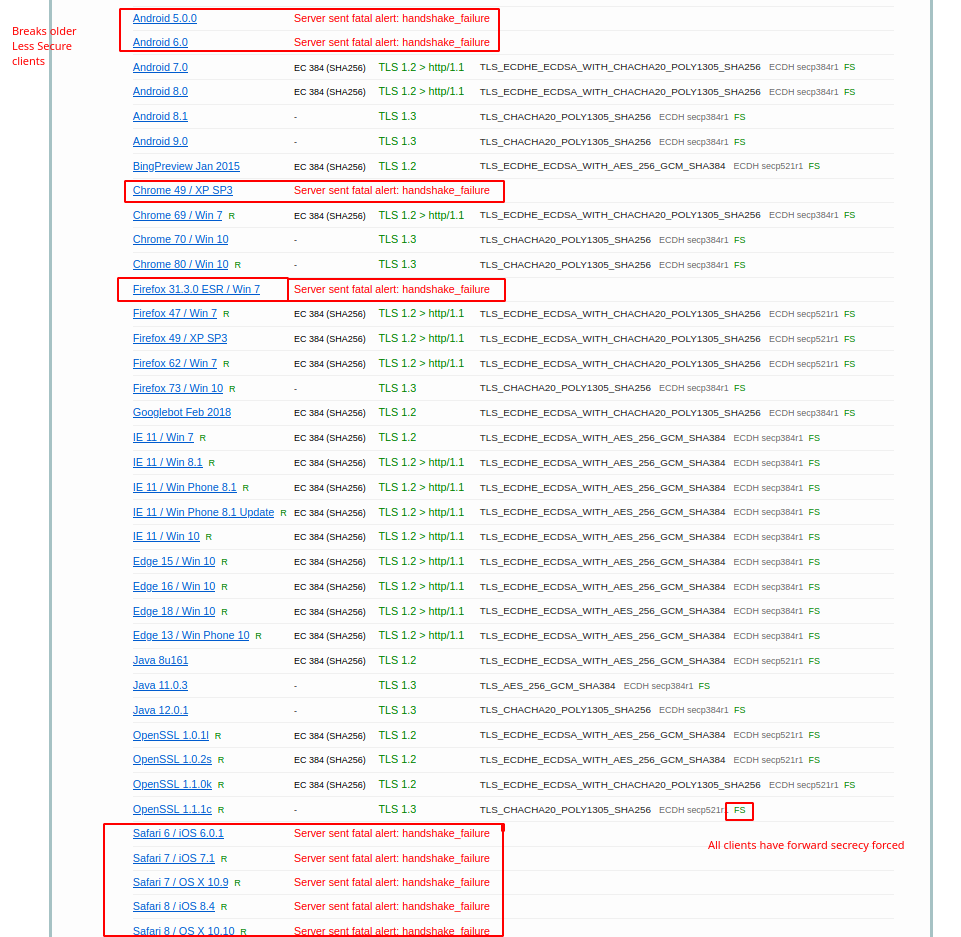
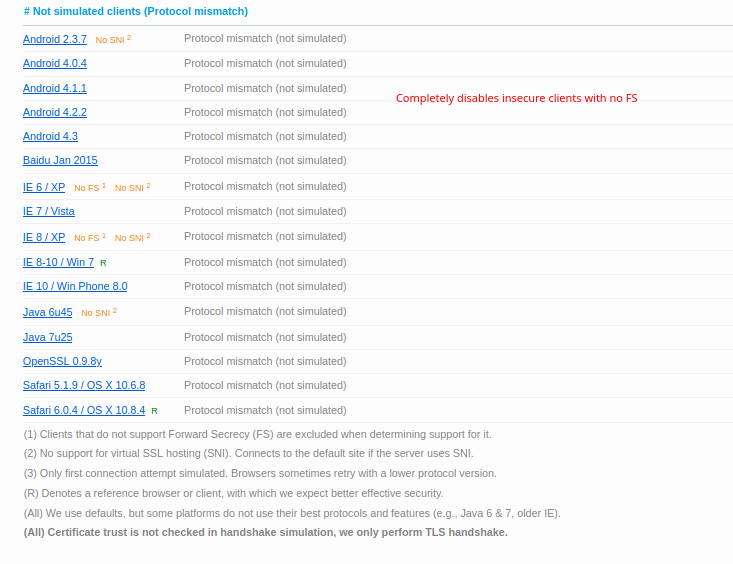
So what we are doing in the first 3 lines is defining where our certs are. The SSL certificate is fullchain.pem and it will include all the certs including LE roots. Privkey.pem is the private key used to sign and with letsencrypt its RSA. I dont like this at all but I digress. The SSL Trusted Certificate is a parameter used for not only specifying the chain but what OCSP responders must lookup and verify. The DH-Parameter is specified for forward secrecy. Certbot can do this or you can. I prefer to do this both globally and per local conf as I don’t use a wildcard certification. The next thing we do is disable the protocols before TLS1.2. This will break certain clients. See my SSL test for more clues to what breaks where. The next specification we need to apply is fine controlling our server side/server controlled ciphers. In order to get a perfect hardened rating we need to disable non AEAD and Non 256 bit encryption ciphers. Blanket disabling a string of ciphers is simple. Find something they have in common like AES128 and place a ! in of the string first before the colon. Place all disabling of ciphers before the enabled cipher order to enforce the policy. Then specify the ciphers in order of how you wish them to be used. We should try to prefer the newer EC ciphers and chacha20 ciphers before having to downgrade or sidegrade to AES256GCM ciphers. Server ciphers on prevents client renegotiation and prevents renegotiation downgrades by a client. We want this to be on. The caching I have is default. I saw no reason to change the SSL cache. ssl_ecdh_curve is the parameter that allows us to specify the EC curves we wish to use. In this case I took the only two I find to be suitably over secure. In this command we don’t need a !(value) as not listing them will disable them.
Reason for Update to Version 2 (No LetsEncrypt):
A letsencrypt disaster of their own doing. This should teach them some lessons:
I have migrated to Sectigo SSL. I have done this because its superior not only for your security but your own convenience. You control all the CSR paramters online in your interface for the cert you bought. They have a very secure verified chain from intermediate to root and they are not going to do you and others dirty like letsencrypt did with their incredibly poor transition to not only ISRG X1 Root but also the ISRG X2 Root (Elliptic curve). You need to be allow listed just to use ISRG X2 and inaddition to that its quite hidden from view. Further adding to the problem X2 has not been propagated to the trust store of most devices. So any socket based stuff will fail. HTTP is alright but sockets are important. They do explain it on their website but thats about all they do
This is not just happening to self hosters.
It really does call into question how much we should trust the CA-Authority system. Right now its the best we got but be aware its been abused in an even worse way by Lenovo: Lenovo PCs ship with man-in-the-middle adware that breaks HTTPS connections [Updated] | Ars Technica
So all in all if I am going to trust them you really need to put your money where you mouth is. The advantage of Sectigo is your not likely to experience downtime during their transitions. They will have a proper transition plan, email you of issues and actually care because they have real high dollar customers. Thats the power of money and what makes money good and paying for this good.
$200 best money I ever spent for something that last 5 years. You should definitely spend it too. Thanks @Novasty for bullying me into this
So how did I move over. What changes?
Now that you have acquired your certificate you must generate a Certificate Signing Request (CSR). You can do this online OR you may do this via openSSL. Online is here: CSR Generator for Name Cheap.
With openSSL this is done with the following procedure. SSH into your NGINX server and create a directory that will store your public .csr file and your private .key file, then run the command to generate a CSR request. Replace *.yourdomain.com with your domain for a wildcard certificate/ Lets walk through the commands now:
AS SUDO:
 mkdir /etc/nginx/pki/certs/
 cd /etc/nginx/pki/certs/
 openssl ecparam -genkey -name secp384r1 | openssl ec -out <DOMAIN>.key
 openssl req -new -key <DOMAIN>.key -out <DOMAIN>.csr
Dont use SECP521k_r1. Due to mistakes on NISTs part its just not used widely nor accepted. Please see these resources as to why:
tls - Why is secp521r1 no longer supported in Chrome, others? - Information Security Stack Exchange
cryptography - Amount of simple operations that is safely out of reach for all humanity? - Information Security Stack Exchange
You will be prompted to give information. You need to be accurate. People are using this certificate to trust you. DO NOT lose these files. You will need to re-CSR and re-cert if you do. That said MAKE SURE if you do not have an EMAIL setup that you add a catch all for email on NameCheap so that your admin@domain goes to your preferred email. Now after copying the contents of the .csr file into your clipboard navigate to the Sectigo or Namecheap SSL certificate that you have made the great decision of purchasing.
Now copy and paste your CSR information into the information to activate the certificate for you domain.
Add your DNS records for CAA and CNAMES to point to the comodo and sectigo endpoints for DNS verification. After you have a certificate registered to your domain you will receive an archive file with your certificates which you may download it from the page or check your provided email. I highly suggest making MULTIPLE back ups of this.
Now you need to install them. Do it in this order for CATing it into the file. If you do not you will get errors while attempting to restart nginx
cat (domain cert)(CA Bundle) >> domain.crt
You may remove the bottom cert in the file manually as its not needed and is already universally in the trust.
Test the configuration
sudo nginx -t
If that passes go ahead and restart NGINX
sudo systemctl restart nginx
OCSP Stapling:
Apple and Google has forced the need for this. So I turned it on and turned verification on however I turned off the force “Must staple” aspect to retain as much compatibility as I could. I also saw no reason to disallow the use of people using CRLs over OCSP. Either works. The last values are just securing the headers. I chose to apply this globally instead of on a per site basis. Make sure before you cut and paste my protections globally that you verify it wont break any of your services. I will expand on any value somebody is confused about in the comments/replies. I think this summarizes what I did.
Events block and Caching HTTP block config
## Events Block
events {
        # High Throughput Settings
        worker_connections 65535;
        multi_accept on;
        use epoll;
}
    # Override Buffer Limitations
    client_body_buffer_size 10K;
    client_header_buffer_size 1k;
    client_max_body_size 8m;
    large_client_header_buffers 2 1k;
    server_tokens off;
    # Send the client a "request timed out" if the body is not loaded by this time. Default 60.
    client_body_timeout   32;
    client_header_timeout 32;
    # Every 60 seconds server broadcasts Sync packets, so 90 is a conservative upper bound.
    # Allow the server to close the connection after a client stops responding.
    # Reason: Frees up socket-associated memory.
    reset_timedout_connection on;
    # Open file descriptors. Caches information about open FDs, frequently accessed files.
    open_file_cache max=200000 inactive=20s;
    open_file_cache_valid 30s;
    open_file_cache_min_uses 2;
    open_file_cache_errors on;
I increase the cache because I felt if I’m going to serve a lot of data to myself and possibly to some friends I want to be able to have that cache so it’s quick to receive. Memory and CPUs are cheap on servers relatively speaking. You can feel free to use my modifications however you don’t need to in the defaults are fine. I made a few changes to the validity. This requires iterative testing in your circumstance or situation so YMMV. Overriding some buffer limitations can help with the proxy performance. I also free up memory wherever possible. If the socket isn’t open or active there is no reason to have memory allocated to it.
Compression and the use of GZIP (HTTP1.1)
These are the following gzip parameters.
    gzip on;
    gzip_disable "MSIE [1-6]\.";
    gzip_proxied expired no-cache no-store private auth;
    gzip_comp_level 9;
    gzip_min_length 500; # Reminder: Default 20
    gzip_types
	text/css
	text/javascript
	text/xml
	text/plain
	text/x-component
	application/javascript
	application/json
	application/xml
	application/rss+xml
	font/truetype
	font/opentype
	application/vnd.ms-fontobject
	image/svg+xml;
    proxy_connect_timeout       600;
    proxy_send_timeout          600;
    proxy_read_timeout          600;
    send_timeout                600;
The use of GZip is nice because compression enables us to transmit more data a little bit more efficiently and quicker however in exchange for CPU cycles on the server end. Notice that my HTTP block doesn’t define a protocol and that’s because I do not want to use HTTP two yet. I need to figure out how I can make it an “optional upgrade or additional protocol/service available like HTTP/3”. It can break too many services particularly cockpit which I do use.
System openSSL Configuration
Coming in Version Three: The migration to LibreSSL
Now let us get to the open SSL config because it’s not only the server that we need to harden we need to also take care of making sure that SSL is using the most secure configuration for our use case. Here is the ADDITION to the default SSL configuration. There were a few things that had to be added:
[default_conf]
ssl_conf = ssl_sect

[ssl_sect]
system_default = system_default_sect

[system_default_sect]
MinProtocol = TLSv1.2
CipherString = DEFAULT@SECLEVEL=2
Ciphersuites = TLS_AES_256_GCM_SHA384:TLS_CHACHA20_POLY1305_SHA256
Options = ServerPreference,PrioritizeChaCha
Do not force this as the only configuration. The purpose of the first 5 lines of code is to make it so that we read the default and then point to our overrides. This makes disabling or modifying our little hack a lot easier. I highly recommend this practice when it comes to confs. What you want to do is specify the Minimum TLS protocol you wish to use. The cipher string security level. I just stuck with two but if you want breakage you could get more secure. I don’t recommend disabling TLS1.2 as this breaks a lot of clients and its not going to make your configuration more secure. Specify your cipher suites. If you remember I said we only want to use 256 bit AEAD type suits so I left only AES-GCM and CHACHA20 suites turned on. The last line forces the server to define the end users cipher based on whats available and prioritize the most efficient cipher if possible. See my wireguard post on why it is more efficient: Infrastructure Series -- Wireguard Site to Site Tunnel
It’s directory is generally going to differ from distribution to distribution. We are adding these to ensure that on the SSL conf we can also disable certain ciphers from being used etc. We can also define it so that we don’t have to change the Let’s encrypt configuration for open SSL It can pull from the system. however I don’t recommend doing that as you want to have your let’s encrypt separate from your open SSL master conf on the system. When we generate configurations from here on out forward we should really try to focus on elliptic curve cryptography that means trying to generate an EC384 bit certificate. That also means generating a DH parameter and an EC DH parameter. pH parameter helps security because it provides something that allows us to do what is called perfect forward security. Generating a DH parameter is easy. Just run the following command:
openssl dhparam -out $DirectoryOfLetsEncrypt/dhparam.pem 4096
OR if you use a proper cert just place it in your NGINX certs directory
Done; Now lets define a couple letsencrypt extras for the time being to make sure our main CA cert is EC based.
Lets encrypt additional conf parameters
As mentioned above we may want to define the additional parameters for use in Letsencrypt in its local configuration so can have the most compatible master openssl configuration for the system and get more specific per piece of software that uses the openssl library.
[root@bi-frost]/etc/letsencrypt# cat options-ssl-nginx.conf
# This file contains important security parameters. Modification of this file manually
# will result in the loss of automatic CERT-BOT updates
# Warning note to self

ssl_session_cache shared:le_nginx_SSL:10m;
ssl_session_timeout 1440m;
ssl_session_tickets off;

ssl_protocols TLSv1.2 TLSv1.3;
ssl_prefer_server_ciphers off;

ssl_ciphers "!AES128:ECDHE-ECDSA-CHACHA20-POLY1305:ECDHE-RSA-CHACHA20-POLY1305:ECDHE-ECDSA-AES256-GCM-SHA384:ECDHE-RSA-AES256-GCM-SHA384";
[root@bi-frost]/etc/letsencrypt#
In my case I named this options-ssl-($SOFTWARE_USED).conf So I may know which configuration overrides which piece of software that is calling the letsencrypt API and the openSSL api. You may think this is overkill but it REALLY helps when debugging errors when it comes to overrides. These are the overrides specific to NGINX to make sure it retains these from the global configuration. The last modification I made was to make sure the cli.ini file was enabling ECDSA and secp384r1 as my main private key. If there is an RSA fallback for something legacy it also defines the secure rsa-key-size. Im not complete sure how to extend this configuration to allow me to modify the signatures to be SHA#512 but that’s an edit for another day I suppose.
[root@bi-frost]/etc/letsencrypt# cat cli.ini
# Because we are using logrotate for greater flexibility, disable the
# internal certbot logrotation.
max-log-backups = 0

# This is an example of the kind of things you can do in a configuration file.
# All flags used by the client can be configured here. Run Certbot with
# "--help" to learn more about the available options.
#
# Note that these options apply automatically to all use of Certbot for
# obtaining or renewing certificates, so options specific to a single
# certificate on a system with several certificates should not be placed
# here.

# Use ECC for the private key
key-type = ecdsa
elliptic-curve = secp384r1

# Use a 4096 bit RSA key instead of 2048
rsa-key-size = 4096

# Uncomment and update to register with the specified e-mail address
#email = $EMAIL (im not doxing it)

# Uncomment to use the standalone authenticator on port 443
# authenticator = standalone

# Uncomment to use the webroot authenticator. Replace webroot-path with the
# path to the public_html / webroot folder being served by your web server.
# authenticator = webroot
# webroot-path = /usr/share/nginx/html
[root@bi-frost]/etc/letsencrypt#
I think the parameters are straight forward. For the reasoning for why to use SHA#512 going forward. (its much more efficient) check out the link below:
Very informative to me. I thought it would nice to drop this resource.
Version 2: This additional configuration is no longer required as I have already done this with the CSR with Namecheap+Sectigo
I configured the CSR as following:
AES-256
SHA3-512
EC384-SECP384r1
Mandatory OCSP Must Staple
Now my certs are better.
Concluding Notes
This guide will be continually expanded and with the help of all reading this clarified. No question is a stupid question when it comes to stuff that is seemingly a black box to most.
P.S HTTP/2 and HTTP/3 are topics for another day when I actually figure out how to do so properly and securely internally. HTTP/2 makes TLS mandatory.
Any services discovered in this guide are pursuant to the following Policy: https://services.< MY-TLD >.net/privacyLegal.html
Links to Infrastructure Series and Other Resources
Blog: Phaselockedloopable- PLL’s continued exploration of networking, self-hosting and decoupling from big tech
Series 1: Native Dual Stack IP4+IP6
Infrastructure Series – Native Dual Stack IP4+IP6
Series 2: Wireguard Site to Site Tunnel
Infrastructure Series – Wireguard Site to Site Tunnel
Series 3: Recursive DNS and Adblocking DNS over TLS w/NGINX
Infrastructure Series – Recursive DNS and Adblocking DNS over TLS w/NGINX
Series 4: NGINX Reverse Proxy and Hardening SSL
Infrastructure Series – NGINX Reverse Proxy and Hardening SSL
Series 5: Taking DNS One Step Further - Full DNS Server infrastructure
Infrastructure Series – Taking DNS One Step Further - Full DNS Server infrastructure
Series 6: HTTP(S) Security Headers! You should use them!
Infrastructure Series – HTTP(S) Security Headers! You should use them! [NGINX]
Series 7: Use NGINX to inject CSS themes
Infrastructure Series – Use NGINX to inject CSS themes
ONE KEY TO RULE THEM ALL
Setting up a YubiKey Properly – One Key to rule them ALL!
Series 9: Infrastructure Series: BIND9 Authoritative DNS Guide “Please See Me Edition”
Infrastructure Series: BIND9 Authoritative DNS Guide “Please See Me Edition”
Buy me a crypto-beer
If you found this guide helpful you can donate Monero or Bitcoin to me at the following address in my User Card Profile